
The rise of JavaScript as the lingua-franca for the web has expanded its reach to unthinkable places. What begun as a beginner friendly language aimed at designers (and initially cooked up in 10-days) is now everywhere: servers, workstations, databases, desktop environments and even internet of things devices. However, the low-end nature of certain microcontroller platforms makes it somewhat difficult for beginners to use JavaScript. In this post we will take a brief look at the different options for running JavaScript on small devices, and we will also pick one of them and get one JavaScript engine running on it. Stay with us and let's see where the journey takes us!
Update: part 2 is live: JavaScript for Microcontrollers and IoT: Building a Sensor Hub
“JavaScript on a microcontroller? Let's check it out!”
Tweet This
Introduction
I am a firm believer that even if something is possible, that doesn't mean it should necessarily be done. And that's also what I think about JavaScript in general. In contrast to many people out there, I think it is a very reasonable programming language, even in spite of its warts. However, that doesn't mean it should be used for everything. So, in a way, I want to be very clear about something upfront: picking any programming language, for any task, is more than just a matter of choice or taste. One way to see this is to think of programming languages as tools. Tools are designed for certain uses and applications. Of course, you can take a hammer and use it to hammer down a screw instead of a nail. Most likely, the result will be subpar. Worst case, bad things will happen. And this applies to programming languages. JavaScript was designed to be dynamic, to allow users to iterate between versions rapidly, and to get out of the way for small automation tasks and scripts (those that you would normally find on a website). It was also designed to be easy to pick up by beginners and people familiar with the syntax of Java. Keep this in mind for the next sections where we will explore how JavaScript fits in this mindset. For now, just remember: think of programming languages as tools, and "pick the right tool for the right job."
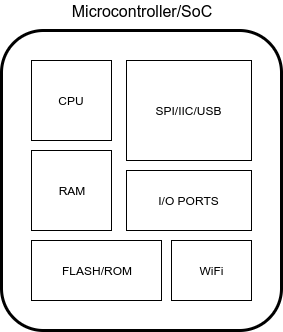
If you are not familiar with microcontrollers, one way to think of them is to picture a really old system, with very little RAM and a slow CPU, and of course with a very small "disk". Of course, microcontrollers come in different sizes, and some of the big ones can stand up to bigger systems, but their purposes are different: microcontrollers are usually designed to provide a certain amount of programmability while remaining cost-effective and small. Bigger systems, like the ones used in your smartphone, are incredibly more powerful but they are also much more expensive. So, it should come as no suprise that microcontrollers are getting used more and more in the IoT craze. They are cheaper than bigger systems, and the recent technological advances make microcontroller platforms increasingly more powerful and compact. This allows powerful programmability even in cheap products, like your run-of-the-mill IoT kettle.
To give you a proper sense of scale, the microcontroller we will be looking at in this post comes with a 120MHz 32-bit CPU, 128KB of RAM, and 1MB of Flash memory. The kicker is this is a mid-to-big-sized microcontroller. There are 8-bit microcontrollers with as little as 0.375KB of ROM and 16 bytes of RAM!. These are intended for ultra low-power, low-cost applications. What we will be doing in this post (running a JavaScript engine) requires considerably more power.
At this point we should probably mention that the definition of microcontroller these days is a bit fuzzy. In the 90s it was used to describe small, embeddable CPUs that came with a certain amount of RAM and ROM integrated. Nowadays most people talk about System-on-Chip (SoC) designs, which is another way of describing highly coupled hardware designs integrating CPU, RAM, ROM and even some peripherals like a GPS receiver. For our purposes we will use these terms interchangeably.
So Why JavaScript Then?
When it comes to embedded development you usually start by looking at what you are trying to do at the hardware level. For instance, if you need to read a sensor of some kind and apply a formula to its value so you can then display the result somewhere, you take a look at what microcontrollers come with an analog/digital converter (ADC) and can also drive a display. The smaller the microcontroller that fits your purposes, the cheaper it gets. Of course, the smaller the microcontroller, the more limited it is when it comes to programmability. So for very small devices you may need to resort to assembly programming, which could impair portability if you later decide to switch platforms. In general, you should pick a small, but not the smallest platform that fits your purposes. You should consider the possibility of future expansions or added requirements, so leaving some room at the hardware level is usually a good idea.
When your use case allows for bigger microcontrollers, some doors start to open. The first door is usually C, the programming language. By using C instead of assembly you gain two key elements: portability and ease of use (which includes readability and maintainability). C was designed as a "portable assembly", so it is pretty much the ideal language for all small microcontrollers (except for the extremely small). As you climb up the ladder of size and features, more doors start to open: C++, operating systems (FreeRTOS, NuttX, etc.), and even high-level connectivity like Ethernet and WiFi. Along with these options, more programming languages start to become available. Certain languages, due to their semantics, cannot be compiled ahead-of-time to machine code. Among these languages is JavaScript. So the first thing we need to ask ourselves is "can a JavaScript engine run within the constraints of our platform?". And the answer, as we will see below, is yes.
The big benefits of higher level languages compared to assembly, C or C++ lie in their safety. Whereas an off-by-one error would typically result in a segmentation fault on your macOS computer, in a microcontroller it can result in a system level crash or freeze. Debugging is also much more limited, so anything that can help in writing safe code helps. Higher level languages are very useful in this sense.
Another benefit has to do with the way code runs in microcontrollers. Typically, the microcontroller reads machine code from the ROM. The ROM is usually written by following a special procedure, so changing it is not convenient. This limits the options for doing code updates or easily iterating between program versions. An interpreter can either read its program from RAM or ROM, opening up the possibility of code updates without flashing. Of course, this comes with its own set of tradeoffs: RAM gets erased after rebooting, so the program needs to be reloaded each time. RAM is also very limited, so the program has to be small. The expressive nature of high-level languages helps a lot in this regard: with very few lines of code, complex behavior and logic can be expressed.
These benefits apply to most higher level, interpreted or JITted languages, but JavaScript brings some benefits of its own. For starters, JavaScript has a huge community with tons of libraries. Most of these libraries won't work on a microcontroller because they require system-level support (from Node.js or browsers), but some of them will, which is very useful. JavaScript is easy to pick up by C and C++ programmers due to its syntactic similarity, so developers used to embedded programming will have little trouble reading a JavaScript codebase. Furthermore, if you recall the introduction, we mentioned JavaScript was designed to write small scripts for common automation tasks and quick iteration. Microcontrollers are usually used in this same scenario! Small pieces of logic interacting with hardware devices for automation or reporting tasks.
So, to sum up, here are the reasons to consider JavaScript or other popular interpreted languages for microcontroller programming:
- Higher-level, added safety: no off-by-one crashes; better handling of errors, complex data types, and type conversions; much more expressive.
- Quick iteration: can load scripts from RAM, no need to flash for each test. Remote updates are possible.
- Huge community and tons of libraries (most of which require some tweaking to run on embedded platforms): bundlers and minifiers are available to ensure the smallest possible code.
- Familiar syntax for C, C++ (and Java) developers.
“Dynamic languages on a microcontroller give you easy code updates and other benefits!”
Tweet This
The Particle Photon, one of the devices we will test in this series, can perform remote updates for compiled code over-the-air. This mode of operation, however, limits the available ROM space for user apps to 128KB.
The Cons
Of course, there are some downsides to picking JavaScript. For starters JavaScript was never designed to run on small, memory-limited devices. As such, certain constructs in the language can consume lots of memory. Most JavaScript interpreters require at least 150KB of ROM and at least 32KB of RAM. Anything smaller than that and you will have to stick to C/C++ or use a scripting language designed for small systems, like Lua.
You will also find that to keep a JavaScript engine within reasonable size constraints some advanced language features might need to be disabled. We will talk about this in detail in the example section below.
Lastly, using JavaScript, or other interpreted languages, will not allow you to escape the use of C or C++. Integration between the platform and JavaScript will require manual intervention, unless you use a platform that is fully supported by the JavaScript engine you picked.
As with every engineering decision, weigh these pros and cons carefully before committing to a choice. In our case, we are doing this for fun. So, should we use JavaScript on a microcontroller? Hell yes! Let's see where it takes us!
The Alternatives
Here we will take a brief look at some hardware and software options. For the hardware side we will be looking a two options: the famous ESP8266 and the Particle Photon. Both of these are reasonably powerful and include support for WiFi connections, which is awesome. They are also very cheap: you can find the ESP8266 for as little as $7 US-dollars; the Photon is currently available at $19. Of course, if you are planning to use many devices, bulk pricing is even lower.
There are also other options such as the newer ESP32, 32-bit PICs, Espruino, ST boards using ARM CPUs, and even the biggest Arduinos like the Intel Curie based Arduino 101.
Do note that most Arduino boards are not powerful enough to run any JavaScript engines, the Arduino 101 being an exception.
Another very interesting option, though much more powerful than the alternatives mentioned above, is the Raspberry Pi Zero W, which manages to pack a 1GHz ARM CPU, 512MB of RAM and WiFi connectivity for as little as $10. With that kind of power the Raspberry Pi Zero is capable of running Linux. That means you can use Node.js and other powerful JavaScript engines. We will focus on low-end devices, however, where running Node and Linux is not possible.
For this series of articles we have picked the Particle Photon and the ESP8266 due to their ease of use and good general availability.
On the software side we will take a look at JerryScript, a JavaScript engine for small devices developed by Samsung; and Espruino, a JavaScript engine part of the Espruino suite for microcontrollers. Both of these engines aim at achieving ECMAScript 5.1 compatibility while remaining compact and using as little RAM and ROM as possible. There are other alternatives, such as Duktape, V7, and MuJS which are under active development and just as powerful.
In this post we will focus on the Particle Photon running JerryScript. In future posts we will look at the ESP8266 and Espruino.
Hands On!
The Particle Photon
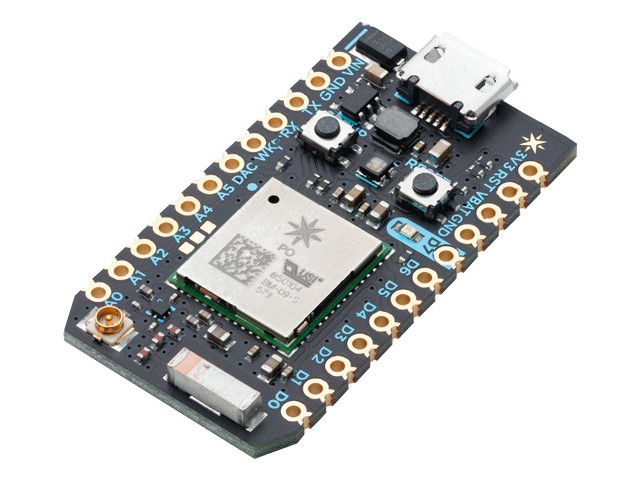
The Particle Photon is a WiFi-enabled SoC with a good number of I/O pins and support for some wired protocols (I2C, CAN, SPI, USB). It combines a 120MHz ARM Cortex M3 microcontroller with a Cypress WiFi chip. It carries 1MB of flash memory and 128KB of RAM. It supports low-power modes and is ideal for embedded uses that require WiFi connectivity.
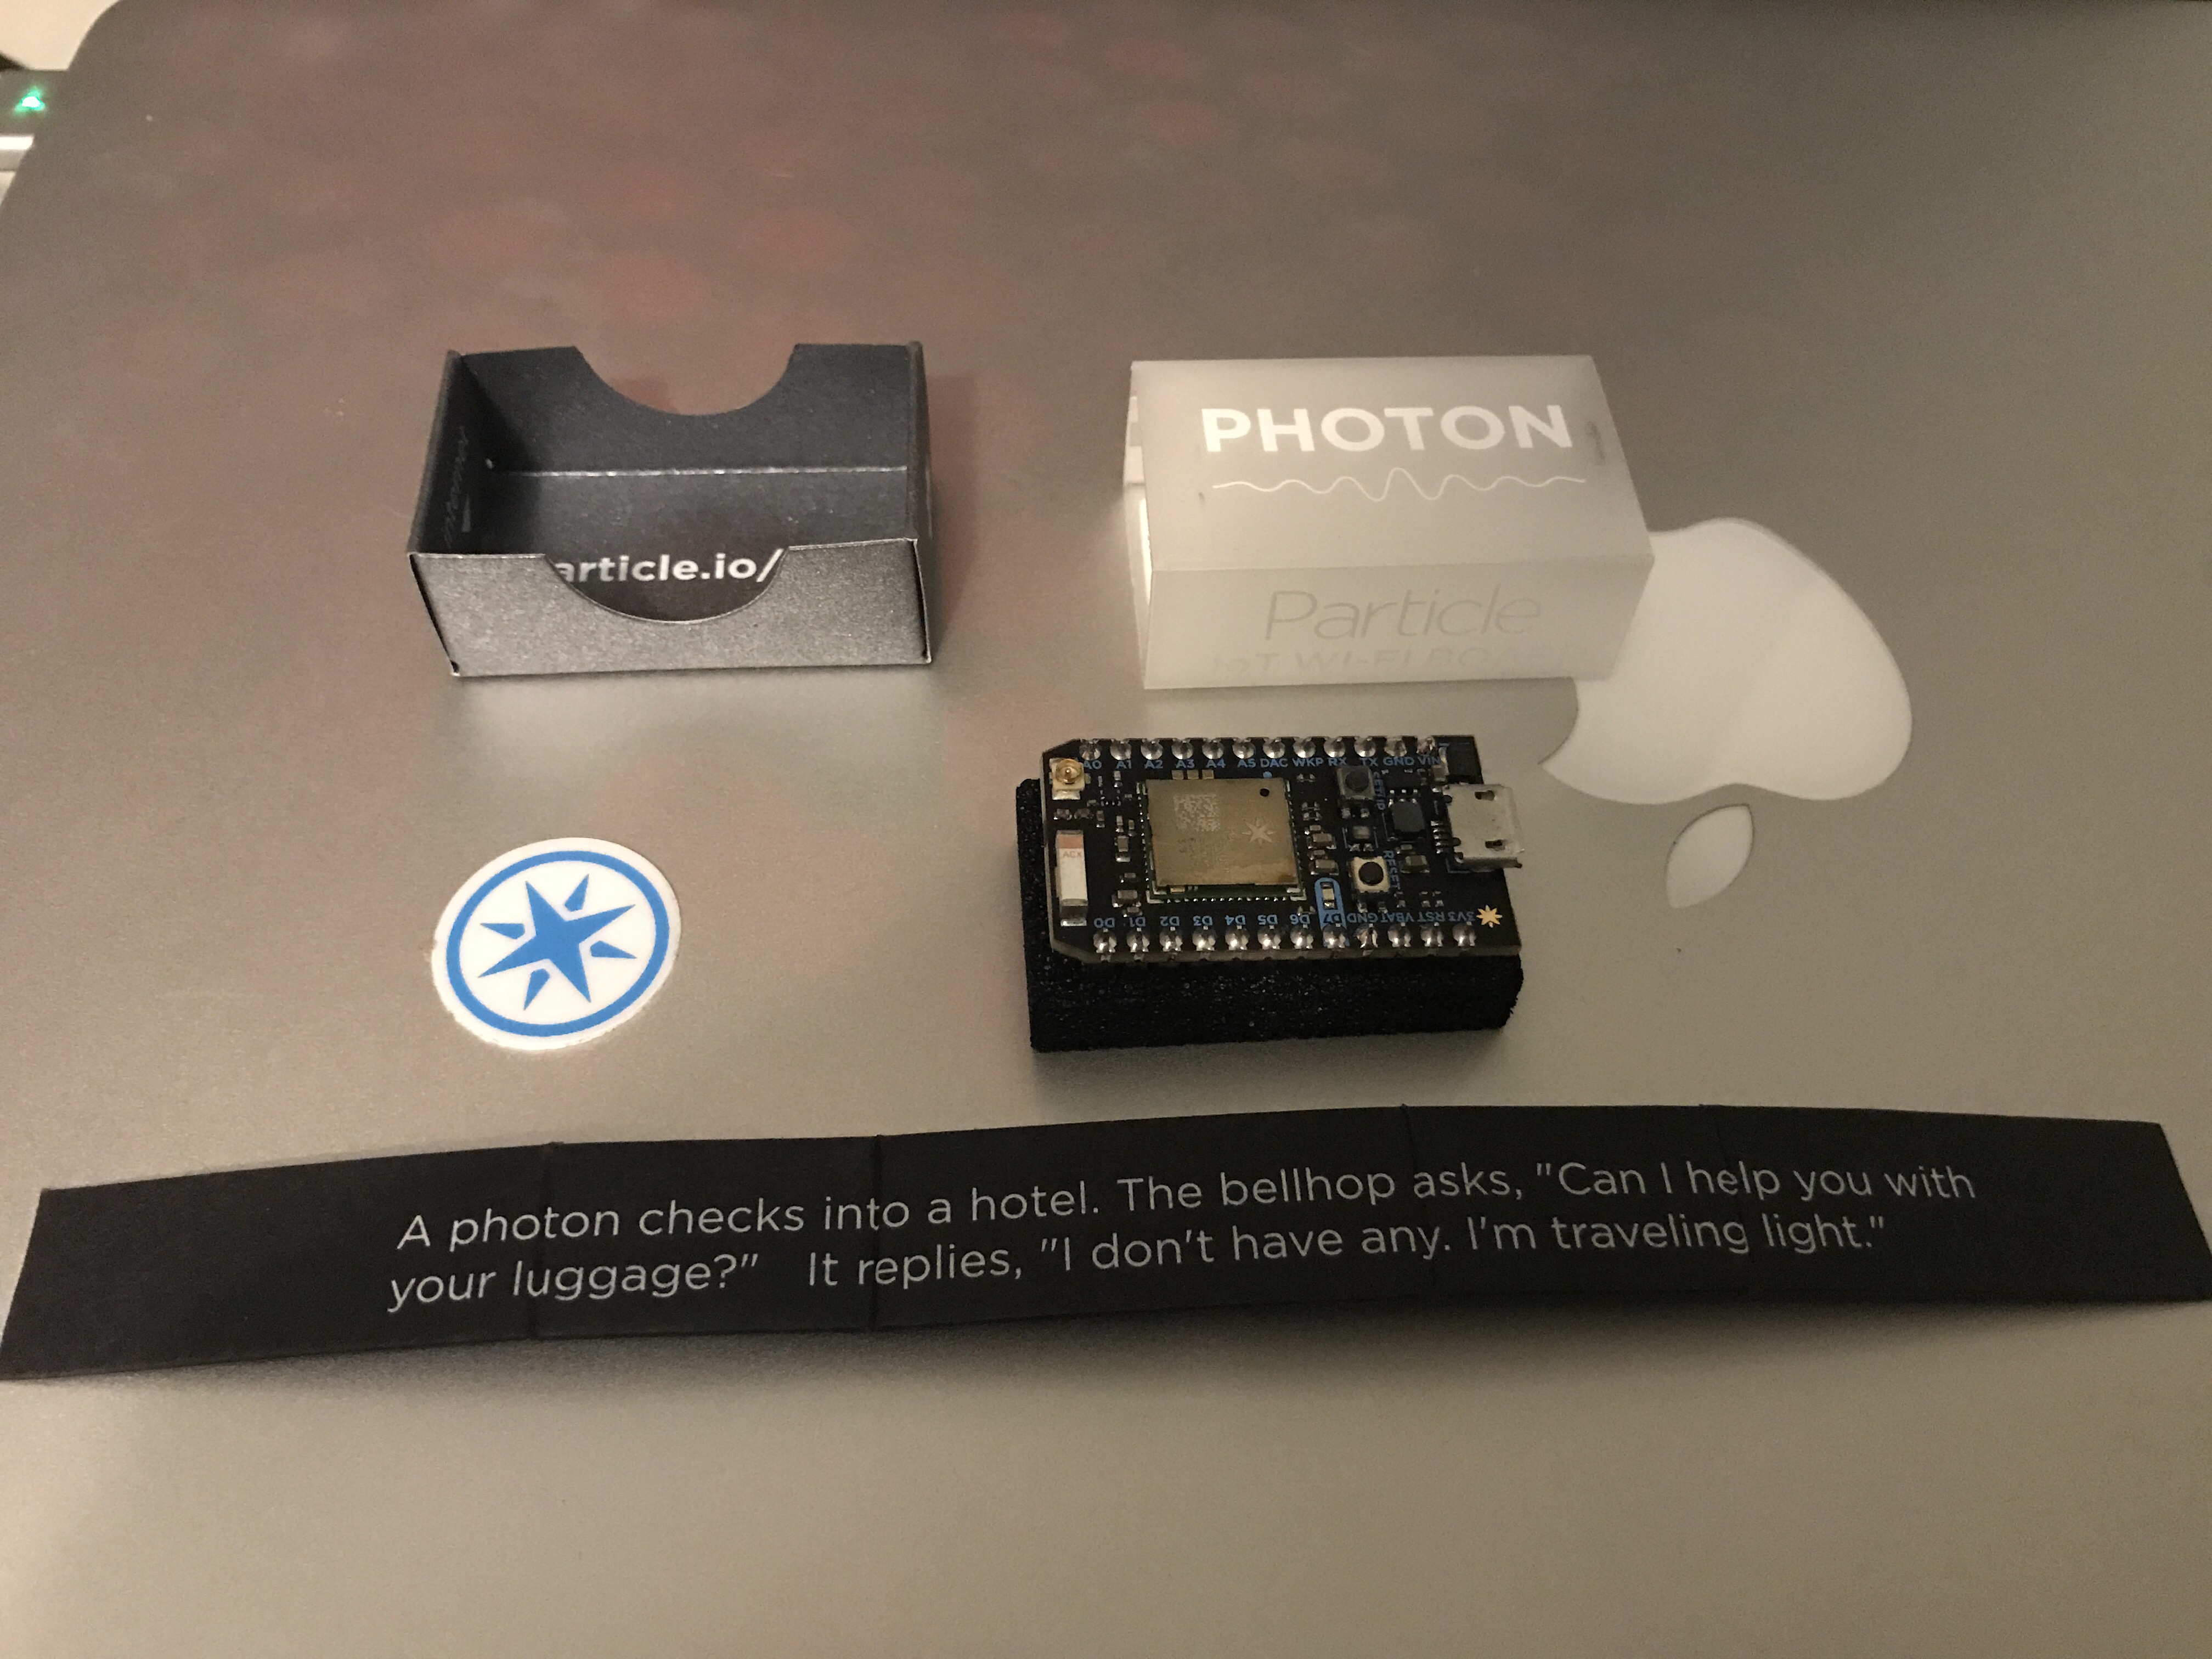
My first thought after receiving the Photon is that it looks very high-quality. The packaging is great, and the PCB seems to be carefully designed. The Photon comes already flashed with Particle's firmware, which can interact with their tools for easy programming and configuration. This means that as soon as you take the Photon out of its box, it is ready to be connected to your development computer and start hacking. Kudos to the folks from Particle for their excellent work.
The software suite provided by Particle is extensive. There is a web-based editor with support for remote flashing, an installable IDE, and a command-line client that can talk to the Photon directly over USB. This makes development extremely simple, which is usually one of the perils of microcontroller development.
The toolsuite uses GCC as its compiler and supports both C and C++ out of the box. Particle supports the Wiring API, a C++ API popularized by Arduino. All of the hardware elements in the Photon can be accessed through this API. There are also high level components like WiFi and TCP/UDP sockets which are also accessed through it. In other words, in contrast to low end devices in which you usually must perform device initialization and configuration before running your code, with a Photon it's just a matter of putting calls to your functions in the right places.
If you are not familiar with the Wiring API, the gist of it is that there are basically two functions that must be provided by the user: setup and loop.
// Called once when the microcontroller boots
void setup() {
    // YOUR CODE
}

// Called periodically by the firmware
void loop() {
    // YOUR CODE
}
The base firmware, provided by Particle, calls setup after basic device initialization is complete. This means that user code can run at this point (to perform whatever initialization is required by your code), but certain hardware components may or may not be available yet (for instance, WiFi). This function is only called once.
After the setup function is called, the firmware then proceeds to call loop periodically. It is uncertain how much time passes between loop calls, but it does happen as soon as possible. The underlying firmware uses the time between loop calls to perform system-level housekeeping (checking buffers, sending keepalive packets, managing peripherals, etc.). Particle includes a very small OS with the firmware so you can focus on higher-level stuff.
One thing to consider is that although GCC is being used as the compiler, many C++ features are not available. This is due to the impact in final binary size introduced by certain C++ constructs. In particular, exceptions are always disabled. You should also refrain from making use of template heavy code, in particular code that instantiates many different versions of a template. This means that simple uses like std::vector<char> are fine. However, every template instance of vector produces a lot of machine code. So, if you have code that relies on std::vector<char>, std::vector<int> and std::vector<long> you have three different versions of the vector code getting compiled. This may be convenient on bigger systems, but it can result in running out of ROM quickly in small devices. Consider this carefully when writing C++ code.
One of the cool things of the Photon is that WiFi connectivity can be entirely managed by the underlying firmware. Putting SYSTEM_MODE(AUTOMATIC); at the beginning of your main.cpp file (the file where loop and setup are defined) causes the system to attempt to connect to the WiFi networks stored in the WiFi chip's memory. This memory survives reboots, so even if your device gets powered off, it will reconnect automatically once the power is restored. WiFi credentials can be setup through the console or through a special SoftAP mode. In the SoftAP mode the Photon becomes an open WiFi access point to which you can connect with any WiFi device. A special API is exposed in this mode that can be used to setup credentials. Particle provides a simple mobile app to do this easily.
The Particle/Wiring API includes many useful calls. Take a look at the documentation to see what can be done.
Getting started with all of this can be a bit daunting, so, for convenience, I have created a public Docker image with everything preinstalled to start testing your own code right away. The Docker image can also be used to flash your Photon with the firmware images it creates. To use this feature, however, a Linux host is required. This is because the Docker image talks directly to the Linux USB interface to send the firmware image to the Photon. Below, I will show you how to set things up on a Linux host. If you are running macOS or Windows, you can use a Virtual Machine and expose the USB port to a Linux guest. Then you can run Docker inside that guest. Another option is to just use Docker to compile the firmware and then flash it using the Particle command line tools for your OS. I will also show you how to do this below.
Getting Started with Photon Development
Although I will show you how to use the Docker image we have prepared for this post, you are free to use Particle's documentation to set this up locally in your computer without Docker.
First, make sure to have Docker installed. Then, download our image:
sudo docker pull sebadoom/jerryphoton
The image is set up to allow compilation of local files easily. In other words, there is no need to rebuild the image every time you want to compile code. This is achieved through Docker's volumes, a feature that allows seamless mounting of host directories inside a container. To test this, clone our Hello World repository in a local directory.
git clone https://github.com/auth0-blog/javascript-for-microcontrollers-example
cd javascript-for-microcontrollers-example
Now compile it!
./compile.sh
The scripts use Docker. Some systems require elevated privileges to run Docker, in that case prepend
sudobefore calling each script.
It may not look like much, but our simple Hello World is actually compiling JerryScript along with it! We will talk about that later, for now this doesn't do much, since we haven't exposed any of Particle's functionality to JerryScript, but the code compiles! You can find the resulting firmware in the dist folder of the project.
As the script passes the --rm argument to Docker, the container gets automatically destroyed after running the command, so there is no need to manually clean-up containers afterwards. We will now see how to flash our newly compiled firmware.
Flashing Using the Docker Image (Linux Hosts)
If you are running our Docker image on a Linux host, flashing the compiled firmware is really easy:
- First, you need to connect your Photon to the computer using a USB cable.
- Now put the Photon in Device Firmware Upgrade (DFU) mode. DFU mode is a special mode that can be used to update firmware even if the previous firmware is bad. This is possible thanks to the bootloader that is installed inside each Photon. To enter DFU mode, press and hold the
SETUPbutton. While holding theSETUPbutton, quickly press and release theRESETbutton. Keep holding theSETUPbutton until the main LED starts flashing yellow. You can now release all buttons. - Run the Docker container using the following script:
./compile-and-flash.sh
If you take a peek at the script, you will notice we are now giving the container full access to our USB devices. This is necessary for the container to send the firmware image to the Photon. After a few seconds, your Photon will reboot and you will see a flashing blue LED. This is our Hello World running!
Flashing Using the CLI In Your Host (Any Host)
If you prefer to flash the firmware manually, you can use Particle's command line tools to do so.
- Install
particle-cli. Theparticlecommand is a Node.js application, so Node must be installed on your system:
npm install -g particle-cli
- Compile the firmware:
./compile.sh
- Now put the Photon in Device Firmware Upgrade (DFU) mode. DFU mode is a special mode that can be used to update firmware even if the previous firmware is bad. This is possible thanks to the bootloader that is installed inside each Photon. To enter DFU mode, press and hold the
SETUPbutton. While holding theSETUPbutton, quickly press and release theRESETbutton. Keep holding theSETUPbutton until the main LED starts flashing yellow. You can now release all buttons. - Run the following command:
particle flash --usb dist/firmware.bin
The particle flash command can also be used to flash devices remotely, through the cloud using WiFi. This requires the Photon to be running (not in DFU mode). Use the particle login and particle setup commands to associate a device to the cloud if you want to explore this option as well.
We now have a simple Hello World running on the Photon. As an added benefit of using our Docker image, we are also sure JerryScript is compiling along with it. Now let's talk a bit about JerryScript.
JerryScript
Now that we have our Photon development environment up and running, we can take a closer look at JerryScript. If you are not familiar with interpreters, here's how things usually go. First, you set up the interpreter by calling an initialization function. This creates a new instance of the interpreter. Then you either call another function to parse and execute a script, or you first call parse a function, which gets the script ready to run, and then call another function to run it. When you no longer need the interpreter, a finalization/destruction function is called. So far so good. Things start to get murkier when either the interpreter or the native environment need to interact with each other. For scripts to be useful, this is necessary! So we will have to get our hands dirty. For the example in this article we have integrated some of the Particle APIs in our JavaScript environment, so you are free to use them out of the box!
JerryScript comes with its own build system which is independent from the Particle one. Fortunately, JerryScript already includes all that's necessary to easily integrate both build systems. In fact, when you ran the Docker compile script before, you actually used this integration! If you are interested in the gritty details, have a look at the JerryScript/Particle integration README.
As we mentioned before, JavaScript was not designed for memory limited systems. As such, some constructs use a lot of memory. Fortunately, JerryScript allows us to easily turn off JavaScript features to reduce code size and memory use. To do this, JerryScript defines profile. You can find these in the jerry-code/profiles subdirectory of the main JerryScript directory. Running some tests, I've found a big chunk of ECMAScript 5.1 can be enabled for the Photon. In our Docker image, we have setup a custom JerryScript profile that disables the following features:
- The
Dateobject - All of ECMAScript 2015 features
- The
Mathobject - Regular expressions
- Unicode case conversions
It may be possible to enable these with some tinkering, but we haven't tested them. In fact, we found that enabling any other single feature resulted in code that exceeded the ROM limits of the Photon. Take into account that the 1MB of flash memory is shared with the underlying firmware, so the space available for the interpreter is much less than that. Still, this is very featureful.
To switch profiles, take a look at the Makefile.particle file in our example. There are some knobs that may be of interest to you. Profiles are set in line 47.
Before diving into our example, let's take a closer look at the JerryScript API.
Running a Script
Here's a short example of how you would normally run a script with JerryScript:
/* Initialize the global JerryScript instance */
jerry_init(JERRY_INIT_EMPTY);

/* Run a script, passed in as a char array (JavaScript code) */
jerry_value_t result = jerry_eval((const jerry_char_t*) script, scriptlen, false);
/* Check the return value, which is a JavaScript value */
if(jerry_value_has_error_flag(result)) {
    /* Handle error */
} else {
    /* Do something with the value here */
}

/* Release the result, this is necessary to avoid leaks */
jerry_release_value(result);

/* Free all JerryScript memory */
jerry_cleanup();
JerryScript is written in C to be as portable as possible (i.e. no C++ features). If you are familiar with C programming you will notice something peculiar about its API: jerry_init does not return a pointer to the newly constructed instance! Nor does any function take an instance as an argument. Instead, JerryScript developers opted to use a global instance. Unfortunately, this has some drawbacks. In particular, whenever you want to run several different instances of JerryScript in the same thread, it is necessary to switch between them before calling JerryScript functions. Personally, I consider this a rather cumbersome approach, and I consider it a drawback when comparing JerryScript to other embeddable JavaScript engines. On the upside, when only one JerryScript instance is required, there's one less argument to pass to functions.
C/JavaScript Interaction
For the embedded engine to be useful, we need some way to have it interact with the rest of the system. Most embedable engines provide a way to call C code from within, and a way for C call to call parts of the scripts.
To call C code from within JavaScript one must associate a C function with a JavaScript function:
static void my_c_function() {
    printf("Hello!\n");
}

static jerry_value_t
my_c_function_wrapper(const jerry_value_t func,
                      const jerry_value_t thiz,
                      const jerry_value_t *args,
                      const jerry_length_t argscount) {
    my_c_function();
    return jerry_create_undefined();
}

void setup() {
    jerry_init(JERRY_INIT_EMPTY);

    // Create a JavaScript function from a C function wrapper
    jerry_value_t func = jerry_create_external_function(my_c_function_wrapper);

    // Create a JavaScript string to use as method name
    jerry_value_t prop = jerry_create_string((const jerry_char_t*)"myCFunction");

    // Get JerryScript's global object (what you would call window in a browser)
    jerry_value_t global = jerry_get_global_object();

    // Bind the 'func' function inside the 'global' object to the 'prop' name
    jerry_set_property(global, prop, func);

    // Release all temporaries
    jerry_release_value(global);
    jerry_release_value(prop);
    jerry_release_value(func);

    // (...)
}
After this code runs, a script executed by JerryScript can call myCFunction() and my_c_function will get called. You may have noticed there are many calls to jerry_release_value. This is because JerryScript uses a reference counting system. Whenever an object is created or returned by a function, its reference count is increased. After passing these objects back to JerryScript, for instance by calling jerry_set_property, their reference count gets increased again. Since now JerryScript is responsible for these objects and we no longer need them, we must manually call jerry_release_value to decrease the reference count. Failing to do so would result in a leak. This is fairly typical in C programming. If the JerryScript API were wrapped in C++, a smart-pointer-like object could be created to make it easier to handle references. However, since JerryScript is coded in C to increase its portability, one must manually handle references like we do above. If you have ever programmed in C you know this is fairly typical, much like handling matching malloc and free calls.
To call JavaScript code from C is much easier. One way to do it is to simply evaluate a string just like we showed in the Running a Script section.
/* Run a script, passed in as a char array (JavaScript code) */
jerry_value_t result = jerry_eval((const jerry_char_t*) script, scriptlen, false);
/* Check the return value, which is a JavaScript value */
if(jerry_value_has_error_flag(result)) {
    /* Handle error */
} else {
    /* Do something with the value here */
}
Another option is to use the jerry_call_function function. This function allows us to specify all parameters passed to the JavaScript function in a way similar to JavaScript-to-C handlers:
// This is how jerry_call_function looks
jerry_value_t
jerry_call_function (const jerry_value_t func_obj_val,
                     const jerry_value_t this_val,
                     const jerry_value_t args_p[],
                     jerry_size_t args_count);

// For instance, to call our myCFunction from before we could do:
void call_javascript_function(void) {
    jerry_value_t global = jerry_get_global_object();
    jerry_value_t prop = jerry_create_string((const jerry_char_t*)"myCFunction");
    jerry_value_t func = jerry_get_property(global, prop);
    jerry_value_t undefined = jerry_create_undefined();

    jerry_value_t result = jerry_call_function(func, undefined, NULL, 0);

    // Do something with the result

    jerry_release_value(result);
    jerry_release_value(undefined);
    jerry_release_value(func);
    jerry_release_value(prop);
    jerry_release_value(global);
}
With this we have enough knowledge about JerryScript to start coding some useful functions for interacting with the Particle Photon API. In fact, we just went ahead and coded useful functions for interacting with GPIO pins, logging, waiting, using TCP sockets, using timers, and making useful system calls (like entering DFU mode). Take a look at our jerryphoton mini-lib included in the example to see how this is done.
Example
So now that we understand enough about the Particle Photon and JerryScript, we are ready to take a look at our example. We will keep things simple for now, and in future posts we will use this to do something a bit more complicated. Our simple example basically does three things:
- It sets up JerryScript and then runs a simple script that turns on and off the blue LED with a frequency of 1Hz (once per second).
- It enables USB logging by putting the USB port in serial mode.
- It sets up a listening TCP socket that can be used to send JavaScript scripts to the Photon over WiFi.
You have already seen point 1 when you first flashed the example before. It was actually JavaScript code that was turning on and off the blue LED! Here's the code:
count = 0;
photon.pin.mode(7, 'OUTPUT');
setInterval(function() {
   photon.pin(7, !photon.pin(7));
   photon.log.trace('Hello from JavaScript! ' + count.toString());
   ++count;
}, 1000);
You can find it inside the main.cpp file, line 36. It is just a C-string that gets passed to JerryScript!
You may have noticed there is an interesting photon object available in the global scope. This is the object our jerryphoton library exposes through JerryScript. It can be used to interact with certain Particle APIs. You may also think setInterval is available right-off-the-bat with JerryScript, but in fact it isn't. This function is also part of our jerryphoton lib. So basically this scripts tests a little part of the library to make sure everything is fine.
Here's a short list of the methods available in case you want to run some tests on your own:
photon.log.trace/info/warn/error(string): logs a string through USB. Formatting must be done on the JavaScript side.photon.delay(number): calls the Particledelayfunction (waits N milliseconds).photon.pin.mode(string): calls the ParticlepinModefunction. Valid modes are"OUTPUT","INPUT","INPUT_PULLUP","INPUT_PULLDOWN". See the Particle docs for the meaning of each mode.photon.pin(number): calls the ParticledigitalReadfunction and returns the value as a boolean.photon.pin(number, boolean): calls the ParticledigitalWritefunction and sets the PIN to the state passed as a boolean.photon.process(): calls theParticle.processfunction, necessary to keep the WiFi connection alive inside blocking calls.photon.dfu(boolean): calls theSystem.dfufunction, passing the argument. This forcibly enters DFU mode. The script ends execution at that point.photon.TCPClient(): creates a ParticleTCPClientobject and returns it wrapped in a JavaScript object. The returned object accepts six calls:connected,connect,write,available,read,stop. This function can be called usingnewor as a normal function, it will return a newTCPClientin both cases. There are differences between the Particle API and the API returned by this object, these are explained below.setInterval/setTimeout(function, number): functions that mimic the browser functions with the same names. They do not support passing a script as a string, they only take a function and a number (milliseconds) as parameters. TheclearIntervalfunction is not available, although most of the code necessary to support it is already in place.
The photon.TCPClient API presents some differences compared to the Particle one.
TCPClient.read(number): returns a JavaScript string with the data read. If there was no data, the string is empty. You can optionally specify a max number of bytes to read.TCPClient.write(string): writes the string passed as parameter to the socket.
All other TCPClient methods are identical to those from the Particle API.
Although very limited compared to what the Particle API provides, this is more than enough to show how things work for our example. Take a look at jerryphoton.cpp inside the source folder of the example. The public API of jerryphoton is very simple:
jerryphoton::js::instance(): get a singleton instance ofjs, the object that encapsulates JerryScript in our example. A singleton was picked due to the way JerryScript was designed: a global instance that must be switched before calls. We opted to just use a single instance to keep the API simple.js.instantiated(): to check whether an instance is created (useful for controlling memory use).js.eval(const chart* script, size_t size = 0): takes a JavaScript script as a string. The string can either be null-terminated or you can pass the length as an additional parameter (optional) to the function. If the size is0, then the script is assumed to be null-terminated. This function evaluates the string. All state changes produced in the interpreter are kepts after the string finishes. In other words, repeated calls to theevalfunction preserve state changes.js.loop(): a function that must be called periodically. This is meant to be called from theloopfunction in your project. This is used internally to manage timers.
That's it! You can now play with the example and test JavaScript easily! But wait, there is more.
USB Logging
You may have noticed we mentioned USB logging before. The Photon presents a serial interface to a computer when connected through USB. In fact, the Photon can act as different USB devices, like a mouse or a keyboard. For our purposes we will just use the USB Serial interface. Through this interface we can send data between the computer and the Photon for debugging. In our example, all logs are pushed to the serial interface.
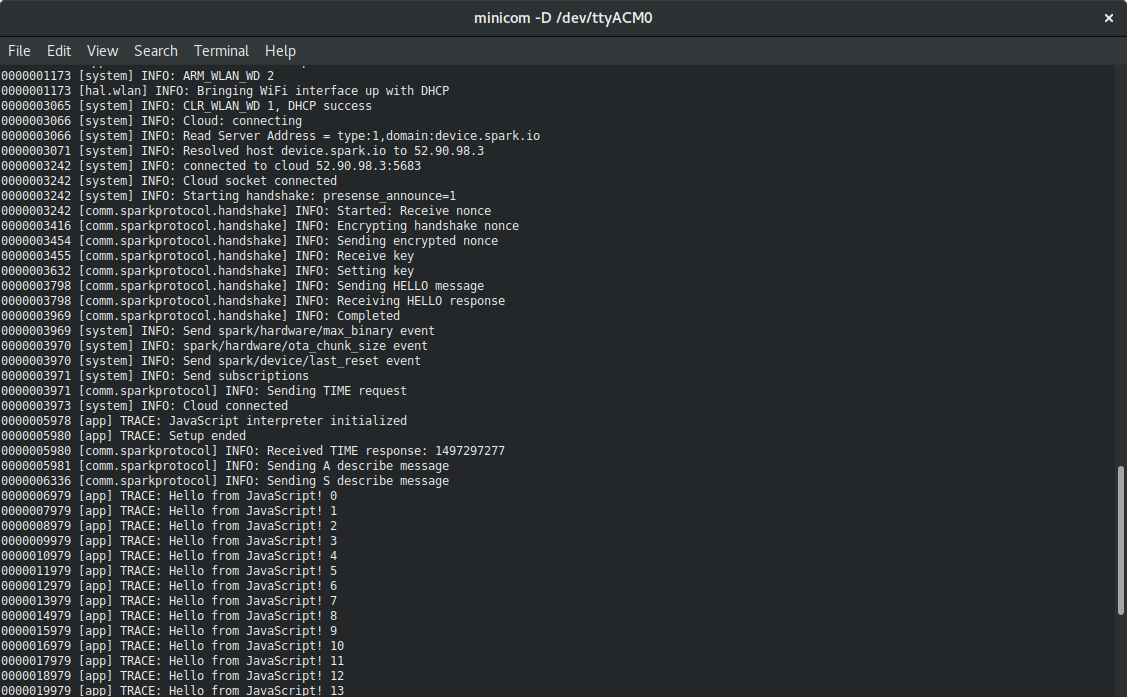
After connecting the Photon to your computer with an USB cable, you need a serial terminal application. If you are on Linux or macOS (homebrew) you can use minicom.
minicom -D /dev/ttyACM0 #macOS should be /dev/tty.usbserial or similar
On Linux you will need access to serial devices to run minicom as user. This can usually be accomplished by adding yourself to the
uucpgroup.
For Windows you can use PuTTY or Realterm.
As soon as you do this, logs should start showing up in your terminal. Note that no data is displayed when the device is in DFU mode.
Uploading a New Script
Our example comes with a simple method to upload new JavaScript scripts without flashing! To use this simply open a socket to the Photon's IP address on port 65550 and send the script. Then disconnect from the socket. As soon as you are disconnected, the script will be parsed and executed. To make this simpler, use the upload-script.sh script in our example.
./upload-script.sh <PHOTON-IP-ADDRESS>
This script uses nc (GNU Netcat) to upload the script to the device. You are free to use any other tool to open a socket and send the data. The script that gets uploaded is test.js. Edit the upload-script.sh script to upload any other JavaScript file. Do note that scripts are parsed from RAM, so there is limit to the size of the scripts you can upload.
The test.js script uses the photon.TCPClient object to attempt to connect to another host on port 3000. You can use nc (in listening mode: nc -lk 3000) to send and receive data to JavaScript code running on the Photon.
var s = photon.TCPClient();
s.connect('i5-4590-LIN', 3000);
s.write('Hello from JS!');

while(s.connected()) {
    photon.process();

    if(s.available()) {
        photon.log.trace(s.read());
    }
}

s.stop();

photon.log.trace('END');
If you want to try this:
- Set the right IP address or hostname for the computer that will be listening for connections in
test.js. - Open port
3000in the computer's firewall. - Run
nc
nc -lk 3000
- Upload the script.
./upload-script.sh <PHOTON-IP-ADDRESS>
You should see Hello from JS! in the console where you run nc. You can also type there and after pressing ENTER you should see the message pop up in the logs where you are running Minicom.
You can use this example to use the Photon to communicate with remote hosts over WiFi from JavaScript! Do note that all communication is done in the clear, as there is no encryption of any kind yet. We will fix this in future posts in this series.
Aside: Auth0 Authentication with JavaScript
At Auth0, we make heavy use of full-stack JavaScript to help our customers to manage user identities, including password resets, creating, provisioning, blocking, and deleting users. Therefore, it must come as no surprise that using our identity management platform on JavaScript web apps is a piece of cake.
Auth0 offers a free tier to get started with modern authentication. Check it out, or sign up for a free Auth0 account here!
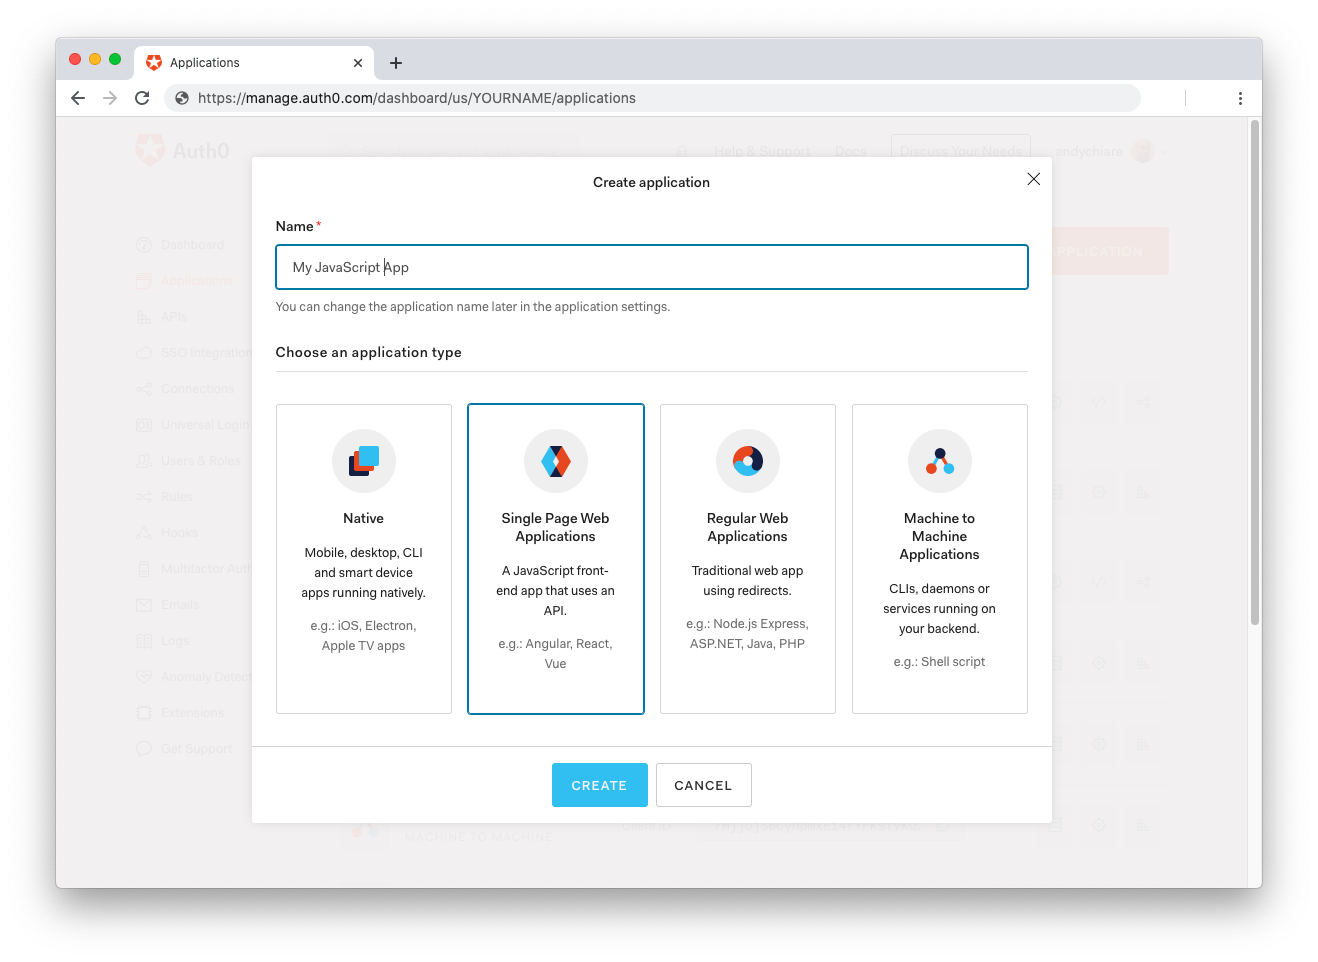
Then, go to the Applications section of the Auth0 Dashboard and click on "Create Application". On the dialog shown, set the name of your application and select Single Page Web Applications as the application type:
After the application has been created, click on "Settings" and take note of the domain and client id assigned to your application. In addition, set the Allowed Callback URLs and Allowed Logout URLs fields to the URL of the page that will handle login and logout responses from Auth0. In the current example, the URL of the page that will contain the code you are going to write (e.g. http://localhost:8080).
Now, in your JavaScript project, install the auth0-spa-js library like so:
npm install @auth0/auth0-spa-js
Then, implement the following in your JavaScript app:
import createAuth0Client from '@auth0/auth0-spa-js';

let auth0Client;

async function createClient() {
  return await createAuth0Client({
    domain: 'YOUR_DOMAIN',
    client_id: 'YOUR_CLIENT_ID',
  });
}

async function login() {
  await auth0Client.loginWithRedirect();
}

function logout() {
  auth0Client.logout();
}

async function handleRedirectCallback() {
  const isAuthenticated = await auth0Client.isAuthenticated();

  if (!isAuthenticated) {
    const query = window.location.search;
    if (query.includes('code=') && query.includes('state=')) {
      await auth0Client.handleRedirectCallback();
      window.history.replaceState({}, document.title, '/');
    }
  }

  await updateUI();
}

async function updateUI() {
  const isAuthenticated = await auth0Client.isAuthenticated();

  const btnLogin = document.getElementById('btn-login');
  const btnLogout = document.getElementById('btn-logout');

  btnLogin.addEventListener('click', login);
  btnLogout.addEventListener('click', logout);

  btnLogin.style.display = isAuthenticated ? 'none' : 'block';
  btnLogout.style.display = isAuthenticated ? 'block' : 'none';

  if (isAuthenticated) {
    const username = document.getElementById('username');
    const user = await auth0Client.getUser();

    username.innerText = user.name;
  }
}

window.addEventListener('load', async () => {
  auth0Client = await createClient();

  await handleRedirectCallback();
});
Replace the
YOUR_DOMAINandYOUR_CLIENT_IDplaceholders with the actual values for the domain and client id you found in your Auth0 Dashboard.
Then, create your UI with the following markup:
<p>Welcome <span id="username"></span></p>
<button type="submit" id="btn-login">Sign In</button>
<button type="submit" id="btn-logout" style="display:none;">Sign Out</button>
Your application is ready to authenticate with Auth0!
Check out the Auth0 SPA SDK documentation to learn more about authentication and authorization with JavaScript and Auth0.
Conclusion
We have taken an introductory look at the status of JavaScript development on microcontrollers. For this we picked JerryScript, a simple JavaScript engine developed by Samsung. We learned how to execute scripts and how to communicate between the C-side of things and the JavaScript-side. JerryScript is really simple to use, although it does have some quirks in its API, like the use of global objects for multiple instances. A potential future improvement for JerryScript would be to allow offline compilation of scripts to bytecode, so that scripts can be included in ROM in forms other than text. Both Duktape and V7, other small JavaScript engines, support this.
Update: a reader has pointed out in the comments that JerryScript does support offline compilation to bytecode. Here are the necessary APIs. Awesome!
On the hardware side we found the Particle Photon incredibly simple to use. Documentation is excellent, as well as the development tools. The Wiring API as implemented by Particle is simple yet effective, and we had no trouble bringing some of its functionality into the JavaScript interpreter. Our example allowed us to remotely upload and excute JavaScript, as well as use pins, TCP client sockets and timers.
We did find the memory available in the ROM to be somewhat limited when compiling most of the JerryScript features. There's so much you can do with 1MB of flash after all the functionality provided by the Particle firmware. It was enough for our tests, but will it be enough for running more complex apps?
Stay tuned for future posts where we will attempt to use JavaScript to write a useful remote monitoring app on the Photon. Hack on!
Update: part 2 is live: JavaScript for Microcontrollers and IoT: Building a Sensor Hub
About the author

Sebastian Peyrott
Senior Engineer