When you're building a mobile app, login flow is one of the first places users decide if your app feels polished or clunky. For Android users, nothing feels more natural than using the Google account already on their phone to log in. That’s what native Google Sign-In offers: no redirects, no browser tabs, just a fast, familiar experience. Auth0 supports this native flow, allowing you to authenticate users with their Google account and still benefit from all of Auth0’s token handling, identity verification, and security features. The end result is a login experience users trust, while keeping your backend logic and architecture unchanged.
Why native Google Sign-In is worth it
If you’re using Auth0 Universal Login already, you might be wondering if native Google Sign-In is worth the extra effort. Spoiler alert: It is! Here are some reason why developers who care about speed, UX, and brand trust should consider going native on Android.
Faster login times
Native sign-in eliminates the browser round-trip, a process that can take several seconds due to network latency, page loads, and redirects. By using the on-device account directly, the login time is reduced to the milliseconds it takes for the native UI to appear, often resulting in a 70-80% faster login experience.
Future-proofing with Android Credential Manager
Beyond the immediate UX gains, choosing the native flow is a strategic decision that aligns your app with the future of the Android platform. Google not only recommends this approach but has built its modern identity tools around it.
This flow is designed to work directly with Credential Manager, which is Android's unified home for all sign-in methods, including passwords, passkeys, and federated logins like Google. By adopting this modern API, your app can securely retrieve saved credentials from the Google Password Manager, enabling the same seamless, one-tap sign-in for returning users that was previously offered by Smart Lock.
For developers, this means you're building on a future-proof foundation. As Google evolves its identity and authentication features, your app will be positioned to seamlessly integrate them, reducing long-term maintenance and keeping your app feeling modern and integrated into the Android ecosystem.
A seamless UX that builds trust
Redirecting users to a browser breaks the trusted context of your application. That brief journey to an external web view introduces uncertainty: "Is this the real Google login page, or a phishing attempt?" Native sign-in reinforces the principle of a secure boundary. The login prompt is presented by the Android OS itself, a universally trusted party, that assures the user that their credentials are being handled securely within the device's native ecosystem.
Why trust matters: For apps that handle sensitive data, such as finance or healthcare, building trust at every step is essential. Redirecting users to an external web view can break that trust by introducing unfamiliar UI or delays. In an Auth0 UX research study, a developer from the financial sector shared that they couldn’t afford any hiccups in the user flow. Because their app required users to enter sensitive financial data, building complete trust was a priority, and web redirects didn’t provide the same level of reassurance as a native experience.
Native sign-in reinforces credibility by keeping the flow consistent, fast, and secure, just what high-trust industries demand.
And best of all, Auth0 lets you implement this while keeping your existing identity setup.
Under the hood: How native login works
So, how does this flow achieve both a seamless user experience and security? It relies on a multi-step handshake between your app, the Android OS, and Auth0.
Consider the following diagram:
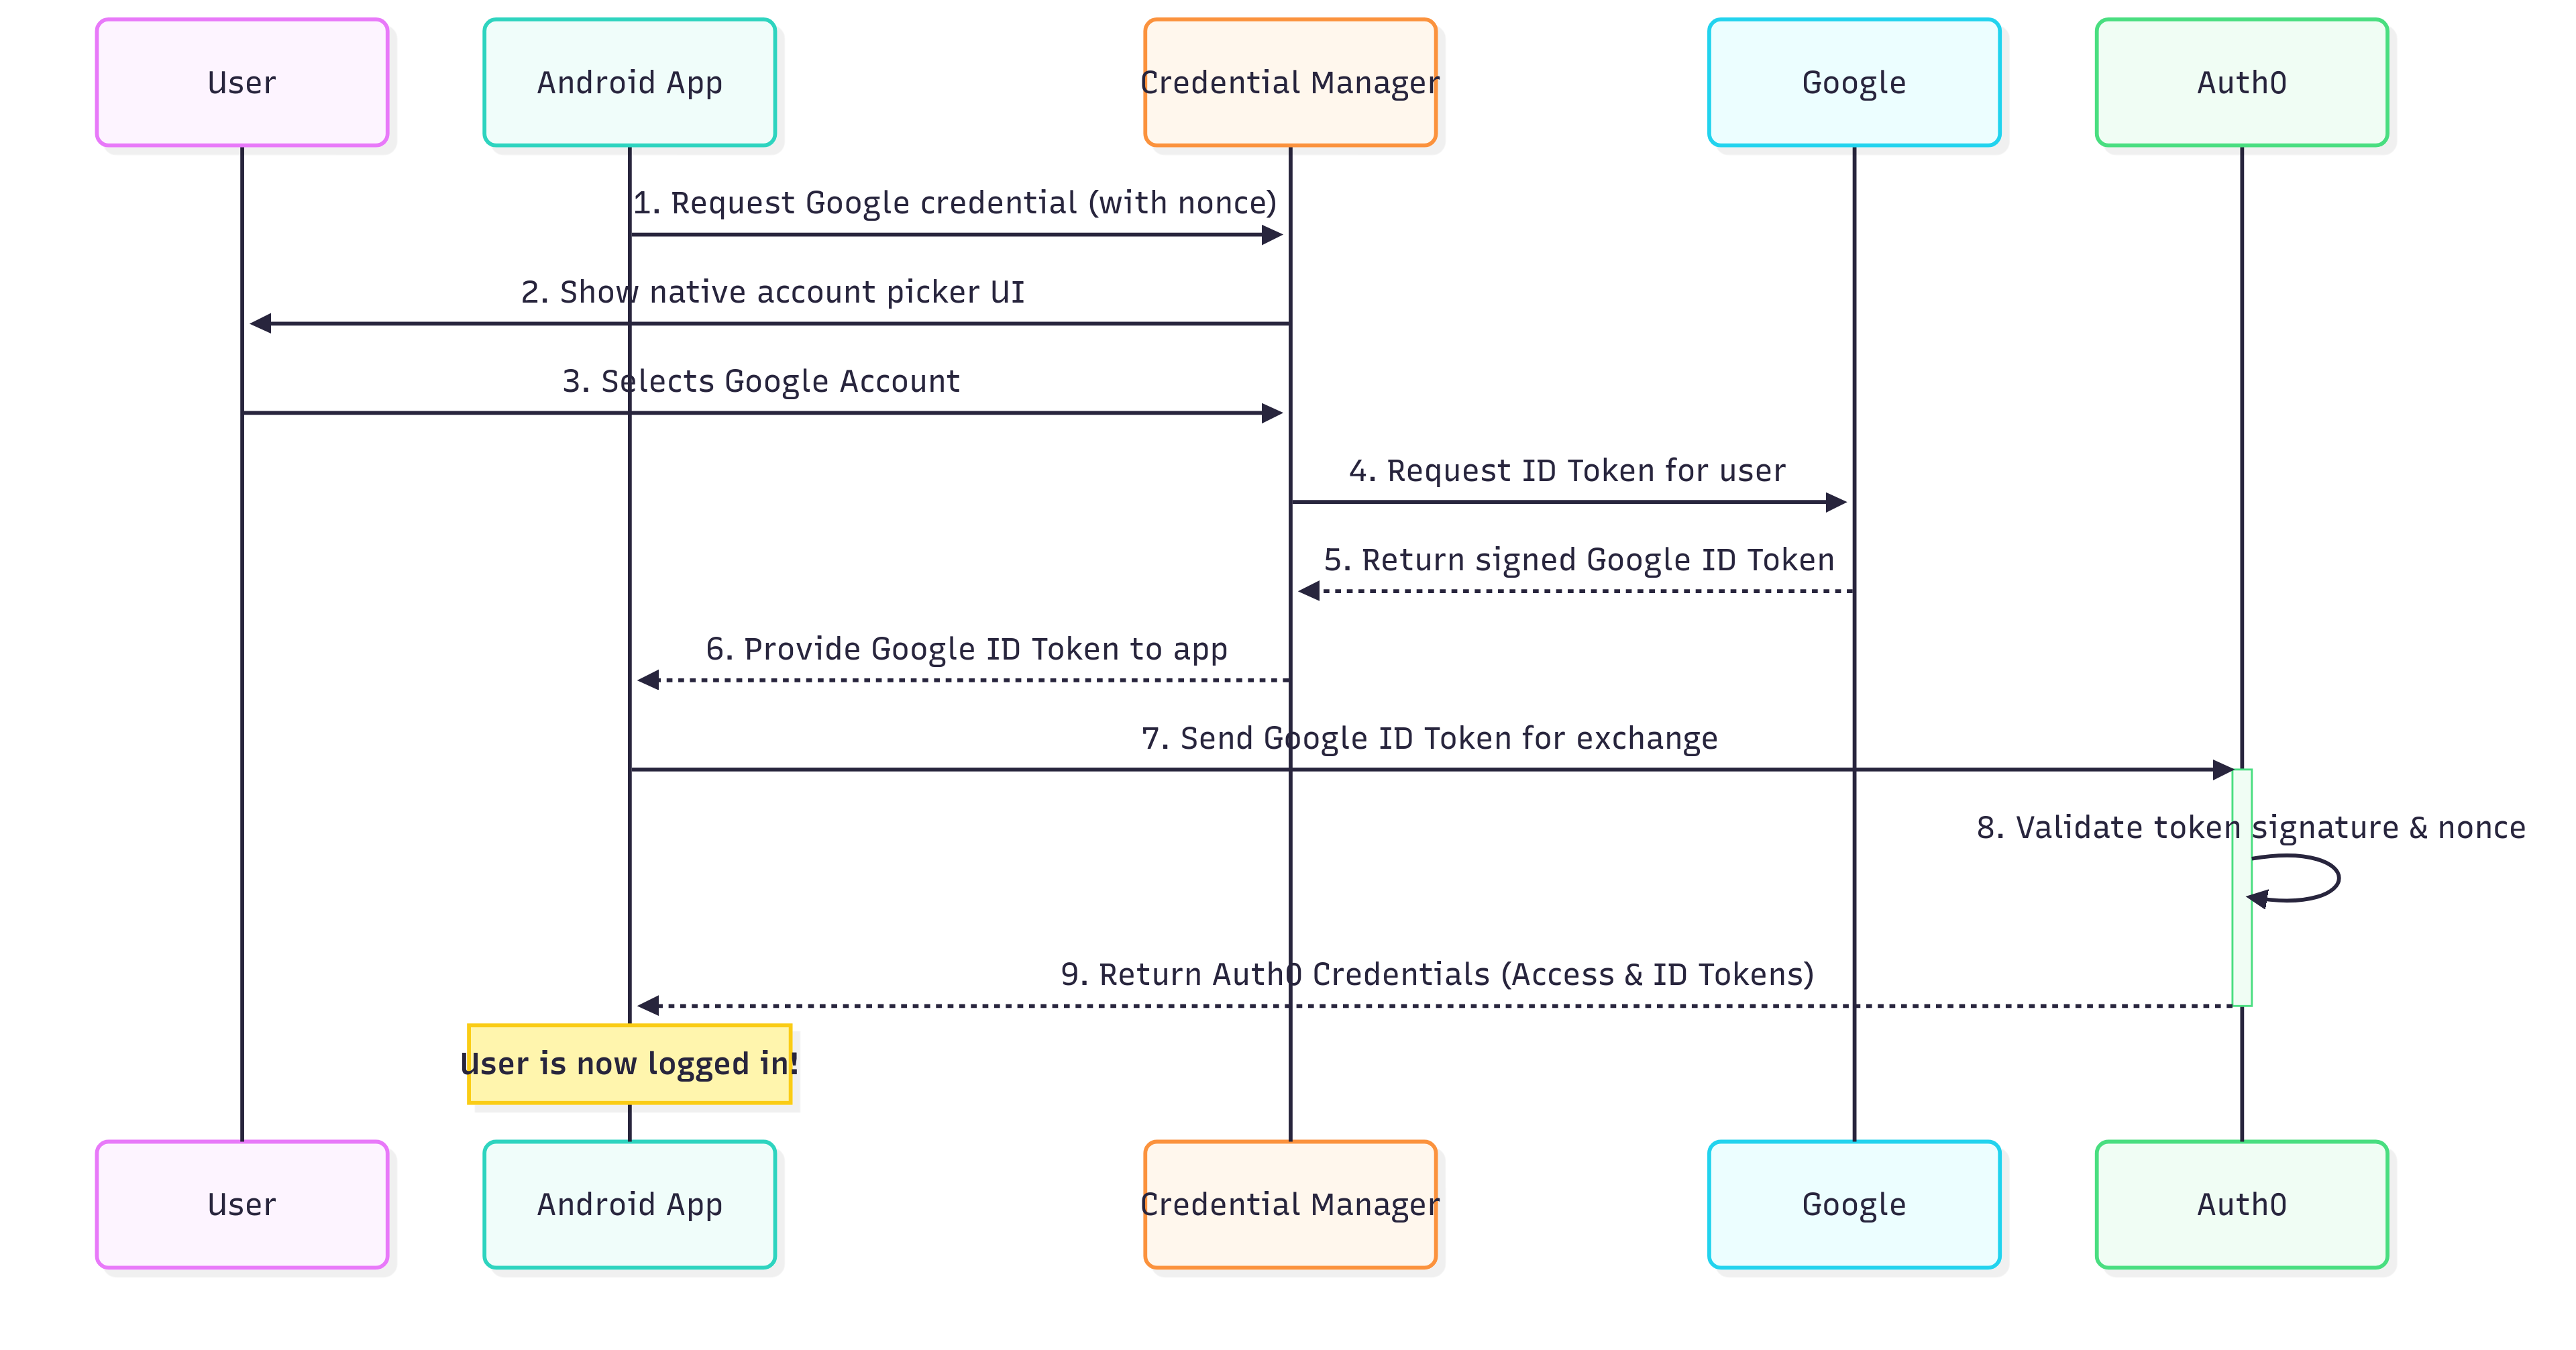
Following the numbered arrows, here is a breakdown of the flow in the diagram:
Request Credential: Your Android app initiates the login by asking the Android OS's Credential Manager for a Google credential, providing a unique nonce for security.
User Interaction: The Credential Manager displays the familiar, native Google account picker to the user.
Account Selection: The user selects their account.
Google Issues Token: The Credential Manager communicates with Google's services in the background, which issue a secure, signed ID Token.
Token Received by Credential Manager: The Credential Manager receives the ID Token issued by Google.
Token Received by App: The ID Token is passed back to your Android app.
Token Exchange with Auth0: Your app sends this Google ID Token to Auth0 along with the nonce generated at the request time.
Validation: Auth0 validates the token's signature using Google's public keys and verifies the nonce to prevent replay attacks.
Auth0 Credentials Issued: Upon successful validation, Auth0 returns its own set of credentials (an Access Token and ID Token) to your app.
Login Complete! Your app now has a secure session managed by Auth0.
Two security concepts make this handshake work:
The ID Token as Proof: When a user consents, the Android OS doesn't just return a username. It asks Google to generate a signed ID Token (a JSON Web Token, or JWT). This token is a verifiable piece of cryptographic proof that contains the user's identity, who it was issued to (your app), and most importantly, a nonce.
The nonce and the Secure Exchange: The nonce (number used once) is a random, unique string your app generates at the start of each login attempt. It gets embedded inside the signed ID Token from Google. When your app sends this token to Auth0, Auth0 performs a critical check: it verifies that the nonce inside the token matches the one it expected for that specific transaction. This instantly defeats replay attacks, where an attacker might try to reuse an old or stolen token. Once validated, Auth0 exchanges the Google ID Token for a set of its own credentials.
How the concepts look in code
Now that you understand the "why," let's walk through how the pieces connect in practice. The following code snippets, also available in a GitHub Gist, illustrate the core steps of the flow in an Android app.
Step 1: Requesting credentials from Google
First, use GetGoogleIdOption to configure your request. This is where you’ll provide two crucial pieces of security information:
setServerClientId(...): This must be the Client ID from your Web Application credentials in the Google Cloud Console. This tells Google that you intend for the resulting ID Token to be used by a backend server (in this case, Auth0).setNonce(...): Provide a unique, random string for every login
val randomNonce = UUID.randomUUID().toString()

val googleIdOption = GetGoogleIdOption.Builder()
    .setFilterByAuthorizedAccounts(false)
    .setServerClientId(getString(R.string.com_google_client_id))
    .setNonce(randomNonce)
    .build()

val request = GetCredentialRequest.Builder()
    .addCredentialOption(googleIdOption)
    .build()
Step 2: Handling a unified result
A key concept to understand is that Credential Manager is a unified API. It’s built to handle not just "Sign in with Google," but also saved passwords and modern passkeys, all through the same entry point. Because of this, your code must check what type of credential the user actually selected.
The standard way to do this is with a when statement. You inspect the result from the getCredential() call to confirm it's the specific type you're expecting for this flow: TYPE_GOOGLE_ID_TOKEN_CREDENTIAL. This check ensures your app responds correctly and securely.
Once you've verified the type, you can then "unbox" the data to get the Google ID Token.
try {
    val credMan = CredentialManager.create(this)
    val result = credMan.getCredential(
        context = this,
        request = request
    )

    val creds = result.credential
    when (creds) {
        is CustomCredential -> {
            if (creds.type == GoogleIdTokenCredential.TYPE_GOOGLE_ID_TOKEN_CREDENTIAL) {
                val googleCredentials = GoogleIdTokenCredential.createFrom(creds.data)
                // Rest of the code
            }
        }
        // Handle other credential types like passkeys or passwords if needed
        else -> {
            // Handle other cases or errors
        }
    }
} catch (e: GetCredentialException) {
    // Handle exceptions from getCredential(), such as the user canceling the flow
}
Step 3: Exchanging the token with Auth0
Finally, you send the idToken from Google to Auth0 using the loginWithNativeSocialToken method. The tokenType parameter is important, because it tells Auth0 which validation strategy to use. In this case, it will use Google's public keys to verify the token's signature.
auth0Client.loginWithNativeSocialToken(
    googleCredential.idToken,
    "http://auth0.com/oauth/token-type/google-id-token"
)
.setScope("openid profile email")
.start(object : Callback<Credentials, AuthenticationException> {
    override fun onSuccess(auth0Creds: Credentials) {
        // Store credentials and update UI
    }

    override fun onFailure(error: AuthenticationException) {
        // Show error message
    }
})
Upgrade your Android users sign-in experience with Auth0
If your Android app already uses Auth0, native Google Sign-In is one of the easiest upgrades you can make for a better user experience. It’s fast, secure, and better aligned with Android platform expectations.
Native Google Sign-In gives you a more trusted, smoother login experience that fits naturally into the Android ecosystem, all without requiring backend changes or major migrations.
To learn more, check out the Auth0 docs on Native Google Sign-In.
About the author

Will Johnson
Developer Advocate
Will Johnson is a Developer Advocate at Auth0. He loves teaching topics in a digestible way to empower more developers. He writes blog posts, records screencasts, and writes eBooks to help developers. He's also an instructor on egghead.io.
View profile