Model Context Protocol (MCP) is an open standard for connecting AI applications to external systems. Much like a self-describing API, an MCP server can be deployed and connected by anyone, increasing the capacity of an LLM in terms of what it can do.
Fine Grained Authorization (FGA) is a tool that allows you to define fine-grained permissions based on the relationship between objects. Inspired by Google's Zanzibar, OpenFGA is an open-source authorization solution for defining fine-grained permissions based on Relationship-Based Access Control (ReBAC). OpenFGA is the engine of Auth0 FGA and similar solutions.
In this article, we will use TypeScript's FastMCP to create an MCP Server that uses Auth0 to authenticate and control access, and Auth0 FGA to define the permissions. By the end, our MCP Server will be able to show only the tools that the user can use through an LLM connecting via an MCP server. In addition, you will add granular filtering, allowing documents to be shown only to users with access to them. In other words: our MCP server will behave differently depending on the permissions of the user.
Prerequisites
We are going to use the following:
- Node.js 18+
- npm
- An Auth0 tenant. Create a free account here.
- An Auth0 FGA account. You can create a free account here.
- Our Git repository. This repository contains all the code for this tutorial and a start application you will use.
This is an introductory tutorial to MCP and FGA, so no previous knowledge in these are required. Beginner level of Node and TypeScript knowledge is ideal.
The Application You Will Build
For this tutorial, you’ll use the FastMCP library to build a TypeScript MCP Server and learn how MCP works and how we can integrate FGA with it to provide granular access control. The MCP server will have three tools:
get_whoami: will tell who the logged-in user is.get_datetime: will return the current date and time, which helps the LLM to have some contextget_documents: this is our real feature and will list the documents in our library. The documents can be public or private and will be filtered based on the user permissions using FGA.
First, we will implement these tools without any kind of security, just showing you how we can use MCP and how we can debug it, then you’ll add the access control layer.
Setup the code
We need to bootstrap our project with dependencies and folder structure. To facilitate your journey, we created a repository so you can follow along. To begin, clone the repository if you haven’t done so and switch to the 01-starter branch. This branch have the initial setup and all dependencies needed for this tutorial:
git switch 01-starter
Now install the dependencies using npm:
npm install
At this branch, we have this folder structure:
   root
   |- src
       |- index.ts
       |- documentApi.ts
   |- package.json
   |- package-lock.json
   |- tsconfig.json
For the dependencies were are using:
@auth0/auth0-api-js: Auth0’s JavaScript SDK for calling Auth0 APIs (management/auth flows) from your app/server.@modelcontextprotocol/sdk: Core MCP toolkit to implement an MCP server: define tools, handle requests, and talk MCP reliably.@openfga/sdk: Client SDK for OpenFGA, used to check/compute fine‑grained permissions (who can access what) this SDK will use the Auth0 FGA you will make available shortly.dotenv: Loads environment variables from a.envfile so sensitive information doesn’t get hardcodedfastmcp: High-level framework to build MCP servers quickly (routing, tool registration, server boilerplate).
Moreover, the documentApi.ts file has a mocked implementation of the document library. The implementation supports both public and private documents.
Implementing the MCP Server in TypeScript
First, create a new file tools.ts inside the src folder:
touch src/tools.ts
Import the dependencies and instantiate the DocumentAPI class:
import {FastMCP} from "fastmcp";
import {DocumentApi} from "./documentApi";

const documentApi = new DocumentApi();
Now, create a function to register the MCP Tools. In another section you’ll add the authorization to these.
export function registerTools(mcpServer: FastMCP) {

}
Now, let's implement the Who am I tool, with limited capability as we don't have any information about the logged user yet.
   mcpServer.addTool({
       name: "get_whoami",
       description: "Returns the information about the authenticated user",
       execute: async (_args) => {
           return {
               content: [
                   {
                       type: "text",
                       text: "I don't know who you are yet. But I will!"
                   }
               ]
           }
       }
   });
For the Get Date and Time, use the following code:
   mcpServer.addTool({
       name: "get_datetime",
       description: "Returns the current UTC date and time",
       execute: async () => {
           const utcDateTime = new Date().toISOString();
           return {
               content: [
                   {
                       type: "text",
                       text: utcDateTime,
                   },
               ],
           };
       },
   });
Lastly, the Get Documents source code. For this version, only public documents are returned. We need FGA for private documents.
   mcpServer.addTool({
       name: "get_documents",
       description:  "Retrieves important documents",
       execute: async (args) => {


           const canViewPrivate = false
           const documents = await documentApi.getDocuments(canViewPrivate);


           return {
               content: [
                   {
                       type: "text",
                       text: JSON.stringify(
                           {
                               count: documents.length,
                               filter: "public",
                               documents: documents,
                           }, null, 2)
                   },
               ],
           };
       },
   });
}
All tools are registered. Now, configure FastMCP and test it. Open the index.ts file and add the following code:
import "dotenv/config";

import { FastMCP } from "fastmcp";
import { registerTools } from "./tools";

const PORT = parseInt(process.env.PORT ?? "3001", 10);

export const server = new FastMCP({
   name: "FastMCP Auth0 Example Server",
   version: "1.0.0",
});

const start = async () => {
   registerTools(server);

   try {
       /**
        * Starts the server.
        */
       await server.start({
           transportType: "httpStream",
           httpStream: {
               port: PORT,
               endpoint: "/mcp",
               stateless: true,
           },
       });
   } catch (err) {
       console.error(err);
       process.exit(1);
   }
};

start();
Change the package.json file to include the start script that will start the server:
"start": "tsx src/index.ts --project tsconfig.json"
To start the FastMCP server run the following command at the root folder of the project:
npm run start
You should see the following output:
> fastmpc-fga@1.0.0 start
> tsx src/index.ts --project tsconfig.json

[FastMCP info] Starting server in stateless mode on HTTP Stream at http://localhost:3001/mcp
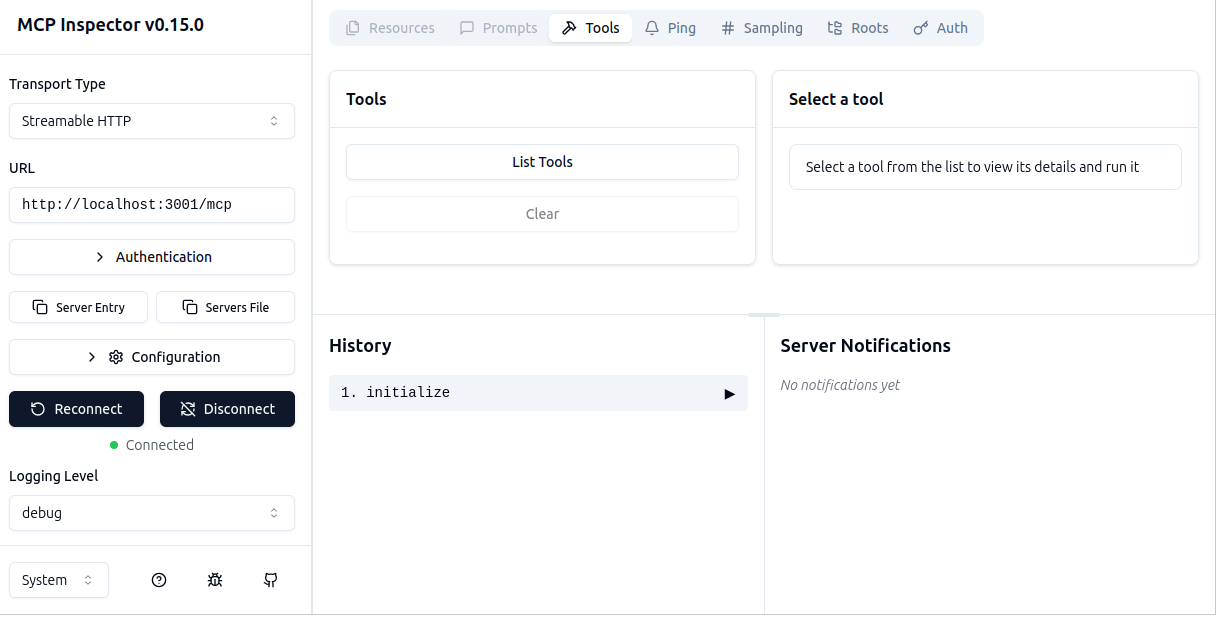
An MCP server can be accessed through requests made by an MCP client. , since a browser is not an MCP client, in order to see results on a screen . you need to use a supported client or a debugging tool like the MCP Inspector.
Testing Your MCP Server Using MCP Inspector
Start Inspector with the following command:
npx @modelcontextprotocol/inspector@latest
The output will provide a valid URL with the token to use in Inspector (eg.: http://localhost:6274/?MCP_PROXY_AUTH_TOKEN=ed3…6a3d9). Open it in your browser and change the following fields:
Transport TypetoStreamable HTTPURLtohttp://localhost:3001/mcp
And click on Connect. You should see a similar screen:
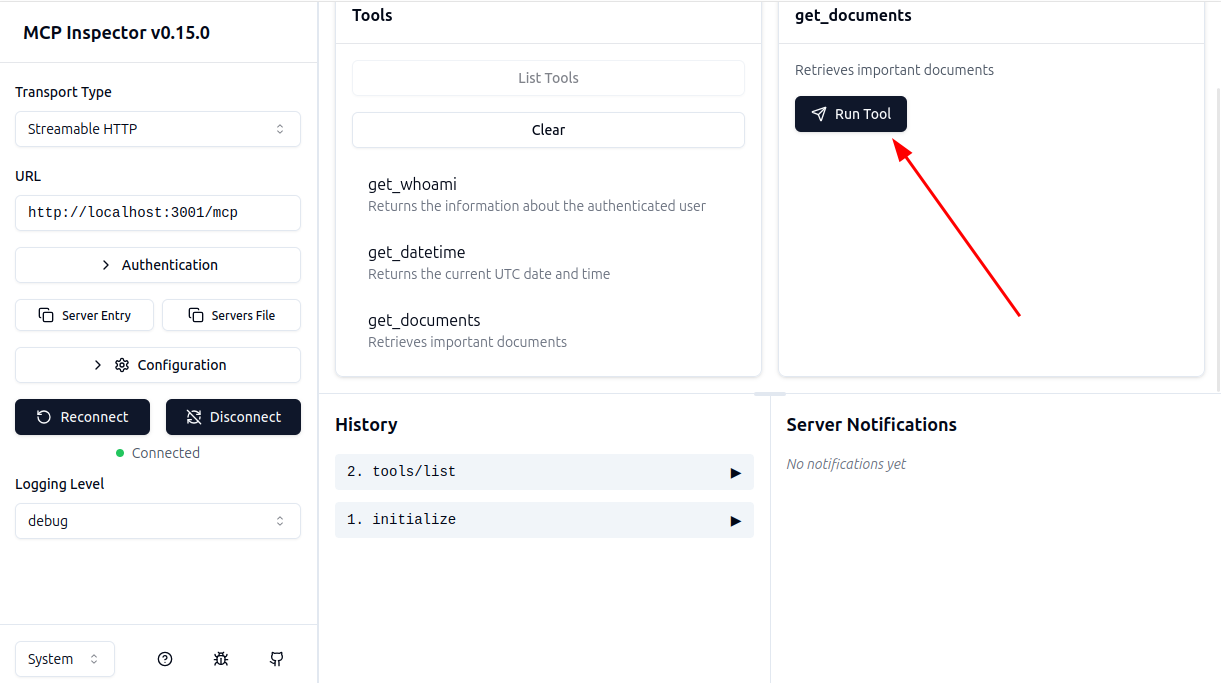
Now, click on the List Tools button to show all the tools available and ask to execute one of them.
Ok, everything is working! Now, let's add authorization.
Note: you can check your progress by changing the branch to 02-fastmcp
Setting Up MCP Server for Authentication
Now, you can configure authentication. Let’s start with OAuth 2.0 to authenticate the users and limit access to the tools.
First you need to adjust the code to add the proper authentication related classes and functions, then we need to configure your Auth0 tenant. In the end, we will show you how to extract an access token from the request and use it to authenticate the user.
First, create the file src/types.ts with the following content. This type will be used to pass authenticated information.
import type { AuthInfo } from "@modelcontextprotocol/sdk/server/auth/types";

export type FastMCPAuthSession = AuthInfo & {
 [key: string]: unknown;
};
Now, create the file src/auth0.ts with the following content:
import type { IncomingMessage } from "http";
import { ApiClient, getToken } from "@auth0/auth0-api-js";
import { InvalidTokenError } from "@modelcontextprotocol/sdk/server/auth/errors";
import type { AuthInfo } from "@modelcontextprotocol/sdk/server/auth/types";
import { FastMCPAuthSession } from "./types";

const AUTH0_DOMAIN = process.env.AUTH0_DOMAIN as string;
const AUTH0_AUDIENCE = process.env.AUTH0_AUDIENCE as string;

const apiClient = new ApiClient({
 domain: AUTH0_DOMAIN,
 audience: AUTH0_AUDIENCE,
});

function isNonEmptyString(value: unknown): value is string {
 return typeof value === "string" && value.length > 0;
}

export const authenticate = async (
 request: IncomingMessage,
): Promise<FastMCPAuthSession> => {
 try {
   const accessToken = getToken(request.headers);
   const decoded = await apiClient.verifyAccessToken({
     accessToken,
   });

   if (!isNonEmptyString(decoded.sub)) {
     throw new InvalidTokenError(
       "Token is missing required subject (sub) claim",
     );
   }

   let clientId: string | null = null;
   if (isNonEmptyString(decoded.client_id)) {
     clientId = decoded.client_id;
   } else if (isNonEmptyString(decoded.azp)) {
     clientId = decoded.azp;
   }

   if (!clientId) {
     throw new InvalidTokenError(
       "Token is missing required client identification (client_id or azp claim).",
     );
   }

   return {
     token: accessToken,
     clientId,
     scopes:
       typeof decoded.scope === "string"
         ? decoded.scope.split(" ").filter(Boolean)
         : [],
     ...(decoded.exp && { expiresAt: decoded.exp }),
     extra: {
       sub: decoded.sub,
       ...(isNonEmptyString(decoded.client_id) && {
         client_id: decoded.client_id,
       }),
       ...(isNonEmptyString(decoded.azp) && { azp: decoded.azp }),
       ...(isNonEmptyString(decoded.name) && { name: decoded.name }),
       ...(isNonEmptyString(decoded.email) && { email: decoded.email }),
     },
   } satisfies AuthInfo;
 } catch (error) {
   console.error(error);
   throw new Response(null, {
     status: 401,
     statusText: "Unauthorized",
   });
 }
};
The code above will do all the authentication logic. We use ApiClient from the Auth0 SDK to validate tokens, but we need to extract tokens from the request. By the end, we return a FastMCPAuthSession object that will be used by the MCP server to authenticate the user and add some extra information to identify the user.
Now, let's change the index.ts file to use the new authentication function. You need to change the beginning of the file indicating the authentication function to use (importing authenticate and FastMCPAuthSession types):
import { FastMCP } from "fastmcp";
import { registerTools } from "./tools";
import { authenticate } from "./auth0";
import { FastMCPAuthSession } from "./types";

const PORT = parseInt(process.env.PORT ?? "3001", 10);

export const server = new FastMCP<FastMCPAuthSession>({
 name: "FastMCP Auth0 Example Server",
 version: "1.0.0",
 authenticate,
});
Now, we need to change the Who am I tool to use the authenticated user information:
import { FastMCPAuthSession } from "./types";

export function registerTools(mcpServer: FastMCP<FastMCPAuthSession>) {
 mcpServer.addTool({
   name: "get_whoami",
   description: "Returns the information about the authenticated user",
   execute: async (_args, { session: authInfo }) => {
     const info = { user: authInfo?.extra, scopes: authInfo?.scopes };
     return {
       content: [
         {
           type: "text",
           text: JSON.stringify(info, null, 2),
         },
       ],
     };
   },
 })
To test it, you need to create an API in Auth0 and set up a store in Auth0 FGA, then you’ll be able to fill the .env file with the necessary variables. Let’s start with the API.
Note: you can check your progress by changing the branch to 03-oauth.
Creating an API in Auth0 to Represent Your MCP Server
To represent your MCP server within Auth0 you need to create an API. Go to APIs in the Auth0 Dashboard. If you haven't an Auth0 account, you can sign up for free here. Then, go to the APIs section and click on Create API.

This will open the form for configuring the API. Set the following fields:
- Name, a friendly name or description for the API. Enter FastMCP Example for this sample.
- Identifier, which is an identifier that the client application uses to request access tokens for the API. Enter the string
https://fastmcpexample.com. This identifier is also known as audience. - Signing Algorithm, leave the default setting, RS256.
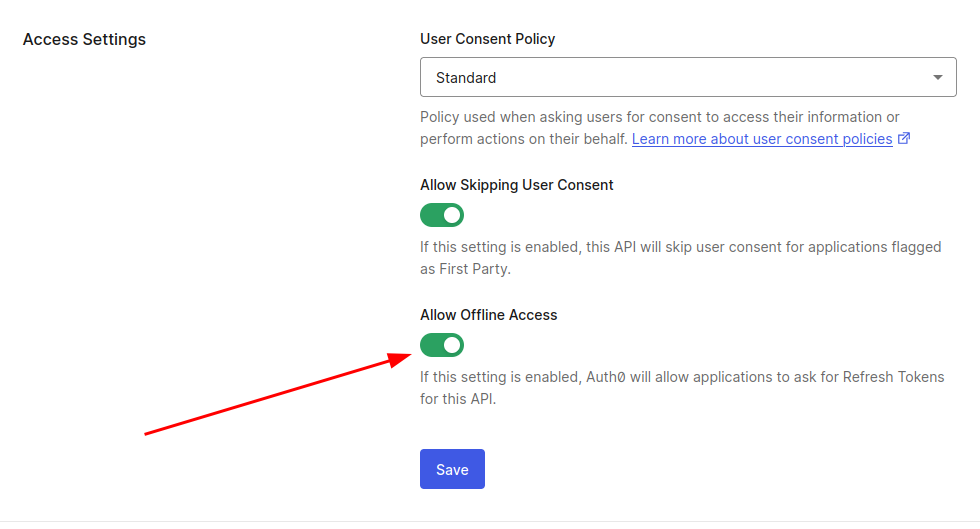
After entering those values, click the Create button. You'll be taken to the API page. Navigate to the Settings tab check “Allow Offline Access” so we can generate Access Token’s in the format of a JWT for this API.
Create a file called .env at root folder and fill with the following values:
AUTH0_DOMAIN=<<YOUR AUTH0 DOMAIN>>
AUTH0_AUDIENCE=https://fastmcpexample.com
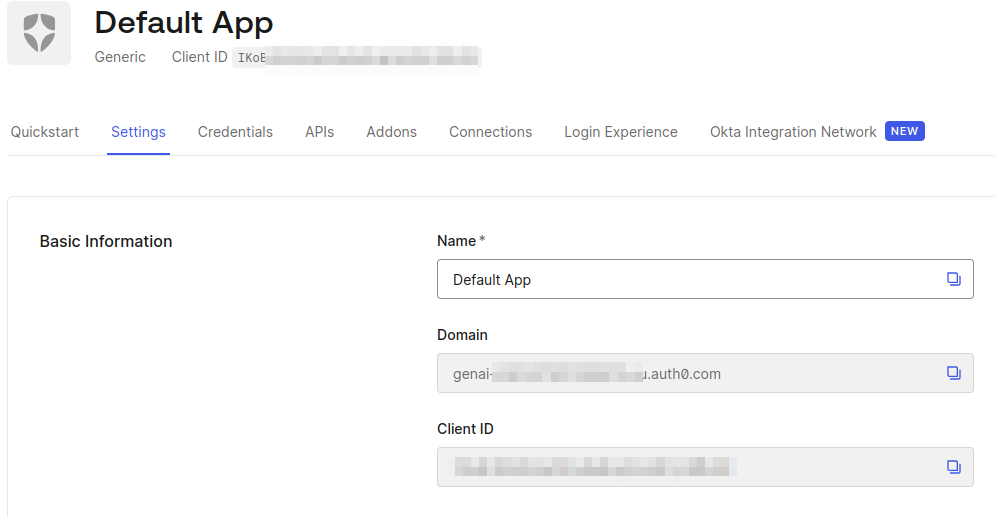
To get the domain, you can access any application and copy the domain value:
Configuring Auth0 FGA
Now that you have your API setup, it’s time to configure your Auth0 FGA account and create the authorization model. Go to the Auth0 FGA dashboard and navigate the Store Settings section, here you’ll need to grab the API URL and STORE ID and add it to the .env file:
FGA_API_URL='<<FGA API URL>>'
FGA_STORE_ID='<<FGA STORE ID>>'
Also, create a new client in the Authorized Clients section:
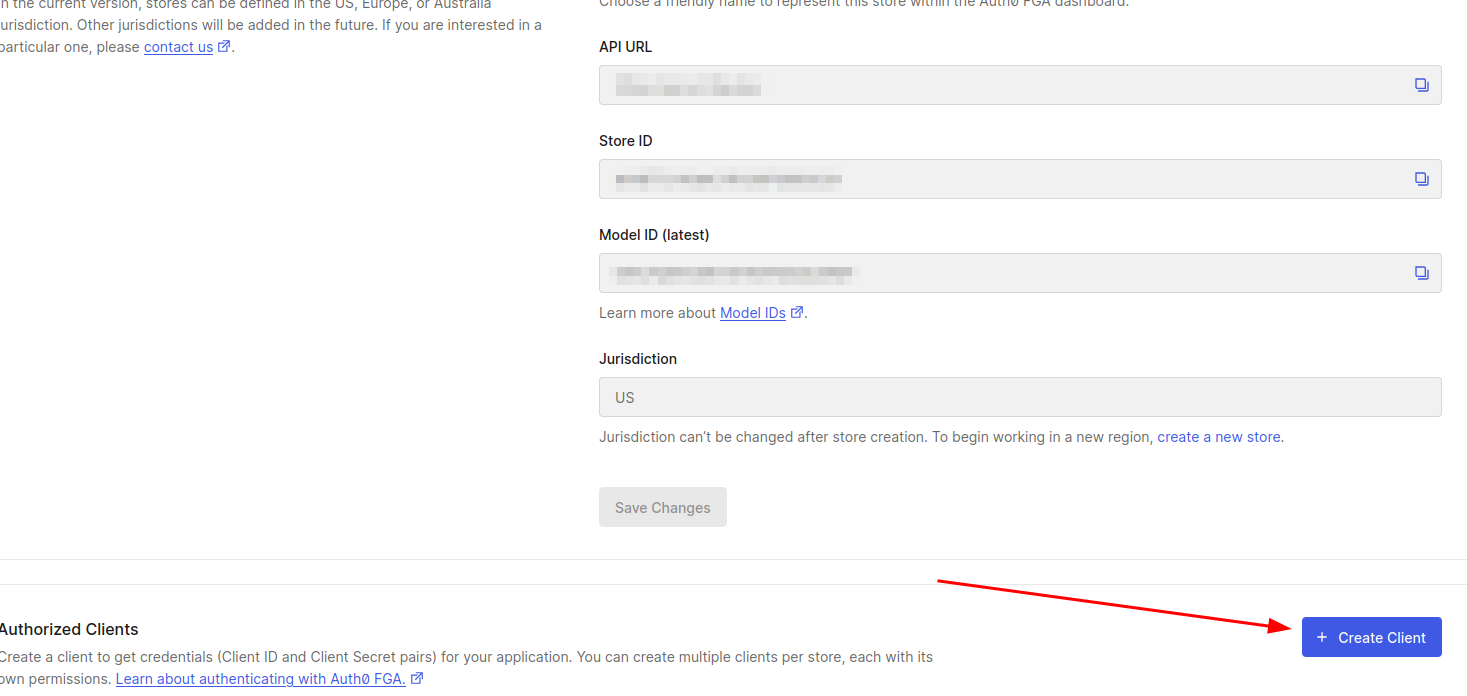
Give it a name and select all client permissions. In the next page, copy the Client ID, Client Secret, API Token Issuer and API Audience values and update the .env file:
FGA_API_TOKEN_ISSUER='<< FGA API ISSUER >>'
FGA_API_AUDIENCE='<< FGA AUDIENCE >>'
FGA_CLIENT_ID='<< FGA CLIENT ID >>'
FGA_CLIENT_SECRET='<< FGA CLIENT SECRET >>'
Most of the changes in FGA model and tuples can be done using the web interface. For this post we recommend using fga cli for flexibility and reproducibility. Follow the instructions for installation and make sure all environment variables defined at this section are exported before running any CLI command moving forward.
Defining the FGA authorization model
The FGA authorization model defines the fine-grained permissions based on the relationship between objects. Create a file called fga/model.fga with the following content:
model
 schema 1.1

   type user

   type group
       relations
           define member : [user]

   type role
       relations
           define assignee : [user, group#member]

   type tool
       relations
           define can_use : [user:*, user, role#assignee,  user with temporal_access, role#assignee with temporal_access]
           define can_view_private_documents : [role#assignee]

   condition temporal_access(grant_time: timestamp, grant_duration: duration, current_time: timestamp) {
       current_time < grant_time + grant_duration
   }
In this model, we define a security schema revolving around the MCP server tools.
We have three main actors:
- user: The individual trying to access our functions.
- group: A collection of users (e.g., 'Admins').
- role: A specific job function (e.g., 'content_editor') assigned to users or groups.
The core logic lies in the tool type, which enforces two permissions:
can_use: Determines who can execute the tool. It is flexible, allowing access to specific users, roles, or the public. It also supports Temporal Access, checking thetemporal_accesscondition to automatically expire permissions after a set time.can_view_private_documents: Controls data visibility. This is restricted solely to users with this relationship.
Also, add the following set of tuples (create a file called fga/tuples.yaml with the following content):
- user: user:*
 relation: can_use
 object: tool:get_datetime

- user: role:admin#assignee
 relation: can_use
 object: tool:get_whoami

- user: role:admin#assignee
 relation: can_use
 object: tool:get_documents

- user: role:admin#assignee
 relation: can_view_private_documents
 object: tool:get_documents

- user: role:content_editor#assignee
 relation: can_use
 object: tool:get_whoami

- user: role:content_editor#assignee
 relation: can_use
 object: tool:get_documents

- user: group:marketing#member
 relation: assignee
 object: role:content_editor

- user: group:managers#member
 relation: assignee
 object: role:admin
These tuples tell the story of our permissions:
- Public Access:
tool:get_datetimeis available to everyone (user:*). - Admin Power: The
adminrole has full access. They can usewhoamiandget_documents, and crucially, they are the only ones grantedcan_view_private_documents. - Editor Limits: The
content_editorrole can use the tools (whoami,get_documents) but is not given permission to view private documents. They get functionality without sensitive data visibility.
To set the FGA model, you can use the FGA CLI you configured earlier. First, load the environment variables from the .env file:
set -a && source .env && set +a
Then, run the following command:
fga model write --file ./fga/model.fga
Now, we need to push the tuples to Auth0 FGA:
fga tuple write --file ./fga/tuples.yaml
Now that our model is set, we can change our tools to use FGA to check permissions.
Note: you can check your progress by changing the branch to 04-fga-model
Connecting FGA With Your MCP Server
Create a new file called src/openfga.ts, that will have all OpenFGA configuration and logic:
import {
 OpenFgaClient,
 CredentialsMethod,
 ConsistencyPreference,
} from "@openfga/sdk";

const FGA_API_URL = process.env.FGA_API_URL as string;
const FGA_STORE_ID = process.env.FGA_STORE_ID as string;
const FGA_API_TOKEN_ISSUER = process.env.FGA_API_TOKEN_ISSUER as string;
const FGA_API_AUDIENCE = process.env.FGA_API_AUDIENCE as string;
const FGA_CLIENT_ID = process.env.FGA_CLIENT_ID as string;
const FGA_CLIENT_SECRET = process.env.FGA_CLIENT_SECRET as string;

let fgaClient = new OpenFgaClient({
 apiUrl: FGA_API_URL,
 storeId: FGA_STORE_ID,
 credentials: {
   method: CredentialsMethod.ClientCredentials,
   config: {
     apiTokenIssuer: FGA_API_TOKEN_ISSUER,
     apiAudience: FGA_API_AUDIENCE,
     clientId: FGA_CLIENT_ID,
     clientSecret: FGA_CLIENT_SECRET,
   },
 },
});

export async function getTools(userId: string): Promise<string[]> {
 const currentTime = new Date().toISOString();
 const toolNames = ["get_whoami", "get_datetime", "get_documents"];
 const checks = toolNames.map((toolName) => ({
   user: `user:${userId}`,
   relation: "can_use",
   object: `tool:${toolName}`,
   context: {
     current_time: currentTime,
   },
 }));
 const response = await fgaClient.batchCheck(
   { checks },
   {
     consistency: ConsistencyPreference.HigherConsistency,
   },
 );
 const allowedTools: string[] = [];
 response.result?.forEach((checkResult) => {
   if (checkResult.allowed) {
     const toolName = checkResult.request?.object?.replace("tool:", "");
     if (toolName) {
       allowedTools.push(toolName);
     }
   }
 });
 return allowedTools;
}

export async function checkPrivateDocumentsAccess(
 userId: string,
): Promise<boolean> {
 const currentTime = new Date().toISOString();
 const { allowed } = await fgaClient.check(
   {
     user: `user:${userId}`,
     relation: "can_view_private_documents",
     object: `tool:get_documents`,
     context: {
       current_time: currentTime,
     },
   },
   {
     consistency: ConsistencyPreference.HigherConsistency,
   },
 );
 return allowed ?? false;
}

export { fgaClient };
The code above will use the OpenFGA SDK to check permissions using the can_use relation, and can_view_private_documents to check if the user has access to private documents. As you can see, there are no roles at this point: the code checks for relations, FGA handles permissions and roles internally.
We need to change FastMCPAuthSession to include the availableTools field. Edit the src/types.ts file to include the following code:
export type FastMCPAuthSession = AuthInfo & {
 availableTools?: string[];
 [key: string]: unknown;
};
Now, we need to change src/auth0.ts to use the get_tools function and fill the FastMCPAuthSession object:
// ...
import { getTools } from "./openfga";
// ...

   let availableTools = await getTools(decoded.sub);

   return {
     token: accessToken,
     clientId,
     scopes:
       typeof decoded.scope === "string"
         ? decoded.scope.split(" ").filter(Boolean)
         : [],
     ...(decoded.exp && { expiresAt: decoded.exp }),
     availableTools,
     extra: {
       sub: decoded.sub,
       ...(isNonEmptyString(decoded.client_id) && {
         client_id: decoded.client_id,
       }),
       ...(isNonEmptyString(decoded.azp) && { azp: decoded.azp }),
       ...(isNonEmptyString(decoded.name) && { name: decoded.name }),
       ...(isNonEmptyString(decoded.email) && { email: decoded.email }),
     },
   } satisfies FastMCPAuthSession;

// ...
Finally, we need to change the registerTools function to use the availableTools. Add a new function called hasAccess that will receive the tool name and tell if the user has access to it. Finally, apply the hasAccess function to the canAccess attribute:
function hasAccess(toolName: string): (auth: FastMCPAuthSession) => boolean {
 return (auth: FastMCPAuthSession) => {
   return auth.availableTools?.includes(toolName) ?? false;
 };
}

// ...
   mcpServer.addTool({
       name: "get_whoami",
       description: "Returns the information about the authenticated user",
       canAccess: hasAccess("get_whoami"),
// ...

 mcpServer.addTool({
   name: "get_datetime",
   description: "Returns the current UTC date and time",
   canAccess: hasAccess("get_datetime"),

// ...

 mcpServer.addTool({
   name: "get_documents",
   description: "Retrieves important documents",
   canAccess: hasAccess("get_documents"),

// ...
To complete all the changes, the get_documents tool needs to check if the user has access to private documents:
// ...
   execute: async (args, { session: authInfo }) => {
     const sub = (authInfo!.extra as { sub: string }).sub;
     const canViewPrivate = await checkPrivateDocumentsAccess(sub);
     const documents = await documentApi.getDocuments(canViewPrivate);
// ...
Before starting the server, the user needs to be added to a group or associated to a relation. Let's add your user to the admin role.
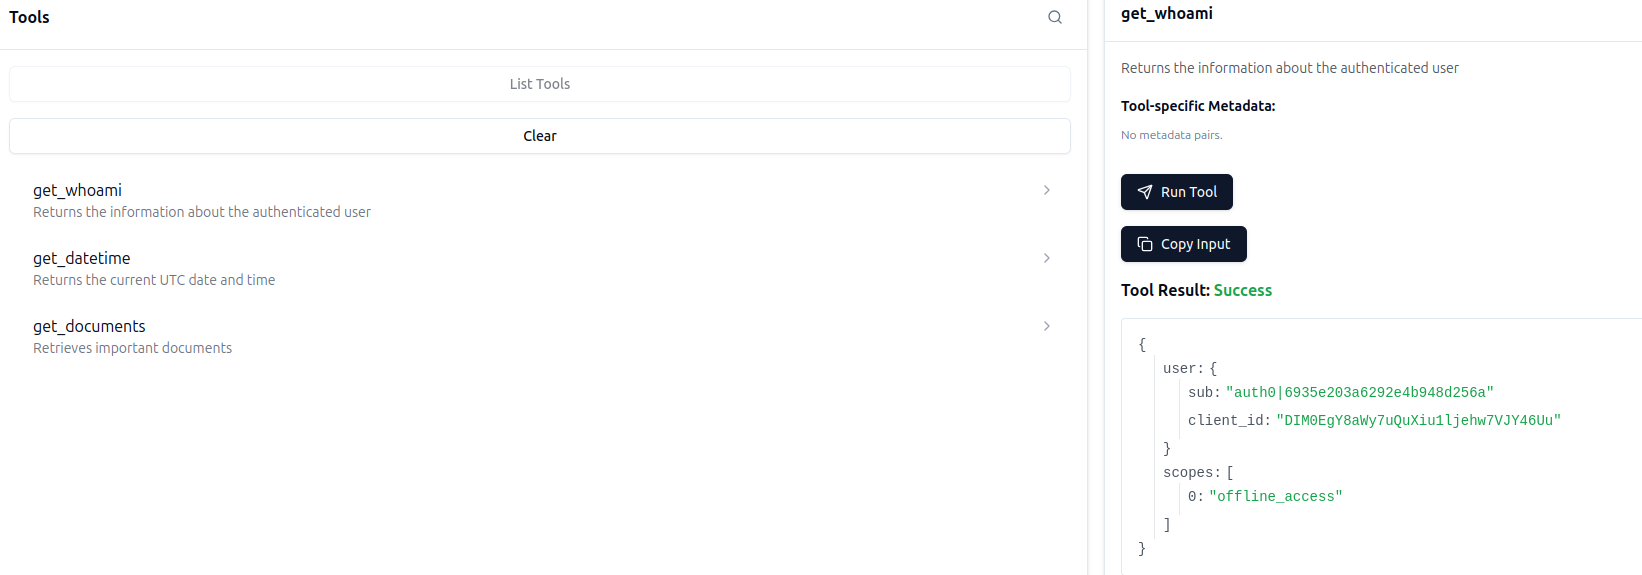
First, execute the get_whoami to get the user subject identifier (sub). It should be similar to auth0|6935e203a6322e4b948d256a.
Now, run the following command to add the user to the manager group:
fga tuple write --store-id "$FGA_STORE_ID" "user:${USER_ID}" member "group:managers" --on-duplicate ignore
Now, run the application again and check that you can access the tool and finally have access to private documents.
Note: you can check the final version in branch 05-fga
Configuring MCP Inspector Authentication
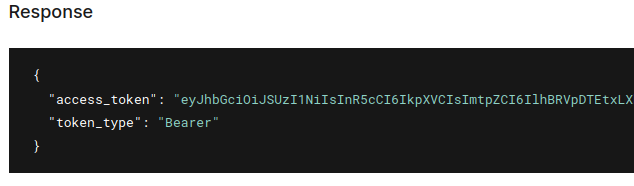
Now that your MCP server requires authentication and we have all the accounts set, we need to generate an access token to interact with the server. You can generate one by going to Applications > APIs section at Auth0 dashboard and then access the Test tab. At the Response section, you’ll have a valid token that can be used. Copy all the value inside access_token attribute:
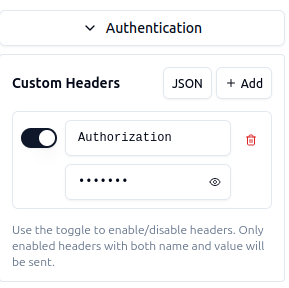
Now, in the Inspector web interface, open the Authentication section and fill the Custom header Authorization with the token copied above (prepend bearer before the token). After that, connect to your server again.
Recap
In this tutorial, we've explored how to build a secure MCP server by combining FastMCP, Auth0, and Fine-Grained Authorization (FGA). You've learned how to:
- Bootstrap an MCP server using FastMCP and expose tools that LLMs can discover and invoke
- Integrate OAuth 2.0 authentication with Auth0 to identify users and protect your endpoints
- Define a relationship-based authorization model with OpenFGA to control both tool access and data visibility
- Dynamically filter tools and content based on user permissions, creating a truly personalized experience for each user
By leveraging FGA's graph-based permission system, your MCP server can now make nuanced authorization decisions—like granting temporary access, role-based tool visibility, and document-level filtering—all without hardcoding business rules into your application logic.
Have questions or want to share what you've built? Join the conversation in our community forum. We'd love to see how you're using MCP and FGA together!
About the author