
As a developer, you're likely familiar with OAuth 2.0 and the use of access tokens to secure APIs. As you may know, the usage model for traditional OAuth 2.0 access tokens is defined in RFC 6750, where a bearer token is defined as a simple string that grants access to the "bearer" of the token.
For years, this has been the standard way to use access tokens. It's simple and effective, but it has a fundamental weakness: if a token is stolen, an attacker can use it to impersonate the legitimate user or application. Tokens can be leaked in numerous ways: through a compromised client device, insecure log files, a person-in-the-middle attack, or a malicious browser extension. Once leaked, a bearer token is a golden ticket for an attacker.
Beyond Bearer Tokens
To address this critical vulnerability, the concept of sender-constraining tokens was developed. The goal is to ensure that a token can only be used by the party it was originally issued to. If we compare an access token to a keycard to access your hotel room, it's like using a keycard that only works when accompanied by your unique fingerprint. Several mechanisms have been proposed to achieve this, but one has emerged as a flexible, powerful, and modern standard: Demonstrating Proof-of-Possession (DPoP), standardized in RFC 9449.
DPoP is a security mechanism that cryptographically binds access and refresh tokens to the specific application instance that requested them. It does this by requiring the client to prove it possesses a secret private key every time it uses the token. This proof is lightweight, works at the application layer, and is perfectly suited for today's diverse application landscape, from server-side web apps to mobile apps and Single-Page Applications (SPAs).
This article will take you on a deep dive into DPoP. We'll explore the security threats it mitigates, dissect its inner workings with code examples, compare it to other sender-constraining methods, and walk through a practical guide on how to implement it in your applications using Auth0.
The Benefits of DPoP
Adopting DPoP isn't just about adding another layer of security; it's about fundamentally hardening your application against a whole class of common attack vectors. The benefits are tangible and address real-world threats.
Enhanced security against token theft
This is the primary reason DPoP exists and is also recommended by the Best Current Practices for OAuth 2.0 Security. Let's consider a few concrete scenarios where bearer tokens are vulnerable and how DPoP protects them:
- Cross-Site Scripting (XSS): An attacker injects malicious code into a web page, which then steals an access token from the browser's local storage or memory. With a bearer token, the attacker can now make API calls on behalf of the user. With DPoP, the stolen token is useless because the attacker doesn't have the client's private key required to generate the DPoP proof.
- Compromised Log Files or Databases: A developer might accidentally log an
Authorizationheader containing a bearer token. If these logs are breached, the token is exposed. Similarly, if a database storing tokens is compromised, they are all at risk. A DPoP-bound token, even if exposed, cannot be used without the corresponding private key, which should never be logged or stored alongside the token. - Malicious Browser Extensions: A seemingly harmless browser extension could have permissions to inspect network traffic or memory, allowing it to exfiltrate tokens. Again, using DPoP, the stolen token is inert without the proof-of-possession key.
By binding the token to the client's key, DPoP prevents an access token from being used by an unauthorized party.
Flexibility for modern applications
Other attempts at sender-constraining, like Mutual TLS (mTLS), operate at the transport layer (the TLS handshake). This is very secure but also rigid. It requires managing X.509 certificates on the client, which is straightforward for server-to-server (confidential) clients but a nightmare for public clients like SPAs running in a browser or mobile applications. Browsers provide very limited APIs for managing cryptographic keys and client certificates, making mTLS impractical for these use cases.
DPoP, by contrast, operates at the application layer. The "proof" is just a JWT sent in an HTTP header. This means:
- Any client can implement it: JavaScript in a browser can use the Web Crypto API, a mobile app can use native cryptographic libraries, and a backend server can use standard JWT libraries.
- It works through intermediaries: Modern infrastructure often includes proxies, gateways, and load balancers that might terminate the original TLS connection from the client. In such a setup, the mTLS binding is lost. DPoP, being part of the application-level data (i.e., HTTP headers), passes through these intermediaries untouched, maintaining end-to-end security.
No complex Public Key Infrastructure (PKI) required
mTLS relies on a Public Key Infrastructure (PKI). This means clients need to obtain a certificate from a trusted Certificate Authority (CA), which vouches for their identity. This involves generating certificate signing requests (CSRs), managing certificate lifecycles (issuance, renewal, revocation), and configuring trust stores. For large-scale applications with thousands or millions of clients, this operational overhead is significant and costly.
DPoP completely sidesteps this complexity. Each client application instance simply generates its own public/private key pair on the fly. There is no CA, no certificate chain to validate, and no complex infrastructure to maintain. The resource server trusts the public key for the lifetime of the token because the client proved possession of the private key at the time of the token request.
Protection for high-value refresh tokens
Refresh tokens are often more valuable targets than access tokens because they are long-lived and can be used to mint new access tokens. DPoP can also be used to sender-constrain refresh tokens. When a client uses a DPoP-bound refresh token to get a new access token, it must also provide a DPoP proof. This ensures that even if a refresh token is stolen from a client's storage, it cannot be used by an attacker to maintain persistent access to the user's account.
FAPI 2.0 ready
Sender constraining is one of the requirements of FAPI 2.0, the security framework built on top of OAuth 2.0 and designed for high-security applications to protect sensitive data and financial transactions. DPoP is one of the mechanisms allowed in FAPI 2.0 to implement sender constraining.
Auth0 provides you with support for FAPI 2.0 through Highly Regulated Identity. Read this blog post to learn more about Auth0’s support for FAPI 2.0.
How DPoP Works
The magic of DPoP lies in a special, short-lived JSON Web Token called the DPoP proof JWT. This ephemeral JWT serves as irrefutable evidence of the client's ownership of a specific private key. When a client intends to access a protected resource, it first generates this DPoP proof JWT, signing it with its private key. This signed proof is then transmitted alongside the access token to the resource server.
To understand the behavior of DPoP, we need to look at its key parts. Our exploration will start with a detailed examination of the DPoP proof JWT's structure, becoming familiar with the various claims that contribute to its cryptographic integrity. Following this, we will analyze the DPoP flow, considering two stages:
- the initial access token request, where the client obtains its access token while simultaneously establishing its cryptographic identity,
- the subsequent token usage, where the client leverages both the access token and the DPoP proof JWT to securely interact with the resource server.
The Anatomy of a DPoP Proof JWT
A DPoP proof is a standard JWT, but with specific claims and header parameters tailored for this purpose.
The header identifies the token as a DPoP proof and contains the public key. Here is an example of a decoded header:
{
  "typ": "dpop+jwt",
  "alg": "ES256",
  "jwk": {
    "kty": "EC",
    "x": "l8tFrhx-34tV3hRICRDY9zC_qjKipZWEvVunexs60A8",
    "y": "Hlnr5TL2ncfXj_i9W2nL1pW2QYj45s4T2l5MIa4WVKw",
    "crv": "P-256"
  }
}
Here is the meaning of the claims:
"typ": "dpop+jwt": This type explicitly declares the JWT's purpose. Servers can immediately reject any JWT in theDPoPheader that doesn't have this type."alg": This specifies the signing algorithm. It must be an asymmetric algorithm (e.g., ES256). Symmetric algorithms are forbidden because they would require the server to know the client's secret, defeating the purpose."jwk": This is the JSON Web Key, which is the public key corresponding to the private key used to sign the proof. This is how the client shares its public key with the server for validation.
The payload contains claims that bind the proof to a specific HTTP request, preventing it from being stolen and replayed in a different context. Here is an example of DPoP proof payload:
{
  "jti": "5a2c4187-2418-4568-a5b7-f4a4d61858b1",
  "htm": "POST",
  "htu": "https://your-tenant.auth0.com/oauth/token",
  "iat": 1678886400
}
Here is the description of the claims in the payload:
"jti"(JWT ID): A unique identifier for this specific JWT. This is crucial for replay prevention. A server should keep track of jti values it has recently seen and reject any duplicates."htm"(HTTP Method): The HTTP method (GET, POST, PUT, etc.) of the request to which this proof is bound. This prevents a proof created for a GET request from being used on a POST request."htu"(HTTP Target URI): The full URL of the endpoint being called, excluding query parameters and/or fragments. This can be the token endpoint or the API endpoint, as you will see shortly. This ensures a proof intended forhttps://api.example.com/orderscannot be used forhttps://api.example.com/users/delete."iat"(Issued At): A timestamp indicating when the JWT was created. Servers should reject proofs that are too old (e.g., older than a few seconds) to further mitigate replay attacks.
Optionally, at the request of the authorization server or the resource server, the payload of the DPoP proof JWT can include a nonce claim. Its value is generated by the server and sent to the client via the DPoP-Nonce HTTP header. The nonce aims to mitigate replay attacks in public clients, i.e., SPA and native apps.
The final part of the JWT is the signature, created by signing the base64-encoded header and payload with the private key that corresponds to the public key stored in the jwk claim of the header. This is the cryptographic "proof" of possession.
Requesting a DPoP-Bound Access Token
Now that we know the structure of a DPoP proof JWT, let’s see how to use it for protecting our requests and access tokens. As we mentioned earlier, we will analyze the DPoP flow in two stages. The first stage is about requesting an access token from the authorization server. Following the diagram below, let’s analyze the steps of the flow.
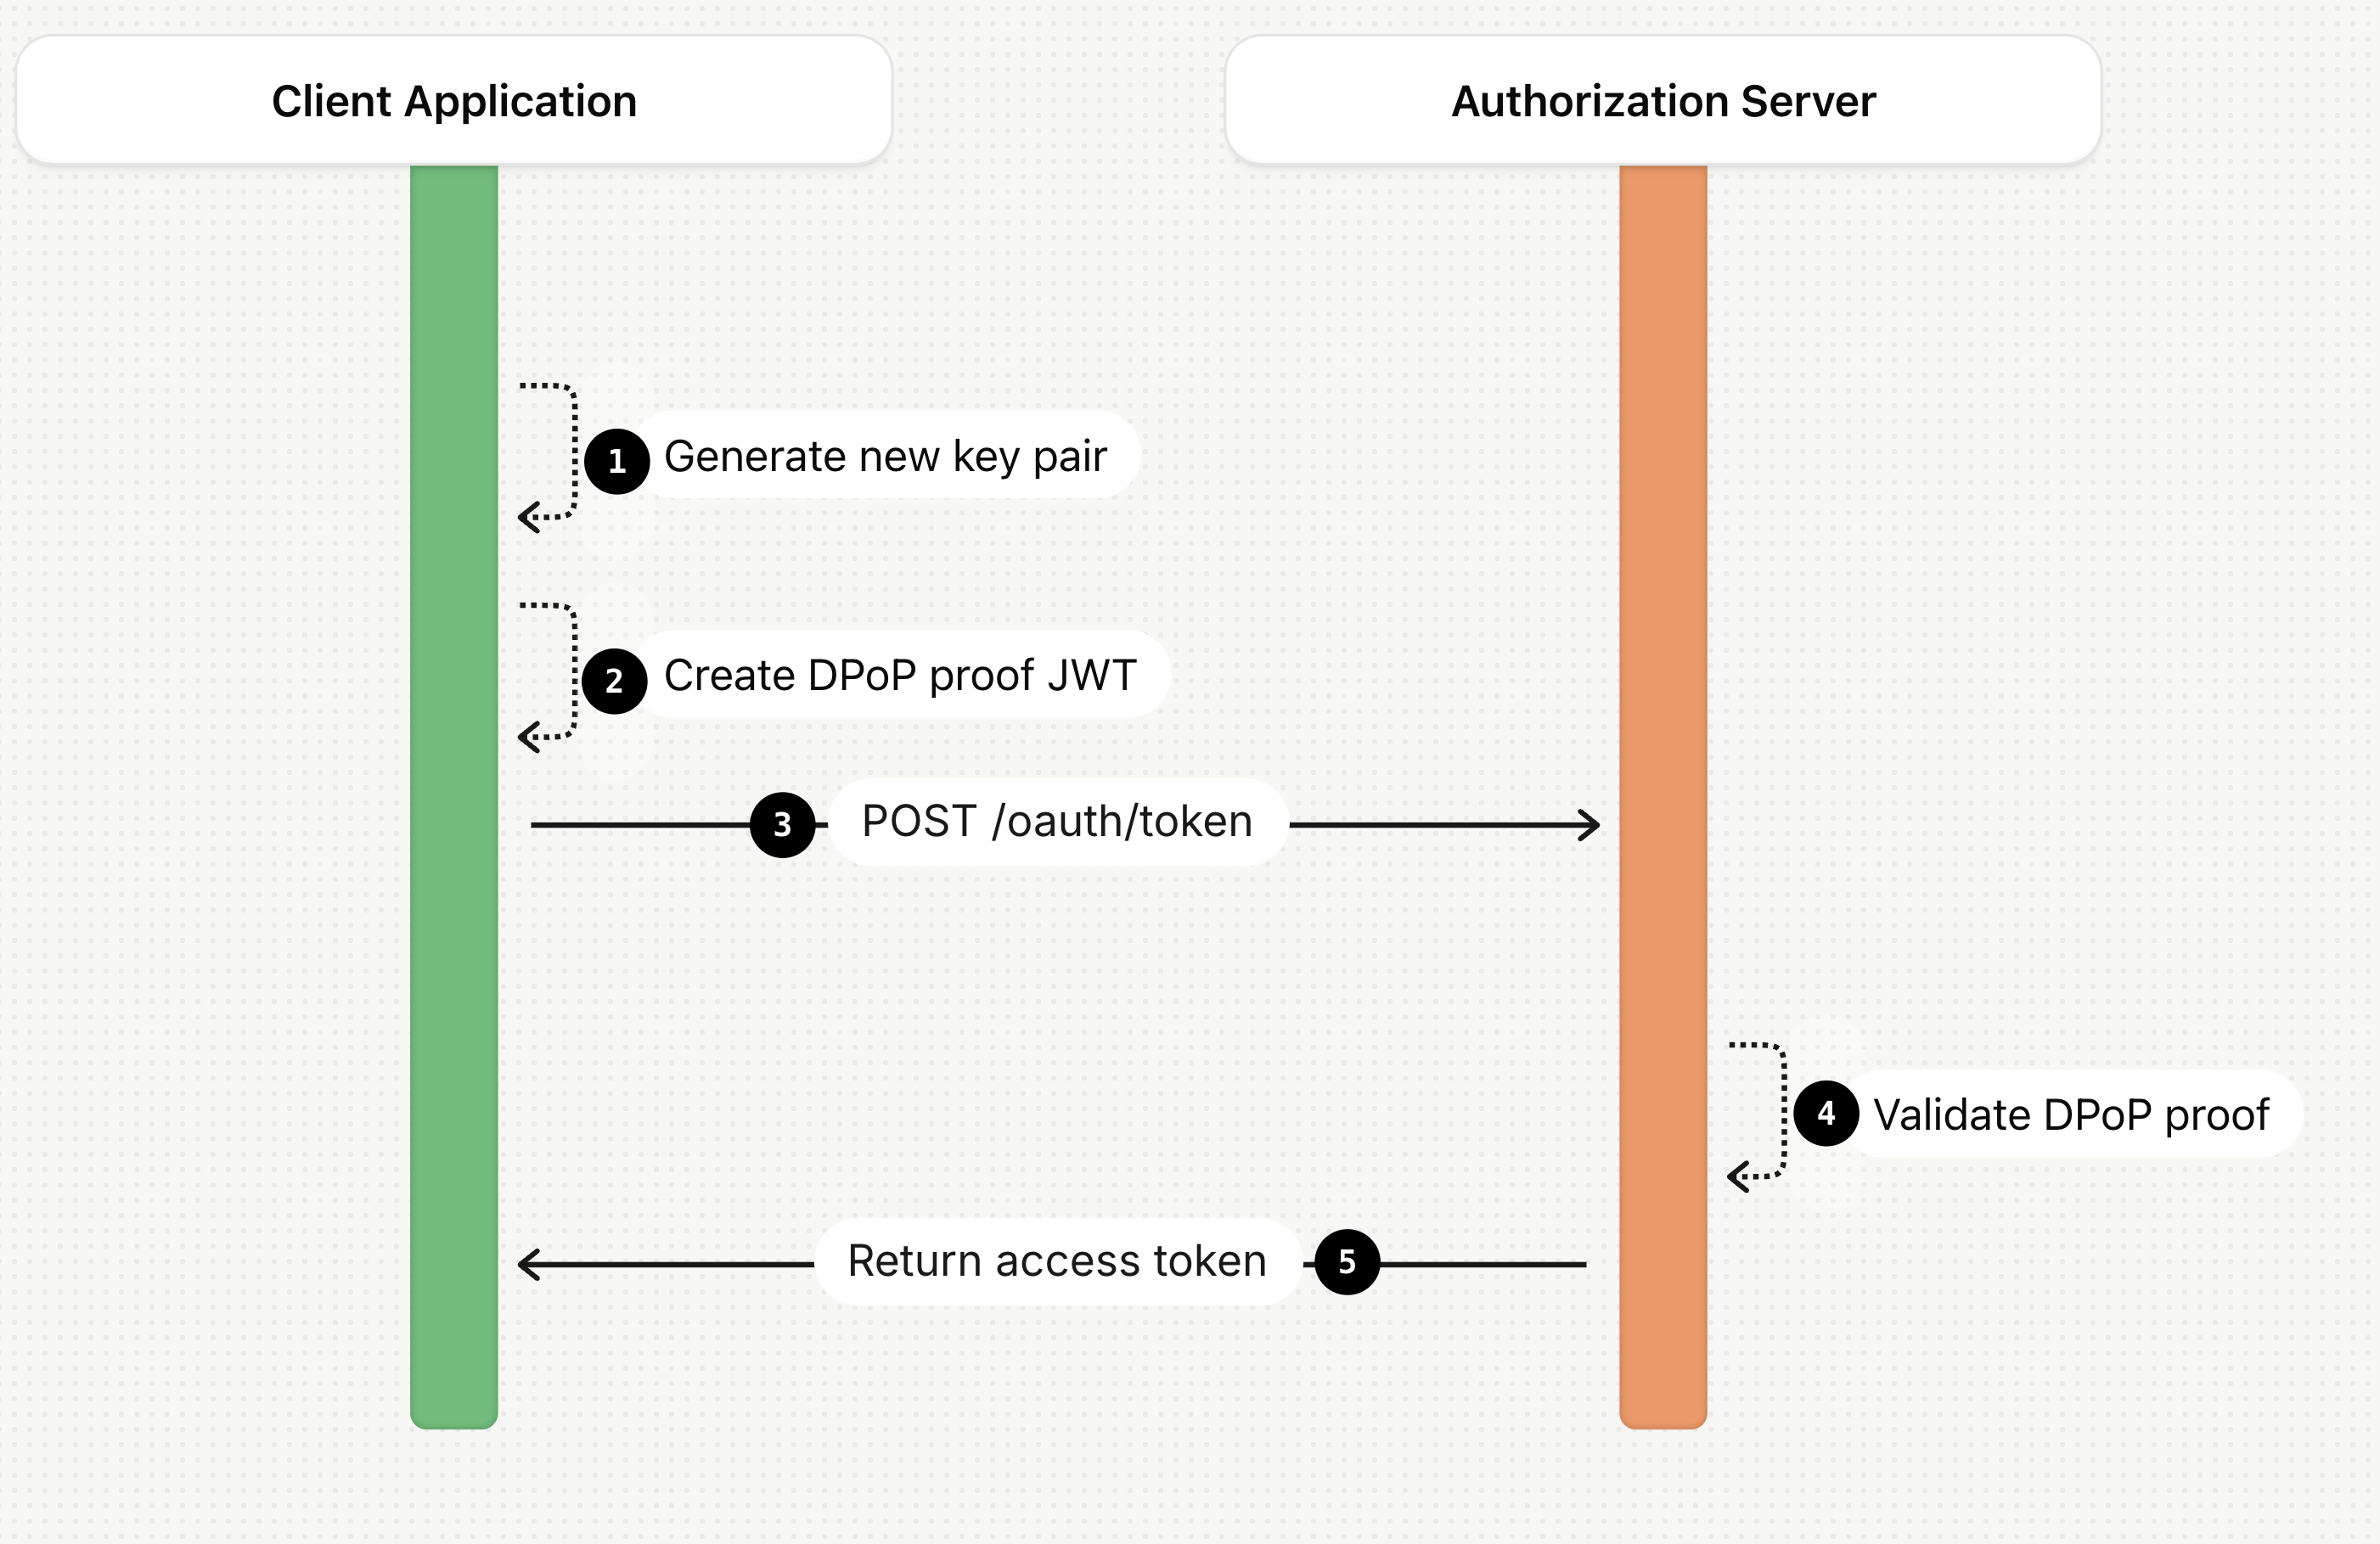
- In the first step, the client application generates a new public/private key pair.
- The client constructs the DPoP proof JWT for the token endpoint. The DPoP proof JWT is signed with the client’s private key and contains the corresponding public key.
- The client makes a POST request to the
/oauth/tokenendpoint. It includes the standard parameters (grant_type,code, etc.) and adds the newly createdDPoPproof in a DPoP HTTP header. The following snippet shows an example of access token request with the DPoP header:
POST /token HTTP/1.1
Host: your-tenant.auth0.com
Content-Type: application/x-www-form-urlencoded
DPoP: eyJhbGciOiJFUzI1NiIsInR5cCI6ImRwb3Arand0IiwiandrIjp7Imt0eSI6IkVDIiwiY3J2I...

grant_type=authorization_code
&code=3LgurgEWbtafaqTn2VxkASV
&redirect_uri=https%3A%2F%2Fapp.example.com
- The authorization server validates the DPoP proof JWT by verifying the signature using the public key stored in the
jwkclaim of the header. It also verifies that the target URL and HTTP method of the current request match thehtuandhtmclaims in the payload. - If the request is valid, it generates an access token. The authorization server also generates a SHA256 thumbprint of the client's public key. This information will be used to confirm the binding of the client's public key with the issued token. In case the issued access token is an opaque string, the authorization server includes this information in the response returned by the token introspection endpoint. If the issued token is a JWT, the authorization server adds a
cnf(confirmation) claim to the access token's payload, as shown in the following snippet:
{
  "iss": "https://your-tenant.auth0.com/",
  "sub": "user|12345",
  "aud": "https://api.example.com/orders",
  "exp": 1678890000,
  "iat": 1678886400,
  "scope": "read:orders",
  "cnf": {
    "jkt": "N_i4l4295g9kE2xStSIyYAnr727xO0I5n82x4NaIphE" // SHA-256 thumbprint of the JWK
  }
}
The access token is ready to be used by the client to securely access the user’s resources.
Using the DPoP-Bound Access Token
Let’s see how the access token is used to access a protected resource by following the numbered steps in this diagram:
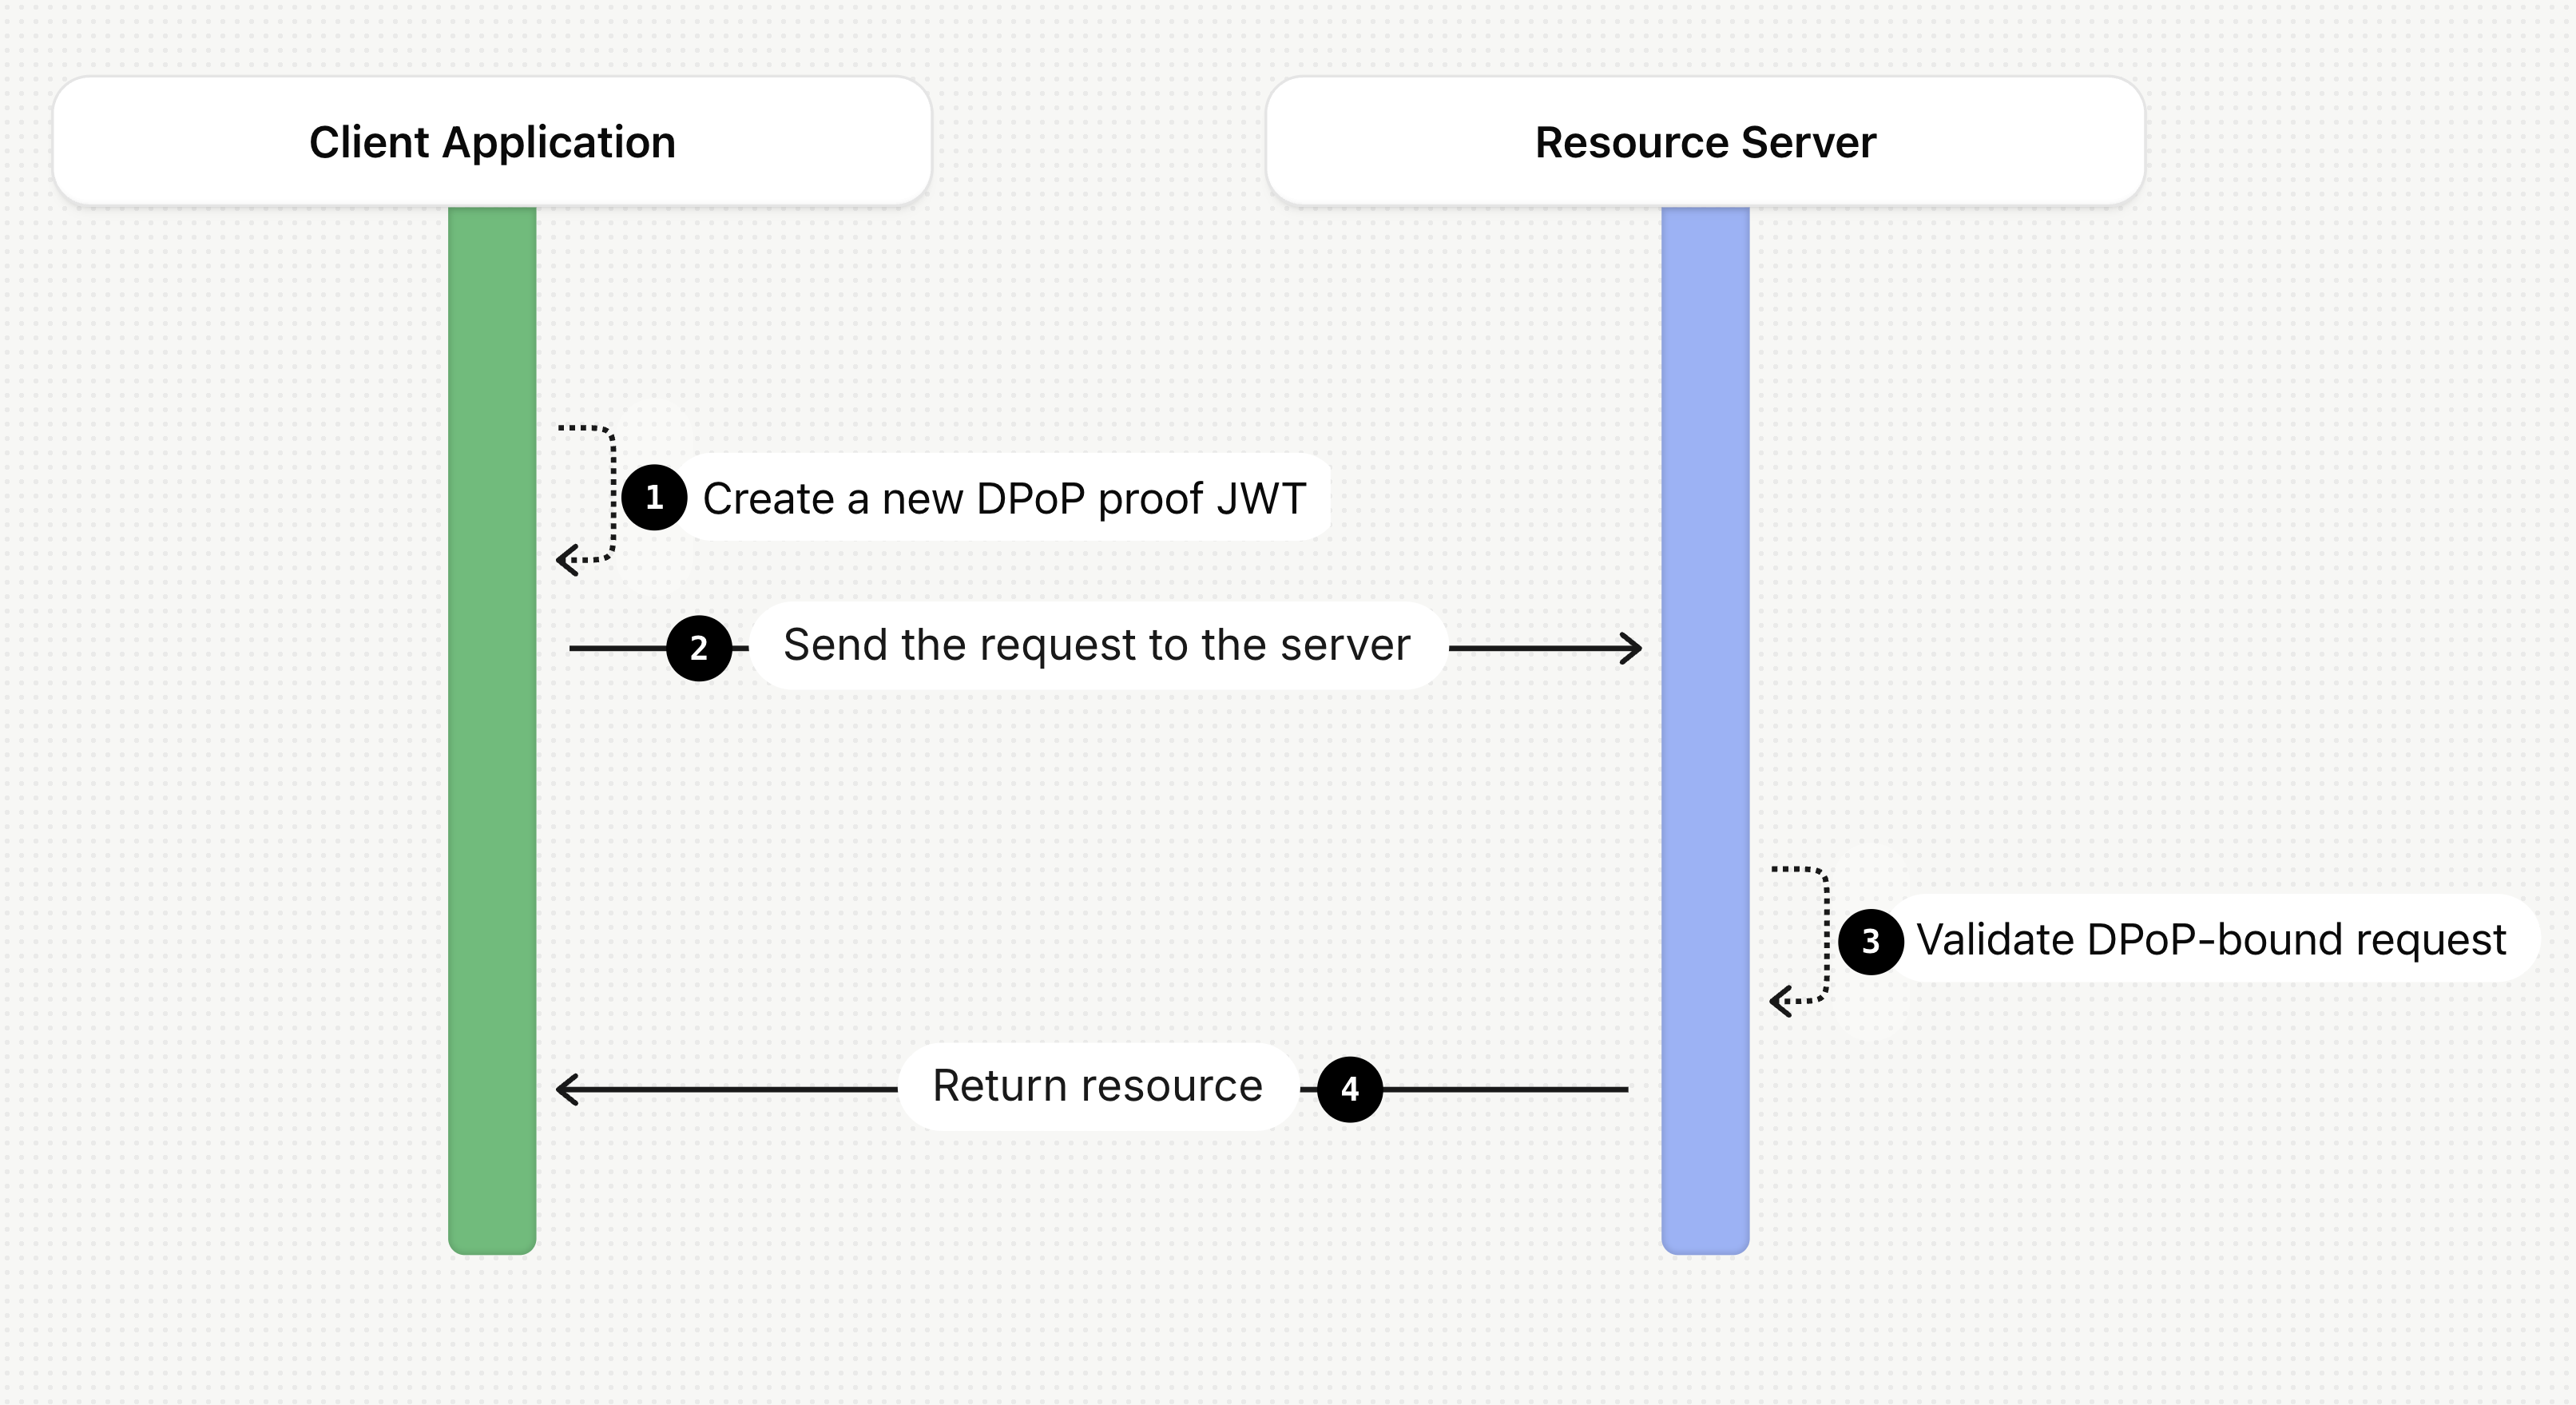
- As the first step, the client application creates a new DPoP proof JWT using the same key pair previously generated. This is a critical point. The client cannot reuse the old proof. For every API request, it must create a new DPoP proof with a fresh
jtiandiat, and withhtmandhtumatching the API endpoint it's about to call. - The client application sends the request to the resource server (the API). It includes two important headers:
Authorization: DPoP <access_token>. Instead of the classicBearerscheme, theDPoPscheme is used. This signals the server that it must perform DPoP validation.DPoP: The newly generated DPoP proof for this specific request.
The following is an example of an API request with a DPoP-protected access token:
GET /protectedresource HTTP/1.1
Host: api.example.com
Authorization: DPoP eyJhbGciOiJFUzI1NiIsInR5cCI6ImF0K0pXVCIsImNuZiI6eyJqa3QiOiJybW56aTJvSWNYW...
DPoP: eyJhbGciOiJFUzI1NiIsInR5cCI6ImRwb3Arand0IiwiandrIjp7Imt0eSI6IkVDIiwiY3J2I...
- When the resource server receives the request, it performs a comprehensive validation. To the usual token validation checks, it adds the following ones:
- Checks for the presence of the
cnfclaim. If it's missing, this isn't a DPoP-bound token. - Verifies the DPoP proof's signature using the
jwkin its header. - Computes the SHA-256 thumbprint of the
jwkfrom the DPoP proof and compares it with thejktvalue inside the access token'scnfclaim. They must match. This is the step that confirms the presenter of the token is the same one it was issued to. - Validates that the
htmandhtuin the DPoP proof match the current API request's method and URL. - Checks the
iatandjtito prevent replay attacks.
- Checks for the presence of the
- Only if all these checks pass, the API processes the request and returns the protected resource. A stolen token will fail to access a DPoP-protected resource because the attacker cannot produce a valid DPoP proof signed by the correct private key.
Take a look at this interactive tutorial, which shows the full DPoP flow for getting an access token and calling a protected API.
Want to get up to speed with OAuth2 and OpenID Connect?
Download the free ebook
Conclusion
The era of relying solely on bearer tokens is drawing to a close, especially for applications handling sensitive data. The risks of token theft are too significant to ignore. DPoP provides a robust, flexible, and developer-friendly solution to the problem of sender-constraining tokens. It effectively mitigates threats from XSS, compromised devices, and log leaks by cryptographically binding tokens to the client that requested them.
By operating at the application layer, DPoP offers broad compatibility across all types of clients—from back-end services to browser-based SPAs and native mobile apps—without the heavy infrastructure requirements of transport-layer solutions like mTLS.
With platforms like Auth0 offering built-in support, implementing this advanced security measure is no longer a daunting task. By enabling DPoP, you take a significant and proactive step towards building more secure, resilient applications that protect both your users and your systems.
About the author

Andrea Chiarelli
Principal Developer Advocate
I have over 20 years of experience as a software engineer and technical author. Throughout my career, I've used several programming languages and technologies for the projects I was involved in, ranging from C# to JavaScript, ASP.NET to Node.js, Angular to React, SOAP to REST APIs, etc.
In the last few years, I've been focusing on simplifying the developer experience with Identity and related topics, especially in the .NET ecosystem.