
Role-Based Access Control, also known as RBAC, is one of the most common strategies to restrict access to protected resources within an organization. It simplifies permission assignment by categorizing users in roles. However, many people making their first foray into RBAC have questions:
- How can you reflect this user categorization on your application to check users' privileges?
- How can you deal with roles in your code?
- Is role control appropriate for Web APIs?
In this article, you will learn the best way to implement RBAC in your ASP.NET Core Web API by using Auth0's capabilities.
What is RBAC?
Consider a payroll system in a company. Different people accessing this system have different rights to view and change data. Each employee can view their own data, while HR people can view all employees' data. Also, while an employee can just view their own data, HR people can change them. Roles may also not be assigned just by department. For example, the HR department may have just a few people who should have the ability to add new employees to the payroll system, with the remainder only having permission to update employees.
Assigning specific permissions individually to each employee can be challenging and lead to mistakes. To expand on the payroll system example, consider that we have at least 4 types of permissions. Each of these must be assigned with perfect accuracy to each employee in your company. With just a handful of employees and a few HR events a month, this would quickly spiral into a time-consuming and error-prone activity. This doesn't even consider needing to reassign permissions for a large group of people due to a security policy change.
Role-Based Access Control helps with the permission assignment by introducing the concept of role. A role is a collection of permissions. Basically, you build a predefined set of permissions, give it a name, such as Employee, HR Assistant, HR Manager, and assign that role to a user. If you need to add or remove a permission from all the users who have a specific role, you just need to add or remove that permission from the role they are assigned. That's a great improvement!
 Want to take your Authorization to the next level? → fga.dev
Setting up the Sample Application
In order to best show how to use roles in an ASP.NET Web API application integrated with Auth0, you will build on a sample application. I've provided a starting point that you can download by running the following command in a terminal window:
git clone --branch starter --single-branch https://github.com/auth0-blog/glossary-rbac-web-api-aspnet.git
Make sure you have the latest .NET SDK already installed on your machine to run the sample ASP.NET application.
The Web API implements a CRUD interface for a glossary of terms. It has some basic endpoints that allow you to create a definition, read a list of term definitions or a single one, and update or delete them. To learn more about the details of building and securing this application, check out this blog post.
Once you download the application on your machine, register it with Auth0 in order to enable support for authorization. If you don't yet have an Auth0 account, you can sign up for a free one. Follow the instructions in this article to register the application with Auth0.
After you have completed the registration, move to the glossary-rbac-web-api-aspnet folder and open the appsettings.json configuration file. Its content should look like this:
// appsettings.json
{
  "Logging": {
    "LogLevel": {
      "Default": "Information",
      "Microsoft": "Warning",
      "Microsoft.Hosting.Lifetime": "Information"
    }
  },
  "AllowedHosts": "*",
  "Auth0": {
    "Domain": "YOUR_AUTH0_DOMAIN",
    "Audience": "YOUR_UNIQUE_IDENTIFIER"
  }
}
Replace the YOUR_AUTH0_DOMAIN placeholder with your Auth0 domain and the YOUR_UNIQUE_IDENTIFIER placeholder with the value you provided as a unique identifier of your API (https://glossary.com, if you kept the value suggested in the mentioned article).
Note: Your Auth0 domain is a string in the form
YOUR-TENANT-NAME.auth0.comwhereYOUR-TENANT-NAMEis the name you provided when you created your account with Auth0. For more information, check the documentation.
To test that everything works as expected, launch the ASP.NET Web API application by typing dotnet run in a terminal window. Now point your browser to https://localhost:5001/swagger, and you should see the Swagger UI shown below to test the API interactively:
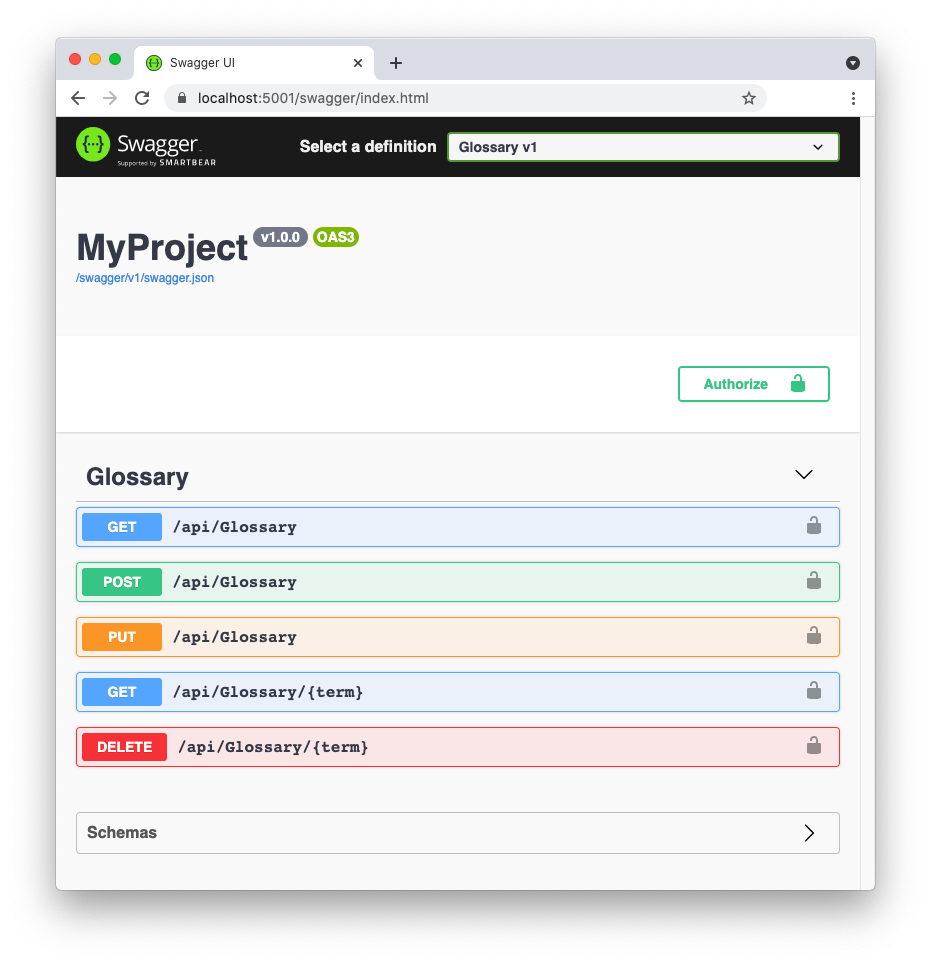
To call the POST, PUT, and DELETE actions, you need an access token, as explained in this section. The related endpoints already require an access token, but they don't perform any check on the permissions granted to the users. This means that any user authorized to access the protected endpoints can do anything: create a new term, modify an existing term, and delete them.
In the following sections, you will implement RBAC to allow just specific users to perform specific actions.
Defining Permissions for Your API
As a first step to enable a more granular control on the access to your Web API, you have to define the permissions needed for your application. In the case of the glossary Web API application, define the permissions using the following strings:
create:term. This permission allows you to add a new term to the glossary.update:term. With this permission, you can update an existing term.delete:term. This permission allows you to delete a term from the glossary.
To associate these permissions with the API, go to the API section of your Auth0 Dashboard and select the API you defined for the glossary application. Then select the Permissions tab. Here you can add the permissions with their descriptions as defined above. At the end of this process, that page will look like the following:
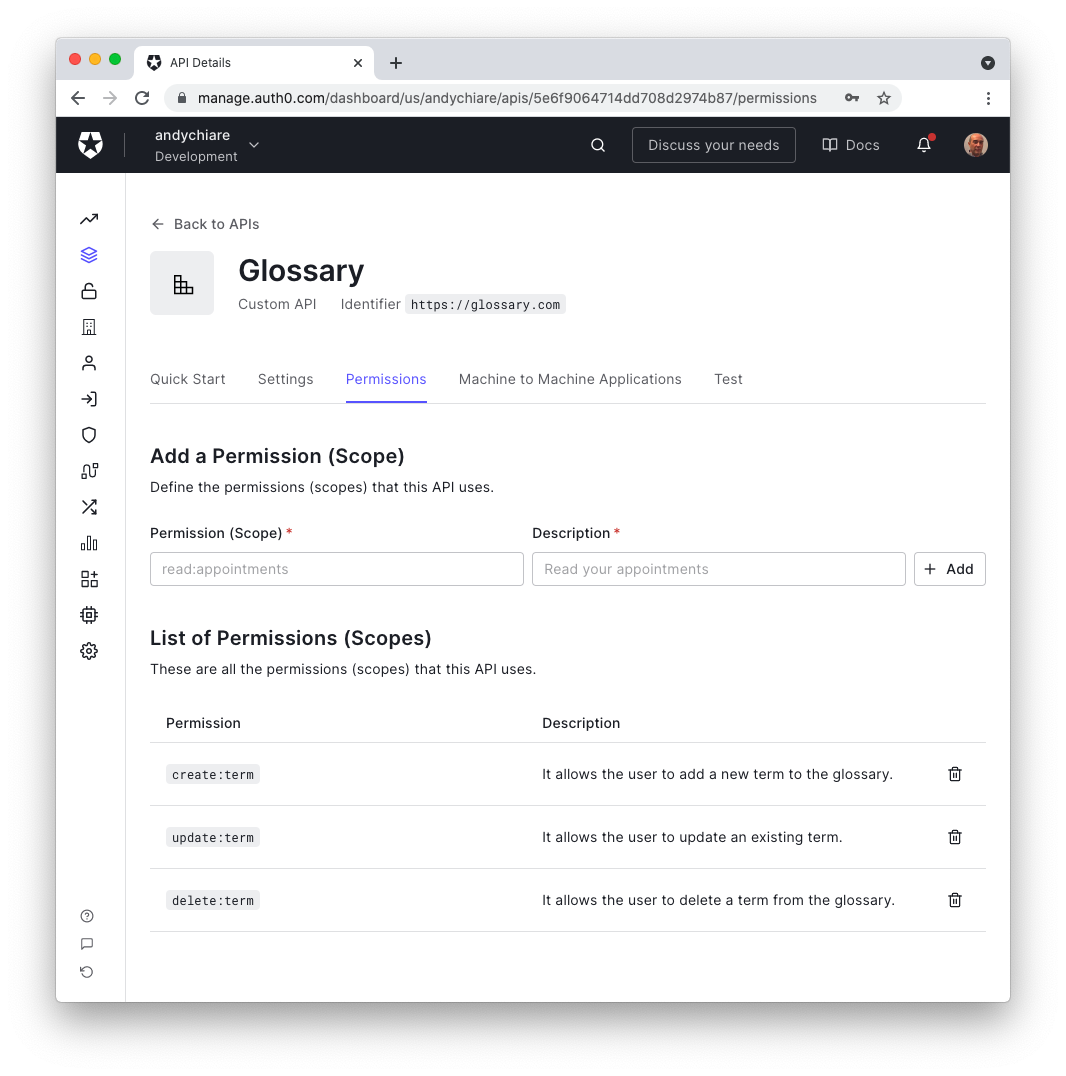
This configuration informs Auth0 that the glossary Web API supports these permissions.
Next, move to the Settings tab and scroll down to the RBAC Settings section. Here, click the Enable RBAC and the Add Permissions in the Access Token toggle buttons, as in the following picture, and then click the Save button at the bottom:
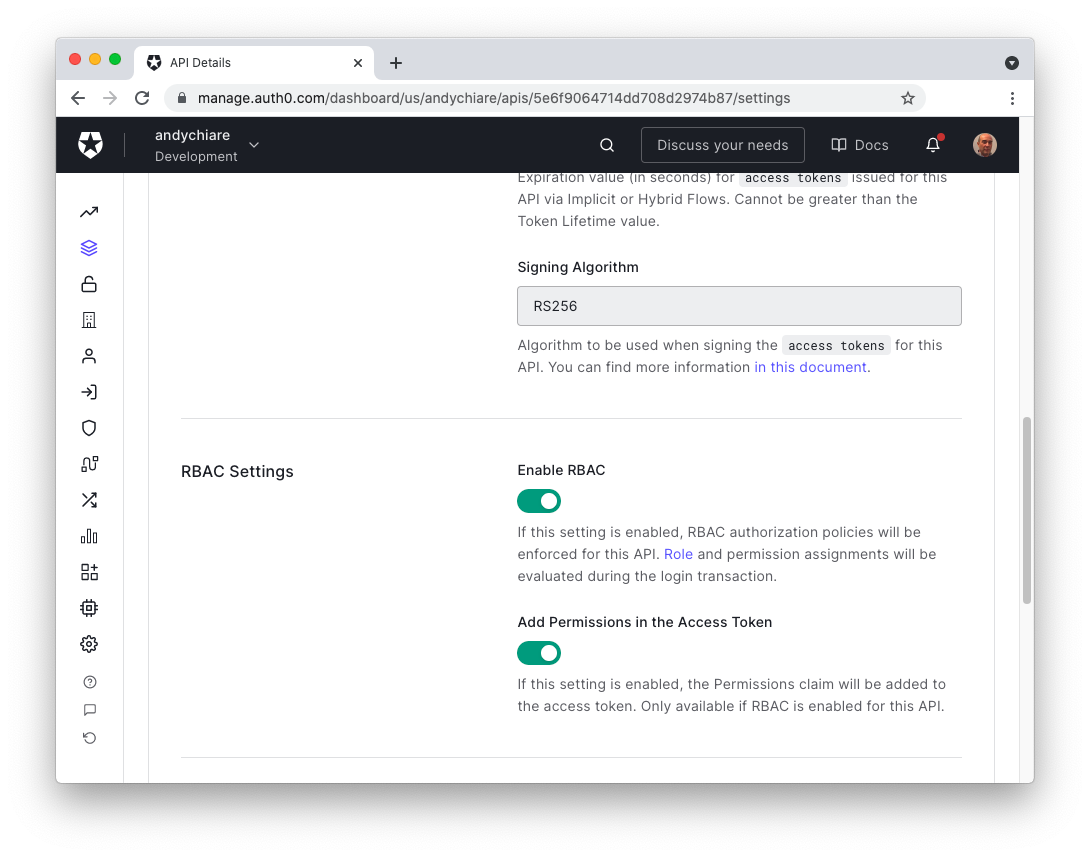
These settings will enforce the evaluation of roles and permissions assignments during the user login.
Auth0 and RBAC
Auth0 lets you organize your RBAC easily through its Dashboard. If you have more complex or specific needs, you can also manage users and roles by using the Auth0 Management API. In this article, you will use the Dashboard to manage users and roles.
Your goal is to create roles so that only specific users can perform specific actions. In practice, you have to create:
- an Editor role, which includes the permission to create (
create:term) and update (update:term) a glossary term, - an Admin role, which includes the permission to delete (
delete:term) a glossary term in addition to being able to create and modify it.
Creating roles
With this goal in mind, head to the Auth0 Dashboard and select Roles under the User Management section of the side menu. Click the Create Role button in the upper right corner and fill the form with the following data:
glossary-adminas the name.- Glossary administrator as the description.
Now click the Create button. In the screen you get, select the Permissions tab and associate the required permissions to define this role by clicking the Add Permissions button. You need to select the API you registered with Auth0 (Glossary, if you kept the suggested name) and select all its permissions, as shown in the following image:
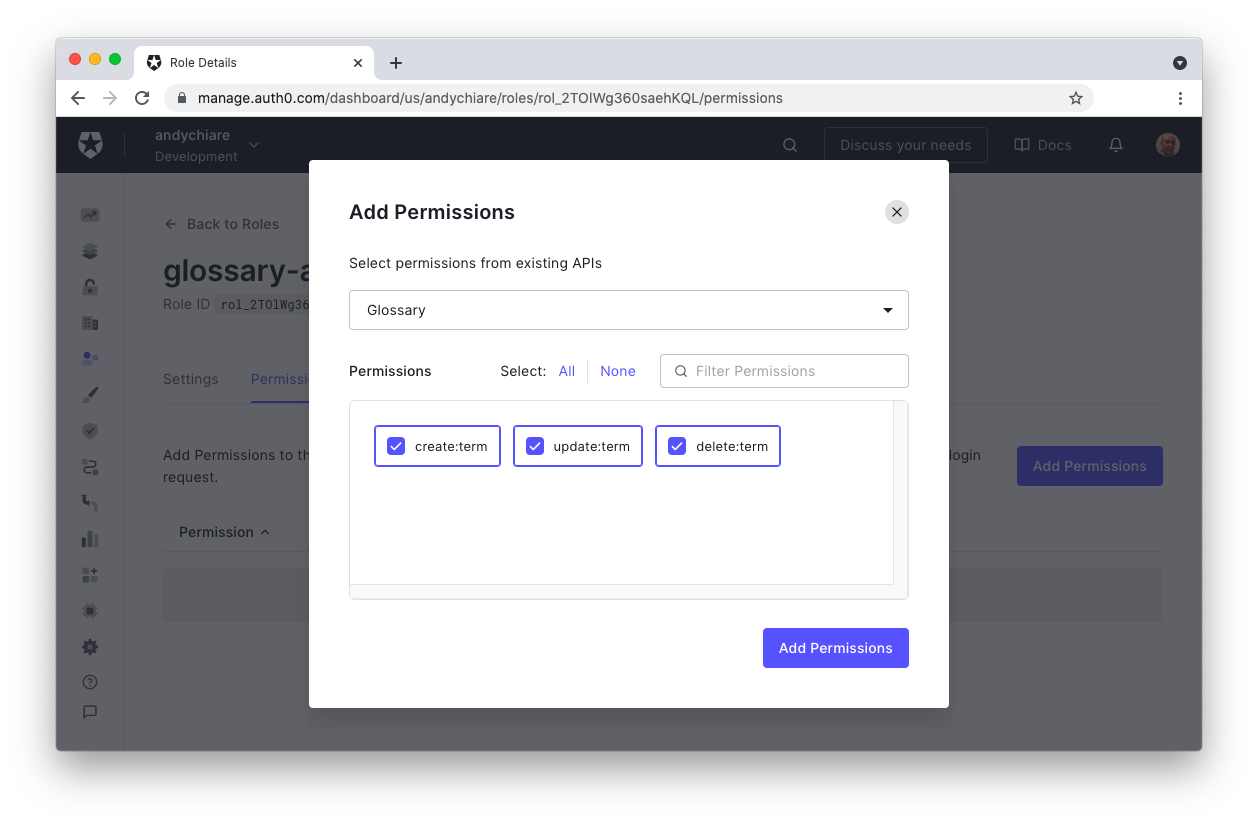
Finally, click the Add Permissions button. You have just created the glossary-admin role as a collection of create:term, update:term, and delete:term permissions
Now, repeat the same process to create the Editor role with the following data:
glossary-editoras the name.- Glossary editor as the description.
This time, you will add only the create:term and update:term permissions to this role, as shown below:
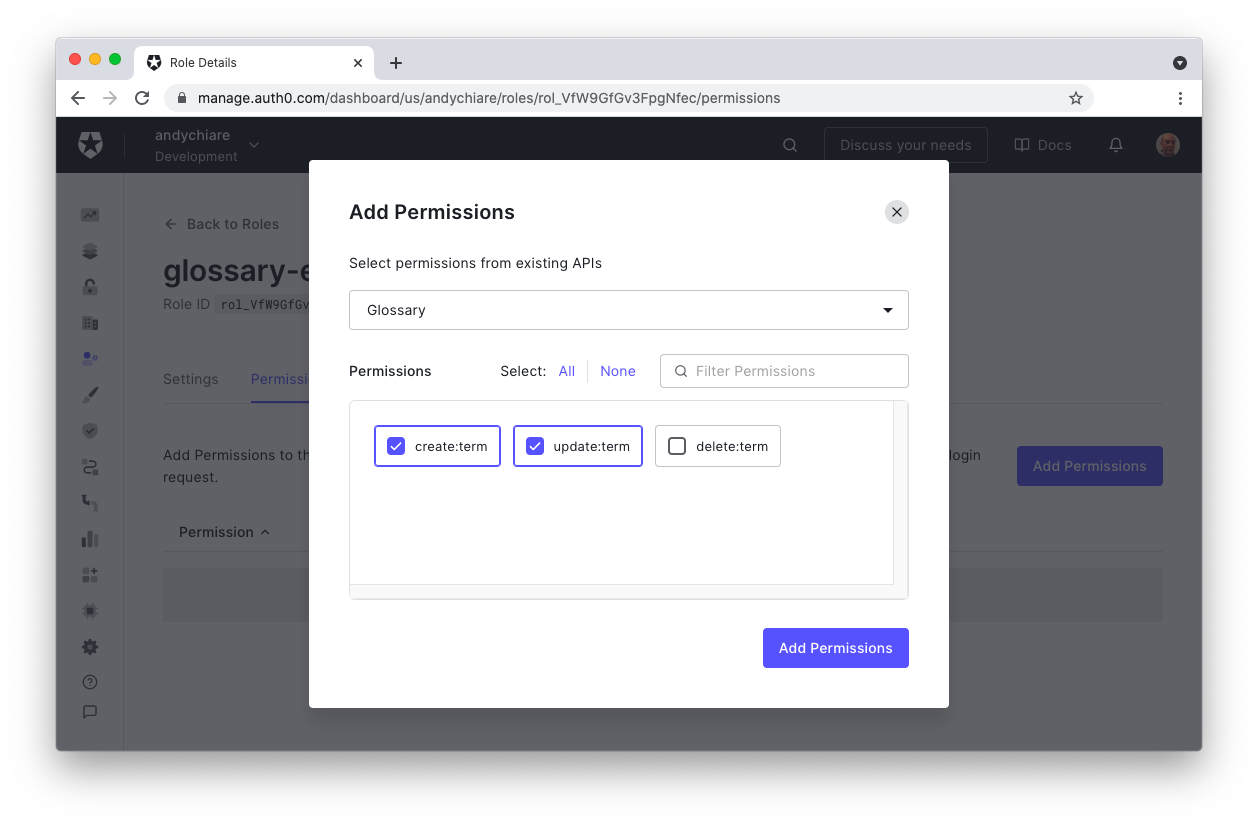
Remember to click the Add Permissions button to finalize the creation of the glossary-editor role.
Creating users with roles
Ultimately, roles are meaningless without users. Now, you'll create two users and assign them the roles you've made to test the application.
The first user will have john@example.com as their email and username and will be assigned the glossary-editor role.
The second user will have jane@example.com as their email and username and will be assigned the glossary-admin role.
Open the Users section in your Auth0 Dashboard and click the Create User button. Then, fill the form with the required data for the first user:john@example.com as the email, a password of your choice, and Username-Password-Authentication as the connection. The following is an example of a filled form:
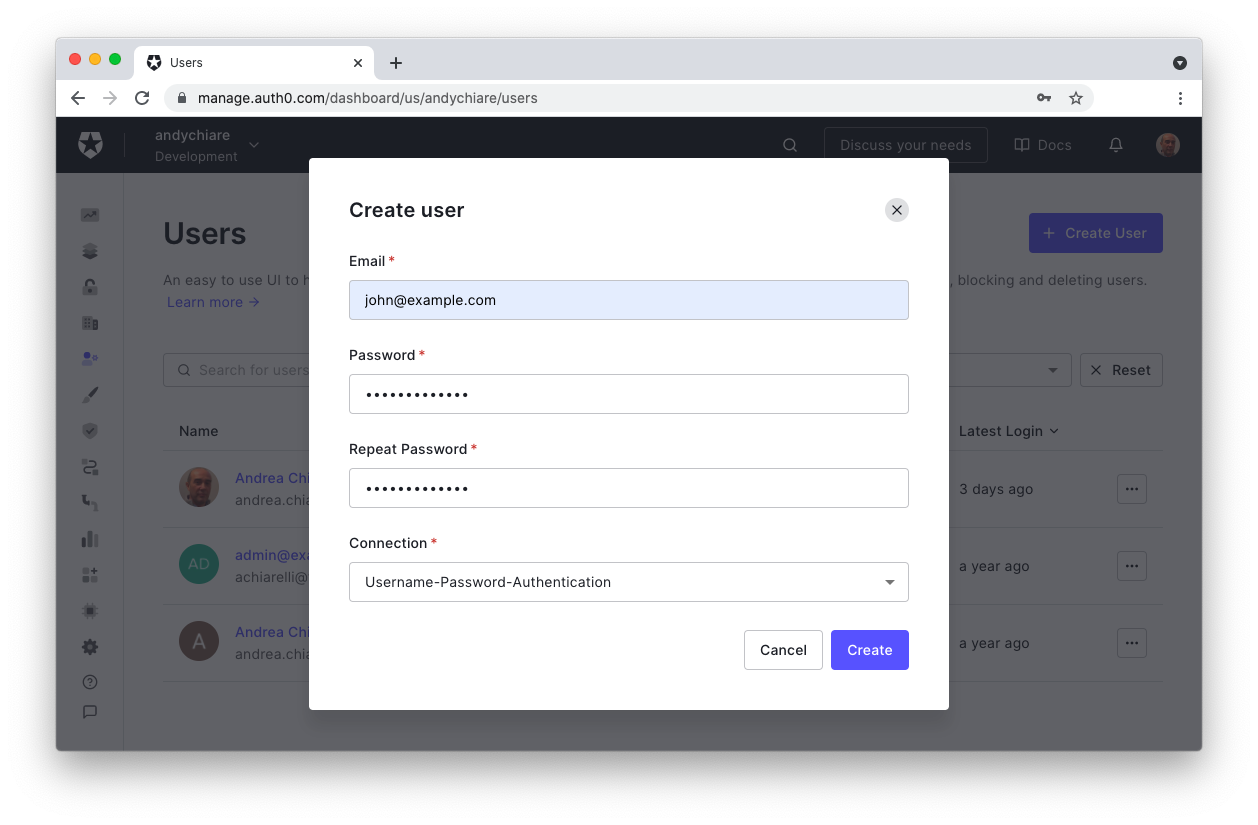
Click the Create button to create the user.
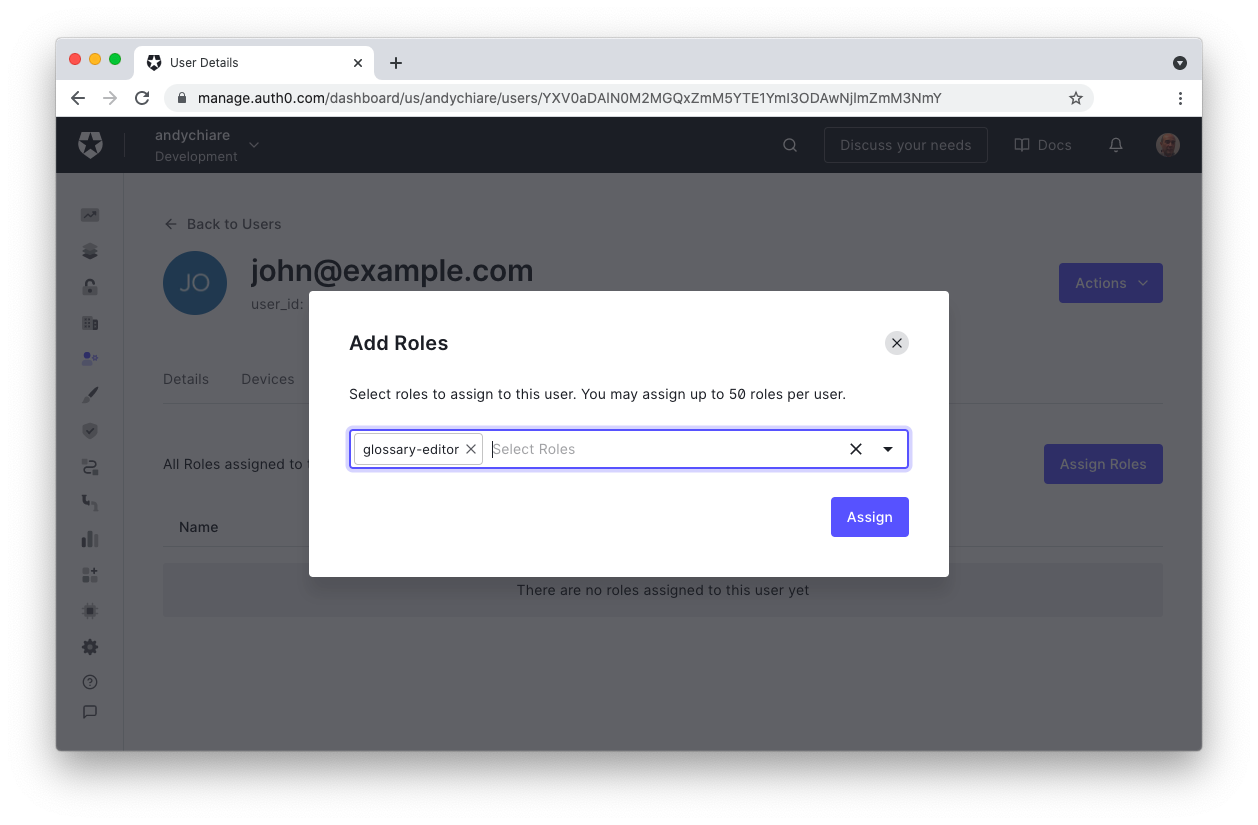
Now, on the user's page, select the Roles tab and click the Assign Roles button. In the popup window, select the glossary-editor role from the drop-down list and click the Assign button. The window should look as follows:
Repeat the same steps described so far to create the user jane@example.com and assign them the glossary-admin role.
Checking Permissions in Your API
At this point, you've configured your API and created users with their respective roles on Auth0. Now it's time to enable your app to have more granular control over the HTTP requests it receives.
Recall that roles are collections of permissions. When you enabled RBAC for your API in the Auth0 Dashboard, you ensured that tokens issued by Auth0 for the API will include permissions within the access token. As a result, when clients use that same token for HTTP requests, the API can parse the token's permissions.
To correctly authorize the incoming HTTP requests, your API needs to make sure the access token has the necessary permissions. You can accomplish this task by defining one or more authorization policies and applying them to the methods that implement your ASP.NET Web API.
An authorization policy is a set of requirements that users or applications must meet in order to be allowed to perform an action on a resource. Let's see how you can define and apply an authorization policy in practice.
Registering an authorization policy
To define an authorization policy for the glossary Web API, open the Startup.cs file in the root folder of the project and append the following code to the body of the ConfigureServices() method:
// Startup.cs

// ...existing code...

namespace Glossary
{
  public class Startup
  {
    // ...existing code...

    public void ConfigureServices(IServiceCollection services)
    {
      // ...existing code...

      //👇 new code
      services.AddAuthorization(options =>
      {
        options.AddPolicy("CreateAccess", policy =>
                          policy.RequireClaim("permissions", "create:term"));
        options.AddPolicy("UpdateAccess", policy =>
                          policy.RequireClaim("permissions", "update:term"));
        options.AddPolicy("DeleteAccess", policy =>
                          policy.RequireClaim("permissions", "delete:term"));
      });
      //👆 new code
    }

    // ...existing code...
  }
}
Here, you've invoked the AddAuthorization() method to configure the ASP.NET authorization service. You've also defined three authorization policies via the AddPolicy() method of the options parameter. Each policy has a name and a lambda expression. For example, the CreateAccess authorization policy is defined by requiring the permissions claim in the access token whose value must be create:term. Similarly, for the UpdateAccess and the DeleteAccess policies.
Different approaches to creating authorization policies in ASP.NET exist. For example, you can use a claim-based authorization or a policy-based authorization approach. You can even create your own approach by customizing the built-in ASP.NET authorization middleware.
Applying an authorization policy
Once you define and register your authorization policies, you can apply them in your Web API. Applying an authorization policy is just a matter of passing parameters to the Authorize attribute. So, open the GlossaryController.cs file under the Controllers folder and apply the changes pointed out in the following:
// Controllers/GlossaryController.cs

// ...existing code...

namespace Glossary.Controllers
{
  [ApiController]
  [Route("api/[controller]")]
  public class GlossaryController : ControllerBase
  {
    // ...existing code...

    [HttpPost]
    [Authorize(Policy = "CreateAccess")]    //👈 changed code
    public ActionResult Post(GlossaryItem glossaryItem)
    {
      // ...existing code...
    }

    [HttpPut]
    [Authorize(Policy = "UpdateAccess")]    //👈 changed code
    public ActionResult Put(GlossaryItem glossaryItem)
    {
      // ...existing code...
    }

    [HttpDelete]
    [Route("{term}")]
    [Authorize(Policy = "DeleteAccess")]    //👈 changed code
    public ActionResult Delete(string term)
    {
      // ...existing code...
    }
  }
}
This way, you are requesting that the ASP.NET authorization middleware evaluates a specific policy to authorize the execution of the related controller's method.
Your Web API is ready to run and check permissions!
Testing the Web API
To test your glossary Web API, you need a client that allows your users to authenticate with Auth0 and get an access token with the proper permissions based on their role. Fortunately, the Swagger UI of the sample Web API is built to be very much an actual client of your API. You just need to enable OAuth support so that the user can authenticate and get their access token.
Configuring the client
To configure your Swagger UI, you need to register it with Auth0. Head to the Application section of your Auth0 Dashboard and click the Create Application button in the upper right corner. In the window that appears, provide a meaningful name, e.g., Glossary client, and select Regular Web Applications as the application type. That window should look like the following:
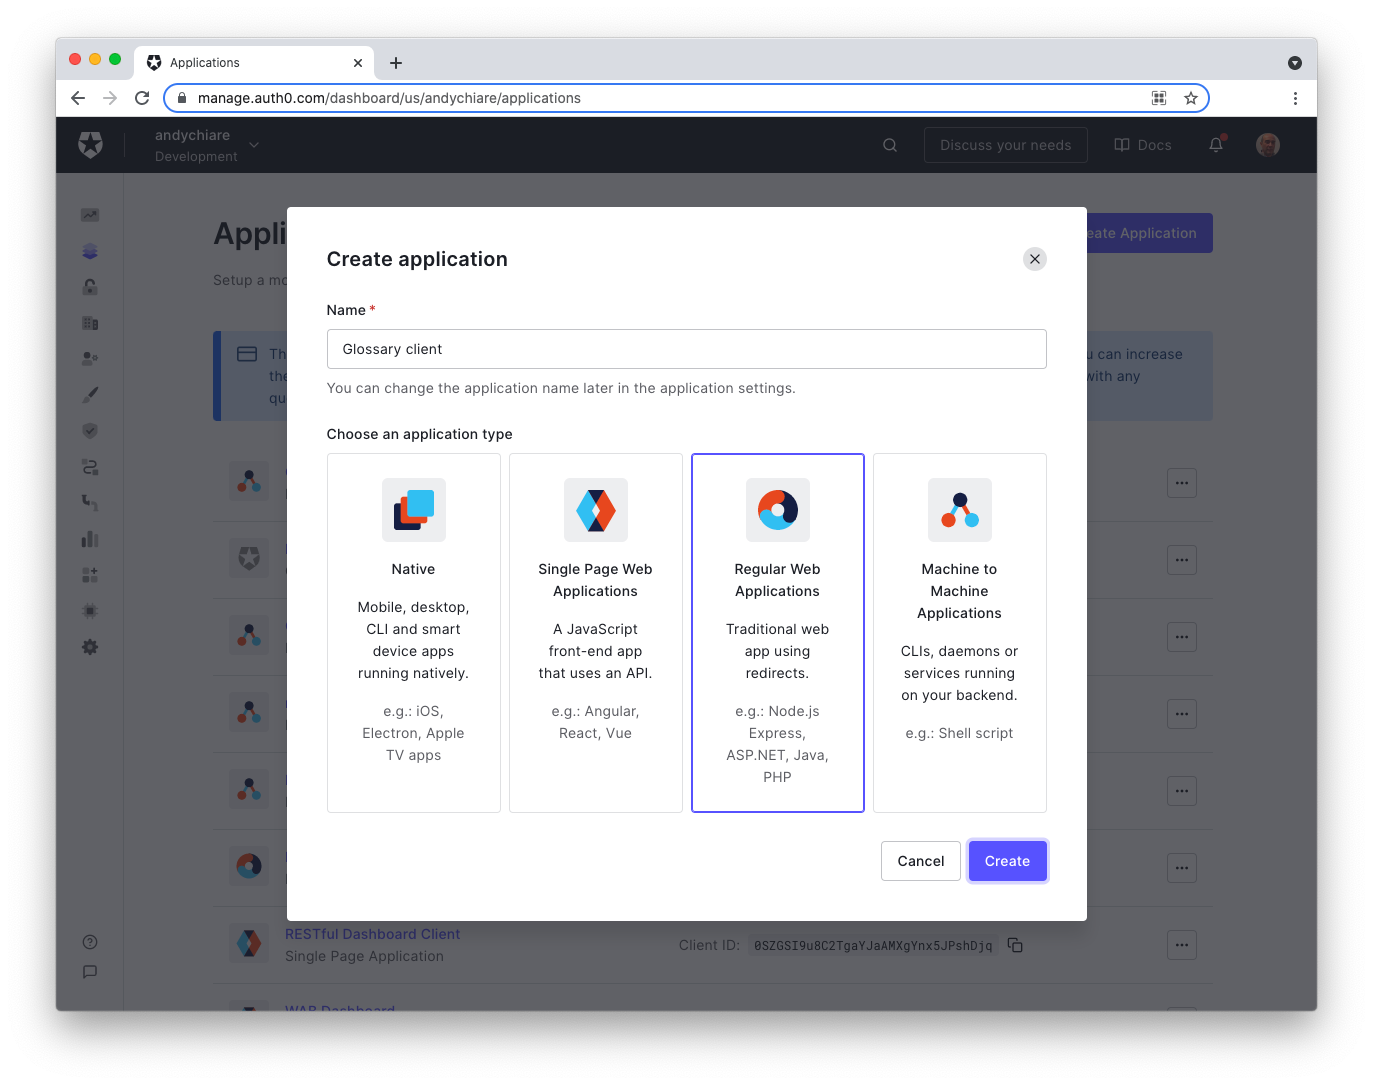
Now, click the Create button to confirm. After the client page is created, move to the Settings tab and take note of the Client ID and the Client Secret values.
Now, back in your project, open the appsettings.json configuration file and apply the changes highlighted below:
// appsettings.json
{
  "Logging": {
    "LogLevel": {
      "Default": "Information",
      "Microsoft": "Warning",
      "Microsoft.Hosting.Lifetime": "Information"
    }
  },
  "AllowedHosts": "*",
  "Auth0": {
    "Domain": "YOUR_AUTH0_DOMAIN",
    "Audience": "YOUR_UNIQUE_IDENTIFIER",
    // 👇 new keys
    "ClientId": "YOUR_CLIENT_ID",
    "ClientSecret": "YOUR_CLIENT_SECRET"
    // 👆 new keys
  },
  "SwaggerUISecurityMode": "oauth2"        // 👈 new key
}
You added the ClientId and ClientSecret keys within the Auth0 section. Replace the YOUR_CLIENT_ID and YOUR_CLIENT_SECRET placeholders with the corresponding values you just annotated from the Auth0 Dashboard. The Domain and Audience keys keep the values you already assigned at the beginning of this article.
Also, you added the SwaggerUISecurityMode key with the oauth2 value. This key enables the Swagger UI to act as an OAuth client so that it asks Auth0 for an access token on behalf of a user. You will see how it works in a moment.
Keep in mind that the
SwaggerUISecurityModekey is a custom key supported by this sample project. It is only required for demo purposes in order to test your API with the Swagger UI. In a real-world scenario, your API will be called by a real client.
Now, launch the Web API by typing dotnet run in a terminal window and point your browser to https://localhost:5001/swagger.
I suggest using your browser in incognito mode to switch between users easily. In fact, an unresolved issue in Swagger UI prevents you from logging out from the authorization server. See these issues for more information.
Testing access with the Editor role
In the Swagger UI of your Web API, click the Authorize button. You should see a window like the following:
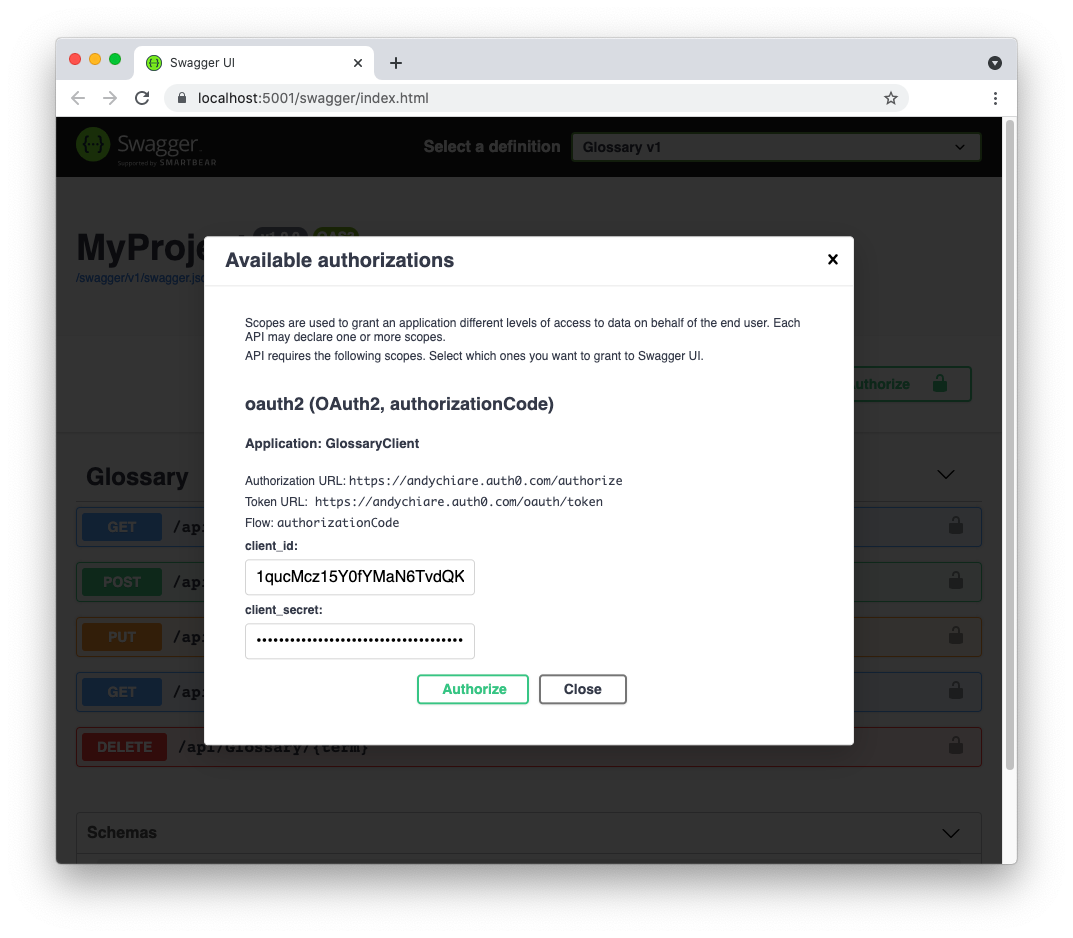
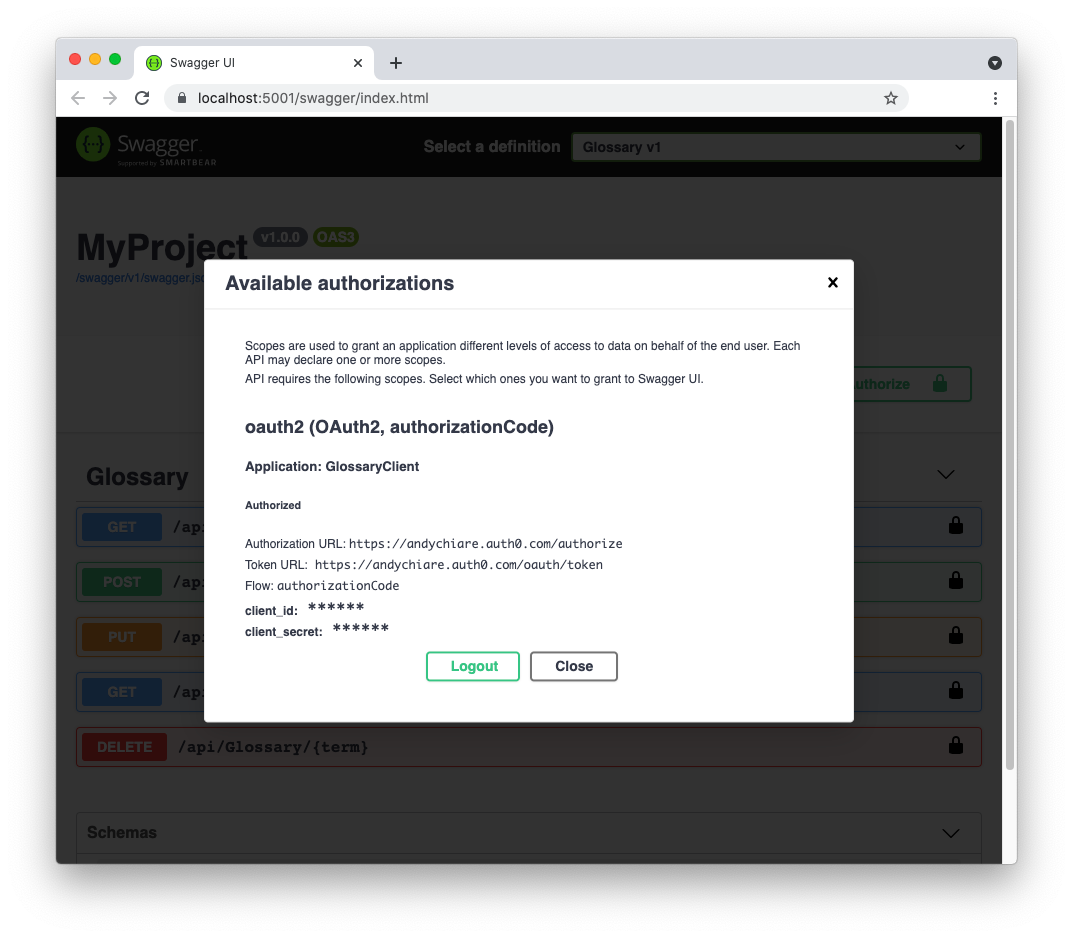
This window asks to authorize the Swagger UI client to obtain an access token on behalf of the user. By clicking the Authorize button here, you will be redirected to the Auth0 Universal Login page. On that page, authenticate as a user having the Editor role by providing the credentials of john@example.com, as you created them before. After you authenticate, you will be redirected back to the following screen:
Your Swagger UI client has now received the access token for that user. Click the Close button and try to add a new term to the glossary through the POST action. In the Swagger UI, click the POST /api/Glossary row and then the Try it out button. Now, add a new term definition as in the following example:
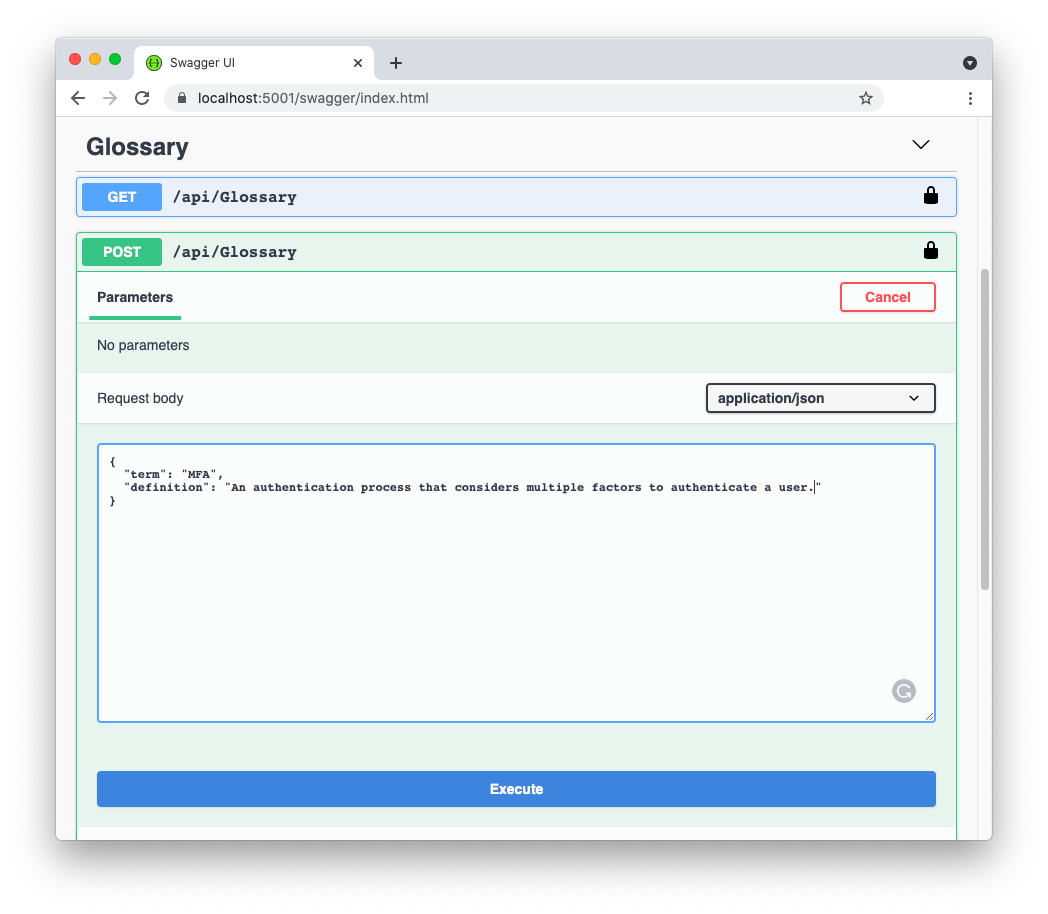
By clicking the Execute button, you should get a successful response similar to the following:
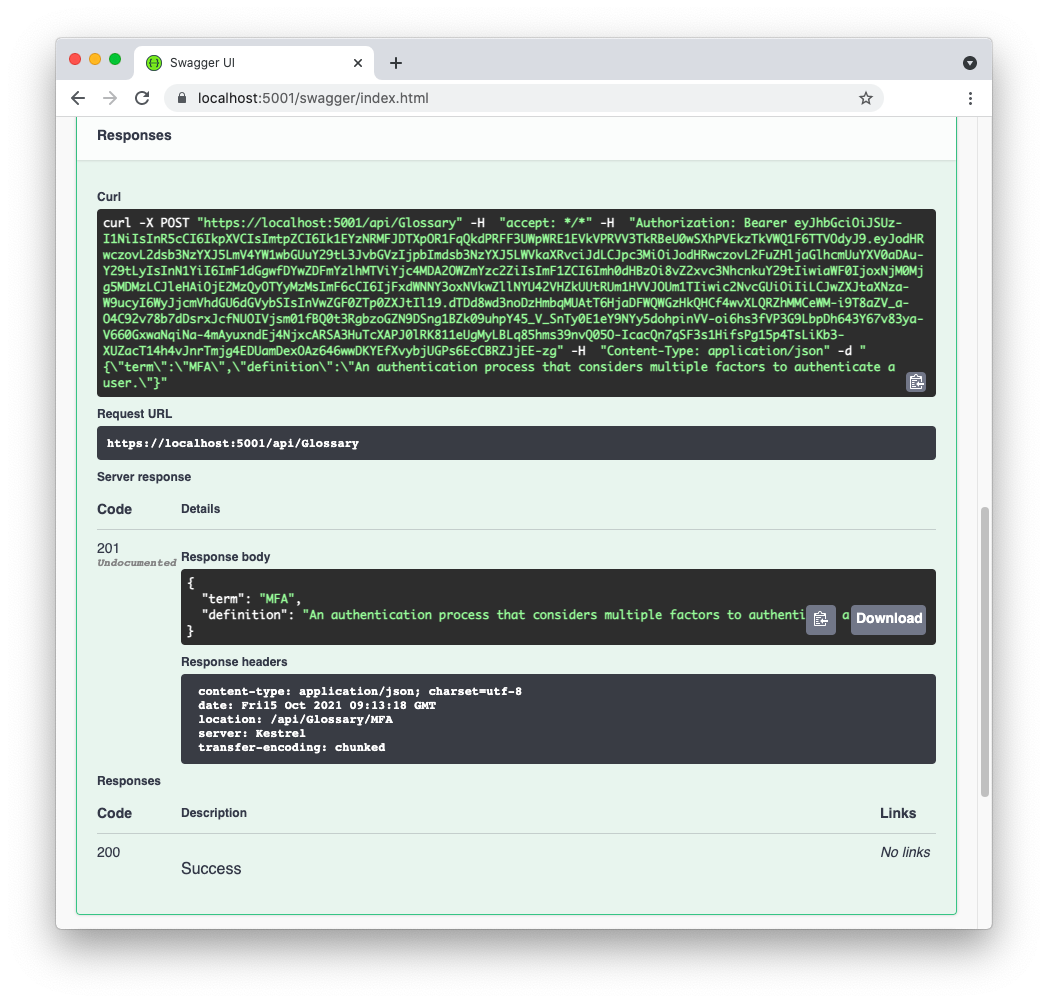
If you copy the access token from the curl statement text box and decode it in jwt.io, you should see a payload similar to the following:
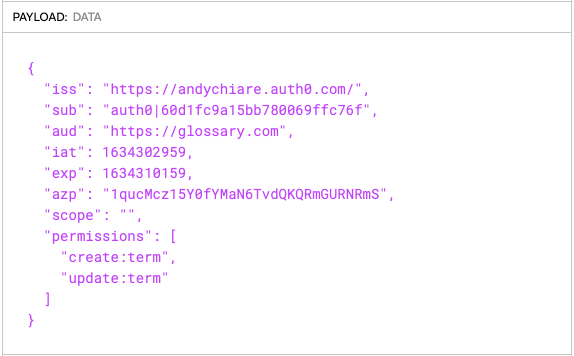
You can see the permissions claim containing the create:term and update:term permissions. These permissions are assigned to the current user thanks to their Editor role. Also, the create:term permission is the one required by the CreateAccess policy that controls the access to the Post() method in your API controller. So, everything works as expected.
If you try to modify a glossary term through the PUT action, you should get a successful response as well.
Testing the API with the Administrator Role
However, if you attempt to delete the newly created term, you should receive a 403 Forbidden status code. In fact, your access token doesn't contain the delete:term permission. Only users with the Admin role are allowed to delete terms.
So, clear the cookies in your browser (or close it and reopen it in incognito mode).
Click the Authorize button again and this time authenticate as the jane@example.com user. That user has the Admin role. Now, try to execute all the three protected actions: POST, PUT, and DELETE. You should be able to perform them successfully.
Roles and APIs
Applying RBAC to Web APIs shown above leverages the Auth0's ability to extract permissions from user roles at login time and add them to the permissions access token's claim. As the API developer, this approach lets you focus just on permissions and leave the role management to Auth0.
As an ASP.NET developer, you may know that you could use the Roles parameter with the Authorize attribute, as shown in the following example:
[HttpPost]
[Authorize(Roles = "glossary-editor, glossary-admin")]
public ActionResult Post(GlossaryItem glossaryItem)
{
  // ... existing code ...
}
So, you might ask yourself a couple of questions at this point:
- Is it possible to include user roles in the access token issued by Auth0?
- Why not check roles instead of permissions on the Web API side?
Let's try to answer both questions.
Including roles in the access token
Auth0 allows you to add user roles in the access token issued at login time. However, this is not a built-in feature, i.e., something that you got without any explicit intervention. To enrich the access token with the user's roles, you need to add an Auth0 Action to the login flow. An Action is a JavaScript function that allows you to customize the standard behavior of different Auth0 flows. Check out this blog post to get an overview of Auth0 Actions.
Showing how to use Auth0 Actions to add user roles in the access token is out of the scope of this article. However, you can take a look at this Action example to get an idea of how it works.
Checking permissions or roles?
One of the reasons you may want to check roles instead of permissions on the Web API side could be that they are easy to read and understand quickly. They lead to a direct mapping between user roles and your API. They are easy to read and understand. Looking at the following code, you know at a glance who is allowed to do a given action:
[HttpDelete]
[Route("{term}")]
[Authorize(Roles = "glossary-admin")]
public ActionResult Delete(string term)
{
  // ... existing code ...
}
It is immediately obvious that only the glossary administrator can delete a glossary term. Having the permission instead of the role requires you to think about who the users having the delete:term permission may be. It implies you have an extra layer of mapping between roles and permissions in mind.
However, there are some drawbacks in checking roles on the Web API side in return for this benefit.
Imagine you implemented your glossary Web API with role checking instead of permission checking. After your Web API is published, you need a new role for your glossary application: the Assistant role. Say you name this role glossary-assistant. Users in this role can only update existing terms, and so they will only have the update:term permission.
To enable this role on your Web API, you now need to change its code in the controller. You need to add the glossary-assistant role to the list of the allowed roles of the Put() method. Not complicated... But now, you need to redeploy your API with the new code!
If you check permissions instead of roles, you don't need any updates on the Web API side. The role management and the permission unpacking is an Auth0 responsibility.
Once again: roles are just collections of permissions. While, in general, permissions are quite static, roles are more dynamic. The need to group permissions for new roles or combine multiple roles for the same user makes permission checking more convenient and lower-maintenance.
Think of the simple glossary Web API. It relies on only three permissions. However, it can lead to the creation of seven roles (eight, if we also consider the empty role). This should make you think about the opportunity to deal with roles on the Web API side.
Finally, consider that Auth0 allows you to directly assign permissions to a user. In that case, if you only check roles, you miss any directly assigned permissions causing a security flaw in your Web API.
Summary
Throughout this article, you learned how to use Auth0 Role-Based Access Control in your ASP.NET Web API.
You started by defining and assigning roles to your users. Then, you registered a glossary Web API with Auth0 and enabled RBAC support. Next, you implemented an authorization policy in your Web API to check user permissions.
Finally, you learned why checking permissions on the API side is better than directly checking roles.
You can find the final version of the glossary Web API implemented throughout the article in this GitHub repository.
About the author

Andrea Chiarelli
Principal Developer Advocate
I have over 20 years of experience as a software engineer and technical author. Throughout my career, I've used several programming languages and technologies for the projects I was involved in, ranging from C# to JavaScript, ASP.NET to Node.js, Angular to React, SOAP to REST APIs, etc.
In the last few years, I've been focusing on simplifying the developer experience with Identity and related topics, especially in the .NET ecosystem.