
As the Model Context Protocol (MCP) gains traction, the transition from "localhost" experimentation to enterprise integration introduces a critical challenge: security. For developers building sophisticated integrations, treating every LLM request as an "admin" action is a significant risk.
Luckily, the MCP specification supports authorization based on OAuth 2.1. So, basically, to protect your MCP server, you have to treat it as a resource server with some extra challenges in case you want to share it publicly to a wide audience.
The .NET ecosystem can leverage the C# SDK for MCP to easily expose tools and resources to an AI-powered application. The SDK reached maturity recently supporting all the features defined by the specification, including security.
This article explores a practical implementation of a secured MCP server. You will walk through a sample project and learn how to:
- Implement three distinct tools: one available for public consumption and two gated behind specific permission sets.
- Make the protected MCP server available to an MCP client, such as VSCode, leveraging Dynamic Client Registration (DCR) supported by Auth0.
Why Protect an MCP Server?
In a standard local setup, the MCP server and the client often share the same security boundary. However, as soon as an MCP server is deployed as a shared service or connected to a multi-user LLM platform, that boundary shifts. Protecting the server becomes relevant for at least two reasons:
- Preventing prompt injection escalation. If a tool allows an LLM to interact with internal databases or APIs, a malicious prompt could attempt to trick the model into executing commands it shouldn't. By implementing strict authorization checks at the server level, you provide a defense in depth strategy. Even if the LLM is convinced to call a restricted tool, the MCP server will reject the request because the underlying user context lacks the necessary permissions.
- Resource isolation and multi-tenancy. Not every user interacting with an AI agent should have the same capabilities. For example, a junior developer might have access to a ReadDocumentation tool, but only a lead engineer should be able to trigger a DeployProduction tool. Without protection, the MCP server treats all requests as equal, which is unacceptable in any regulated or professional environment.
These reasons are what OAuth 2.1 support in the MCP specification aims to prevent. We will use it to protect a sample MCP server built with C# by integrating with Auth0.
To learn how Auth0 helps you secure MCP clients and servers, check out Auth for MCP. For a detailed explanation of authorization support in MCP, read the Authorization specification.
Build Your MCP Server in C#
Let’s begin our exploration by implementing a very simple MCP server that we will later extend and secure using Auth0.
Prerequisites
The MCP server project we are going to implement requires the following:
- .NET SDK 10 or later,
- The C# SDK for MCP package,
- An Auth0 account. If you don’t have it, sign up for free here.
Create the MCP Server
To create a simple MCP server, you can use the MCP server template project provided by Microsoft. Currently, the template is in preview, so you won’t find it in the builtin template set. You can download and install the package by running the following command in a terminal window:
dotnet new install Microsoft.McpServer.ProjectTemplates
Once you have downloaded the project template, you can create your MCP server project by running a command like the following:
dotnet new mcpserver -n AspNetCoreMcpServer -t remote
This command creates a new MCP server project named AspNetCoreMcpServer in a folder with the same name. The option -t remote specifies to create an MCP server based on HTTP transport, which leads to actually creating an ASP.NET Core application.
MCP servers can use stdio or HTTP as transport protocols. OAuth protection for MCP servers is only designed for HTTP-based MCP servers. See When Should You Use Authorization? for more information.
Explore the project
Let’s take a quick look at the project to understand its implementation.
Go to the project’s folder and open the Program.cs file. You should see the the following code:
//Program.cs

var builder = WebApplication.CreateBuilder(args);

// Add the MCP services: the transport to use (http) and the tools to register.
builder.Services
    .AddMcpServer()
    .WithHttpTransport()
    .WithTools<RandomNumberTools>();

var app = builder.Build();
app.MapMcp();

app.Run();
This is an ordinary .NET application that uses the MCP server service (AddMcpServer). This service uses the HTTP transport (WithHttpTransport) and exposes the tools implemented by the class RandomNumberTools (WithTools<RandomNumberTools>). The invocation of the MapMcp() method initializes the MCP server.
The C# SDK for MCP library takes charge of all the complexity of implementing the MCP protocol. You can stay focused on the tool implementation, which is pretty straightforward as well.
Open the RandomNumberTools.cs file in the Tools folder and take a look at the code:
//Tools/RandomNumberTools.cs

using System.ComponentModel;
using ModelContextProtocol.Server;

internal class RandomNumberTools
{
    [McpServerTool]
    [Description("Generates a random number between the specified minimum and maximum values.")]
    public int GetRandomNumber(
        [Description("Minimum value (inclusive)")] int min = 0,
        [Description("Maximum value (exclusive)")] int max = 100)
    {
        return Random.Shared.Next(min, max);
    }
}
You see a very simple class implementing the method GetRandomNumber(), which returns a random number within a range. The attribute McpServerTool marks the GetRandomNumber() method as an MCP tool. The Description attributes describe what the tool does and what its parameters mean, very important to let the LLM understand when and how to use it. In fact, clear descriptions of the tool's functionality help the LLM select the appropriate tool for a given task.
That’s all! Your MCP server is ready to run.
Test your MCP server
Since the MCP server we implemented is nothing more than an ASP.NET Core application, we can test it in several ways: you can use curl or the .http file automatically generated with the project. Or you can use the MCP Inspector.
We'll integrate our MCP server directly into an MCP client like VSCode. This will come in handy later when we implement some advanced features.
You can add your MCP server to VSCode by creating a .vscode folder in your project’s root folder, and adding an mcp.json file with the following JSON content:
//.vscode/mcp.json
{
  "servers": {
    "AspNetCoreMcpServer": {
      "url": "http://localhost:PORT",
      "type": "http"
    }
  },
  inputs": []
}
Make sure to replace the PORT placeholder with the port your MCP server listens to.
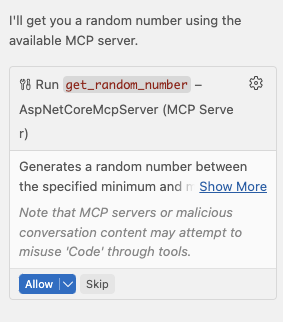
Once you have added your MCP server to VSCode, set its chat window to agent mode and ask to get a random number. You should be prompted to authorize the use of the tool as shown in the following screenshot:
After you authorize it, you will get a random number:
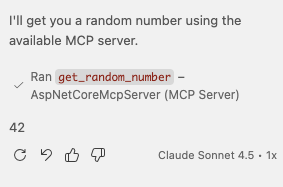
Cool! You have a new working MCP server in your VSCode instance!
A new Auth0-powered .NET app in less than a minute? Try out our templates
Install the Nugget package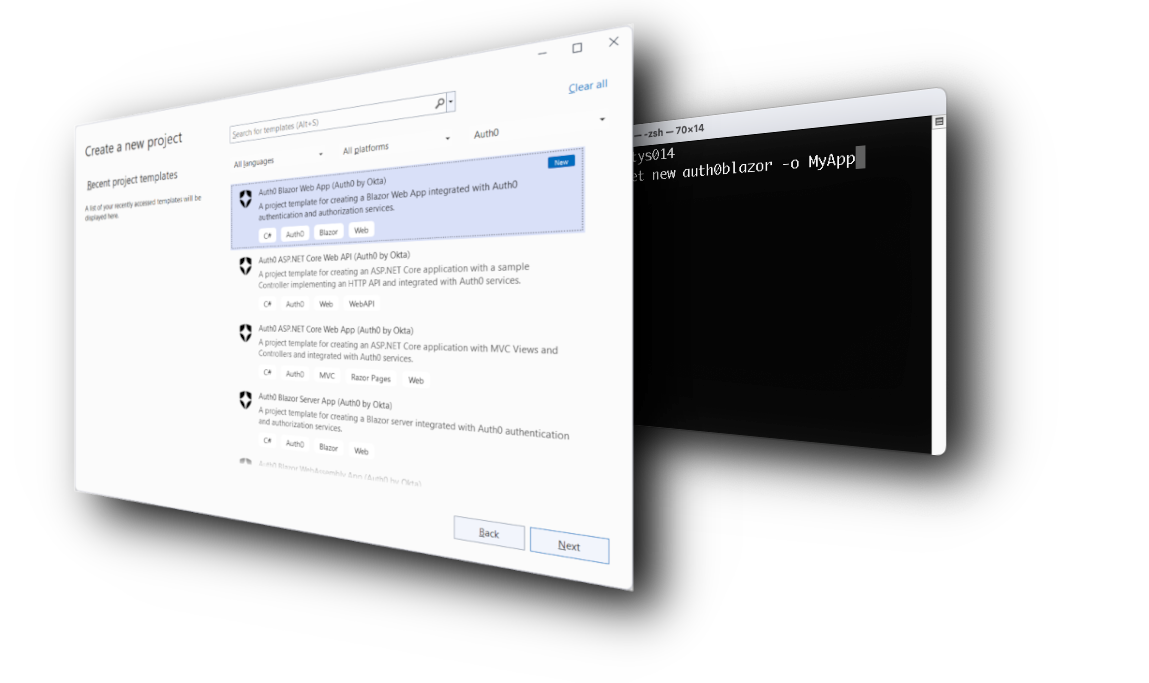
Protect Your MCP Server
Now let's move on to the real focus of this article: protecting your MCP server from unauthorized access.
Define the tools to protect
Currently, anyone installing your MCP server can use its only tool, get_random_number. This tool is publicly accessible because there is no restriction on it. You will leave it so, but you will also add two new tools that will require some form of authorization.
Specifically, you will add a tool that gets the current state of a hypothetical system and another one that sets the state of this system. The system is fictitious, of course, but you can think of it as a kind of processor that can be found in different states.
To implement these tools, add a new file named SystemTools.cs to the Tools folder with the following code:
//Tools/SystemTools.cs

using System.ComponentModel;
using ModelContextProtocol.Server;

internal enum SystemState
{
    Ready,
    Waiting,
    Running,
    Stopped
}

internal class SystemTools
{
    private static readonly SystemState[] AllStates = Enum.GetValues<SystemState>();
    private static SystemState? _currentState;

    [McpServerTool]
    [Description("Returns the current state of the fictitious system. Possible states are: Ready, Waiting, Running, Stopped.")]
    public string GetSystemState()
    {
        _currentState ??= AllStates[Random.Shared.Next(AllStates.Length)];
        return _currentState.ToString()!;
    }

    [McpServerTool]
    [Description("Sets the current state of the fictitious system. Valid states are: Ready, Waiting, Running, Stopped.")]
    public string SetSystemState(
        [Description("The new state to set. Must be one of: Ready, Waiting, Running, Stopped.")] SystemState state)
    {
        _currentState = state;
        return $"System state set to '{_currentState}'.";
    }
}
You see that the tool GetSystemState() picks a random state the first time it is called and stores it into a private static variable, _currentState. Any subsequent call to the tool will return the value stored in that variable.
The tool SetSystemState() changes the value of the state stored in the _currentState variable.
You will protect these two new tools by requiring that the user has specific permissions to use each of them.
According to the MCP specification, your MCP server is nothing but a resource server in the context of OAuth, and VSCode is just an OAuth client. So actually all you are going to implement is a well-known scenario: you will use Auth0 as the authorization server, which will authenticate the user and provide the access token to the MCP client (VSCode) in order to access the tools exposed by your MCP server. The access token will include the required permissions to access the protected tools.
However, you may have a little concern now. You want to share your MCP server as a package that anyone can download and use in their VSCode instance. How can they register their VSCode instance with Auth0 as required for any OAuth client? Well, the MCP specification supports a few ways to do this. You will use Dynamic Client Registration (DCR), which allows an MCP client (VSCode) to self-register with the authorization server (Auth0). Be aware that DCR raises security concerns, as we will mention later.
Configure your Auth0 tenant
First of all, you need to configure Auth0 at the tenant level. In fact, you need to enable Dynamic Client Registration to allow MCP clients to register. You also need to enable Resource Parameter Compatibility Profile as required by the MCP specification.
Keep in mind that these are tenant level settings, which means they affect all the applications registered in that tenant.
To enable those settings, go to Settings on the left menu and then select the Advanced tab. Scroll down to the Settings section and enable the Dynamic Client Registration (DCR) and Resource Parameter Compatibility Profile toggles, as shown in the image below:
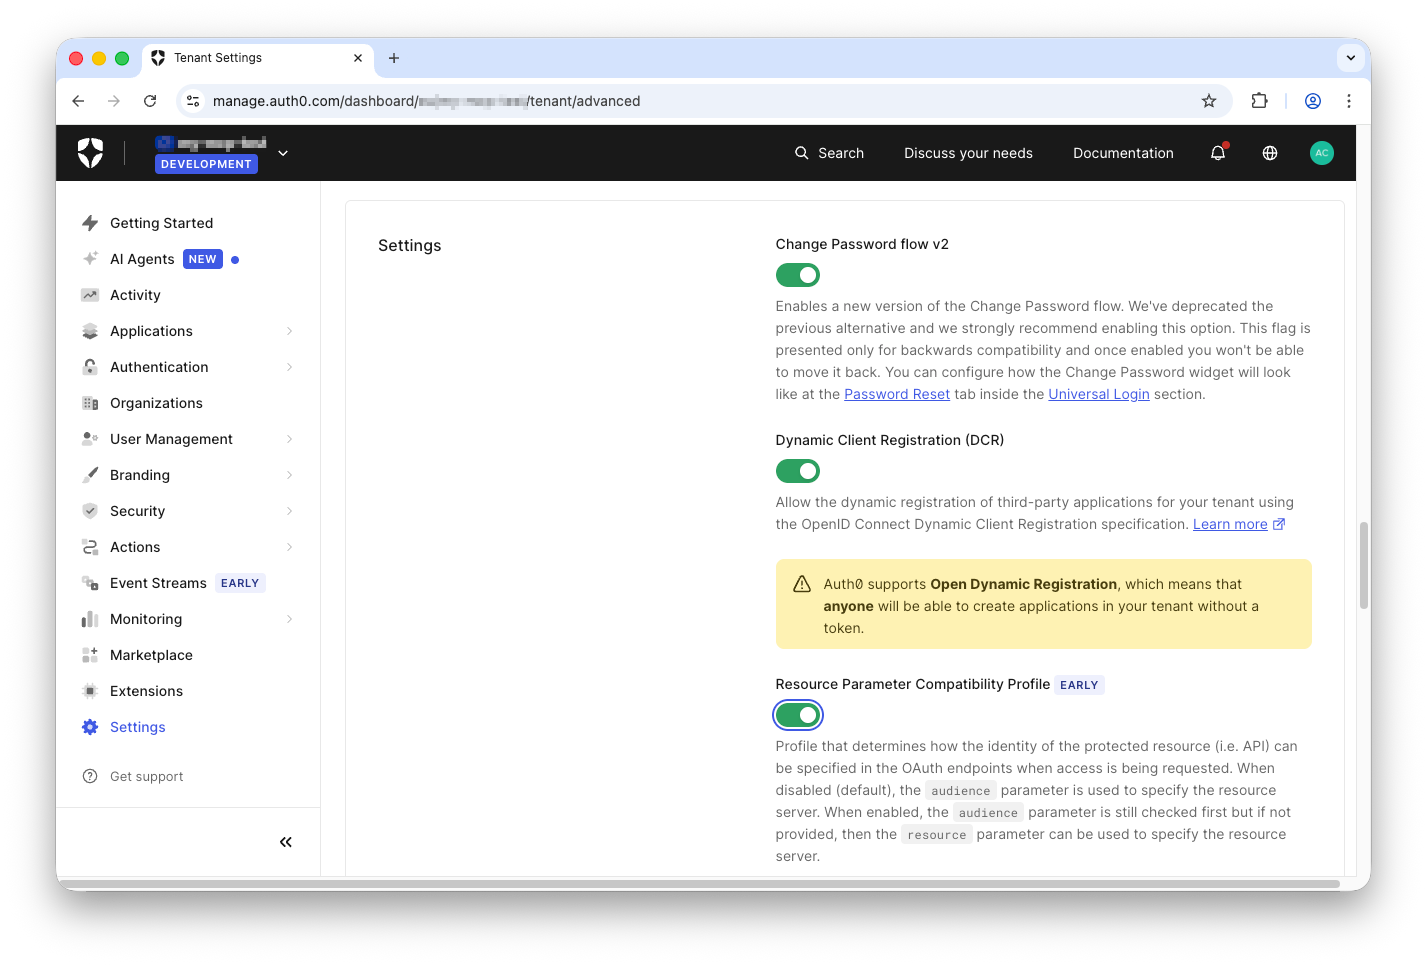
As mentioned before, you need to enable Dynamic Client Registration to allow VSCode to self-register with Auth0 the first time a user interacts with your MCP server. This allows any client to register with Auth0 with potential risks such as resource exhaustion or unauthorized access attempts. Read Register your MCP Client Application to learn more about the dangers of an open DCR endpoint and possible solutions.
Beyond the static registration of an MCP client, an alternative approach is based on Client ID Metadata Document (CIMD), a recent standard whose implementation is in progress.
In addition to the previous tenant-level settings, you also need to promote the connections the MCP clients will use to domain level. To this purpose, go to the Authentication menu item of your dashboard and select the connection to configure. For our current example, select the Username-Password-Authentication connection under Database, and scroll down until you see the setting Promote Connection to Domain Level. Enable it as shown below:
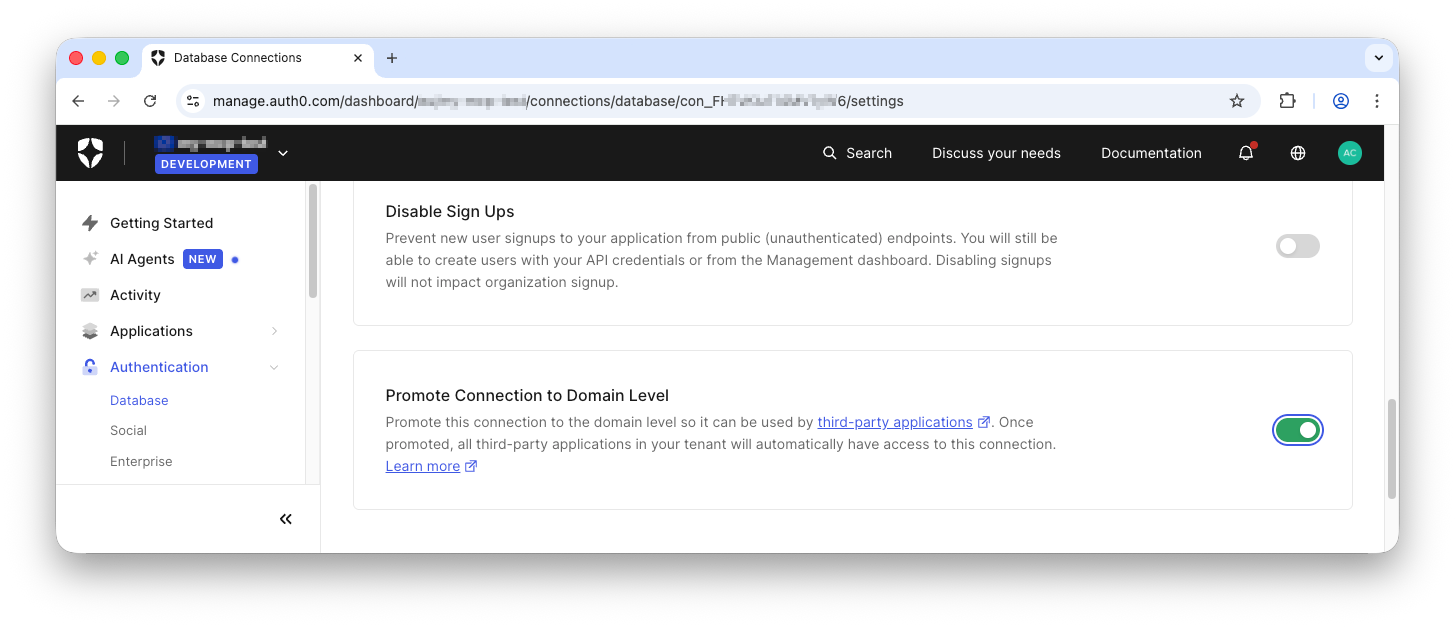
Great! You have prepared your Auth0 tenant for self-registrations of MCP clients.
Register your MCP Server
Now you need to register your MCP server.
As mentioned earlier, from the OAuth point of view, an MCP server is nothing but a resource server or API server. This means that you can register it with Auth0 as a standard API. The only requirement is to make sure to set your MCP server base URL as the audience. This is a requirement of the Protected Resource Metadata specification. So, in your case, if your MCP server listens to http://localhost:5678, use this URL as the audience.
Once you have created your API on the Auth0 dashboard, scroll down in the Settings tab to reach the Access Token Settings section. Here, select the RFC 9068 format as shown in the following picture:
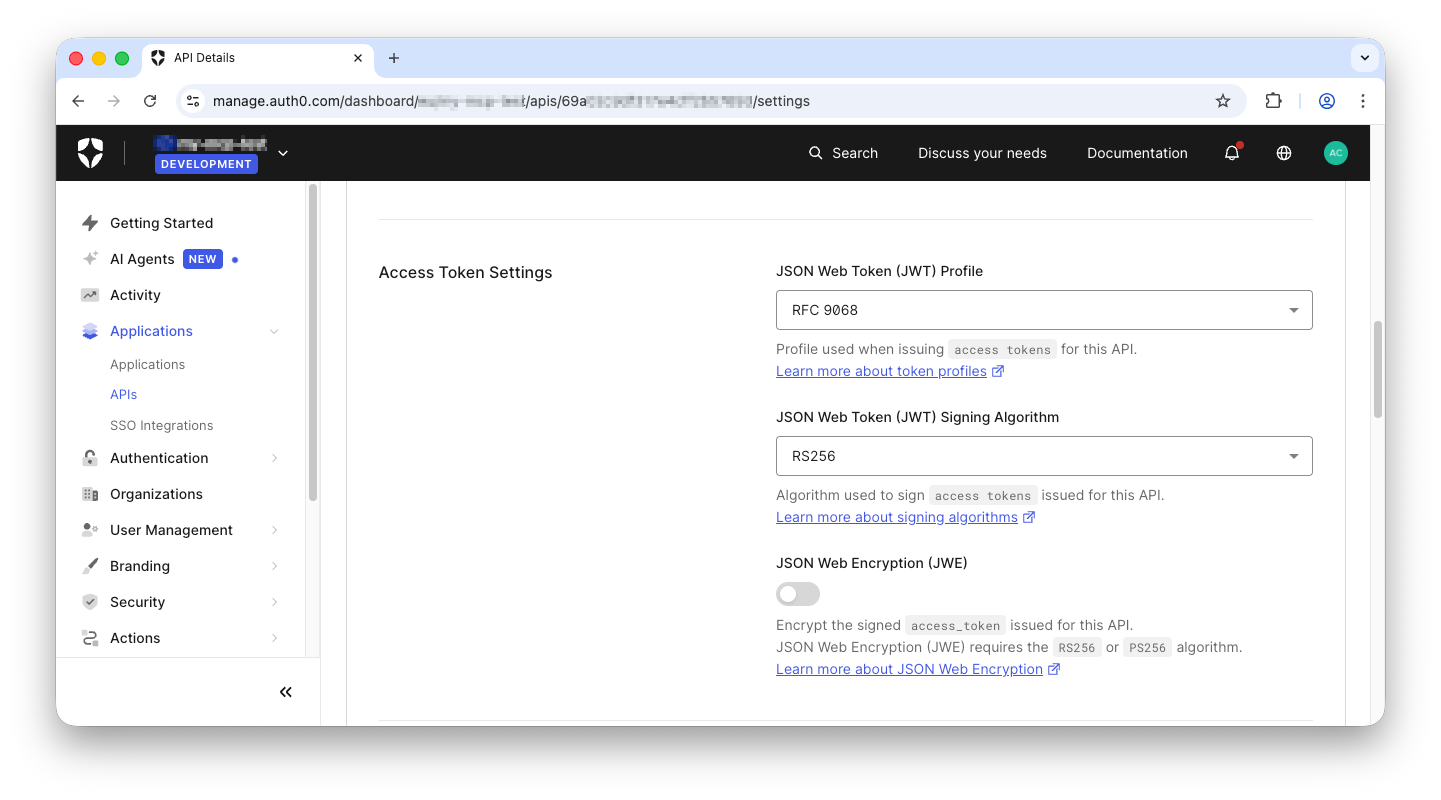
Read the documentation to learn more about access token profiles.
Then scroll down more to the RBAC Settings section and enable both RBAC and Add Permissions in the Access Token:
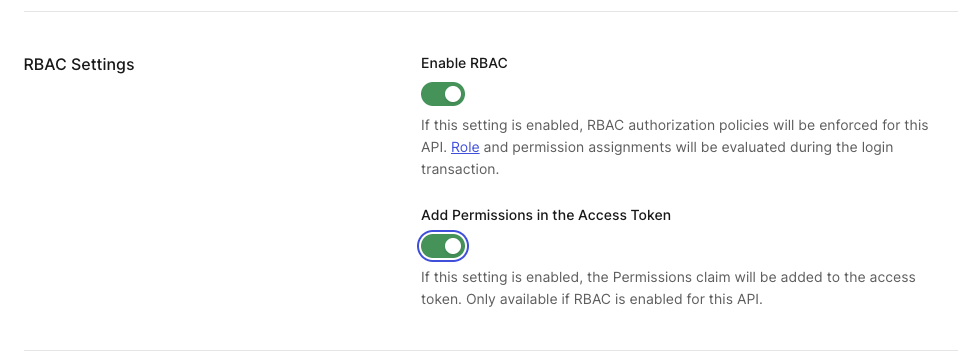
These settings will include the user’s permissions in the access token so your MCP server will be able to make authorization decisions to let users access the tools.
Save the settings and go to the Permissions tab. Here you should add the tool:getsystemstate and `tool:setsystemstate permissions as shown below:
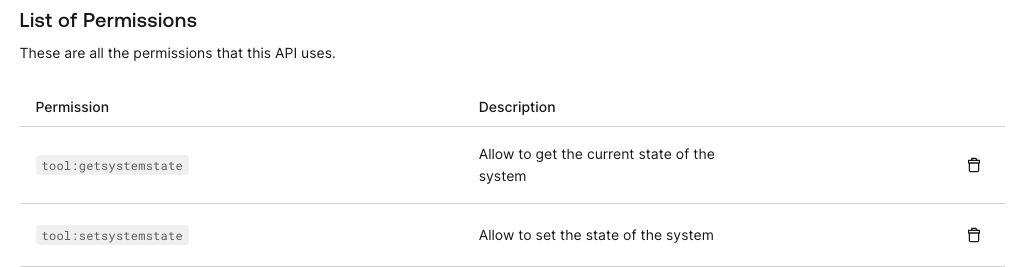
Follow the instructions in this document to learn how to add permissions to an API.
Finally, go to the Application Access tab and select the Allow value for the application access policy for user access, as you can see in the picture below:
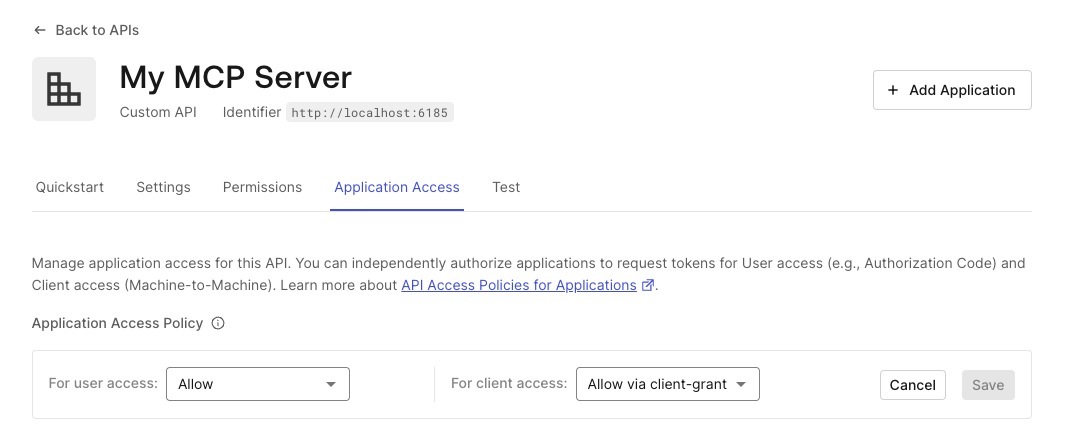
This setting allows any self-registered MCP client to access your MCP server on behalf of the user. To learn more about this setting, read the API Access Policy documentation.
Now your MCP server is configured on the Auth0 side.
Secure your MCP Server
Let’s complete the MCP server protection by modifying the current code.
First, add an appsettings.json file with the current content:
//appsettings.json

{
  "Auth0": {
    "Domain": "YOUR_DOMAIN",
    "Audience": "YOUR_MCP_SERVER_BASE_URL"
  },
  "McpServer": {
    "BaseUrl": "YOUR_MCP_SERVER_BASE_URL"
  }
}
Replace YOUR_DOMAIN with your Auth0 tenant domain, and YOUR_MCP_SERVER_BASE_URL with the actual URL of your MCP server. Remember that YOUR_MCP_SERVER_BASE_URL must also correspond to the audience you registered in Auth0.
Now you will add support for the access token validation and protection on the two MCP tools you added to the initial project.
Install the middleware to manage JWT tokens with the following command:
dotnet package add Microsoft.AspNetCore.Authentication.JwtBearer
Replace the current content of the Program.cs file with the following code:
//Program.cs
using Microsoft.AspNetCore.Authentication.JwtBearer;
using Microsoft.IdentityModel.Tokens;
using ModelContextProtocol.AspNetCore.Authentication;

var builder = WebApplication.CreateBuilder(args);

var authority = $"https://{builder.Configuration["Auth0:Domain"]}/";
var audience = builder.Configuration["Auth0:Audience"];
var mcpServerBaseUrl = builder.Configuration["McpServer:BaseUrl"];

builder.Services.AddAuthentication(options =>
{
    options.DefaultChallengeScheme = McpAuthenticationDefaults.AuthenticationScheme;
    options.DefaultAuthenticateScheme = JwtBearerDefaults.AuthenticationScheme;
})
.AddJwtBearer(options =>
{
    options.Authority = authority;
    options.TokenValidationParameters = new TokenValidationParameters
    {
        ValidateIssuer = true,
        ValidateAudience = true,
        ValidateLifetime = true,
        ValidateIssuerSigningKey = true,
        ValidAudience = audience,
        ValidIssuer = authority
    };

    options.Events = new JwtBearerEvents
    {
        OnTokenValidated = context =>
        {
            Console.WriteLine("Token validated successfully.");
            return Task.CompletedTask;
        },
        OnAuthenticationFailed = context =>
        {
            Console.WriteLine($"Authentication failed: {context.Exception.Message}");
            return Task.CompletedTask;
        }
    };
})
.AddMcp(options =>
{
    options.ResourceMetadata = new()
    {
        Resource = mcpServerBaseUrl ?? audience ?? string.Empty,
        AuthorizationServers = { authority },
        ScopesSupported = ["tool:getsystemstate", "tool:setsystemstate"],
    };
});

builder.Services.AddAuthorization();

builder.Services
    .AddMcpServer()
    .WithHttpTransport()
    .AddAuthorizationFilters()
    .WithTools<RandomNumberTools>();

var app = builder.Build();

app.MapMcp().RequireAuthorization();

app.Run(mcpServerBaseUrl);
Let’s break down this code to understand what it does.
Basically, it adds support for authenticating client requests as in any ordinary ASP.NET Core Web API:
//Program.cs

//...existing code...

builder.Services.AddAuthentication(options =>
{
    options.DefaultChallengeScheme = McpAuthenticationDefaults.AuthenticationScheme;
    options.DefaultAuthenticateScheme = JwtBearerDefaults.AuthenticationScheme;
})
.AddJwtBearer(options =>
{
    options.Authority = authority;
    options.TokenValidationParameters = new TokenValidationParameters
    {
        ValidateIssuer = true,
        ValidateAudience = true,
        ValidateLifetime = true,
        ValidateIssuerSigningKey = true,
        ValidAudience = audience,
        ValidIssuer = authority
    };

    options.Events = new JwtBearerEvents
    {
        OnTokenValidated = context =>
        {
            Console.WriteLine("Token validated successfully.");
            return Task.CompletedTask;
        },
        OnAuthenticationFailed = context =>
        {
            Console.WriteLine($"Authentication failed: {context.Exception.Message}");
            return Task.CompletedTask;
        }
    };
})

//...existing code...
This code sets up the access token validation logic through AddJwtBearer(). The OnTokenValidated and OnAuthenticationFailed event managers do nothing special apart from showing their message to the console, but you can use them for any customization you may need.
Just after AddJwtBearer() invocation, you find AddMcp(), as highlighted below:
//Program.cs

//...existing code...

builder.Services.AddAuthentication(options =>
{
  //...existing code...
})
.AddJwtBearer(options =>
{
  //...existing code...
})
.AddMcp(options =>
{
    options.ResourceMetadata = new()
    {
        Resource = mcpServerBaseUrl ?? audience ?? string.Empty,
        AuthorizationServers = { authority },
        ScopesSupported = ["tool:getsystemstate", "tool:setsystemstate"],
    };
});

//...existing code
The AddMcp() method defines the Protected Resource Metadata (PRM) document for this MCP server. This document provides useful information for the client about the capabilities of the MCP server and which authorization server to contact to access protected tools.
This document will be dynamically exposed at the URL YOUR_MCP_SERVER_BASE_URL/.well-known/oauth-protected-resource, where YOUR_MCP_SERVER_BASE_URL is the base URL of your MCP server. The document will contain the following JSON:
{
  "resource": "YOUR_MCP_SERVER_BASE_URL",
  "authorization_servers": [
    "https://YOUR_DOMAIN"
  ],
  "bearer_methods_supported": [
    "header"
  ],
  "scopes_supported": [
    "tool:getsystemstate",
    "tool:setsystemstate"
  ]
}
Finally, enforce authorization with the code highlighted below:
//Program.cs

//...existing code...

builder.Services.AddAuthorization();  //👈 new code

builder.Services
    .AddMcpServer()
    .WithHttpTransport()
    .AddAuthorizationFilters()  //👈 new code
    .WithTools<RandomNumberTools>();

var app = builder.Build();

app.MapMcp().RequireAuthorization();  //👈 changed code

app.Run(mcpServerBaseUrl);  //👈 changed code
You added the authorization middleware service (AddAuthorization()) and support for authorization filters (AddAuthorizationFilters()). Also, you applied authorization to the MCP endpoints (RequireAuthorization()) and forced the server to use the base URL defined in the appsettings.json file. The last change is not strictly required, but it ensures that you have one source of truth for the MCP base URL.
Add authorization policy
You added a generic support for authorization with AddAuthorization(). This makes sure that only authenticated users access the protected tools. But our initial intent is to allow users to access each specific tool based on their permissions.
You can do this by defining a couple of authorization policies based on the existence of specific permissions in the access token. To this purpose, replace the AddAuthorization() invocation with the following code:
//Program.cs

//...existing code...

builder.Services.AddAuthorization(options =>
{
    options.AddPolicy("GetSystemStatePolicy", policy =>
        policy.RequireClaim("permissions", "tool:getsystemstate"));

    options.AddPolicy("SetSystemStatePolicy", policy =>
        policy.RequireClaim("permissions", "tool:setsystemstate"));
});

//...existing code...
This code defines two authorization policies:
GetSystemStatePolicybased on thetool:getsystemstatevalue for the claimpermissions.SetSystemStatePolicybased on thetool:setsystemstatevalue for the claimpermissions.
Let’s complete the protection of the tools by applying the authorization filter with the specific policy, as shown below:
//Tools/SystemTools.cs

//...existing code...

internal class SystemTools
{
    //...existing code...

    [McpServerTool]
    [Description("Returns the current state of the fictitious system. Possible states are: Ready, Waiting, Running, Stopped.")]
    [Authorize(Policy = "GetSystemStatePolicy")]  //👈 new code
    public string GetSystemState()
    {
        //...existing code...
    }

    [McpServerTool]
    [Description("Sets the current state of the fictitious system. Valid states are: Ready, Waiting, Running, Stopped.")]
    [Authorize(Policy = "SetSystemStatePolicy")]  //👈 new code
    public string SetSystemState(
        [Description("The new state to set. Must be one of: Ready, Waiting, Running, Stopped.")] SystemState state)
    {
        //...existing code...
    }
}
Your MCP server is secure now!
Test Your Secure MCP Server
Now it’s time to test your brand new secure MCP server!
Run your server with the dotnet run command.
Then, in your VSCode instance, restart your MCP server:

After a few seconds, you will see a popup message like the following:
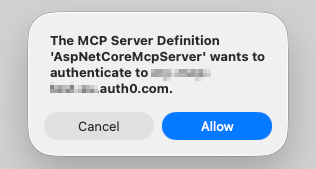
This message is the effect of the RequireAuthorization() execution you added to the server. It sent a 401 HTTP status message to VSCode with a reference to the Protected Resource Metadata document, where VSCode found all the needed info to start the user authentication and authorization process.
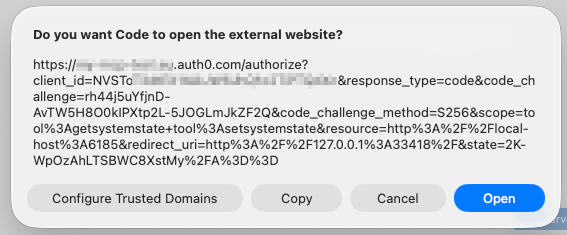
Once you have allowed the authentication flow, you will get the authorization request that VSCode is about to send to Auth0, as shown below:
After user authentication, you will be requested to authorize VSCode to access your profile:
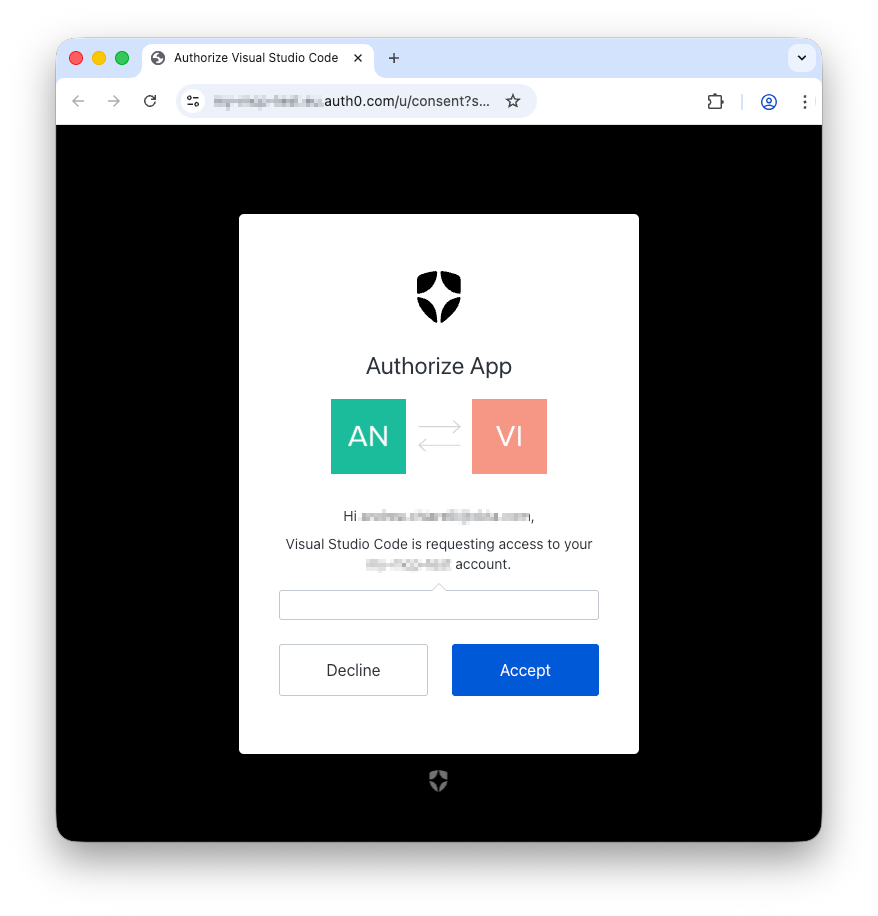
Once you accept the request, you will be redirected back to your VSCode instance.
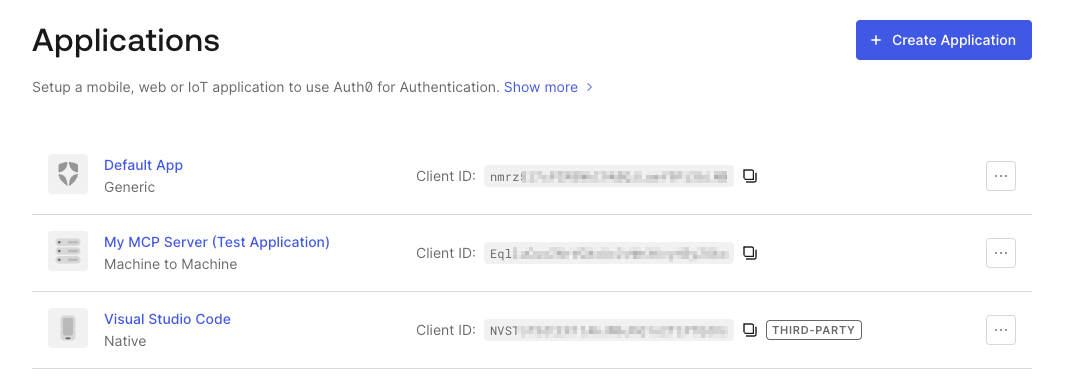
You didn’t notice it, but under the hood, your VSCode instance automatically registered with Auth0 using DCR. You can verify this by going to your Auth0 dashboard and look in the list of the registered applications. You will see VSCode among them, and it is marked as a third-party application, as you can see below:
Now your VSCode instance has an access token to access the tools implemented by your MCP server.
Make sure your chat window is in Agent mode and list the tools provided by your MCP server. You will see only the get_random_number tool:
Why? Doesn’t VSCode have an access token?
VSCode has an access token, but without the required permissions to access the protected tools. So you can only access the public tool as before the protection implementation.
To test your MCP server properly, you should assign one or more of the required permissions to your user profile on Auth0. Follow the instructions in Assign Permissions to Users to assign the tool:getsystemstate permission to your user profile.
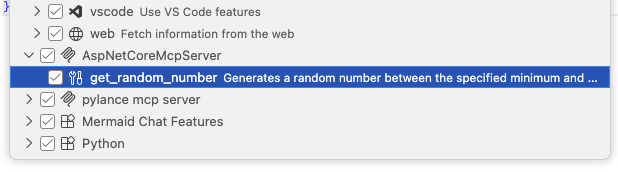
Use the command palette to sign out and restart your MCP server in VSCode. Then authenticate and check again the list of tools available to you. This time you should also see the get_system_state tool:

Ask something involving the state of the fictitious system in the chat window, as shown in the following screenshot:
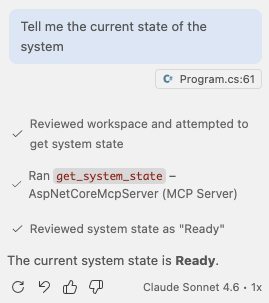
You should be able to use the tool as expected.
Now, feel free to play with the permissions to get access to the other tool.
Let’s Recap
After a long journey, this article provided a comprehensive guide on securing a C# MCP server using Auth0, transforming it from a local experiment into an enterprise-ready resource server.
The journey covered the following main steps:
- Building the Base MCP Server: You quickly set up a basic, unsecured MCP server using the C# SDK for MCP and the MCP server template, exposing a simple
GetRandomNumber()tool. - Defining Protected Tools: You introduced two new tools,
GetSystemState()andSetSystemState(), which require specific authorization, setting the stage for security implementation. - Auth0 Tenant Configuration: You configured the Auth0 tenant by enabling Dynamic Client Registration (DCR) to allow MCP clients (like VSCode) to self-register, and enabling the Resource Parameter Compatibility Profile as required by the MCP specification. We also promoted necessary connections to the domain level.
- Registering the MCP Server as an API: The MCP server was registered with Auth0 as a standard API (Resource Server), ensuring its base URL was set as the audience. You configured it to use RFC 9068 access tokens and enabled Role-Based Access Control (RBAC) to include permissions in the access token.
- Securing the Server Code: You updated the C# application to:
- Include necessary configuration via
appsettings.json. - Integrate the
JwtBearerauthentication middleware for access token validation against Auth0. - Define the Protected Resource Metadata (PRM) document using
AddMcp(), providing clients with authorization server and scope information. - Implement authorization policies based on specific permissions.
- Apply these policies to the respective tools using the
[Authorize]attribute.
- Include necessary configuration via
- Testing the Secure Server: Finally, you tested the secured server by integrating it with VSCode. The process demonstrated the DCR flow, user authentication, and the crucial step of assigning user permissions within Auth0 to grant access to the newly protected tools.
By following these steps, you successfully implemented an OAuth 2.1-compliant security layer, ensuring that access to sensitive tools is gated by proper user permissions validated through Auth0.
You can download the final version of this project from this GitHub repository, looking into the auth-for-mcp/aspnetcore-mcp-server folder.
To learn more about using Auth0 to secure your AI agents check out Auth0 for AI Agents.
About the author

Andrea Chiarelli
Principal Developer Advocate
I have over 20 years of experience as a software engineer and technical author. Throughout my career, I've used several programming languages and technologies for the projects I was involved in, ranging from C# to JavaScript, ASP.NET to Node.js, Angular to React, SOAP to REST APIs, etc.
In the last few years, I've been focusing on simplifying the developer experience with Identity and related topics, especially in the .NET ecosystem.