In our last article about LangChain and First Party tool calling, we created an application to manage a fictional Zoo company: the Zoo AI. The management application It was divided into two projects: a traditional REST API backend protected with Auth0 and with Role-Based Access Control (RBAC), and a LangChain integrated project with a frontend in which Zoo employees were able to send messages to an AI that would decide the best course of action based on the situation and the user role.
The focus of the first article was to teach how an AI could integrate into your APIs without sacrificing security or company policies. All tasks, even those committed by an LLM, were always made on behalf of the user, with his username stamped and signed on each request.
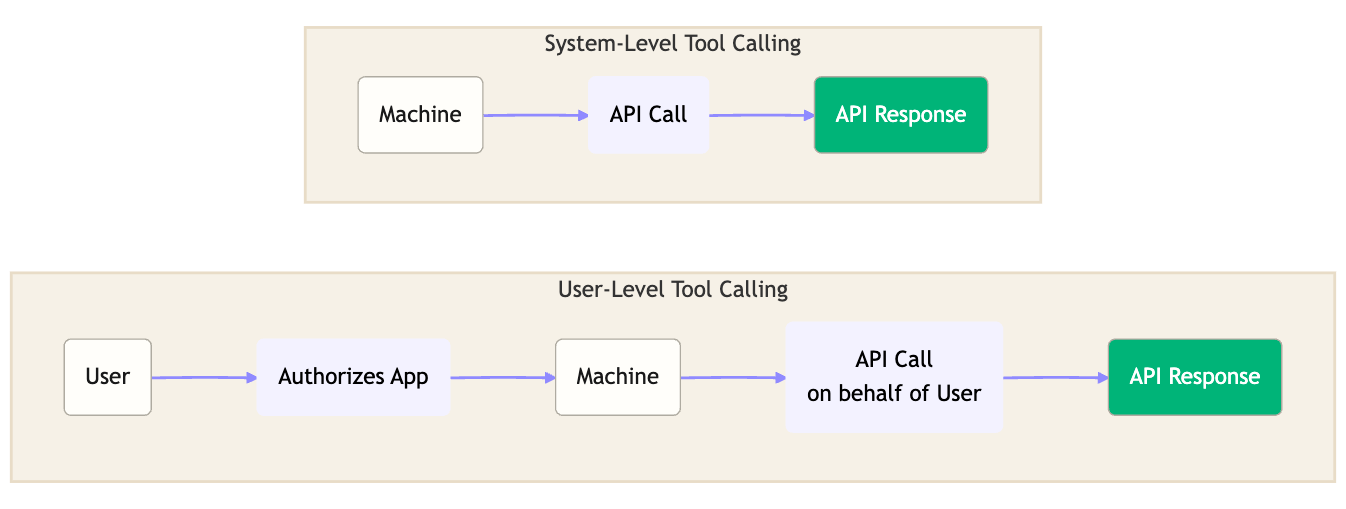
There were two types of tool calling: a system-level tool calling and the user-level tool calling. While, in the first, the machine makes the API calls, the other is made in the name of an user, which must have authorized the application to access protected resources available exclusively for a specific user-group.
In this article, we keep the notion of calling tools on users' behalf. However, we will introduce a new complexity: can we securely call third-party tools using LangChain’s stack and LLMs? In more technical words: we need to retrieve access tokens from third-party APIs with correct permissions and avoid having the LLM have access to these tokens directly, making a secure AI integration.
Expanding the Zoo AI Tool
To show third-party tool calling, we are going to use the same project as before.
Learn how to build a secure tool-calling AI agent using LangChain, FastAPI, and Python. You’ll learn how to protect a FastAPI API with Auth0 and to implement agent frontend that uses LangChain tool calling to interact with it securely.
For a quick recap, the project created in the last article had 3 tools:
- List animals: so one could know about all the animals in the zoo, its species, age and last events
- Put events on animals: any employee can add new events to an animal. The events are always stored with the user id and its role.
- Send messages to groups of users: An employee could call veterinarians to check an animal, or the janitor to clean an area.
The whole idea with LangChain was to allow a more natural communication with the system and a more efficient decision making as well. For example:
“Alex is sleepy today, he seems tired" would make the LLM check which animal is Alex and prompt veterinarians to check his health.
At the end of this tutorial, the Zoo management app will have a new ability: allow employees to do supply purchases related to its engagement. For example, veterinarians can ask for veterinarian supplies, and janitors can ask for specific cleaning material. How are we going to do this? By sending e-mails to our suppliers! We are going to create templates the AI needs to fulfill before sending them.
Prerequisites
- Python 3.11 or later
- Poetry for dependency management. Check how to install.
- An Auth0 for GenAI account. Create one.
- An OpenAI account and API key. Create one or use any other LLM provider supported by LangChain.
- A Google Account and Google API for Auth configured (follow this tutorial)
- In your Auth0 tenant, create a username/password user with a ROLE. Follow the instructions at the previous article(section Setting up authentication in the Zoo API)
- Our repository cloned
Preparing the Environment
We will use the earlier article as the basis for the work we are going to do today. You need to clone the repository and switch to step2-firstparty-toolcalling branch. This is the starting point of this tutorial. Also, use poetry to install the dependencies and create a virtual environment. All needed dependencies are already included in the pyproject.toml file.
git clone https://github.com/auth0-samples/auth0-zoo-ai
cd auth0-zoo-ai
git switch step2-firstparty-toolcalling
poetry install
Now, we need to create an Auth0 for GenAI account. The link provides a special configuration for GenAI solutions that enables preview features such as Token Vault, which we are going to use.
We have two projects inside the repository: api and agent. The api will not be changed, but we need to configure it. You can follow the section Setting Up Auth0 Authentication for the FastAPI API at our previous article.
The agent will have new features described below.
Setting Up the Login Mechanism
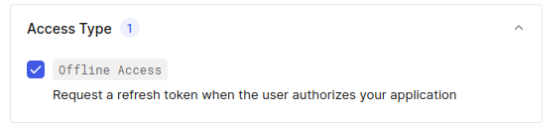
Gmail is the platform we will use to send emails on users' behalf. Based on that, we need to set up how users authenticate in our application: using Google’s social login. To set up Google Authentication, follow this documentation and set Offline Access and Gmail.Send permissions. We just need these two.

At the end, you should have the social connection google-auth2 configured.

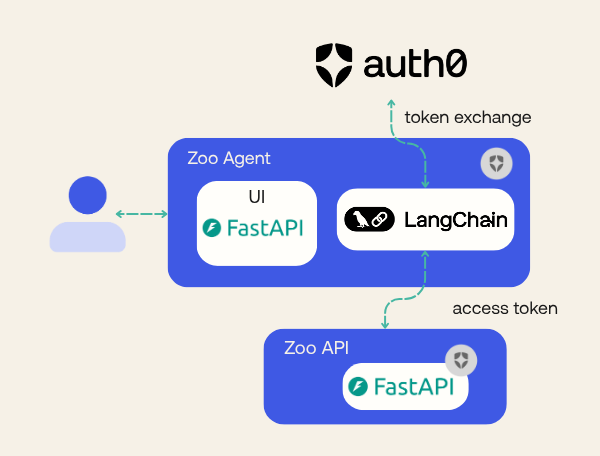
Creating an Auth0 Application with Token Exchange
Now, we need to configure authentication for our agent project. We also need to add Token Exchange with Token Vault enabled; this feature will enable us to receive a user’s Google account token with permission to send emails.
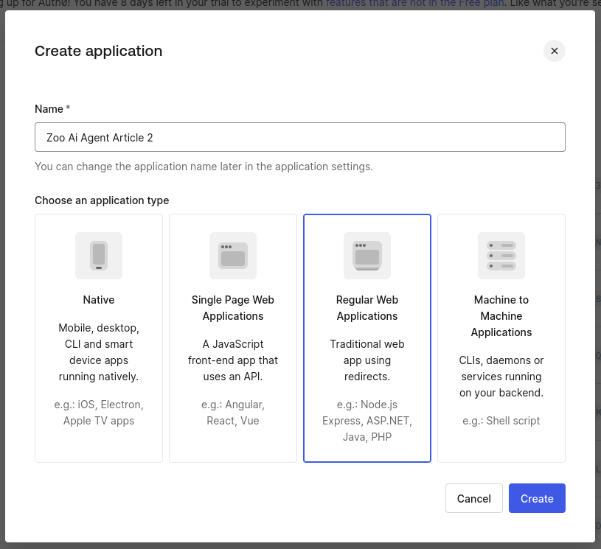
Go to Applications -> Applications and click on “Create Application”. In Application type, select “Regular Web Application” and give the name “Zoo AI Agent Article 2”:
After the creation, go to the application settings and fill the following values:
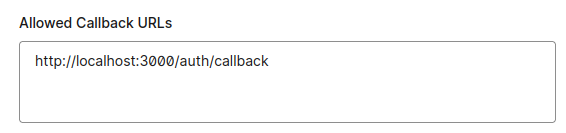
- Allowed callback URL - http://localhost:3000/auth/callback
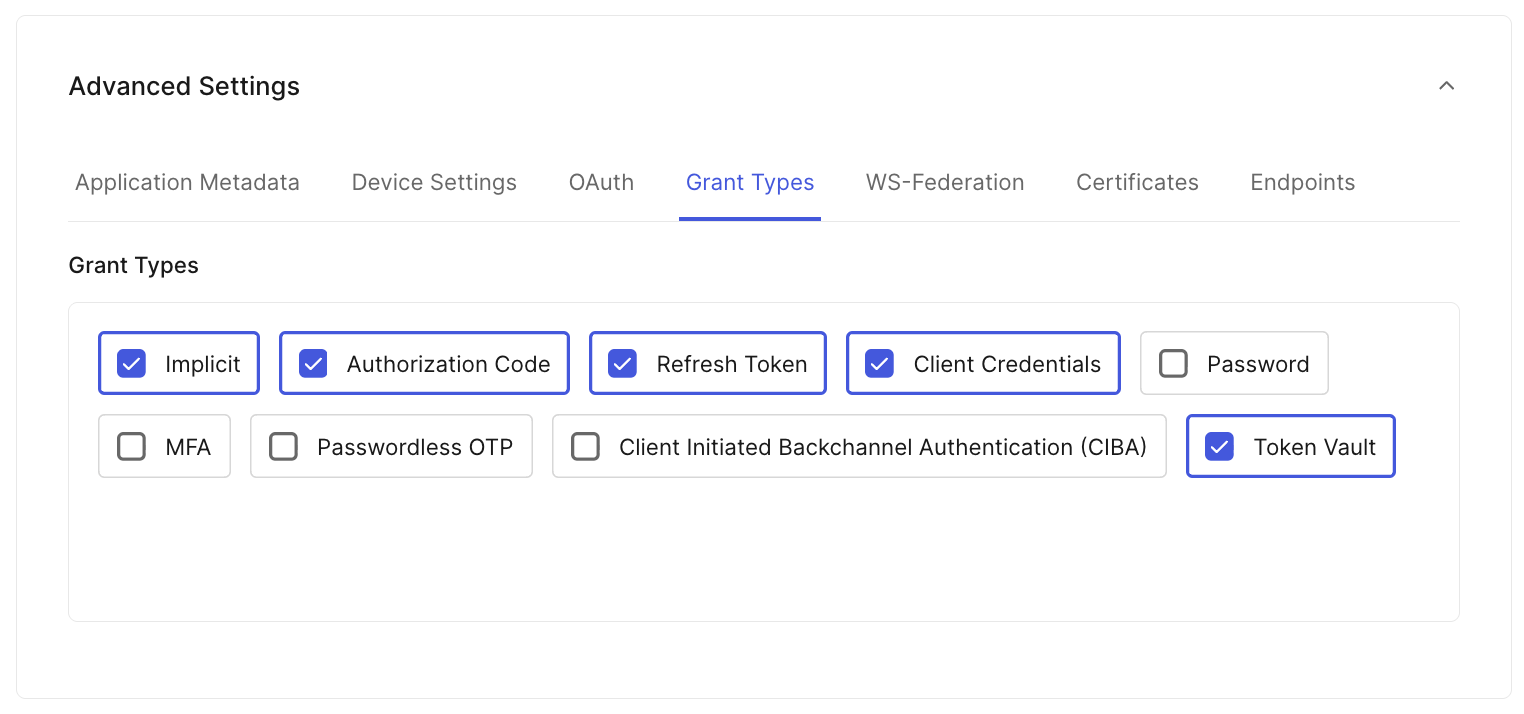
- Advanced settings, grant types, select: Implicit, Authorization Code, Refresh Token, Client Credentials, and Token Vault
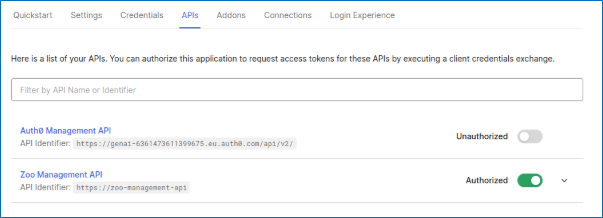
In the tab API, authorize “Zoo Management API”
In the tab Connections, enable google-oauth2 connection and disable every other connection.

Make sure Token Vault is enabled for your tenant, navigate to Authentication -> Social select the google-oauth2 and navigate to the bottom. In the Advanced section toggle on to enable Token Vault and remember to Save Changes.
Now we need to fill our environment variables and test the application. Create a file .env in folder agent with the following content:
AUTH0_DOMAIN="YOUR_AUTH0_DOMAIN"
AUTH0_CLIENT_ID="YOUR_AUTH0_CLIENT_ID"
AUTH0_CLIENT_SECRET="YOUR_AUTH0_CLIENT_SECRET"
APP_BASE_URL="http://localhost:3000"
APP_SECRET_KEY="use [openssl rand -hex 32] to generate a 32 bytes value"
# OpenAI
OPENAI_API_KEY="YOUR_OPEN_AI_KEY"
API_AUDIENCE="https://zoo-management-api"
API_BASE_URL="http://localhost:8000"

VETERINARIAN_SUPPLIES_EMAIL="EMAIL_SENT_FOR_VETERINARY_SUPPLIES"
CLEANING_SUPPLIES_EMAIL="EMAIL_SENT_FOR_CLEANING_SUPPLIES"
You must change the values of the following properties, anything else you can keep as is.
AUTH0_DOMAIN,AUTH0_CLIENT_IDandAUTH0_CLIENT_SECRET– You can get it in your Auth0 Application Settings.APP_SECRET_KEY– This key is used to encrypt the user session as a cookie in the user's browser. You can use the command above to generate a unique value.OPENAI_API_KEY– You can create a free one.VETERINARY_SUPPLIES_EMAIL– fill with the e-mail that will receive orders for veterinary supplies.CLEANING_SUPPLIES_EMAIL– Fill with the e-mail that will receive orders for cleaning supplies.
We should now test the application to check if everything is working as expected. Run both commands to spin up the projects:
On folder api/, run:
poetry run uvicorn main:app
And on the folder agent/, run:
poetry run uvicorn main:app --reload --port 3000
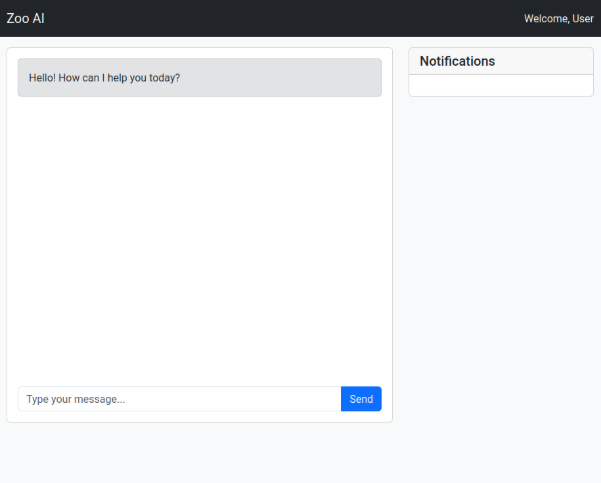
Now, open the browser window with the http://localhost:3000 address. You will be redirected to Auth0 Universal Login. Just follow the login steps. In the end, you should see a screen like this:
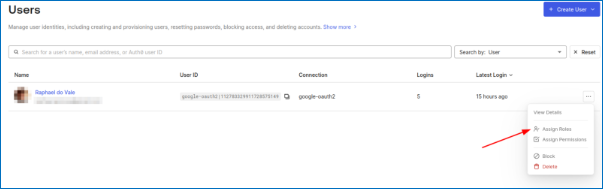
Before being able to use the screen, we need to associate a user role to the google user. Without this, most APIs won’t work. In the Auth0 dashboard, go to User Management -> Users. Find the user you just created, click on the three dots at right, and click on “Assign Roles”
Now, refresh the screen so you could get a new token with the role assigned. The screen allows you to communicate with our system and ask questions. Also, new notifications are polled for every 5 seconds. The notifications are not directed to a single user, but to a user role.
Go ahead and play with the tool, here some prompt ideas:
- Alex seems hungry, call someone to feed him
- The lemurs are dancing. Ask the janitors to play "I like to move it"
- What’s the current Gloria status?
Calling Third-Party Tools
Now that our application is running, we can work with more advanced features. In that section, our Zoo AI tool will be able to order veterinarian and cleaning supplies from the “external world”. Since we can’t connect to a real supplier, we will use e-mails as fake orders.
In this section, we also introduce the library auth0-ai-langchain. This library is designed to work with LangGraph and help with Federated Token retrieval for Third Party API calling, authorization with FGA, and RAG support. For this article, we will focus on the third-party API calling part.
Let’s create a new file called tools_thirdparty_api_call.py to combine all this logic. Do not forget to create it in the agent folder. Add the following lines to the file:
import os
import base64
from datetime import date
from email.mime.text import MIMEText

import requests
from auth0_ai.authorizers.federated_connection_authorizer import get_access_token_for_connection
from auth0_ai_langchain.auth0_ai import Auth0AI
from dotenv import load_dotenv
from langchain_core.tools import StructuredTool
from pydantic import BaseModel, Field

load_dotenv()
auth0_ai = Auth0AI()

with_send_email_gmail = auth0_ai.with_federated_connection(
    connection="google-oauth2",
    scopes=["https://www.googleapis.com/auth/gmail.send"],
)
In this code, we declare the with_send_email_gmail variable that allows any function wrapped into it to recover Google’s access token to the specified scope. No other scope will be provided, and you must specify from which social connection you are going to recover the token (google-auth2, in this case).
Now, we need to create our send_email function:
def send_email(to_email: str, subject: str, body: str) -> str:
    try:
        gmail_access_token = get_access_token_for_connection()
        message = MIMEText(body)
        message['to'] = to_email
        message['subject'] = subject
        raw_message = base64.urlsafe_b64encode(message.as_bytes()).decode('utf-8')
        response = requests.post(
            'https://gmail.googleapis.com/gmail/v1/users/me/messages/send',
            headers={
                'Authorization': f'Bearer {gmail_access_token}',
                'Content-Type': 'application/json'
            },
            json={'raw': raw_message}
        )
        response.raise_for_status()
        sent_message = response.json()
        return f"Email sent successfully to {to_email}. Message ID: {sent_message['id']}"
    except Exception as e:
        return f"Unexpected error sending email: {e}"
The send email function calls get_access_token_for_connection to retrieve the desired token from Google. But how does get_access_token_for_connection know which token needs to be recovered? Because the function will be wrapped with with_send_email_gmail. Now, we need to implement the tools for ordering veterinarians and cleaning supplies.
class AskVeterinarianSuppliesArgs(BaseModel):
    medicine_description: str = Field(..., description="Description of the medicine")
    quantity: int = Field(..., description="Quantity of the medicine")
    due_date: date = Field(..., description="Due date of the medicine")
    animal_id: str = Field(..., description="ID of the animal to take the medicine")

def ask_for_veterinarian_supplies(
        medicine_description: str,
        quantity: int,
        due_date: date,
        animal_id: str
) -> str:
    return send_email(
        to_email=os.getenv("VETERINARIAN_SUPPLIES_EMAIL"),
        subject=f"Medicine request for animal {animal_id}",
        body=f"Medicine request for animal {animal_id}:\n\n"
             f"Medicine description: {medicine_description}"
             f"\nQuantity: {quantity}"
             f"\nDue date: {due_date}",
    )

ask_for_veterinarian_supplies_tool = with_send_email_gmail(
    StructuredTool.from_function(
        func=ask_for_veterinarian_supplies,
        name="ask_for_medical_supplies",
        description="Veterinarians can ask for supplies to be delivered to an animal.",
        args_schema=AskVeterinarianSuppliesArgs,
    )
)
For the veterinarian, we defined the base arguments with the Pydantic model. Therefore, we created the real function ask_for_veterinarian_supplies that will recover the destination e-mail and create a template asking for supplies. In the end, we will wrap the function with the with_send_email_gmail so the library knows which token it needs to recover.
We need to do something similar for cleaning supplies:
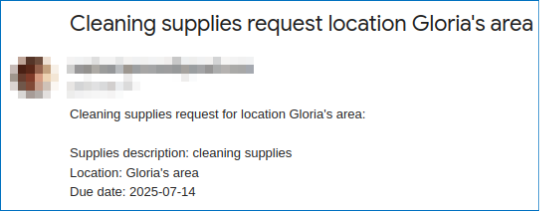
class AskCleaningSuppliesArgs(BaseModel):
    supplies_description: str = Field(..., description="Description of the supplies")
    location: str = Field(..., description="Location of to deliver")
    due_date: date = Field(..., description="Due date of the supplies")

def ask_for_cleaning_supplies(
        supplies_description: str,
        location: str,
        due_date: date,
) -> str:
    return send_email(
        to_email=os.getenv("CLEANING_SUPPLIES_EMAIL"),
        subject=f"Cleaning supplies request location {location}",
        body=f"Cleaning supplies request for location {location}:\n"
             f"\nSupplies description: {supplies_description}"
             f"\nLocation: {location}"
             f"\nDue date: {due_date}",
    )

ask_for_cleaning_supplies_tool = with_send_email_gmail(
    StructuredTool.from_function(
        func=ask_for_cleaning_supplies,
        name="ask_for_cleaning_supplies",
        description="Zookeepers can ask for cleaning supplies to be delivered to a specific location.",
        args_schema=AskCleaningSuppliesArgs,
    )
)
Now, we need to register these two tools so our agent can use them. Change the file agent.py to include both functions (do not forget to import these functions):
tools = [
    list_animals,
    update_animal_status,
    notify_staff,
    ask_for_veterinarian_supplies_tool,
    ask_for_cleaning_supplies_tool,
]
You may be asking: how do with_federated_connection and get_access_token_for_connection know which user gets the token? The library needs the user refresh token informed in a context configuration. Check the function run_agent in agent.py file::
async def run_agent(user_input: str, user_role: str, user_id: str, token: str, refresh_token: str) -> str:
    config = {
        "configurable": {
            "thread_id": user_id,
            "_credentials": {
                "refresh_token": refresh_token
            },
            "api_access_token": token,
        }
    }

# (...)
This refresh token is not related to Google, but since we enabled Token Vault, the library will use it to retrieve a Google’s access token using the credentials stored in Auth0 servers. The result is that, internally, your code will receive a Google’s access token with the specified scope.
Now, we can test the application again and check how it behaves:
“I need the following supplies ordered and delivered for the next week: Alex is out of bandages supplies, buy it. Marty and Gloria need cleaning supplies.”
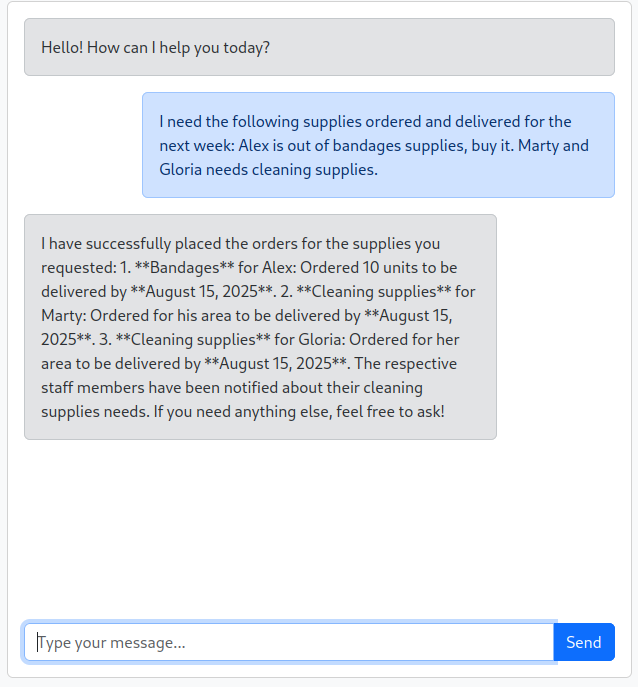
Go check your email!
Note: You can find the final, completed code for this tutorial on the step3-thirdparty-toolcalling branch of the repository.
Recap
This article is all about integrating third-party tools using Auth0 and LangGraph, building on the Zoo AI project from the earlier article. It starts with the basics of secure AI integration with APIs, making sure everything is done on behalf of the user with proper authentication.
Then, it dives into the tricky part of securely calling third-party tools, like getting access tokens from third-party APIs without exposing them to the LLM. The Zoo AI tool now lets employees order supplies by sending emails to suppliers, showing off the practical side of third-party tool calling.
This and much more is made possible by using LangGraph and Auth0 for AI Agents to protect the application.
About the author