
TL;DR: In this article, we will learn how to use SQLAlchemy as the ORM (Object Relational Database) library to communicate with relational database engines. First, we will learn about some core concepts of SQLAlchemy (like engines and connection pools), then we will learn how to map Python classes and its relationships to database tables, and finally we will learn how to retrieve (query) data from these tables. The code snippets used in this article can be found in this GitHub repository.
“Learn how to use SQLAlchemy ORM to persist and query data on Python applications.”
Tweet This
SQLAlchemy Introduction
SQLAlchemy is a library that facilitates the communication between Python programs and databases. Most of the times, this library is used as an Object Relational Mapper (ORM) tool that translates Python classes to tables on relational databases and automatically converts function calls to SQL statements. SQLAlchemy provides a standard interface that allows developers to create database-agnostic code to communicate with a wide variety of database engines.
As we will see in this article, SQLAlchemy relies on common design patterns (like Object Pools) to allow developers to create and ship enterprise-grade, production-ready applications easily. Besides that, with SQLAlchemy, boilerplate code to handle tasks like database connections is abstracted away to let developers focus on business logic.
Before diving into the ORM features provided by SQLAlchemy, we need to learn how the core works. The following sections will introduce important concepts that every Python developer needs to understand before dealing with SQLAlchemy applications.
Python DBAPI
The Python DBAPI (an acronym for DataBase API) was created to specify how Python modules that integrate with databases should expose their interfaces. Although we won't interact with this API directly—we will use SQLAlchemy as a facade to it—it's good to know that it defines how common functions like connect, close, commit, and rollback must behave. Consequently, whenever we use a Python module that adheres to the specification, we can rest assured that we will find these functions and that they will behave as expected.
In this article, we are going to install and use the most popular PostgreSQL DBAPI implementation available: psycopg. Other Python drivers communicate with PostgreSQL as well, but psycopg is the best candidate since it fully implements the DBAPI specification and has great support from the community.
To better understand the DBAPI specification, what functions it requires, and how these functions behave, take a look into the Python Enhancement Proposal that introduced it. Also, to learn about what other database engines we can use (like MySQL or Oracle), take a look at the official list of database interfaces available.
SQLAlchemy Engines
Whenever we want to use SQLAlchemy to interact with a database, we need to create an Engine. Engines, on SQLAlchemy, are used to manage two crucial factors: Pools and Dialects. The following two sections will explain what these two concepts are, but for now it suffices to say that SQLAlchemy uses them to interact with DBAPI functions.
To create an engine and start interacting with databases, we have to import the create_engine function from the sqlalchemy library and issue a call to it:
from sqlalchemy import create_engine
engine = create_engine('postgresql://usr:pass@localhost:5432/sqlalchemy')
This example creates a PostgreSQL engine to communicate with an instance running locally on port 5432 (the default one). It also defines that it will use usr and pass as the credentials to interact with the sqlalchemy database. Note that, creating an engine does not connect to the database instantly. This process is postponed to when it's needed (like when we submit a query, or when create/update a row in a table).
Since SQLAlchemy relies on the DBAPI specification to interact with databases, the most common database management systems available are supported. PostgreSQL, MySQL, Oracle, Microsoft SQL Server, and SQLite are all examples of engines that we can use alongside with SQLAlchemy. To learn more about the options available to create SQLAlchemy engines, take a look at the official documentation.
SQLAlchemy Connection Pools
Connection pooling is one of the most traditional implementations of the object pool pattern. Object pools are used as caches of pre-initialized objects ready to use. That is, instead of spending time to create objects that are frequently needed (like connections to databases) the program fetches an existing object from the pool, uses it as desired, and puts back when done.
The main reason why programs take advantage of this design pattern is to improve performance. In the case of database connections, opening and maintaining new ones is expensive, time-consuming, and wastes resources. Besides that, this pattern allows easier management of the number of connections that an application might use simultaneously.
There are various implementations of the connection pool pattern available on SQLAlchemy . For example, creating an Engine through the create_engine() function usually generates a QueuePool. This kind of pool comes configured with some reasonable defaults, like a maximum pool size of 5 connections.
As usual production-ready programs need to override these defaults (to fine-tune pools to their needs), most of the different implementations of connection pools provide a similar set of configuration options. The following list shows the most common options with their descriptions:
pool_size: Sets the number of connections that the pool will handle.max_overflow: Specifies how many exceeding connections (relative topool_size) the pool supports.pool_recycle: Configures the maximum age (in seconds) of connections in the pool.pool_timeout: Identifies how many seconds the program will wait before giving up on getting a connection from the pool.
To learn more about connection pools on SQLAlchemy, check out the official documentation.
SQLAlchemy Dialects
As SQLAlchemy is a facade that enables Python developers to create applications that communicate to different database engines through the same API, we need to make use of Dialects. Most of the popular relational databases available out there adhere to the SQL (Structured Query Language) standard, but they also introduce proprietary variations. These variations are the solely responsible for the existence of dialects.
For example, let's say that we want to fetch the first ten rows of a table called people. If our data was being held by a Microsoft SQL Server database engine, SQLAlchemy would need to issue the following query:
SELECT TOP 10 * FROM people;
But, if our data was persisted on MySQL instance, then SQLAlchemy would need to issue:
SELECT * FROM people LIMIT 10;
Therefore, to know precisely what query to issue, SQLAlchemy needs to be aware of the type of the database that it is dealing with. This is exactly what Dialects do. They make SQLAlchemy aware of the dialect it needs to talk.
On its core, SQLAlchemy includes the following list of dialects:
Dialects for other database engines, like Amazon Redshift, are supported as external projects but can be easily installed. Check out the official documentation on SQLAlchemy Dialects to learn more.
SQLAlchemy ORM
ORM, which stands for Object Relational Mapper, is the specialization of the Data Mapper design pattern that addresses relational databases like MySQL, Oracle, and PostgreSQL. As explained by Martin Fowler in the article, Mappers are responsible for moving data between objects and a database while keeping them independent of each other. As object-oriented programming languages and relational databases structure data on different ways, we need specific code to translate from one schema to the other.
For example, in a programming language like Python, we can create a Product class and an Order class to relate as many instances as needed from one class to another (i.e. Product can contain a list of instances of Order and vice-versa). Though, on relational databases, we need three entities (tables), one to persist products, another one to persist orders, and a third one to relate (through foreign key) products and orders.
As we will see in the following sections, SQLAlchemy ORM is an excellent Data Mapper solution to translate Python classes into/from tables and to move data between instances of these classes and rows of these tables.
SQLAlchemy Data Types
While using SQLAlchemy, we can rest assured that we will get support for the most common data types found in relational databases. For example, booleans, dates, times, strings, and numeric values are a just a subset of the types that SQLAlchemy provides abstractions for. Besides these basic types, SQLAlchemy includes support for a few vendor-specific types (like JSON) and also allows developers to create custom types and redefine existing ones.
To understand how we use SQLAlchemy data types to map properties of Python classes into columns on a relation database table, let's analyze the following example:
class Product(Base):
    __tablename__ = 'products'
    id=Column(Integer, primary_key=True)
    title=Column('title', String(32))
    in_stock=Column('in_stock', Boolean)
    quantity=Column('quantity', Integer)
    price=Column('price', Numeric)
In the code snippet above, we are defining a class called Product that has six properties. Let's take a look at what these properties do:
- The
__tablename__property tells SQLAlchemy that rows of theproductstable must be mapped to this class. - The
idproperty identifies that this is theprimary_keyin the table and that its type isInteger. - The
titleproperty indicates that a column in the table has the same name of the property and that its type isString. - The
in_stockproperty indicates that a column in the table has the same name of the property and that its type isBoolean. - The
quantityproperty indicates that a column in the table has the same name of the property and that its type isInteger. - The
priceproperty indicates that a column in the table has the same name of the property and that its type isNumeric.
Seasoned developers will notice that (usually) relational databases do not have data types with these exact names. SQLAlchemy uses these types as generic representations to what databases support and use the dialect configured to understand what types they translate to. For example, on a PostgreSQL database, the title would be mapped to a varchar column.
SQLAlchemy Relationship Patterns
Now that we know what ORM is and have look into data types, let's learn how to use SQLAlchemy to map relationships between classes to relationships between tables. SQLAlchemy supports four types of relationships: One To Many, Many To One, One To One, and Many To Many.
Note that this section will be an overview of all these types, but in the SQLAlchemy ORM in Practice action we will do a hands-on to practice mapping classes into tables and to learn how to insert, extract, and remove data from these tables.
The first type, One To Many, is used to mark that an instance of a class can be associated with many instances of another class. For example, on a blog engine, an instance of the Article class could be associated with many instances of the Comment class. In this case, we would map the mentioned classes and its relation as follows:
class Article(Base):
    __tablename__ = 'articles'
    id = Column(Integer, primary_key=True)
    comments = relationship("Comment")


class Comment(Base):
    __tablename__ = 'comments'
    id = Column(Integer, primary_key=True)
    article_id = Column(Integer, ForeignKey('articles.id'))
The second type, Many To One, refers to the same relationship described above but from the other perspective. To give a different example, let's say that we want to map the relationship between instances of Tire to an instance of a Car. As many tires belong to one car and this car contains many tires, we would map this relation as follows:
class Tire(Base):
    __tablename__ = 'tires'
    id = Column(Integer, primary_key=True)
    car_id = Column(Integer, ForeignKey('cars.id'))
    car = relationship("Car")


class Car(Base):
    __tablename__ = 'cars'
    id = Column(Integer, primary_key=True)
The third type, One To One, refers to relationships where an instance of a particular class may only be associated with one instance of another class, and vice versa. As an example, consider the relationship between a Person and a MobilePhone. Usually, one person possesses one mobile phone and this mobile phone belongs to this person only. To map this relationship on SQLAlchemy, we would create the following code:
class Person(Base):
    __tablename__ = 'people'
    id = Column(Integer, primary_key=True)
    mobile_phone = relationship("MobilePhone", uselist=False, back_populates="person")

class MobilePhone(Base):
    __tablename__ = 'mobile_phones'
    id = Column(Integer, primary_key=True)
    person_id = Column(Integer, ForeignKey('people.id'))
    person = relationship("Person", back_populates="mobile_phone")
In this example, we pass two extra parameters to the relationship function. The first one, uselist=False, makes SQLAlchemy understand that mobile_phone will hold only a single instance and not an array (multiple) of instances. The second one, back_populates, instructs SQLAlchemy to populate the other side of the mapping. The official Relationships API documentation provides a complete explanation of these parameters and also covers other parameters not mentioned here.
The last type supported by SQLAlchemy, Many To Many, is used when instances of a particular class can have zero or more associations to instances of another class. For example, let's say that we are mapping the relationship of instances of Student and instances of Class in a system that manages a school. As many students can participate in many classes, we would map the relationship as follows:
students_classes_association = Table('students_classes', Base.metadata,
    Column('student_id', Integer, ForeignKey('students.id')),
    Column('class_id', Integer, ForeignKey('classes.id'))
)

class Student(Base):
    __tablename__ = 'students'
    id = Column(Integer, primary_key=True)
    classes = relationship("Class", secondary=students_classes_association)

class Class(Base):
    __tablename__ = 'classes'
    id = Column(Integer, primary_key=True)
In this case, we had to create a helper table to persist the association between instances of Student and instances of Class, as this wouldn't be possible without an extra table. Note that, to make SQLAlchemy aware of the helper table, we passed it in the secondary parameter of the relationship function.
The above code snippets show just a subset of the mapping options supported by SQLAlchemy. In the following sections, we are going to take a more in-depth look into each one of the available relationship patterns. Besides that, the official documentation is a great reference to learn more about relationship patterns on SQLAlchemy.
SQLAlchemy ORM Cascade
Whenever rows in a particular table are updated or deleted, rows in other tables might need to suffer changes as well. These changes can be simple updates, which are called cascade updates, or full deletes, known as cascade deletes. For example, let's say that we have a table called shopping_carts, a table called products, and a third one called shopping_carts_products that connects the first two tables. If, for some reason, we need to delete rows from shopping_carts we will need to delete the related rows from shopping_carts_products as well. Otherwise we will end up with a lot of garbage and unfulfilled references in our database.
To make this kind of operation easy to maintain, SQLAlchemy ORM enables developers to map cascade behavior when using relationship() constructs. Like that, when operations are performed on parent objects, child objects get updated/deleted as well. The following list provides a brief explanation of the most used cascade strategies on SQLAlchemy ORM:
save-update: Indicates that when a parent object is saved/updated, child objects are saved/updated as well.delete: Indicates that when a parent object is deleted, children of this object will be deleted as well.delete-orphan: Indicates that when a child object loses reference to a parent, it will get deleted.merge: Indicates thatmerge()operations propagate from parent to children.
If more information about this feature is needed, the SQLAlchemy documentation provides an excellent chapter about Cascades.
SQLAlchemy Sessions
Sessions, on SQLAlchemy ORM, are the implementation of the Unit of Work design pattern. As explained by Martin Fowler, a Unit of Work is used to maintain a list of objects affected by a business transaction and to coordinate the writing out of these changes. This means that all modifications tracked by Sessions (Units of Works) will be applied to the underlying database together, or none of them will. In other words, Sessions are used to guarantee the database consistency.
The official SQLAlchemy ORM documentation about Sessions gives a great explanation how changes are tracked, how to get sessions, and how to create ad-hoc sessions. However, in this article, we will use the most basic form of session creation:
from sqlalchemy import create_engine
from sqlalchemy.orm import sessionmaker

# create an engine
engine = create_engine('postgresql://usr:pass@localhost:5432/sqlalchemy')

# create a configured "Session" class
Session = sessionmaker(bind=engine)

# create a Session
session = Session()
As we can see from the code snippet above, we only need one step to get sessions. We need to create a session factory that is bound to the SQLAlchemy engine. After that, we can just issue calls to this session factory to get our sessions.
SQLAlchemy in Practice
Now that we got a better understanding of the most important pieces of SQLAlchemy, it's time to start practicing it. In the following sections, we will create a small project based on pipenv—a Python dependency manager—and add some classes to it. Then we will map these classes to tables persisted to a PostgreSQL database and learn how to query data.
Starting the Tutorial Project
To create our tutorial project, we have to have Python installed on our machine and pipenv installed as a global Python package. The following commands will install pipenv and set up the project. These commands are dependent on Python, so be sure to have it installed before proceeding:
# install pipenv globally
pip install pipenv

# create a new directory for our project
mkdir sqlalchemy-tutorial

# change working directory to it
cd sqlalchemy-tutorial

# create a Python 3 project
pipenv --three
Running PostgreSQL
To be able to practice our new skills and to learn how to query data on SQLAlchemy, we will need a database to support our examples. As already mentioned, SQLAlchemy provides support for many different databases engines, but the instructions that follow will focus on PostgreSQL. There are many ways to get an instance of PostgreSQL. One of them is to use some cloud provider like Heroku or ElephantSQL (both of them have free tiers). Another possibility is to install PostgreSQL locally on our current environment. A third option is to run a PostgreSQL instance inside a Docker container.
The third option is probably the best choice because it has the performance of an instance running locally, it's free forever, and because it's easy to create and destroy Docker instances. The only (small) disadvantage is that we need to install Docker locally.
After having Docker installed, we can create and destroy dockerized PostgreSQL instances with the following commands:
# create a PostgreSQL instance
docker run --name sqlalchemy-orm-psql \
    -e POSTGRES_PASSWORD=pass \
    -e POSTGRES_USER=usr \
    -e POSTGRES_DB=sqlalchemy \
    -p 5432:5432 \
    -d postgres

# stop instance
docker stop sqlalchemy-orm-psql

# destroy instance
docker rm sqlalchemy-orm-psql
The first command, the one that creates the PostgreSQL instance, contains a few parameters that are worth inspecting:
--name: Defines the name of the Docker instance.-e POSTGRES_PASSWORD: Defines the password to connect to PostgreSQL.-e POSTGRES_USER: Defines the user to connect to PostgreSQL.-e POSTGRES_DB: Defines the main (and only) database available in the PostgreSQL instance.-p 5432:5432: Defines that the local5432port will tunnel connections to the same port in the Docker instance.-d postgres: Defines that this Docker instance will be created based on the official PostgreSQL repository.
Installing SQLAlchemy Dependencies
In this tutorial, we will need to install only two packages: sqlalchemy and psycopg2. The first dependency refers to SQLAlchemy itself and the second one, psycopg2, is the PostgreSQL driver that SQLAlchemy will use to communicate with the database. To install these dependencies, we will use pipenv as shown:
# install sqlalchemy and psycopg2
pipenv install sqlalchemy psycopg2
This command will download both libraries and make them available in our Python virtual environment. Note that to run the scripts that we are going to create, we first need to spawn the virtual environment shell. That is, before executing python somescript.py, we need to execute pipenv shell. Otherwise, Python won't be able to find the installed dependencies, as they are just available in our new virtual environment.
Mapping Classes with SQLAlchemy
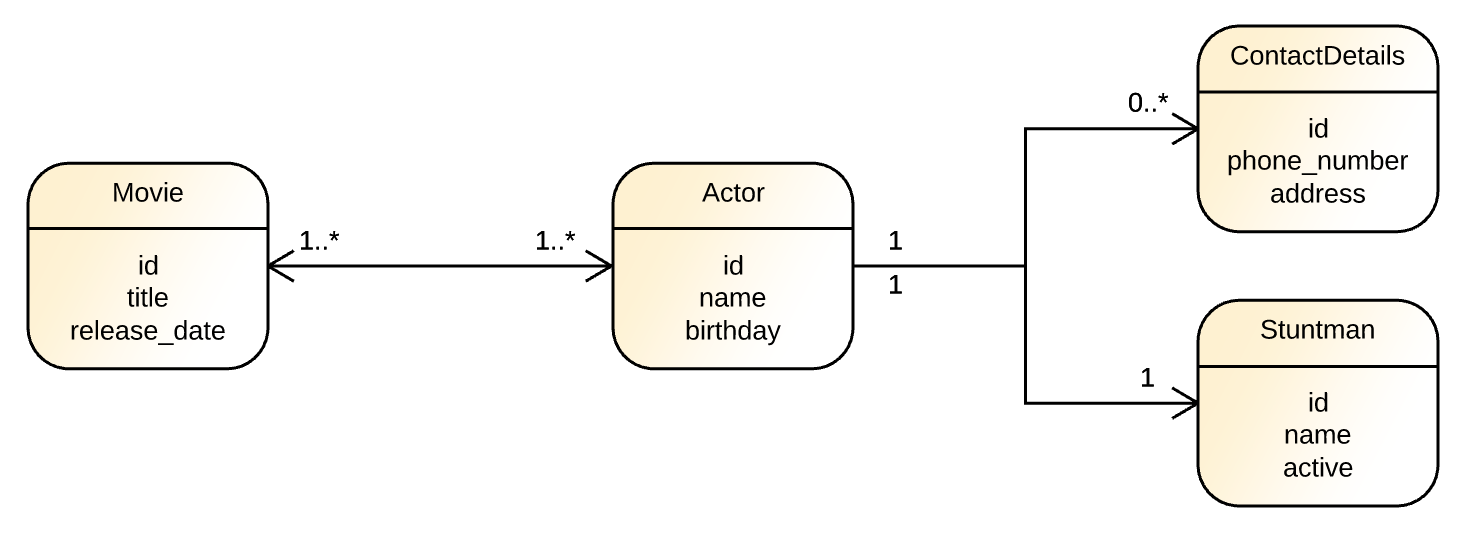
After starting the dockerized PostgreSQL instance and installing the Python dependencies, we can begin to map Python classes to database tables. In this tutorial, we will map four simple classes that represent movies, actors, stuntmen, and contact details. The following diagram illustrates these entities' characteristics and their relations.
To start, we will create a file called base.py in the main directory of our project and add the following code to it:
# coding=utf-8

from sqlalchemy import create_engine
from sqlalchemy.ext.declarative import declarative_base
from sqlalchemy.orm import sessionmaker

engine = create_engine('postgresql://usr:pass@localhost:5432/sqlalchemy')
Session = sessionmaker(bind=engine)

Base = declarative_base()
This code creates:
- a SQLAlchemy Engine that will interact with our dockerized PostgreSQL database,
- a SQLAlchemy ORM session factory bound to this engine,
- and a base class for our classes definitions.
Now let's create and map the Movie class. To do this, let's create a new file called movie.py and add the following code to it:
# coding=utf-8

from sqlalchemy import Column, String, Integer, Date

from base import Base


class Movie(Base):
    __tablename__ = 'movies'

    id = Column(Integer, primary_key=True)
    title = Column(String)
    release_date = Column(Date)

    def __init__(self, title, release_date):
        self.title = title
        self.release_date = release_date
The definition of this class and its mapping characteristics is quite simple. We start by making this class extend the Base class defined in the base.py module and then we add four properties to it:
- A
__tablename__to indicate what is the name of the table that will support this class. - An
idto represent the primary key in the table. - A
titleof typeString. - A
release_dateof typeDate.
The next class that we will create and map is the Actor class. Let's create a file called actor.py and add the following code to it:
# coding=utf-8

from sqlalchemy import Column, String, Integer, Date

from base import Base


class Actor(Base):
    __tablename__ = 'actors'

    id = Column(Integer, primary_key=True)
    name = Column(String)
    birthday = Column(Date)

    def __init__(self, name, birthday):
        self.name = name
        self.birthday = birthday
The definition of this class is pretty similar to the previous one. The differences are that the Actor has a name instead of a title, a birthday instead of a release_date, and that it points to a table called actors instead of movies.
As many movies can have many actors and vice-versa, we will need to create a Many To Many relationship between these two classes. Let's create this relationship by updating the movie.py file as follows:
# coding=utf-8

from sqlalchemy import Column, String, Integer, Date, Table, ForeignKey
from sqlalchemy.orm import relationship

from base import Base

movies_actors_association = Table(
    'movies_actors', Base.metadata,
    Column('movie_id', Integer, ForeignKey('movies.id')),
    Column('actor_id', Integer, ForeignKey('actors.id'))
)


class Movie(Base):
    __tablename__ = 'movies'

    id = Column(Integer, primary_key=True)
    title = Column(String)
    release_date = Column(Date)
    actors = relationship("Actor", secondary=movies_actors_association)

    def __init__(self, title, release_date):
        self.title = title
        self.release_date = release_date
The difference between this version and the previous one is that:
- we imported three new entities:
Table,ForeignKey, andrelationship; - we created a
movies_actors_associationtable that connects rows ofactorsand rows ofmovies; - and we added the
actorsproperty toMovieand configured themovies_actors_associationas the intermediary table.
The next class that we will create is Stuntman. In our tutorial, a particular Actor will have only one Stuntman and this Stuntman will work only with this Actor. This means that we need to create the Stuntman class and a One To One relationship between these classes. To accomplish that, let's create a file called stuntman.py and add the following code to it:
# coding=utf-8

from sqlalchemy import Column, String, Integer, Boolean, ForeignKey
from sqlalchemy.orm import relationship, backref

from base import Base


class Stuntman(Base):
    __tablename__ = 'stuntmen'

    id = Column(Integer, primary_key=True)
    name = Column(String)
    active = Column(Boolean)
    actor_id = Column(Integer, ForeignKey('actors.id'))
    actor = relationship("Actor", backref=backref("stuntman", uselist=False))

    def __init__(self, name, active, actor):
        self.name = name
        self.active = active
        self.actor = actor
In this class, we have defined that the actor property references an instance of Actor and that this actor will get a property called stuntman that is not a list (uselist=False). That is, whenever we load an instance of Stuntman, SQLAlchemy will also load and populate the Actor associated with this stuntman.
The fourth and final class that we will map in our tutorial is ContactDetails. Instances of this class will hold a phone_number and an address of a particular Actor, and one Actor will be able to have many ContactDetails associated. Therefore, we will need to use the Many To One relationship pattern to map this association. To create this class and this association, let's create a file called contact_details.py and add the following source code to it:
# coding=utf-8

from sqlalchemy import Column, String, Integer, ForeignKey
from sqlalchemy.orm import relationship

from base import Base


class ContactDetails(Base):
    __tablename__ = 'contact_details'

    id = Column(Integer, primary_key=True)
    phone_number = Column(String)
    address = Column(String)
    actor_id = Column(Integer, ForeignKey('actors.id'))
    actor = relationship("Actor", backref="contact_details")

    def __init__(self, phone_number, address, actor):
        self.phone_number = phone_number
        self.address = address
        self.actor = actor
As we can see, creating a Many To One association is kinda similar to creating a One To One association. The difference is that in the latter we instructed SQLAlchemy not to use lists. This instruction ends up restricting the association to a single instance instead of a list of instances.
Persisting Data with SQLAlchemy ORM
Now that we have created our classes, let's create a file called inserts.py and generate some instances of these classes to persist to the database. In this file, let's add the following code:
# coding=utf-8

# 1 - imports
from datetime import date

from actor import Actor
from base import Session, engine, Base
from contact_details import ContactDetails
from movie import Movie
from stuntman import Stuntman

# 2 - generate database schema
Base.metadata.create_all(engine)

# 3 - create a new session
session = Session()

# 4 - create movies
bourne_identity = Movie("The Bourne Identity", date(2002, 10, 11))
furious_7 = Movie("Furious 7", date(2015, 4, 2))
pain_and_gain = Movie("Pain & Gain", date(2013, 8, 23))

# 5 - creates actors
matt_damon = Actor("Matt Damon", date(1970, 10, 8))
dwayne_johnson = Actor("Dwayne Johnson", date(1972, 5, 2))
mark_wahlberg = Actor("Mark Wahlberg", date(1971, 6, 5))

# 6 - add actors to movies
bourne_identity.actors = [matt_damon]
furious_7.actors = [dwayne_johnson]
pain_and_gain.actors = [dwayne_johnson, mark_wahlberg]

# 7 - add contact details to actors
matt_contact = ContactDetails("415 555 2671", "Burbank, CA", matt_damon)
dwayne_contact = ContactDetails("423 555 5623", "Glendale, CA", dwayne_johnson)
dwayne_contact_2 = ContactDetails("421 444 2323", "West Hollywood, CA", dwayne_johnson)
mark_contact = ContactDetails("421 333 9428", "Glendale, CA", mark_wahlberg)

# 8 - create stuntmen
matt_stuntman = Stuntman("John Doe", True, matt_damon)
dwayne_stuntman = Stuntman("John Roe", True, dwayne_johnson)
mark_stuntman = Stuntman("Richard Roe", True, mark_wahlberg)

# 9 - persists data
session.add(bourne_identity)
session.add(furious_7)
session.add(pain_and_gain)

session.add(matt_contact)
session.add(dwayne_contact)
session.add(dwayne_contact_2)
session.add(mark_contact)

session.add(matt_stuntman)
session.add(dwayne_stuntman)
session.add(mark_stuntman)

# 10 - commit and close session
session.commit()
session.close()
This code is split into 10 sections. Let's inspect them:
- The first section imports the classes that we created, the SQLAlchemy engine, the Base class, the session factory, and
datefrom thedatetimemodule. - The second section instructs SQLAlchemy to generate the database schema. This generation occurs based on the declarations that we made while creating the four main classes that compose our tutorial.
- The third section extracts a new session from the session factory.
- The fourth section creates three instances of the
Movieclass. - The fifth section creates three instances of the
Actorclass. - The sixth section adds actors to movies. Note that the Pain & Gain movie references two actors: Dwayne Johnson and Mark Wahlberg.
- The seventh section creates instances of the
ContactDetailsclass and defines what actors these instances are associated to. - The eighth section defines three stuntmen and also defines what actors these stuntmen are associated to.
- The ninth section uses the current session to save the movies, actors, contact details, and stuntmen created. Note that we haven't explicitly saved actors. This is not needed because SQLAlchemy, by default, uses the
save-updatecascade strategy. - The tenth section commits the current session to the database and closes it.
To run this Python script, we can simply issue the python inserts.py command (let's not forget to run pipenv shell first) in the main directory of our database. Running it will create five tables in the PostgreSQL database and populate these tables with the data that we created. In the next section, we will learn how to query these tables.
Querying Data with SQLAlchemy ORM
As we will see, querying data with SQLAlchemy ORM is quite simple. This library provides an intuitive, fluent API that enables developers to write queries that are easy to read and to maintain. On SQLAlchemy ORM, all queries start with a Query Object that is extracted from the current session and that is associated with a particular mapped class. To see this API in action, let's create a file called queries.py and add to it the following source code:
# coding=utf-8

# 1 - imports
from actor import Actor
from base import Session
from contact_details import ContactDetails
from movie import Movie

# 2 - extract a session
session = Session()

# 3 - extract all movies
movies = session.query(Movie).all()

# 4 - print movies' details
print('\n### All movies:')
for movie in movies:
    print(f'{movie.title} was released on {movie.release_date}')
print('')
The code snippet above—that can be run with python queries.py,—shows how easy it is to use SQLAlchemy ORM to query data. To retrieve all movies from the database, we just needed to fetch a session from the session factory, use it to get a query associated with Movie, and then call the all() function on this query object. The Query API provides dozens of useful functions like all(). In the following list, we can see a brief explanation about the most important ones:
count(): Returns the total number of rows of a query.filter(): Filters the query by applying a criteria.delete(): Removes from the database the rows matched by a query.distinct(): Applies a distinct statement to a query.exists(): Adds an exists operator to a subquery.first(): Returns the first row in a query.get(): Returns the row referenced by the primary key parameter passed as argument.join(): Creates a SQL join in a query.limit(): Limits the number of rows returned by a query.order_by(): Sets an order in the rows returned by a query.
To explore the usage of some of these functions, let's append the following code to the queries.py script:
# 1 - imports
from datetime import date

# other imports and sections...

# 5 - get movies after 15-01-01
movies = session.query(Movie) \
    .filter(Movie.release_date > date(2015, 1, 1)) \
    .all()

print('### Recent movies:')
for movie in movies:
    print(f'{movie.title} was released after 2015')
print('')

# 6 - movies that Dwayne Johnson participated
the_rock_movies = session.query(Movie) \
    .join(Actor, Movie.actors) \
    .filter(Actor.name == 'Dwayne Johnson') \
    .all()

print('### Dwayne Johnson movies:')
for movie in the_rock_movies:
    print(f'The Rock starred in {movie.title}')
print('')

# 7 - get actors that have house in Glendale
glendale_stars = session.query(Actor) \
    .join(ContactDetails) \
    .filter(ContactDetails.address.ilike('%glendale%')) \
    .all()

print('### Actors that live in Glendale:')
for actor in glendale_stars:
    print(f'{actor.name} has a house in Glendale')
print('')
The fifth section of the updated script uses the filter() function to fetch only movies that were released after January the first, 2015. The sixth section shows how to use join() to fetch instances of Movie that the Actor Dwayne Johnson participated in. The seventh and last section, shows the usage of join() and ilike() functions to retrieve actors that have houses in Glendale.
Running the new version of the script (python queries.py) now will result in the following output:
### All movies:
The Bourne Identity was released on 2002-10-11
Furious 7 was released on 2015-04-02
No Pain No Gain was released on 2013-08-23

### Recent movies:
Furious 7 was released after 2015

### Dwayne Johnson movies:
The Rock starred in No Pain No Gain
The Rock starred in Furious 7

### Actors that live in Glendale:
Dwayne Johnson has a house in Glendale
Mark Wahlberg has a house in Glendale
As we can see, using the API is straightforward and generates a code that is readable. To see other functions supported by the Query API, and their description, take a look at the official documentation.
“Querying data with SQLAlchemy ORM is easy and intuitive.”
Tweet This
Securing Python APIs with Auth0
Securing Python APIs with Auth0 is very easy and brings a lot of great features to the table. With Auth0, we only have to write a few lines of code to get:
- A solid identity management solution, including single sign-on
- User management
- Support for social identity providers (like Facebook, GitHub, Twitter, etc.)
- Enterprise identity providers (Active Directory, LDAP, SAML, etc.)
- Our own database of users
For example, to secure Python APIs written with Flask, we can simply create a requires_auth decorator:
# Format error response and append status code

def get_token_auth_header():
    """Obtains the access token from the Authorization Header
    """
    auth = request.headers.get("Authorization", None)
    if not auth:
        raise AuthError({"code": "authorization_header_missing",
                        "description":
                            "Authorization header is expected"}, 401)

    parts = auth.split()

    if parts[0].lower() != "bearer":
        raise AuthError({"code": "invalid_header",
                        "description":
                            "Authorization header must start with"
                            " Bearer"}, 401)
    elif len(parts) == 1:
        raise AuthError({"code": "invalid_header",
                        "description": "Token not found"}, 401)
    elif len(parts) > 2:
        raise AuthError({"code": "invalid_header",
                        "description":
                            "Authorization header must be"
                            " Bearer token"}, 401)

    token = parts[1]
    return token

def requires_auth(f):
    """Determines if the access token is valid
    """
    @wraps(f)
    def decorated(*args, **kwargs):
        token = get_token_auth_header()
        jsonurl = urlopen("https://"+AUTH0_DOMAIN+"/.well-known/jwks.json")
        jwks = json.loads(jsonurl.read())
        unverified_header = jwt.get_unverified_header(token)
        rsa_key = {}
        for key in jwks["keys"]:
            if key["kid"] == unverified_header["kid"]:
                rsa_key = {
                    "kty": key["kty"],
                    "kid": key["kid"],
                    "use": key["use"],
                    "n": key["n"],
                    "e": key["e"]
                }
        if rsa_key:
            try:
                payload = jwt.decode(
                    token,
                    rsa_key,
                    algorithms=ALGORITHMS,
                    audience=API_AUDIENCE,
                    issuer="https://"+AUTH0_DOMAIN+"/"
                )
            except jwt.ExpiredSignatureError:
                raise AuthError({"code": "token_expired",
                                "description": "token is expired"}, 401)
            except jwt.JWTClaimsError:
                raise AuthError({"code": "invalid_claims",
                                "description":
                                    "incorrect claims,"
                                    "please check the audience and issuer"}, 401)
            except Exception:
                raise AuthError({"code": "invalid_header",
                                "description":
                                    "Unable to parse authentication"
                                    " token."}, 400)

            _app_ctx_stack.top.current_user = payload
            return f(*args, **kwargs)
        raise AuthError({"code": "invalid_header",
                        "description": "Unable to find appropriate key"}, 400)
    return decorated
Then use it in our endpoints:
# Controllers API

# This doesn't need authentication
@app.route("/ping")
@cross_origin(headers=['Content-Type', 'Authorization'])
def ping():
    return "All good. You don't need to be authenticated to call this"

# This does need authentication
@app.route("/secured/ping")
@cross_origin(headers=['Content-Type', 'Authorization'])
@requires_auth
def secured_ping():
    return "All good. You only get this message if you're authenticated"
To learn more about securing Python APIs with Auth0, take a look at this tutorial. Alongside with tutorials for backend technologies (like Python, Java, and PHP), the Auth0 Docs webpage also provides tutorials for Mobile/Native apps and Single-Page applications.
Next Steps
We have covered a lot of ground in this article. We've learned about basic SQLAlchemy concepts like Engines, Connection Pools, and Dialects. After that, we've learned about how SQLAlchemy addresses ORM topics like Relationship Patterns, Cascade strategies, and the Query API. In the end, we applied this knowledge in a small exercise. In summary, we had the chance to learn and practice the most important pieces of SQLAlchemy and SQLAlchemy ORM. In the next article, we are going to use these new skills to implement RESTful APIs with Flask—the Python microframework for the web. Stay tuned!
About the author

Bruno Krebs
R&D Content Architect (Auth0 Alumni)