TL;DR: This article will guide you in creating automated tests with xUnit for your C# applications. You will learn the basics of automated tests and how to create unit and integration tests.
The full code you are going to develop throughout the article is available in this GitHub repository.
Test Automation Basics
Testing ensures that your application is doing what it's meant to do. It seems a trivial statement, but sometimes this statement is underrated, especially when you change your existing codebase. You have to make sure not only that your changes work as intended, but also that the untouched code continues to do its expected job.
Manual testing is a very demanding task, not only for performing the tests themselves but because you have to execute them a huge number of times. It is a repetitive task, and where there is a repetitive task, you need automation.
Traditionally, a few different types of automated tests are available. Let's take a quick look at the definitions of the most common ones:
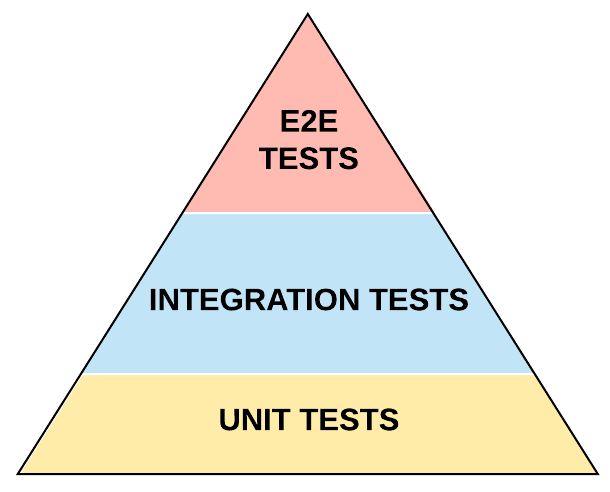
- Unit tests. This type of test focuses on testing a unit of code: a building block of a software application, such as a function or a class. Unit tests ensure that an isolated component of a software application works as expected.
- Integration tests. Unlike unit tests, integration tests help to discover any issues when the units of code are assembled together to create more complex components. In fact, even if each unit of code is working correctly in an isolated environment, you may discover some issues when you put them together to build your application.
- End-to-end (E2E) tests. This is a type of test ensuring that a user-level function works as expected. To an extent, they are similar to integration tests. However, here the focus is on the functions that are directly accessible by the software's user or somehow from outside the application. An E2E test may involve many systems and aims to simulate a production scenario.
Many other test definitions exist based on the test goals and the perspective with which you look at them. But the ones above represent the most common ones from the developer's point of view.
Of course, each type of test brings value to ensuring the correctness of the software application, and each one has its strengths and weaknesses. For example, while the unit tests are usually executed really fast, the end-to-end tests are slower and may have various points of failure due to the interaction of multiple systems.
When testing your system, you cannot pretend to be able to cover all possible use cases. You should limit them to a subset due in part to the growth of complexity when passing from a simple unit to a composition of systems, in part to the time required to execute the tests. Usually, the number of tests decreases while passing from unit to end-to-end tests, following the well-known Test Pyramid diagram:
Regarding the way to structure your automated tests, a typical approach follows the so-called AAA pattern. The name comes from the initials of the three actions usually needed to perform a test:
- Arrange. With this action, you prepare all the required data and preconditions.
- Act. This action performs the actual test.
- Assert. This final action checks if the expected result has occurred.
Throughout this article, you will use this pattern in writing your tests.
“Learn how to create unit and integration tests with xUnit.”
Tweet This
Your First Unit Test with xUnit
The .NET Core platform supports different testing frameworks. However, xUnit has become the most popular due to its simplicity, expressiveness, and extensibility. The project is supported by the .NET Foundation, and it is part of the more recent versions of .NET Core. This means that you don't need to install anything but the .NET Core SDK.
Setting up the project to test
To understand how to use xUnit to automate your tests, let's explore the basics by creating unit tests for an existing project.
You may have heard about Test-Driven Development (TDD). It is a software development process that promotes the writing of tests before writing your application code. This approach leads to a short and iterative development cycle based on writing a test and letting it fail, fixing it by writing the application code, and refactoring the application code for readability or performance.
This article will drive you to write tests without promoting any specific approach to software development.
Download from GitHub the project to test by typing the following command:
git clone -b starting-point-unit-tests --single-branch https://github.com/auth0-blog/unit-integration-test-xunit.git
This command will clone only the starting-point-unit-tests branch of the repository in your machine. After the command executes, you will find the unit-integration-test-xunit folder containing a unit-tests subfolder. This subfolder contains the PasswordValidator folder with a project with the same name.
The PasswordValidator project is a very simple library to validate passwords with the following constraints:
- The password length must be at least eight characters and a maximum of twenty characters
- The password must contain one or more uppercase characters
- The password must contain one or more lowercase characters
- The password must contain one or more numeric values
- The password must contain one or more special characters in the list @#!$%
Its implementation is based on the following class defined in the PasswordValidator.cs file:
// unit-tests/PasswordValidator/PasswordValidator.cs

using System.Text.RegularExpressions;

namespace Validators.Password
{
  public class PasswordValidator
  {
    public bool IsValid(string password)
    {
      Regex passwordPolicyExpression = new Regex(@"((?=.*\d)(?=.*[a-z])(?=.*[A-Z])(?=.*[@#!$%]).{8,20})");
      return passwordPolicyExpression.IsMatch(password);
    }
  }
}
As you can see, the validation logic is implemented by the IsValid() method through a regular expression. The PasswordValidator class represents here a unit of code because it is self-contained and focused on one specific goal.
Creating the test project
To ensure that the IsValid() method is working as you expect, you need to set up a test project.
This article will use the .NET Core command-line tools, but of course, you can use the integrated testing tools of Visual Studio.
Make sure to be in the unit-tests folder and write the following commands in a terminal window:
dotnet new xunit -o PasswordValidator.Tests
dotnet add ./PasswordValidator.Tests/PasswordValidator.Tests.csproj reference ./PasswordValidator/PasswordValidator.csproj
The first command creates the unit test project, while the second one adds to it a reference to the PasswordValidator project.
Testing a positive case
At this point, rename the PasswordValidator.Tests/UnitTest1.cs file into PasswordValidator.Tests/ValidityTests.cs and replace its content with the following:
// unit-tests/PasswordValidator.Tests/ValidityTests.cs

using System;
using Xunit;
using Validators.Password;

namespace PasswordValidatorTests
{
  public class ValidityTest
  {
    [Fact]
    public void ValidPassword()
    {
      //Arrange
      var passwordValidator = new PasswordValidator();
      const string password = "Th1sIsapassword!";

      //Act
      bool isValid = passwordValidator.IsValid(password);

      //Assert
      Assert.True(isValid, $"The password {password} is not valid");
    }
  }
}
Here you see the ValidityTest class, which is hosting the unit tests for the IsValid() method of the PasswordValidator class. The only unit test currently implemented is the ValidPassword() method. This method is decorated with the Fact attribute, which tells xUnit that this is a test. The statements in the body of the ValidPassword() method are organized to highlight the AAA pattern mentioned above.
In the Arrange step, you create an instance of the PasswordValidator class and define a possible valid password.
In the Act step, you invoke the IsValid() method with the previously defined password.
Finally, the Assert step verifies that the returned result is the expected one. This check uses the Assert object, which provides many methods to validate a result. In this case, you are using the True() method, which is successful when its first argument is true. Otherwise, the test fails and displays the string provided as the second argument.
To run this first test, make sure to be in the unit-tests/PasswordValidator.Tests folder and type the following command in your terminal window:
dotnet test
After building the test project and possibly the PasswordValidator project, you should see something similar to the following in your console:
Microsoft (R) Test Execution Command Line Tool Version 16.3.0
Copyright (c) Microsoft Corporation.  All rights reserved.

Starting test execution, please wait...

A total of 1 test files matched the specified pattern.

Test Run Successful.
Total tests: 1
     Passed: 1
 Total time: 1.1692 Seconds
Your first unit test passed!
Testing a negative case
When you are testing your code, you shouldn't just verify the positive cases; that is, the cases where things are fine. You also have to verify negative cases. For the IsValid() method, you have to verify a possible case where the password passed as an argument doesn't comply with the constraints. So, add the new unit test implemented by the method NotValidPassoword() to the ValidityTest class, as shown below:
// unit-tests/PasswordValidator.Tests/ValidityTests.cs

using System;
using Xunit;
using Validators.Password;

namespace PasswordValidatorTests
{
  public class ValidityTest
  {
    [Fact]
    public void ValidPassword()
    {
      // ...code...
    }

    [Fact]
    public void NotValidPassword()
    {
      //Arrange
      var passwordValidator = new PasswordValidator();
      const string password = "thisIsaPassword";

      //Act
      bool isValid = passwordValidator.IsValid(password);

      //Assert
      Assert.False(isValid, $"The password {password} should not be valid!");
    }
  }
}
In this case, you are passing an invalid password, and in the Assert step, you expect that the value returned by the IsValid() method is false. If you run the tests with dotnet test you will get two successful tests. Pretty easy!
“Unit tests ensure that an isolated component of a software application works as expected.”
Tweet This
Creating Theories in xUnit
The two cases of password validity tested by the unit tests are far from exhaustive. They are just two simple examples of positive and negative cases, but, of course, the possible cases to test are many more. You cannot expect to check every possible case, but you can test a significant subset of typical cases. This helps in having a greater code coverage for your production code. In the password validation example, this means that you should identify a representative set of valid and invalid passwords. For each password in these sets, you should apply one of the tests implemented above.
This approach should ensure significant confidence in the correct behavior of the IsValid() method. But it requires to replicate the same code for each sample password to test. You know that code replication is not a good practice. Fortunately, xUnit can help you with this issue with theories. A theory is a parametric unit test that allows you to represent a set of unit tests sharing the same structure. Theories allow you to implement what is called data-driven testing, which is a testing approach heavily based on input data variation.
So, to have an idea of what theories are, replace the content of the ValidityTests.cs file with the following:
// unit-tests/PasswordValidator.Tests/ValidityTests.cs

using System;
using Xunit;
using Validators.Password;

namespace PasswordValidatorTests
{
  public class ValidityTest
  {
    [Theory]
    [InlineData("Th1sIsapassword!", true)]
    [InlineData("thisIsapassword123!", true)]
    [InlineData("Abc$123456", true)]
    [InlineData("Th1s!", false)]
    [InlineData("thisIsAPassword", false)]
    [InlineData("thisisapassword#", false)]
    [InlineData("THISISAPASSWORD123!", false)]
    [InlineData("", false)]
    public void ValidatePassword(string password, bool expectedResult)
    {
      //Arrange
      var passwordValidator = new PasswordValidator();

      //Act
      bool isValid = passwordValidator.IsValid(password);

       //Assert
      Assert.Equal(expectedResult, isValid);
    }
  }
}
The code above shows one single method, ValidatePassword(), in place of the two methods implemented before. This method has two parameters: password and expectedResult. And the application of the Arrange-Act-Assert pattern is based on these parameters.
In addition, you see a set of attributes decorating the method. The first attribute marks the ValidatePassword() method as a theory. The other InlineData attributes represent the data to pass to the method. Each attribute has a couple of values that are mapped to the method's parameters. So, basically, the first value of each InlineData attribute is a possible password, and the second value is the boolean value expected as a result of the IsValid() method.
In other words, each InlineData attribute represents one invocation of the ValidatePassword() test. In fact, if you launch the dotnet test command, you will get a message saying that all eight tests passed.
Besides the
InlineDataattribute, xUnit provides you with other ways to define data for theories, likeClassData, where the data source is a class implementing theIEnumerableinterface, andMemberData, where the data source is a property or a method.Unfortunately, the official documentation is very poor on these advanced but useful features.
Leverage Auth0's authentication and authorization services in your .NET applications.
DOWNLOAD THE FREE EBOOK
Introducing Integration Tests
In the previous section, you started familiarizing yourself with writing unit tests. Now, it's time to take a look at how you can implement integration tests with xUnit. From a syntax and semantics perspective, they are not so different from unit tests. The main difference with them lies in the implementation of what you want to test. While in the unit test case, you verify the behavior of a small and autonomous piece of code, the integration tests verify a more complex code, usually composed of a few units and sometimes with some dependency with external systems, like databases, file systems, and so on.
Differences with E2E tests are somewhat a matter of interpretation. As said, E2E tests are more focused on system features from the user's standpoint. So, if your system is an API, an E2E test is a test that verifies that the API is correct. If your system is a mobile app using this API, the E2E tests are the tests of the features accessible from the app's UI.
Setting up the project to test
To better understand how to create integration tests, you will create a test project for an ASP.NET Core Web API that allows you to manage a glossary of terms. This application enables you to get terms definitions, create new ones, or update and delete the existing ones. The endpoint to get term definitions is public, while the other endpoints are protected with Auth0 authentication and authorization features.
If you want to know the details of the project implementation, you can check out the Building and Securing Web APIs with ASP.NET Core 3 article.
So, to prepare your environment, move to the unit-integration-test-xunit folder, and create a new integration-tests folder. Now, move to the integration-tests folder and type the following command in a terminal window:
git clone https://github.com/auth0-blog/glossary-web-api-aspnet-core.git
This command will clone the glossary GitHub repository in your machine. So, you will find a glossary-web-api-aspnet-core subfolder with the new project within the integration-tests folder. This is the project you are going to test in a minute.
Creating the test project
To create the integration test project, move to the integration-tests folder, and type the following command:
dotnet new xunit -o Glossary.IntegrationTests
As you already know, this command creates the basic xUnit test project in the Glossary.IntegrationTests folder. Move to this new folder and run the command shown here:
dotnet add package Microsoft.AspNetCore.Mvc.Testing
The command above adds to the new test project the Microsoft.AspNetCore.Mvc.Testing package, which provides infrastructural support for testing ASP.NET-based applications. In practice, this package takes care of bootstrapping the project under test and allows you to change the application configuration for test purposes.
Then, add to the test project a reference to the glossary project with the following command:
dotnet add ./Glossary.IntegrationTests.csproj reference ../glossary-web-api-aspnet-core/Glossary.csproj
Finally, rename the UnitTest1.cs file in the integration-tests/Glossary.IntegrationTests folder as IntegrationTests.cs, and replace its content with the following:
// integration-tests/Glossary.IntegrationTests/IntegrationTests.cs

using System.Collections.Generic;
using System.Net;
using System.Net.Http;
using System.Net.Http.Headers;
using System.Text;
using System.Text.Json;
using System.Threading.Tasks;
using Microsoft.AspNetCore.Mvc.Testing;
using Xunit;

namespace Glossary.IntegrationTests
{
  public class IntegrationTests : IClassFixture<WebApplicationFactory<Glossary.Startup>>
  {
    private readonly HttpClient httpClient;

    public IntegrationTests(WebApplicationFactory<Glossary.Startup> factory)
    {
      httpClient = factory.CreateClient();
    }
  }
}
With this code, you are setting up the basic infrastructure to write and run your integration tests.
When the testing framework creates an instance of the IntegrationTests class, it creates an instance of an HTTP server running the glossary project as well. This test server instance will be shared among all the tests that belong to the IntegrationTests class.
In particular, your IntegrationTests class implements the IClassFixture interface. The class fixture is a xUnit feature that allows you to share an object instance among all tests in a test class. In this case, the shared object is an instance of the WebApplicationFactory class provided by the Microsoft.AspNetCore.Mvc.Testing library. This class creates a TestServer instance; that is, an in-memory server responding to HTTP requests. The TestServer is created upon the specified class: Glossary.Startup in this example.
Also, the test server instance provides us with the ability to get a preconfigured HTTP client through the CreateClient() method. In the code above, you are using this ability in the class constructor, where the HTTP client is assigned to the private variable httpClient.
With this infrastructure, you are now ready to write your integration tests.
Testing public endpoints
As a first step, you are going to test the public endpoint that allows you to get the list of term definitions. This endpoint responds to the api/glossary URL and returns a list of terms in JSON format. The sample application you are testing returns a predefined set of term definitions, so this simplifies the Assert step of the test.
So, to implement this first test, add the following method to the IntegrationTests class:
// integration-tests/Glossary.IntegrationTests/IntegrationTests.cs

// ...using section...

namespace Glossary.IntegrationTests
{
  public class IntegrationTests : IClassFixture<WebApplicationFactory<Glossary.Startup>>
  {
    // ...code...

    [Fact]
    public async Task GetGlossaryList()
    {
      // Act
      var response = await httpClient.GetAsync("api/glossary");

      // Assert
      response.EnsureSuccessStatusCode();
      var stringResponse = await response.Content.ReadAsStringAsync();
      var terms = JsonSerializer.Deserialize<List<GlossaryItem>>(stringResponse, new JsonSerializerOptions { PropertyNamingPolicy = JsonNamingPolicy.CamelCase });

      Assert.Equal(3, terms.Count);
      Assert.Contains(terms, t => t.Term == "Access Token");
      Assert.Contains(terms, t => t.Term == "JWT");
      Assert.Contains(terms, t => t.Term == "OpenID");
    }
  }
}
Like you saw in the unit test example, the GetGlossaryList() method is decorated with the Fact attribute. You may notice that the code implementing the test is missing the Arrange step. Actually, in this specific case, the Assert step has been performed by the class constructor. In fact, it created the HTTP client instance for all the tests. So, in this test, you simply call the API and analyze the response, ensuring that it is as expected.
As usual, to run this test, type dotnet test in a terminal window.
Testing protected endpoints
Testing the protected endpoints is somewhat more complicated. But let's do it in stages, starting with the negative cases and then tackling the positive one.
First of all, since the Web API application you are testing is secured with Auth0, you need to configure it getting the required parameters from the Auth0 Dashboard. You need an Auth0 account to configure the application. If you haven't one, you can sign up for a free Auth0 account here. Then, follow the steps to configure the application, as explained in the article mentioned above.
Take note of the value of the audience parameter. You will need it later on.
The API you are going to test is the one that allows you to add a new term definition to the glossary. This operation is based on an HTTP POST request to the api/glossary endpoint with a JSON-formatted body describing the new term definition. As said, the addition, change, and deletion of terms are protected, and only authorized users can perform them.
Start testing the addition operation by ensuring that a request without an access token fails. You can do this by adding the following method to the IntegrationTests class:
// integration-tests/Glossary.IntegrationTests/IntegrationTests.cs

// ...using section...

namespace Glossary.IntegrationTests
{
  public class IntegrationTests : IClassFixture<WebApplicationFactory<Glossary.Startup>>
  {
    // ...code...

    [Fact]
    public async Task AddTermWithoutAuthorization()
    {
      // Arrange
      var request = new HttpRequestMessage(HttpMethod.Post, "api/glossary");

      request.Content = new StringContent(JsonSerializer.Serialize(new
      {
        term = "MFA",
        definition = "An authentication process that considers multiple factors."
      }), Encoding.UTF8, "application/json");

      // Act
      var response = await httpClient.SendAsync(request);

      // Assert
      Assert.Equal(HttpStatusCode.Unauthorized, response.StatusCode);
    }
  }
}
Here, you create a request to add a term definition, send the HTTP POST request to the endpoint, and verify that the status code received from the server is 401 Unauthorized.
As a negative case, you should also verify that an attempt to add a new term with an invalid access token fails as well. You can accomplish this by adding the following test:
// integration-tests/Glossary.IntegrationTests/IntegrationTests.cs

// ...using section...

namespace Glossary.IntegrationTests
{
  public class IntegrationTests : IClassFixture<WebApplicationFactory<Glossary.Startup>>
  {
    // ...code...

    [Fact]
    public async Task ChangeTermWithInvalidAuthorization()
    {
      // Arrange
      var request = new HttpRequestMessage(HttpMethod.Post, "api/glossary");

      request.Content = new StringContent(JsonSerializer.Serialize(new
      {
        term = "MFA",
        definition = "An authentication process that considers multiple factors."
      }), Encoding.UTF8, "application/json");
      request.Headers.Authorization = new AuthenticationHeaderValue("Bearer", "This is an invalid token");

      // Act
      var response = await httpClient.SendAsync(request);

      // Assert
      Assert.Equal(HttpStatusCode.Unauthorized, response.StatusCode);
    }
  }
}
The only difference compared with the AddTermWithoutAuthorization() test is that here you added a Bearer token with an invalid value to the HTTP POST request.
At this point, if you run dotnet test, you should have all the three tests passing.
After making sure that adding a new term to the glossary requires you to be authorized, you need to create a test to verify that an authorized request works correctly. So, to have a valid access token from Auth0, you should register your test project as a client application, and configure it with the appropriate parameters. Fortunately, Auth0 automatically generated a test client application for you when you registered the Web API. To find the related parameters, access the Auth0 Dashboard and move to the Applications section. Here, you will find an application named Glossary (Test Application). If you registered your Web API with a different name, you should find that name followed by (Test Application). Click the name of that application and take note of the Domain, Client ID, and Client Secret parameters:

Now create an appsettings.json file in the root folder of the test project (integration-tests/Glossary.IntegrationTests) with the following content:
{
  "Auth0": {
    "ClientId": "YOUR_CLIENT_ID",
    "ClientSecret": "YOUR_CLIENT_SECRET",
    "Domain": "YOUR_DOMAIN",
    "Audience": "YOUR_AUDIENCE"
  }
}
In this file, replace the placeholders with the respective values you've just got from the Auth0 Dashboard. The value for the YOUR_AUDIENCE placeholder is the string you associated with the Web API as its identifier (e.g., https://glossary.com).
You may worry about storing credentials in this configuration file. However, since your test project is not intended to be public, the scenario you are setting up is a machine-to-machine one. So, storing the client's credentials in the configuration file is ok.
To make the configuration file available at runtime, add the following ItemGroup element in the Glossary.IntegrationTests.csproj file:
<!-- integration-tests/Glossary.IntegrationTests/Glossary.IntegrationTests.csproj -->
<Project Sdk="Microsoft.NET.Sdk">
<!-- ... other settings ... -->
  <ItemGroup>
    <None Update="appsettings.json">
      <CopyToOutputDirectory>PreserveNewest</CopyToOutputDirectory>
    </None>
  </ItemGroup>
</Project>
Now, to load these configuration data in your test project, apply the following changes to the code of the integration tests:
// integration-tests/Glossary.IntegrationTests/IntegrationTests.cs

using System.Collections.Generic;
using System.IO; //new
using System.Linq; //new
using System.Net;
using System.Net.Http;
using System.Net.Http.Headers;
using System.Text;
using System.Text.Json;
using System.Threading.Tasks;
using Auth0.AuthenticationApi; //new
using Auth0.AuthenticationApi.Models; //new
using Microsoft.AspNetCore.Mvc.Testing;
using Microsoft.Extensions.Configuration; //new
using Xunit;

namespace Glossary.IntegrationTests
{
  public class IntegrationTests : IClassFixture<WebApplicationFactory<Glossary.Startup>>
  {
    private readonly HttpClient httpClient;
    private readonly IConfigurationSection auth0Settings;

    public IntegrationTests(WebApplicationFactory<Glossary.Startup> factory)
    {
      httpClient = factory.CreateClient();

      auth0Settings = new ConfigurationBuilder()
         .SetBasePath(Directory.GetCurrentDirectory())
         .AddJsonFile("appsettings.json")
         .Build()
         .GetSection("Auth0");
    }

    // ...code...

  }
}
You add new references to a few namespaces marked with //new in the using section. Also, you add a new private auth0Settings variable, which will keep the Auth0 configuration values from the appsettings.json file. The content from the configuration file is loaded in the class constructor.
The next step is to obtain an access token from Auth0. You can leverage the Auth0 Authentication API SDK to create an Auth0 client and easily request the needed token. So, run the following command to install the SDK:
dotnet add package Auth0.AuthenticationApi
After the SDK is installed, add the GetAccessToken() method to the IntegrationTests class as shown below:
// integration-tests/Glossary.IntegrationTests/IntegrationTests.cs

// ...using section...

namespace Glossary.IntegrationTests
{
  public class IntegrationTests : IClassFixture<WebApplicationFactory<Glossary.Startup>>
  {

    // ...code...

    async Task<string> GetAccessToken()
    {
      var auth0Client = new AuthenticationApiClient(auth0Settings["Domain"]);
      var tokenRequest = new ClientCredentialsTokenRequest()
      {
        ClientId = auth0Settings["ClientId"],
        ClientSecret = auth0Settings["ClientSecret"],
        Audience = auth0Settings["Audience"]
      };
      var tokenResponse = await auth0Client.GetTokenAsync(tokenRequest);

      return tokenResponse.AccessToken;
    }
  }
}
This method creates a request to the Auth0 authorization server for the Client Credentials Flow and returns the access token.
Finally, you have what you need to test the authorized request to create a new glossary term definition. The following method implements this test:
// integration-tests/Glossary.IntegrationTests/IntegrationTests.cs

// ...using section...

namespace Glossary.IntegrationTests
{
  public class IntegrationTests : IClassFixture<WebApplicationFactory<Glossary.Startup>>
  {
    // ...code...

    [Fact]
    public async Task AddTermWithAuthorization()
    {
      // Arrange
      var request = new HttpRequestMessage(HttpMethod.Post, "api/glossary");

      request.Content = new StringContent(JsonSerializer.Serialize(new
      {
        term = "MFA",
        definition = "An authentication process that considers multiple factors."
      }), Encoding.UTF8, "application/json");

      var accessToken = await GetAccessToken();
      request.Headers.Authorization = new AuthenticationHeaderValue("Bearer", accessToken);

      // Act
      var response = await httpClient.SendAsync(request);

      // Assert
      Assert.Equal(HttpStatusCode.Created, response.StatusCode);
      Assert.Equal("/api/glossary/MFA", response.Headers.GetValues("Location").FirstOrDefault());
    }
  }
}
The structure of this test is similar to the negative case ones. In this case, you get a valid access token by calling the GetAccessToken() method. Also, in the Assert step, you make sure that the status code and the reference to the newly created resource are as expected.
“Differences between integration tests and E2E tests are somewhat a matter of interpretation.”
Tweet This
Mocking External Dependencies
The integration tests you implemented so far work fine. They take into account negative and positive cases and make sure that results are the ones you expected. However, they are testing more than the Web API application code. They are also testing the integration with Auth0, which may be a good thing as an end-to-end test, but it could lead to some drawbacks. In fact, when you have one or more external system involved in the application you are testing, you should be aware at least of the following issues:
- if there is an issue with the remote system or in the infrastructure that connects your application to the external system, your tests will fail with an exception
- you may need to call the external system directly as part of your tests (as seen in the example above), increasing the number of dependencies required to run the test
- access to the external system may affect the performance of your tests
If your goal is to test only the correctness of your source code, you should avoid involving external systems in your integration tests. This means that you want to test the integration of just the software components building up your application.
Fortunately, .NET Core provides you with some features that allow you to mock external systems and focus on testing just your application code. In this section, you are going to take a look at how to exclude the Auth0 integration from the integration tests you wrote so far.
Mocking the external system
The first step is to create a mock for the external system; in the Web API application you are testing, that is Auth0. To replace it, you need to build an entity that generates and provides support to validate tokens. For this purpose, add the FakeJwtManager.cs file to the integration-tests/Glossary.IntegrationTests folder with the following content:
// integration-tests/Glossary.IntegrationTests/FakeJwtManager.cs

using System;
using System.IdentityModel.Tokens.Jwt;
using System.Security.Cryptography;
using Microsoft.IdentityModel.Tokens;

namespace Glossary.IntegrationTests
{
  public static class FakeJwtManager
  {
    public static string Issuer { get; } = Guid.NewGuid().ToString();
    public static string Audience { get; } = Guid.NewGuid().ToString();
    public static SecurityKey SecurityKey { get; }
    public static SigningCredentials SigningCredentials { get; }

    private static readonly JwtSecurityTokenHandler tokenHandler = new JwtSecurityTokenHandler();
    private static readonly RandomNumberGenerator generator = RandomNumberGenerator.Create();
    private static readonly byte[] key = new byte[32];

    static FakeJwtManager()
    {
      generator.GetBytes(key);
      SecurityKey = new SymmetricSecurityKey(key) { KeyId = Guid.NewGuid().ToString() };
      SigningCredentials = new SigningCredentials(SecurityKey, SecurityAlgorithms.HmacSha256);
    }

    public static string GenerateJwtToken()
    {
      return tokenHandler.WriteToken(new JwtSecurityToken(Issuer, Audience, null, null, DateTime.UtcNow.AddMinutes(10), SigningCredentials));
    }
  }
}
The FakeJwtManager class provides the basic data you need to configure a JWT-based authorization system. The values for the properties Issuer, Audience, SecurityKey, and SigningCredentials are randomly generated. The class also provides the GenerateJwtToken() method that provides you with a token generated from that values.
Overriding the application configuration
The Web API application is configured to use Auth0 for access control. So, you may wonder how to force it to use the Auth0 mock you build with the FakeJwtManager class. Actually, you don't need to change the application you are testing. You are going to override its configuration.
As you remember, you used the WebApplicationFactory class to create a TestServer instance based on the Glossary.Startup class. What you need is to be able to affect the TestServer instance creation so that you can inject your custom configuration to mock Auth0. You can get this result by creating a custom version of the WebApplicationFactory class.
Create a CustomWebApplicationFactory.cs file with the following code:
// integration-tests/Glossary.IntegrationTests/CustomWebApplicationFactory.cs

using Microsoft.AspNetCore.Authentication.JwtBearer;
using Microsoft.AspNetCore.Hosting;
using Microsoft.AspNetCore.Mvc.Testing;
using Microsoft.AspNetCore.TestHost;
using Microsoft.Extensions.DependencyInjection;
using Microsoft.IdentityModel.Tokens;

namespace Glossary.IntegrationTests
{
  public class CustomWebApplicationFactory<TStartup> : WebApplicationFactory<Startup>
  {
    protected override void ConfigureWebHost(IWebHostBuilder builder)
    {
      builder.ConfigureTestServices(services =>
      {
        services.PostConfigure<JwtBearerOptions>(JwtBearerDefaults.AuthenticationScheme, options =>
              {
            options.TokenValidationParameters = new TokenValidationParameters()
            {
              IssuerSigningKey = FakeJwtManager.SecurityKey,
              ValidIssuer = FakeJwtManager.Issuer,
              ValidAudience = FakeJwtManager.Audience
            };
          });
      });
    }
  }
}
This class inherits from the WebApplicationFactory class and overrides the ConfigureWebHost() method. This method receives the Web Host builder of the application and uses the ConfigureTestServices() method to configure the TestServer. In particular, it overrides the JwtBearerOptions configuration by assigning the values from the FakeJwtManager mock.
Adapting the integration tests
Now you can simplify your integration tests by getting rid of the appsettings.json configuration file and the code to manage it.
Edit the IntegrationTests.cs file and apply the changes shown below:
// integration-tests/Glossary.IntegrationTests/IntegrationTests.cs

using System;
using System.Collections.Generic;
using System.Linq;
using System.Net;
using System.Net.Http;
using System.Net.Http.Headers;
using System.Text;
using System.Text.Json;
using System.Threading.Tasks;
using Xunit;

namespace Glossary.IntegrationTests
{
  public class IntegrationTests : IClassFixture<CustomWebApplicationFactory<Glossary.Startup>>
  {
    private readonly HttpClient httpClient;

    public IntegrationTests(CustomWebApplicationFactory<Glossary.Startup> factory)
    {
      httpClient = factory.CreateClient();
    }

    // ...code...
  }
}
You removed a few unnecessary namespaces from the using section and replaced the reference to the WebApplicationFactory class with the CustomWebApplicationFactory class. Also, you removed the auth0Settings private variable definition and the initialization of that variable in the constructor.
In addition, now you can remove the GetAccessToken() method since you don't need it anymore.
Finally, replace the implementation of the AddTermWithAuthorization test with the following:
// integration-tests/Glossary.IntegrationTests/IntegrationTests.cs

// ...using section...

namespace Glossary.IntegrationTests
{
  public class IntegrationTests : IClassFixture<CustomWebApplicationFactory<Glossary.Startup>>
  {
    // ...code...

    [Fact]
    public async Task AddTermWithAuthorization()
    {
      // Arrange
      var request = new HttpRequestMessage(HttpMethod.Post, "api/glossary");

      request.Content = new StringContent(JsonSerializer.Serialize(new
      {
        term = "MFA",
        definition = "An authentication process that considers multiple factors."
      }), Encoding.UTF8, "application/json");

      var accessToken = FakeJwtManager.GenerateJwtToken();
      request.Headers.Authorization = new AuthenticationHeaderValue("Bearer", accessToken);

      // Act
      HttpResponseMessage response = new HttpResponseMessage();
      try
      {
        response = await httpClient.SendAsync(request);
      }
      catch (Exception ex)
      {
        Console.WriteLine(ex.Message);
      }


      // Assert
      Assert.Equal(HttpStatusCode.Created, response.StatusCode);
      Assert.Equal("/api/glossary/MFA", response.Headers.GetValues("Location").FirstOrDefault());
    }
  }
}
The only difference with the previous version of the test is how you get the access token. Instead of using the GetAccessToken() method, you now are invoking FakeJwtManager.GenerateJwtToken().
With these changes, you will get all tests successful again, but now your code will be independent of the external system.
Summary
At the end of this article, you learned how to create different types of automated tests using xUnit. You started to create unit tests to verify the behavior of an isolated and autonomous piece of code. Then, you built a few integration tests involving Auth0 as an external system. Finally, you discovered how to mock external systems to get your integration tests more focused on your own code.
You can find the code implemented throughout this article on GitHub.
About the author

Andrea Chiarelli
Principal Developer Advocate
I have over 20 years of experience as a software engineer and technical author. Throughout my career, I've used several programming languages and technologies for the projects I was involved in, ranging from C# to JavaScript, ASP.NET to Node.js, Angular to React, SOAP to REST APIs, etc.
In the last few years, I've been focusing on simplifying the developer experience with Identity and related topics, especially in the .NET ecosystem.