How It Works
When you enable data migration, the plugin exposes two secure endpoints that allow Auth0 to authenticate users using WordPress accounts. These endpoints are secured with a secret token and can be set only to allow IP addresses used by Auth0. The login flow is as follows:- A user attempts to login with an Auth0 login form (embedded on your site or hosted at Auth0).
- If Auth0 can’t find a user associated with the provided credentials in your database connection, it proceeds to call the Migration endpoint on your WordPress site with the user credentials and the migration token.
- The plugin finds a user in your WordPress database with the provided username/email and verifies the password.
- If a user can be successfully authenticated, Auth0 creates the user in the database connection for your site, authenticates the user, and logs them in.
- The next time the user logs in, they will use the Auth0 user, and the Migration endpoint will be skipped.
Set Up and Configuration
The easiest way to construct User Migration is to use the Setup Wizard when the plugin is first installed. To learn more about the process, read Install Login by Auth0. If the User Migration Setup Wizard could not complete or you want to see the process in more detail, follow the steps below. Again, this is starting from scratch with a database connection that does not have any users. The following process should be completed on a site with no traffic or with maintenance mode turned on.- Create and correctly configure an Application, and create and activate an empty Database Connection for the Application. These can be the same as the ones created in the standard Setup Wizard process, or you can create these from scratch. To learn more about the Setup Wizard, read Install Login by Auth0.
- In the Auth0 > Settings screen in WordPress, make sure the Application’s Domain, Client ID and Client Secret are saved in the correct fields in the Basic tab.
-
In the Advanced view, enable the User Migration Endpoints setting, and select Save Changes. If you are using constant-based settings, set
AUTH0_ENV_MIGRATION_WStotrueandAUTH0_ENV_MIGRATION_TOKENto a secure random string at least 16 digits long and without single quotes or backslashes. - Under the settings, you should now see a Security Token. Keep this page open as you will need this value later on in the process.
- In the Auth0 Dashboard, go to the Database Connection you want to use and enable Requires Username and Import Users to Auth0.
- Select the Custom Database view, and enable Use my own database.
- There should be two tabs below this setting under Database Action Scripts: one for Login and one for Get User.
- Select the Login view, clear out the existing code, copy the db-login.js code from the GitHub repository, and paste it into the code editor.
-
This step is for versions 3.10.0 and earlier: Look for
{THE_WS_URL}and replace that with your WordPress instance’s site URL, followed by/index.php?a0_action=migration-ws-login. The site URL can be found in the Settings > General screen in wp-admin. You can test this by pasting the complete URL in your browser. You should see{"status":401,"error":"Unauthorized"}. -
This step is for versions 3.10.0 and earlier: Look for
{THE_WS_TOKEN}and replace that with the token that appears under the User Migration Endpoints setting. - There should be no errors in the editor. If everything looks good, click Save at the top.
-
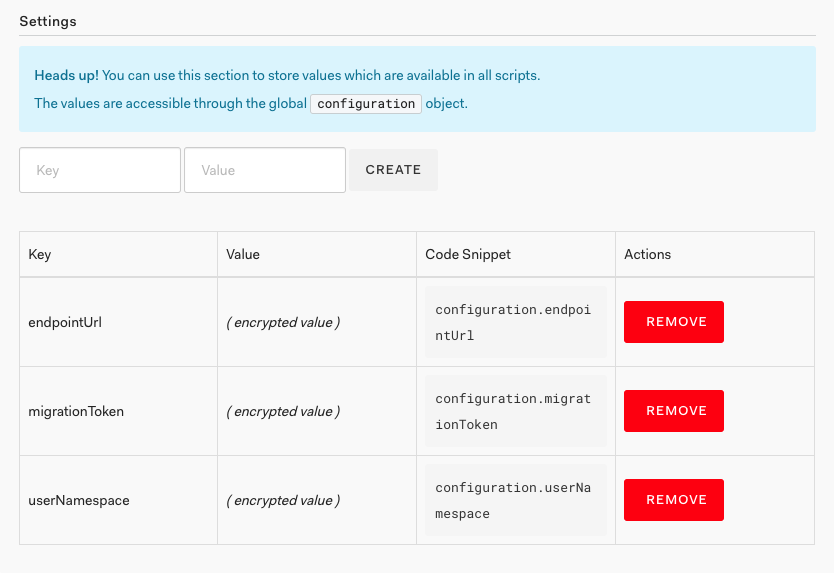
This step is for 3.11.0 and later: Scroll down to Settings and add the following configuration variables:
endpointUrlset to your WordPress instance’s site URL (wp-admin > Settings > General > “Site URL” field), followed by/index.php?a0_action=.migrationTokenset to the security token value seen in step 4 above.userNamespaceset to your Application name in Auth0 or any other value only including letters, numbers, and dashes.
- Click the Try button at the top and use a valid WordPress user account in the form that appears. You should see the “The profile is” followed by the user’s data. If not, please see the Troubleshooting section below.
- Select the Get User view, clear out the existing code, copy the db-get-user.js code from the GitHub repository, and paste it into the code editor.
-
This step is for 3.10.0 and earlier: Look for
{THE_WS_URL}and replace that with your WordPress instance’s site URL, followed by /index.php?a0_action=migration-ws-get-user. The site URL can be found in the Settings > General screen in wp-admin. You can test this by pasting the complete URL in your browser. You should see{"status":401,"error":"Unauthorized"}. -
This step is for 3.10.0 and earlier: Look for
{THE_WS_TOKEN}and replace that with the token that appears under the User Migration Endpoints setting. - There should be no errors in the editor. If everything looks good, click Save.
- Click the Try button at the top and use an email with a valid WordPress user account in the form that appears. You should see the “The profile is” followed by the user’s data. If not, please see the Troubleshooting section below.
- In a new browser session, navigate to a login page on the WordPress site and attempt to log in (the user should not already exist in the database). You’ll notice that the login process takes a little longer than usual at first, but it should succeed. Subsequent logins will be faster.
- (OPTIONAL) To turn on additional security for the migration endpoints, go to Auth0 > Settings screen in WordPress, turn on, then Save Changes. Attempt to log in with a different user to test that Auth0 can still reach the endpoints.
Troubleshooting
Issues with the User Migration typically come from a few places:- Incorrect URL or token in the custom database scripts.
- IP allow list turned on but with incorrect IP addresses.
- Restricted or cached endpoints on your WordPress instance.
Unexpected token < in JSON at position 0
This means the custom script is not getting data back in a format it can use. An incorrect endpoint URL likely causes this in the database script. First, copy the URL on line 10 in the script and paste it in your browser. If the endpoint is correct, it should display one of the two messages below:{"status":401,"error":"Unauthorized"}
// or
{"status":403,"error":"Forbidden"}
If what you’re seeing is the home page or a 404, then the URL is incorrect. Look for your site URL under Settings > General > Site URL in the WordPress admin. Add /index.php?a0_action=migration-ws-login to the end for the Login script and /index.php?a0_action=migration-ws-get-user to the end for the Get User script.
- For versions 3.10.0 and earlier: The URL value should appear in the script itself as the first parameter in the
request.postcall. - For versions 3.11.0 and later: The token value should be saved in a configuration variable. Add the following to the first line of the function and use the Try button to see what is stored for
endpointUrl:
callback(null, configuration);
If you’re sure the URLs are correct and are still having this issue, check with your host to make sure those URLs are not cached or restricted in any way.
Wrong email or password
This is the default error shown if anything else goes wrong. The easiest way to troubleshoot what’s happening is to temporarily output the error that’s being sent back (these are opaque by default to avoid displaying anything that might give attackers something to work with). On line 30 of the Login script, change:callback(null);
to:
callback(wpUser.error);
Save the script, and try the connection again. You should see one of the following messages and be able to pinpoint the issue with the steps below. Once you’ve solved the issue, change the script back to what it was.
Forbidden
This means that the migration endpoints are turned off in your WordPress install. In WordPress, go to Auth0 > Settings > Advanced and turn on User Migration Endpoints. Make sure the token that appears there is the same as what is used for both custom database scripts:- For versions 3.10.0 and earlier: The token value should appear in the script itself after
access_token: - For versions 3.11.0 and later: The token value should be saved in a configuration variable. Add the following to the first line of the function and use the Try button to see what is stored for
migrationToken:
callback(null, configuration);
Unauthorized
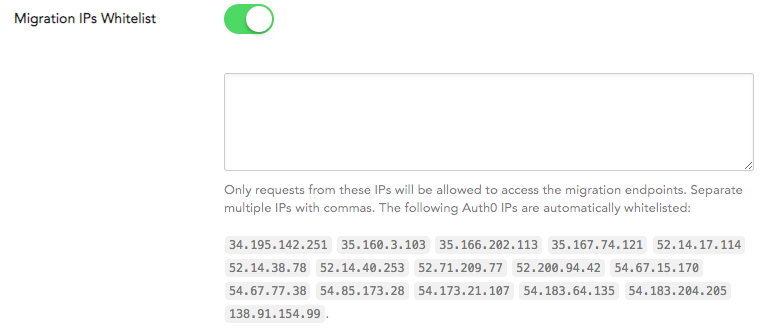
This means that the migration IP allow list is turned on, but the incoming IP address is not on the list. Just below the Login script you should see a list of IP addresses:
Unauthorized: missing authorization header
The is either missing in the database script (line 16), or your server is not processing the headers correctly. Check the Login script and make sure that the token exists and matches what is in WordPress. If the token is there and correct, then you’ll need to talk to your host to enable theAuthorization header to be parsed. For help with server troubleshooting, read Apache 2.4 + PHP-FPM and Authorization headers on stackoverflow.com. To see how the token is retrieved, view the plugin code in the GitHub repository.
Invalid token
The security token in the database script is incorrect. Check the Login script line 16 and make sure that the token matches what is in WordPress.Invalid Credentials
The email address and/or password being used is incorrect. Check to make sure you’re entering the correct email address and that the password is correct. You can reset the user password to something else to make sure you have the correct one.Cannot Change Email or Incorrect User Data
If you are using more than one custom database connection in your Auth0 tenant and you’re unable to change the email address or are getting user data stored for the wrong user, it’s likely that you have overlapping user IDs in Auth0. This problem has been fixed for new sites installing 3.11.0 but, for connections created before then, this will need to be manually fixed by doing one of the following:- If you don’t have any user data stored that needs to be kept (if you’re only using the connection to support login and not storing any metadata), you can create a new custom database connection using the steps above (using the 3.11.0 notes) and switch the Application to this new connection (make sure to turn the old connection off). The migration will be restarted, and there will be no impact on the user experience.
- If you do have data in Auth0 that needs to be kept, you can use our User Import/Export Extension to adjust the user data.
- Create a new custom database connection using the steps above (using the 3.11.0 notes).
- Export all users from the existing connection (we recommend putting your site in maintenance mode while doing the switch-over, so no users are missed).
- Change all user IDs to add the namespace used when creating the new connection. User IDs should go from something like
auth0|123toauth0|Your-WP-Site-Name|123. Adjust all other fields you need to follow the import schema. To learn more, read Bulk User Import Database Schema and Examples. - Turn the new connection on and the old connection off for your application.
- Import the new user data into the new connection and test.
- If you have a paid account, you can contact our support team to run a database update script to change the user IDs to a namespaced version and add the namespace to your database script at the same time (step 12 in Set Up and Configuration above).