Use this file to discover all available pages before exploring further.
MQTT is a lightweight protocol often used for devices to communicate with other systems. It is designed for the publish/subscribe messaging pattern. You can read more about MQTT on Wikipedia.Generally speaking there are 3 components:
A publisher of messages.
A subscriber to messages.
A broker that connects one and the other.
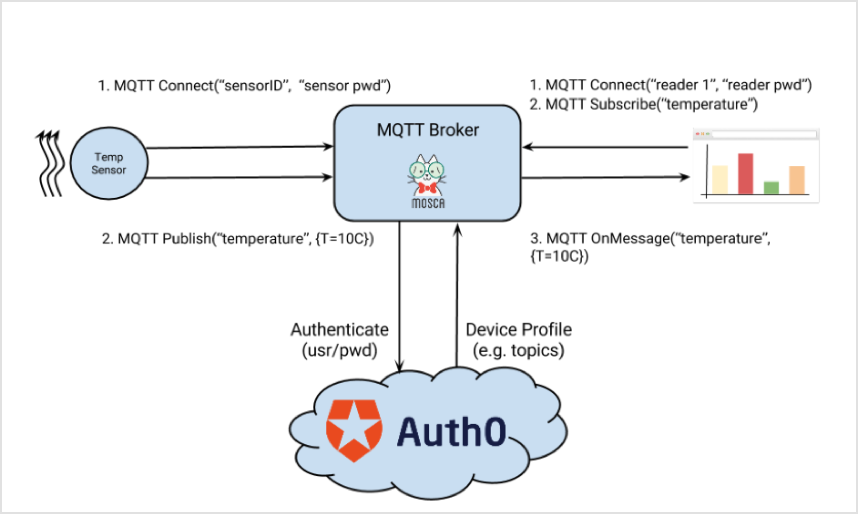
There’s a notion of topics (a.k.a. as channels or subjects) which messages are associated with. Topics are used to route messages between publishers and subscribers.The MQTT protocol supports a basic authentication mechanism based on usernames & passwords. These credentials are sent with the CONNECT message.This article shows an integration between nodejs based MQTT broker: mosca and Auth0. In this example, Auth0 is used to authenticatepublishers and subscribers to the broker, and then authorize routing of messages.
mosca is straightforward to host and can be embedded in other servers. For the purpose of this sample, we simply self-host a mosca server:
var mosca = require('mosca')var Auth0Mosca = require('auth0mosca');var settings = { port: 9999,};//'Thermostats' is a Database connection where all devices are registered.var auth0 = new Auth0Mosca('https://eugeniop.auth0.com', '{Your Auth0 ClientID}', '{Your Auth0 Client Secret}','Thermostats');//Setup the Mosca servervar server = new mosca.Server(settings);//Wire up authentication & authorization to moscaserver.authenticate = auth0.authenticateWithCredentials();server.authorizePublish = auth0.authorizePublish();server.authorizeSubscribe = auth0.authorizeSubscribe();server.on('ready', setup);// Fired when the mqtt server is readyfunction setup() { console.log('Mosca server is up and running');}server.on('clientConnected', function(client) { console.log('New connection: ', client.id );});
This creates a server listening for MQTT messages on port 9999. mosca allows you to override the 3 functions used to authenticate and authorize operations.In this sample, we are using a very simple module auth0mosca to perform these functions. Auth0 is wired up to mosca.
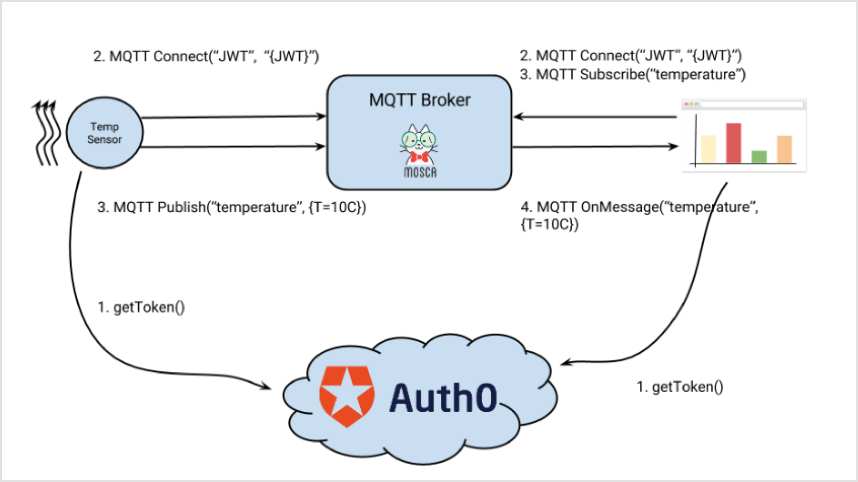
authenticateWithCredentials uses the OAuth2 Resource Owner Password Credential Grant to authenticate the broker and all connections to it. Each time a publisher or a subscriber send a CONNECT message to the broker the authenticate function is called. In it we call the Auth0 endpoint and forward the device’s username/password. Auth0 validates this against its account store (that is the first request.post in the code). If successful, it validates and parses the (JWT) to obtain the device profile and adds it to the client object that represents either the subscriber or the publisher. That’s done in the jwt.verify call.By convention, all devices connected to the broker have an account in Auth0.Notice that the Device Profile also has a property topics. This is an array with all topics this particular device is allowed to. In the screenshot above, thermostat-1a will be allowed publishing (or subscribing) to topics temperature and config.The authorizePublish and authorizeSubscribe functions simply check that a particular requested topic is present in this list.The authenticateWithJWT expects a JWT in the password field. The flow in this case is slightly different:
The publisher & subscriber will obtain a token
They connect to mosca submitting the JWT
mosca validates the JWT
Messages are sent and re-transmitted to subscribers
Publishers and subscribers will obtain the JWT through some means. Notice that the broker doesn’t need to communicate with Auth0 anymore. JWTs are self-contained artifacts that can be validated with the secret used to sign them.
This shows how easy it is to use Auth0 in various scenarios. Auth0’s user store is being used to manage devices. Of course much more sophisticated authorization rules could be written based on other conditions: time, location, device_id, and so on All these would be very simple to implement, either through additional profile attributes or through Rules. This also shows how the flexible Auth0 Profile can be extended to support arbitrary artifacts (such as topics in the example).To learn more about Rules, you can review Auth0 Rules.Ιt is never a good idea to send credentials (username/password) over unsecured networks. There are other implementations that provide transport level security that would prevent message contents to be revealed. mosca supports TLS as an example. Likely a production deployment would favor this, unless all traffic happens in a closed network.