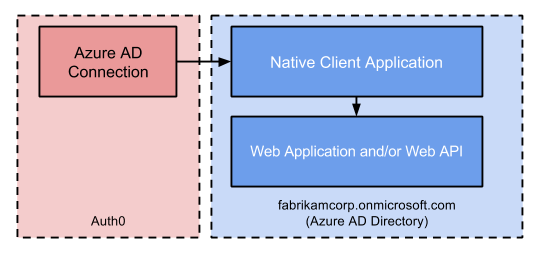
In addition to the WS-Federation and Connect flows, it’s also possible to use the Resource Owner flow with Azure AD. This flow allows you to capture and validate a user’s credentials (email and password) instead of showing the Azure AD login page. For security and (SSO) reasons, this is not the recommended approach; still, the flow can be useful in Native mobile scenarios or to batch-process authentication with Azure AD. This configuration requires two applications: a Web Application and/or Web API, and a Native Application. From Azure AD’s point of view, users will be authenticated using the Native Application to gain access to the Web Application and/or Web API.Documentation Index
Fetch the complete documentation index at: https://auth0.com/llms.txt
Use this file to discover all available pages before exploring further.
Prerequisites
Register your Application with Auth0:- Select Native for the Application Type.
- Add an Allowed Callback URL. Your callback URL format will vary depending on your platform. For details about the format for your platform, see our Native Quickstarts.
- Ensure your Application’s Grant Types include the appropriate flows.
Steps
To connect your application using Resource Owner flow, you must:- Set up your applications in the Microsoft Azure portal.
- Create an enterprise connection in Auth0.
- Enable the enterprise connection for your Auth0 Application.
- Test the connection.
Microsoft Azure account
Before proceeding, you will need a valid Microsoft Azure account and must have your own Microsoft Azure AD directory for which you are a Global administrator.If you don’t have a Microsoft Azure account, you can sign up for free; then, if necessary, set up an Azure AD directory by following Microsoft’s Quickstart: Create a new tenant in Azure Active Directory - Create a new tenant for your organization.Alternatively, if you have an Office 365 account, you can use the account’s Azure AD instance instead of creating a new one. To access your Office 365 account’s Azure AD instance:
- Sign in to Office 365, and navigate to the Office 365 Admin Center.
- Open the Admin centers menu drawer located in the left menu, and click on Azure AD.
Set up your applications in the Microsoft Azure portal
Register a new web application
To learn how to register your application with Azure AD, read Quickstart: Register an application with the Microsoft identity platform on Microsoft Docs. While setting up your application, make sure you use the following settings:- If you want to allow users from external organizations (like other Azure AD directories), select Accounts in any organizational directory (Any Azure AD directory - Multitenant) when setting Supported account types.
- When asked to set a Redirect URI, select Web and enter your callback URL:
https://{yourDomain}/login/callback.
Find your Auth0 domain name for redirects
If your Auth0 domain name is not shown above and you are not using our custom domains feature, your domain name is a concatenation of your tenant name, your regional subdomain, and
auth0.com, separated by the dot (.) symbol.For example, if your tenant name is exampleco-enterprises, and your tenant is in the US region, your Auth0 domain name would be exampleco-enterprises.us.auth0.com and your Redirect URI would be https://exampleco-enterprises.us.auth0.com/login/callback.However, if your tenant is in the US region and was created before June 2020, then your Auth0 domain name would be exampleco-enterprises.auth0.com and your Redirect URI would be https://exampleco-enterprises.auth0.com/login/callback.If you are using custom domains, your Redirect URI would be https://<YOUR CUSTOM DOMAIN>/login/callback.Configure your web application to expose an API
To learn how to configure your Web application to expose an API with Azure AD, read Quickstart: Configure an application to expose web APIs on Microsoft Docs. While configuring your app, make sure you use the following settings:- When asked to set a Scope name, enter
API.Access.
Register a new native application
To learn how to register a native application in Azure, read Quickstart: Register an application with the Microsoft identity platform on Microsoft Docs. While setting up your app, make sure you use the following settings:- If you want to allow users from external organizations (like other Azure AD directories), select Accounts in any organizational directory (Any Azure AD directory - Multitenant) when setting Supported account types.
- When asked to set a Redirect URI, select
Public client/native (mobile & desktop)and enter your callback URL. Your callback URL format will vary depending on your platform. For details about the format for your platform, read Native Quickstarts.
Create a client secret for your native application
To learn how to create a , read Quickstart: Configure a client application to access web APIs - Add Credentials to your web application on Microsoft Docs. Generate a Client secret and record its value. You will need it later in the tutorial.If you configure an expiring secret, make sure to record the expiration date; you will need to renew the key before that day to avoid a service interruption.
Add permissions for your native application
To learn how to add permissions for your Native application, read Quickstart: Configure a client application to access web APIs - Add permissions to access web APIs on Microsoft Docs. Auth0 requires that you enable the least privileged permissions necessary (for the Microsoft Graph API and for the Web application you configured to expose an API) for this configuration to work properly. To learn more about Microsoft Graph API permissions, read Microsoft Graph permissions reference on Microsoft Docs. While setting up your permissions, make sure you use the following settings for Microsoft Graph API:-
When asked for a permission type, choose Delegated permissions.
- Under User, select User.Read so your app can sign in users and read the signed-in user’s profile.
- Under Directory, select Directory.Read.All so your app can read directory data on the signed-in user’s behalf.
-
When asked for a permission type, choose Delegated permissions.
- Under API, select API.Access so your app can access your API on the user’s behalf.
Configure the connection in Auth0
After creating both applications in Azure AD, you can configure the Auth0 connection:-
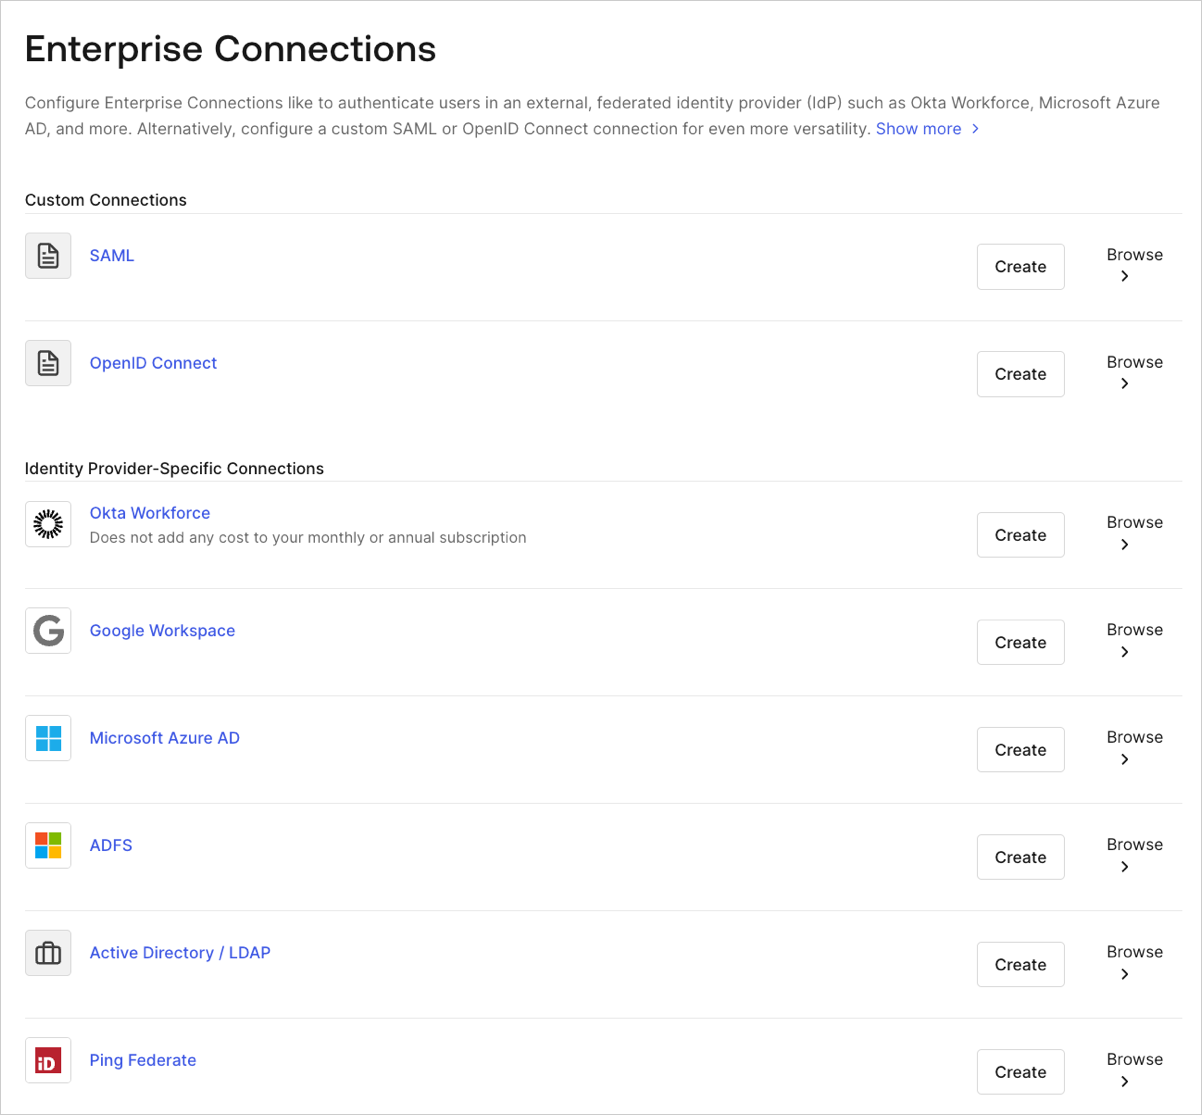
Navigate to Auth0 Dashboard > Authentication > Enterprise, locate Microsoft Azure AD, and select the add (+) button.
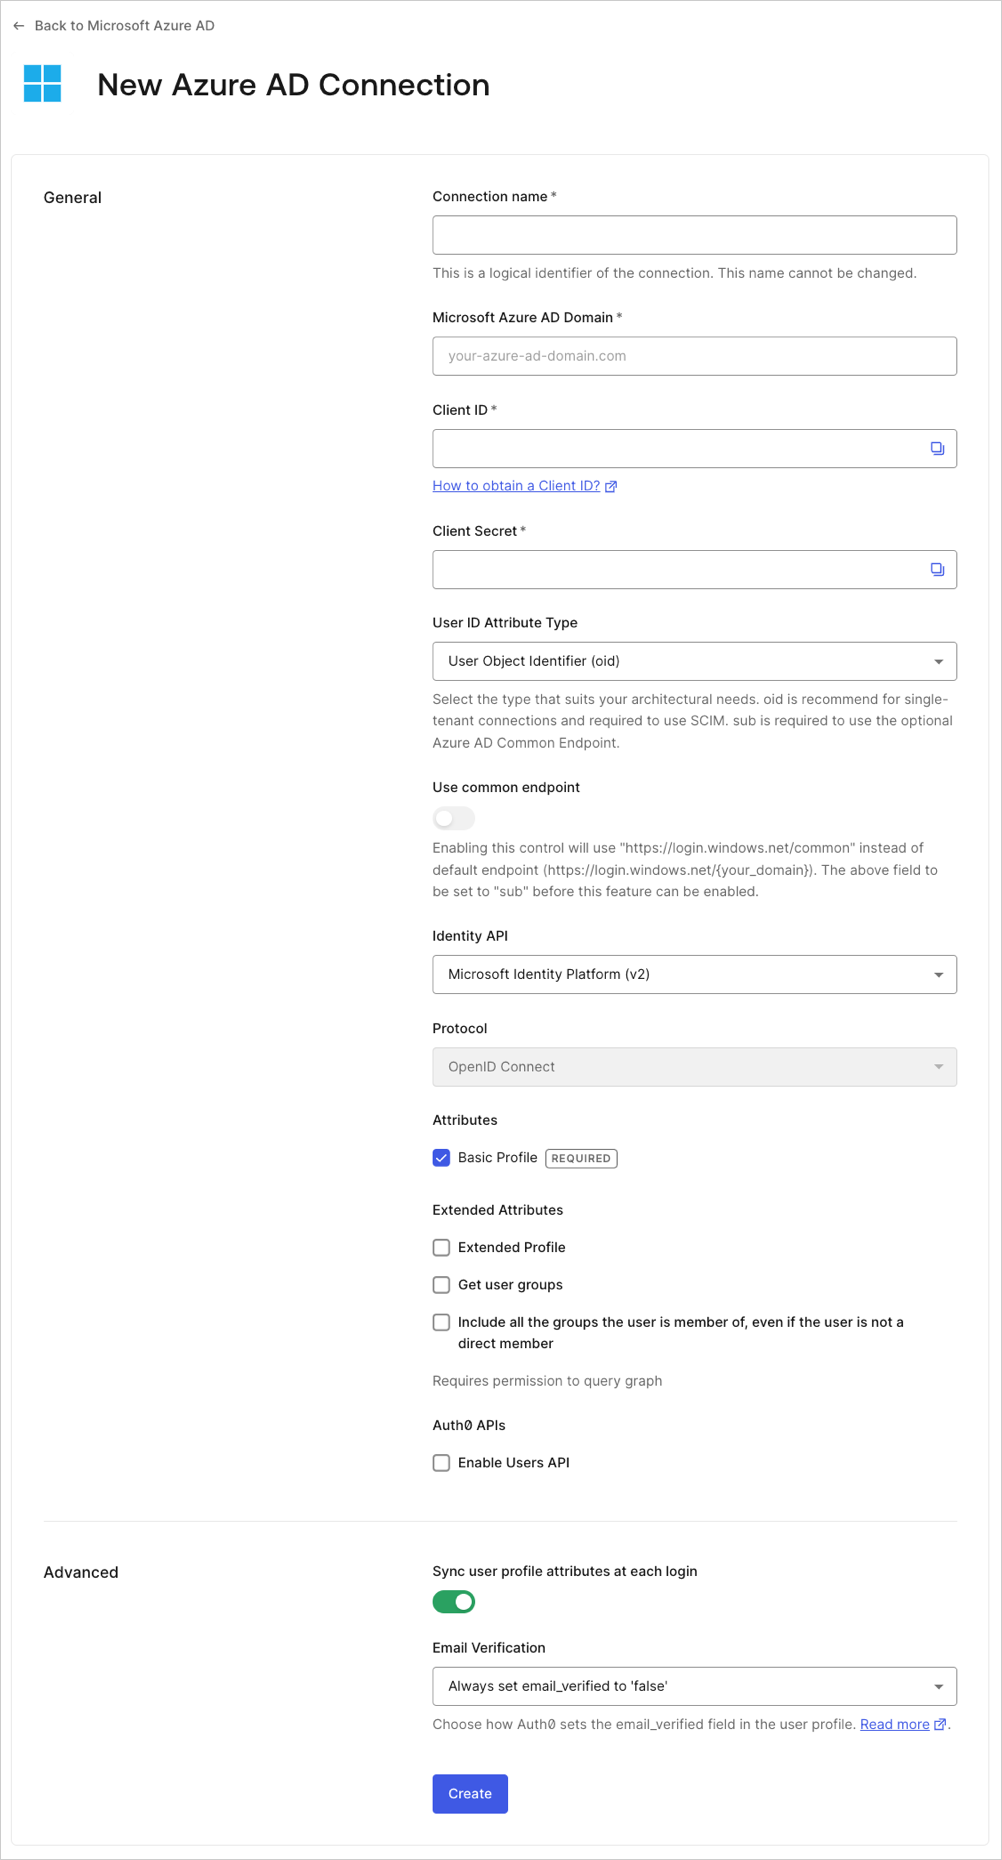
- Enter details for your connection, and select Create:
| Field | Description |
|---|---|
| Connection name | Logical identifier for your connection; it must be unique for your tenant. Once set, this name can’t be changed. |
| Microsoft Azure AD Domain | Your Azure AD domain name. You can find this on your Azure AD directory’s overview page in the Microsoft Azure portal. |
| Client ID | Unique identifier for your registered Azure AD application. Enter the saved value of the Application (client) ID for the Native application you registered in Azure AD. |
| Client Secret | String used to gain access to your registered Azure AD application. Enter the saved value of the Client secret for the Native app you registered in Azure AD. |
| Use common endpoint (optional) | When enabled, your application will dynamically accept users from new directories. Typically enabled if you selected a multitenant option for Supported account types for the application you registered in Azure AD. When enabled, Auth0 will redirect users to Azure’s common login endpoint, and Azure will perform Home Realm Discovery based on the domain of the user’s email address. |
| Identity API | API used by Auth0 to interact with Azure AD endpoints. Learn about the differences in behavior in Microsoft’s Why update to Microsoft identity platform (v2.0) doc. Select Azure Active Directory (v1), and for App ID URI, enter the saved value of the Application ID URI that was created when you configured your Web application to expose an API. |
| Attributes | Basic attributes for the signed-in user that your app can access. Indicates how much information you want stored in the Auth0 User Profile. |
| Extended Attributes (optional) | Extended attributes for the signed-in user that your app can access. |
| Auth0 APIs (optional) | When selected, indicates that you require the ability to make calls to the Azure AD Users API. |
| Sync user profile attributes at each login | When enabled, Auth0 automatically syncs user profile data with each user login, thereby ensuring that changes made in the connection source are automatically updated in Auth0. |
| Email Verification | Choose how Auth0 sets the email_verified field in the user profile. To learn more, see Email Verification for Azure AD and ADFS. |
Enable the enterprise connection for your Auth0 application
To use your new Azure AD enterprise connection, you must enable the connection for your Auth0 Applications.Test the connection
Now you’re ready to test your connection.Group Memberships and Advanced Profile Information
In this native flow, Auth0 will receive an from Azure AD which has been issued for your Azure AD Web application. As a result, features like loading group memberships and advanced profile information will no longer work because the Access Token received by Azure AD can no longer be used to query the Azure AD Graph API for this additional information. However, if you depend on group memberships and advanced profile information, you can change your configuration to accommodate your needs:-
In Azure, configure your Native application with additional permissions for the Microsoft Graph API:
-
When asked for a permission type, choose Delegated permissions.
- Under Directory, select Directory.AccessAsUser.All, so your app can access the directory as the signed-in user.
-
When asked for a permission type, choose Delegated permissions.
-
In Auth0, modify your Azure AD enterprise connection:
-
In Identity API, select
Azure Active Directory (v1), and for App ID URI, enter the URI of the Azure AD Graph API:
-
In Identity API, select