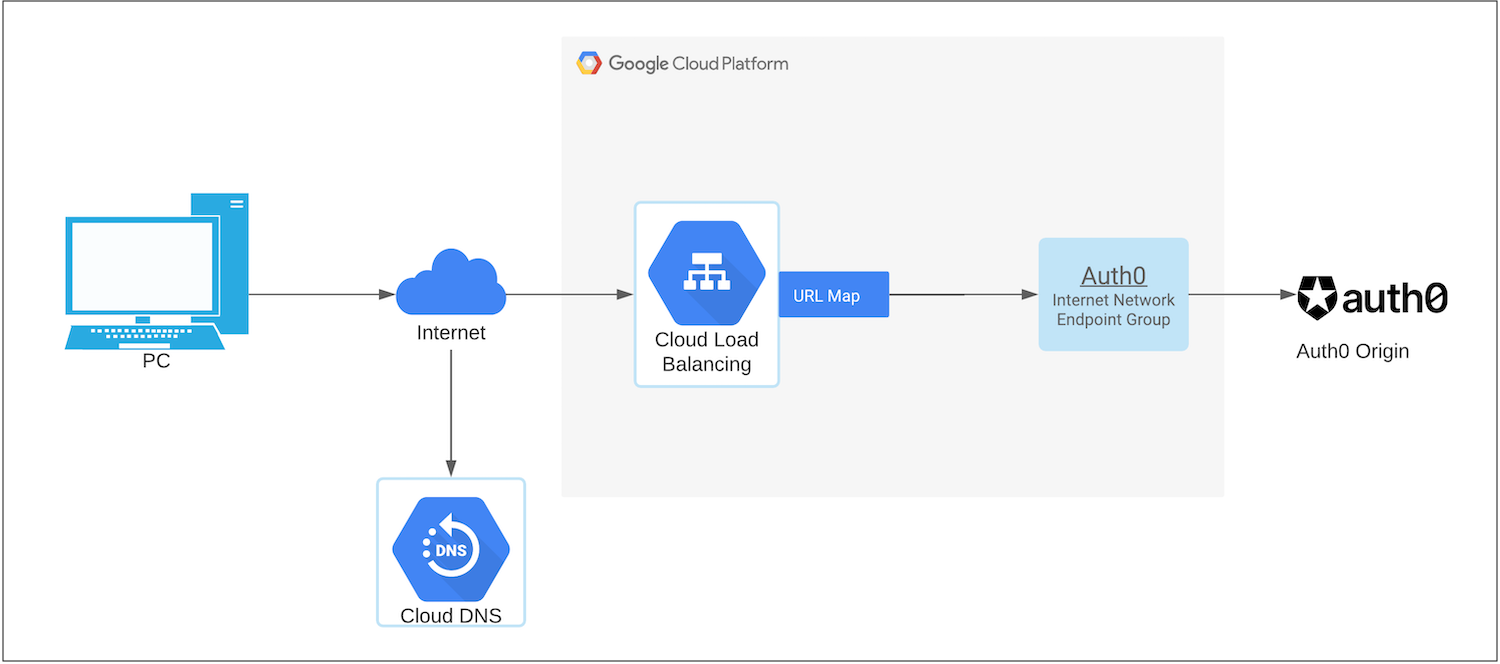
Auth0 custom domains are available with any paid subscription plan. If you want to manage the SSL/TLS certificates yourself, you will need an Enterprise subscription. For more information, see Auth0 pricing plans.
- Google Cloud Platform Load Balancer distributes traffic across multiple instances of applications.
- Internet Network Endpoint Group is a backend that resides outside of Google Cloud. See Internet Network endpoint group for details.

-
Configure Custom Domains with Self-Managed Certificates if you haven’t already. Make note of the Origin Domain Name and
cname-api-keyvalues for use later. - Verify ownership of the domain by adding a TXT record in your DNS server in the Auth0 Dashboard > Tenant Settings > Custom Domains and click Verify.
- Once GCP has verified your domain, log in to the GCP console.
-
Go to Network Services > Load Balancing. Click Create Load Balancer. To learn more, read Google Cloud Platform Load Balancing in Google Cloud documentation.
- Select HTTP(S) Load Balancing.
- Select From Internet to my VMs because we need to route the traffic from Internet to Auth0. Click Continue.
- Provide a name for the load balancer such as
auth0-reverse-proxyand click Create.
-
Configure the backend.
- Create an internet network endpoint group (NEG) which is a backend that resides outside of Google Cloud. To learn more, see Internet network endpoint groups overview in Google Cloud documentation.
- Select the newly created Internet NEG as a backend in the backend service configuration and set the
cname-api-keyandhostvalue (origin domain name) from your Auth0 tenant. - Click Done.
-
Set up the
hostandpathrules.- Choose Action as Route traffic to a single backend.
- In Host rewrite, enter your origin domain name from your Auth0 tenant that you saved earlier.
- Click Create.
-
Configure the frontend.
- Create a certificate. The easiest method is to choose Google-managed certificate because Google automatically provisions the SSL certificate for you.
- If you do not choose a Google-managed certificate, then it is your responsibility to renew and upload the SSL certificate with your certificate authority before it expires.
-
Review and finalize the configuration.
It will take a minute for GCP to configure the load balancer. Typical issues that might cause an error include:
- Invalid API key: The
cname-api-keywas not set to Auth0 from GCP. - 403 Forbidden: The
hostheader was not sent to Auth0 from GCP.
- Invalid API key: The
- Update your DNS records to connect your domain to your load balancer.

