- Confirm that the access token has been passed via the
authorizationheader of the request to access the API. - Verify the RS256 signature of the Access Token using a public key obtained via a JWKS endpoint.
- Ensure the access token has the required Issuer
issandaudclaims.
- Create an Auth0 API
- Import and deploy the AWS API Gateway API
- Create the custom authorizers
- Secure the API using custom authorizers
- Test your deployment
How API Gateway custom authorizers work
According to Amazon, an API Gateway custom authorizer is a “Lambda function you provide to control access to your API using bearer token authentication strategies, such as or .” Whenever someone (or some program) attempts to call your API, API Gateway checks to see if there’s a custom authorizer configured for the API. If there is a custom authorizer for the API, API Gateway calls the custom authorizer and provides the authorization token extracted from the request header received. You can use the custom authorizer to implement different types of authorization strategies, including JWT verification, to return IAM policies authorizing the request. If the policy returned is invalid or if the permissions are denied, the API call fails. For a valid policy, API caches the returned policy, associating it with the incoming token and using it for the current and subsequent requests. You can configure the amount of time for which the policy is cached. The default value is300 seconds and the maximum length of caching is 3600 seconds (you can also set the value to 0 to disable caching).
To read more, visit What is Amazon API Gateway? in the Amazon Developer’s Guide. For more information on verification, review our JSON Web Token article.
Prerequisite
You need to sign up for an AWS account. This grants you access to the AWS features, including API Gateway and Lambda. All new members receive twelve months of free tier access to AWS.Create an Auth0 API
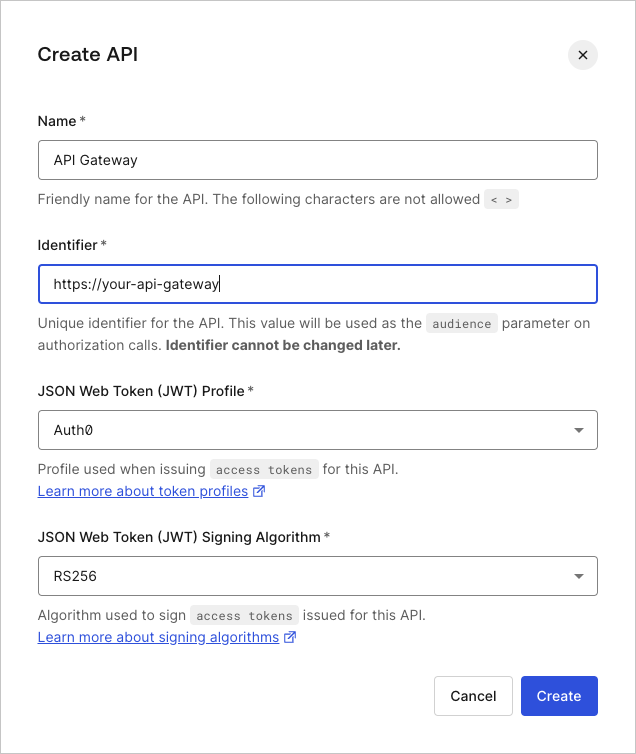
Configure the APIs consumed by the applications that successfully authorize.- Go to Auth0 Dashboard > Applications > APIs, and select Create API.
-
Enter values for the following fields, and select Create.
Field Description Name A friendly name for your API. This is the name you’ll see in your list of Auth0 APIs. Identifier A logical identifier for your API. We recommend formatting this identifier like a URL https://your-api-gateway.Signing Algorithm The algorithm you want Auth0 to use to sign the issued access token. To learn more, see Signing Algorithms.
Import and deploy the AWS API Gateway API
This portion of the tutorial has been adapted from the official AWS example. Please refer to this example for in-depth notes and discussion.
- Import an API into API Gateway
- Test an API import
- Deploy an API for use with any front-end applications
- Test an API deployment
Import and configure the Pets API
- Log in to your AWS account, and using the Services drop-down located in the top navigation bar, go to the API Gateway Console.
-
If you’ve previously created an API, simply navigate to the API Gateway Console and click Create API. You’ll be given the option to create the Example API on the Create new API form.
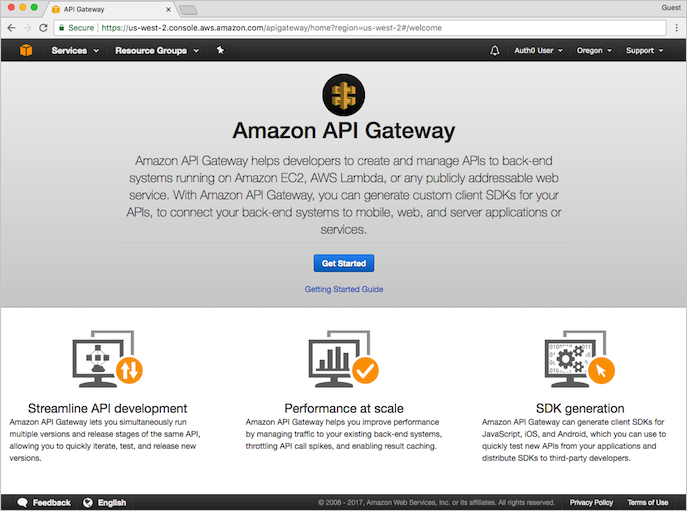
If you’ve never created an API using API Gateway, you’ll see the following screen. Click Get Started to proceed.
You’ll see a pop-up message welcoming you to API Gateway. Click OK to proceed.
-
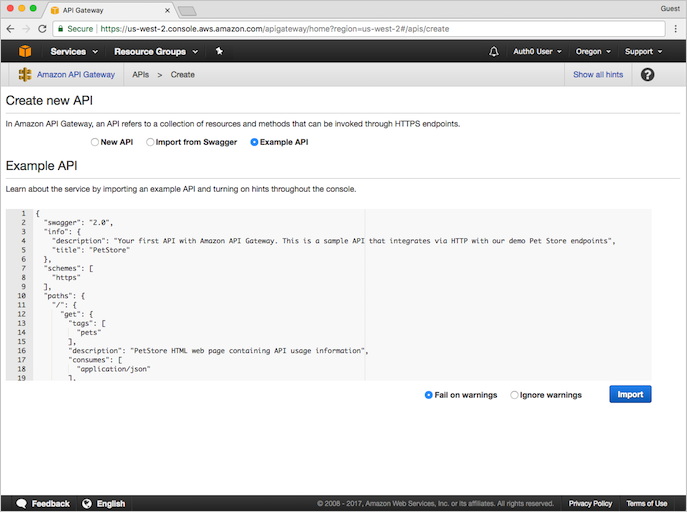
On the Create new API form, you’ll see that Example API is selected by default, and there’s an example API defined in the editor. We’ll use this API for the rest of our tutorial, so begin the API creation process by clicking Import.
When done, AWS displays a message indicating that your API created and populated with the provided data. Notice the API already has methods associated with it (namely,
GETandPOST). You can view the details of a method, modify its configuration, or test the method invocation by clicking the method name from the resource tree.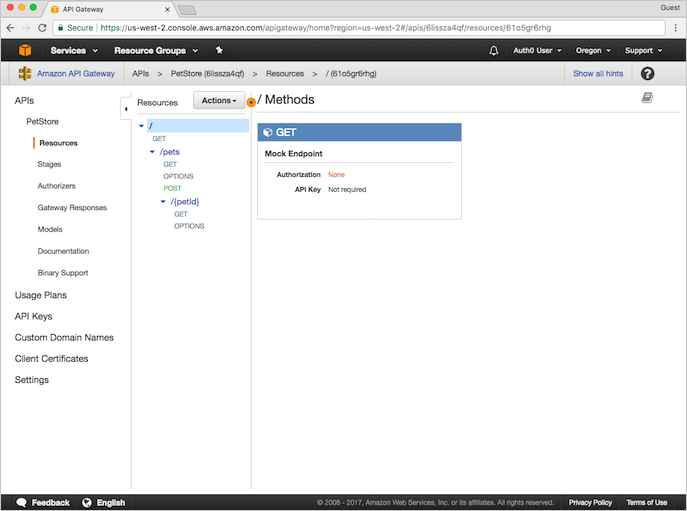
Test your API
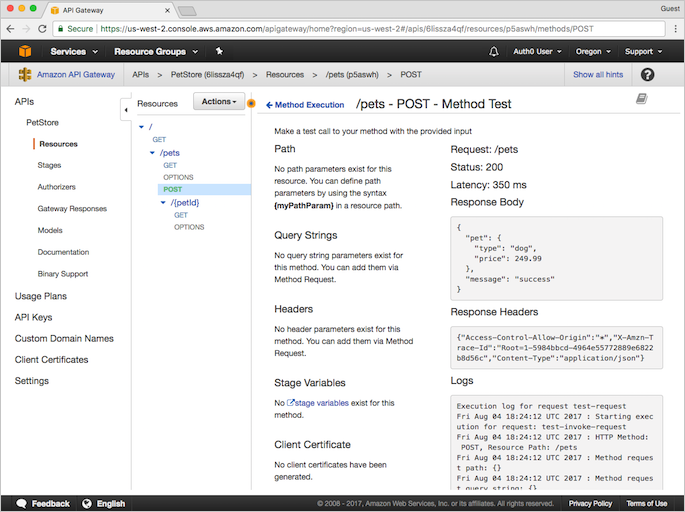
To test your API, click POST under/pets. This brings up the Method Execution window that provides an overview of the POST method’s structure and behaviors:
- Method Request and Method Response: the API’s interface with the front-end
- Integration Request and Integration Response: the API’s interface with the back-end
-
Click Test (shown on the Client sliver located in the middle of the page). You’ll be redirected to the
/pets - POST - Method Testpage. Scroll to the bottom of the page, and provide the following snippet as the Request Body:The request body indicates the attributes of the pet we want to add to the database, as well as the cost for the pet.
-
Click Test to proceed. You’ll see the results of the test at the right side of the page.
Deploy the API
The test we just completed was done using the API Gateway console. To use the API with a different application, you’ll need to deploy the API to a stage.- From the Actions menu, select Deploy API.
-
Provide the following values, and click Deploy.
Parameter Value Deployment stage Choose [New Stage]Stage name Provide a name for your stage Stage description Provide a description for your stage Deployment description Provide a description for your API deployment
Test the deployment
When the API has successfully deployed, you’ll be redirected to the Test Stage Editor. You can, at this point, test the API to see if it deployed correctly.-
At the top of the Test Stage Editor window is a blue banner with your Invoke URL. This is the URL used to invoke the
GETendpoint of your API. Click on the link to submit theGET / methodrequest in a browser. This should result in the following success response: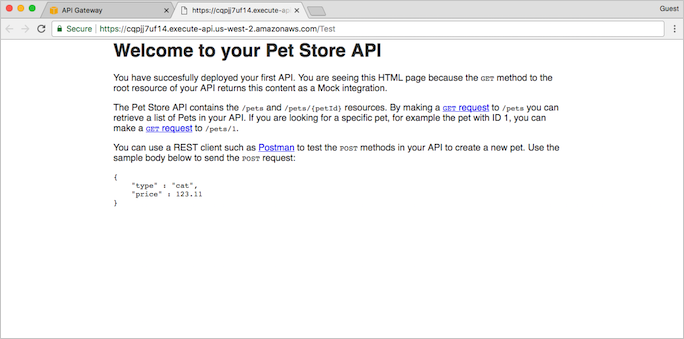
-
In the Stages page, expand the tree under Test. Click GET under
/pets/{petId}.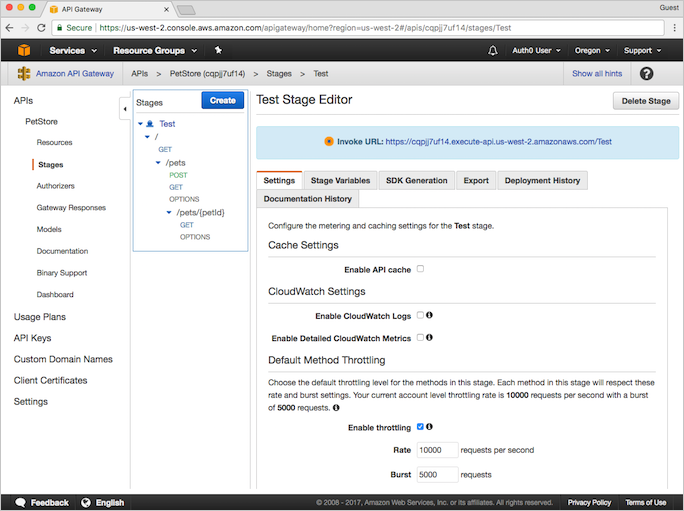
-
You’ll see an Invoke URL displayed in the blue banner at the top of the window. The final portion,
{petID}, stands for a path variable. Replace this variable with1, and navigate to the new URL using your browser. You should receive an HTTP 200 request with the following JSON payload:
Create the custom authorizers
Now that we have a fully functional API that’s managed by API Gateway, secure this API so only those with the appropriate authorization may access the back-end behind the API. Use API Gateway’s custom request authorizers to authorize your APIs using bearer token authorization strategies, such as OAuth 2.0 or SAML. For each incoming request, the following happens:- API Gateway checks for a properly-configured custom authorizer.
- API Gateway calls the custom authorizer (which is a Lambda function) with the authorization token.
- If the authorization token is valid, the custom authorizer returns the appropriate AWS Identity and Access Management (IAM) policies.
- API Gateway uses the policies returned in step 3 to authorize the request.
Prepare the custom authorizer
You can download a sample custom authorizer that supports Auth0-issued tokens. Afterward, you’ll need to customize the files so that the custom authorizer works for your environment.- Unzip the folder containing the sample files you downloaded above to the location of your choice, and navigate to the folder using the command line.
-
Within the sample folder, run
npm installto install the Node.js packages required for deployment; AWS requires that these files be included in the bundle you will upload to AWS during a later step. -
Configure your local environment with a
.envfile. You can copy the.env.samplefile (while simultaneously renaming it.env) usingcp .env.sample .env. Make the following changes:As an example, the text of yourParameter Value TOKEN_ISSUERThe issuer of the token. If Auth0 is the token issuer, use https://{yourDomain}/. Be sure to include the trailing slash.JWKS_URIThe URL of the JWKS endpoint. If Auth0 is the token issuer, use https://{yourDomain}/.well-known/jwks.jsonAUDIENCEThe identifier value of the API you created in the Create an Auth0 API section above. .envfile should look something like this when complete:
Test the custom authorizer locally
Obtain a valid JWT access token. There are multiple ways you can get one and the method you choose depends on your application’s type, trust level, or overall end-user experience. For more information, review Get Access Tokens.- You can get a test token for your API by navigating to Auth0 Dashboard > Applications > APIs, selecting your API, and selecting Test.
- Create a local
event.jsonfile containing the token. You can copy the sample file (runcp event.json.sample event.json). ReplaceACCESS_TOKENwith your JWT token, andmethodArnwith the appropriate ARN value for theGETmethod of your API.
methodArn:
- Using the API Gateway Console, open the PetStore API.
- In the left-hand navigation, select Resources.
- In the middle Resources panel, expand the resource tree. Underneath
/pets, select GET. - In the Method Request box, you’ll see the ARN.
- Run the test using
npm test.
Effect is Allow, your authorizer would’ve allowed the call to API Gateway.
To learn more, visit Lambda-local at NPM.
Create the IAM role
The IAM role has the required permissions to call Lambda functions; before we can proceed with our custom authorizer, we’ll need to create an IAM role that can call our custom authorizer whenever API Gateway receives a request for access.- Log in to AWS, and navigate to the IAM Console. In the left-hand navigation, select Roles.
- Select Create new role.
- Under AWS service, select the AWS Lambda row, then Next: Permissions.
- On the Attach permissions policy screen, select the AWSLambdaRole. You can use the provided filter to narrow down the list of options. Select Next: Tags, then select Next: Review to proceed.
-
On the Review screen, provide a Role name, such as
Auth0Integration. Leave the rest of the fields as is. Select Create role. - Once AWS has created your role, you’ll be directed back to the Roles page of IAM. Select your new role.
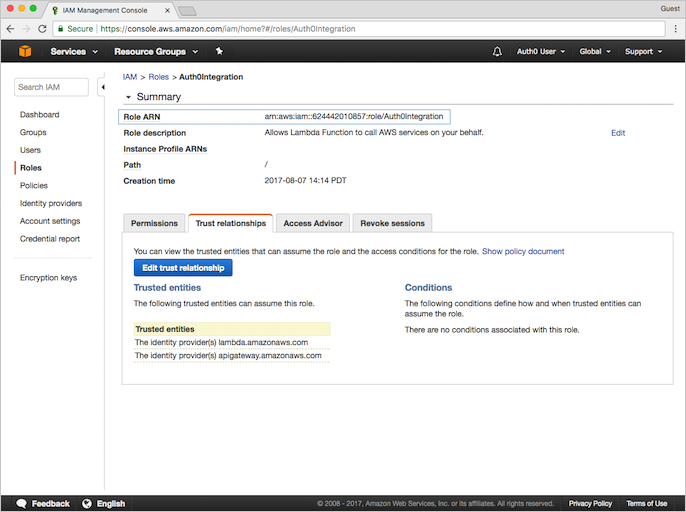
- On the Summary page for the role you’ve just created, select the Trust relationships view.
-
Select Edit trust relationship, and populate the Policy Document field with the following JSON snippet:
- Click Update Trust Policy.
-
You’ll be redirected back to the Summary page. Copy down the Role ARN value for later use.
Create the Lambda function and deploy the custom authorizer
Now that you’ve configured your custom authorizer for your environment and tested it to see it works, deploy it to AWS.-
Create a bundle that you can upload to AWS by running
npm run bundle. This generates acustom-authorizer.zipbundle containing the source, configuration, and node modules required by AWS Lambda. - Navigate to the Lambda console, and click Create function.
-
On the Select blueprint page, click Author from scratch to create a blank function. Under Basic information, provide values for the following parameters:
Parameter Value Name A name for your Lambda function, such as jwtRsaCustomAuthorizerDescription A description for your Lambda function (optional) Runtime Select Node.js 10.x - Click Create Function to continue.
- On the Configuration page of your function, scroll down to the Function Code section.
- Select Upload a .ZIP file as the Code entry type.
-
Click Upload and select the
custom-authorizer.zipbundle you created earlier. -
Then, create the following three Environment variables. Note that this information is identical to that which is the
.envfile.Parameter Value TOKEN_ISSUERThe issuer of the token. If Auth0 is the token issuer, use https://{yourDomain}/JWKS_URIThe URL of the JWKS endpoint. If Auth0 is the token issuer, use https://{yourDomain}/.well-known/jwks.jsonAUDIENCEThe identifier value of the API you created in step 1. - In the Execution role section, select Use an existing role then select the IAM role you created previously as the Existing role.
- Under Basic settings, set Timeout to 30 sec.
- Click Save.
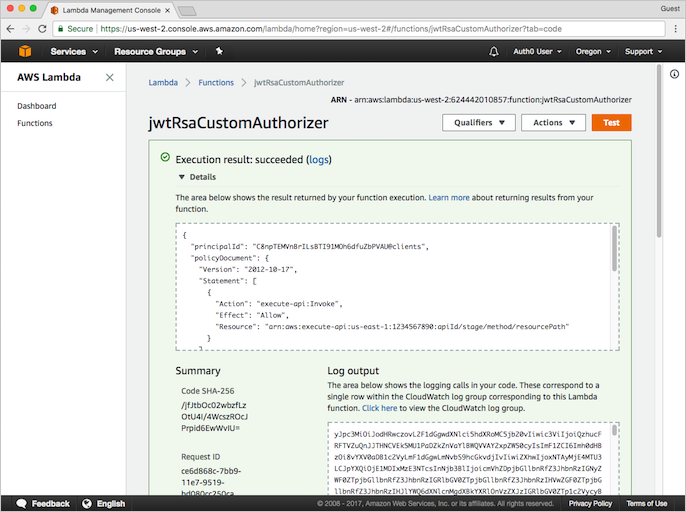
- To test the Lambda function you just created, click Test in the top-right corner.
-
Copy the contents of your
event.jsonfile into the Configure test event form. You can use the default “Hello World” event template. - Click Create.
-
Run your test by selecting it and clicking Test. If the test was successful, you’ll see: “Execution result: succeeded”. Expanding the output window should show a message similar to the one you received after your successful local test.
Configure API Gateway custom authorizer
- Return to API Gateway Console and open the PetStore API we created earlier.
-
Using the left-hand navigation, open Authorizers and select Create New Authorizer, then set the following parameters, and click Create.
Parameter Value Name jwt-rsa-custom-authorizerType Select Lambda Lambda Region Use the region for the Lambda function you created previously Lambda Function jwtRsaCustomAuthorizerLambda Invoke Role The IAM Role ARN you copied above Lambda Event Payload Select Token Token Source AuthorizationToken Validation ^Bearer [-0-9a-zA-z\.]*$TTL (seconds) 3600 -
After AWS creates the authorizer and the page refreshes, test your authorizer by clicking Test and providing the Auth0 token (
Bearer ey...) you previously used. If the test was successful, you’ll see a response similar to the following.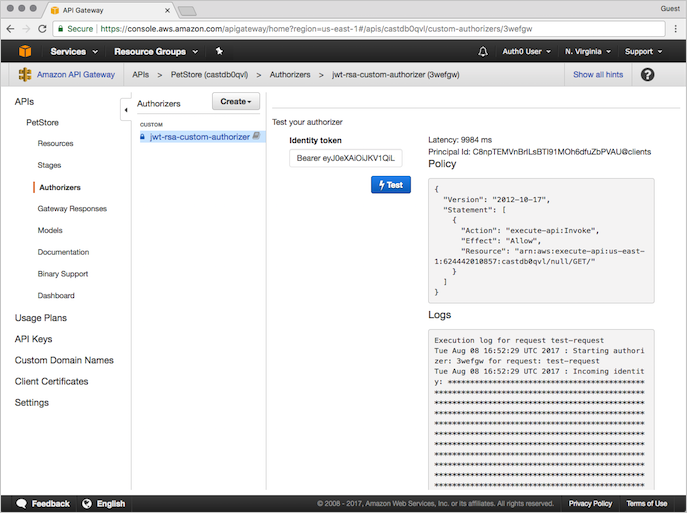
Secure the API using custom authorizers
To learn how to secure your API’s endpoints, see the Amazon API Gateway developer guide article: Use API Gateway Lambda Authorizers.Configure API Gateway resources to use the custom authorizer
-
Log in to AWS, and navigate to the API Gateway Console.
Custom authorizers are set on a method by method basis; if you want to secure multiple methods using a single authorizer, you’ll need to repeat the following instructions for each method.
-
Open the PetStore API we created in step 2 of this tutorial. Under the Resource tree in the center pane, select the GET method under the
/petsresource.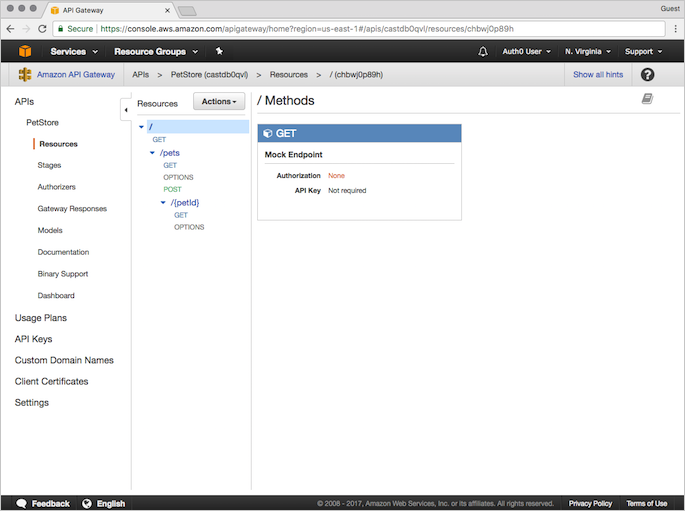
- Select Method Request.
-
Under Settings, click the pencil icon to the right of Authorization and choose the
jwt-rsa-custom-authorizercustom authorizer you created in step 3. -
Click the check mark icon to save your choice of custom authorizer. Make sure the API Key Required field is set to
false.
Deploy the API
To make your changes public, deploy your API.- From the Actions menu, select Deploy API.
-
Provide the following values, and click Deploy:
Parameter Value Deployment stage Choose [New Stage]Stage name Provide a name for your stage Stage description Provide a description for your stage Deployment description Provide a description for your API deployment
Test your deployment
To test your deployment, make aGET call to the Invoke URL you noted in the previous step. If this test fails, check that you obtained the JWT access token correctly.
For details, see Get Access Tokens.