ユーザーの同意とサードパーティアプリケーション
OIDC準拠の認証パイプラインでは、リソースサーバー(APIなど)をアプリケーションとは別のエンティティとして定義することができます。そうすることで、APIを使用するアプリケーションからAPIを切り離すだけでなく、サードパーティアプリケーションを定義して、外部パーティに対し、APIの内部で保護されているリソースへの安全なアクセスを許可することができます。
同意ダイアログ
ユーザーがサードパーティアプリケーションを通じて認証を行い、そのアプリケーションがユーザー情報へのアクセスや、代理としてAPIで何らかのアクションを行うことへの認可を求める場合、ユーザーに対して同意ダイアログが表示されます。
たとえば、このような要求:
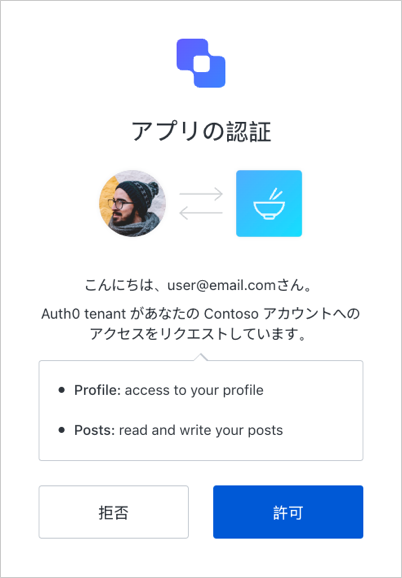
GET /authorize?
client_id=some_third_party_client
&redirect_uri=https://fabrikam.com/contoso_social
&response_type=token id_token
&__scope=openid profile email read:posts write:posts__
&__audience=https://social.contoso.com__
&nonce=...
&state=...
Was this helpful?
は、次のようなユーザー同意ダイアログになります。

ユーザーがアプリケーションの要求を承認すると、ユーザー権限付与が作成されます。付与は、このアプリケーション、このリソースサーバー、このスコープの組み合わせに対するユーザーの同意を表します。アプリケーションは、その後、通常どおりにAuth0から認証成功の応答を受け取ります。
一度同意が与えられると、その同意が明示的に取り消されるまで、ログイン時に同意ダイアログが表示されなくなります。
スコープの説明
デフォルトでは、同意ページは、スコープの名前を使ってユーザーの同意を求めます。下の図のように、スコープ名をaction:resource_name形式で定義します。

同意ページは、同じリソースに対するスコープをグループにまとめ、そのリソースに対するアクションを1行に表示します。たとえば上記の構成では、Posts: read and write your posts(投稿:あなたの投稿の読み取りと書き出し)と表示されます。
代わりに[Description(説明)]フィールドを表示したい場合は、テナントのuse_scope_descriptions_for_consentをtrueに設定します。これは、そのテナント上のすべてのAPIの同意プロンプトに影響します。
use_scope_descriptions_for_consentフラグを設定するには、APIに適切な呼び出しをする必要があります。
curl --request PATCH \
--url 'https://{yourDomain}/api/v2/tenants/settings' \
--header 'authorization: Bearer API2_ACCESS_TOKEN' \
--header 'cache-control: no-cache' \
--header 'content-type: application/json' \
--data '{ "flags": { "use_scope_descriptions_for_consent": true } }'
Was this helpful?
var client = new RestClient("https://{yourDomain}/api/v2/tenants/settings");
var request = new RestRequest(Method.PATCH);
request.AddHeader("content-type", "application/json");
request.AddHeader("authorization", "Bearer API2_ACCESS_TOKEN");
request.AddHeader("cache-control", "no-cache");
request.AddParameter("application/json", "{ \"flags\": { \"use_scope_descriptions_for_consent\": true } }", ParameterType.RequestBody);
IRestResponse response = client.Execute(request);
Was this helpful?
package main
import (
"fmt"
"strings"
"net/http"
"io/ioutil"
)
func main() {
url := "https://{yourDomain}/api/v2/tenants/settings"
payload := strings.NewReader("{ \"flags\": { \"use_scope_descriptions_for_consent\": true } }")
req, _ := http.NewRequest("PATCH", url, payload)
req.Header.Add("content-type", "application/json")
req.Header.Add("authorization", "Bearer API2_ACCESS_TOKEN")
req.Header.Add("cache-control", "no-cache")
res, _ := http.DefaultClient.Do(req)
defer res.Body.Close()
body, _ := ioutil.ReadAll(res.Body)
fmt.Println(res)
fmt.Println(string(body))
}
Was this helpful?
HttpResponse<String> response = Unirest.patch("https://{yourDomain}/api/v2/tenants/settings")
.header("content-type", "application/json")
.header("authorization", "Bearer API2_ACCESS_TOKEN")
.header("cache-control", "no-cache")
.body("{ \"flags\": { \"use_scope_descriptions_for_consent\": true } }")
.asString();
Was this helpful?
var axios = require("axios").default;
var options = {
method: 'PATCH',
url: 'https://{yourDomain}/api/v2/tenants/settings',
headers: {
'content-type': 'application/json',
authorization: 'Bearer API2_ACCESS_TOKEN',
'cache-control': 'no-cache'
},
data: {flags: {use_scope_descriptions_for_consent: true}}
};
axios.request(options).then(function (response) {
console.log(response.data);
}).catch(function (error) {
console.error(error);
});
Was this helpful?
#import <Foundation/Foundation.h>
NSDictionary *headers = @{ @"content-type": @"application/json",
@"authorization": @"Bearer API2_ACCESS_TOKEN",
@"cache-control": @"no-cache" };
NSDictionary *parameters = @{ @"flags": @{ @"use_scope_descriptions_for_consent": @YES } };
NSData *postData = [NSJSONSerialization dataWithJSONObject:parameters options:0 error:nil];
NSMutableURLRequest *request = [NSMutableURLRequest requestWithURL:[NSURL URLWithString:@"https://{yourDomain}/api/v2/tenants/settings"]
cachePolicy:NSURLRequestUseProtocolCachePolicy
timeoutInterval:10.0];
[request setHTTPMethod:@"PATCH"];
[request setAllHTTPHeaderFields:headers];
[request setHTTPBody:postData];
NSURLSession *session = [NSURLSession sharedSession];
NSURLSessionDataTask *dataTask = [session dataTaskWithRequest:request
completionHandler:^(NSData *data, NSURLResponse *response, NSError *error) {
if (error) {
NSLog(@"%@", error);
} else {
NSHTTPURLResponse *httpResponse = (NSHTTPURLResponse *) response;
NSLog(@"%@", httpResponse);
}
}];
[dataTask resume];
Was this helpful?
$curl = curl_init();
curl_setopt_array($curl, [
CURLOPT_URL => "https://{yourDomain}/api/v2/tenants/settings",
CURLOPT_RETURNTRANSFER => true,
CURLOPT_ENCODING => "",
CURLOPT_MAXREDIRS => 10,
CURLOPT_TIMEOUT => 30,
CURLOPT_HTTP_VERSION => CURL_HTTP_VERSION_1_1,
CURLOPT_CUSTOMREQUEST => "PATCH",
CURLOPT_POSTFIELDS => "{ \"flags\": { \"use_scope_descriptions_for_consent\": true } }",
CURLOPT_HTTPHEADER => [
"authorization: Bearer API2_ACCESS_TOKEN",
"cache-control: no-cache",
"content-type: application/json"
],
]);
$response = curl_exec($curl);
$err = curl_error($curl);
curl_close($curl);
if ($err) {
echo "cURL Error #:" . $err;
} else {
echo $response;
}
Was this helpful?
import http.client
conn = http.client.HTTPSConnection("")
payload = "{ \"flags\": { \"use_scope_descriptions_for_consent\": true } }"
headers = {
'content-type': "application/json",
'authorization': "Bearer API2_ACCESS_TOKEN",
'cache-control': "no-cache"
}
conn.request("PATCH", "/{yourDomain}/api/v2/tenants/settings", payload, headers)
res = conn.getresponse()
data = res.read()
print(data.decode("utf-8"))
Was this helpful?
require 'uri'
require 'net/http'
require 'openssl'
url = URI("https://{yourDomain}/api/v2/tenants/settings")
http = Net::HTTP.new(url.host, url.port)
http.use_ssl = true
http.verify_mode = OpenSSL::SSL::VERIFY_NONE
request = Net::HTTP::Patch.new(url)
request["content-type"] = 'application/json'
request["authorization"] = 'Bearer API2_ACCESS_TOKEN'
request["cache-control"] = 'no-cache'
request.body = "{ \"flags\": { \"use_scope_descriptions_for_consent\": true } }"
response = http.request(request)
puts response.read_body
Was this helpful?
import Foundation
let headers = [
"content-type": "application/json",
"authorization": "Bearer API2_ACCESS_TOKEN",
"cache-control": "no-cache"
]
let parameters = ["flags": ["use_scope_descriptions_for_consent": true]] as [String : Any]
let postData = JSONSerialization.data(withJSONObject: parameters, options: [])
let request = NSMutableURLRequest(url: NSURL(string: "https://{yourDomain}/api/v2/tenants/settings")! as URL,
cachePolicy: .useProtocolCachePolicy,
timeoutInterval: 10.0)
request.httpMethod = "PATCH"
request.allHTTPHeaderFields = headers
request.httpBody = postData as Data
let session = URLSession.shared
let dataTask = session.dataTask(with: request as URLRequest, completionHandler: { (data, response, error) -> Void in
if (error != nil) {
print(error)
} else {
let httpResponse = response as? HTTPURLResponse
print(httpResponse)
}
})
dataTask.resume()
Was this helpful?
拒否された許可に対処する
ユーザーがアプリケーションへの同意を拒否した場合は、要求の中で指定されたredirect_uri
に、access_denied
エラーと共にリダイレクトされます。
HTTP/1.1 302 Found
Location: https://fabrikam.com/contoso_social#
error=access_denied
&state=...
Was this helpful?
ファーストパーティアプリケーションに対して同意をスキップする
ファーストパーティアプリケーションは、同意ダイアログをスキップできますが、これはユーザーの代わりにアクセスしようとしているAPIの[Allow Skipping User Consent(ユーザー同意のスキップの許可)]オプションが有効になっている場合にのみ可能です。
ユーザーの同意とアプリケーション
現時点では、検証可能なファーストパーティアプリケーションのみが同意ダイアログをスキップできます。localhost
は検証可能なファーストパーティーになり得ない(ユーザーが悪意のあるアプリケーションをlocalhost
で実行する可能性がある)ため、ファーストパーティーアプリケーションであるかにかかわらず、localhost
で実行されるアプリケーションには常に同意ダイアログが表示されます。開発中には、以下のようなエントリーを/etc/hosts
ファイルに追加すると、これを回避することができます。
127.0.0.1 myapp.example
同様に、「localhost
」がアプリケーションのAllowed Callback URLs(許可されているコールバックURL)設定([Dashboard]>[Applications(アプリケーション)]>[Settings(設定)])にあるいずれかのドメインに含まれている場合、(ファーストパーティーアプリケーションであっても)同意はスキップできません。必ず、Allowed Callback URLs(許可されているコールバックURL)を更新して、アプリケーションに構成したコールバックURLと更新後のドメインマッピングが一致するようにしてください。
サードパーティアプリケーションは信頼できないものとみなされるため、同意ダイアログをスキップできません。
ユーザーが、一度同意したものの、それを取り消したい場合は:
同意を取り消す
リソース所有者のパスワードフローを使うときは、同意ダイアログは使用されません。ユーザーが直接アプリケーションにパスワードを入力し、これがアプリケーションに対してユーザーアカウントへのフルアクセスを付与したことと同じになるためです。
[Auth0 Dashboard]>[User Management(ユーザー管理]>[Users(ユーザー)]に移動し、同意を取り消すユーザーをクリックします。
[Authorized Application(認可アプリケーション)]タブをクリックします。
該当するアプリケーションの横にある[Revoke(取り消し)]をクリックします。
パスワードベースのフロー
/authorize
エンドポイントにリダイレクトするときにprompt=consent
パラメーターを含めることで、ユーザーに対して同意を強制できます。これは、ユーザーにアプリケーションと要求されたスコープに対するユーザー付与がすでにある場合でも同じです。
ユーザーに同意を強制する
同意ダイアログのUIは、カスタマイズすることも、カスタムドメインに設定することもできません。