REST vs SOAP - Building Modern Applications
Learn about the key differences between REST and SOAP, when you might use one over the other and different ways to secure them.

REST vs. SOAP
Developers have lots of choices when building modern applications. Static vs. dynamic languages, established players like Java or relative newcomers like Golang, monolithic all-in-one frameworks vs modularized libraries or even having your entire stack run on Javascript are just the tip of the iceberg. Adding to that list is an important decision that developers have to choose – REST or SOAP.
REST and SOAP, simply put, are methods of communication between applications. While the end goal is the same, REST and SOAP cannot be directly compared as REST is a set of guidelines that developers may choose to implement differently from project to project while SOAP is a well defined and standardized protocol for data exchange. Still, a comparison can be made highlighting the benefits and drawbacks of using one over the other. Both are still widely used throughout the industry and we hope to shine the light on why and when you might use one over the other.
Representational State Transfer (REST)
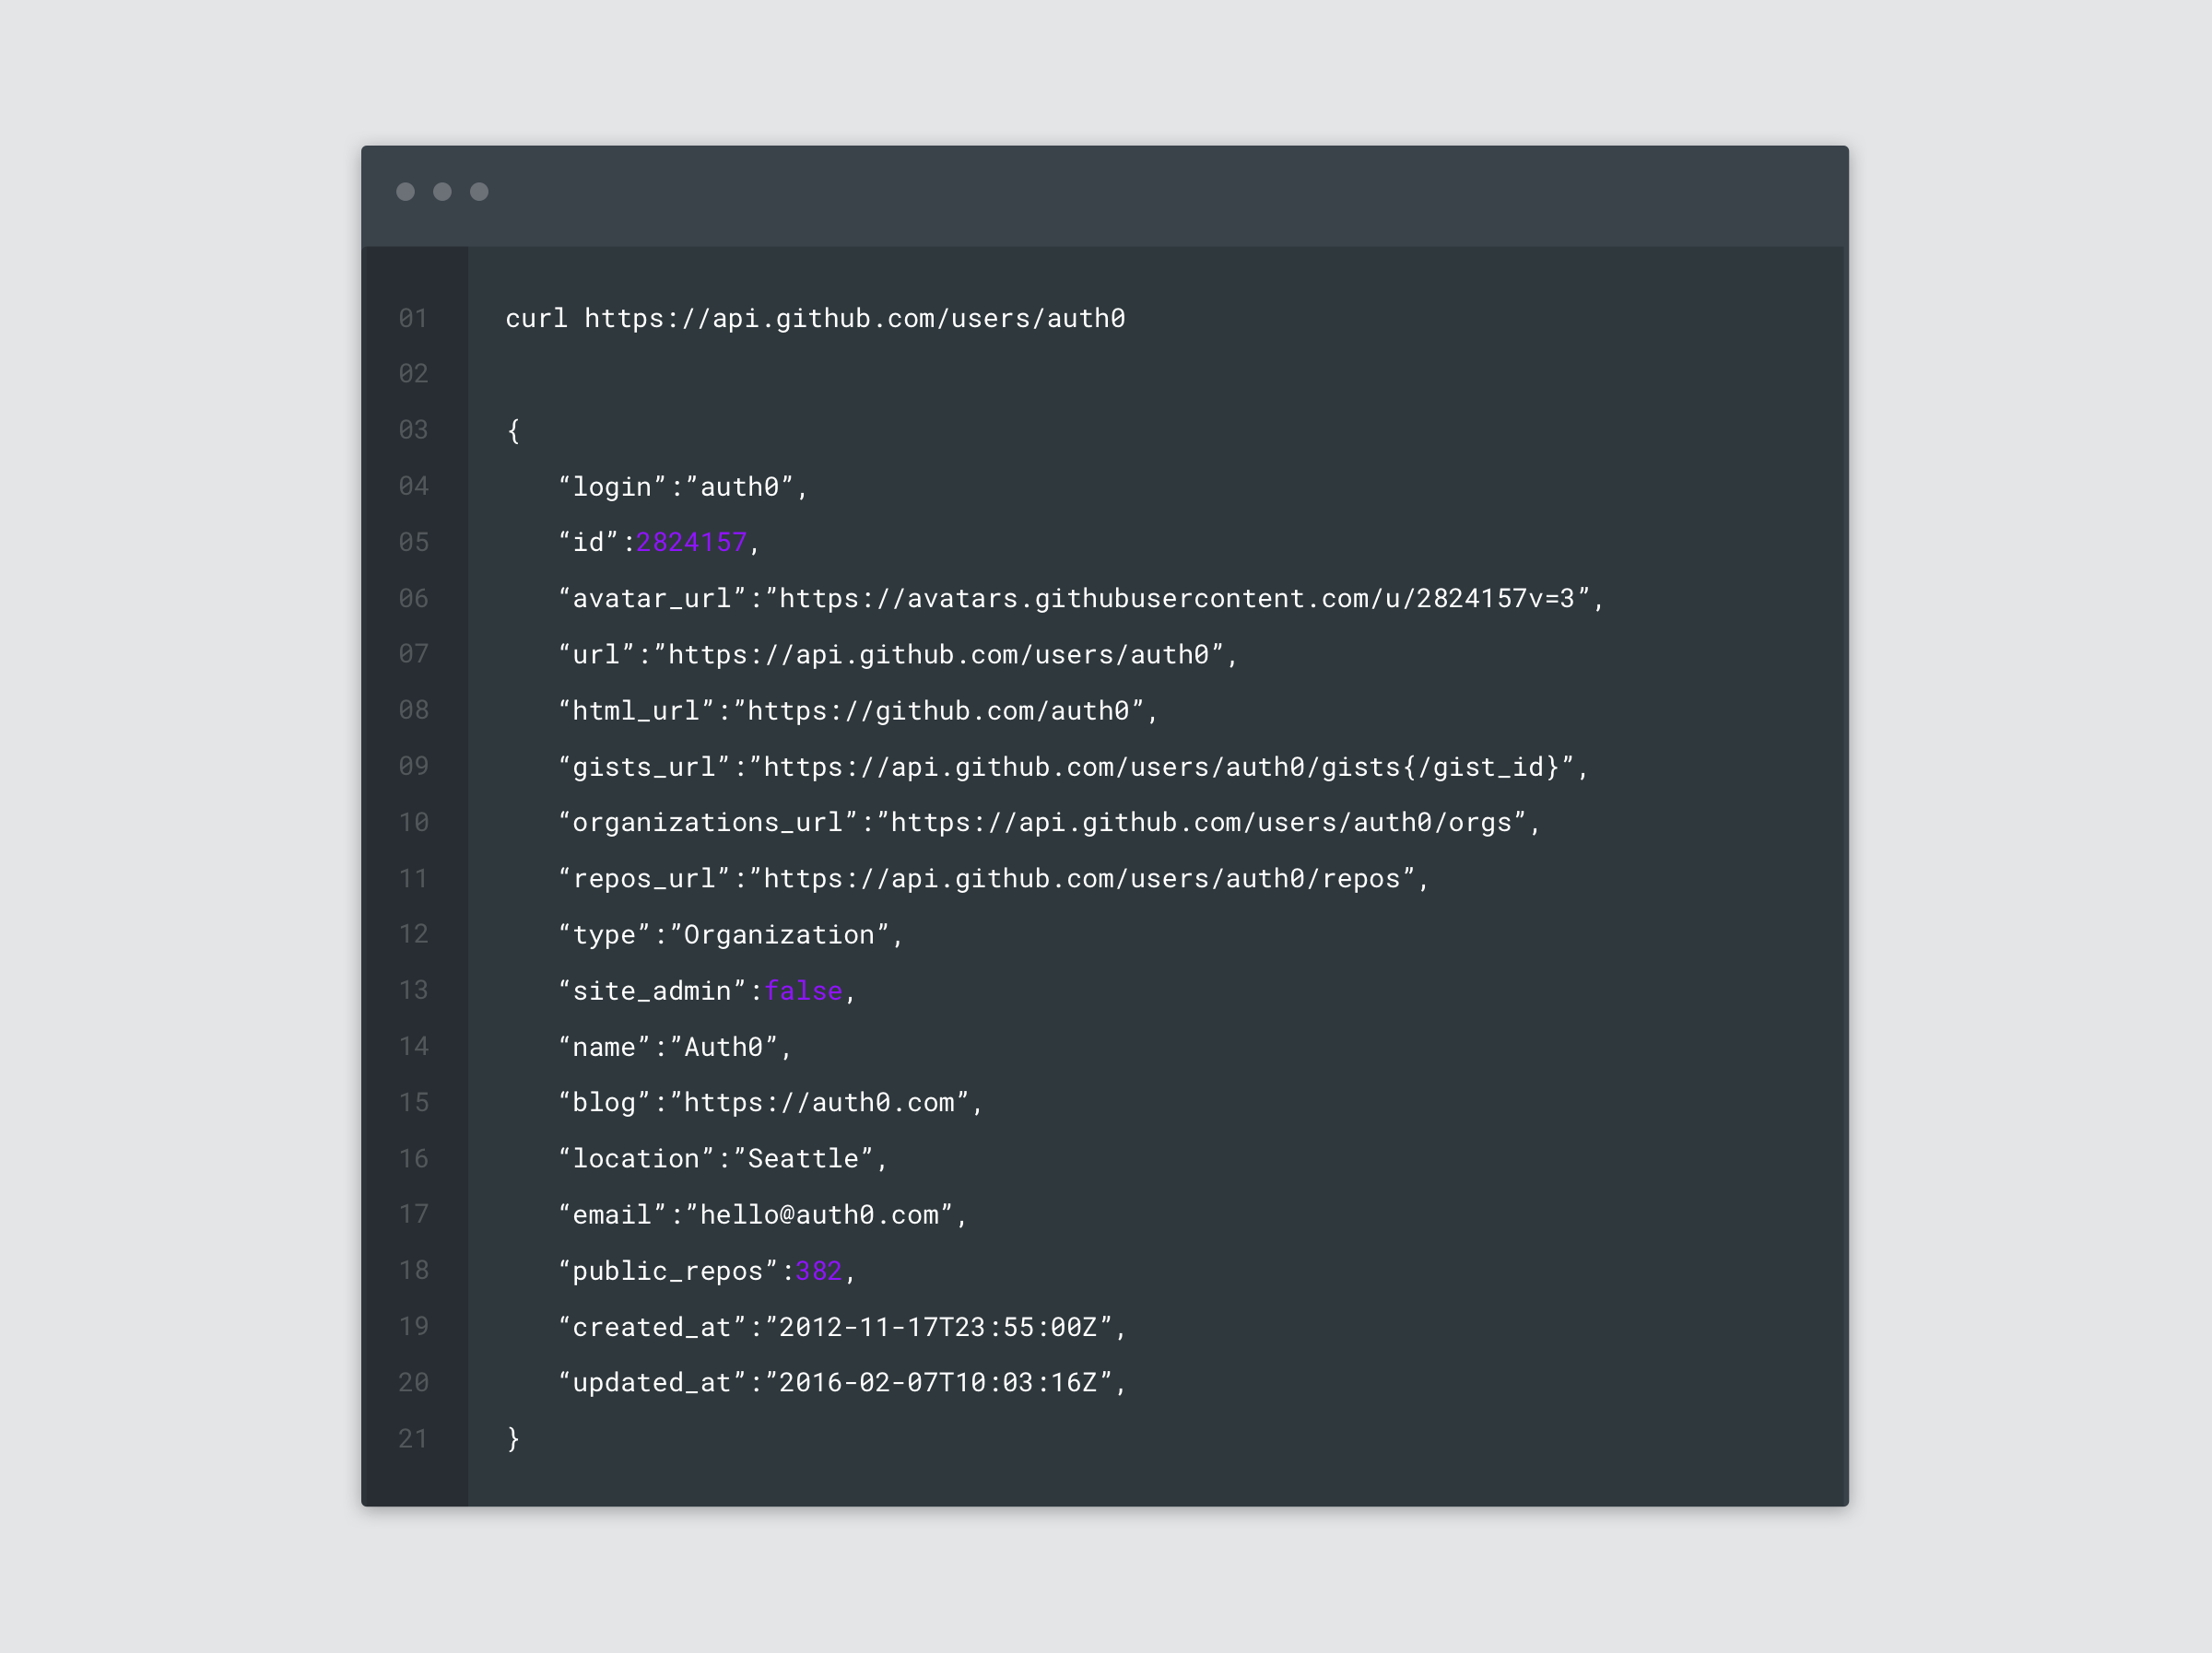
Representational State Transfer (REST) is an architectural pattern commonly used in developing modern web based applications ranging from websites, mobile apps, games and more. Developing a REST based API allows you to expose functionality of your web service over HTTP and interact with it over the web. Utilizing HTTP verbs like GET and POST the client instructs the API to retrieve or create resources.
RESTful API’s have gained massive popularity due to their interoperability and flexibility on the web. Web services built with this architecture can evolve independently of the applications that consume them. REST based API’s do not have a well defined security protocol – but JSON Web Tokens (JWTs) are the most common method of authenticating and authorizing requests.
Pros
- Stateless – each call to the web service has all the information it needs to process the request and does not rely on storing client-server context.
- Flexible – RESTful API’s can accept and serve data in many different formats including JSON, XML, Atom and others. JSON is by far the most popular data format used in REST based API’s.
- Cacheable – responses are cacheable which can greatly improve the performance of the web service by eliminating unnecessary calls to the backend.
Cons
- Standards – there is no defined standard for building REST based API’s. There are many great resources and guides such as the White House RESTful API Standards and the REST API Tutorial, but many permutations of REST based API’s exist.
- HTTP – RESTful applications are confined to the HTTP protocol.
Simple Object Access Protocol (SOAP)
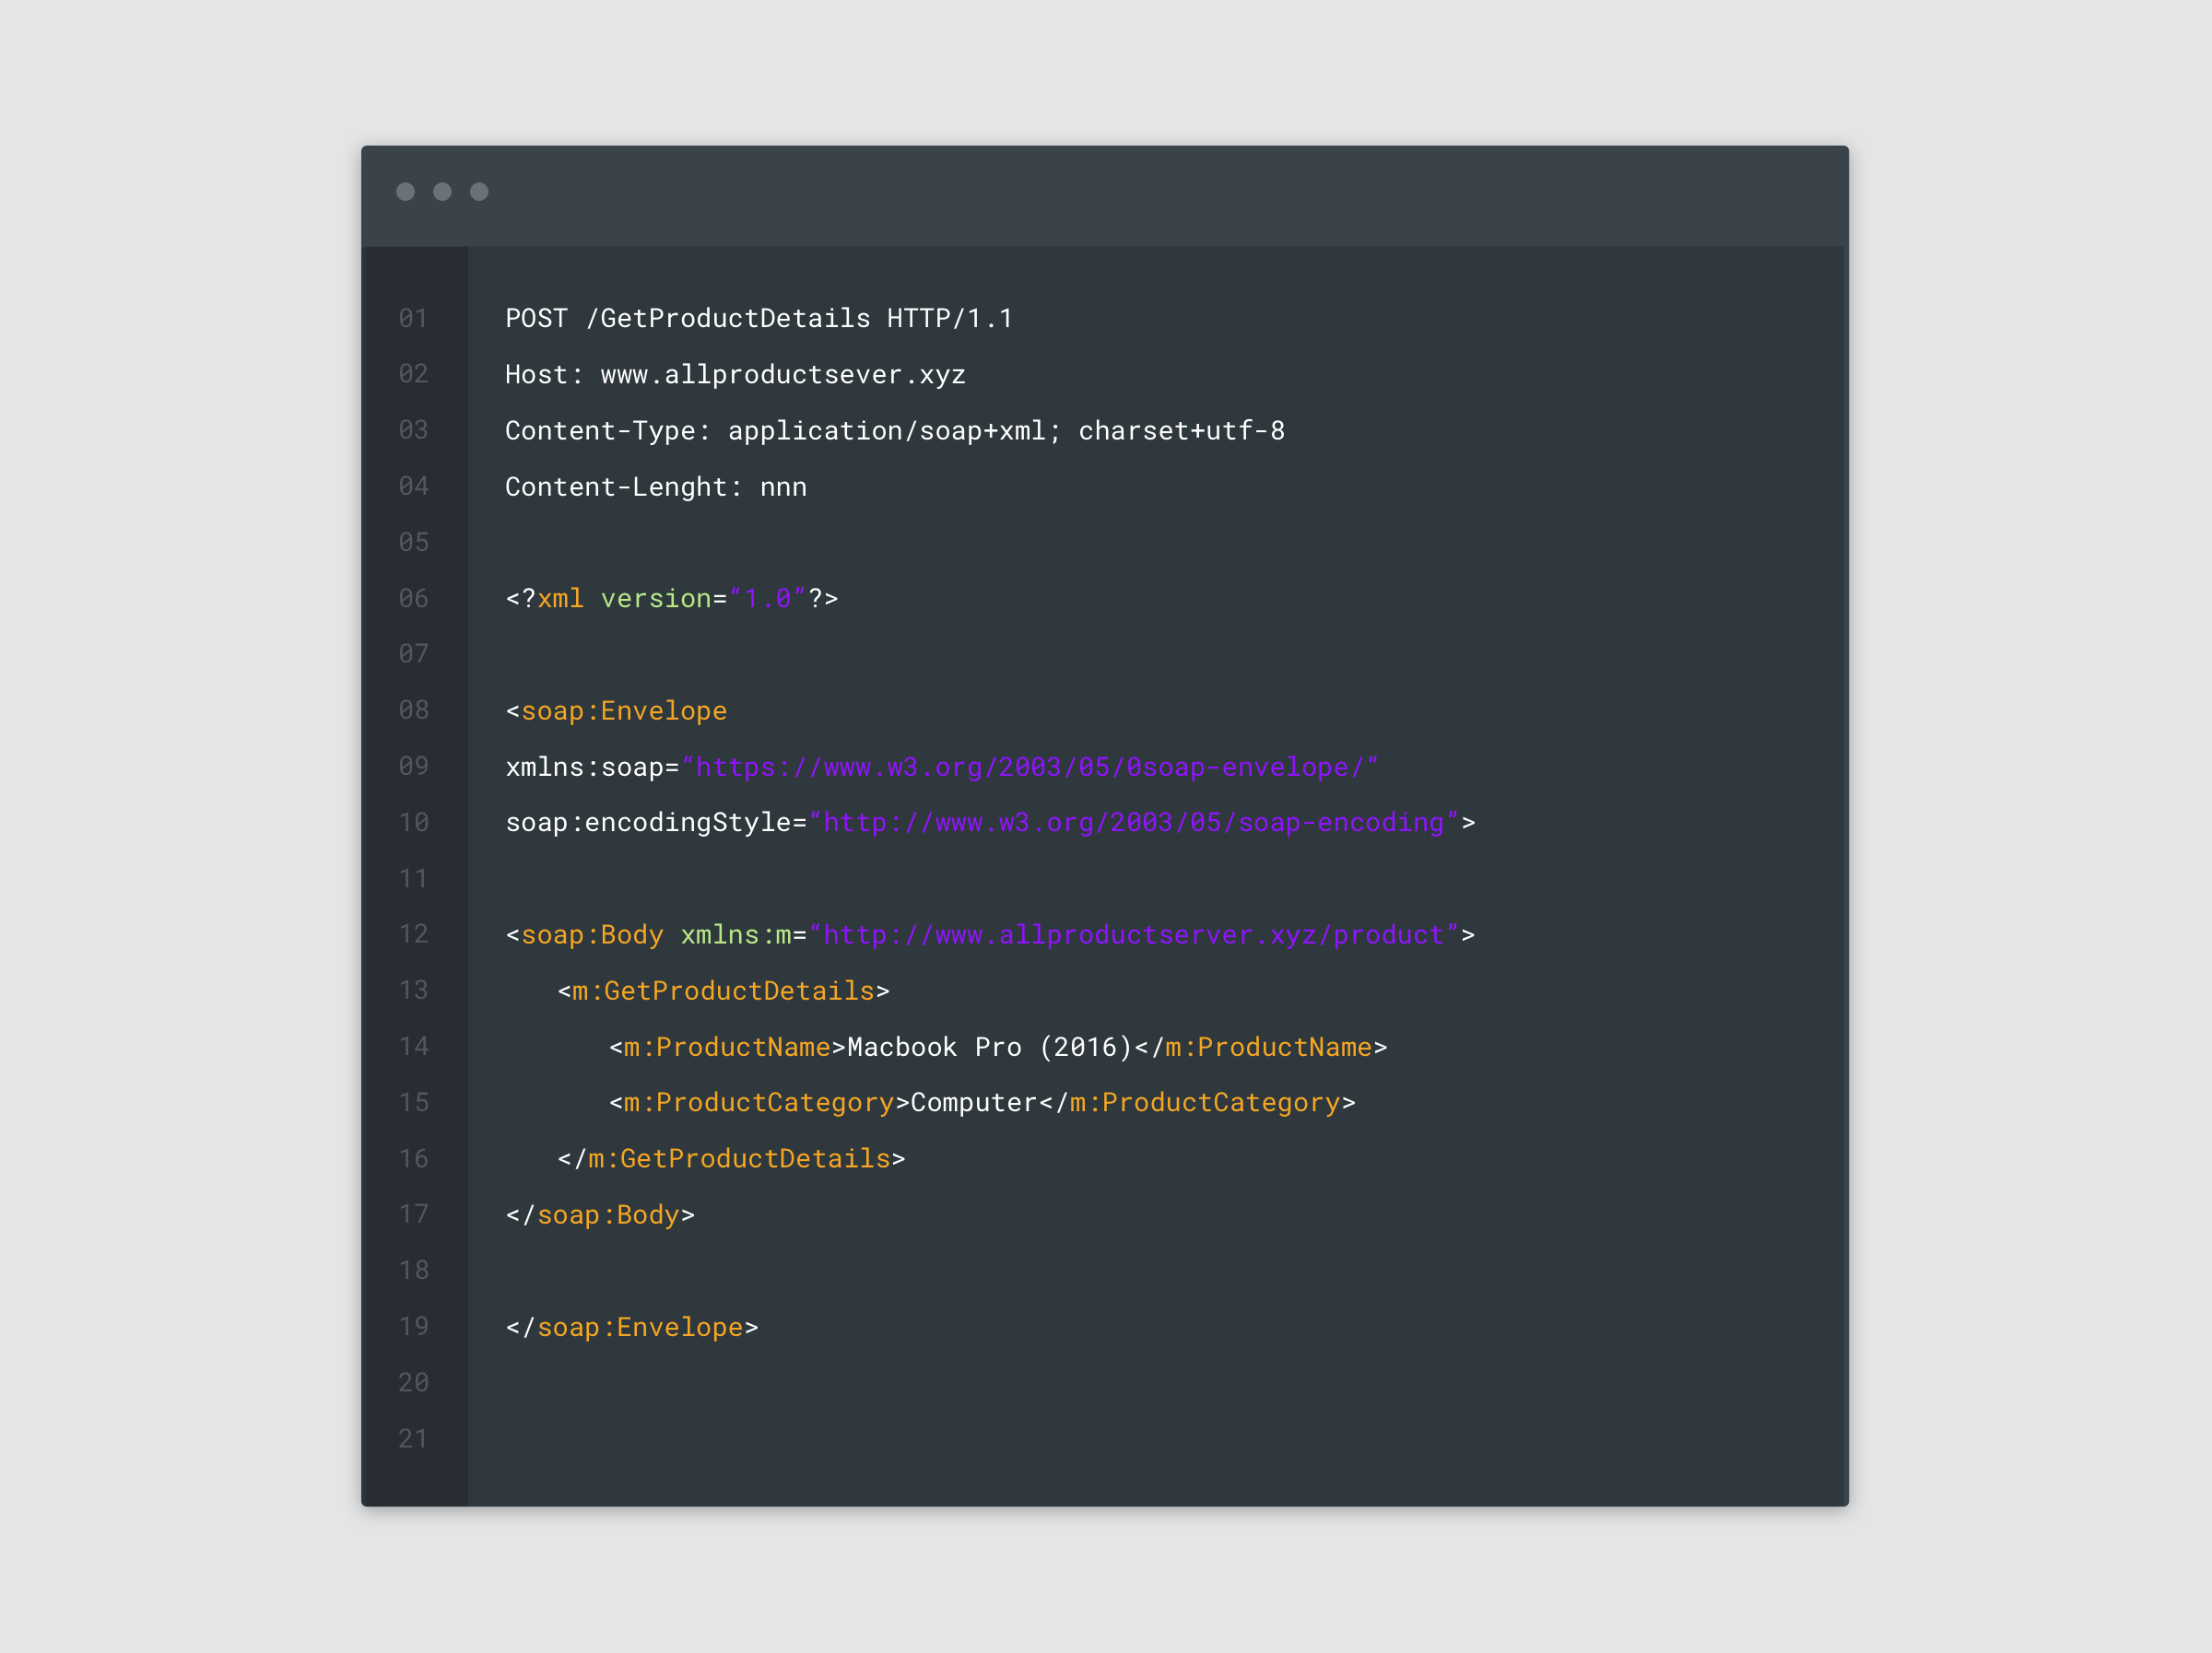
Simple Object Access Protocol (SOAP) on the other hand is a protocol for data exchange. It’s strengths lie in that it has a certain set of rules and standards that must be obeyed for successful client / server interactions. SOAP requests are delivered via envelopes that must contain all the required information to process the request.
A SOAP request envelope generally consists of an optional header and a required body attribute. The header attribute is used for information such as security credentials and other metadata while the body attribute is used to handle the actual data and any errors that arise. This is a simplification of how SOAP handles data exchange so for more in-depth information check out the W3C Specification and if you’re itching to write a write a SOAP web service try an easy to follow tutorial.
Pros
- WSDL – the Web Services Description Language (WSDL) describes the web service methods, access and other parameters making it a one-stop shop for learning how to consume the API.
- Extensibility – WS-* extensions such as WS-Security, WS-Addressing, WS-Federation and others can greatly enhance the capabilities of the application.
- Protocol Neutral – accessible via HTTP, SMTP, TCP and other application level protocols.
Cons
- XML Infoset – SOAP uses XML for transferring payload data which can take significantly longer to serialize which leads to performance issues.
- Complex Syntax – SOAP works exclusively with XML and reading the data envelopes can be difficult and time-consuming.
Use Cases for REST
RESTful API’s are everywhere. From single page apps to the Internet of Things (IoT), services powered by REST based API’s are the norm. Besides the technical benefits we’ve outlined above, REST based API’s are a great fit for many businesses because they are generally easier to understand and develop for. REST is a great choice for startups, mobile apps, and developers building modern Single Page Applications (SPA).
Many companies are built around providing a RESTful API that solves a singular problem and integrates into any application seamlessly. Auth0 is a great example of this. Other common use cases for REST are companies exposing their dataset and allowing 3rd parties to build products on top of the exposed API such as the Falcon App built on top of Twitter’s RESTful API.
Use Cases for SOAP
Web services utilizing SOAP are commonly found in enterprise environments. Large enterprise environments such as those found in banking and healthcare benefit most from utilizing SOAP as it gives them greater flexibility and control over the client/server interactions. Expressing complex methods is generally easier with SOAP as well as ACID compliant transactions.
SOAP is better suited for the enterprise but that’s not to say that it can’t or shouldn’t be used for smaller endeavours. The only caveat to that is that building a SOAP application will generally take longer so if you are just experimenting with an idea you may get bogged down by the complexity vs actually shipping code. A common litmus test in the REST vs. SOAP debate states that “if you can’t find a specific reason for building your web service with SOAP, use REST.”
Authenticating REST API’s with JWT
REST API’s are commonly authenticated with Json Web Tokens (JWT). If an API endpoint needs to be protected, the strategy is to require the client, when making a request to the API, to include an Authorization header that includes a token verifying the identity of the requester. The server then verifies that the token is valid and if it is, processes the request.
There are many benefits to using token based authentication and you can learn all about them here. REST API’s are not limited to token based authentication – you can use cookie/session based authentication or even roll your own mechanism for authentication.
Protecting RESTful endpoints with JWT
Let’s take a look at an example of how you can protect your RESTful API with JWT. You have built a mobile application that displays a motivational quote of the day. The daily quote is retrieved via a GET request to your RESTful API at /api/v1/quote. The feedback you’ve received is great and your users are engaged. You want to give them the functionality to submit their own quotes to the app.
A new RESTful endpoint is created so that when a POST request is sent to /api/v1/quote containing the required data in the body – the submitted quote is saved to database for your review. You don’t want just anybody sending you quotes though. Only registered users should be able to. The implementation of the API is as such:
...
routes.post('/api/v1/quote', function(req, res){
// getToken is a helper function that looks for an Authorization
// key in the header that contains the value 'Bearer {token}'
// it then strips out the Bearer keyword and returns just the {token}
var token = getToken(req.headers.authorization);
var quote = req.body.quote;
jwt.verify(token, 'secret', function(err, decoded){
if(err){
res.json(err) // Return error details
} else {
// Save the quote to a database
res.json({'message':'Quote Successfully Submitted. Thank you!'});
}
});
});
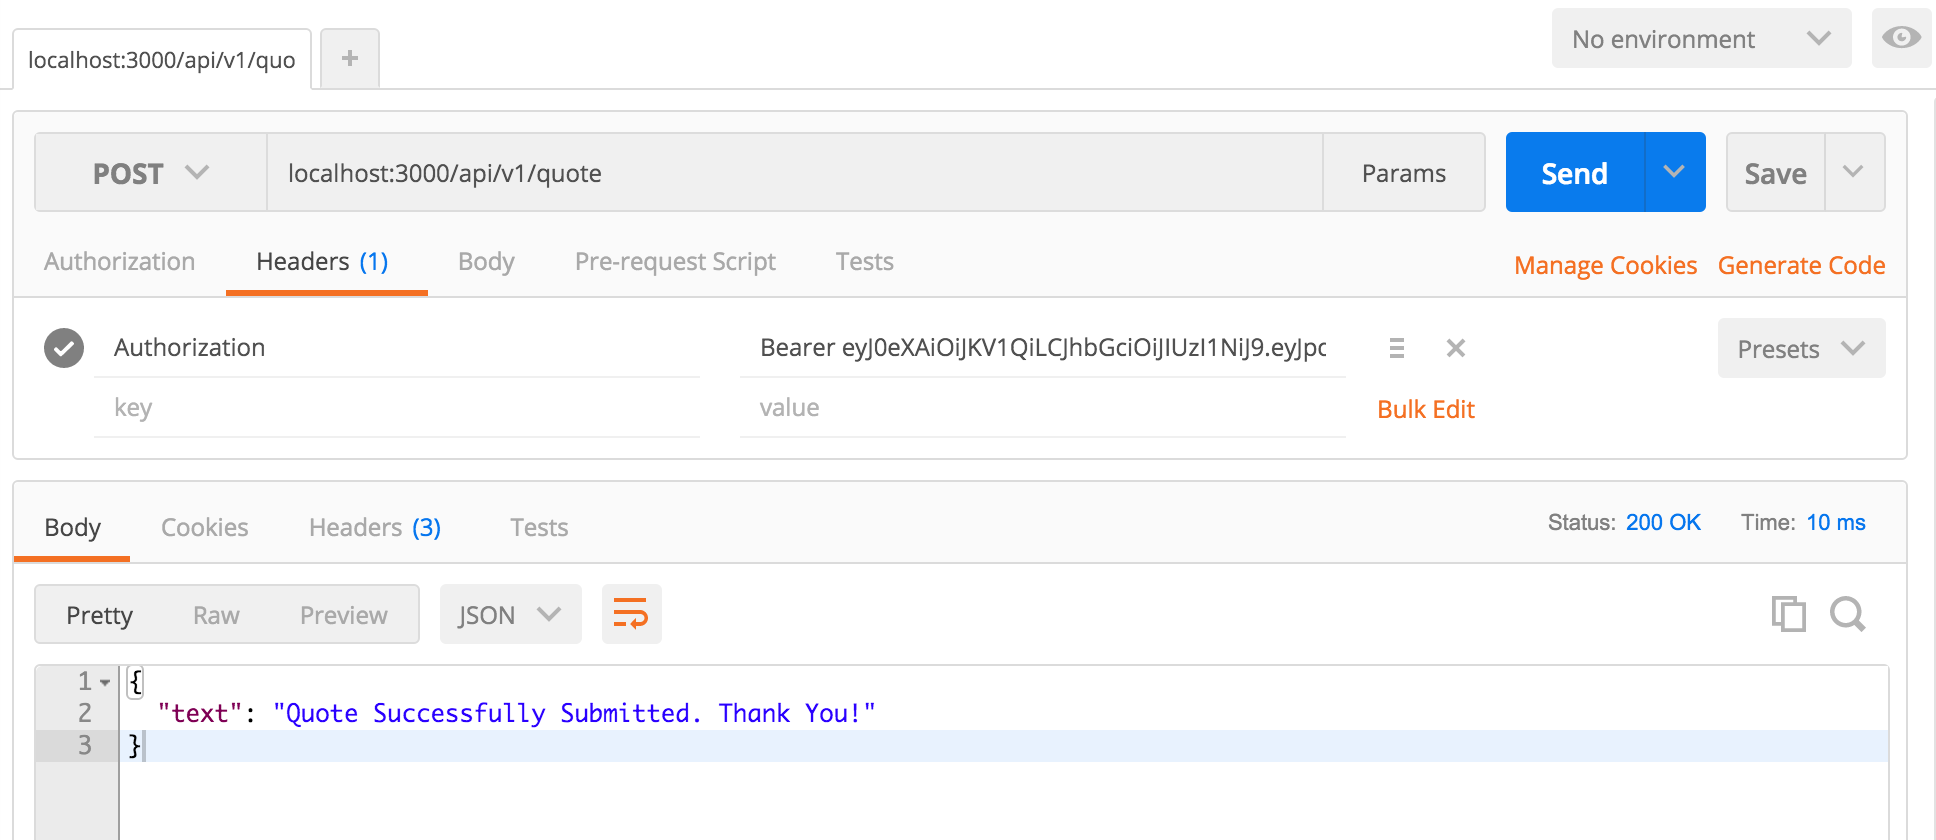
...In the implementation above, when a user makes a POST request to the /api/v1/quote endpoint, we extract their JWT and store it in a variable called token. If the authorization header does not exist, we simply stop further execution as we can safely assume the user is unauthenticated. If we do get a token, we verify that it is valid. The token is verified against a secret that it was originally signed with. Additionally, we check to see if the token is expired. The decoded object may have additional data such as user permissions that can be added when the token is created, but for our demo we kept it simple.
POST to API with valid JWT
POST to API with no JWT
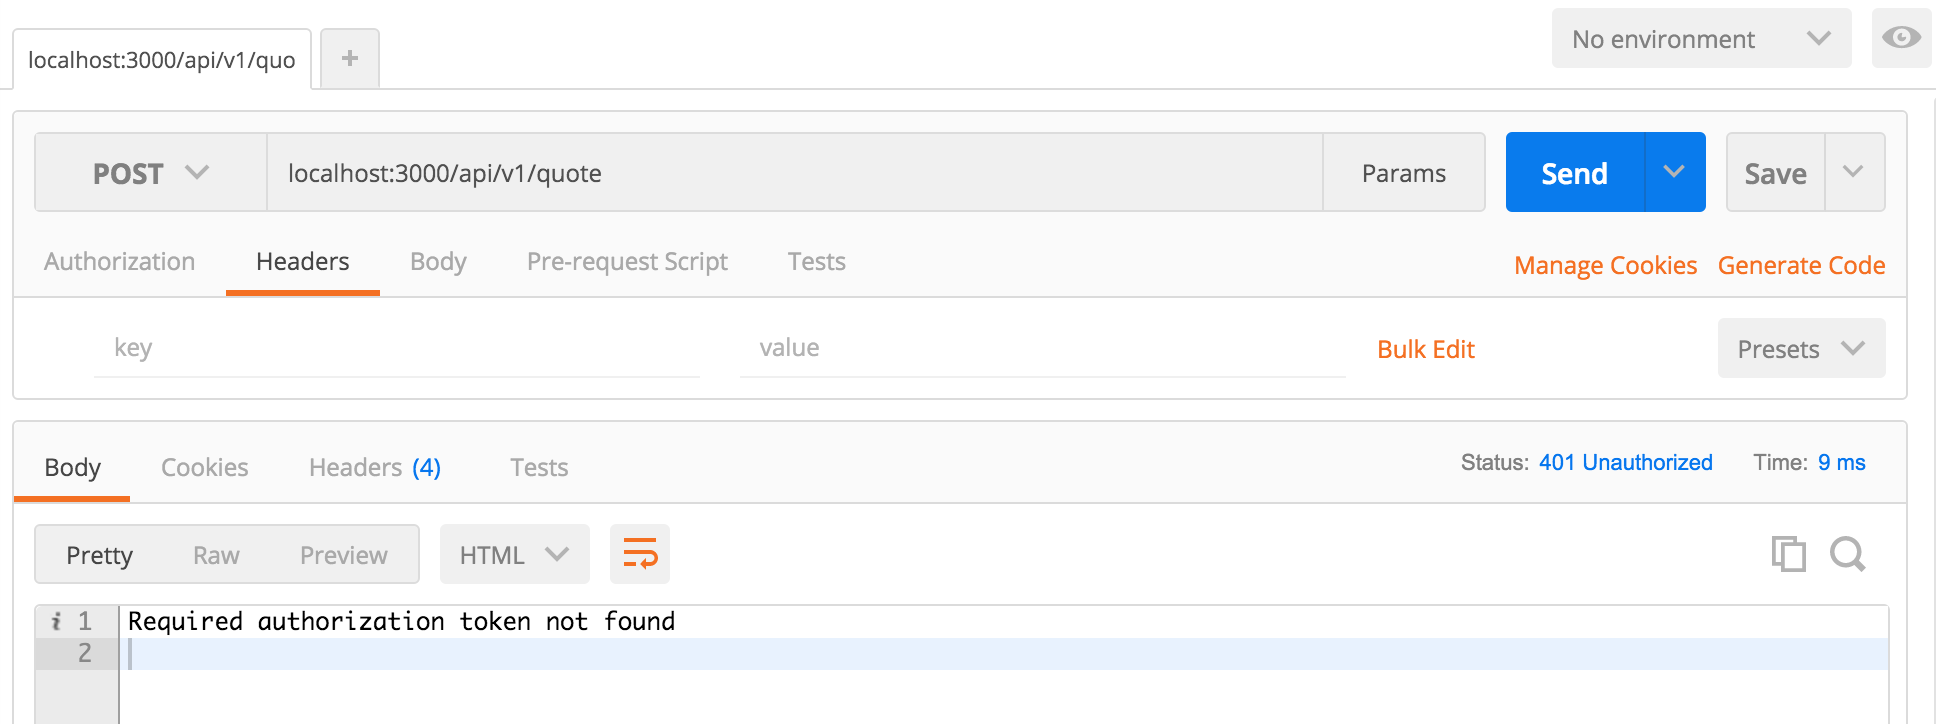
If all checks out and no err is returned, we know the user is authenticated so we save their quote to the database and send them a nice message thanking them for using our app. In this example, we did the token verification inside the endpoint implementation. In a real world scenario the token verification would preferably be done through a middleware higher up in the call-stack.
Auth0 can easily take care of generating JWTs as part of the authentication workflow. Once a user has successfully logged in, Auth0 will return a JWT which you would store in local storage or a cookie. Then, every time a request is sent to the API, you would append the token in the header under an Authorization key. On the server side, you will need to validate this token, which as we saw above is a simple task when using one of the many Auth0 SDK’s.
Authenticating SOAP API’s with SAML
SOAP is just as flexible as REST when it comes to protecting and authenticating a web service. WS-Security is the key extension that supports many authentication models including: basic username/password credentials, SAML, OAuth and more.
A common way that SOAP API’s are authenticated is via SAML Single Sign On (SSO). SAML works by facilitating the exchange of authentication and authorization credentials across applications. A SAML federation is comprised of three parts: the user, an Identity Provider and a Service Provider. The user makes a request from the Service Provider to an Identity Provider and if the request is successful the user is authenticated and can access the application.
Implementing SAML Single Sign On with SSOCircle
Implementing SAML SSO can be a daunting, difficult, and time intensive task. Auth0 can help! Let’s see how quickly we can setup SAML SSO with SSOCircle. Auth0 will be the Service Provider, while SSOCircle will be the Identity Provider meaning that once a user attempts to login they will be taken to SSOCircle to verify their identity.
With an SSOCircle account created, let’s go and get the public metadata for SSOCircle. We can get this by visiting https://idp.ssocircle.com/. From here, we want to get three attributes, the KeyDescriptor Signing X509 Certificate, SingleSignOnService Redirect Location and the SingleLogoutService Redirect Location.
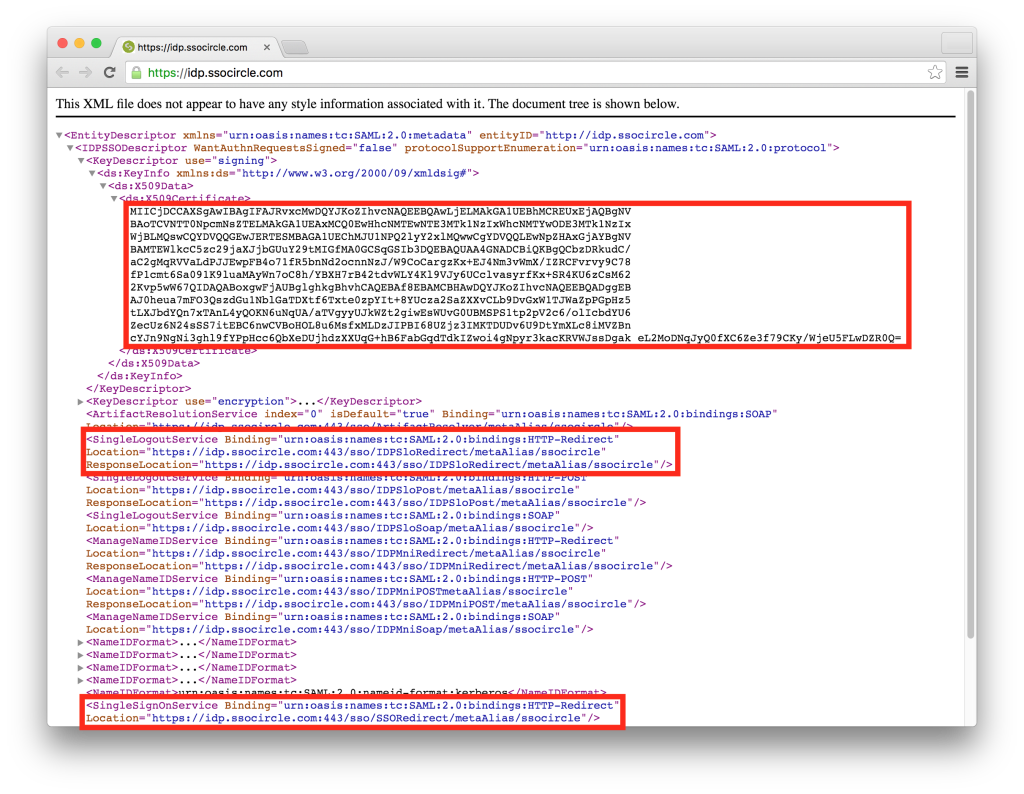
We will begin by creating a new .pem file to store the certificate by creating a new file and copying the X509 Certificate. We will additionally need to add the Begin and End Certificate delimiters as shown below.
-----BEGIN CERTIFICATE-----
MIIDATCCAemgAwIBAgICCpgwDQYJKoZIhvcNAQEFBQAwLjELMAkGA1UEBhMCREUx
EjAQBgNVBAoTCVNTT0NpcmNsZTELMAkGA1UEAxMCQ0EwHhcNMTEwNTE3MTkzNDEx
WhcNMjEwODE3MTkzNDExWjAuMQswCQYDVQQGEwJERTESMBAGA1UEChMJU1NPQ2ly
Y2xlMQswCQYDVQQDEwJDQTCCASIwDQYJKoZIhvcNAQEBBQADggEPADCCAQoCggEB
ALm1xZq5goTh7NmdzZsZUJed9+7XauwuaNuGyZpIGRo4FsP1YPgs+40mYAoa9rDj
CEekixkfSI6nBUMdHuRIMHogyu/OVxskrL91SLO5m5u9JhgIhO/s9pnmnrnNUILf
RccE4+AEO1xsBQ/x1sY2zDZk+71Pfvifc9vVxedHpNAumbe1nb+CofUtAbF6PkHv
g3pqCoMPmC7m4NAr9h+zq3ekeWf8j5SOicupet9XhsO6zUr0Wga/Zs6J0khhYmFy
zpqoP2rLJ4a/9qduSGslOWsed6kD+zvhLMAUVcw3goli4VhepNzU5iGL9QdVj7m4
YQRMofBRYyL7tBWO6jzLpFcCAwEAAaMpMCcwFAYJYIZIAYb4QgEBAQH/BAQDAgD/
MA8GA1UdEwEB/wQFMAMBAf8wDQYJKoZIhvcNAQEFBQADggEBAKmOo8un97VFxNgo
iAzpU5fugKdAFFnKHTvUzDLQ81O455OyT6tcAsXHz6sy2c6GozqDV7xrXSqnues8
p9/w0KzVY9/YuxB90uiSJVh0zMxS+NwyfG1Od5Brloh9eBM4YulUI3V2ustcck17
2G4X4/QSK8uo0bjELUzSNAGj7uypsKKXjX++enfAJzLSsqk3Y8Tmon4R6GYBj4mo
1nL6ujeXqB/kH44XnEmU7ojyIC1kawFRdY4GDFIq3HOBFNzlNbJVL+jKdgTQJTET
rNTDjxXmxwpZ90+lPbEaLQeElwAQi7pMtcqD/f8Dqaifk9ZvpCB7NC+oLM5ej9nK
TawsVqs=
-----END CERTIFICATE-----
Save this file as SSOCircle.pem. Navigate to the Auth0 Dashboard and create a new SAMLP Identity Provider connection by navigating to Connections, then the Enterprise submenu and clicking on the + icon in the SAMLP Identity Provider section. There are lots of settings we can configure here, but for our demo we will first set a Connection Name, which can be anything you choose. We will skip the Email Domains for this demo, but the email domains section is where you would define which domains will automatically work with single sign on – this will typically be your corporate domain.
The Sign In and Sign Out URL’s we have received from the public SSOCircle Metadata so we will insert those there. The last part of the configuration is uploading the .pem certificate we created earlier. With those settings configured – we can ignore the rest and just click save.
After saving the settings, you will be prompted to continue and will need to get the metadata for your connection. It should look like:
<EntityDescriptor entityID='urn:auth0:{ACCOUNT_NAME}:{CONNECTION_NAME}' xmlns='urn:oasis:names:tc:SAML:2.0:metadata'>
  <SPSSODescriptor WantAssertionsSigned='true' protocolSupportEnumeration='urn:oasis:names:tc:SAML:2.0:protocol'>

    <SingleLogoutService Binding='urn:oasis:names:tc:SAML:2.0:bindings:HTTP-Redirect' Location='https://{ACCOUNT_NAME}.auth0.com/samlp/logout'/>
    <SingleLogoutService Binding='urn:oasis:names:tc:SAML:2.0:bindings:HTTP-POST' Location='https://{ACCOUNT_NAME}.auth0.com/samlp/logout'/>
    <NameIDFormat>urn:oasis:names:tc:SAML:1.1:nameid-format:emailAddress</NameIDFormat>
    <NameIDFormat>urn:oasis:names:tc:SAML:2.0:nameid-format:persistent</NameIDFormat>
    <NameIDFormat>urn:oasis:names:tc:SAML:2.0:nameid-format:transient</NameIDFormat>
    <AssertionConsumerService Binding='urn:oasis:names:tc:SAML:2.0:bindings:HTTP-POST' Location='https://{ACCOUNT_NAME}.auth0.com/login/callback?connection={CONNECTION_NAME}' index='0' isDefault='true'/>
  </SPSSODescriptor>
</EntityDescriptor>
This is your connections metadata and you will use it to register a new Service Provider on SSOCircles side. Head over to SSOCircle and navigate to the Manage Metadata section. Once there, click on the Add New Service Provider. You will need to enter the fully qualified domain name (FQDN), which in our case will be auth0.com, select EmailAddress in the attributes sent in assertion section and finally paste the XML Metadata in the textarea provided. Click submit and you the Auth0 service provider will be registered.
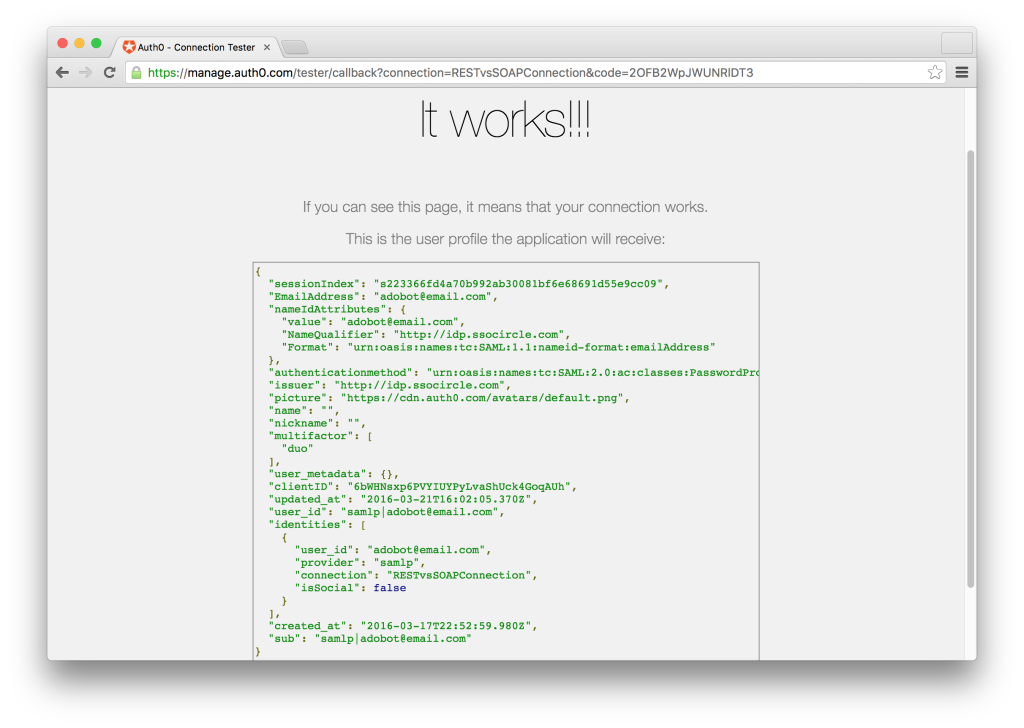
To test that the connection was successful – click on the manage button under the SAMLP Identity Provider section and then Try (which is the play icon). If all went well you should see a screen just like the one below. That’s it! Now you have integrated SAML Single Sign On with Auth0 acting as the Service Provider and SSOCircle acting as the Identity Provider. For a more indepth guide on implementing a SAML federation, check out the docs.
REST or SOAP Authentication Made Easy with Auth0
Whether you are building a mobile app consuming RESTful services or an enterprise SOAP app, Auth0 has you covered when it comes to authentication.
JWT authentication is the bread and butter of Auth0. With an extensive authentication library as well as SDK’s for many programming languages and frameworks you can have authentication up and running in minutes. Support for over 30 social connections including Facebook, Twitter and Google as well as the ability to use an existing user database makes switching to Auth0 a breeze.
Auth0 can act both as a Service Provider and an Identity Provider in a SAML based federation. Applications such as Salesforce or Box can utilize Auth0 as an Identity Provider to allow users to login to such services through Auth0. In the case of having Auth0 act as the Service Provider, Auth0 will send an authorization request to an Identity Provider such as SSOCircle, OneLogin or any other SAML-compliant Identity Provider.
Sign up for free
Start building today and secure your apps with the Auth0 identity platform today.