
What is a I18N?
I18N is a short name invented for the term internationalization. The number eighteen (18) refers to the number of characters between the first letter in the word, I, and the last one, N. Internationalization is the process of developing software that can be localized for multiple languages and cultures easily. For developers, internationalizing means abstracting all the texts that users can get from an application. This abstraction usually occurs by replacing these texts by unique codes that refer to them, and by organizing them by language. Whenever an user starts interacting with the application, they define the preferred language (automatically or manually) and the application starts providing messages according to the language informed.
For example, on a web browser like Firefox or Google Chrome, the menus and help messages that the user can see are shown according to the main language set on the operating system. Although this default configuration is usually what the user expects, software providers normally add an option so the default language can be overwritten.
Throughout this article we are going to see how can we internationalize a Spring Boot API, even for occasions where errors (expected or not) occur in the application.
“Supporting multiple languages on Spring Boot apps is easy.”
Tweet This
What Will We Build?
As we don't want to spend too much time setting up a new project from the ground, we are going to take advantage of the QuestionMarks project that we started building in previous articles. There is no need to read all the articles, although it would be a good idea as they provide good Spring Boot techniques. We will clone the GitHub repository that supports the project, and we are going to checkout a specific Git tag that will give us a solid basis to focus on what we are interested on, I18N and exception handling.
QuestionMarks Summary
The idea behind QuestionMarks is that the application will enable users to practice and enhance their knowledge by answering a set of multiple choice questions. To provide a better organization, these questions are grouped in different exams. For example, there could be an exam called JavaScript Interview that would hold a set of JavaScript related questions to help users to prepare for interviews. In this article we won't build the whole application as it would take a lot of time and would make the article huge, but we will be able to see the technologies aforementioned in action.
Throughout previous articles, we have integrated Spring Data JPA, PostgreSQL, and Liquibase to manage the persistence layer. Therefore, we will need to launch a PostgreSQL instance to support the application. We also created a nice feature that allow us to automatically map DTOs into entities while validating their data. The problem now is that if the data is not valid, or if an unexpected error occurs, our application will not provide user-friendly messages. To overcome this issue, we are going to enhance QuestionMarks to handle these errors and encapsulate (or replace) messages in a structured way.
Launching PostgreSQL
Before cloning the existing project, we need to setup a PostgreSQL instance to support our database operations and the persistence layer. As stated in the first article, Docker can be a great solution to launch applications without installing them on our development machine.
We do need Docker installed, but the process of installing it is quite simple (for MacOS check this link, for Windows this link, and for Ubuntu this link). Having Docker properly installed, we can run a dockerized instance of PostgreSQL as follows:
docker run --name questionmarks-psql \
    -p 5432:5432 \
    -e POSTGRES_DB=questionmarks \
    -e POSTGRES_PASSWORD=mysecretpassword \
    -d postgres
Note that if we do not want to launch PostgreSQL inside a Docker instance, or if we do have another PostgreSQL instance already available, we will need to guarantee that we have a database called questionmarks on it, and that the postgres user has mysecretpassword as password. Or, we can change these values in the ./src/main/resources/application.properties file:
spring.datasource.url=jdbc:postgresql://localhost/questionmarks
spring.datasource.username=postgres
spring.datasource.password=mysecretpassword
spring.datasource.driver-class-name=org.postgresql.Driver
Cloning QuestionMarks
Next step is to clone the GitHub repository that supports QuestionMarks and checkout a specific tag for this article. We achieve that by issuing the following commands:
git clone https://github.com/auth0-blog/questionmarks-server.git
cd questionmarks-server
git checkout post-3
Now we need to import the Spring Boot project in our preferred IDE (Integrated Development Environment). Most Java IDEs provide an easy way to import projects based on Gradle, which is the build tool used in the QuestionMarks application. After that, let's run the application, through the IDE or through the gradle bootRun command, and interact with it a little:
# running through the command line
gradle bootRun

# creates a new exam
curl -X POST -H "Content-Type: application/json" -d '{
    "title": "JavaScript",
    "description": "JS developers."
}' http://localhost:8080/exams

# lists all exams (probably just the one above)
curl http://localhost:8080/exams

# updates the first exam changing its title and description
curl -X PUT -H "Content-Type: application/json" -d '{
    "id": 1,
    "title": "JavaScript Interview Questions",
    "description": "An exam focused on helping JS developers."
}' http://localhost:8080/exams

# tries to update an exam without informing the id
curl -X PUT -H "Content-Type: application/json" -d '{
    "title": "JavaScript Interview Questions",
    "description": "An exam focused on helping JS developers."
}' http://localhost:8080/exams
The last command issued above will produce an error message that looks like this:
{"timestamp":1503943673649,"status":400,"error":"Bad Request","exception":"org.springframework.web.bind.MethodArgumentNotValidException","errors":[{"codes":["NotNull.exam.id","NotNull.id","NotNull.java.lang.Long","NotNull"],"arguments":[{"codes":["exam.id","id"],"arguments":null,"defaultMessage":"id","code":"id"}],"defaultMessage":"may not be null","objectName":"exam","field":"id","rejectedValue":null,"bindingFailure":false,"code":"NotNull"}],"message":"Validation failed for object='exam'. Error count: 1","path":"/exams"}
Although possible, it's not that easy to understand what exactly went wrong during the execution of the request. Let's improve this message.
Implementing a Validator Utility
The first thing that we are going to do in our application is to create a utility class called Check. This class will contain some helper methods to validate common situations. For example, with it we will be able to check if a reference is null and, if that's the case, throw an exception containing a message code and some arguments. Let's create this class in the com.questionmarks.util package with the following code:
package com.questionmarks.util;

import org.springframework.util.CollectionUtils;
import org.springframework.util.ObjectUtils;

import java.util.Collection;
import java.util.Map;

public final class Check {
    public static void isNull(Object object, String message, Object... args) {
        if (object != null) {
            throw new RestException(message, args);
        }
    }

    public static void isTrue(boolean expression, String message, Object... args) {
        if (!expression) {
            throw new RestException(message, args);
        }
    }

    public static void notNull(Object object, String message, Object... args) {
        if (object == null) {
            throw new RestException(message, args);
        }
    }

    public static void notEmpty(Object[] array, String message, Object... args) {
        if (ObjectUtils.isEmpty(array)) {
            throw new RestException(message, args);
        }
    }

    public static void notEmpty(Collection<?> collection, String message, Object... args) {
        if (CollectionUtils.isEmpty(collection)) {
            throw new RestException(message, args);
        }
    }

    public static void notEmpty(Map<?, ?> map, String message, Object... args) {
        if (CollectionUtils.isEmpty(map)) {
            throw new RestException(message, args);
        }
    }

    public static void notEmpty(String text, String message, Object... args) {
        if (text == null || "".equals(text.trim())) {
            throw new RestException(message, args);
        }
    }
}
Besides the helper method that guarantees that a reference is notNull, the utility class also provides methods to check if something (String, Map, Collection, or Array) is empty, if some expression isTrue, and if a reference isNull. All the methods provided in the class throw an exception called RestException when their assertion fails. This class doesn't exist yet, so let's create it in the com.questionmarks.util package with the following code:
package com.questionmarks.util;

import lombok.AllArgsConstructor;
import lombok.Getter;

@Getter
@AllArgsConstructor
public class RestException extends RuntimeException {
    private String message;
    private Object[] args;
}
The RestException class contains some characteristics that are worth mentioning. First of all, it is an extension of RuntimeException and, therefore, it's an unchecked exception. This means that we don't need to encapsulate calls to methods that throw instances of this exception on try-catch blocks. Second of all, this class defines two properties: message and args. We will use the message property to store the message code that we want to send to the user whenever an error occurs, and we will use args to store variables that will be interpolated in the message before sending it. We will take a closer look at the process in a while.
The last things that catches the eyes are the @AllArgsConstructor and the @Getter annotations. These annotations are provided by Lombok and they automatically create boilerplate code for us. The first annotation, @AllArgsConstructor, creates a constructor in the class with two parameters, one for each property defined in the class. The second annotation, @Getter, defines get methods for the message and args properties.
Globally Handling Exceptions on Spring Boot
Every message that our Spring Boot API is going to send to the user will be serialized as a JSON object. Therefore, we need to create a class to represent a structured message. Let's call this class RestMessage and add to the com.questionmarks.util package with the following code:
package com.questionmarks.util;

import lombok.Getter;

import java.util.List;

@Getter
public class RestMessage {
    private String message;
    private List<String> messages;

    public RestMessage(List<String> messages) {
        this.messages = messages;
    }

    public RestMessage(String message) {
        this.message = message;
    }
}
In contrast to RestException, we haven't used any Lombok annotation to create the constructors of this class. As of the time of writing, no feature provided by Lombok creates separate constructors for each property. Therefore, we needed to add the code by ourselves, but at least we could take advantage of the @Getter annotation again.
As the idea is to serialize instances of this class as JSON objects back to the user, we are going to tweak the serialization process a little. By default, Jackson (the JSON serializer used by Spring Boot) serializes all properties in an instance, having them values or not. To avoid adding a bunch of null in these JSON objects, let's edit the application.properties file by adding the following line:
spring.jackson.default-property-inclusion=non_null
With this configuration in place, we can move ahead and implement the class that will handle all exceptions thrown throughout the execution of requests in our application. Let's call this class RestExceptionHandler and create it in the main package (com.questionmark):
package com.questionmarks;

import com.questionmarks.util.RestException;
import com.questionmarks.util.RestMessage;
import org.springframework.beans.factory.annotation.Autowired;
import org.springframework.context.MessageSource;
import org.springframework.http.HttpStatus;
import org.springframework.http.ResponseEntity;
import org.springframework.validation.BindingResult;
import org.springframework.web.bind.MethodArgumentNotValidException;
import org.springframework.web.bind.annotation.ControllerAdvice;
import org.springframework.web.bind.annotation.ExceptionHandler;

import java.util.List;
import java.util.Locale;
import java.util.stream.Collectors;

@ControllerAdvice
public class RestExceptionHandler {
    private static final String UNEXPECTED_ERROR = "Exception.unexpected";
    private final MessageSource messageSource;

    @Autowired
    public RestExceptionHandler(MessageSource messageSource) {
        this.messageSource = messageSource;
    }

    @ExceptionHandler(RestException.class)
    public ResponseEntity<RestMessage> handleIllegalArgument(RestException ex, Locale locale) {
        String errorMessage = messageSource.getMessage(ex.getMessage(), ex.getArgs(), locale);
        return new ResponseEntity<>(new RestMessage(errorMessage), HttpStatus.BAD_REQUEST);
    }

    @ExceptionHandler(MethodArgumentNotValidException.class)
    public ResponseEntity<RestMessage> handleArgumentNotValidException(MethodArgumentNotValidException ex, Locale locale) {
        BindingResult result = ex.getBindingResult();
        List<String> errorMessages = result.getAllErrors()
                .stream()
                .map(objectError -> messageSource.getMessage(objectError, locale))
                .collect(Collectors.toList());
        return new ResponseEntity<>(new RestMessage(errorMessages), HttpStatus.BAD_REQUEST);
    }

    @ExceptionHandler(Exception.class)
    public ResponseEntity<RestMessage> handleExceptions(Exception ex, Locale locale) {
        String errorMessage = messageSource.getMessage(UNEXPECTED_ERROR, null, locale);
        ex.printStackTrace();
        return new ResponseEntity<>(new RestMessage(errorMessage), HttpStatus.INTERNAL_SERVER_ERROR);
    }
}
As this class' implementation is not that trivial, let's take a closer look at the details.
Making the Exception Handler Global
To make our exception handler implementation global, we have used the @ControllerAdvice annotation. This annotation is an specialization of @Component and enable developers to apply, among other things, @ExceptionHandler methods globally to all controllers in an application.
This means that the methods defined in this class that handle exceptions will apply to all @Controllers that we define in our application. This help us avoiding having to define a base class that the controllers have to extend or having to define exception handlers on each controller.
“Global exception handler on Spring Boot RESTful APIs are awesome!”
Tweet This
Injecting an I18N Message Resource
Since we aim to support multiple languages, we have defined the constructor of this class to get an instance of MessageSource injected. This instance enables us to search for (I18N) messages defined in messages.properties files, or on its variations for other languages, based on codes.
As an example, in this class we've defined a private constant called UNEXPECTED_ERROR. The value of this constant is Exception.unexpected and will point to a message that tells the user that the error was not expected. We will define the messages and its localizations in a while.
Handling RestExceptions
To handle exceptions derived from (or instance of) RestException, we define a method called handleIllegalArgument and annotate it with @ExceptionHandler(RestException.class). Whenever an exception of this class is catch by the method, the code message set in the exception is passed to the MessageSource instance to get a localized message explaining the error. Besides that, the args property and the current locale are passed alongside with the message code so Spring can interpolate the localized final message replacing any placeholders.
String errorMessage = messageSource
          .getMessage(ex.getMessage(), ex.getArgs(), locale);
Handling Bean Validation Exceptions
In the previous article, we've developed a solution that transforms DTOs into entities and that triggers the bean validation for these DTOs automatically. This means that, for example, if we define a property as @NotNull in a DTO and a user sends an instance that contains null as the value property, a MethodArgumentNotValidException is thrown saying that this situation is not valid.
To catch this exception and provide a better message, we have defined a method called handleArgumentNotValidException and set it to handle MethodArgumentNotValidExceptions. Since multiple validation errors might occur, we map the error codes to messages defined in messages.properties files.
List<String> errorMessages = result.getAllErrors()
    .stream()
    .map(objectError -> messageSource.getMessage(objectError, locale))
    .collect(Collectors.toList());
Handling Unexpected Exceptions
The last method defined in the RestExceptionHandler class is responsible for handling exceptions that we have not foreseen. For example, let's say that for some reason Spring is unable to inject a Repository instance in a controller, and we try to use this null reference to hit the database. In this situation a NullPointerException will be thrown by the application and this method will catch it. Since our application was not expecting this error to occur, and we don't have much to say to the user, we just use the UNEXPECTED_ERROR constant to search for a localized message that tells the user that something went wrong.
String errorMessage = messageSource.getMessage(UNEXPECTED_ERROR, null, locale);
ex.printStackTrace();
We also call printStackTrace method in the exception to log its details to be able to analyze it later.
Using the Global Exception Handler
Now that we have a global exception handler in place, let's change some classes to see it working. In the previous article we've created two DTOs to handle the insertion and update of exams, ExamCreationDTO and ExamUpdateDTO. Both of them used only @NotNull annotation to avoid null values on their properties. Let's start incrementing the ExamCreationDTO class to add a new validation:
package com.questionmarks.model.dto;

import com.fasterxml.jackson.annotation.JsonIgnore;
import lombok.Getter;
import lombok.Setter;

import javax.validation.constraints.NotNull;
import javax.validation.constraints.Size;
import java.time.LocalDateTime;

@Getter
@Setter
public class ExamCreationDTO {
    @NotNull
    @Size(min = 1, max = 50)
    private String title;

    @NotNull
    @Size(min = 1, max = 512)
    private String description;

    @JsonIgnore
    private final LocalDateTime createdAt = LocalDateTime.now();

    @JsonIgnore
    private final LocalDateTime editedAt = LocalDateTime.now();
}
The difference between this version and the one created in the previous article is that now we use @Size annotations to guarantee that title and description won't exceed the limits defined in the database. To keep everything consistent, let's add the same annotation to the same fields but in the ExamUpdateDTO class:
package com.questionmarks.model.dto;

import com.fasterxml.jackson.annotation.JsonIgnore;
import lombok.Getter;
import lombok.Setter;

import javax.persistence.Id;
import javax.validation.constraints.NotNull;
import javax.validation.constraints.Size;
import java.time.LocalDateTime;

@Getter
@Setter
public class ExamUpdateDTO {
    @Id
    @NotNull
    private Long id;

    @NotNull
    @Size(min = 1, max = 50)
    private String title;

    @NotNull
    @Size(min = 1, max = 512)
    private String description;

    @JsonIgnore
    private final LocalDateTime editedAt = LocalDateTime.now();
}
From now on, when the bean validation process gets triggered on instances of these classes, title and description on both classes are checked to guarantee that no null values are set on it, and that the values don't exceed the limits defined. Case one or more of these validations fail, an instance of MethodArgumentNotValidException is thrown indicating what properties failed. For example, if the user sends a title with more than 50 characters, the bean validation process will produce an exception with the following code: Size.exam.title. The exception handler will then get this code and search in the messages.properties file for an associated message.
We will define these messages in the next sections, but first let's make just one more change in our application. We will refactor the DTOModelMapper class to validate if the application managed to find the object persisted with the id provided on a DTO. For those who didn't read the previous article, this class is responsible for the automatic mapping of DTOs into entities and, for DTOs that include @Id properties, it tries to fetch records from the database. Let's refactor the resolveArgument method in this class to include a call to Check.notNull() method, as follows:
package com.questionmarks.util;

// ... imports

public class DTOModelMapper extends RequestResponseBodyMethodProcessor {
    // ...

    @Override
    public Object resolveArgument(MethodParameter parameter, ModelAndViewContainer mavContainer, NativeWebRequest webRequest, WebDataBinderFactory binderFactory) throws Exception {
        Object dto = super.resolveArgument(parameter, mavContainer, webRequest, binderFactory);
        Object id = getEntityId(dto);
        if (id == null) {
            return modelMapper.map(dto, parameter.getParameterType());
        } else {
            Object persistedObject = entityManager.find(parameter.getParameterType(), id);
            Check.notNull(persistedObject, "Exception.notFound",
                    parameter.getParameterType().getSimpleName(), id);
            modelMapper.map(dto, persistedObject);
            return persistedObject;
        }
    }

    // ...
}
By adding the Check.notNull call to the else block, we guarantee that the program is able to find an entity with the id passed before proceeding with the execution. Case no entity is found, a RestException is thrown with the Exception.notFound code and with the simple name (getSimpleName) of the class alongside with the id provided.
Creating the I18N Messages
Last thing we need to have a Spring Boot API that supports multiple languages, is to map the messages that we will send to our users, and translate them to other languages. The messages in English will be stored in a new file called messages.properties that we are going to create in the src/main/resources/ folder. Let's add the following messages:
NotNull.exam.id=Please, inform the exam''s id to be updated.
NotNull.exam.title=Please, provide a title to the exam.
NotNull.exam.description=Please, provide a description to the exam.
Size.exam.title=Exam title must contain between {2} and {1} characters.
Size.exam.description=Exam description must contain between {2} and {1} characters.
Exception.notFound=No record of {0} could be found with id {1}.
Exception.unexpected=An unexpected error occurred while processing your request.
Whenever a validation fails, Spring Boot generates a code that starts with the annotation name (e.g. Size), then it adds the entity where the validation failed (e.g. exam), and lastly it adds the property (e.g. description). Like that, it's easy to know what messages we need to map when dealing with bean validation.
For some messages, we have defined placeholders like {0} and {1}. These placeholders are replaced by Spring to provide a better explanation to users. For example, if the size of an exam's title is too long, Spring gets the message referenced by Size.exam.title and replace {2} and {1} with the minimum and maximum length set in the @Size annotation.
In the messages added above, only two didn't follow the pattern explained: Exception.notFound and Exception.unexpected. The former have been created when refactoring the DTOModelMapper class, and the latter have been defined to tell users about errors that we didn't expect.
Supporting Other Languages
To give alternative languages for users, we need to create other files with translated versions of the messages above. The names of these files must start with messages followed by an underscore and the ISO code of the language chose (e.g. _pt). Optionally, we can add another underscore followed by the ISO code of an specific region (e.g. _BR). This pattern enables us to provide messages to multiple languages and its variations.
In this article, we are going to create a file called messages_pt_BR.properties, in the src/main/resources/ folder, to support users from Brazil (BR):
NotNull.exam.id=Por favor, informe o id do exame a ser editado.
NotNull.exam.title=Por favor, informe um título para o exame.
NotNull.exam.description=Por favor, informe uma descrição para o exame.
Size.exam.title=O título do exame deve conter entre {2} e {1} caracteres.
Size.exam.description=A descrição do exame deve conter entre {2} e {1} caracteres.
Exception.unexpected=Um erro inesperado ocorreu durante a execução da sua requisição.
The official language in Brazil is Portuguese (pt), but as the language spoken there is quite different from Portugal, we opted to have a translation crafted specially for Brazilians. This is everything we need to do to support the Portuguese variation spoken in Brazil. Now, whenever a user express that they want messages in Brazilian Portuguese, Spring Boot will search the messages_pt_BR.properties file to get the appropriate message.
In the next section we will see how to interact with the API to get user-friendly messages in both languages: English and Brazilian Portuguese.
Interacting with a Localized Spring Boot API
Before start testing our API, let's run the application. This can be accomplished through our IDE or through the gradle bootRun command. When the API finishes bootstrapping, we can send the following request to add a new exam:
# adds a new exam
curl -X POST -H "Content-Type: application/json" -d '{
    "title": "Another show exam",
    "description": "Another show exam desc"
}' http://localhost:8080/exams
The command above must work without problems and no output message is expected from the API. Now, if we send the following request:
# tries to add a new exam without a title
curl -X POST -H "Content-Type: application/json" -d '{
    "description": "Another show exam desc"
}' http://localhost:8080/exams
It's expected a message sent back from our API, since we didn't define a title, saying "Please, provide a title to the exam.". As the message is structured as JSON, the output from Spring Boot is:
{"messages":["Please, provide a title to the exam."]}}
This proves that RestExceptionHandler got in action and crafted a better message for the user. But let's say that we prefer to get messages in Brazilian Portuguese, how do we do? Easy! We just need to inform the API which language we want through the Accept-Language header in the request:
curl -X POST -H "Content-Type: application/json" -H "Accept-Language: pt-BR" -d '{
  "description": "Another show exam desc"
}' http://localhost:8080/exams
And the output provided by Spring Boot will be in Portuguese:
{"messages":["Por favor, informe um título para o exame."]}
For the sake of completeness, let's see placeholders getting replaced when we send a title that is too long:
curl -X POST -H "Content-Type: application/json" -d '{
  "title": "This title is too long to be accepted and Spring Boot will complain about it",
  "description": "Another show exam desc"
}' http://localhost:8080/exams
As we haven't defined the Accept-Language header in the request above, and as the title exceeded the limits, Spring Boot will send us the following message:
{"messages":["Exam title must contain between 1 and 50 characters."]}
Both the {1} and {2} placeholders in the original, English message, got replaced by the min and max values set in the @Size annotation configured in the ExamCreationDTO.
Aside: Securing Spring APIs with Auth0
Securing Spring Boot APIs with Auth0 is easy and brings a lot of great features to the table. With Auth0, we only have to write a few lines of code to get solid identity management solution, single sign-on, support for social identity providers (like Facebook, GitHub, Twitter, etc.), and support for enterprise identity providers (like Active Directory, LDAP, SAML, custom, etc.).
In the following sections, we are going to learn how to use Auth0 to secure APIs written with Spring Boot.
Creating the API
First, we need to create an API on our free Auth0 account. To do that, we have to go to the APIs section of the management dashboard and click on "Create API". On the dialog that appears, we can name our API as "Contacts API" (the name isn't really important) and identify it as https://contacts.blog-samples.com (we will use this value later).
Registering the Auth0 Dependency
The second step is to import a dependency called auth0-spring-security-api. This can be done on a Maven project by including the following configuration to pom.xml (it's not harder to do this on Gradle, Ivy, and so on):
<project ...>
    <!-- everything else ... -->
    <dependencies>
        <!-- other dependencies ... -->
        <dependency>
            <groupId>com.auth0</groupId>
            <artifactId>auth0-spring-security-api</artifactId>
            <version>1.0.0-rc.3</version>
        </dependency>
    </dependencies>
</project>
Integrating Auth0 with Spring Security
The third step consists of extending the WebSecurityConfigurerAdapter class. In this extension, we use JwtWebSecurityConfigurer to integrate Auth0 and Spring Security:
package com.auth0.samples.secure;

import com.auth0.spring.security.api.JwtWebSecurityConfigurer;
import org.springframework.beans.factory.annotation.Value;
import org.springframework.context.annotation.Configuration;
import org.springframework.security.config.annotation.method.configuration.EnableGlobalMethodSecurity;
import org.springframework.security.config.annotation.web.builders.HttpSecurity;
import org.springframework.security.config.annotation.web.configuration.EnableWebSecurity;
import org.springframework.security.config.annotation.web.configuration.WebSecurityConfigurerAdapter;

@Configuration
@EnableWebSecurity
@EnableGlobalMethodSecurity(prePostEnabled = true)
public class SecurityConfig extends WebSecurityConfigurerAdapter {
    @Value(value = "${auth0.apiAudience}")
    private String apiAudience;
    @Value(value = "${auth0.issuer}")
    private String issuer;

    @Override
    protected void configure(HttpSecurity http) throws Exception {
        JwtWebSecurityConfigurer
                .forRS256(apiAudience, issuer)
                .configure(http)
                .cors().and().csrf().disable().authorizeRequests()
                .anyRequest().permitAll();
    }
}
As we don't want to hard code credentials in the code, we make SecurityConfig depend on two environment properties:
auth0.apiAudience: This is the value that we set as the identifier of the API that we created at Auth0 (https://contacts.blog-samples.com).auth0.issuer: This is our domain at Auth0, including the HTTP protocol. For example:https://blog-samples.auth0.com/.
Let's set them in a properties file on our Spring application (e.g. application.properties):
auth0.issuer:https://blog-samples.auth0.com/
auth0.apiAudience:https://contacts.blog-samples.com/
Securing Endpoints with Auth0
After integrating Auth0 and Spring Security, we can easily secure our endpoints with Spring Security annotations:
package com.auth0.samples.secure;

import com.google.common.collect.Lists;
import org.springframework.security.access.prepost.PreAuthorize;
import org.springframework.web.bind.annotation.GetMapping;
import org.springframework.web.bind.annotation.PostMapping;
import org.springframework.web.bind.annotation.RequestBody;
import org.springframework.web.bind.annotation.RequestMapping;
import org.springframework.web.bind.annotation.RestController;

import java.util.List;

@RestController
@RequestMapping(value = "/contacts/")
public class ContactController {
    private static final List<Contact> contacts = Lists.newArrayList(
            Contact.builder().name("Bruno Krebs").phone("+5551987654321").build(),
            Contact.builder().name("John Doe").phone("+5551888884444").build()
    );

    @GetMapping
    public List<Contact> getContacts() {
        return contacts;
    }

    @PostMapping
    public void addContact(@RequestBody Contact contact) {
        contacts.add(contact);
    }
}
Now, to be able to interact with our endpoints, we will have to obtain an access token from Auth0. There are multiple ways to do this and the strategy that we will use depends on the type of the client application we are developing. For example, if we are developing a Single Page Application (SPA), we will use what is called the Implicit Grant. If we are developing a mobile application, we will use the Authorization Code Grant Flow with PKCE. There are other flows available at Auth0. However, for a simple test like this one, we can use our Auth0 dashboard to get one.
Therefore, we can head back to the APIs section in our Auth0 dashboard, click on the API we created before, and then click on the Test section of this API. There, we will find a button called Copy Token. Let's click on this button to copy an access token to our clipboard.
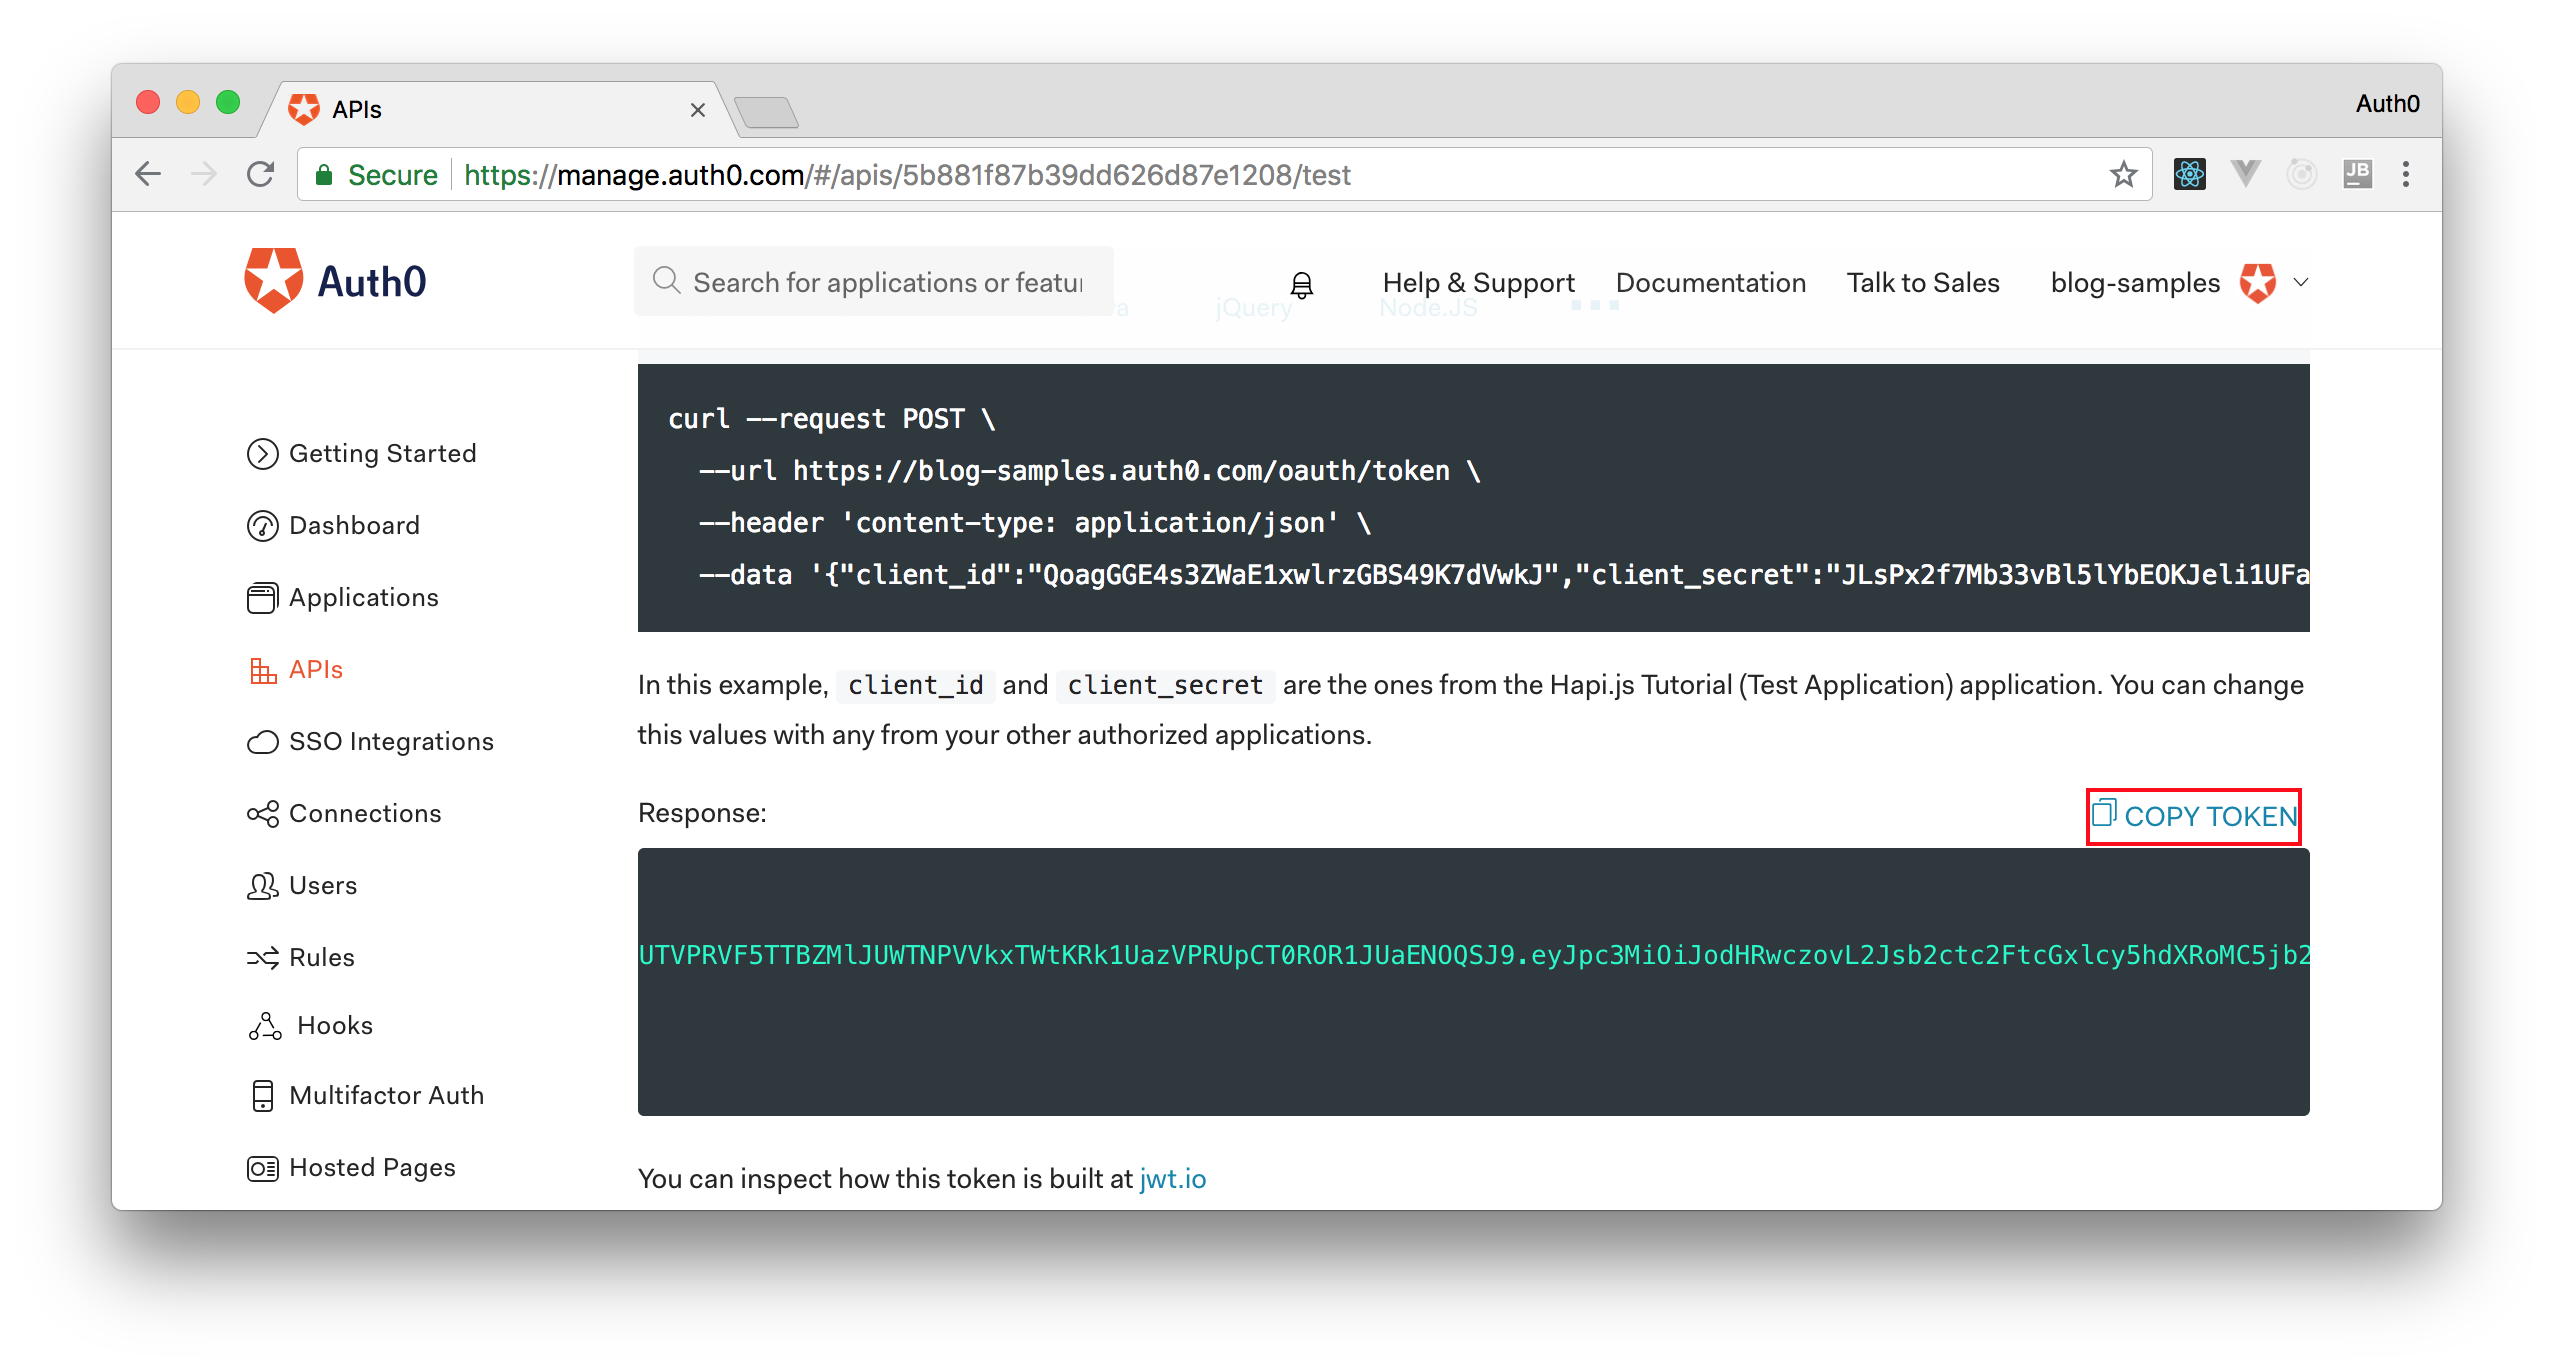
After copying this token, we can open a terminal and issue the following commands:
# create a variable with our token
ACCESS_TOKEN=<OUR_ACCESS_TOKEN>

# use this variable to fetch contacts
curl -H 'Authorization: Bearer '$ACCESS_TOKEN http://localhost:8080/contacts/
Note: We will have to replace
<OUR_ACCESS_TOKEN>with the token we copied from our dashboard.
As we are now using our access token on the requests we are sending to our API, we will manage to get the list of contacts again.
That's how we secure our Node.js backend API. Easy, right?
Next Steps: Integration Testing on Spring Boot APIs
There we go, we now have a proper exception handler in place, fully integrated with bean validation and that is easy to use. We are now ready to add the missing endpoints that our to-be-developed frontend applications will need. As we want these new endpoints to function properly, in the next article we are going to create these endpoints alongside with integration tests.
Throughout the article, we are going to use libraries such as JUnit and Hamcrest to simulate interactions with the RESTful API to guarantee that everything works as expected. Stay tuned!
About the author

Bruno Krebs
R&D Content Architect (Auth0 Alumni)