
JHipster is a powerful development platform that provides developers with the tools they need to create modern, scalable, and robust web applications using Spring Boot. Using OAuth 2.0 with JHipster is an excellent way to ensure your web applications are secure and well-protected from unauthorized access. Integrating OAuth and OpenID Connect (OIDC) into your applications allows you to easily implement authorization and authentication, manage user identities, and provide secure access to resources.
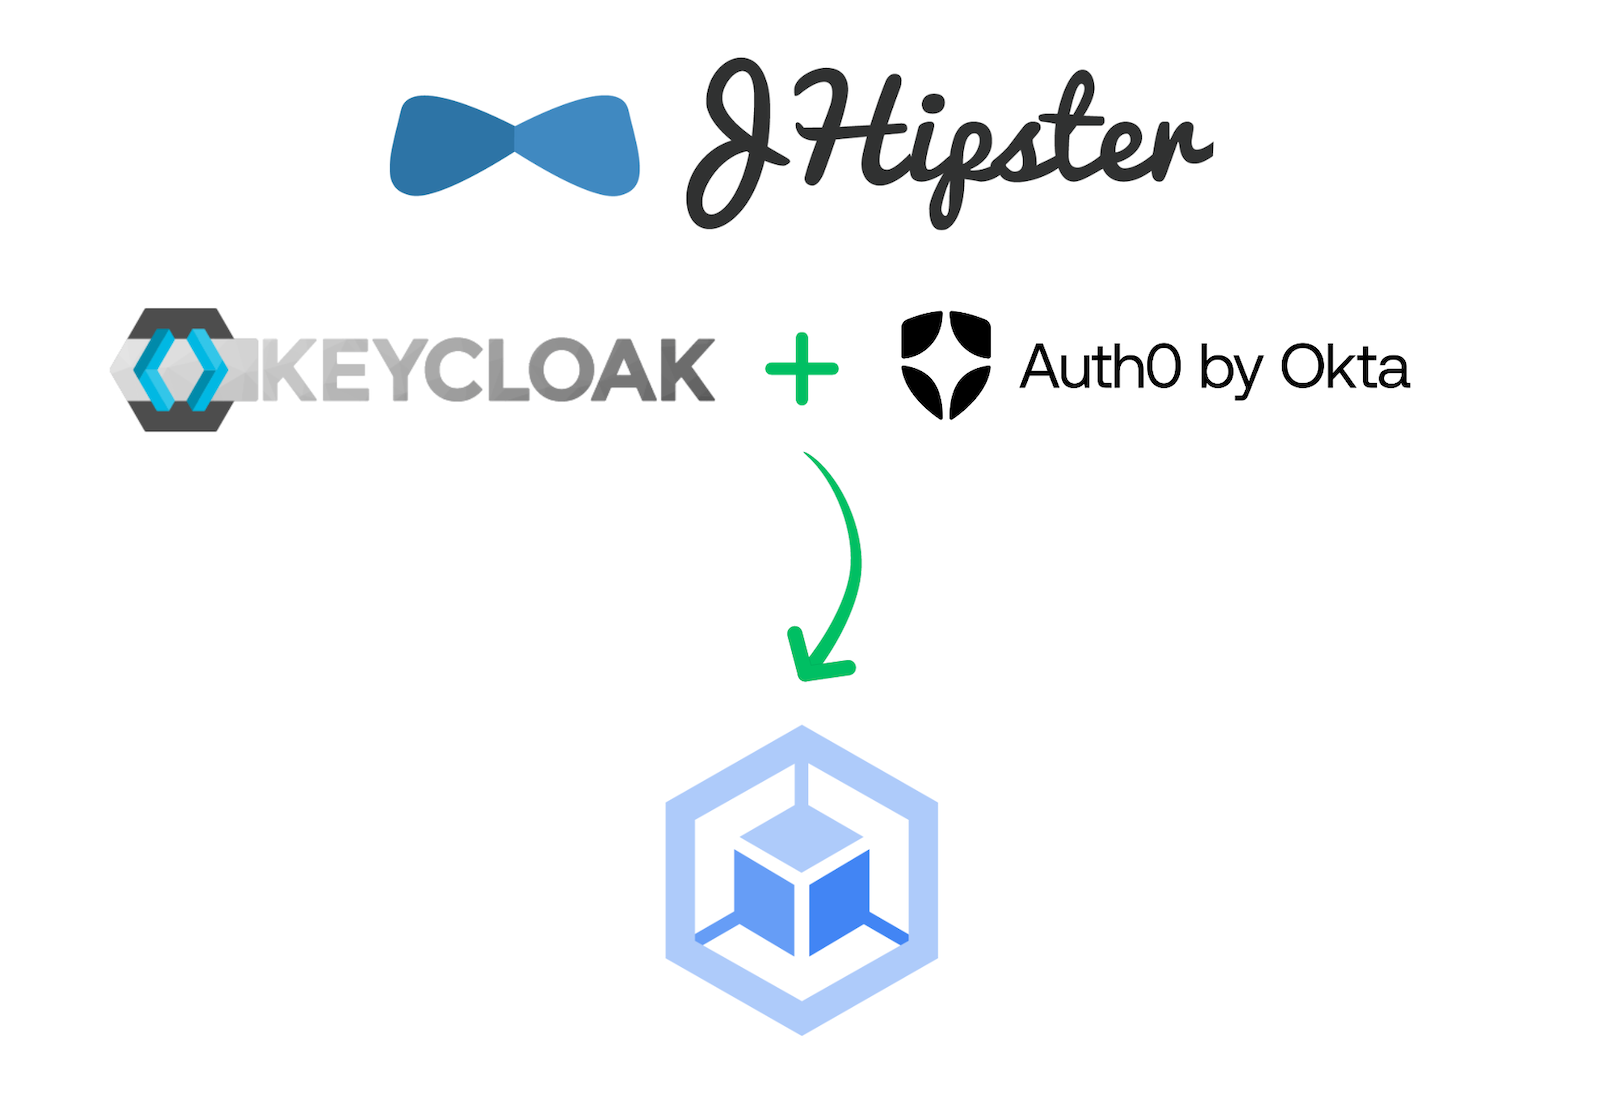
By default, the OAuth 2.0 and OIDC server configured with JHipster is Keycloak, an open source identity and access management solution. This is because Keycloak can be run in a local Docker container and pre-populated with users and client registrations. You can also use JHipster with Auth0 directly, and we've written a couple of tutorials to help you migrate a JHipster project to Auth0.
This time, we figured it'd be fun to explore how to chain Keycloak and Auth0 together. This architecture might be useful for those folks who are already using Keycloak in production or companies that have mandated Keycloak, but still want to use the more advanced features available in Auth0. If you level-up by using Auth0 for your identity provider, you can go beyond the basic capabilities offered by the open source offering.
In this tutorial, we'll show you how you can configure Keycloak to use Auth0 as an upstream provider. This will set you up for success because you can use Auth0's advanced identity features, like actions and passkeys, to delight your customers. It's all pretty slick! 😃
The JHipster Kubernetes generator creates all the necessary Kubernetes resources, such as deployments, services, and ingresses, based on the configuration of the JHipster application. This includes setting up the database, configuring security, and setting up any necessary environment variables. In JHipster 8, the Kubernetes sub-generator supports Keycloak for Ingress GKE deployment!
In this post, I'll walk you through the generation of a demo Spring Boot microservices application with Keycloak integration using JHipster and its deployment to Google Kubernetes Engine (GKE). You'll also learn how to add Auth0 as an upstream provider to give you the best of both worlds (open source Keycloak + Auth0 for advanced features).
This tutorial was created with the following tools and services:
- Node.js v18.16.1
- npm 9.5.1
- Java OpenJDK 17
- DockerHub account
- Docker 24.0.2
- Google Cloud CLI 437.0.1
- Kubectl v1.26.3
- Auth0 account
- Auth0 CLI 1.0.0
Deploy Spring Boot Microservices and Keycloak to Google Kubernetes Engine
In this walkthrough, you will build a microservices architecture example from JHipster, consisting of a gateway application based on Spring Gateway and two Spring Boot microservices blog and store. The gateway will act as the entrance to your microservices, providing HTTP routing and load balancing, quality of service, security and API documentation for all microservices. With the help of the JHipster Kubernetes sub-generator, you can deploy the application and its required services (Consul for service discovery, and Keycloak for OpenID Connect) to Google Kubernetes Engine (GKE).
Build the Spring Boot microservices architecture
Install JHipster, you can do the classical local installation with npm.
npm i -g generator-jhipster@8
Generate the microservices architecture from a JDL (JHipster Domain Language) descriptor file. Create a folder for the project and add the file microservices.jdl with the following content:
application {
  config {
    baseName gateway
    packageName com.okta.developer.gateway
    applicationType gateway
    authenticationType oauth2
    buildTool gradle
    clientFramework vue
    prodDatabaseType postgresql
    serviceDiscoveryType consul
    testFrameworks [cypress]
  }
  entities Blog, Post, Tag, Product
}

application {
  config {
    baseName blog
    packageName com.okta.developer.blog
    applicationType microservice
    authenticationType oauth2
    buildTool gradle
    databaseType neo4j
    enableHibernateCache false
    serverPort 8081
    serviceDiscoveryType consul
  }
  entities Blog, Post, Tag
}

application {
  config {
    baseName store
    packageName com.okta.developer.store
    applicationType microservice
    authenticationType oauth2
    buildTool gradle
    databaseType mongodb
    enableHibernateCache false
    serverPort 8082
    serviceDiscoveryType consul
  }
  entities Product
}

entity Blog {
  @Id id String
  name String required minlength(3)
  handle String required minlength(2)
}

entity Post {
  @Id id String
  title String required
  content TextBlob required
  date Instant required
}

entity Tag {
  @Id id String
  name String required minlength(2)
}

entity Product {
  @Id id String
  title String required
  price BigDecimal required min(0)
  image ImageBlob
}

relationship ManyToOne {
  Blog{user(login)} to User with builtInEntity
  Post{blog(name)} to Blog
}

relationship ManyToMany {
  Post{tag(name)} to Tag{post}
}

paginate Post, Tag with infinite-scroll
paginate Product with pagination

microservice Product with store
microservice Blog, Post, Tag with blog

deployment {
  deploymentType docker-compose
  appsFolders [gateway, blog, store]
  dockerRepositoryName "indiepopart"
}
Create a Docker Hub personal account, if you don't have one, and replace the dockerRepositoryName with the account name. Then run the following command:
jhipster jdl microservices.jdl
After the generation, you will find sub-folders were created for the gateway, store, and blog services. The gateway will act as the front-end application and as a secure router to the store and blog microservices.
Then build and publish each application image. For example, in the gateway folder run:
./gradlew -Pprod bootJar jib \
  -Djib.to.image=<your-dockerhub-username>/gateway \
  -Djib.to.auth.username=<your-dockerhub-username> \
  -Djib.to.auth.password=<your-dockerhub-secret>
Note: The your-dockerhub-secret value will be your Docker Hub password or an access token if you have two-factor authentication enabled. If you are already logged in using
docker loginit is not required passing username/pass to each command.
Run the Kubernetes sub-generator
Now let's generate the Kubernetes descriptors using JHipster. During the process, the generator will prompt for an FQDN (Fully qualified domain name) for the Ingress services, so let's first create a public IP on Google Cloud. With the help of nip.io, if you set <public-ip>.nip.io as your FQDN, you can test the deployment without having to purchase a real domain.
Google Cloud provides a free tier of their services that grants you $300 in free credits if you are a new user.
After you sign up, install gcloud CLI. When you reach the end of the process, the last step is to run gcloud init and set up authorization for the tool. Also, install the Kubectl authentication plugin. Enable Compute and Container APIs:
gcloud services enable compute.googleapis.com
gcloud services enable container.googleapis.com
You can list the services that are enabled with the following command:
gcloud services list
Create the public IP with the following command:
gcloud compute addresses create gateway-ip --global
Note: The name for public IP must be the gateway or monolith application base name, you can find it in the JDL. For the current example, the application base name is
gateway.
application {
  config {
    baseName gateway
    applicationType gateway
Find out the IP address with the following command:
gcloud compute addresses describe gateway-ip --global --format='value(address)'
Create a kubernetes folder at the root of the project, and run the generator:
mkdir kubernetes
cd kubernetes
jhipster k8s
Choose the following options when prompted:
- Type of application: Microservice application
- Root directory: ../
- Which applications? (select all)
- Set up monitoring? No
- Which applications with clustered databases? select store
- Kubernetes namespace: demo
- Docker repository name: <your-dockerhub-username>
- Command to push Docker image:
docker push - Enable Istio? No
- Kubernetes service type? Ingress
- Kubernetes ingress type? Google Kubernetes Engine Ingress
- Root FQDN for ingress services: <public-ip>.nip.io
- Use dynamic storage provisioning? Yes
- Use a specific storage class? (leave empty)
Customize the configuration
The generated Kubernetes descriptors will create a certificates issuer in the cluster, pointing to Let's Encrypt staging environment. The Let's Encrypt issuer requires an email address to remind you to renew the certificate after 30 days before expiry. You will only receive this email if something goes wrong when renewing the certificate with cert-manager. Set the email address in the issuer yaml descriptor kubernetes/cert-manager/letsencrypt-staging-issuer.yml:
spec:
  acme:
    server: https://acme-staging-v02.api.letsencrypt.org/directory
    email: <your-email>
Deploy to Google Kubernetes Engine (GKE)
If you haven't already, install the gke-gcloud-auth-plugin:
gcloud components install gke-gcloud-auth-pluginCreate a Kubernetes cluster on Google Cloud:
gcloud container clusters create jhipster-cluster \
  --zone us-central1-a \
  --machine-type n1-standard-4 \
  --enable-autorepair \
  --enable-autoupgrade
Note: Run gcloud compute zones list to see the available zones. You should choose one near you.
Then, fetch the cluster credentials with:
gcloud container clusters get-credentials jhipster-cluster --zone us-central1-a
get-credentials will update a kubeconfig file with appropriate credentials and endpoint information to point kubectl at a specific cluster in Google Kubernetes Engine.
Install cert-manager in your cluster:
kubectl apply -f https://github.com/cert-manager/cert-manager/releases/download/v1.12.2/cert-manager.yaml
Note: If you see a
kubectlerror The gcp auth plugin has been removed., see Here's what to know about changes to kubectl authentication coming in GKE v1.26 for details on how to fix it.
Apply the deployment descriptors, from the kubernetes folder:
./kubectl-apply.sh -f
Important note: Keycloak client applications (a monolith or microservices) will fail to start until Let's Encrypt has issued the certificate and it has synchronized inside the cluster. In the following section, the issuance process is explained in more detail.
The certificate might take several minutes to be ready, you can check the status by inspecting the object events:
kubectl describe certificate keycloak-ssl -n demo
The output should be similar to the following text:
Events:
  Type    Reason     Age   From                                       Message
  ----    ------     ----  ----                                       -------
  Normal  Issuing    10m   cert-manager-certificates-trigger          Issuing certificate as Secret does not exist
  Normal  Generated  10m   cert-manager-certificates-key-manager      Stored new private key in temporary Secret resource "keycloak-ssl-rsfkj"
  Normal  Requested  10m   cert-manager-certificates-request-manager  Created new CertificateRequest resource "keycloak-ssl-mp8s7"
  Normal  Issuing    10m   cert-manager-certificates-issuing          Issued temporary certificate
  Normal  Issuing    4m    cert-manager-certificates-issuing          The certificate has been successfully issued
Also, the ingress service will be updated once the certificate is available. You can check the ingress events with the following command:
kubectl describe ingress gateway -n demo
The output should contain the message "certs updated":
Events:
  Type     Reason             Age                   From                       Message
  ----     ------             ----                  ----                       -------
  ...
  Normal   Sync               78s (x2 over 4m33s)  loadbalancer-controller    UrlMap "k8s2-um-ag6evarw-demo-gateway-gijhgcnp" updated
  Normal   Sync               66s (x9 over 9m6s)   loadbalancer-controller    Scheduled for sync
  Normal   Sync               25s                  loadbalancer-controller    TargetProxy "k8s2-ts-ag6evarw-demo-gateway-gijhgcnp" certs updated
Once the cluster is healthy, you can test the deployment by navigating to http://gateway.demo.<public-ip>.nip.io :
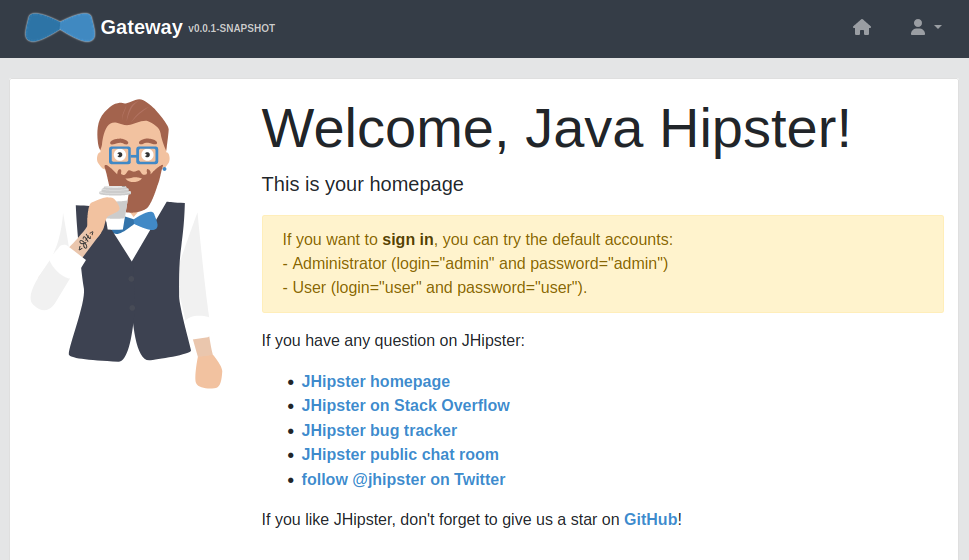
Note: If you see a Server Error it might be because the
gatewayis not in Running status yet. You can check the pod status withkubectl get pod -n demo.
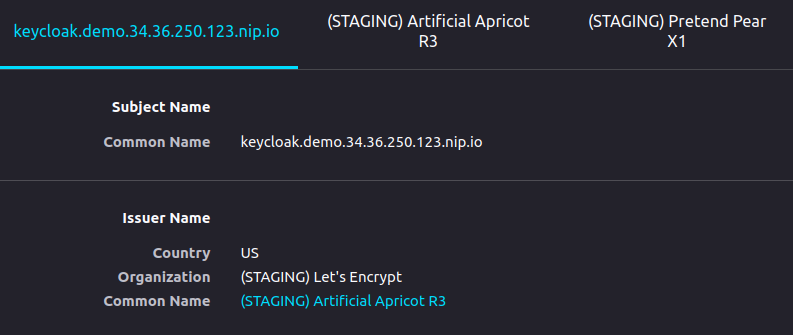
If you click on Sign in you will be redirected to the Keycloak sign-in page. As the certificate for TLS was issued by the Let's Encrypt staging environment, the browser won't trust it by default. Accept the certificate and you will be able to sign in with admin/admin or user/user. If you inspect the certificate, you will find the certificate hierarchy.
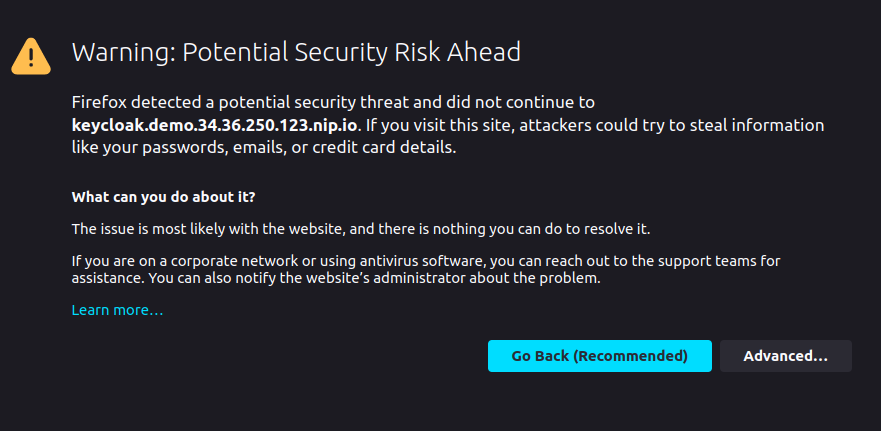
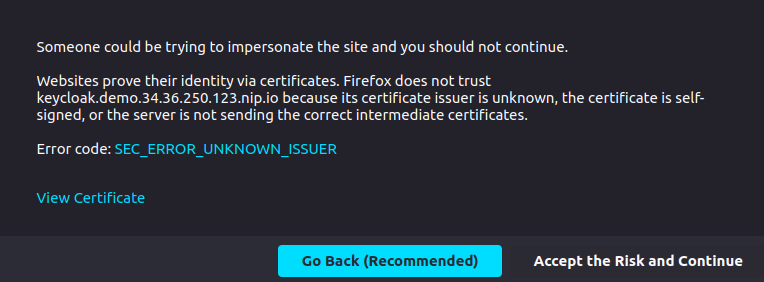
Note: Let's Encrypt production environment issues browser-trusted certificates, but it does not work with nip.io domains due to rate limits per domain.
Important Note: You can delete the cluster and public IP in between sessions to save costs with the following gcloud commands:
gcloud container clusters delete jhipster-cluster --zone us-central1-a
  --zone <cluster-zone>
gcloud compute addresses delete gateway-ip --global
Add HTTPS to the Gateway
The GKE Ingress will serve the primary certificate if no certificate has a Common Name (CN) that matches the domain name in the client request. This means in the previous ingress configuration, the Keycloak certificate will be served for gateway HTTPS requests. You can update the tls section in the gateway-ingress.yml file to generate a certificate for the gateway itself:
tls:
  - secretName: keycloak-ssl
    hosts:
      - keycloak.demo.<public-ip>.nip.io
  - secretName: gateway-ssl
    hosts:
      - gateway.demo.<public-ip>.nip.io
Also, you should force HTTPS in the gateway as explained in the JHipster Security documentation.
Update the admin password
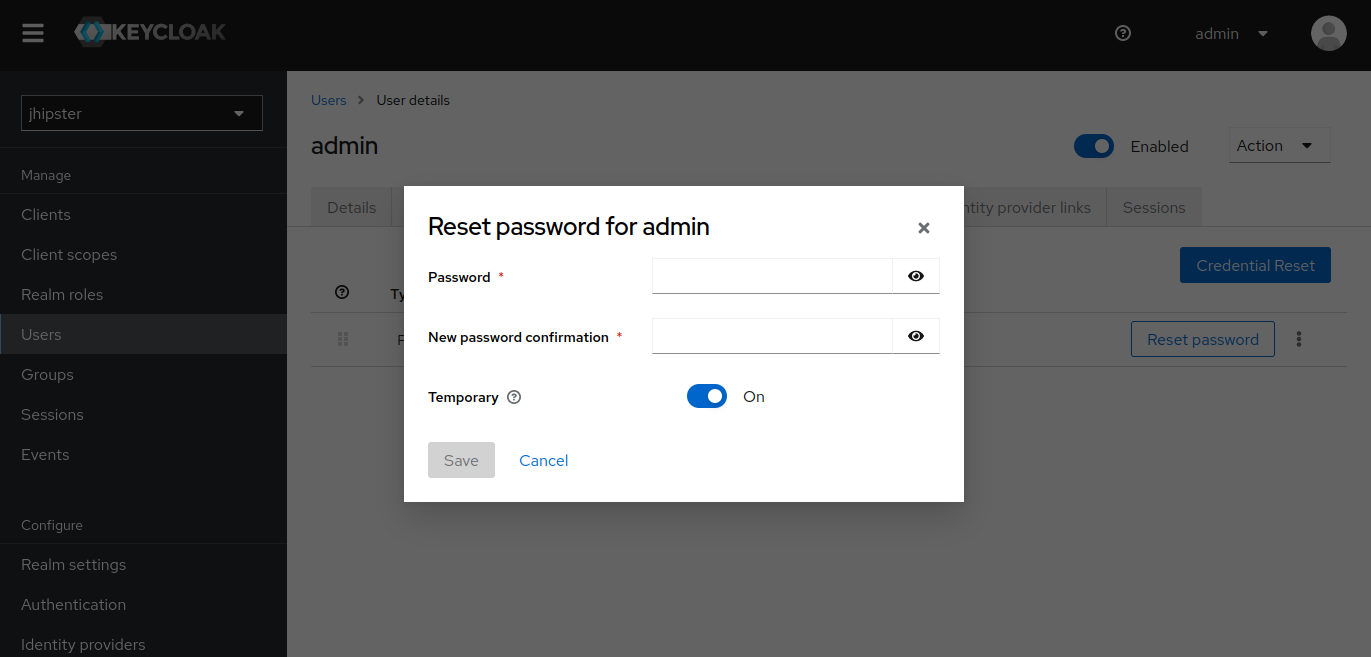
You can update admin password by signing in to Keycloak at https://keycloak.demo.<public-ip>.nip.io with admin/admin, and then choosing jhipster realm on the top left drop down options. Then choose Users on the left menu, select the admin user, and select the Credentials tab. There you can click Reset password and set a new password for the user.
About Cert-Manager and Let's Encrypt Certificates
cert-manager is an X.509 certificate controller for Kubernetes and OpenShift. It automates the issuance of certificates from popular public and private Certificate Authorities, to secure Ingress with TLS. It ensures the certificates are valid and up-to-date, and attempts to renew certificates before expiration.
With cert-manager, a certificate issuer is a resource type in the Kubernetes cluster, and Let's Encrypt is one of the supported sources of certificates that can be configured as the issuer. The ACME (Automated Certificate Management Environment) protocol is a framework for automating the issuance and domain validation procedure, which allows servers to obtain certificates without user interaction. Let's Encrypt is a Certificate Authority that supports ACME protocol, and through cert-manager, the cluster can request and install Let's Encrypt generated certificates.
Certificate issuance flow
The process for obtaining a certificate with ACME protocol has two major tasks, Domain Validation, where the agent proves it controls the domain, and Certificate Issuance, where the agent requests a certificate (or renews or revokes).
At a high level, the following steps are required for obtaining a certificate from an ACME server. In the test deployment, cert-manager acts as the agent, and Let's Encrypt staging as the CA (Certificate Authority).
- The agent registers to the CA with a key pair
- The agent submits an order for a certificate to be issued
- The CA issues a DNS01 or HTTP01 challenge
- The CA provides a nonce the agent must sign with its private key
- The agent completes the challenge
- The agent signs the nonce with its private key
- The agent notifies the CA it is ready for validation
- The CA verifies the signature on the nonce satisfied
- The CA verifies the challenge has been satisfied
- The authorized agent sends a certificate signing request
- The CA issues the certificate
About ACME orders and challenges
When a Certificate resource is created, cert-manager automatically creates a CertificateRequest. An Order resource represents a single certificate request, also created automatically, and is used by the ACME issuer to manage the lifecycle of the ACME order for a signed TLS certificate. The Order resource manages challenges for the order with the Challenge resource.
The Challenge resource is queued for scheduled processing. The challenge controller will perform a self-check, and once it is passed, the ACME authorization is accepted for the ACME server to perform the validation.
The HTTP01 Ingress solver
The HTTP-01 challenge is the most common challenge type. Let's Encrypt gives a token to the agent, and the agent must place a file at http://<YOUR_DOMAIN>/.well-known/acme-challenge/<TOKEN> that contains the token and a thumbprint (computation) of the agent. Once the agent tells Let's Encrypt that the file is ready, Let's Encrypt validates the file and issues the certificate.
The challenge type is configured in the issuer, along with the ingress class for the solver. cert-manager will create a new Ingress resource to route Let's Encrypt challenge requests to the solver pods, which are also created automatically.
The following annotations are added by the k8s sub-generator in the ingress resource, for the challenge solver to work and the TLS certificate to be automatically created by cert-manager:
apiVersion: networking.k8s.io/v1
kind: Ingress
metadata:
  name: gateway
  namespace: demo
  annotations:
    kubernetes.io/ingress.allow-http: "true" # Required to allow HTTP connections from challenge requests
    kubernetes.io/ingress.class: gce
    kubernetes.io/ingress.global-static-ip-name: gateway-ip
    cert-manager.io/issuer: letsencrypt-staging # The name of the issuer to acquire the certificate, which must be in the same namespace
    acme.cert-manager.io/http01-edit-in-place: "true" # The ingress is modified in place, instead of creating a new ingress resource for the HTTP01 challenge
    cert-manager.io/issue-temporary-certificate: "true" # A temporary certificate will be set on the secret until the final certificate has been returned. used for keeping compatibility with the `ingress-gce` component
Delegate Authentication to Auth0
Keycloak supports identity provider federation, meaning it can be configured to delegate authentication to one or more Identity Providers. An example of IDP federation is social login via Facebook or Google. Authentication can be delegated to any IDP supporting OpenID Connect or SAML 2.0. Auth0 uses the OpenID Connect protocol to authenticate users and allows adding custom logic to the login and identity flows via Auth0 Actions.
JHipster applications require custom access token claims for authorization, and these can be configured using Auth0 Actions. The sections below describe the step-by-step process to add Auth0 authentication to the gateway using Keycloak, without making any application changes. You can find a detailed description of the brokering flow in the Keycloak server administration guide.
Create an Auth0 account
Sign up at Auth0 and install the Auth0 CLI. Then in the command line run:
auth0 login
The command output will display a device confirmation code and open a browser session to activate the device.
Note: My browser was not displaying anything, so I had to manually activate the device by opening the URL
https://auth0.auth0.com/activate?user_code={deviceCode}.
On successful login, you will see the tenant, which you will use as the issuer later:
✪ Welcome to the Auth0 CLI 🎊

If you don't have an account, please create one [here](https://a0.to/blog_signup).

Your device confirmation code is: KGFL-LNVB

 ▸    Press Enter to open the browser to log in or ^C to quit...

Waiting for the login to complete in the browser... ⣻Opening in existing browser session.
Waiting for the login to complete in the browser... done

 ▸    Successfully logged in.
 ▸    Tenant: dev-avup2laz.us.auth0.com
The next step is to create a client app, which you can do in one command:
auth0 apps create \
  --name "Spring Boot + Keycloak" \
  --description "JHipster + Spring Boot + Keycloak = 🤠" \
  --type regular \
  --callbacks https://keycloak.demo.<public-ip>.nip.io/realms/jhipster/broker/auth0/endpoint \
  --logout-urls https://keycloak.demo.<public-ip>.nip.io/realms/jhipster/broker/auth0/endpoint/logout_response \
  --reveal-secrets
Once the app is created, you will see the OIDC app's configuration:
=== dev-avup2laz.us.auth0.com application created

  CLIENT ID            ***
  NAME                 Spring Boot + Keycloak
  DESCRIPTION          JHipster + Spring Boot + Keycloak = 🤠
  TYPE                 Regular Web Application
  CLIENT SECRET        ***
  CALLBACKS            ***
  ALLOWED LOGOUT URLS  ***
  ALLOWED ORIGINS
  ALLOWED WEB ORIGINS
  TOKEN ENDPOINT AUTH
  GRANTS               implicit, authorization_code, refresh_token, client_credentials

 ▸    Quickstarts: https://auth0.com/docs/quickstart/webapp
 ▸    Hint: Emulate this app's login flow by running `auth0 test login ***`
 ▸    Hint: Consider running `auth0 quickstarts download ***`
Create users and roles
As Auth0 will be used as the identity provider, you must create some test users. You can do this with the Auth0 CLI:
auth0 users create
Complete the required information, you will see an output like the lines below:
Connection Name: Username-Password-Authentication
 Name: Patrick
 Email: patrick@email.com
 Password: ********

=== dev-avup2laz.us.auth0.com user created

  ID          auth0|643ec0e1e671c7c9c5916ed6
  EMAIL       patrick@email.com
  CONNECTION  Username-Password-Authentication
Save the ID for later.
For this example, Auth0 will also be used for role management. JHipster applications are generated with authorization based on two roles that can be assigned to the user: ROLE_USER and ROLE_ADMIN. Create these roles in Auth0:
autho0 roles create
You will see an output like the following:
Name: ROLE_USER
Description: A user

=== dev-avup2laz.us.auth0.com role created

 ID           rol_175cvyWy20sxohgo
 NAME         ROLE_USER
 DESCRIPTION  A user
Assign the roles to the users you created:
auth0 users roles assign
Follow the steps, you will see the output below:
User ID: auth0|643ec0e1e671c7c9c5916ed6
? Roles rol_24d61Zxpvuas66tF (Name: ROLE_ADMIN), rol_175cvyWy20sxohgo (Name: ROLE_USER)

=== dev-avup2laz.us.auth0.com roles assigned to user (2)

  ID                    NAME        DESCRIPTION
  rol_24d61Zxpvuas66tF  ROLE_ADMIN  An administrator
  rol_175cvyWy20sxohgo  ROLE_USER   A user
Configure a Login Action
Besides the roles assignment I just explained, the authentication flow must be customized to add the roles and the username to the access token claims expected by JHipster applications. The way to accomplish this task with Auth0 is by adding a Login Action.
First configure your preferred editor to use with the Auth0 CLI:
export EDITOR=nano
Then create the Login Action:
auth0 actions create
Select post-login for the Trigger. When the editor opens, set the following implementation for the onExecutePostLogin function.
exports.onExecutePostLogin = async (event, api) => {
  const namespace = 'https://www.jhipster.tech';
  if (event.authorization) {
    api.idToken.setCustomClaim('preferred_username', event.user.email);
    api.idToken.setCustomClaim(`${namespace}/roles`, event.authorization.roles);
    api.accessToken.setCustomClaim(`${namespace}/roles`, event.authorization.roles);
  }
}
Save the file. You should see the output below once the action was created.
Name: jhipster
 Trigger: post-login

=== dev-avup2laz.us.auth0.com action created

  ID             083009b5-651e-43d3-8c1e-0053309da2ac
  NAME           jhipster
  TYPE           post-login
  STATUS         pending
  DEPLOYED       ✗
  LAST DEPLOYED
  LAST UPDATED   0 seconds ago
  CREATED        0 seconds ago
  CODE           /**
                  * Handler that will be called during the execution of a PostLogin flow.
                  *
                  * @param {Event} event - Details about the user and the context in which they are logging in.
                  * @param {PostLoginAPI} api - Interface whose methods can be used to change the behavior of the login.
                  */
                 exports.onExecutePostLogin = async (event, api) => {
                   const namespace = 'https://www.jhipster.tech';
                   if (event.authorization) {
                     api.idToken.setCustomClaim('preferred_username', event.user.email);
                     api.idToken.setCustomClaim(`${namespace}/roles`, event.authorization.roles);
                     api.accessToken.setCustomClaim(`${namespace}/roles`, event.authorization.roles);
                   }
                 };


                 /**
                  * Handler that will be invoked when this action is resuming after an external redirect. If your
                  * onExecutePostLogin function does not perform a redirect, this function can be safely ignored.
                  *
                  * @param {Event} event - Details about the user and the context in which they are logging in.
                  * @param {PostLoginAPI} api - Interface whose methods can be used to change the behavior of the login.
                  */
                 // exports.onContinuePostLogin = async (event, api) => {
                 // };
You can list the available actions with the following command:
auth0 actions list
The output will show the deployment status of each action:
=== dev-avup2laz.us.auth0.com actions

  ID                                    NAME      TYPE        STATUS  DEPLOYED
  ee0ea308-0e50-4be3-893b-74f9ccbb3703  jhipster  post-login  built   ✗
Note the DEPLOYED status is x. Go ahead and deploy it using the action ID:
auth0 actions deploy ee0ea308-0e50-4be3-893b-74f9ccbb3703
Once the action is deployed, you must attach it to the login flow. You can do this with Auth0 Management API for Actions:
auth0 api patch "actions/triggers/post-login/bindings" \
  --data '{"bindings":[{"ref":{"type":"action_id","value":"ee0ea308-0e50-4be3-893b-74f9ccbb3703"},"display_name":"Add Roles"}]}'
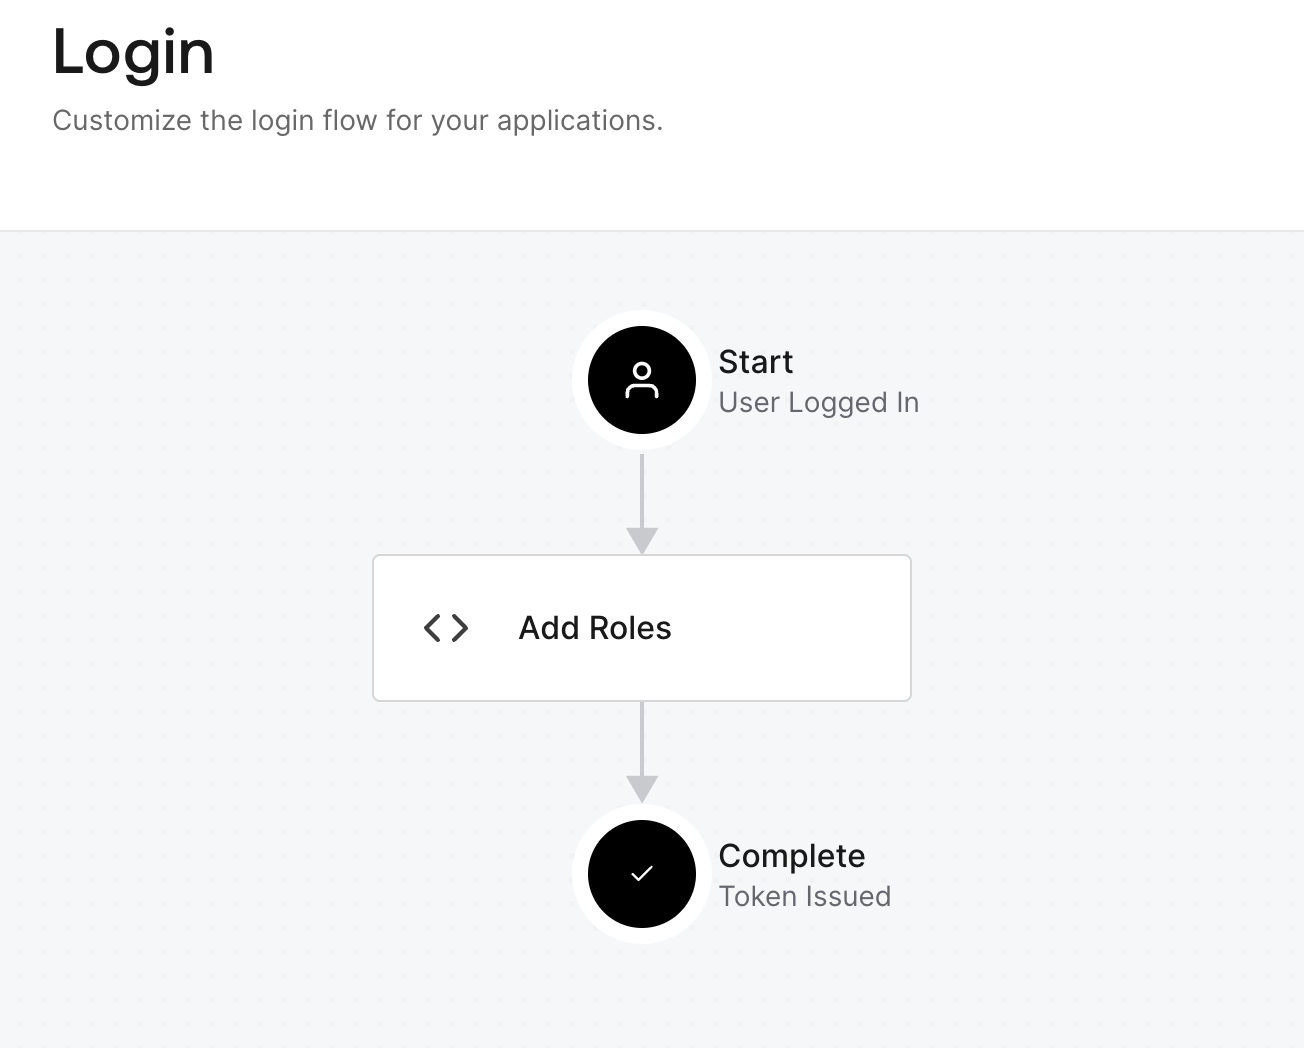
You cans visualize the flow in the Auth0 dashboard. Sign in and on the left menu you choose Actions, then in the Flows screen, choose Login.
Now that all is set on the identity provider side, let's configure Keycloak as an identity broker delegating authentication to Auth0.
Add the Auth0 Identity Provider
Navigate to https://keycloak.demo.<public-ip>.nip.io, and sign in with admin/admin. On the welcome page, choose Administration Console. On the left menu, for the top options, choose the jhipster realm. Then, at the bottom of the menu, choose Identity providers. In the User-defined section, choose OpenID Connect v1.0. Fill in the provider configuration as follows:
- RedirectURI: (pre-filled)
- Alias: auth0
- User discovery endpoint: On
- Discovery endpoint: https://<auth0-domain>/.well-known/openid-configuration
- Client authentication: Client secret sent as post
- Client ID: auth0-client-id
- Client Secret: auth0-client-secret
- Client assertion signature algorithm: Algorithm not specified (not required for the selected client authentication method)
Click on Add to continue the configuration. Click on Show Metadata and set https://<auth0-domain>/oidc/logout as the Logout URL. Below the Client Secret field, click on Advanced. In the Scopes field, set openid profile email offline_access and click on Save.
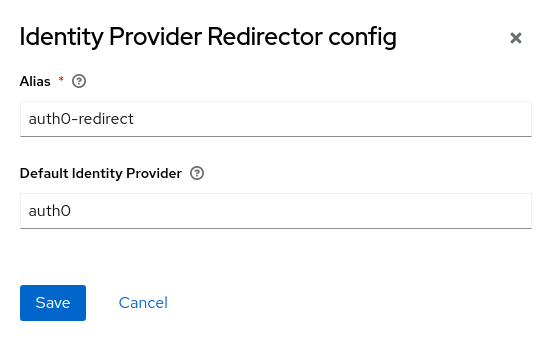
On the left menu, choose Authentication. In the flows table, choose browser. In the Identity Provider Redirector step, click the gear icon. Set an alias for the configuration, and set auth0 as the default identity provider. This configuration will skip the Keycloak sign-in form, and display the Auth0 sign-in form directly.
Go back to Authentication, and choose the first broker login flow. Disable the Review Profile step.
Map the roles claim
The users that sign in through Auth0 are imported to Keycloak. The role assigned in Auth0 must be mapped to the pre-configured roles in Keycloak for the authorization mechanism to work. In the Keycloak Administration Console, go to Identity providers again, and choose auth0. Then choose the Mappers tab. Click Add mapper. Fill in the values as follows and click Save:
- Name:
ROLE_USER - Sync mode override: Force (update the user roles during every login)
- Mapper type: Claim to Role
- Claim: https://www\.jhipster\.tech/roles (escape the dot
.with backslash\.) - Claim Value:
ROLE_USER - Role: Select
ROLE_USER
Repeat the process for mapping ROLE_ADMIN.

Test Keycloak as an identity broker
Navigate to http://gateway.demo.<public-ip>.nip.io. The gateway homepage should display. Click on sign in and you should be redirected to the Auth0 sign-in form:
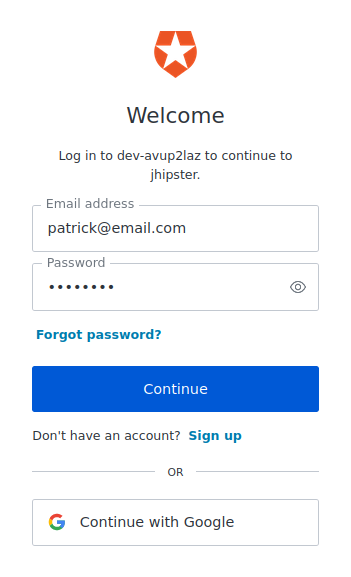
After signing in, the gateway home page will display the username (email). If roles were mapped correctly, the user should be able to create entities (granted by ROLE_USER), and the Administration menu will also display (granted by ROLE_ADMIN).
Recommended Practices for Keycloak in Production
When running Keycloak in a container, it can be started in development mode with the start-dev command or production mode with the start command, both available in the default container image. Production mode follows a secure by default principle and expects hostname and HTTPS/TLS configuration to be set, otherwise, Keycloak won't start and will display an error. Also, in production mode HTTP is disabled by default.
Keycloak documentation provides some key guidelines for production deployment that apply to all environments.
- HTTPS/TLS: The exchange of credentials and other sensitive data with Keycloak requires all communication to and from Keycloak to be secured. HTTP over TLS can be enabled by configuring Keycloak to load the required certificate infrastructure or by using a reverse proxy to keep a secure connection with clients while communicating with Keycloak using HTTP.
- Keycloak hostname: Keycloak usually runs in a private network but certain public-facing endpoints must be exposed to applications. The base URLs determine how tokens are issued and validated, how action links are created, and how the OpenID Connect Discovery Document
realms/{realm-name}/.well-known/openid-configurationis created. - Reverse proxy: A reverse proxy/load balancer component is recommended for a production environment, unifying access to the network. Keycloak supports multiple proxy modes. The
edgemode allows HTTP communication between the proxy and Keycloak, and the proxy keeps a secure connection with clients, using HTTPS/TLS. - Production grade database: The database plays a crucial role in the performance and Keycloak supports several production-grade databases, including PostgreSQL.
- High Availability: Choose multi-mode clustered deployment. In production mode, distributed caching of realm and session data is enabled and all nodes in the network are discovered.
Learn More about Keycloak in Production
I hope you enjoyed this post and learned about some best practices for deploying Keycloak to production when developing with JHipster. Keep learning about Keycloak and Spring Boot! Check out the following links:
- Full Stack Java with React, Spring Boot, and JHipster
- Micro Frontends for Java Microservices
- Build a Beautiful CRUD App with Spring Boot and Angular
- Integrate React Native and Spring Boot Securely
- Build Secure Ionic Apps with Angular and JHipster
Our Zero Index Developer Newsletter will keep you informed about the latest happenings in the Java security space. Subscribe today!
For more tutorials like this one, follow @oktadev on Twitter. We also have a YouTube channel you might like. If you have any questions, please leave a comment below!
About the author

Jimena Garbarino
Spring Cloud Developer