Application architectures have evolved very quickly during the latest few years. The classic monolithic architecture has been broken down into a collection of microservices to support a more dynamic development and deployment infrastructure. However, albeit its popularity, there are certain downsides to using a microservice architecture. Recently, a more granular breakdown of a distributed application components is becoming popular: nanoservices. Nanoservices aren't a replacement for microservices but are adept at addressing some of their shortcomings, and they can provide better isolation and granularity.
This article will introduce the nanoservice architecture and show how to create them with ASP.NET and Azure Functions.
From Monolithic to Nanoservice Architecture
A monolithic architecture comprises a collection of components that are built, deployed, scaled, and maintained as a single unit. Albeit the simplicity, it is extremely difficult to change, scale or maintain such applications. A monolithic application typically uses a homogenous technology platform. Building a monolith with heterogeneous technologies is extremely difficult. Over a while, a monolith can become highly complex to handle: operational agility, scalability, and maintainability can become a challenge. Microservice architecture evolved to address the shortcomings of monolithic architectures over the past few years. Microservices adoption has been on the rise primarily because of the quest for improved scalability, flexibility, and performance.
What is microservice architecture?
Microservice architecture is a service-oriented architecture (SOA) variant that builds an application comprising lightweight, loosely coupled, modular services. These services can execute on a wide variety of platforms and are independently developed, tested, deployed, and managed. Microservice architecture is easier to maintain, scale, and test because they are smaller and more focused than their predecessors. You can leverage microservice architecture to replace long-running, complex monolithic applications with significant resource and management overheads. The term microservice refers to the limited scope of functionality provided by the service rather than the length of the code used to create it.
The advent of nanoservice architecture
There is no precise definition of how big or small a microservice should be. Although microservice architecture can address a monolith's shortcomings, each microservice might grow large over a while. Microservice architecture is not suitable for applications of all types. Without proper planning, microservices can grow as large and cumbersome as the monolith they are meant to replace. A nanoservice is a small, self-contained, deployable, testable, and reusable component that breaks down a microservice into smaller pieces. A nanoservice, on the other hand, does not necessarily reflect an entire business function. Since they are smaller than microservices, different teams can work on multiple services at a given point in time. A nanoservice should perform one task only and expose it through an API endpoint. If you need your nanoservices to do more work for you, link them with other nanoservices. Nanoservices are not a replacement for microservices - they complement the shortcomings of microservices.
Benefits of nanoservice architecture
The advantages of using nanoservices are as follows:
- Lightweight. A nanoservice is much more focused than a microservice and is therefore much lighter.
- Security. The granular nature of nanoservices allows it to have its security protocol and be deployed independently of other nanoservices. As a result, you can isolate a nanoservice that handles sensitive data from another that doesn’t.
- Pure encapsulation. A nanoservice encapsulates business logic but is restricted to only one feature. The nanoservice can be called from anywhere provided you have the required permission to invoke it.
- Feedback loop. A nanoservice can collect data and metrics much the same way as a microservice, allowing for extensive metrics monitoring and tooling. The granular nature of nanoservices facilitates faster feedback loops – this allows for quick feedback loops, which can help you diagnose and resolve problems more quickly. You can also have constant feedback on how your nanoservice is performing in real-time.
Nanoservices vs. microservices
The words microservice and nanoservice tend to be synonymous, but there are subtle differences between them. While the former has evolved to address monoliths' shortcomings, the latter is an evolved form of microservice architecture and handles its complexities but is not a replacement. Nanoservice architecture is a good choice when your microservices become too large or if you need more flexibility and isolation than they can provide. Nanoservices have a limited scope than microservices, and they are typically at the functional level. You could construct a microservice out of nanoservices. Microservices outperform monoliths in several ways, and nanoservices are even better. You may use nanoservices to build the business logic once and encapsulate it within a serverless function allowing it to be reused. To design a robust, scalable architecture, you should use a combination of both microservice and nanoservice architecture to leverage the best of both worlds while at the same time eliminating the downsides of each.
Serverless computing and Azure Functions
The cloud's pledge of unlimited size, improved resource maintenance, and lower costs necessitated new ways of thinking about executing apps. Serverless computing is one such technology that has proliferated over the past few years. It allows you to quickly build and deploy software and services while removing the need to maintain the underlying infrastructure.
The nanoservices built in this article will leverage serverless technology by using Azure Functions. An Azure Function is essentially a piece of code that runs in the cloud, typically in a serverless environment designed to accelerate and simplify application development. It is a serverless compute service that allows one to run code on-demand without managing resources or hosting it on a server. In using Azure Functions, you would need to pay for serverless computing based on the amount of time your Azure Function has run. Azure Functions are a great way to building nanoservices - serverless with simple APIs. You can trigger an Azure Function using any event in Azure, using third-party services as well as any on-premise systems.
The ItemCheckOut Application
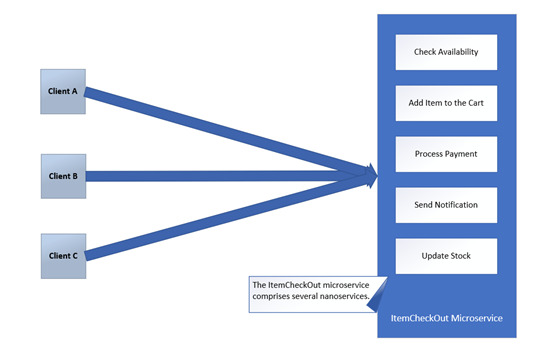
Let's put nanoservice concepts into practice by implementing a concrete example. Consider an item checkout process of an e-commerce application. Typically, the list of the steps you would have to follow is:
- Check if an item is available
- Add items to the Cart
- Process payment
- Send a confirmation email
- Update stock
Each of these steps corresponds to a nanoservice which can be implemented by a stand-alone serverless function. You can use Azure, AWS or Google Cloud, etc., to write your serverless function. In this article, we'll take advantage of Azure Functions to build and deploy our serverless functions. Together, these functions comprise the ItemCheckout microservice, as shown in the following picture.
Prerequisites
To execute the code examples shown in this article, here are the minimum requirements you should have installed in your system:
- .NET 5 SDK
- Visual Studio 2019
The application structure
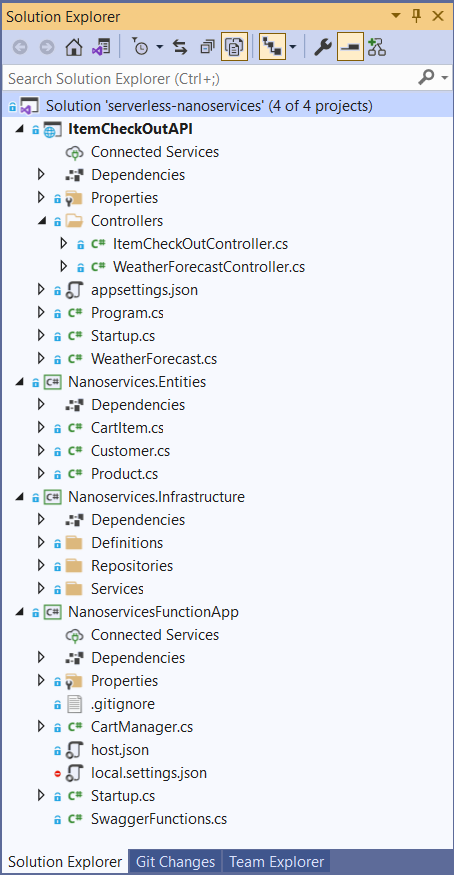
The application you are going to build will comprise four projects as part of a single Visual Studio solution:
ItemCheckOutAPI. This project contains the necessary code for invoking the nanoservices implemented as Azure Functions.Nanoservices.Entities. This project defines the classes used to represent the data.Nanoservices.Infrastructure. In this project, you'll define the infrastructure to store and operate on the data.NanoservicesFunctionApp. This project implements the actual nanoservices.
The following picture shows how the solution structure of the completed application will look like:
We'll be building each of these projects in the sections that follow.
The following are the dependencies of each of the four projects in this application:
Nanoservices.Entities-> NoneItemCheckOutAPI->Nanoservices.EntitiesNanoservices.Infrastructure->Nanoservices.EntitiesNanoservicesFunctionApp->Nanoservices.EntitiesandNanoservices.Infrastructure
The following dependency diagram illustrates these dependencies:

Implementing the ItemCheckOut Application
We'll follow the steps outlined below to build the ItemCheckOut application and deploy the nanoservices to Azure:
- Create the entity classes. In this step, you'll create the basic classes the application will manage.
- Create the repository infrastructure. In this step, you will define the classes responsible for handle data.
- Create the business logic component. This step implements the business logic of the microservice you are going to build.
- Register the dependencies. In this step, you prepare the connection between the components you've already created and the nanoservices you are going to create in the next step.
- Create the Azure Functions. Here, you will implement the actual nanoservices as Azure Functions.
- Deploy the Azure Functions. In this step, you will publish to Azure the nanoservices created in the previous step.
- Call the nanoservices. This step implements the microservice that invokes the nanoservices.
So, let's start.
Create the entity classes
To keep things simple, we’ll use just three entity classes, namely, CartItem, Customer, and Product. Create a class library project in Visual Studio and name it Nanoservices.Entities. Then, create a class file in this project named CartItem.cs with the following code:
// Nanoservices.Entities/CartItem.cs
using System;

namespace Nanoservices.Entities
{
    public class CartItem
    {
        public Guid Id { get; set; }
        public Guid Product_Id { get; set; }
        public Guid Customer_Id { get; set; }
        public int Number_Of_Items { get; set; }
        public DateTime Item_Added_On { get; set; }
    }
}
The CartItem class represents each item in the cart.
Add a new class file to the Nanoservices.Entities project named Customer.cs. This class will have the following code:
// Nanoservices.Entities/Customer.cs
using System;

namespace Nanoservices.Entities
{
    public class Customer
    {
        public Guid Id { get; set; }
        public string FirstName { get; set; }
        public string LastName { get; set; }
        public string EmailAddress { get; set; }
    }
}
Finally, add the Product.cs class file with this code:
// Nanoservices.Entities/Product.cs
using System;

namespace Nanoservices.Entities
{
    public class Product
    {
        public Guid Id { get; set; }
        public string Code { get; set; }
        public string Name { get; set; }
        public int Quantity_In_Stock { get; set; }
        public decimal Unit_Price { get; set; }
    }
}
Create the repository infrastructure
Create another class library project in the same solution named Nanoservices.Infrastructure. This project will contain the repository and the business logic classes and their interfaces. The Nanoservices.Infrastructure project has a dependency on the Nanoservices.Entities project you created in the previous step. So, add this dependency in Visual Studio.
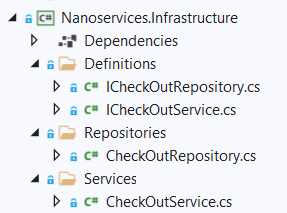
Now, create three solution folders in this project named Definitions, Repositories, and Services. The following picture provides you with a preview of how we are going to organize the files in this project:
For the sake of simplicity, we’ll not be using any database in this example. Applying the Repository Design Pattern, the sample data will reside in the CheckOutRepository class only.
Before creating that class, let’s first define an interface named ICheckOutRepository. In the Definitions folder, create a class file named ICheckOutRepository.cs with the following code in there:
// Nanoservices.Infrastructure/Definitions/ICheckOutRepository.cs
using Nanoservices.Entities;
using System.Collections.Generic;
using System.Threading.Tasks;

namespace Nanoservices.Infrastructure.Definitions
{
    public interface ICheckOutRepository
    {
        Task<List<CartItem>> GetAllCartItems();
        Task<List<Product>> GetAllProducts();
        Task<List<Customer>> GetAllCustomers();
        public Task<bool> IsItemAvailable(string productCode);
        public Task<bool> AddItemToCart(CartItem cartItem);
        public Task<bool> ProcessPayment(CartItem cartItem);
        public Task<bool> SendConfirmation(CartItem cartItem);
        public Task<bool> UpdateStock(CartItem cartItem);
    }
}
In the Repositories folder, create a CheckOutRepository.cs class file with the following code:
// Nanoservices.Infrastructure/Repositories/CheckOutRepository.cs
using Nanoservices.Entities;
using Nanoservices.Infrastructure.Definitions;
using System;
using System.Collections.Generic;
using System.Linq;
using System.Threading.Tasks;

namespace Nanoservices.Infrastructure.Repositories
{
    public class CheckOutRepository : ICheckOutRepository
    {
        private readonly List<Customer> customers = new List<Customer>();
        private readonly List<Product> products = new List<Product>();
        private readonly List<CartItem> cartItems = new List<CartItem>();
        public CheckOutRepository()
        {
            customers.Add(new Customer()
            {
                Id = Guid.NewGuid(),
                FirstName = "Joydip",
                LastName = "Kanjilal",
                EmailAddress = "joydipkanjilal@yahoo.com"
            });

            customers.Add(new Customer()
            {
                Id = Guid.NewGuid(),
                FirstName = "Steve",
                LastName = "Smith",
                EmailAddress = "stevesmith@yahoo.com"
            });

            products.Add(new Product
            {
                Id = Guid.NewGuid(),
                Code = "P0001",
                Name = "Lenovo Laptop",
                Quantity_In_Stock = 15,
                Unit_Price = 125000
            });

            products.Add(new Product
            {
                Id = Guid.NewGuid(),
                Code = "P0002",
                Name = "DELL Laptop",
                Quantity_In_Stock = 25,
                Unit_Price = 135000
            });

            products.Add(new Product
            {
                Id = Guid.NewGuid(),
                Code = "P0003",
                Name = "HP Laptop",
                Quantity_In_Stock = 20,
                Unit_Price = 115000
            });

            cartItems.Add(new CartItem()
            {
                Id = Guid.NewGuid(),
                Product_Id = products.Where(p => p.Code.Equals("P0001")).FirstOrDefault().Id,
                Customer_Id = customers.Where(c => c.FirstName == "Joydip").FirstOrDefault().Id,
                Number_Of_Items = 1,
                Item_Added_On = DateTime.Now
            });

            cartItems.Add(new CartItem()
            {
                Id = Guid.NewGuid(),
                Product_Id = products.Where(p => p.Code.Equals("P0003")).FirstOrDefault().Id,
                Customer_Id = customers.Where(c => c.FirstName == "Steve").FirstOrDefault().Id,
                Number_Of_Items = 10,
                Item_Added_On = DateTime.Now
            });

            cartItems.Add(new CartItem()
            {
                Id = Guid.NewGuid(),
                Product_Id = products.Where(p => p.Code.Equals("P0002")).FirstOrDefault().Id,
                Customer_Id = customers.Where(c => c.FirstName == "Joydip").FirstOrDefault().Id,
                Number_Of_Items = 5,
                Item_Added_On = DateTime.Now
            });
        }
        public Task<List<CartItem>> GetAllCartItems()
        {
            return Task.FromResult(cartItems);
        }
        public Task<List<Product>> GetAllProducts()
        {
            return Task.FromResult(products);
        }
        public Task<List<Customer>> GetAllCustomers()
        {
            return Task.FromResult(customers);
        }
        public Task<bool> AddItemToCart(CartItem cartItem)
        {
            cartItems.Add(cartItem);
            return Task.FromResult(true);
        }
        public Task<bool> IsItemAvailable(string productCode)
        {
            var p = products.Find(p => p.Code.Trim().Equals(productCode));

            if (p != null)
                return Task.FromResult(true);
            return Task.FromResult(false);
        }
        public Task<bool> ProcessPayment(CartItem cartItem)
        {
            var product = products.Where(c => c.Id == cartItem.Product_Id).FirstOrDefault();
            var totalPrice = product.Unit_Price * cartItem.Number_Of_Items;
            //Write code here to process payment for the purchase
            return Task.FromResult(true);
        }
        public Task<bool> SendConfirmation(CartItem cartItem)
        {
            var customer = customers.Where(c => c.Id == cartItem.Customer_Id).FirstOrDefault();
            //Write code here to send an email to the customer confirming the purchase
            return Task.FromResult(true);
        }
        public Task<bool> UpdateStock(CartItem cartItem)
        {
            var p = products.Find(p => p.Id == cartItem.Product_Id);
            p.Quantity_In_Stock--;
            return Task.FromResult(true);
        }
    }
}
The CheckOutRepository class implements the ICheckOutRepository interface, and its constructor adds some sample data to play with.
Create the business logic component
The business logic component of our microservice is responsible for providing its core functionalities. This being a minimal implementation of a microservices-based application together with its nanoservices, you wouldn't actually have any business logic as such in this component. In our case, it will act as a passthrough between the CartManager class we will implement in a later section and the repository.
Let's first create the service interface. In the Definitions solution folder of the Nanoservices.Infrastructure project, create a class file named ICheckOutService.cs with the following code in there:
// Nanoservices.Infrastructure/Definitions/ICheckOutService.cs
using Nanoservices.Entities;
using System.Collections.Generic;
using System.Threading.Tasks;

namespace Nanoservices.Infrastructure.Definitions
{
    public interface ICheckOutService
    {
        public Task<List<CartItem>> GetAllCartItems();
        public Task<List<Product>> GetAllProducts();
        public Task<List<Customer>> GetAllCustomers();
        public Task<bool> IsItemAvailable(string productCode);
        public Task<bool> AddItemToCart(CartItem cartItem);
        public Task<bool> ProcessPayment(CartItem cartItem);
        public Task<bool> SendConfirmation(CartItem cartItem);
        public Task<bool> UpdateStock(CartItem cartItem);
    }
}
The ICheckOutService interface contains the signature of all the operations that correspond to a nanoservice. Next, create a class named CheckOutService in a file named CheckOutService.cs inside the Services solution folder of the Nanoservices.Infrastructure project with the following code in there:
// Nanoservices.Infrastructure/Services/ICheckOutService.cs
using Nanoservices.Entities;
using Nanoservices.Infrastructure.Definitions;
using System.Collections.Generic;
using System.Threading.Tasks;

namespace Nanoservices.Infrastructure.Services
{
    public class CheckOutService : ICheckOutService
    {
        private readonly ICheckOutRepository _repository;
        public CheckOutService(ICheckOutRepository repository)
        {
            _repository = repository;
        }
        public Task<List<CartItem>> GetAllCartItems()
        {
            return _repository.GetAllCartItems();
        }
        public Task<List<Product>> GetAllProducts()
        {
            return _repository.GetAllProducts();
        }
        public Task<List<Customer>> GetAllCustomers()
        {
            return _repository.GetAllCustomers();
        }
        public Task<bool> AddItemToCart(CartItem cartItem)
        {
            return _repository.AddItemToCart(cartItem);
        }
        public Task<bool> IsItemAvailable(string productCode)
        {
            return _repository.IsItemAvailable(productCode);
        }
        public Task<bool> ProcessPayment(CartItem cartItem)
        {
            return _repository.ProcessPayment(cartItem);
        }
        public Task<bool> SendConfirmation(CartItem cartItem)
        {
            return _repository.SendConfirmation(cartItem);
        }
        public Task<bool> UpdateStock(CartItem cartItem)
        {
            return _repository.UpdateStock(cartItem);
        }
    }
}
Create an Azure Functions project in Visual Studio
Assuming you already have an Azure account, we'll examine how to build and deploy Azure Functions. You can create an Azure Function either from the Azure Portal or Visual Studio. In this article, we'll create and deploy Azure Functions using Visual Studio 2019.
Follow the steps outlined below to create an Azure Function in Visual Studio 2019.
From within the Visual Studio IDE, right-click on your solution in the Solution Explorer window and select Add->New Project.
In the "Add New Project" window, select "Azure Functions" as the project template.
Click "Next".
In the "Configure your new project" window, specify the name and location for your Azure Functions Project. Use
NanoservicesFunctionAppas the name for the projectClick "Create".
In the "Create a new Azure Functions application" window, select "Http Trigger" as the trigger to be used. Look at the following picture as a reference:

Select the "Storage account" as "None" as we'll not be using one here.
Select "Authorization level" as "Anonymous".
Click "Create".
A new Http-triggered Azure Function project will be created. By default, a file named Function1.cs will be created with the code of a default function for your reference. Now, delete this file as we don't need it in our application. We'll create our own Azure Functions shortly.
Register the dependencies
ASP.NET Core provides built-in support for the dependency injection (DI) design pattern. DI enables you to achieve Inversion of Control (IoC) between classes and their dependencies and helps in creating loosely-coupled components and writing maintainable code. ASP.NET Core provides a built-in service container named IServiceProvider. You should register your dependencies with the service container in the ConfigureServices method of the Startup class in your application.
To learn more on dependency injection in .NET, check out this article.
Azure Functions support dependency injection as well. Let's explore how to enable it in this project.
As the first step, install the Microsoft.Azure.Functions.Extensions package in this project by using the NuGet package manager. Then, add the NanoServices.Infrastructure project as a dependency in this project.
Now, add a class file named Startup.cs to your Azure Function project with the following code in there:
// NanoservicesFunctionApp/Startup.cs
using Microsoft.Azure.Functions.Extensions.DependencyInjection;
using Microsoft.Extensions.DependencyInjection;
using Nanoservices.Infrastructure.Definitions;
using Nanoservices.Infrastructure.Repositories;
using Nanoservices.Infrastructure.Services;

[assembly: FunctionsStartup(typeof(NanoservicesFunctionApp.Startup))]

namespace NanoservicesFunctionApp
{
    public class Startup : FunctionsStartup
    {
        public override void Configure(IFunctionsHostBuilder builder)
        {
            builder.Services.AddScoped<ICheckOutRepository, CheckOutRepository>();
            builder.Services.AddScoped<ICheckOutService, CheckOutService>();
        }
    }
}
The FunctionsStartup assembly attribute indicates the type name to be used during startup.
The Startup class extends the FunctionsStartup base class. Within its Configure method, you register the needed dependencies through the AddScoped method.
Create the Azure Functions
In this section, you'll create the Azure Functions that implement the nanoservices. These functions will be invoked based on an HTTP request, hence the name HTTP-triggered Azure Functions. You can learn more on HTTP-triggered Azure Functions from here.
Now, create a file named CartManager.cs in the root of the NanoservicesFunctionApp project with the following code in there:
// NanoservicesFunctionApp/CartManager.cs
using Microsoft.AspNetCore.Http;
using Microsoft.AspNetCore.Mvc;
using Microsoft.Azure.WebJobs;
using Microsoft.Azure.WebJobs.Extensions.Http;
using Microsoft.Extensions.Logging;
using Nanoservices.Entities;
using Nanoservices.Infrastructure.Definitions;
using Newtonsoft.Json;
using System.Net.Http;
using System.Threading.Tasks;
using System.Web.Http;

namespace NanoservicesFunctionApp
{
    public class CartManager
    {
        private readonly ICheckOutService _checkoutService;
        public CartManager(ICheckOutService checkoutService)
        {
            _checkoutService = checkoutService;
        }
    }
}
We'll now create all our Azure Functions one by one as methods of the CartManager class.
The IsItemAvailable Azure Function
This function checks if an item is available for purchase and returns true if it is available, false otherwise. The following code snippet illustrates the IsItemAvailable method to add to the CartManager class:
[FunctionName("IsItemAvailable")]
public async Task<IActionResult> IsItemAvailable(
    [HttpTrigger(AuthorizationLevel.Anonymous, "get", "post", Route = null)]
    HttpRequest req, ILogger log)
{
    string productCode = req.Query["productcode"];
    return new OkObjectResult(await _checkoutService.IsItemAvailable(productCode));
}
The GetAllCartItems Azure Function
This function returns a list of all cart items. The following code snippet illustrates the GetAllCartItems implementation:
[FunctionName("GetAllCartItems")]
public async Task<IActionResult> GetAllCartItems(
    [HttpTrigger(AuthorizationLevel.Anonymous, "get", "post", Route = null)]
    HttpRequest req, ILogger log)
{
    return new OkObjectResult(await _checkoutService.GetAllCartItems());
}
The GetAllCustomers Azure Function
The GetAllCustomers function retrieves all customer records. The following code snippet illustrates this function:
[FunctionName("GetAllCustomers")]
public async Task<IActionResult> GetAllCustomers(
    [HttpTrigger(AuthorizationLevel.Anonymous, "get", "post", Route = null)]
    HttpRequest req, ILogger log)
{
    return new OkObjectResult(await _checkoutService.GetAllCustomers());
}
The GetAllProducts Azure Function
The GetAllProducts function returns a list of all available products:
[FunctionName("GetAllProducts")]
public async Task<IActionResult> GetAllProducts(
    [HttpTrigger(AuthorizationLevel.Anonymous, "get", "post", Route = null)]
    HttpRequest req, ILogger log)
{
    return new OkObjectResult(await _checkoutService.GetAllProducts());
}
The AddItemToCart Azure Function
This function is used to add items to the cart. The following is the source code of the AddItemToCart Azure Function:
[FunctionName("AddItemToCart")]
public async Task<IActionResult> AddItemToCart(
    [HttpTrigger(AuthorizationLevel.Anonymous, "get", "post", Route = null)]
    HttpRequestMessage req, ILogger log)
{
    string jsonContent = await req.Content.ReadAsStringAsync();
    if (string.IsNullOrEmpty(jsonContent))
    {
        return new BadRequestErrorMessageResult("Invalid input.");
    }

    CartItem cartItem = JsonConvert.DeserializeObject<CartItem>(jsonContent);
    return new OkObjectResult(await _checkoutService.AddItemToCart(cartItem));
}
The UpdateStock Azure Function
The UpdateStock function is used to update the stock of items. The following is the source code of this Azure Function:
[FunctionName("UpdateStock")]
public async Task<IActionResult> UpdateStock(
    [HttpTrigger(AuthorizationLevel.Anonymous, "get", "put", Route = null)]
    HttpRequestMessage req, ILogger log)
{
    string jsonContent = await req.Content.ReadAsStringAsync();
    if (string.IsNullOrEmpty(jsonContent))
    {
        return new BadRequestErrorMessageResult("Invalid input.");
    }

    CartItem cartItem = JsonConvert.DeserializeObject<CartItem>(jsonContent);
    return new OkObjectResult(await _checkoutService.UpdateStock(cartItem));
}
The CartManager class
The complete source code of the CartManager.cs file is given below for your reference:
// NanoservicesFunctionApp/CartManager.cs
using Microsoft.AspNetCore.Http;
using Microsoft.AspNetCore.Mvc;
using Microsoft.Azure.WebJobs;
using Microsoft.Azure.WebJobs.Extensions.Http;
using Microsoft.Extensions.Logging;
using Nanoservices.Entities;
using Nanoservices.Infrastructure.Definitions;
using Newtonsoft.Json;
using System.Net.Http;
using System.Threading.Tasks;
using System.Web.Http;

namespace NanoservicesFunctionApp
{
    public class CartManager
    {
        private readonly ICheckOutService _checkoutService;
        public CartManager(ICheckOutService checkoutService)
        {
            _checkoutService = checkoutService;
        }

        [FunctionName("IsItemAvailable")]
        public async Task<IActionResult> IsItemAvailable(
            [HttpTrigger(AuthorizationLevel.Anonymous, "get", "post", Route = null)]
            HttpRequest req, ILogger log)
        {
            string productCode = req.Query["productcode"];
            return new OkObjectResult(await _checkoutService.IsItemAvailable(productCode));
        }

        [FunctionName("GetAllCartItems")]
        public async Task<IActionResult> GetAllCartItems(
            [HttpTrigger(AuthorizationLevel.Anonymous, "get", "post", Route = null)]
            HttpRequest req, ILogger log)
        {
            return new OkObjectResult(await _checkoutService.GetAllCartItems());
        }

        [FunctionName("GetAllCustomers")]
        public async Task<IActionResult> GetAllCustomers(
            [HttpTrigger(AuthorizationLevel.Anonymous, "get", "post", Route = null)]
            HttpRequest req, ILogger log)
        {
            return new OkObjectResult(await _checkoutService.GetAllCustomers());
        }

        [FunctionName("GetAllProducts")]
        public async Task<IActionResult> GetAllProducts(
            [HttpTrigger(AuthorizationLevel.Anonymous, "get", "post", Route = null)]
            HttpRequest req, ILogger log)
        {
            return new OkObjectResult(await _checkoutService.GetAllProducts());
        }

        [FunctionName("UpdateStock")]
        public async Task<IActionResult> UpdateStock(
           [HttpTrigger(AuthorizationLevel.Anonymous, "get", "put", Route = null)]
            HttpRequestMessage req, ILogger log)
        {
            string jsonContent = await req.Content.ReadAsStringAsync();
            if (string.IsNullOrEmpty(jsonContent))
            {
                return new BadRequestErrorMessageResult("Invalid input.");
            }

            CartItem cartItem = JsonConvert.DeserializeObject<CartItem>(jsonContent);
            return new OkObjectResult(await _checkoutService.UpdateStock(cartItem));
        }

        [FunctionName("AddItemToCart")]
        public async Task<IActionResult> AddItemToCart(
           [HttpTrigger(AuthorizationLevel.Anonymous, "get", "post", Route = null)]
            HttpRequestMessage req, ILogger log)
        {
            string jsonContent = await req.Content.ReadAsStringAsync();
            if (string.IsNullOrEmpty(jsonContent))
            {
                return new BadRequestErrorMessageResult("Invalid input.");
            }

            CartItem cartItem = JsonConvert.DeserializeObject<CartItem>(jsonContent);
            return new OkObjectResult(await _checkoutService.AddItemToCart(cartItem));
        }
    }
}
Deploy the Azure Functions
To deploy the Azure Functions we created earlier, follow the steps outlined below:
Right-click on the
NanoservicesFunctionAppproject in the Solution Explorer window and click Publish.In the Publish window that appears, select Azure (it is the default) as the publishing target since we'll be hosting our Nanoservice in the Azure cloud platform. See the following picture for reference:
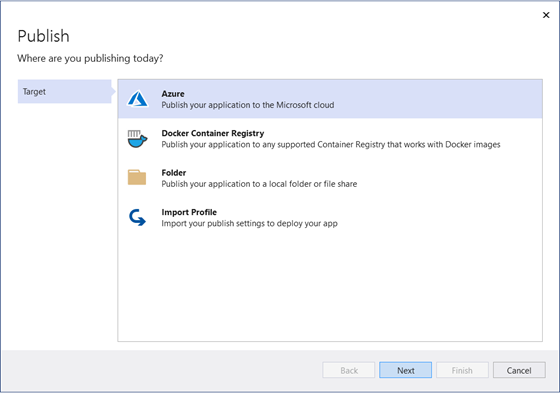
Click Next.
Now, specify "Azure Functions App (Windows)" as the target (this is the default) to host the application:

Click Next.
Lastly, specify the Subscription name, View, and the
FunctionAppto be used. Since you don't have aFunctionAppalready created, you can create a new one by clicking on the + symbol. Specify the name of theFunctionAppasNanoservicesFunctionApp.Click Finish.
Check if the Settings and Hosting information is correct:
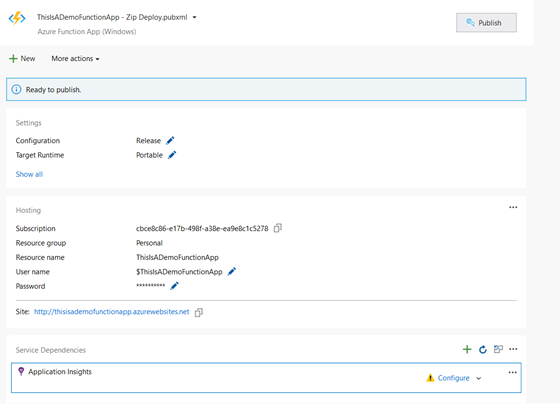
Click Publish to complete the process.
Once your Azure Function has been published, you can consume it in your application much the same way you consume any other service using HttpClient.
Testing the Azure Functions
So far, so good. Since the nanoservices are deployed in the Azure environment, you can test them from within the Azure Portal itself. To test the Azure Functions, follow the steps outlined below:
- Log in to the Azure Portal (skip this step if you're already logged in).
- In the Home screen, click on
FunctionApp. - In the
FunctionAppscreen, click onNanoservicesFunctionAppsince it is theFunctionAppwe would like to test. - In the next screen, click on Functions to list each of the Azure Functions of the
FunctionApp - Click on the
GetAllCustomersAzure Function to test it. - In the next screen, click Code + Test.
- Now, click on Test/Run.
- Next, specify the HTTP method and, optionally, the key. (Function keys or function access keys provide a default security mechanism to access Azure Functions.)
- Click Run to execute the Azure Function.
Here's how the output would look like:

Call the Nanoservices from an ASP.NET Core Web API Application
To complete the application, we need to create the ItemCheckOutAPI microservice, which will consume the nanoservices published on Azure. For this purpose, follow the steps mentioned below in your Visual Studio instance opened on the solution we are working on:
- From within the Visual Studio IDE, right-click on your solution in the Solution Explorer window and select Add->New Project.
- From the “Add New Project” window, select "ASP.NET Core Web API" as the project template and click Next.
- From the “Configure your new project” window, specify the name of the project as
ItemCheckOutAPIand click Next. - Specify .NET 5 as the target framework you would like to use.
- Make sure that the "Enable OpenAPI support" checkbox is checked.
- Make sure that the "Configure for HTTPS" checkbox is checked, but the "Enable Docker" checkbox is unchecked.
- Click Create to complete the process.
Build the ItemCheckOut microservice
We'll now build our minimalistic microservice. It will implement action methods that correspond to each operation of the item checkout process we discussed earlier. Each of these action methods would wrap the calls to the serverless functions we created earlier.
Before starting to code, add a reference to the Nanoservices.Entities project.
Now, in the Controllers folder, create an API controller named ItemCheckOutController and replace the default code with the following:
// ItemCheckOutAPI/Controllers/ItemCheckOutController.cs
using Microsoft.AspNetCore.Mvc;
using Microsoft.Extensions.Configuration;
using Nanoservices.Entities;
using Newtonsoft.Json;
using System.Collections.Generic;
using System.Net.Http;
using System.Text;
using System.Threading.Tasks;

namespace ItemCheckOutAPI.Controllers
{
    [Route("api/[controller]")]
    [ApiController]
    public class ItemCheckOutController : ControllerBase
    {
        private readonly string baseURL;
        private readonly IConfiguration _configuration;
        public ItemCheckOutController(IConfiguration configuration)
        {
            _configuration = configuration;
            baseURL = _configuration.GetSection("MyAppSettings").GetSection("AzureFunctionURL").Value;
        }

        [HttpGet("IsItemAvailable")]
        public async Task<bool> IsItemAvailable(string productCode)
        {
            return await IsItemAvailableInternal(productCode);
        }

        [HttpGet("GetAllCartItems")]
        public async Task<List<CartItem>> GetAllCartItems()
        {
            return await GetAllCartItemsInternal();
        }

        [HttpGet("GetAllProducts")]
        public async Task<List<Product>> GetAllProducts()
        {
            return await GetAllProductsInternal();
        }

        [HttpGet("GetAllCustomers")]
        public async Task<List<Customer>> GetAllCustomers()
        {
            return await GetAllCustomersInternal();
        }

        [HttpPost("AddItemToCart")]
        public async Task<bool> AddItemToCart([FromBody] CartItem cartItem)
        {
            return await AddItemToCartInternal(cartItem);
        }

        [HttpPost("ProcessPayment")]
        public async Task<bool> ProcessPayment([FromBody] CartItem cart)
        {
            return await Task.FromResult(true);
        }

        [HttpPost("SendConfirmation")]
        public async Task<bool> SendConfirmation([FromBody] CartItem cartItem)
        {
            return await Task.FromResult(true);
        }

        [HttpPut("UpdateStock")]
        public async Task<bool> UpdateStock([FromBody] CartItem cartItem)
        {
            return await UpdateStockInternal(cartItem);
        }
        private async Task<bool> IsItemAvailableInternal(string productCode)
        {
            string azureFunctionBaseUrl = baseURL + "IsItemAvailable";
            string queryStringParams = $"?productCode={productCode}";
            string url = azureFunctionBaseUrl + queryStringParams;
            using (HttpClient client = new HttpClient())
            {
                using (HttpResponseMessage responseMessage = await client.GetAsync(url))
                {
                    using (HttpContent content = responseMessage.Content)
                    {
                        string data = await content.ReadAsStringAsync();
                        if (data != null)
                            return bool.Parse(data);
                        return false;
                    }
                }
            }
        }
        private async Task<bool> AddItemToCartInternal(CartItem cartItem)
        {
            string url = baseURL + "AddItemToCart";
            var json = JsonConvert.SerializeObject(cartItem);
            var data = new StringContent(json, Encoding.UTF8, "application/json");

            using (HttpClient client = new HttpClient())
            {
                var response = await client.PostAsync(url, data);
            }

            return true;
        }
        private async Task<bool> UpdateStockInternal(CartItem cartItem)
        {
            string azureFunctionBaseUrl = baseURL + "UpdateStock";
            string url = azureFunctionBaseUrl;

            var json = JsonConvert.SerializeObject(cartItem);
            var data = new StringContent(json, Encoding.UTF8, "application/json");

            using (HttpClient client = new HttpClient())
            {
                var response = await client.PutAsync(url, data);
            }

            return true;
        }
        private async Task<List<CartItem>> GetAllCartItemsInternal()
        {
            string url = baseURL + "GetAllCartItems";
            using (HttpClient client = new HttpClient())
            {
                using (HttpResponseMessage responseMessage = await client.GetAsync(url))
                {
                    using (HttpContent content = responseMessage.Content)
                    {
                        string data = await content.ReadAsStringAsync();
                        return JsonConvert.DeserializeObject<List<CartItem>>(data);
                    }
                }
            }
        }
        private async Task<List<Product>> GetAllProductsInternal()
        {
            string url = baseURL + "GetAllProducts";
            using (HttpClient client = new HttpClient())
            {
                using (HttpResponseMessage responseMessage = await client.GetAsync(url))
                {
                    using (HttpContent content = responseMessage.Content)
                    {
                        string data = await content.ReadAsStringAsync();
                        return JsonConvert.DeserializeObject<List<Product>>(data);
                    }
                }
            }
        }
        private async Task<List<Customer>> GetAllCustomersInternal()
        {
            string url = baseURL + "GetAllCustomers";
            using (HttpClient client = new HttpClient())
            {
                using (HttpResponseMessage responseMessage = await client.GetAsync(url))
                {
                    using (HttpContent content = responseMessage.Content)
                    {
                        string data = await content.ReadAsStringAsync();
                        return JsonConvert.DeserializeObject<List<Customer>>(data);
                    }
                }
            }
        }
    }
}
Call the Azure Functions from the API Methods
Each of the action methods of the ItemCheckOutController class corresponds to a nanoservice we’ve implemented using Azure Functions earlier. Note that the methods of the ItemCheckOutController class having the “Internal” suffix are private. These are the methods that will actually communicate with the Azure Functions.
As an example, the following code snippet shows how the ASP.NET Core Web API calls the Azure Function. The IsItemAvailableInternal method accepts the product code as a parameter and returns true or false depending on whether or not the product is available for purchase.
private async Task<bool> IsItemAvailableInternal(string productCode)
{
    string azureFunctionBaseUrl = baseURL + "IsItemAvailable";
    string queryStringParams = $"?productCode={productCode}";
    string url = azureFunctionBaseUrl + queryStringParams;
    using (HttpClient client = new HttpClient())
    {
        using (HttpResponseMessage responseMessage = await client.GetAsync(url))
        {
            using (HttpContent content = responseMessage.Content)
            {
                string data = await content.ReadAsStringAsync();
                if (data != null)
                    return bool.Parse(data);
                return false;
            }
        }
    }
}
The other private methods follow the pattern shown above.
Use Swagger UI to Test the ItemCheckOut Application
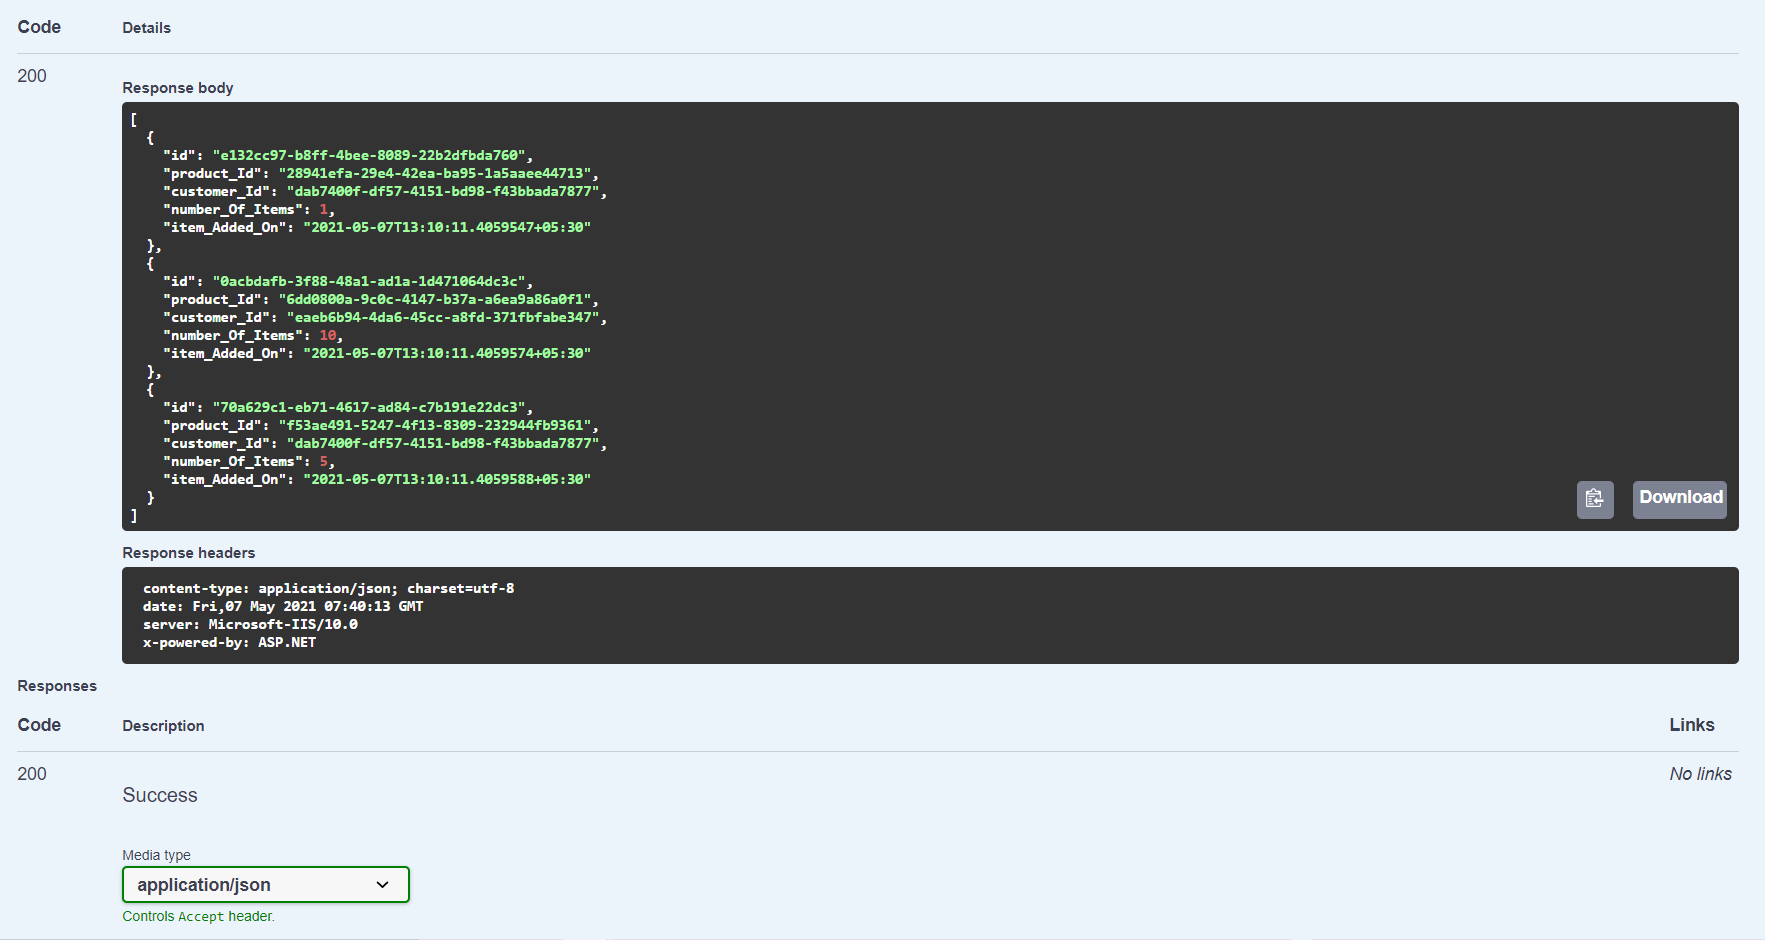
Now that the nanoservices are already published in Azure, you can run the ItemCheckOutAPI microservice application and then invoke the API endpoints using Swagger UI with your browser. Swagger is available in your ASP.NET application thanks to the integrated OpenAPI support.
The following picture shows the output of the GetAllCartItems API endpoint called using Swagger UI:
Nanoservices: The Future
Microservices evolved to address the flaws of traditional monolithic architecture. Nanoservices are essentially extra-small microservices with a narrower scope and are more focused and driven by serverless computing. Although nanoservices are adept at addressing the shortcomings of microservice architecture, they have their own set of issues and challenges.
Nanoservice technology is not quite there yet, but with serverless computing and serverless solutions getting cheaper day by day, it is all set to be the technology of choice for building high-performant and scalable applications for quite some time. It will find its place in this envisioned ubiquitous world where new technologies and architectures suffice the constantly changing business world's needs.
The era of extra-small microservices powered by serverless computing is inevitable. For example, BBC's website is a real-world application of nanoservices used to render dynamic web pages, generate the headline, retrieve weather information, and update cricket match scores, among other things.
The complete source code of the ItemCheckOut application built throughout this article is available here.
About the author

Joydip Kanjilal
Software Architect and Advisor
