TL;DR Learn how to manage your application and Auth0 configuration using HashiCorp Terraform and the infrastructure-as-code paradigm.
What is HashiCorp Terraform?
You may have heard the phrase "infrastructure as code" (IaC) before — as a category, the term describes the practice of managing infrastructure through configuration files. The primary benefit of IaC is in alleviating pain points that come from maintaining your cloud infrastructure, especially as your application and environments grow in complexity and requirements.
Terraform is an orchestration tool in the IaC paradigm for managing, deploying, and scaling cloud infrastructure. This infrastructure can include both public and private cloud offerings, software, and services.
Terraform provides several benefits:
- A scalable and modular system for managing your cloud resources
- A straightforward and flexible configuration language
- Cloud and on-premises offerings to scale up usage across teams.
So how does Auth0 fit into this picture? Well, with the Auth0 Provider, your Auth0 configurations can be managed entirely using Terraform. Rather than working through the UI, your Auth0 applications, APIs, and more can be created, updated, and managed through code and Terraform's CLI.
This post will walk you through using Terraform to manage a web application, including creating and configuring various Auth0 resources.
Prerequisites and Pre-Existing Code
There are a few things you'll need to get started with this tutorial:
- An Auth0 Account. You can sign up for a free Auth0 account here.
- Docker Desktop and a Docker Hub account. The sample application is a containerized Express application, so before you get started, you'll need Docker set up on your local machine. Check out Docker's Getting Started page for more information on installing Docker, and if you're unfamiliar with containerized applications, they also feature a quick intro to container concepts.
- Terraform! Terraform's documentation contains installation instructions. Alternatively, you can use tfenv, a version manager that handles downloading the right version for you.
To keep things moving, you'll be starting with a prebuilt Express application, running on Docker, that you'll be using in this tutorial. You can find the code in this GitHub repository. Clone or download the repository and open the project in your favorite text editor.
The application is based on the Auth0 Express Quickstart application. The home page contains a link to log in; when the user signs in, they'll be redirected to a user page that shows a list of permissions associated with their access token. Some users will be designated as administrators and will have more permissions, whereas basic users will have a single permission. You'll create a default admin user and configure the role and permissions as part of the tutorial.
Setting Up an Application
Note: The command line examples in this article assume you have a Unix-like Operating System (Linux, macOS, etc.). Terraform and Docker both work with Windows, and you can easily adapt them to fit your OS; consult the Docker or Terraform documentation if you're stuck.
Here are the quick instructions to get set up for development (these can also be found in the project README):
$ git clone git@github.com:auth0-blog/terraform-secure-express-example
$ cd terraform-secure-express-example
$ npm install
$ docker build . -t terraform-secure-express:1.0
To verify that the image built correctly, run the following command:
$ docker run --name terraform-secure-express -p 3000:3000 terraform-secure-express:1.0
You should see the following error in your console:
$ docker run --name terraform-secure-express -p 3000:3000  terraform-secure-express:1.0

/app/node_modules/passport-auth0/lib/index.js:39
      throw new Error('You must provide the ' + k + ' configuration value to use passport-auth0.');
      ^

Error: You must provide the domain configuration value to use passport-auth0.
    at /app/node_modules/passport-auth0/lib/index.js:39:13
    ...
This error means that the Auth0 credentials for this application — Client ID, Client Secret, and domain name — haven't been set in the container yet.
One of your first actions using the Auth0 Terraform provider will be to create and set those credentials. For now, you can remove the Docker container:
$ docker container rm terraform-secure-express
You're back to a clean slate and ready to get started with Terraform!
Adding Terraform Configuration
Terraform's interface for describing infrastructure comes in the form of configuration files. The configuration uses Hashicorp Configuration Language (HCL), a configuration language that (as the name suggests) is defined by Hashicorp. Terraform configuration files are the 'code' in Terraform's infrastructure-as-code paradigm — they're intended to be checked into version control and evolve incrementally.
To get started with adding Terraform to your application, you'll create a configuration file that will control deploying a local instance of your Docker app. Create a new file in the application directory called main.tf, then open the file in your text editor of choice and add the following to it:
resource "docker_image" "terraform-secure-express" {
  name = "terraform-secure-express:1.0"
}
And that's it! You've described your first piece of infrastructure using a resource. Resources are one of the core concepts in Terraform configuration. Each resource block in your configuration files describes an object in your infrastructure. Let's break down this resource block to explore it further:
resource "docker_image" "terraform-secure-express" {
  # ...
}
A resource block is defined with a type — docker_image in this case — and a unique name like "terraform-secure-express" The name is only relevant within your configuration module and doesn't mean anything to the infrastructure object itself. This unique type-name tuple allows you to reference this resource in other blocks elsewhere in your configuration, which you'll see later in the tutorial.
The lines of configuration inside the resource block are arguments — further configuration options for the infrastructure node. The exact options available depends on the type of resource. In your docker_image block, you've only got one argument, name:
name = "terraform-secure-express:1.0"
This argument sets the name and version number of the Docker image that your infrastructure requires.
When Terraform runs, this block is saying (more or less): "I need the terraform-secure-express docker image, and make sure it's version 1.0." Terraform can then communicate with your local Docker Registry to ensure that the correct image is present. Terraform is a declarative tool. You define the output, and the providers make sure to reach the desired state by calling the required APIs. That's the fundamental difference compared to scripts that provision infrastructure imperatively.
Tip: Terraform can work with remote Docker Registries, but that's out of scope for this tutorial.
So far, so good. If you were to run Terraform now, it would complete successfully, though you wouldn't see anything — your described infrastructure just contains a Docker image, not an actual running container. To configure your container, you'll need a docker_container resource in your main.tf file:
resource "docker_container" "terraform-secure-express" {
  image = docker_image.terraform-secure-express.latest
  name  = "terraform-secure-express"
  ports {
    internal = 3000
    external = 3000
  }
}
Some of the resource arguments in docker_container should be self-explanatory if you're familiar with Docker: name will set the name of the container once running, for example, and the ports argument indicates port mapping that Terraform should perform as it starts up the Docker container.
One important thing to notice is that the image argument references your previously defined docker_image resource: docker_image.terraform-secure-express.latest. This reference is an attribute that your docker_image resource exposes, allowing you to use the ID of the docker image described by that resource. Attributes follow the pattern of [RESOURCE_TYPE].[RESOURCE_NAME].[ATTRIBUTE_NAME] when referenced.
You'll encounter a number of these exported attributes later on in the tutorial. Attributes are a powerful feature of Terraform — using them, you can easily pass properties between resources to describe your interconnected infrastructure nodes. Terraform uses these dependencies to figure out the order in which the resources need to be provisioned.
With those two resources in place, you should now be able to spin up your Docker container using Terraform! To do this, run the following command in the CLI:
$ terraform init
This command gets your Terraform environment ready to go, installing any plugins and providers required for your configuration.
Sometimes, you'll want to see what Terraform is going to do before it does it. To see this, you can run terraform plan, which will describe the changes, additions, and deletions that Terraform will perform during its run. Feel free to run it to get a preview of the next step!
Finally, it's time for Terraform to get to work. Run the following command:
$ terraform apply
The output from this command should look the same as what you saw if you ran terraform plan. This time, though, you'll be prompted to confirm that you want the actions performed:
Plan: 2 to add, 0 to change, 0 to destroy.

Do you want to perform these actions?
  Terraform will perform the actions described above.
  Only 'yes' will be accepted to approve.

  Enter a value:
Type yes and hit enter, and Terraform takes care of the rest! You'll see a confirmation message once it creates the resources. Most Terraform providers are idempotent. Running terraform apply doesn't have any additional effect once the infrastructure is there.
You're now managing your app's infrastructure via Terraform! However, the application still isn't working because you haven't yet created an Auth0 Application and passed the client credentials into the app container. In the next section, you'll be creating this Application using Terraform via the Auth0 Provider.
A Note on Providers
So far, your Terraform configuration is using two different resource types to build out your infrastructure. But where are those resource types defined? Can you change the default behaviors that the resource performs, for example, or set common credentials for resources that interact with a given cloud provider?
The answer is yes, through Terraform Providers. In a way, Providers are the layer above resources — they define resource types, how resources behave, and what arguments are available when you describe a resource in your configuration. They also provide configuration options themselves, which change the behavior of all resource types defined by the provider.
In your configuration, both of the resource types used in the previous section (docker_image and docker_container) are defined by the docker Provider. The Docker Provider allows you to configure things like the address to the Docker host, as well as authentication credentials to one or more Docker registries.
Some providers — again, like Docker — don't require any arguments to be provided if you want everything to behave in a "default" manner. You simply define a resource block, like you've been doing already, and you're good to go. Since resource types are unique, Terraform can perform a lookup to download the correct provider during the init phase. You saw the console output of the download phase when you ran terraform init in the earlier step! You'll see later in this tutorial how to provide additional configuration to a Provider.
In the next section, you'll add the Auth0 Provider to your configuration and use it to create a new Auth0 Client application.
Create an Auth0 client using HashiCorp Terraform
Create a Machine to Machine Application
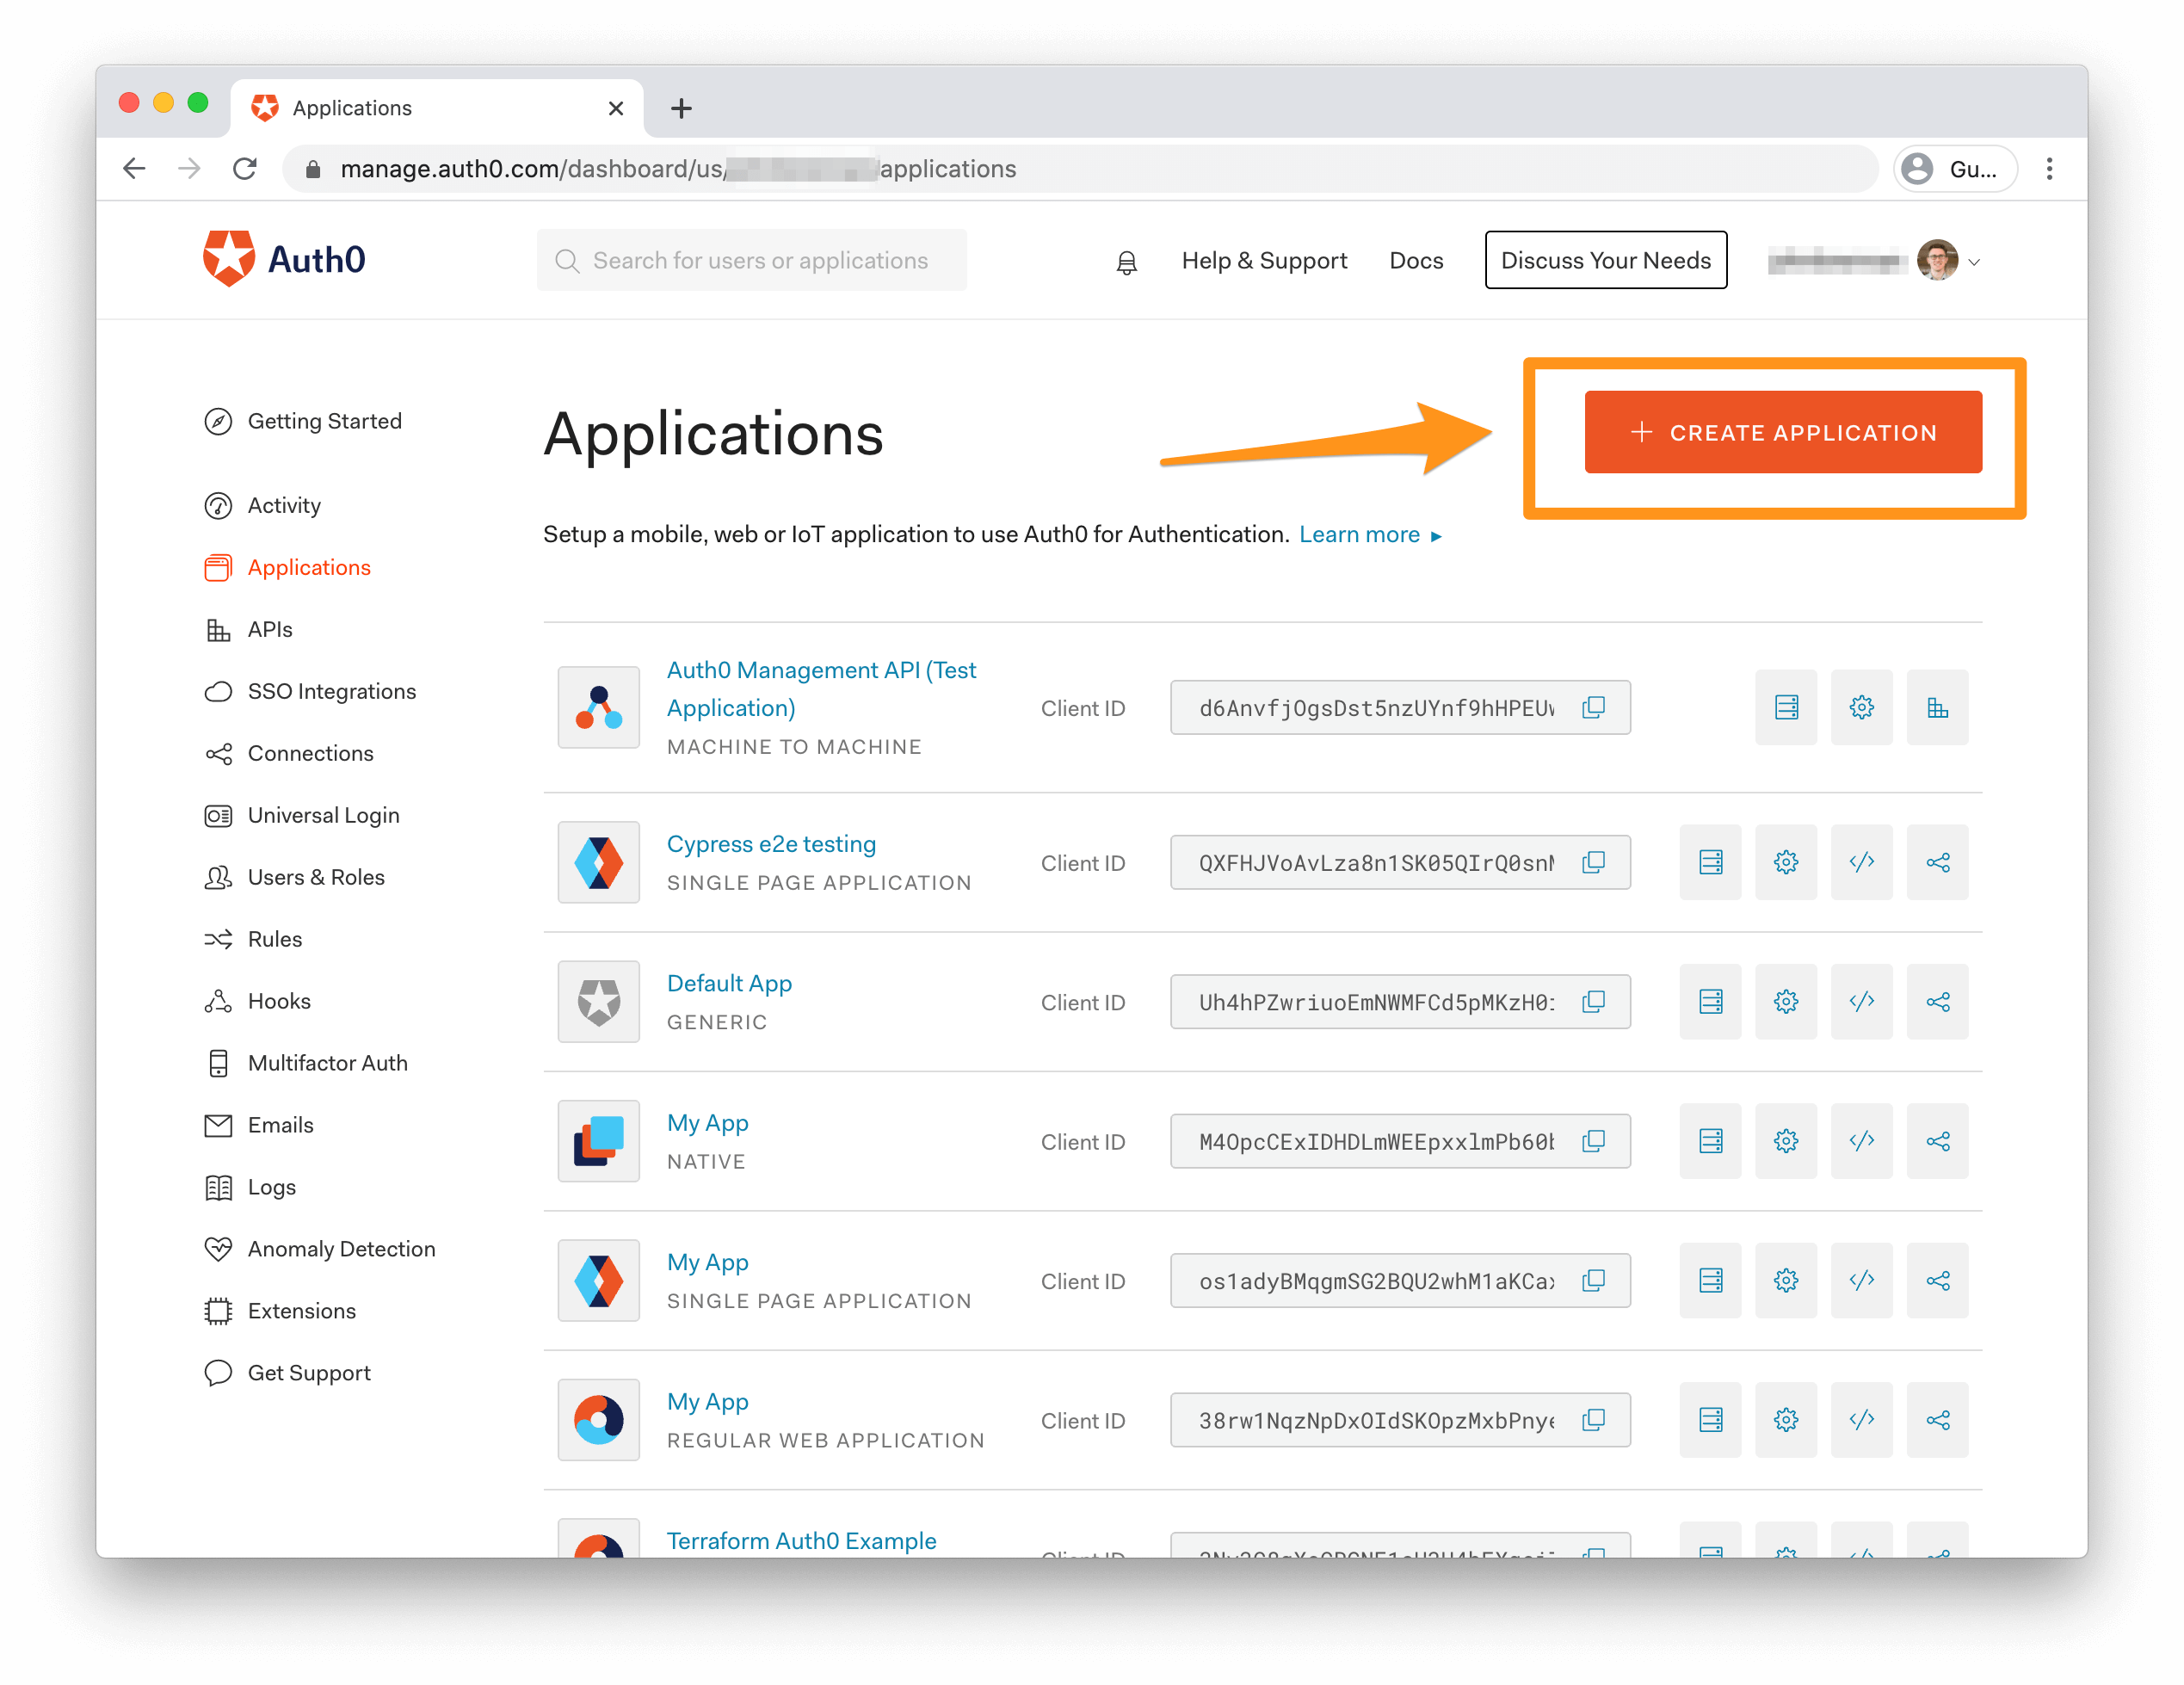
Before you continue the project, you'll need to make a quick detour to the Auth0 site. Think of this as the bootstrapping phase — for Terraform to be able to create Clients and APIs in Auth0, you'll need to manually create an Auth0 Machine-to-Machine Application that allows Terraform to communicate with Auth0.
Head to the Applications section of your Auth0 Dashboard and click the orange "Create Application" button on the right.
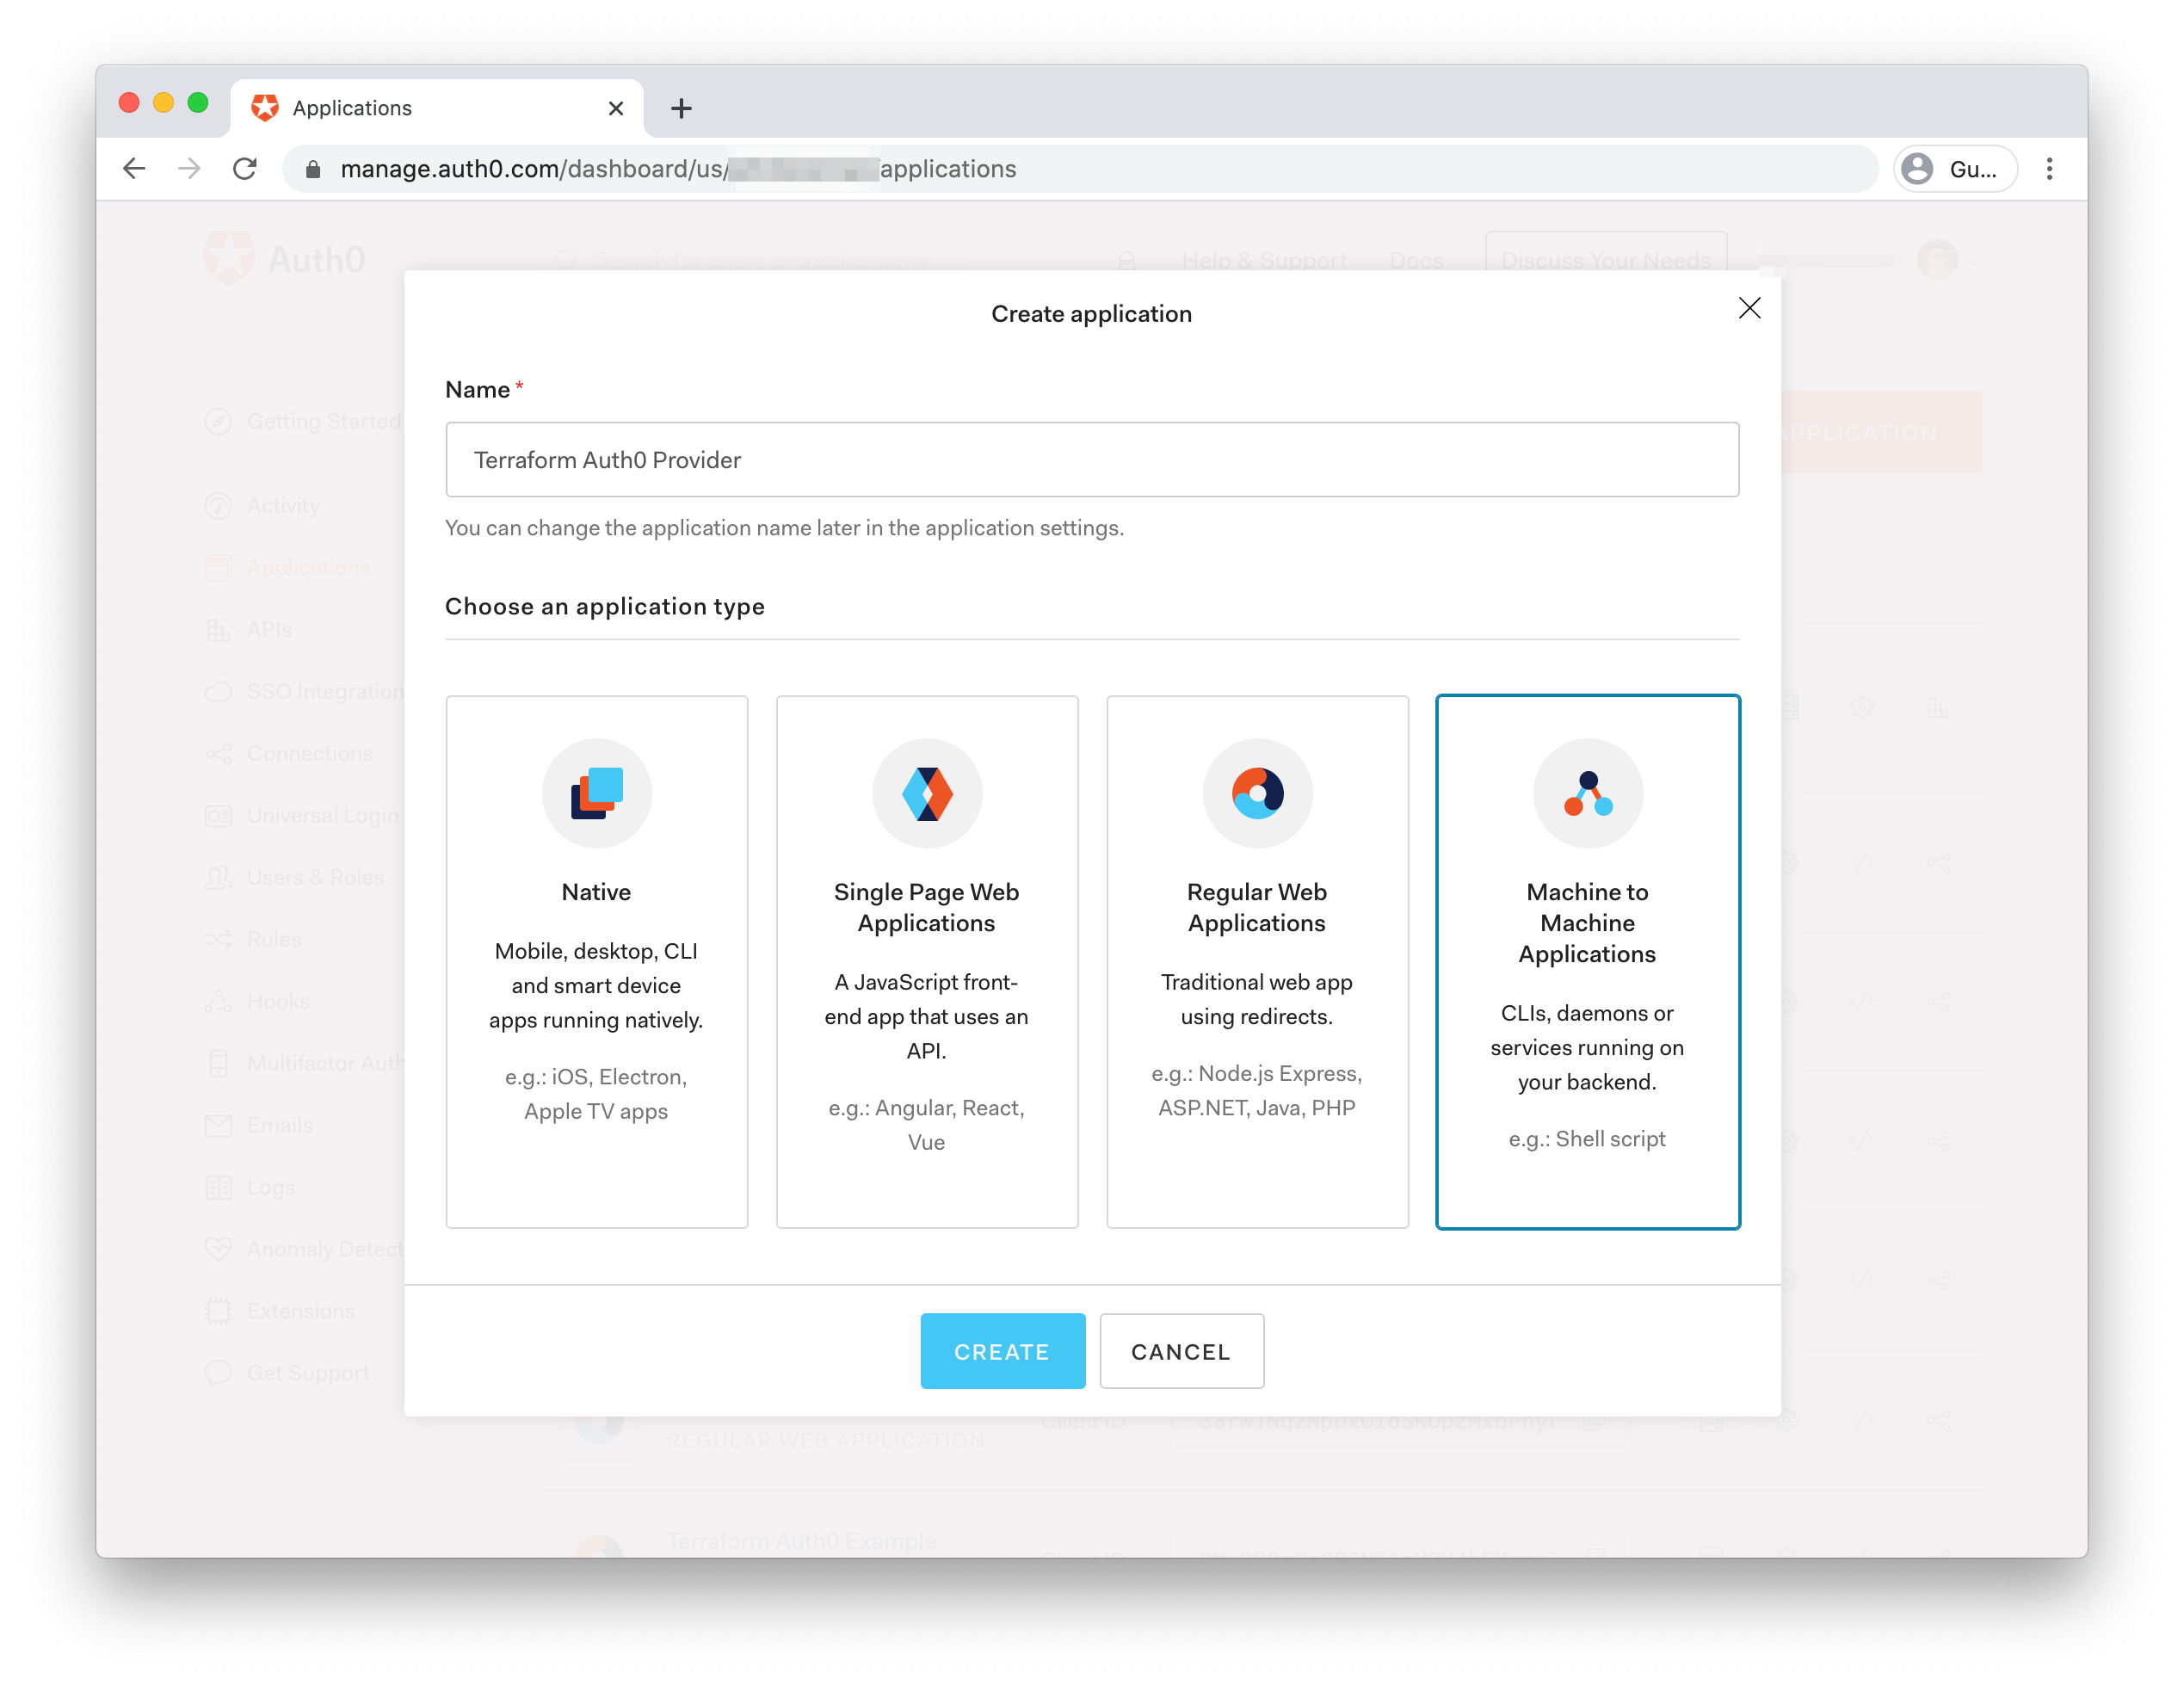
In the form that pops up, give your app a name like "Terraform Auth0 Provider" and select "Machine to Machine Application" as the type. Click the blue "Create" button to be taken to the next screen.
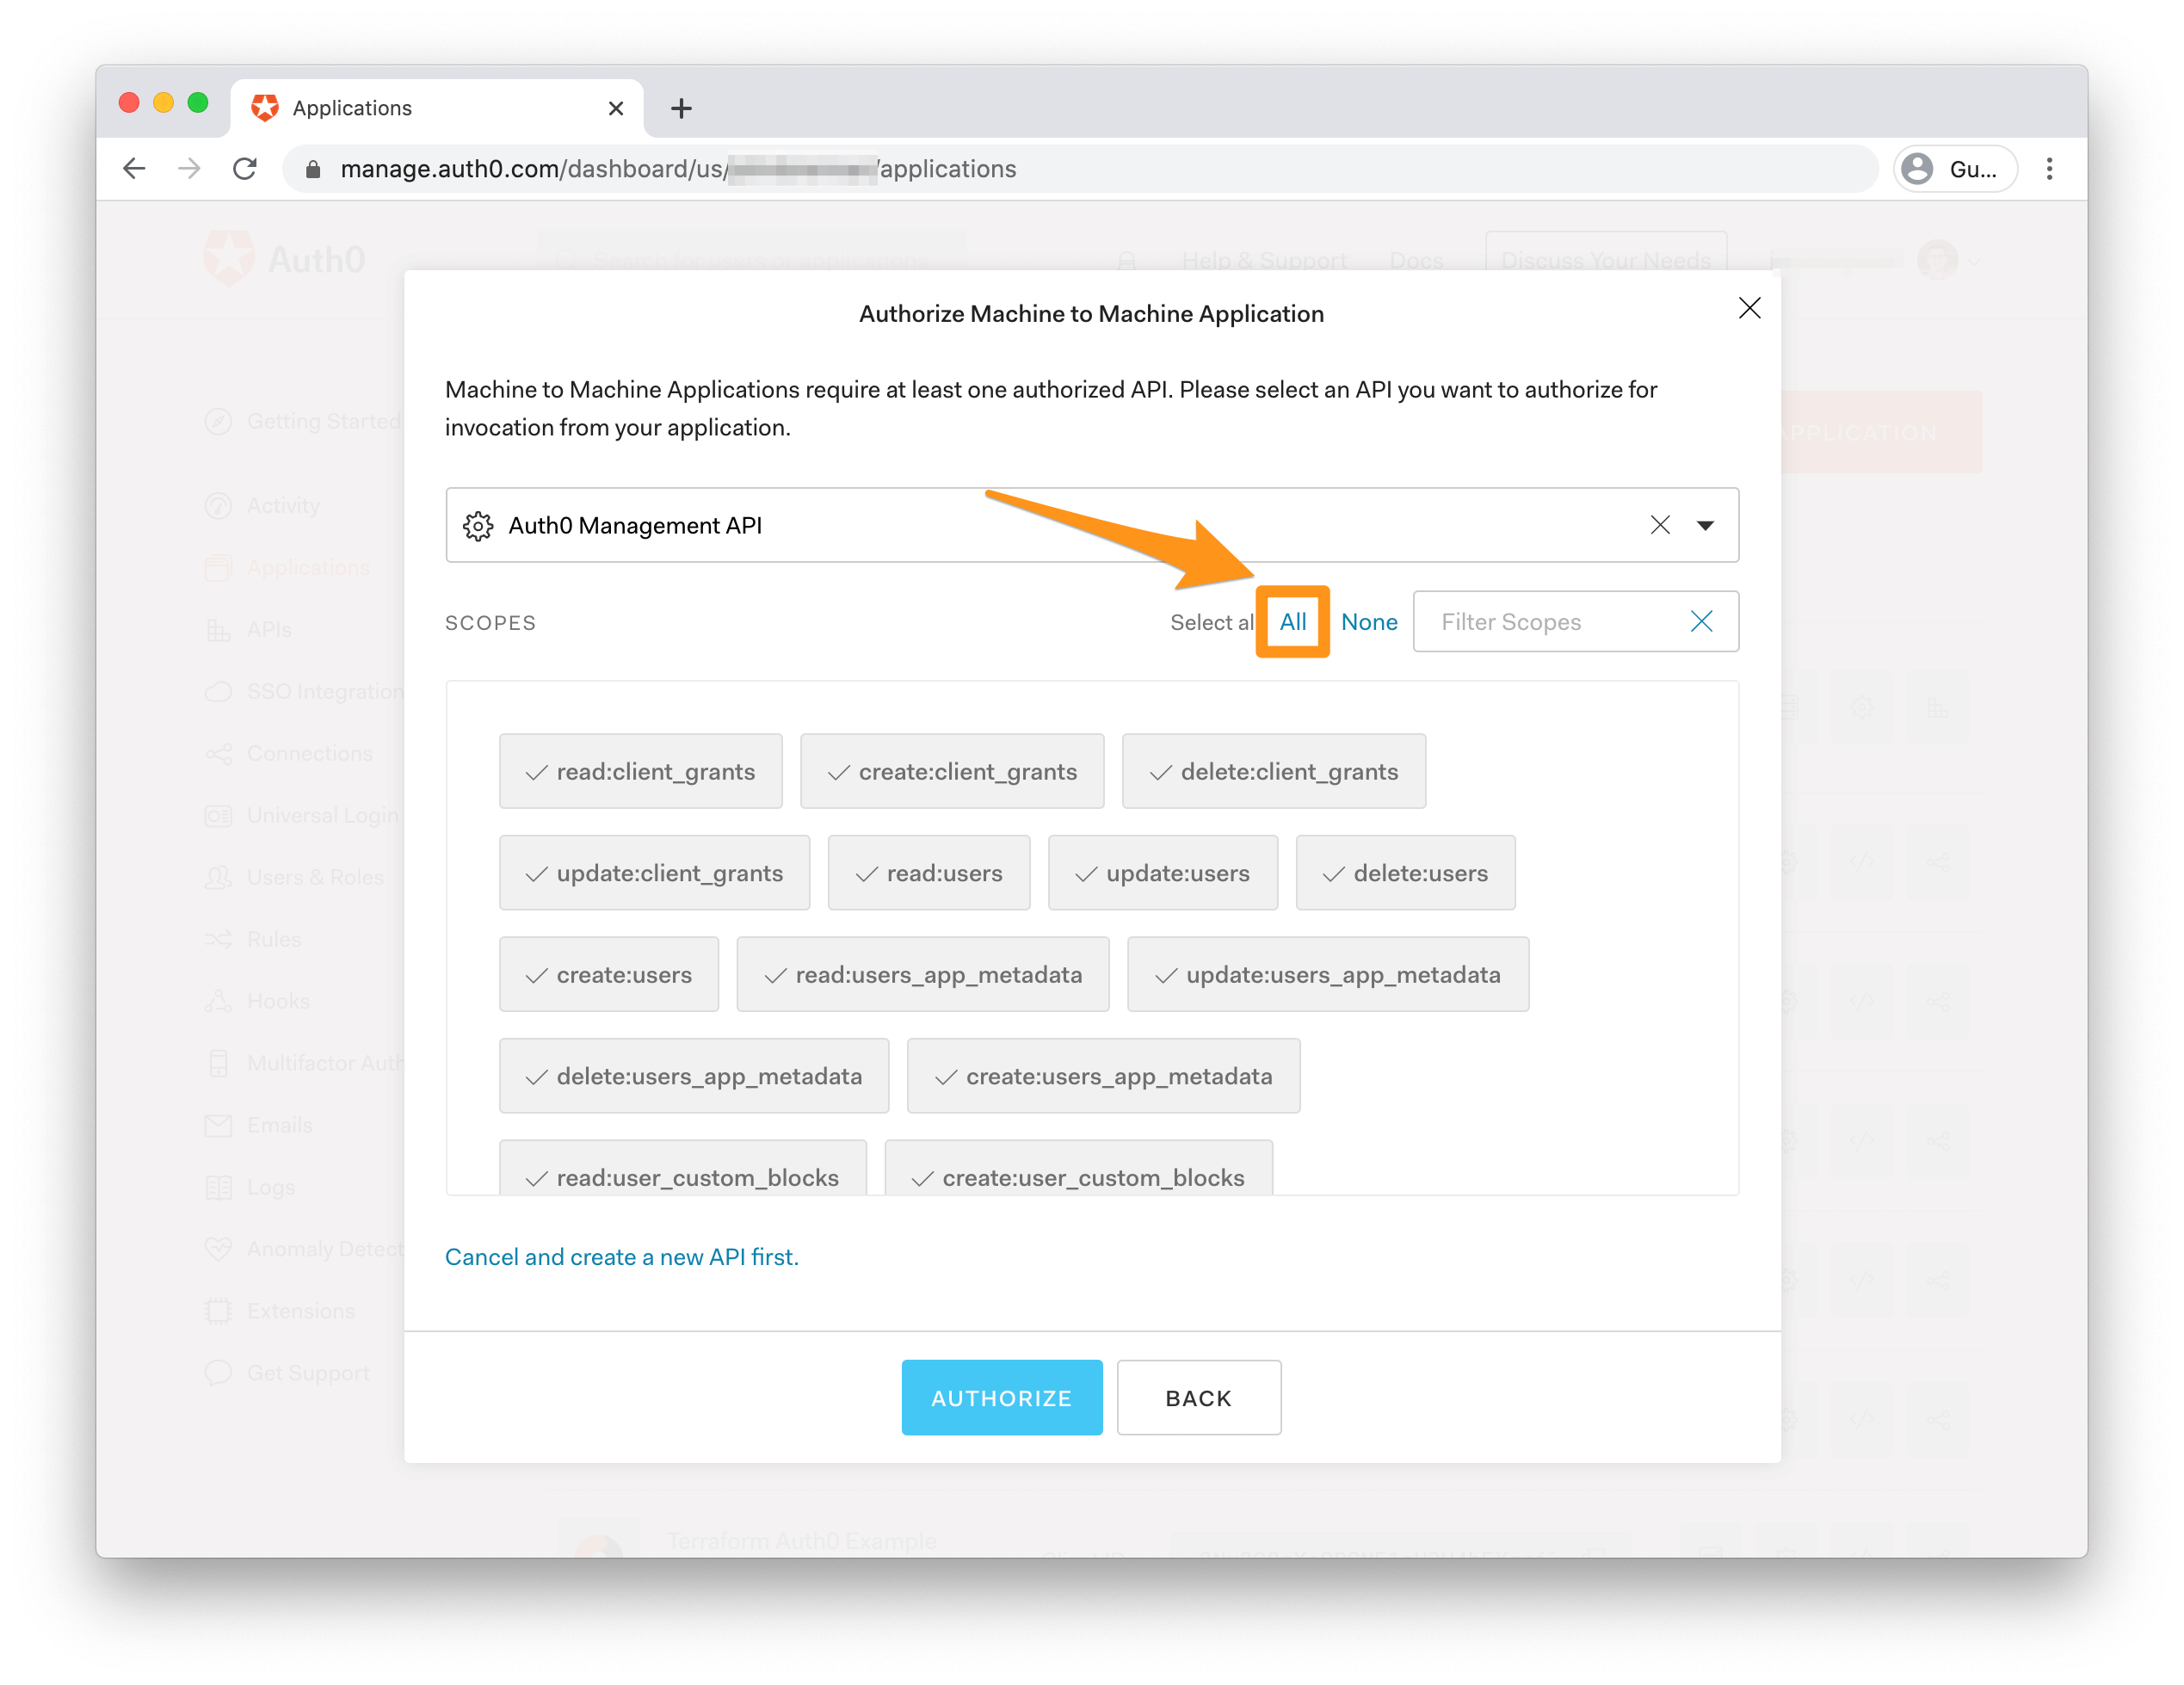
You'll need to authorize your new app to call the Auth0 Management API. Select it in the dropdown and then authorize all scopes by clicking "All" in the top right of the scopes selection area. Click the blue "Authorize" button to continue.
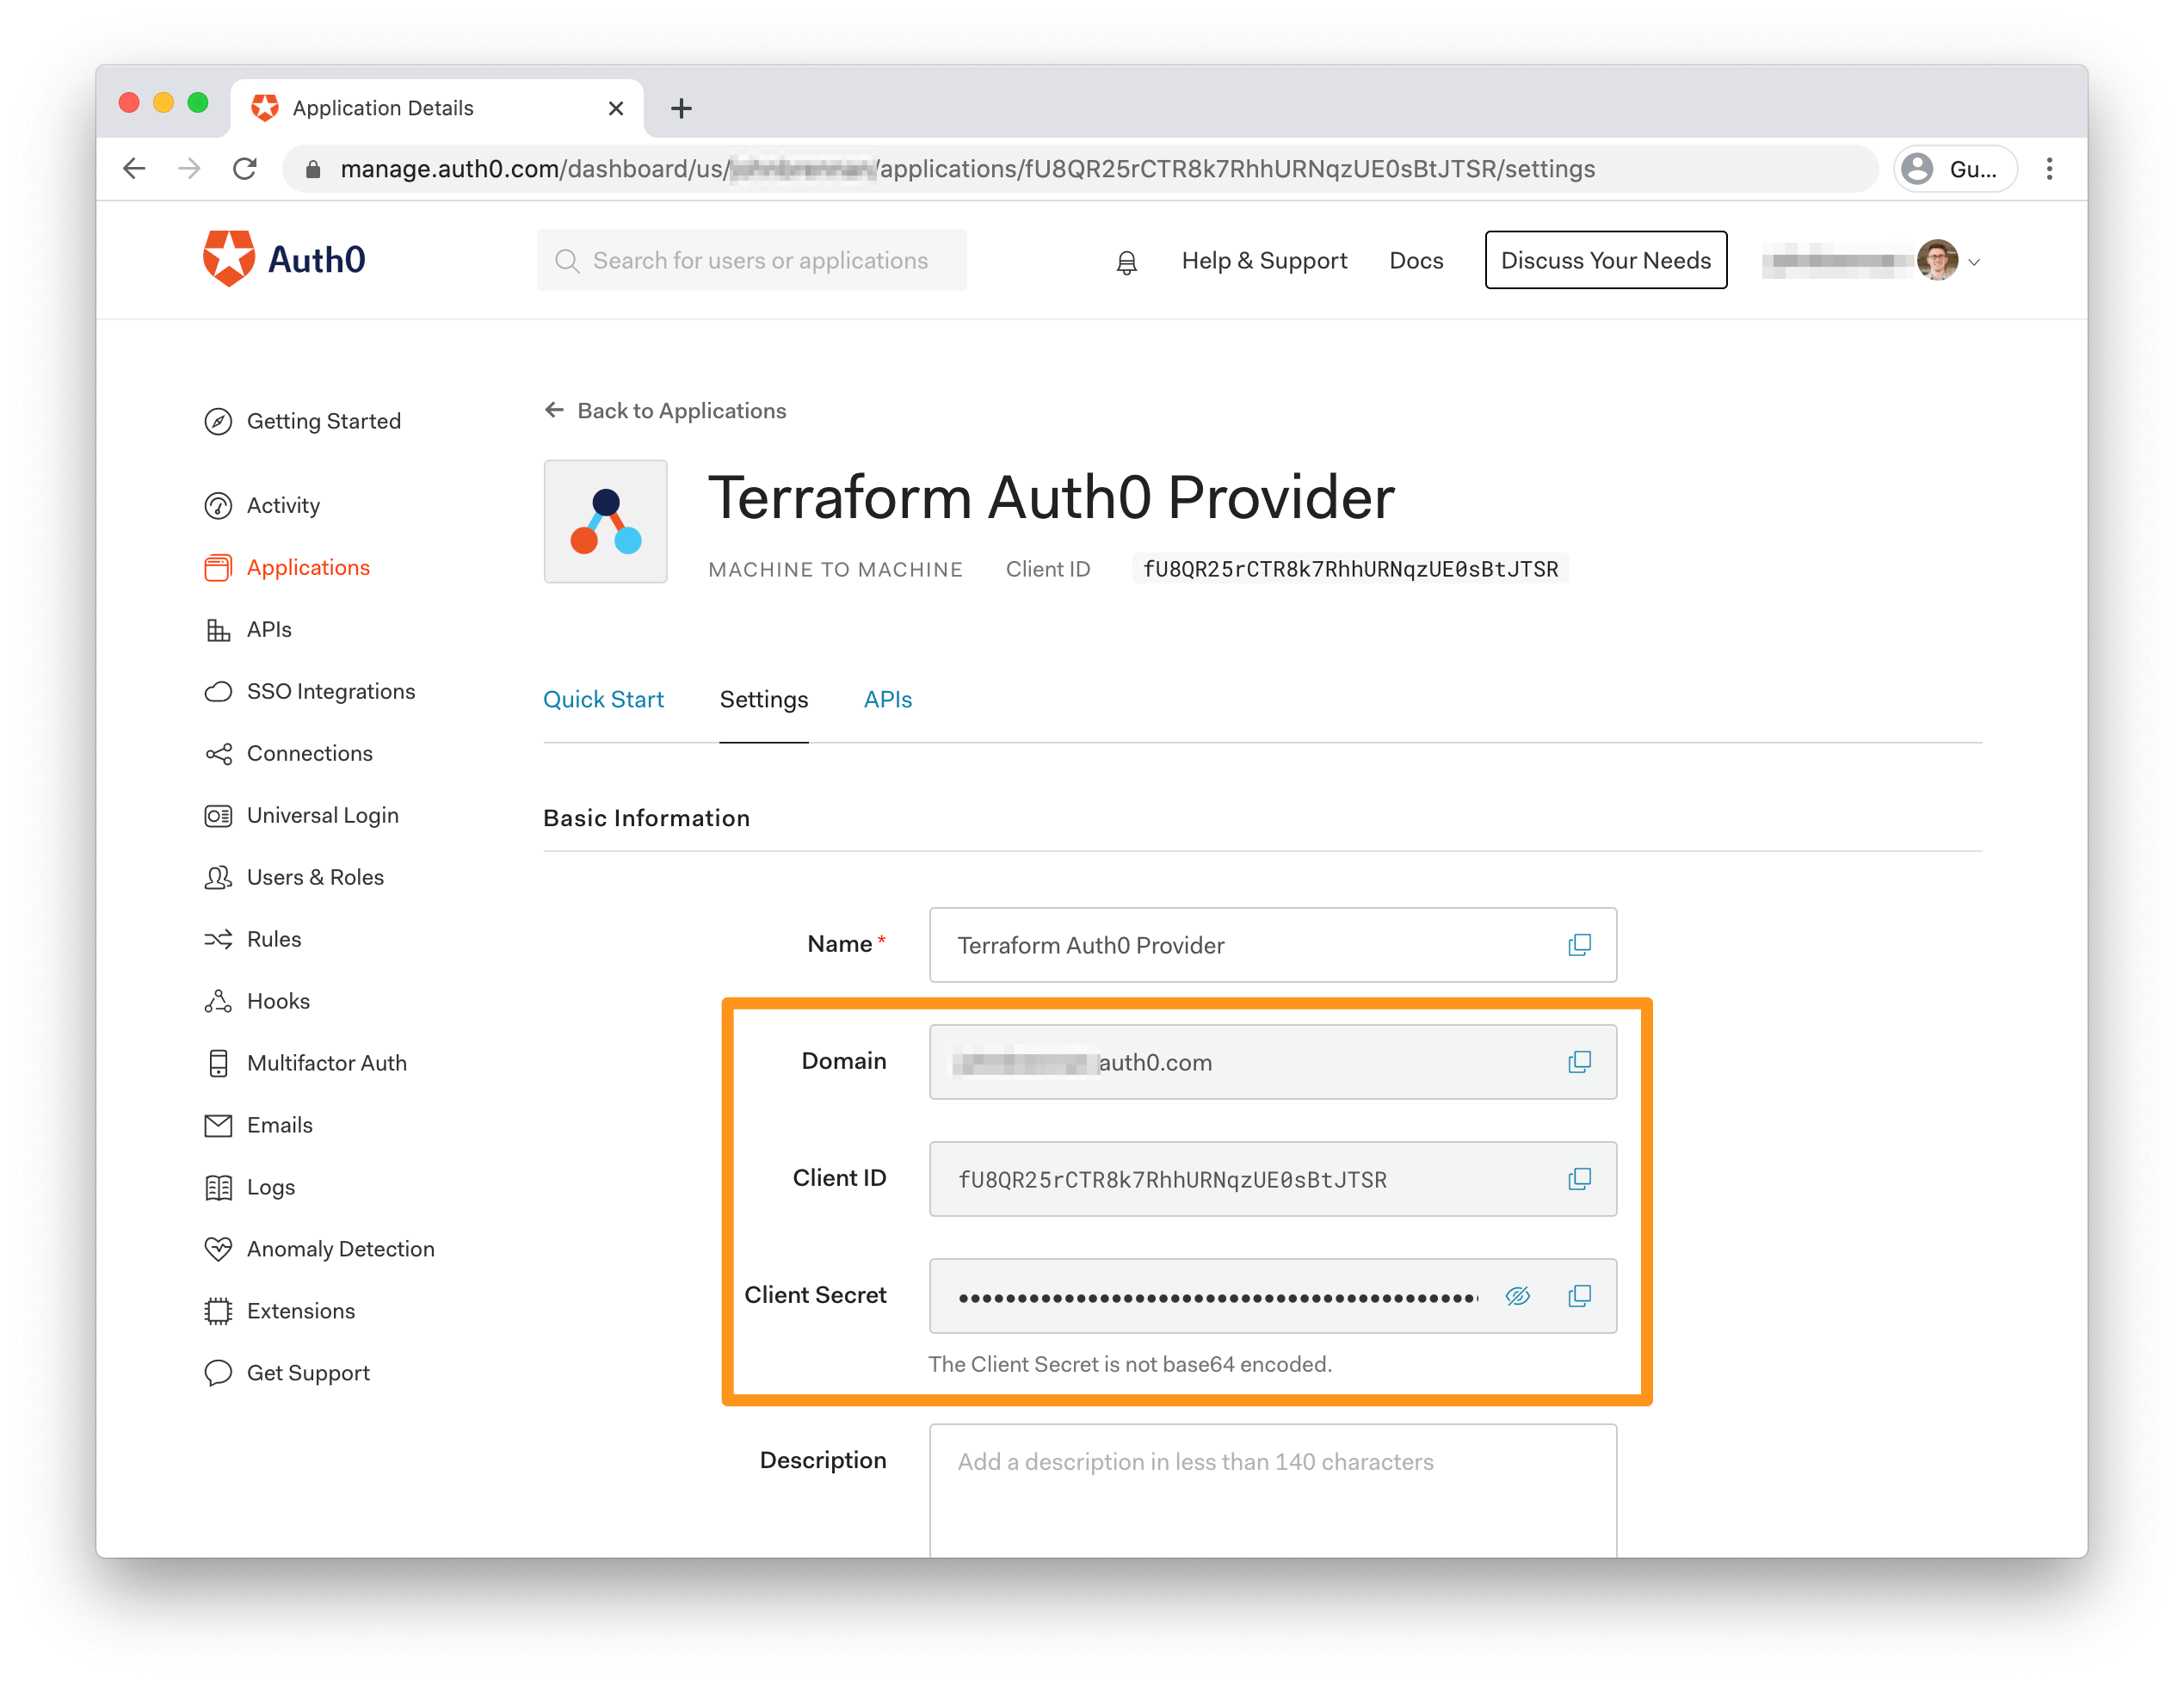
You'll be taken to the details page for your new application. Open the "Settings" tab and copy the Domain, Client ID, and Client Secret values - you'll need them in the next step for configuring the Auth0 Provider.
Configure the Provider
Although you can put passwords, secrets, and other credentials directly into Terraform configuration files, security best practices say that you should never store sensitive information in plaintext. There are several ways to store values like this outside of the configuration file itself; for now, you'll set your Auth0 Application credentials as environment variables. Many secret management products integrate with Terraform, including Hashicorp Vault and AWS Secrets Manager, but those are beyond this tutorial's scope.
In the terminal window where you're running Terraform, run the following commands, substituting AUTHO_DOMAIN, CLIENT_ID, and CLIENT_SECRET for your M2M app's values:
$ export TF_VAR_auth0_domain={AUTH0_DOMAIN}
$ export TF_VAR_auth0_client_id={CLIENT_ID}
$ export TF_VAR_auth0_client_secret={CLIENT_SECRET}
Prefixing TF_VAR_ to the environment variables means that Terraform can pick up those values and use them as Input Variables — injected properties to help parameterize your configuration without changing the source code. You can read up more on environment variables in the Terraform docs.
After you've set your environment variables, head back to your text editor, and add the following in main.tf:
variable "auth0_domain" {}
variable "auth0_client_id" {}
variable "auth0_client_secret" {}

terraform {
  required_providers {
    auth0 = {
      source  = "alexkappa/auth0"
      version = "~> 0.16.0"
    }
  }
}

provider "auth0" {
  domain        = var.auth0_domain
  client_id     = var.auth0_client_id
  client_secret = var.auth0_client_secret
}
Here, you can see a Provider block being defined — this is how Providers can be configured to work a specific way. In this case, The Auth0 Provider will communicate with the Auth0 Management API using the M2M credentials you've provided. Moreover, we specify the version range that we want to allow for the provider, to prevent an uncontrolled update.
The variable blocks create the variable reference that the Provider configuration uses. You don't need to set a variable default value in the config file itself; Terraform will fill them in from your TF_VAR_* environment variables.
Tip: The order doesn't matter in Terraform configuration files - you can declare resources, providers, and other values in any order. You don't need to put all the code in one file either. Terraform reads the whole directory by default and builds the relationships itself.
With your provider configured to communicate with Auth0's Management API, you can now start using the various Auth0 resources available from the provider. First up: using auth0_client to create the Auth0 application to wire up your Express app!
Add the auth0_client Resource
Time to create your Auth0 Application. Add the following to your Terraform config file:
resource "auth0_client" "terraform-secure-express" {
  name            = "Terraform Secure Express"
  description     = "App for running Dockerized Express application via Terraform"
  app_type        = "regular_web"
  callbacks       = ["http://localhost:3000/callback"]
  oidc_conformant = true

  jwt_configuration {
    alg = "RS256"
  }
}
This pattern is hopefully starting to look familiar — you're defining a resource of type auth0_client and giving it the unique name terraform-secure-express. Within the resource block, arguments provide more context for the resource. The auth0_client resource has many possible arguments. The only required field is name, but any client configuration options available through the Management API are available.
You also don't need to worry about getting all of your settings right the first time — one of the major benefits of infrastructure-as-code like Terraform is that your settings and configuration can change incrementally over time. Storing config files in version control is a great way to track your infrastructure and configuration changes.
Here are the details of the configuration options above:
name: The name of your application.description: A detailed description of your application.app_type: The type of application you're building. Since this is an Express server-side web application,regular_webmakes sense here. If we were building a JavaScript single-page app, for instance, we'd usespainstead. The full list of options is available here.callbacks: An array of URLs that are valid callbacks for your application. In the Auth0 Dashboard, this is available in your application settings after creating your app.oidc_conformant: This flag is on by default if you create new applications in the Auth0 Dashboard and indicates that your app strictly conforms to the OIDC spec, as explained in the Auth0 documentation.jwt_configuration: This set of options allows configuration of the handling of JSON Web Tokens (JWTs) in your application. Using the RS256 algorithm for signing JWTs is the recommended best practice, as explained in the Auth0 docs.
With the new resource in place, you can run the following terminal commands to apply your configuration:
$ terraform init
$ terraform apply
init is required here because you've added the auth0 provider to your configuration, so Terraform will need to download the provider before applying the configuration. If you change your configuration but don't add any new providers, you can skip terraform init and just run terraform apply.
After apply finishes, you can verify that the application was created by going to the Auth0 Dashboard Applications page. You should see a new application called "Terraform Secure Express", as specified in the name argument passed to the resource.
Add auth0_client values to Docker Env variables
There's one last step before your Express app will work. Using Terraform, you'll need to get the Client ID and Secret of your newly created application into the Docker container where the Express app is running. To do so, you'll use attributes that the auth0_client resource exports. The Provider documentation lists the auth0_client resource's attributes. You'll use the client_id and client_secret attributes, inserting them into your app's Docker container as ENV variables — all without needing to manually copy values from the UI.
Add the following arguments to your existing docker_container resource:
resource "docker_container" "terraform-secure-express" {
  # ... 👆 existing code

  # ... 👇 new code
  env = [
    "AUTH0_CLIENT_ID=${auth0_client.terraform-secure-express.client_id}",
    "AUTH0_CLIENT_SECRET=${auth0_client.terraform-secure-express.client_secret}",
    "AUTH0_CLIENT_DOMAIN=${var.auth0_domain}"
  ]
}
This addition is hopefully self-explanatory — the env argument allows you to set environment variables inside your Docker container, passed as a set of Strings (which is why you need to use interpolation with ${} to grab the relevant values).
All that's left now is to apply the changes:
$ terraform apply
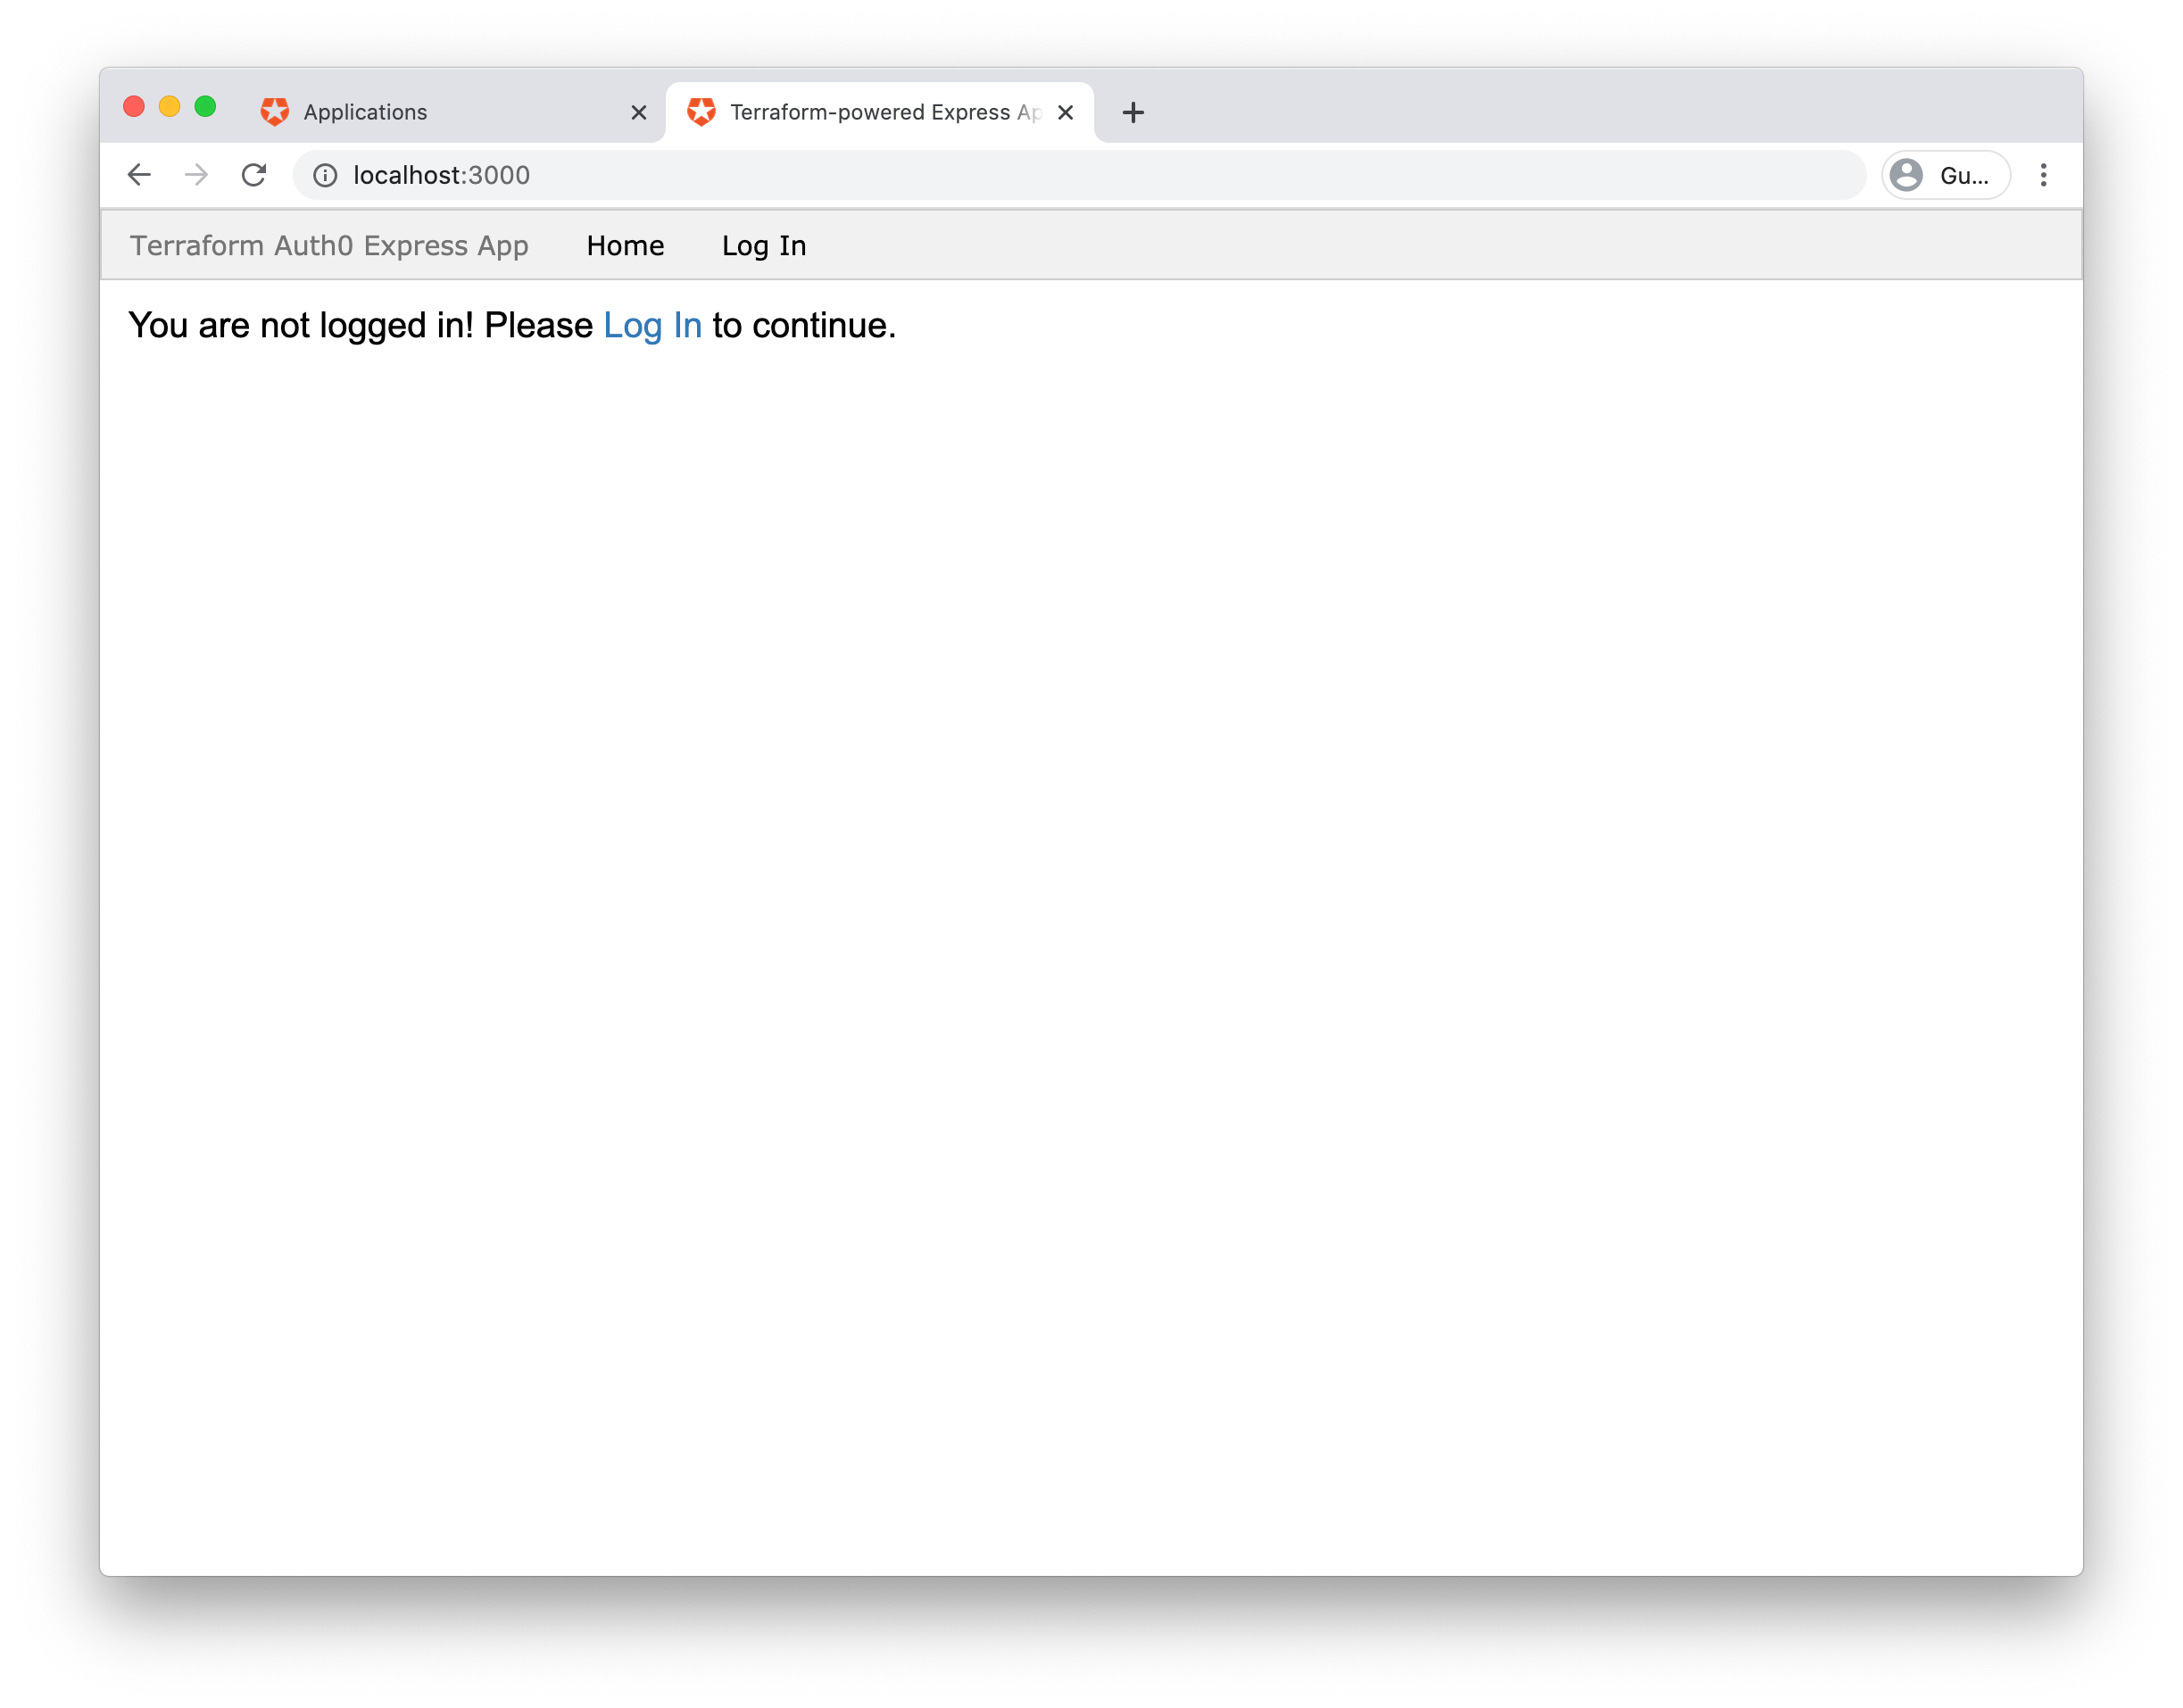
To ensure it's working, head to http://localhost:3000 in your browser. You should now see a basic landing page and, if you click the "log in" link, you should now see the Auth0 universal login screen!
The power of Terraform should hopefully be revealing itself at this point. You can change existing resources in your configuration code based on new infrastructure, and their changes are applied quickly and painlessly. In this case, your Docker app now has the environment variables it needs, which are dynamically retrieved from Auth0's API. No need for additional secret management for the client credentials!
So you've now got a running app — what's next? Users of the application, of course! In the next two sections, you'll see how you can also manage Auth0 databases, users, and roles through Terraform.
Add an Admin User With HashiCorp Terraform
As a refresher: the Express application used in this tutorial allows two different user types: administrators and "regular" users. Using the auth0_connection and auth0_user resource, you'll create a default "admin" user in a new username/password database in your Auth0 tenant.
Create a new Auth0 Connection
Auth0 Connections provide several different sources of users, including managed databases and social login and identity providers. These can all be managed through Terraform using the auth0_connection resource. For this tutorial, you'll first be creating a standard username/password database to manage your application's users and then adding the admin user to it.
Here's what the auth0_connection looks like:
resource "auth0_connection" "terraform-express-user-db" {
  name     = "terraform-express-user-db"
  strategy = "auth0"
  options {
    password_policy        = "good"
    brute_force_protection = true
  }
  enabled_clients = [auth0_client.terraform-secure-express.id, var.auth0_client_id]
}
Let's dig into the arguments in detail:
name: As you might expect, this sets the name of the Connection.strategy: This specifies the type of Connection Terraform will create. Theauth0value means that it's an Auth0-managed database. Thestrategyargument documentation shows the many values that this argument can have.options: This covers more fine-grained settings for your Connection.password_policy: This sets the required strength of passwords in the database. The strength is onlygoodfor this tutorial, but if this were a production application, you'd be better off choosingexcellentfor your password policy ;)brute_force_protection: This one is also self-explanatory — it enables protection against brute force attacks against your application.
enabled_clients: This argument allows you to enable access to this Connection from your Auth0 applications — naturally, your Express app requires access, so it's included here as an attribute. You also need to enable the Terraform M2M application so that it can create users in the database.
Create your user
User creation is handled by the auth0_user resource:
variable "auth0_admin_user_password" {}

resource "auth0_user" "terraform-express-admin-user" {
  connection_name = auth0_connection.terraform-express-user-db.name
  user_id         = "12345"
  email           = "admin@example.com"
  email_verified  = true
  password        = var.auth0_admin_user_password
}
Once again, let's run through the arguments for this new resource:
user_id: The unique identifier for this user. For this tutorial, you're using numerical IDs, but if you have an ID scheme, feel free to adapt this to your needs.email: The (obviously not real) email address of the admin user.email_verified: An optional but helpful argument that allows you to skip email verification.password: The admin user's password, the value of which is being set by a variable.
You'll need to set the password as another environment variable. Head to your terminal and run the following command:
$ export TF_VAR_auth0_admin_user_password="TerraformExampleAdmin12$"
At this point, you can run terraform apply to create your database and user:
$ terraform apply
To verify the changes, head to http://localhost:3000 and use the admin user credentials (user: admin@example.com; password: TerraformExampleAdmin12$) to sign in to your application.
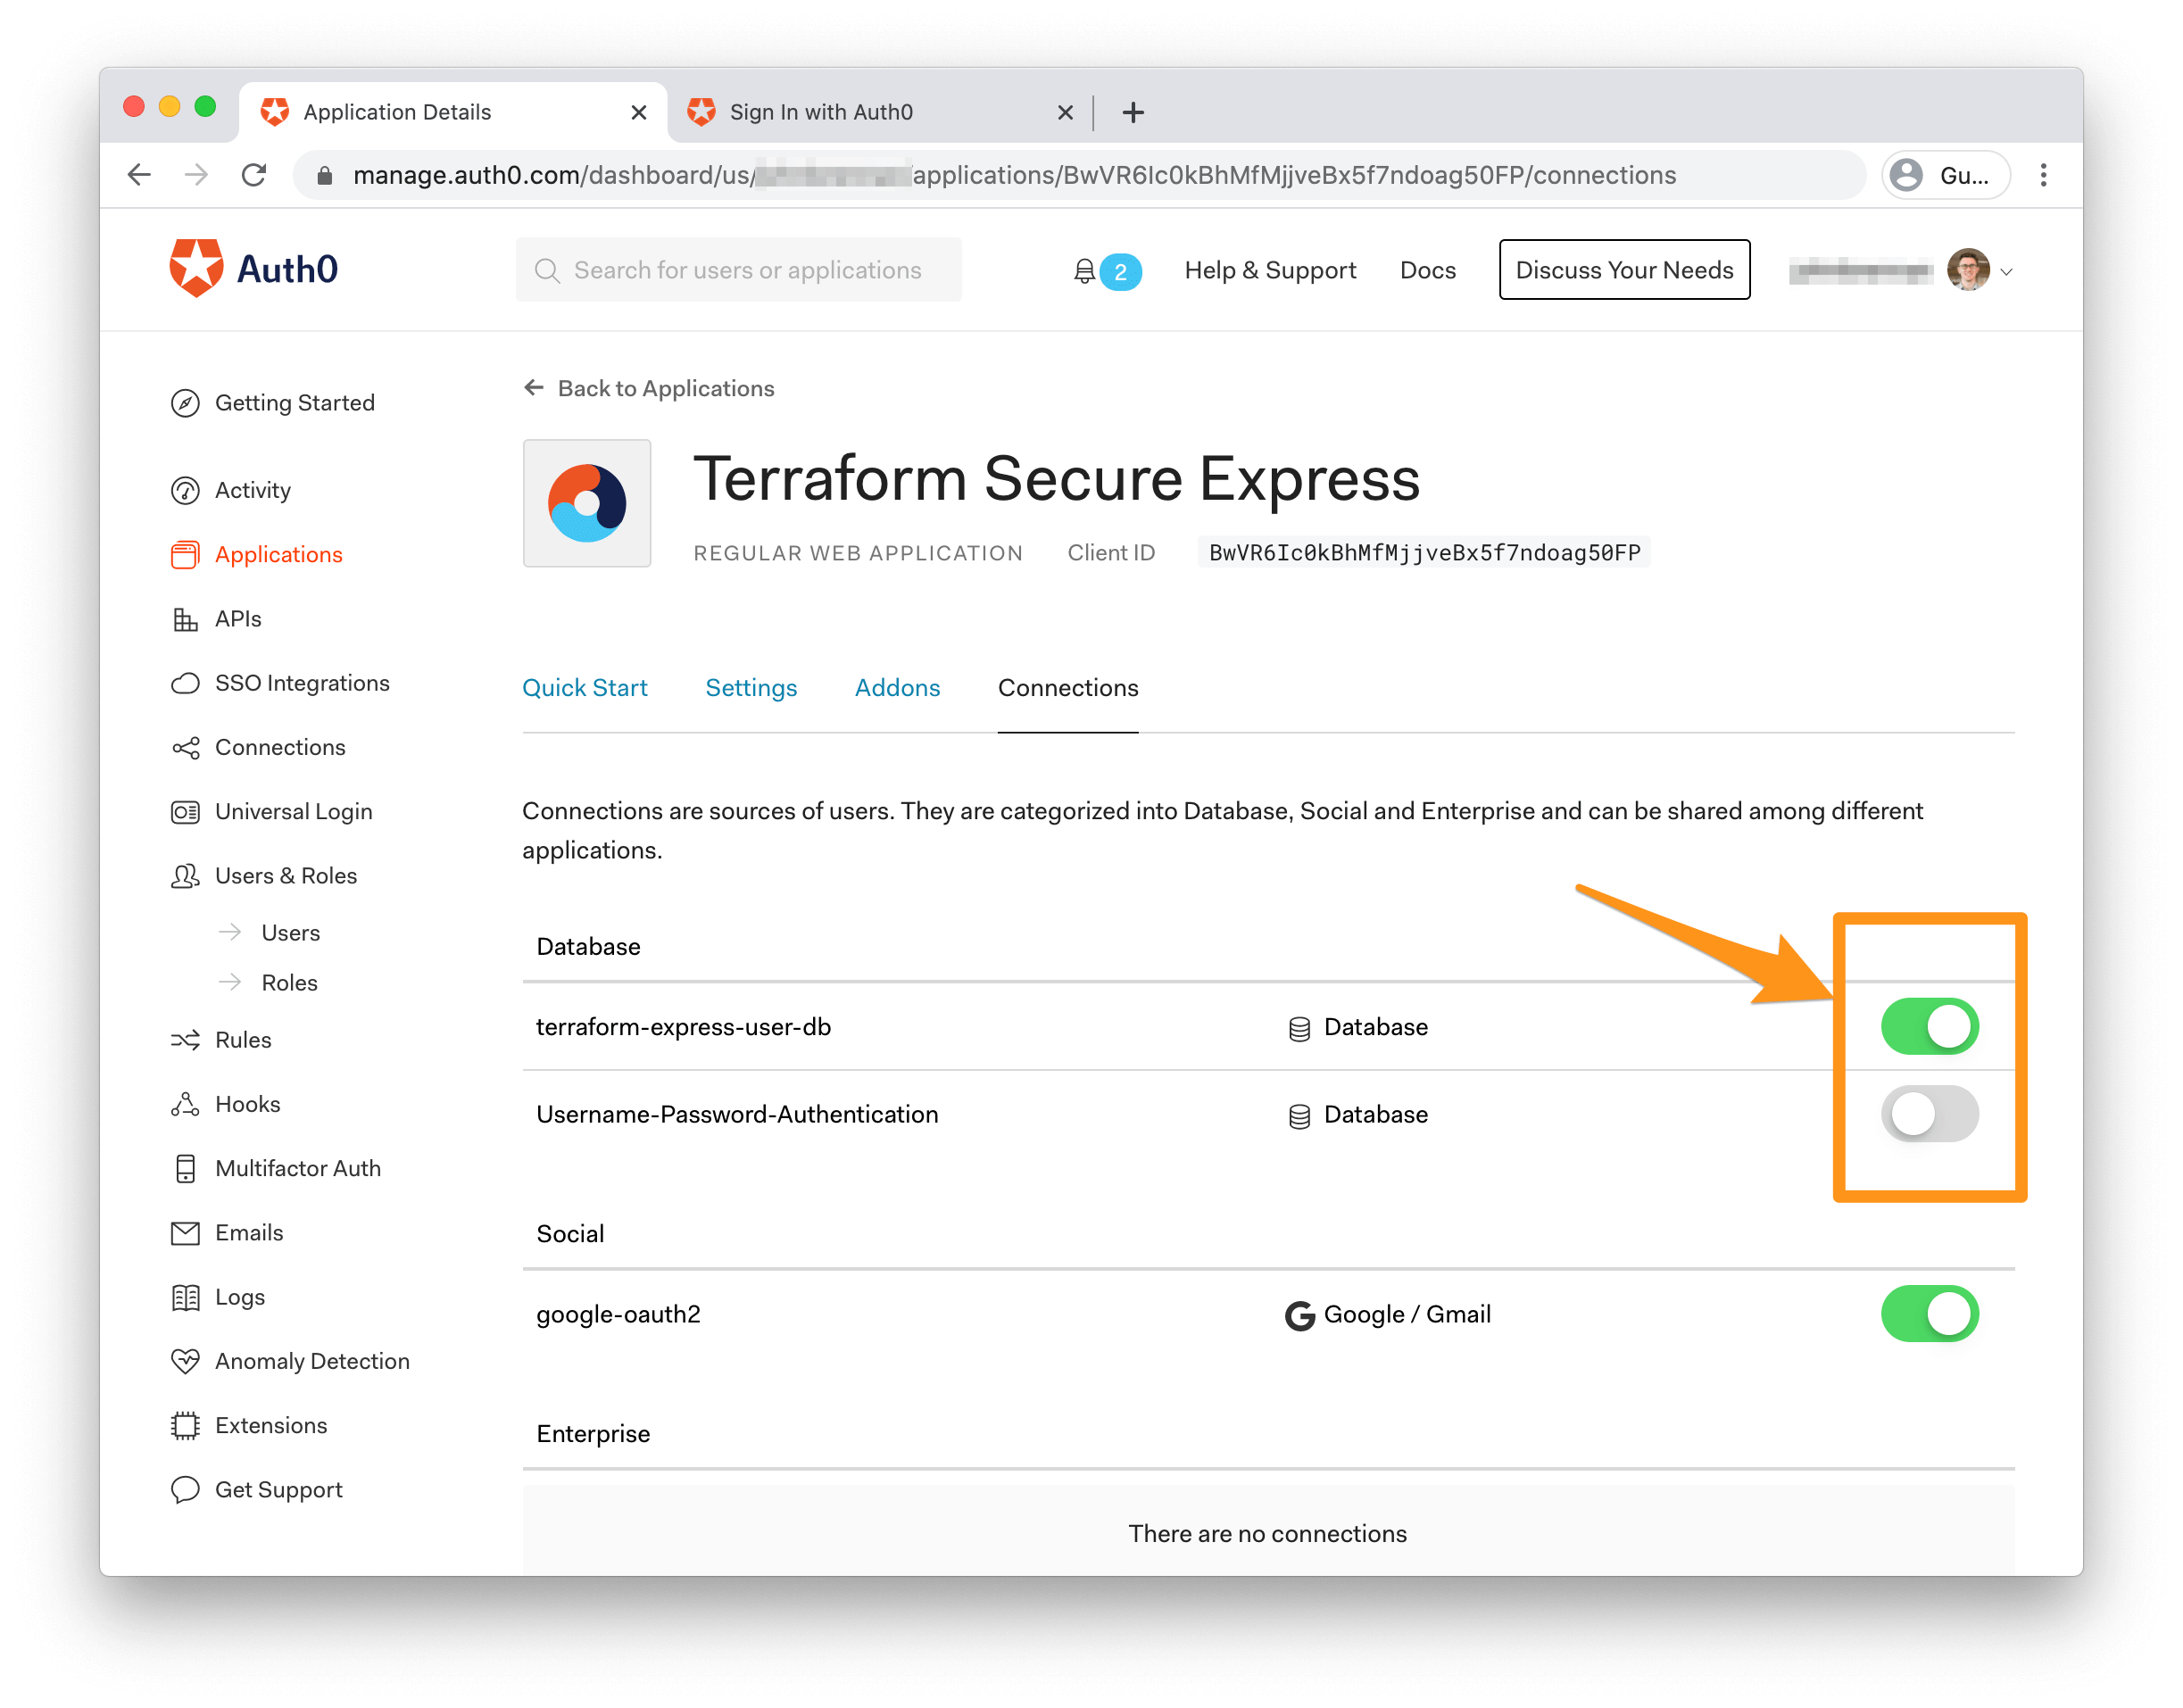
Tip: If you receive a "Wrong email or password" error when you attempt to log in, there's a chance that you need to disable other connections for your application. Head to your Auth0 Applications Dashboard, click on the "Terraform Secure Express" application, and click the "Connections" tab. Ensure that all connections except the
terraform-express-user-dbconnection are disabled.
You've now signed in successfully! There's only one problem: your admin user doesn't have any admin permissions associated with it. It's time to fix that with a couple more Terraform resources.
Create an Auth0 API and Role
The easiest way to add permissions to your user is by assigning them a Role. You'll also need to create an Auth0 API, also known as a Resource Server, to define the permissions that the role can have. An Auth0 API represents a backend resource — in this case, the Express application — and sets various permissions that the resource recognizes in its settings. A Role, then, sits between the API resource and the user; it tells Auth0 that a given user has specific permissions when accessing some backend resource.
More information about Role-Based Access Control is available in the Auth0 Docs. If you're a little uncertain what this all means, the demo should hopefully clarify things. First, add the API resource to your Terraform config:
variable "terraform-express-api-identifier" {
  type    = string
  default = "https://terraform-express-resource-server"
}

resource "auth0_resource_server" "terraform-express-resource-server" {
  name                                            = "Terraform Auth0 Resource Server"
  identifier                                      = var.terraform-express-api-identifier
  skip_consent_for_verifiable_first_party_clients = true
  token_dialect                                   = "access_token_authz"
  enforce_policies                                = true

  scopes {
    value       = "create:note"
    description = "Only administrators can create notes"
  }

  scopes {
    value       = "read:note:self"
    description = "Read Own Notes"
  }

  scopes {
    value       = "read:note:all"
    description = "Administrators can read all notes"
  }
}
Here, you're setting a name and unique identifier (formatted like a URL, as is recommended by Auth0) for your API. You're also creating a simple set of scopes for the API. The skip_consent_for_verifiable_first_party_clients is a byproduct of the fact that the sample app is a server-side application and not a public API accessed from a single-page app or other methods. token_dialect and enforce_policies are options that enable Role-Based Access Control (RBAC) on this API and ensuring that user permissions are included in the access token.
For this to work, you'll need to add one line to your auth0_client code to clarify that it's a first-party app:
resource "auth0_client" "terraform-secure-express" {
  # ... 👆 existing code

  # ... 👇 new code
  is_first_party = true
}
You'll also need to add the API identifier to the environment variables in your Docker container:
resource "docker_container" "terraform-secure-express" {
  # ... 👆 existing code

  env = [
    "AUTH0_CLIENT_ID=${auth0_client.terraform-secure-express.client_id}",
    "AUTH0_CLIENT_SECRET=${auth0_client.terraform-secure-express.client_secret}",
    "AUTH0_CLIENT_DOMAIN=${var.auth0_domain}", # 👈 add a comma here
    # ... 👇 new code
    "AUTH0_API_IDENTIFIER=${var.terraform-express-api-identifier}"
  ]
}
The auth0_resource_server documentation outlines the other arguments that can be passed into the resource, including authorization token lifetimes and authorization policy enforcement.
With the resource server in place, creating a role that encompasses a set of scopes is done as follows:
resource "auth0_role" "terraform-express-admin-role" {
  name        = "admin"
  description = "administrator"
  permissions {
    resource_server_identifier = auth0_resource_server.terraform-express-resource-server.identifier
    name                       = "create:note"
  }

  permissions {
    resource_server_identifier = auth0_resource_server.terraform-express-resource-server.identifier
    name                       = "read:note:all"
  }
}
You should be getting used to the resource pattern by now. Here, you're providing the name and description of the role, plus a set of permissions that correspond to scopes defined on your API/Resource Server.
There's one last step to do: add the role to your auth0_user admin resource:
resource "auth0_user" "terraform-express-admin-user" {
  # ... 👆 existing code

  # ... 👇 new code
  roles = [auth0_role.terraform-express-admin-role.id]
}
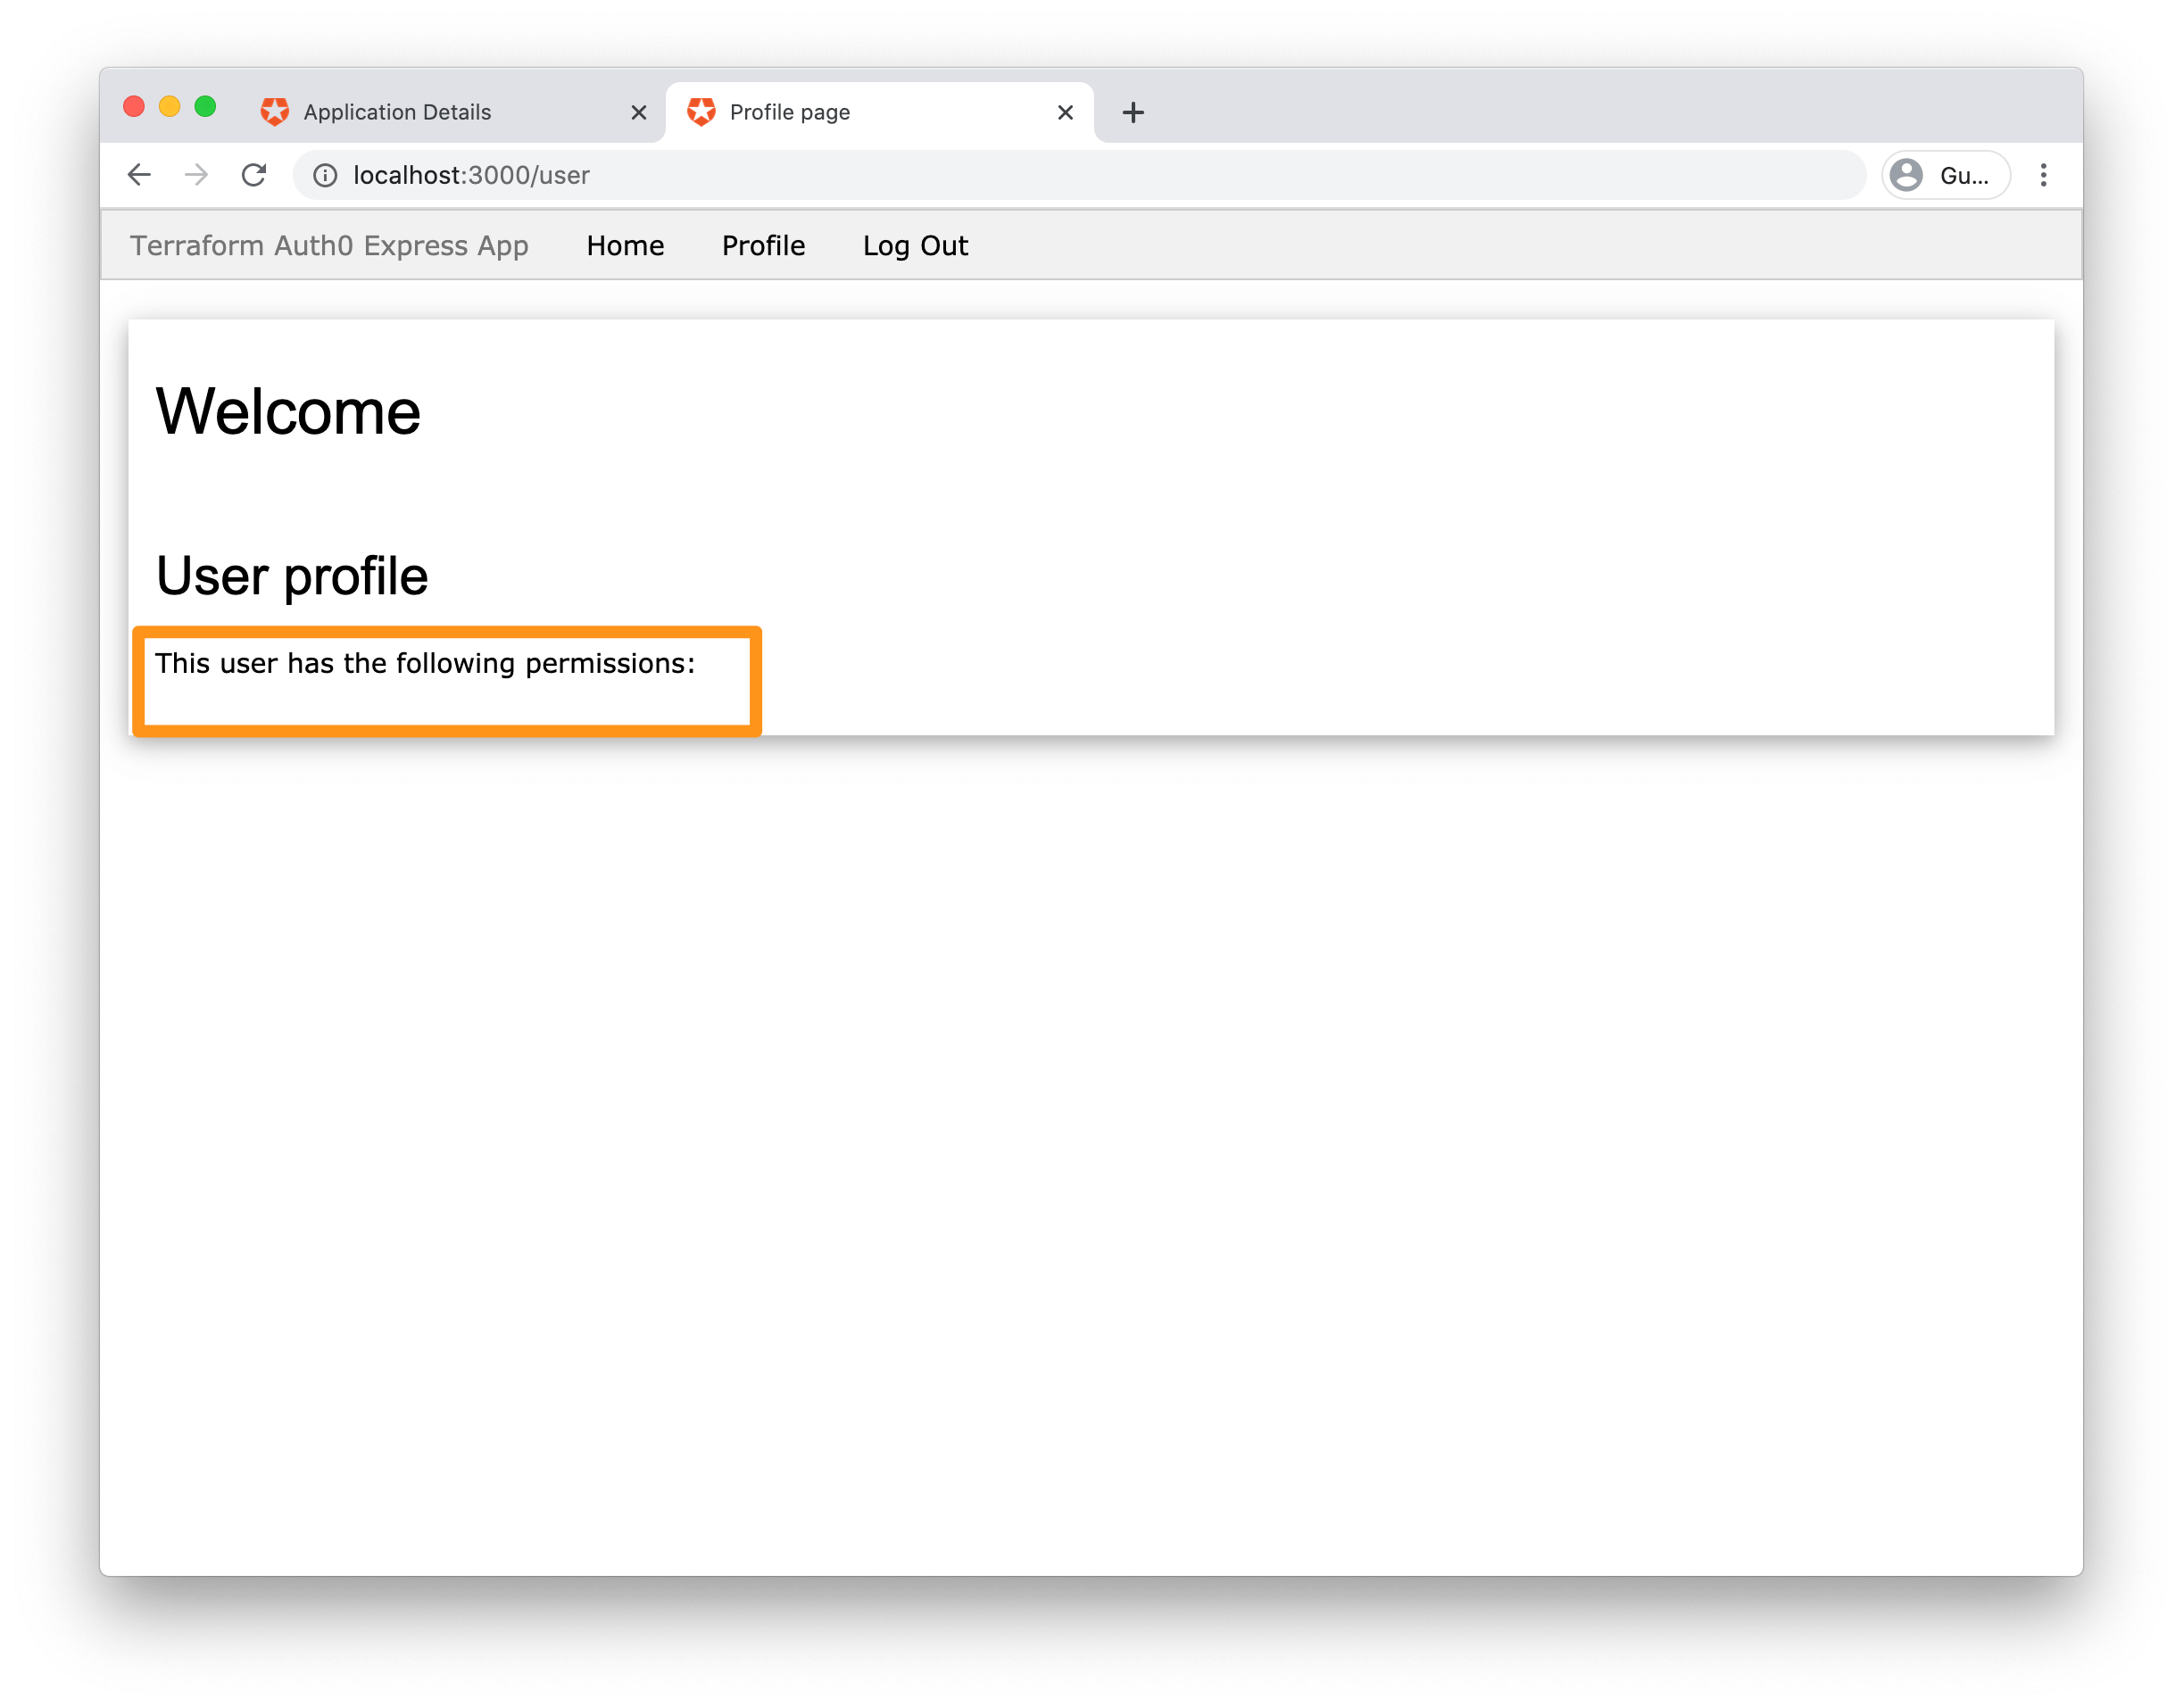
The admin user will now be updated to include the admin role for the identifier. Run terraform apply to apply the changes, then sign back into your app at http://localhost:3000.
You should see the list of permissions that an admin user has - create:note and read:note:all.
Add an Auth0 Rule Using Terraform
You're not quite done with roles yet - remember the read:note:self scope that you added to your resource server? By default, we want any newly-created user to have a role assigned to them that contains permissions for that scope. For simplicity's sake, let's call that role basic_user.
Add this to your Terraform configuration:
resource "auth0_role" "terraform-express-basic-user-role" {
  name        = "basic_user"
  description = "Basic User"
  permissions {
    resource_server_identifier = auth0_resource_server.terraform-express-resource-server.identifier
    name                       = "read:note:self"
  }
}
This role is a little simpler than the last, as there's only one permission needed on it.
Next up: assigning a role to a user when they first sign in is a great use case for an Auth0 feature called Rules. Rules are snippets of custom code that run any time a user authenticates with your Auth0 Tenant. A rule that checks for the basic_user role on login and assigns it when it doesn't exist seems like a pretty good way to automatically handle role assignments without a lot of manual work - and luckily, Terraform configuration can also manage Rules!
Create a new file called basic-user-rule.js in the root directory of the project and paste the following into it:
function addBasicRoleToUser(user, context, callback) {
  var request = require("request");

  var count = context.stats && context.stats.loginsCount ? context.stats.loginsCount : 0;
  if (count > 1) {
      return callback(null, user, context);
  }

  var headers = {
      'Authorization': 'Bearer ' + auth0.accessToken,
  };
  const data = {
      "roles": [
          "${TERRAFORM_ROLE_ID}"
      ]
  };

  request.post({
      url: `https://$${auth0.domain}/api/v2/users/$${user.user_id}/roles`,
      headers: headers,
      json: data
  }, (err, response, body) => {
      return callback(new Error("Can not update users with role"));
  });

  callback(null, user, context);
}
The first section of this rule uses the context argument to make sure roles don't get assigned after you've logged in multiple times. It then sets up some header and data variables that will be sent to the Auth0 Management API. Note the ${TERRAFORM_ROLE_ID} string — this will be replaced with the basic_user role's actual ID during the Terraform run. Finally, the rule makes an API call to the Auth0 Management API to update the roles of the user that's signing in and calls callback to indicate the end of the rule.
If you're curious about any of the details of this Rule, you can find more information in the Auth0 Rules documentation.
You can import the content of your JS into your terraform config with a helper function called templatefile. You can treat the code as a template and pass things like the basic_user role ID into the rule dynamically:
resource "auth0_rule" "terraform-express-basic_user-rule" {
  name = "basic-user-role-assignment"
  script = templatefile("${path.module}/basic-user-rule.js", {
    TERRAFORM_ROLE_ID : auth0_role.terraform-express-basic-user-role.id
  })
  enabled = true
}
Just remember to escape the dollar sign ($$) if it's not intended for a variable that you inject.
With your new role and rule in place, it's time to apply the changes:
$ terraform apply
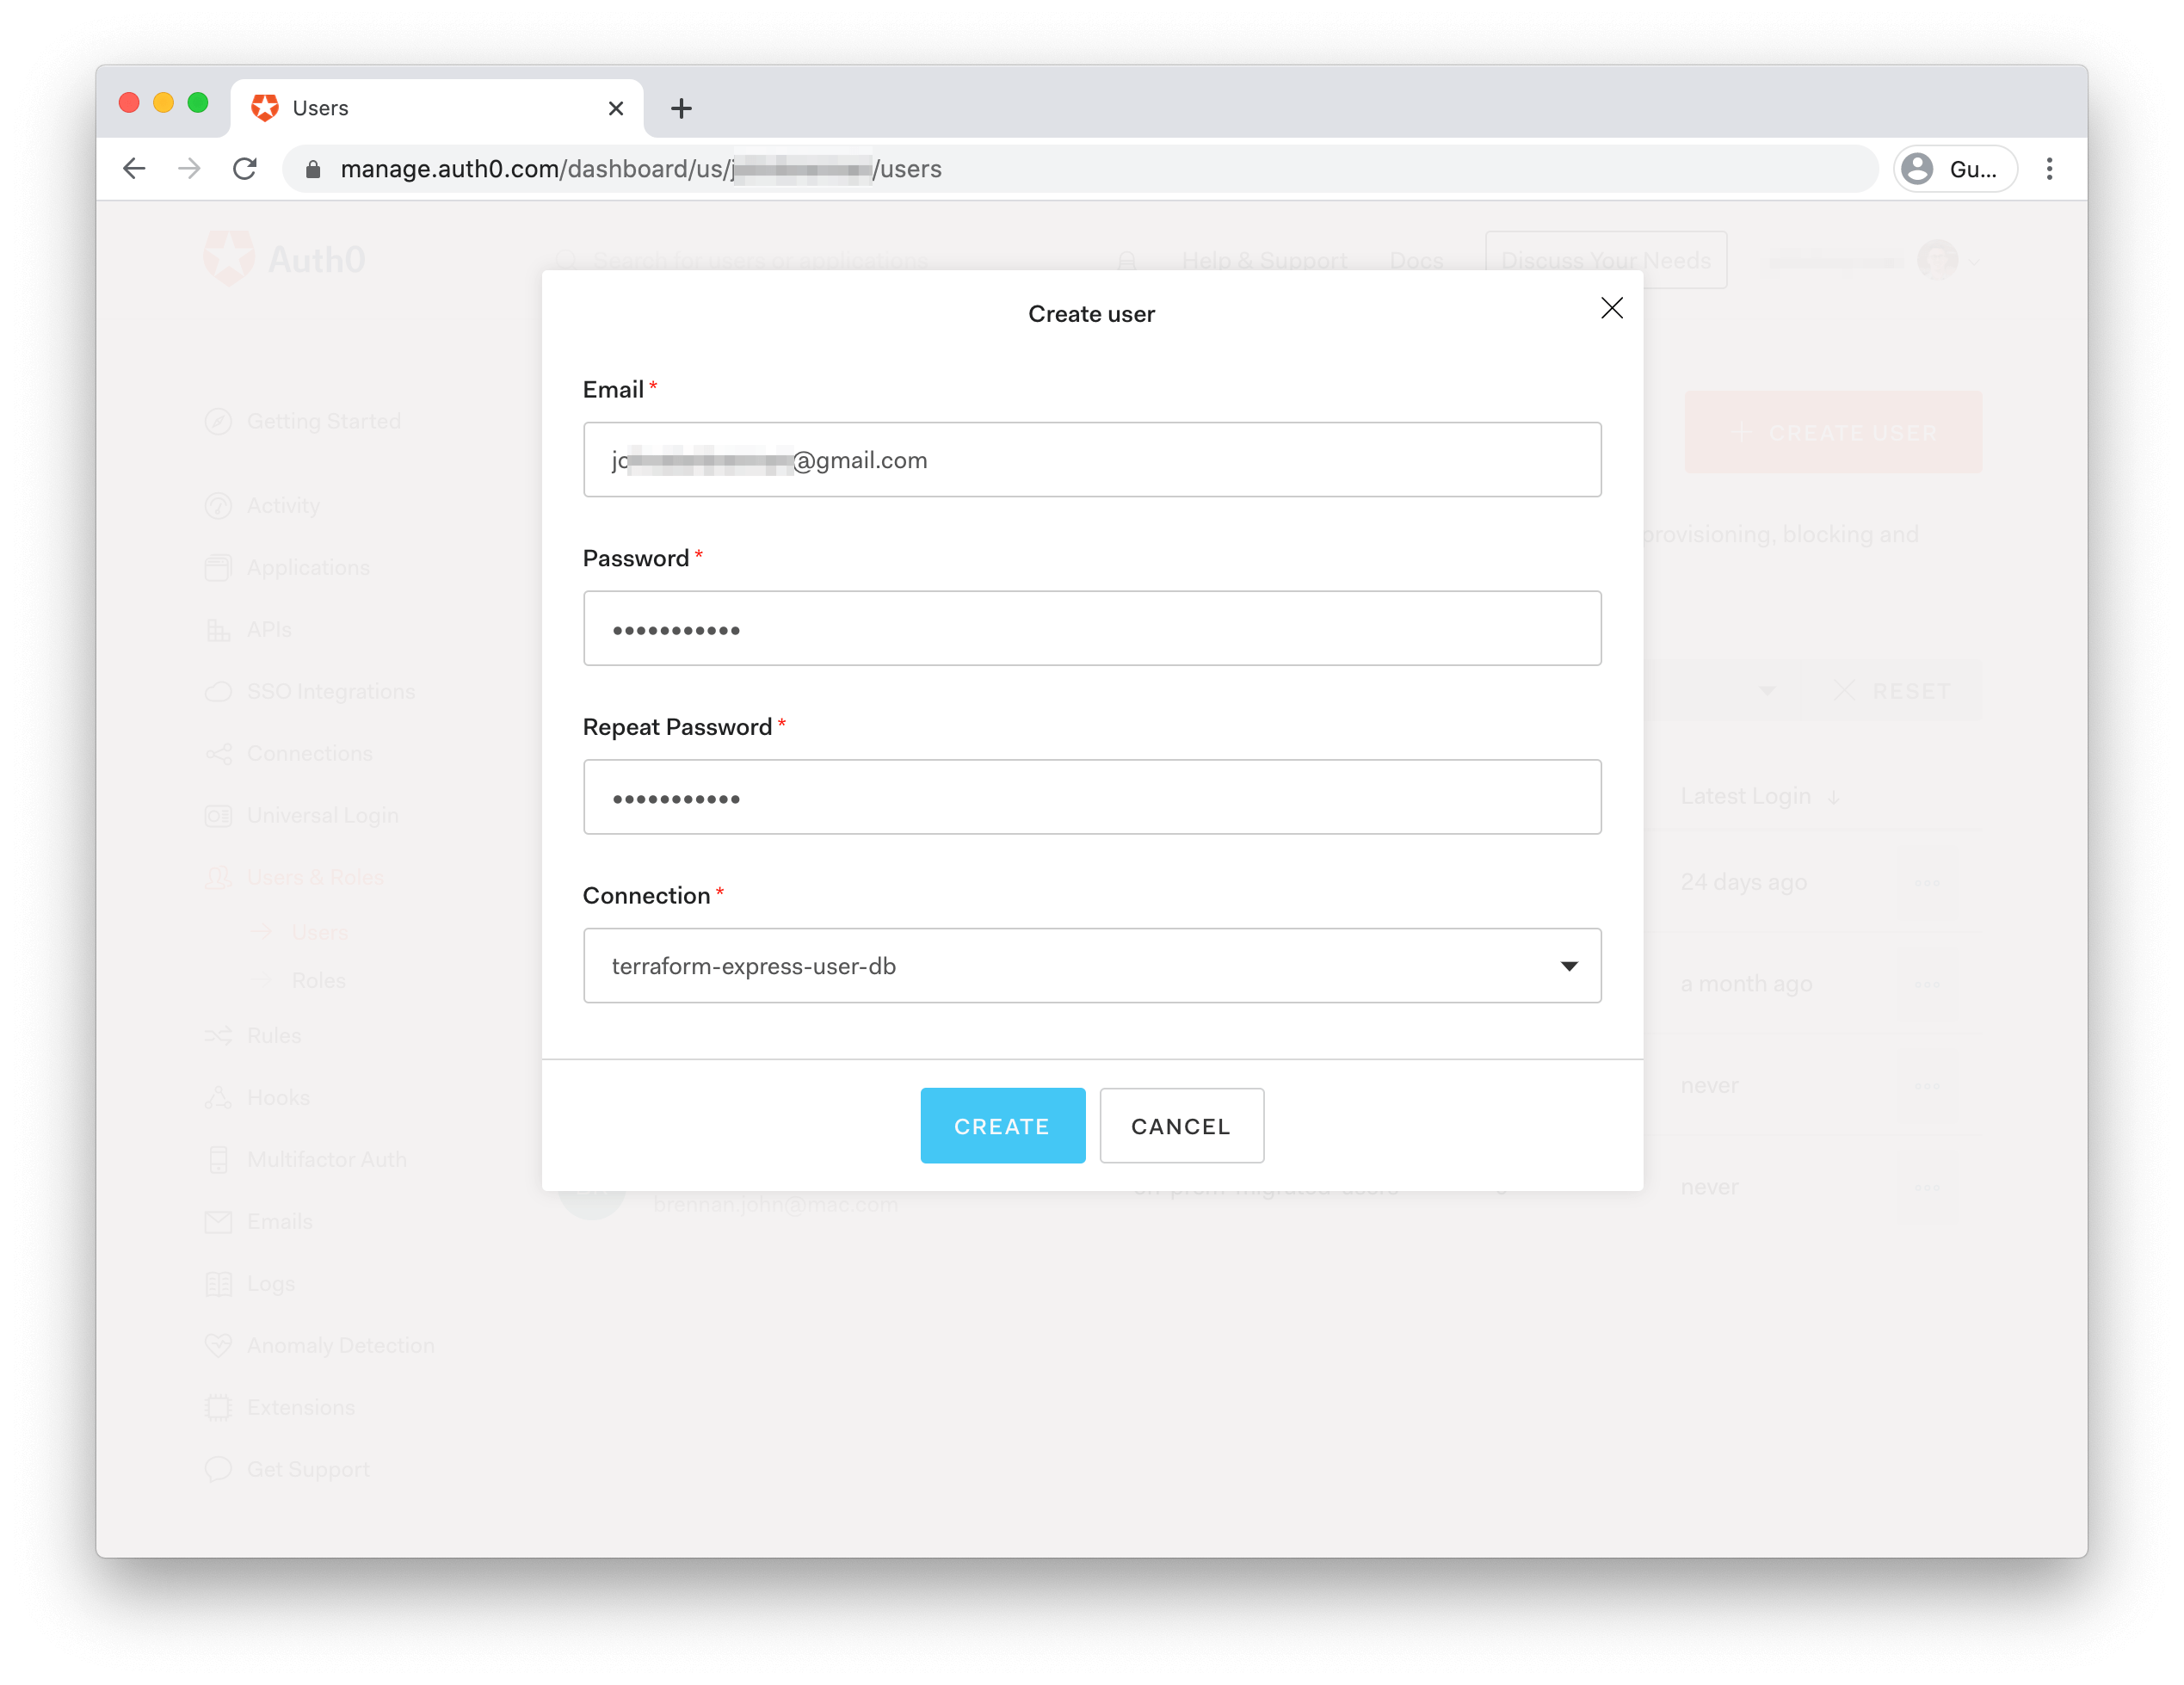
To verify the rule in the Auth0 UI, you can head to the Rules page. To test it, you can create a test user for your app using the Auth0 UI. Head to Users and click "Create User" in the top right. Fill in the following details:
- Email: a real email address (as you'll need to verify the user via email)
- Password: choose a sufficiently secure password.
- Connection: choose the
terraform-express-user-dbConnection.
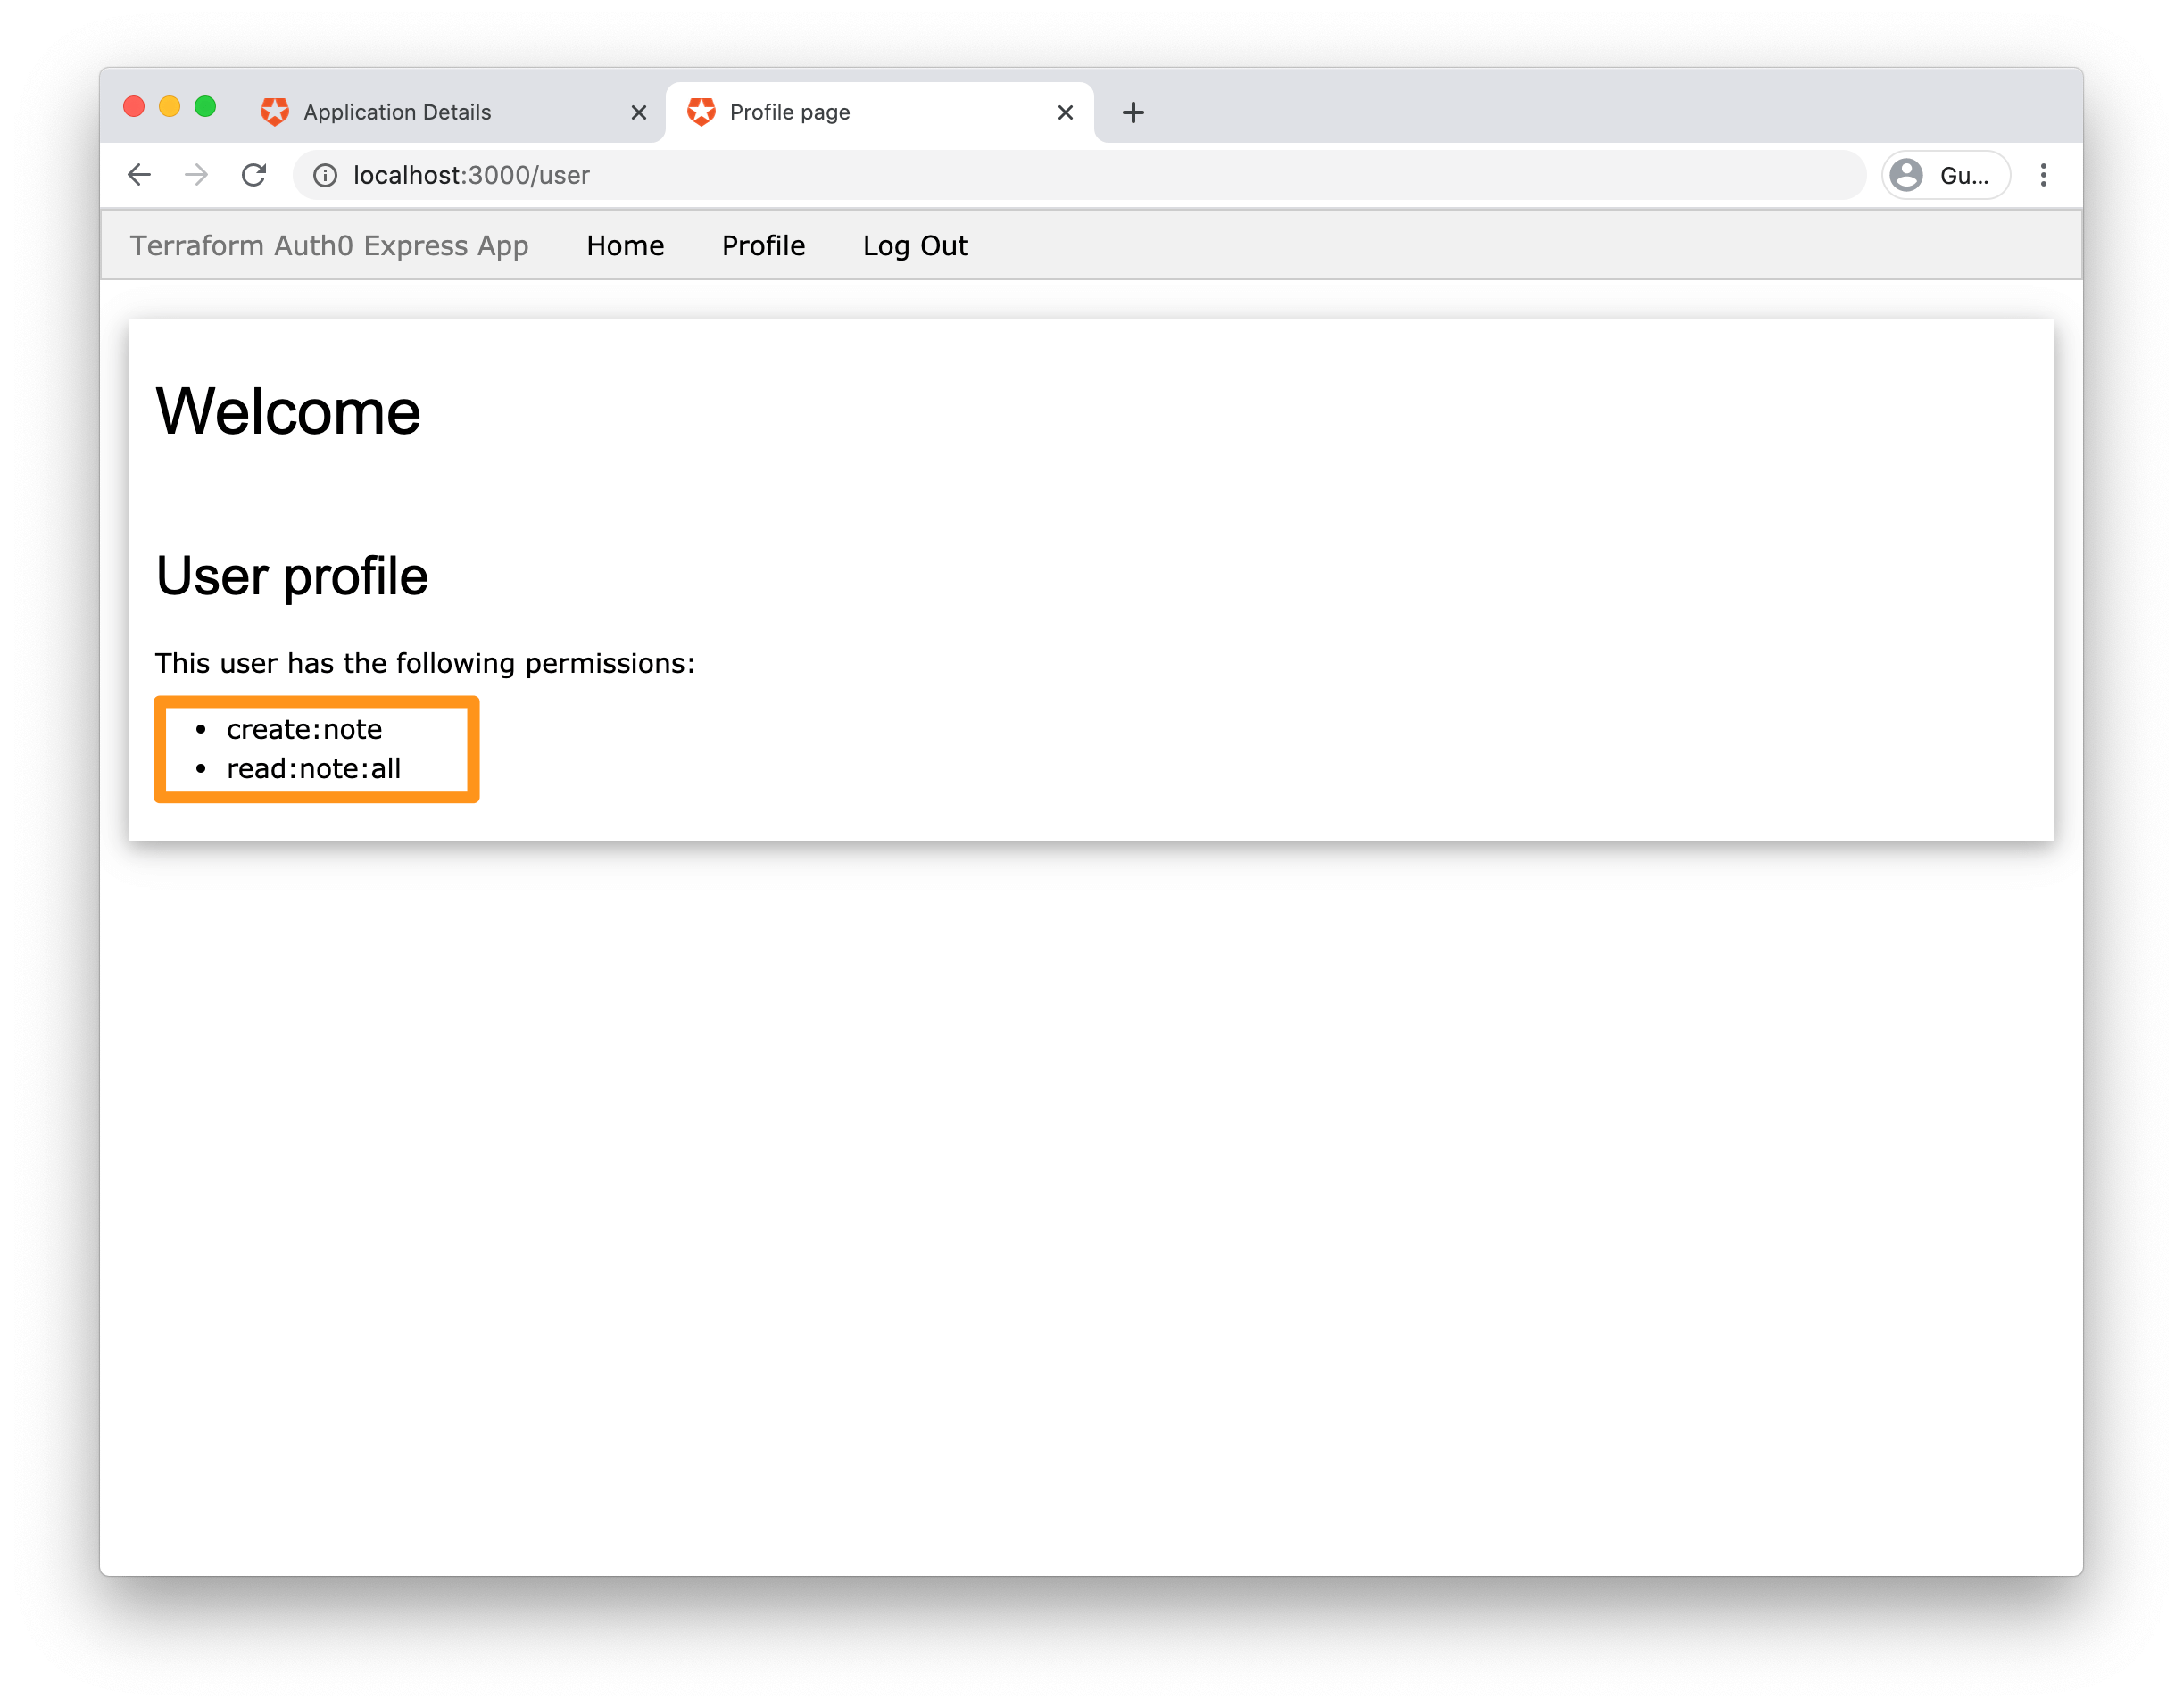
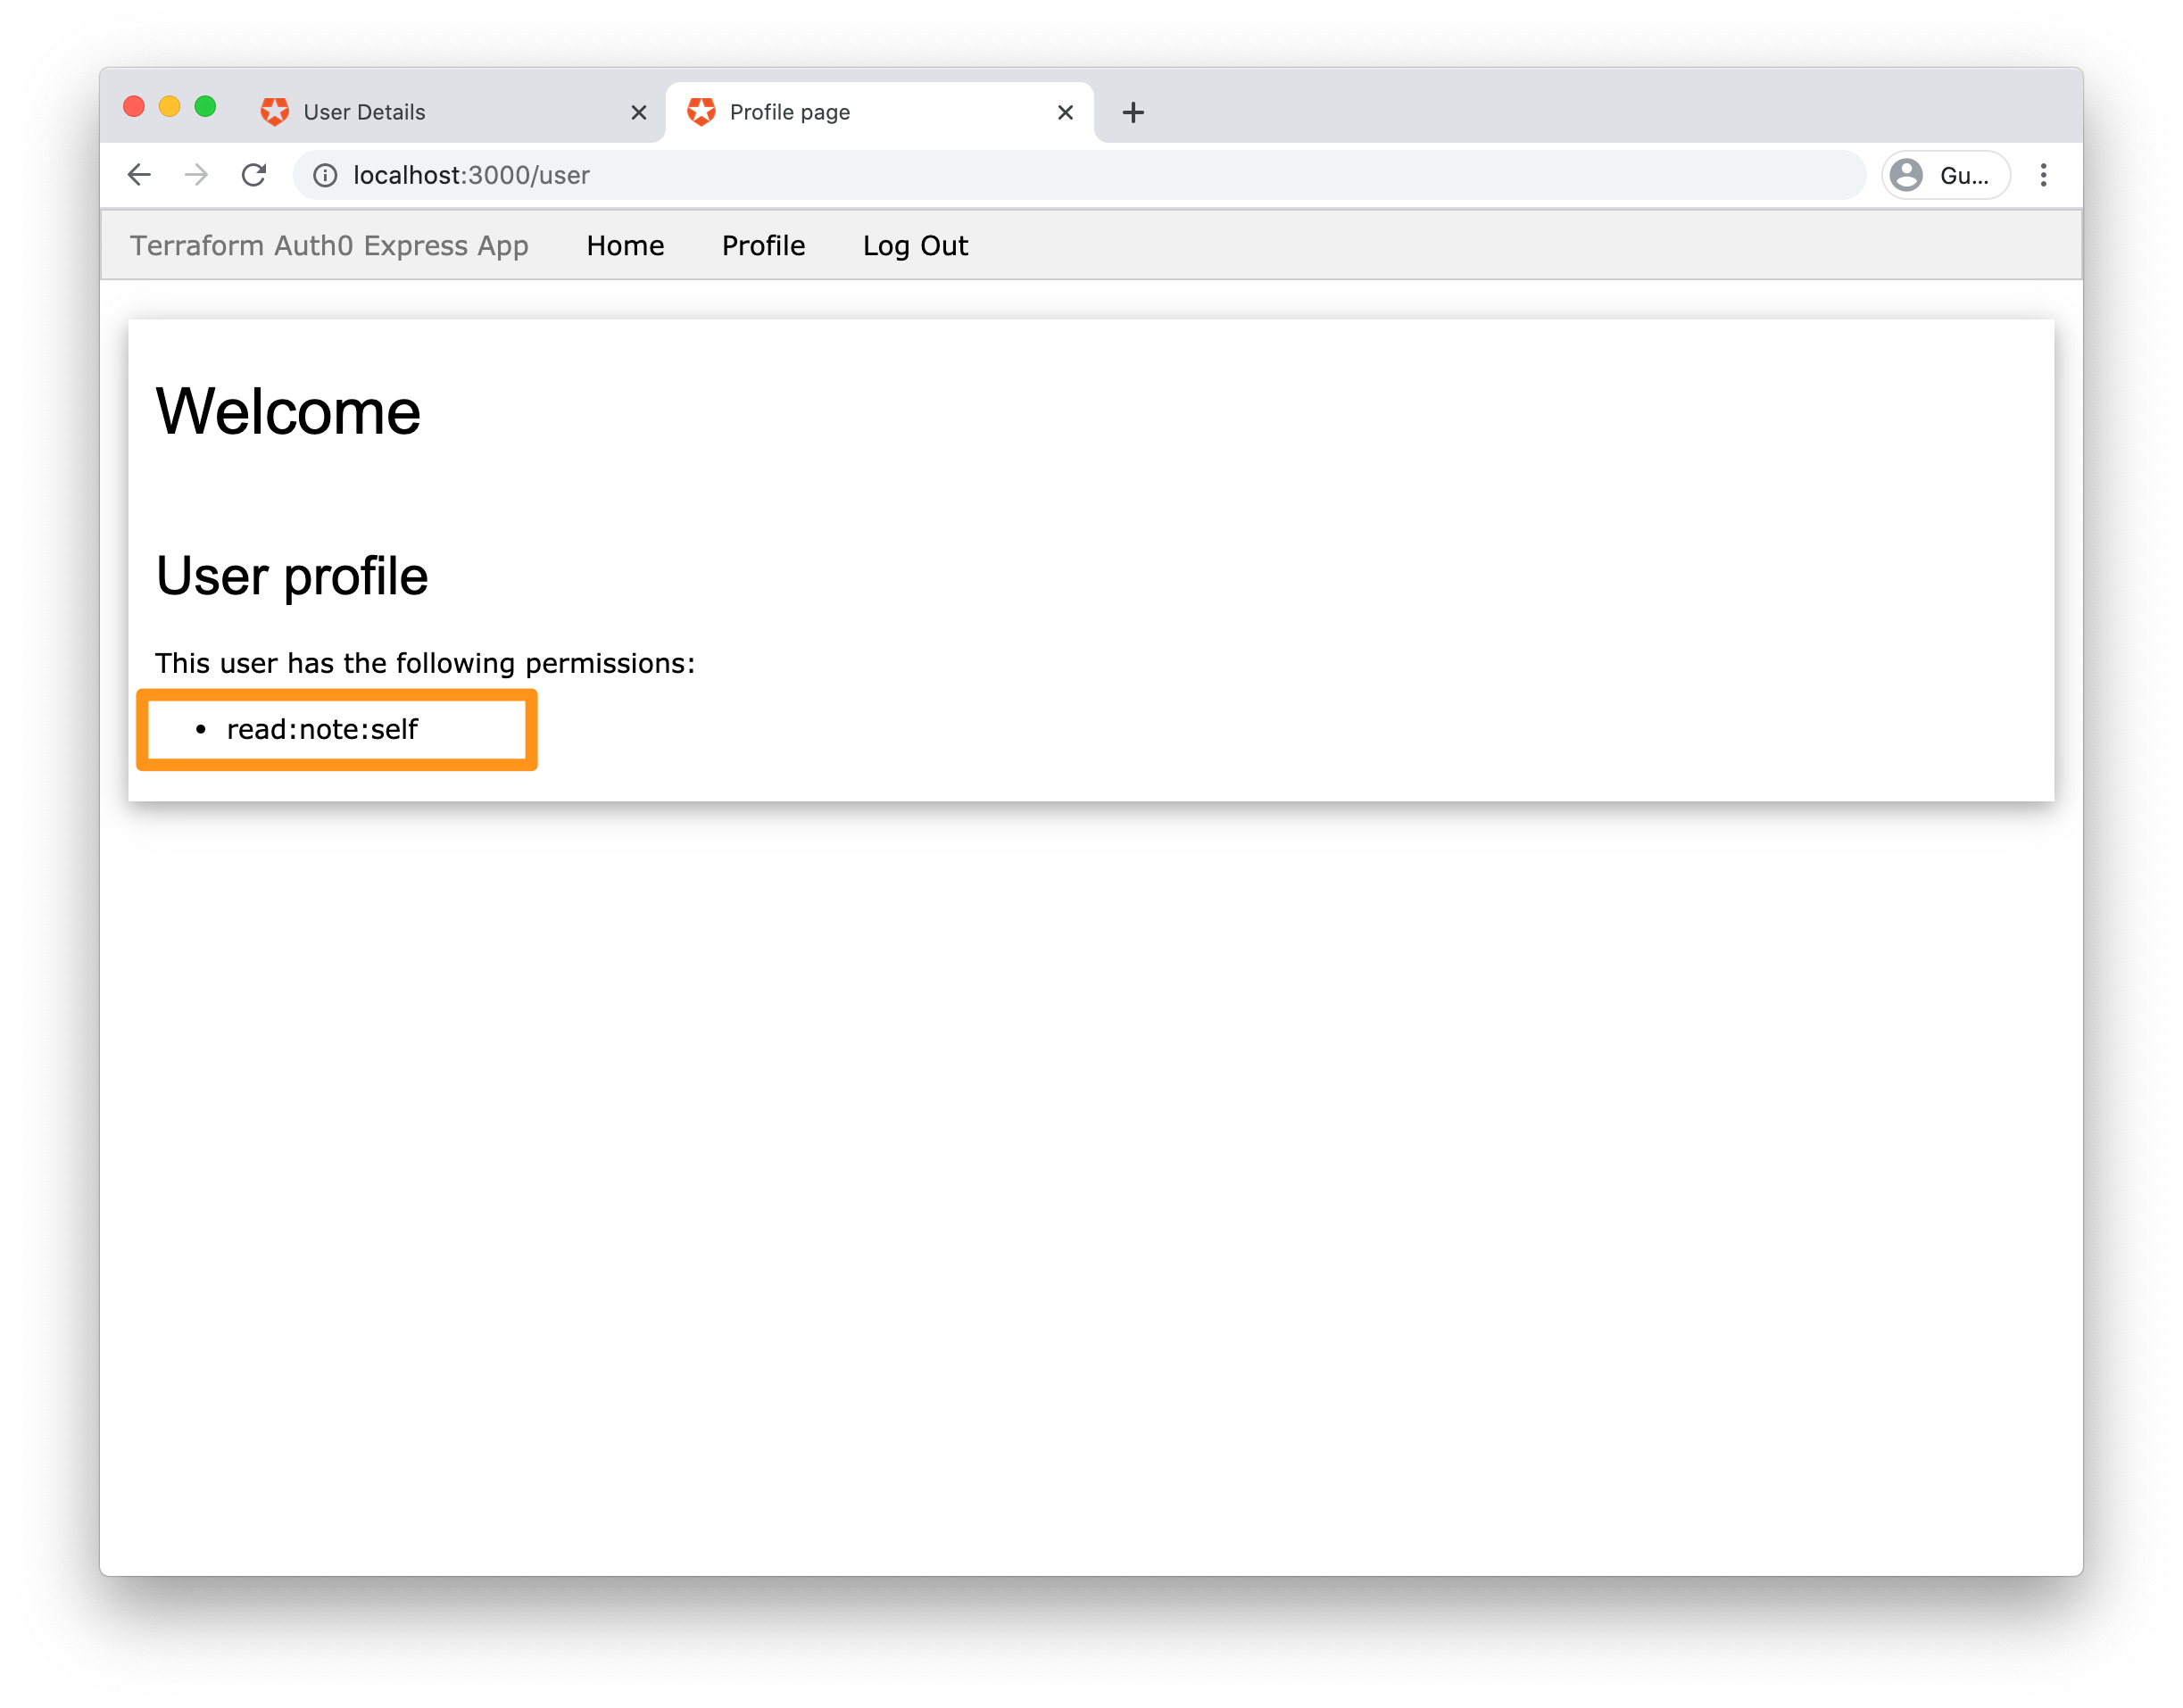
After you've created the user, sign in to your app http://localhost:3000 with the new credentials. You should be able to log in correctly and see the read:note:self permission listed on the application's page.
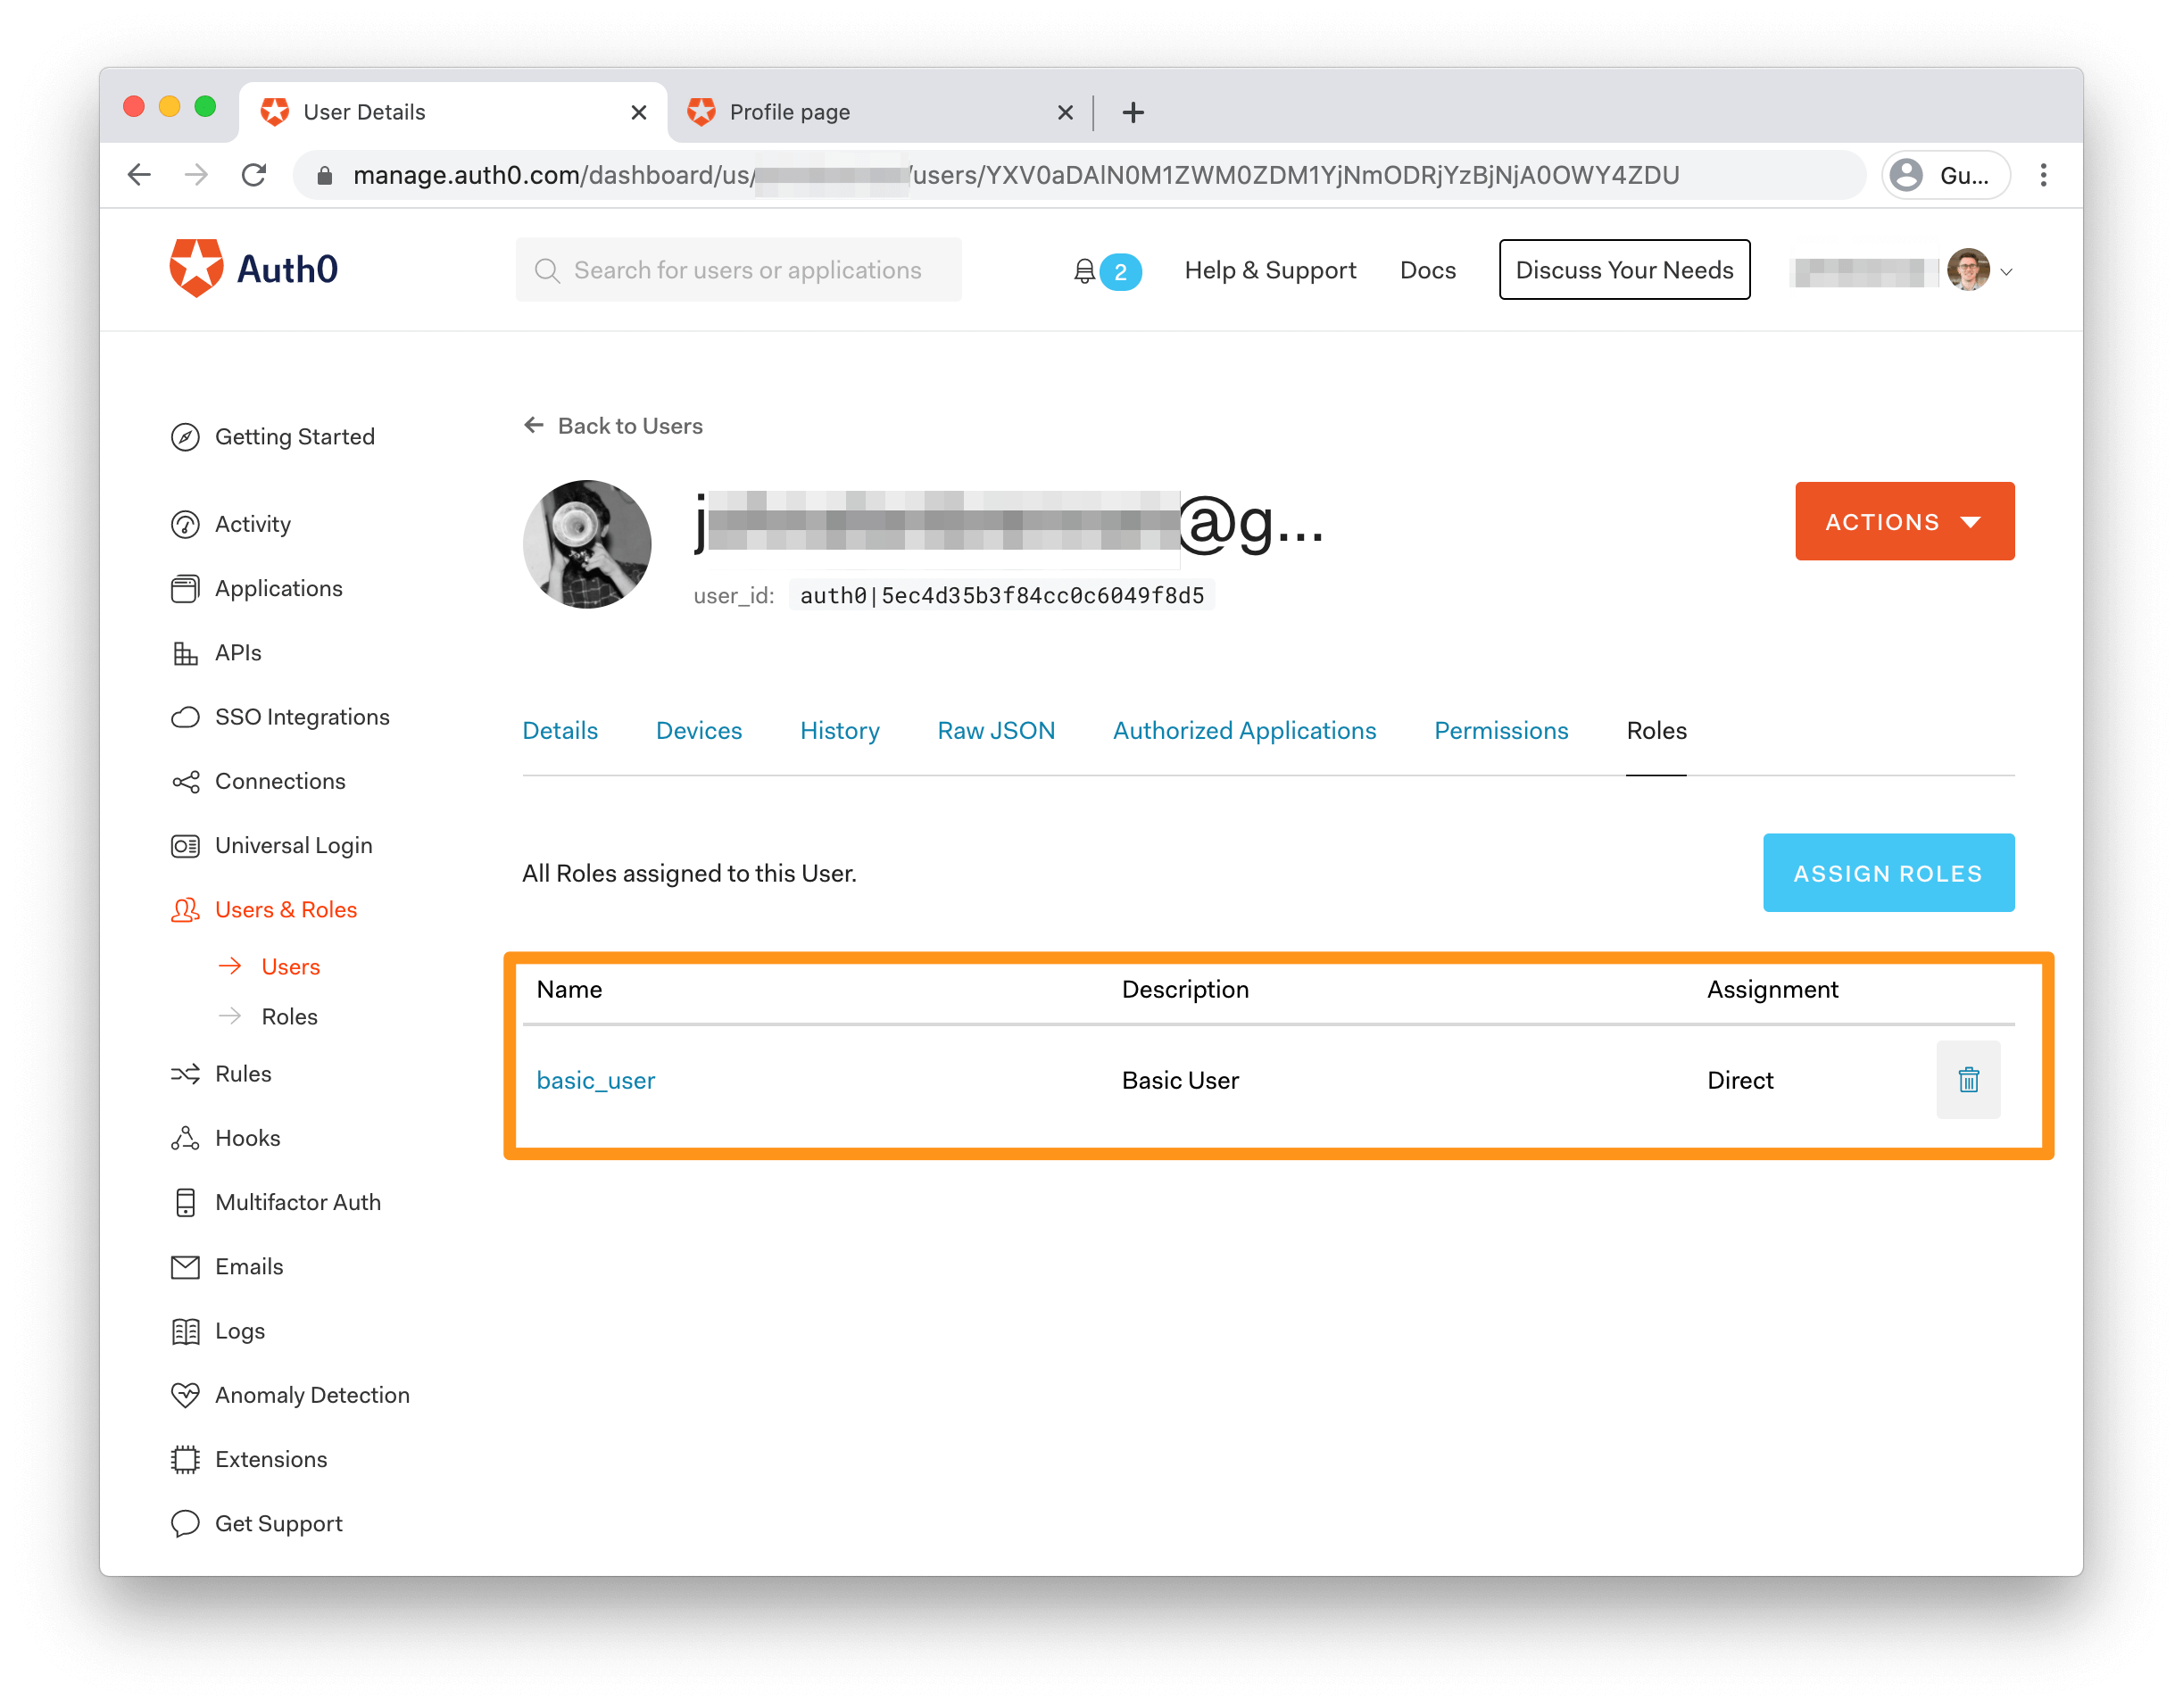
If you go back to the Auth0 Users Dashboard and click on the details for your signed-in user, you should see that they now have the basic_user role assigned:
If you check the repository, you'll see that the code is split in different files to increase readability. This is easy refactoring to do as you extend your solution. You can specify the version of terraform that you use in a versions.tf file:
terraform {
  required_version = ">= 0.13"
}
And in a .terraform-version file for tfenv:
0.13.0
This is particularly convenient if you're collaborating with other developers.
Conclusion
In this tutorial, you've taken a containerized Express application and wired it up to many common parts of the Auth0 ecosystem: Apps, APIs, Database Connections, Users, Roles, and Rules. Hopefully, you've got a sense of the power and simplicity of both the infrastructure-as-code paradigm and managing your Auth0 configuration through Terraform.
“Terraform makes managing your Auth0 configuration straightforward and helps manage complexity as your infrastructure needs grow.”
Tweet This
If you want to see the completed application source, you can find it on the complete branch of the GitHub repository.
Terraform is fantastic for managing your infrastructure changes as your needs and complexity grow over time. It can also extend to manage multi-tenant setups for easily configuring dev/test/production environments, including connecting to cloud providers like AWS and Azure. We'll be tackling topics such as these in a future post, so stay tuned!
About the author

John Brennan
R&D Content Engineer (Auth0 Alumni)