
TL;DR: This article will show you how to implement a reverse proxy in C# and .NET Core to overcome specific needs that you could hardly solve with an out-of-the-box software. You can find the code of the final project on this GitHub repository.
Using a Reverse Proxy
Among the various elements of a network infrastructure (such as DNS servers, firewalls, proxies and similar), reverse proxies gained a lot of popularity not only among IT people but also among developers. This is mainly due to the growth in popularity of microservice architectures and to advanced integration needs between technical partners.
What is a Reverse Proxy
A standard proxy server acts as an intermediary between a client and a server in order to perform processing like caching, traffic monitoring, resource access control, etc. The relevant thing is that the client requests to contact a specific server and the proxy, after evaluating how to satisfy this request, contacts the target server on behalf of the client.
A reverse proxy is a special type of proxy server that hides the target server to the client. The client requests a resource to the proxy server which retrieves it from another server and provides it to the client. In this case, the client has no idea that the resource comes from another server.
Why Use a Reverse Proxy
A reverse proxy can be used in different contexts:
Load balancing:
Maybe this is one of the most familiar uses of a reverse proxy. It can distribute the requests load among a set of identical servers accordingly to some specific algorithm providing support for scalability and availability of a system.
URL rewriting:
Having meaningful URLs is crucial from an SEO standpoint. If you cannot change the URLs of your website, you can hide them behind a reverse proxy that exposes to users and web crawlers a more attractive version.
Static content serving:
Many reverse proxy servers may be configured to act as web servers. This allows you to use them for providing static content, such as HTML pages, JavaScript scripts, images, and other files while forwarding requests for dynamic content to dedicated servers. This is a sort of load balancing based on the content type.
API gateway:
In a system with a microservice architecture, you have multiple servers offering different services through their APIs. You can use a reverse proxy to expose a single entry point for the combination of the server's APIs.
Multiple website combining:
This is pretty similar to the API gateway context. In this case, you can have a single entry point for multiple websites, possibly with a centralized homepage.
Why Implementing a Custom Reverse Proxy
One of the most popular reverse proxies is NGINX. Of course, you can use other tools like Pound or Squid, or you can also configure the Apache Web server to act as a reverse proxy. These tools offer a lot of configuration options that allow you to set up your system in most common scenarios. Some of them also provide the ability to extend their functionality with scripting languages, such as, for example, the Lua scripting language in NGINX. This capability allows you to meet some processing needs that the simple server configuration doesn't provide: HTTP header manipulation, conditional request forwarding, simple content transformation, etc.
However, you may find scenarios where even an integrated scripting language is not enough for your needs due to the complexity of the scenario itself or because the scripts become hard to maintain. Consider, for example, a scenario where you need to expose a remote Web application within the current domain and need to prepare the HTTP requests by injecting data from a database and manipulate the responses to integrate them in the current environment. Or a scenario where you need to apply complex custom rules to analyze the HTTP traffic.
If you are in such a situation, you may need to build your own custom reverse proxy.
Implementing a Reverse Proxy in C#
Implementing the core of your own reverse proxy is not so hard as it may sound. Of course, you will be unlikely to create a reverse proxy with all the options that NGINX or other similar tools can provide. However, you can focus on your specific goal in order to solve it at your best without resorting to complex configurations and scripts.
In the remainder of this article, you will build a simple reverse proxy in C# that will allow you to integrate into your website a Google form. The form is publicly available without authentication and allows users to register to receive a T-shirt. When integrated into your Web application through the reverse proxy, it will be pre-filled with some personal data of the current user. Of course, the implementation of the Web application will be kept simple in order to focus on the challenges related to the reverse proxy. Let's start coding!
Setting up the Project
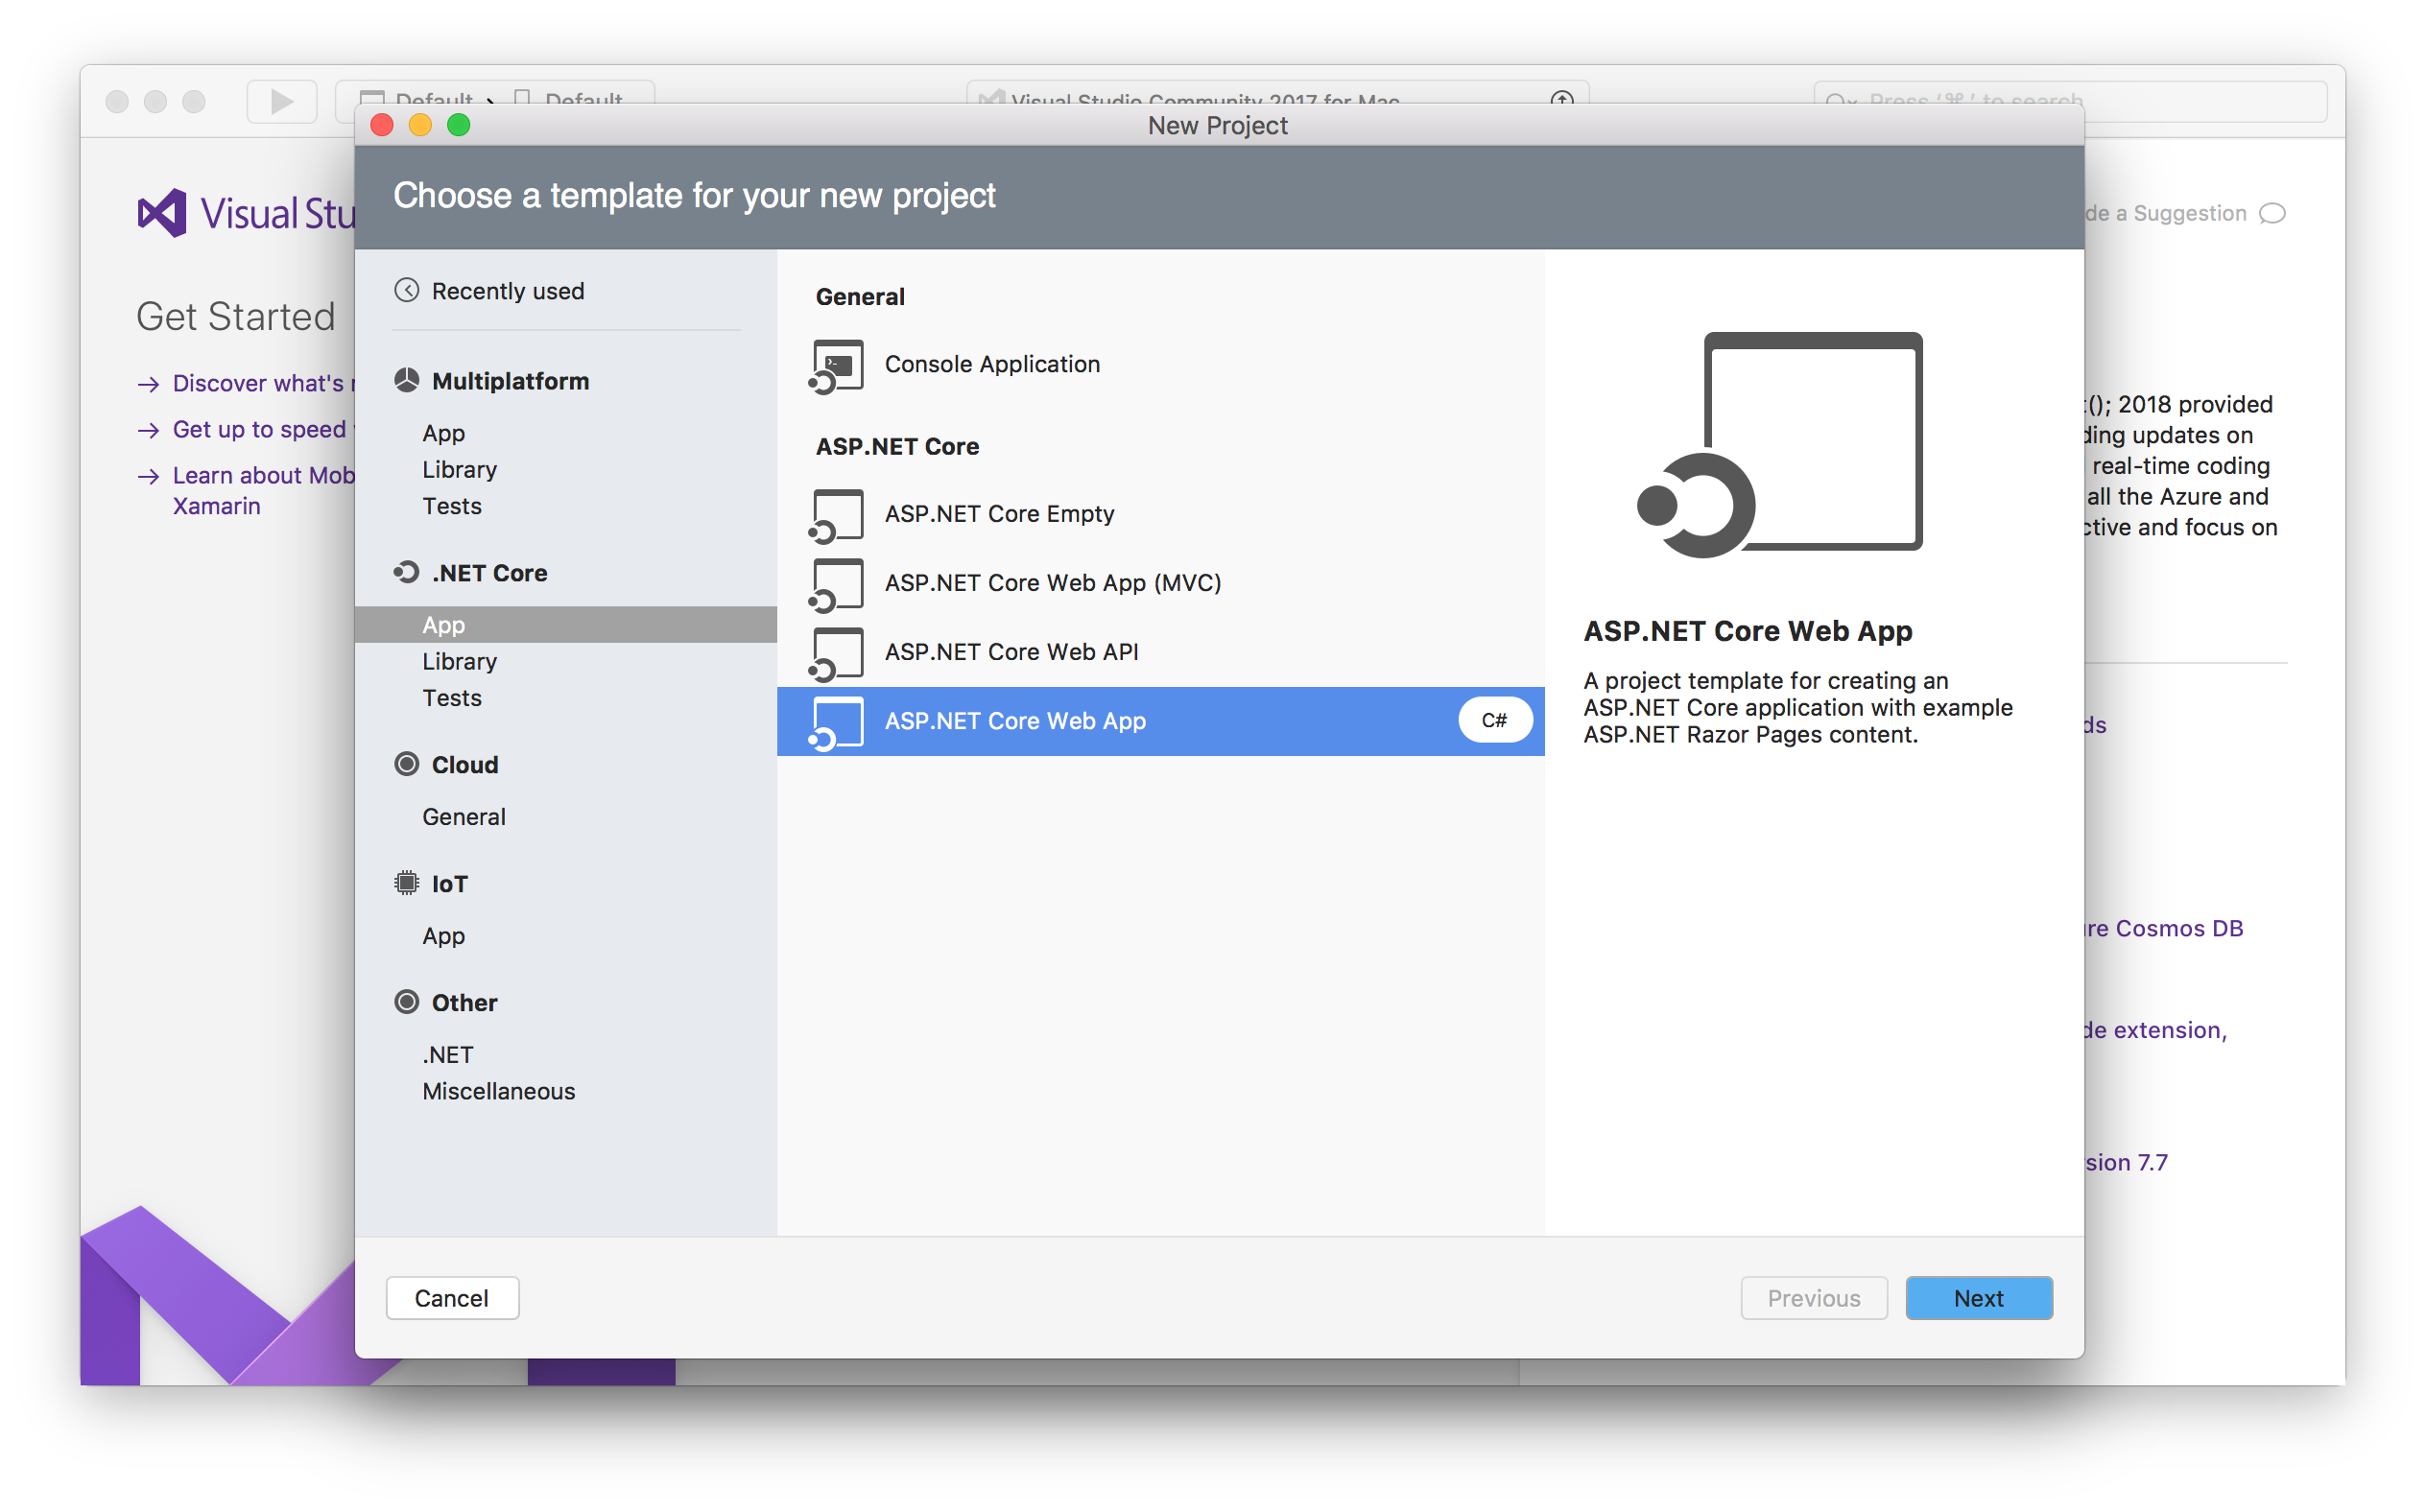
You can create a new .NET Core project by using Visual Studio or via command line.
By using Visual Studio, you choose the empty ASP.NET Core template as shown in the following picture:
Or, you can create the same project template by typing the following command in a console window:
dotnet new web -n ReverseProxyApplication
You should get the following screen in a few seconds:
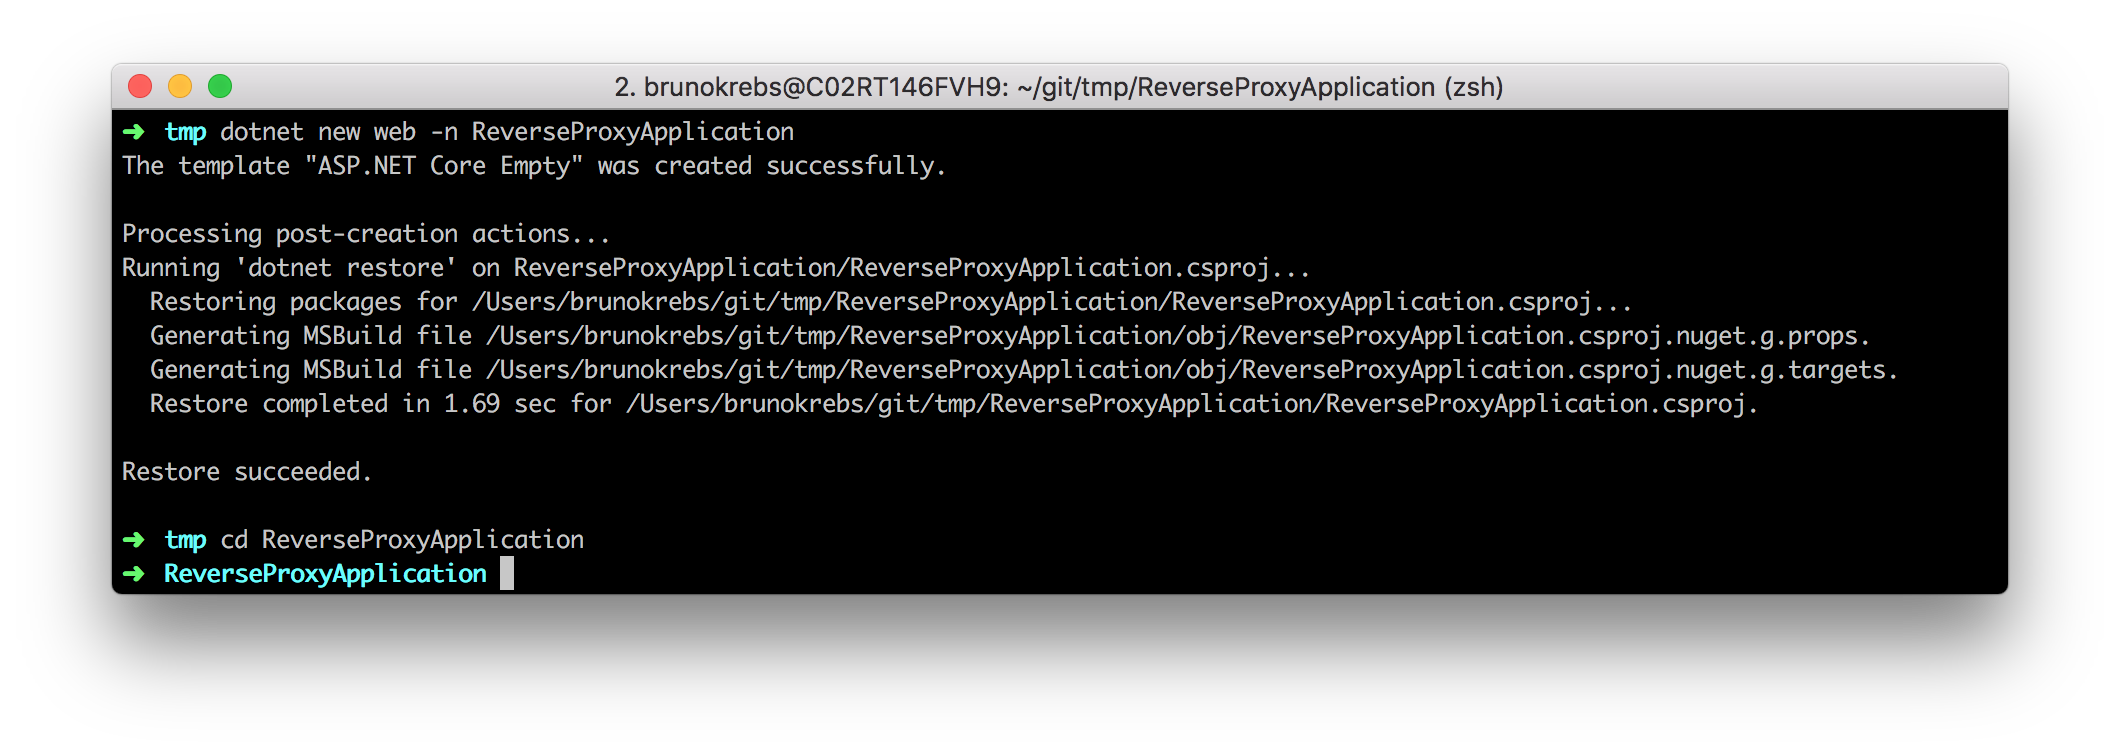
Regardless of your choice, you will get the minimal project files for an empty ASP.NET application in the folder you have specified.
Adding the Reverse Proxy Middleware
Recalling the definition of a reverse proxy, you need to intercept some HTTP requests and redirect them to another server without the client knowing it. In the .NET Core infrastructure, you can obtain this by implementing a middleware. A middleware is a component that use to intercept HTTP request and responses to manipulate them as needed.
So, add a new file to the project named ReverseProxyMiddleware.cs with the following content:
// ReverseProxyApplication/ReverseProxyMiddleware.cs
using Microsoft.AspNetCore.Http;
using System;
using System.Linq;
using System.Net.Http;
using System.Threading.Tasks;

namespace ReverseProxyApplication
{
  public class ReverseProxyMiddleware
  {
    private static readonly HttpClient _httpClient = new HttpClient();
    private readonly RequestDelegate _nextMiddleware;

    public ReverseProxyMiddleware(RequestDelegate nextMiddleware)
    {
      _nextMiddleware = nextMiddleware;
    }

    public async Task Invoke(HttpContext context)
    {
      var targetUri = BuildTargetUri(context.Request);

      if (targetUri != null)
      {
        var targetRequestMessage = CreateTargetMessage(context, targetUri);

        using (var responseMessage = await _httpClient.SendAsync(targetRequestMessage, HttpCompletionOption.ResponseHeadersRead, context.RequestAborted))
        {
          context.Response.StatusCode = (int)responseMessage.StatusCode;
          CopyFromTargetResponseHeaders(context, responseMessage);
          await responseMessage.Content.CopyToAsync(context.Response.Body);
        }
        return;
      }
      await _nextMiddleware(context);
    }

    private HttpRequestMessage CreateTargetMessage(HttpContext context, Uri targetUri)
    {
      var requestMessage = new HttpRequestMessage();
      CopyFromOriginalRequestContentAndHeaders(context, requestMessage);

      requestMessage.RequestUri = targetUri;
      requestMessage.Headers.Host = targetUri.Host;
      requestMessage.Method = GetMethod(context.Request.Method);

      return requestMessage;
    }

    private void CopyFromOriginalRequestContentAndHeaders(HttpContext context, HttpRequestMessage requestMessage)
    {
      var requestMethod = context.Request.Method;

      if (!HttpMethods.IsGet(requestMethod) &&
        !HttpMethods.IsHead(requestMethod) &&
        !HttpMethods.IsDelete(requestMethod) &&
        !HttpMethods.IsTrace(requestMethod))
      {
        var streamContent = new StreamContent(context.Request.Body);
        requestMessage.Content = streamContent;
      }

      foreach (var header in context.Request.Headers)
      {
        requestMessage.Content?.Headers.TryAddWithoutValidation(header.Key, header.Value.ToArray());
      }
    }

    private void CopyFromTargetResponseHeaders(HttpContext context, HttpResponseMessage responseMessage)
    {
      foreach (var header in responseMessage.Headers)
      {
        context.Response.Headers[header.Key] = header.Value.ToArray();
      }

      foreach (var header in responseMessage.Content.Headers)
      {
        context.Response.Headers[header.Key] = header.Value.ToArray();
      }
      context.Response.Headers.Remove("transfer-encoding");
    }
    private static HttpMethod GetMethod(string method)
    {
      if (HttpMethods.IsDelete(method)) return HttpMethod.Delete;
      if (HttpMethods.IsGet(method)) return HttpMethod.Get;
      if (HttpMethods.IsHead(method)) return HttpMethod.Head;
      if (HttpMethods.IsOptions(method)) return HttpMethod.Options;
      if (HttpMethods.IsPost(method)) return HttpMethod.Post;
      if (HttpMethods.IsPut(method)) return HttpMethod.Put;
      if (HttpMethods.IsTrace(method)) return HttpMethod.Trace;
      return new HttpMethod(method);
    }

    private Uri BuildTargetUri(HttpRequest request)
    {
      Uri targetUri = null;

      if (request.Path.StartsWithSegments("/googleforms", out var remainingPath))
      {
        targetUri = new Uri("https://docs.google.com/forms" + remainingPath);
      }

      return targetUri;
    }
  }
}
Here you have defined a ReverseProxyMiddleware class with two private properties:
private static readonly HttpClient _httpClient = new HttpClient();
private readonly RequestDelegate _nextMiddleware;
The _httpClient property defines the HTTP client you will use to pass requests to the target server, while the _nextMiddleware property represents any subsequent middleware in the ASP.NET HTTP pipeline. You initialize the _nextMiddleware property in the class constructor as follows:
public ReverseProxyMiddleware(RequestDelegate nextMiddleware)
{
  _nextMiddleware = nextMiddleware;
}
Most of the work is done by the Invoke() method, as you can see in the following snippet of code:
public async Task Invoke(HttpContext context)
{
  var targetUri = BuildTargetUri(context.Request);

  if (targetUri != null)
  {
    var targetRequestMessage = CreateTargetMessage(context, targetUri);

    using (var responseMessage = await _httpClient.SendAsync(targetRequestMessage, HttpCompletionOption.ResponseHeadersRead, context.RequestAborted))
    {
      context.Response.StatusCode = (int)responseMessage.StatusCode;
      CopyFromTargetResponseHeaders(context, responseMessage);
      await responseMessage.Content.CopyToAsync(context.Response.Body);
    }
    return;
  }
  await _nextMiddleware(context);
}
This method tries to build the target URI, that is the address of the target server, starting from the current HTTP context. If a target Uri has been returned by the BuildTargetUri() method, it means that the original HTTP request should be forwarded to the target server, so the original request must be processed. Otherwise, the request is not processed by the current middleware, and it is passed to the next middleware in the pipeline.
When the request needs to be processed, it builds a message for the target server through the CreateTargetMessage() method and sends it by using the _httpClient private property. Then, the response received from the target server is entirely copied into the response to be provided to the client.
In summary, this code describes the standard workflow of a reverse proxy. You can find a few methods in the class supporting the copy of the content and the headers of the HTTP request and response, but the more interesting code is the one that builds the target Uri:
private Uri BuildTargetUri(HttpRequest request)
{
  Uri targetUri = null;

  if (request.Path.StartsWithSegments("/googleforms", out var remainingPath))
  {
    targetUri = new Uri("https://docs.google.com/forms" + remainingPath);
  }

  return targetUri;
}
As you can see, this code looks for requests whose path starts with the /googleforms string and returns a new URI by replacing that string with https://docs.google.com/forms, that is the base Uri of the Google Forms service. If the /googleforms prefix is not found, null will be returned.
Using the Reverse Proxy Middleware
Now, you are ready to use the reverse proxy middleware in the ASP.NET application. So, open the Startup.cs file and modify the Configure() method as shown in the following example:
// ReverseProxyApplication/Startup.cs
public void Configure(IApplicationBuilder app, IHostingEnvironment env)
{
  if (env.IsDevelopment())
  {
    app.UseDeveloperExceptionPage();
  }

  app.UseMiddleware<ReverseProxyMiddleware>();

  app.Run(async (context) =>
  {
    await context.Response.WriteAsync("<a href='/googleforms/d/e/1FAIpQLSdJwmxHIl_OCh-CI1J68G1EVSr9hKaYFLh3dHh8TLnxjxCJWw/viewform?hl=en'>Register to receive a T-shirt</a>");
  });
}
In this case, you are adding the reverse proxy middleware to the HTTP pipeline through the UseMiddleware() method. Also, you are changing the default content sent to the browser with a link pointing to the Google form via the internal URI prefix /googleforms. After this change, you can launch the Web application by pressing the start button in Visual Studio or by typing the dotnet run command in a console window.
The very first run from Visual Studio might display a message saying that "this project is configured to use SSL". This happens because, by default, Visual Studio configures the ASP.NET application to use HTTPS. So, the at the first run, an SSL certificate will be installed on your system. You should accept this alert and the subsequent alert asking confirmation about the certificate installation.
When the ASP.NET application is running, you can point your browser to localhost:5000. There, you will see a blank screen with a link to the Google Forms:
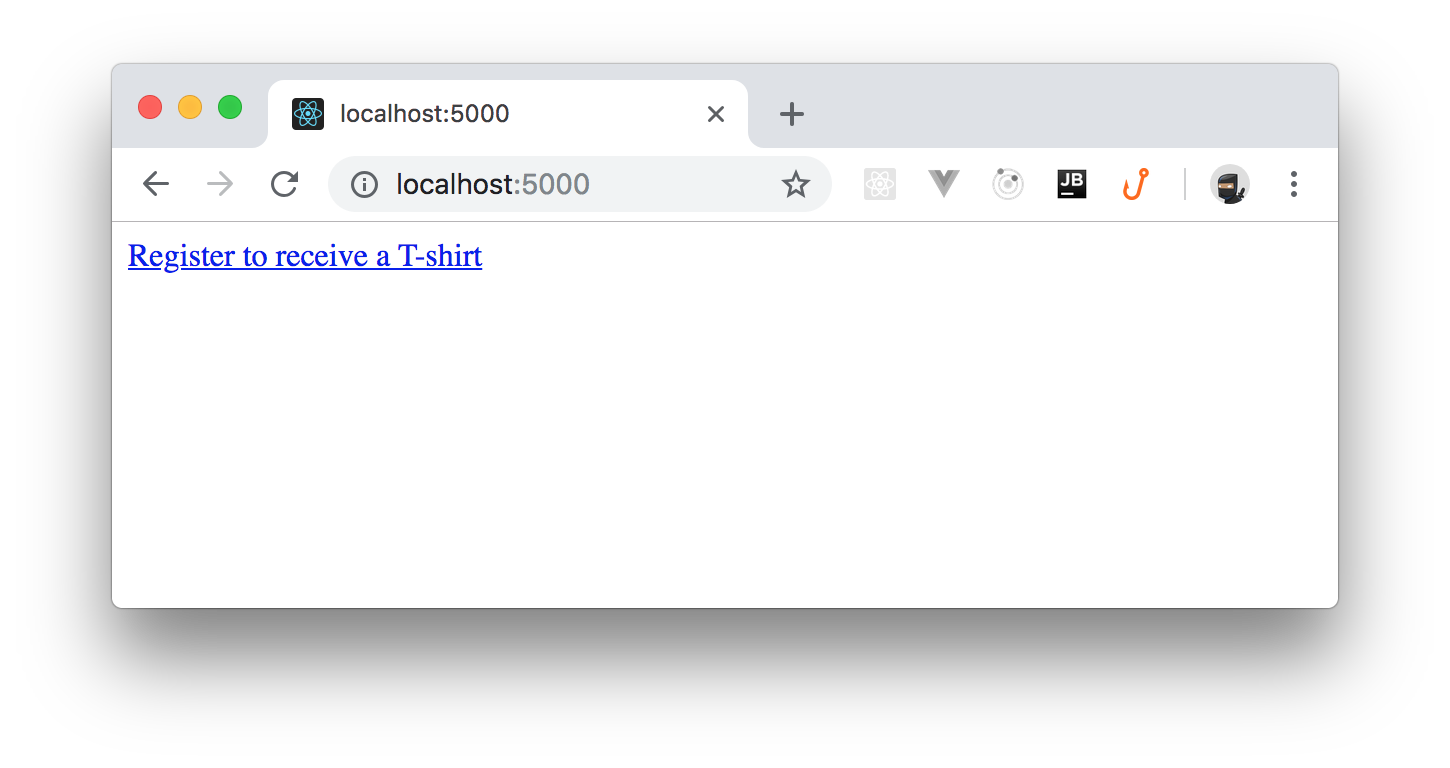
By clicking this link, you should get a page that shows the Google Form as it was being served from your project.
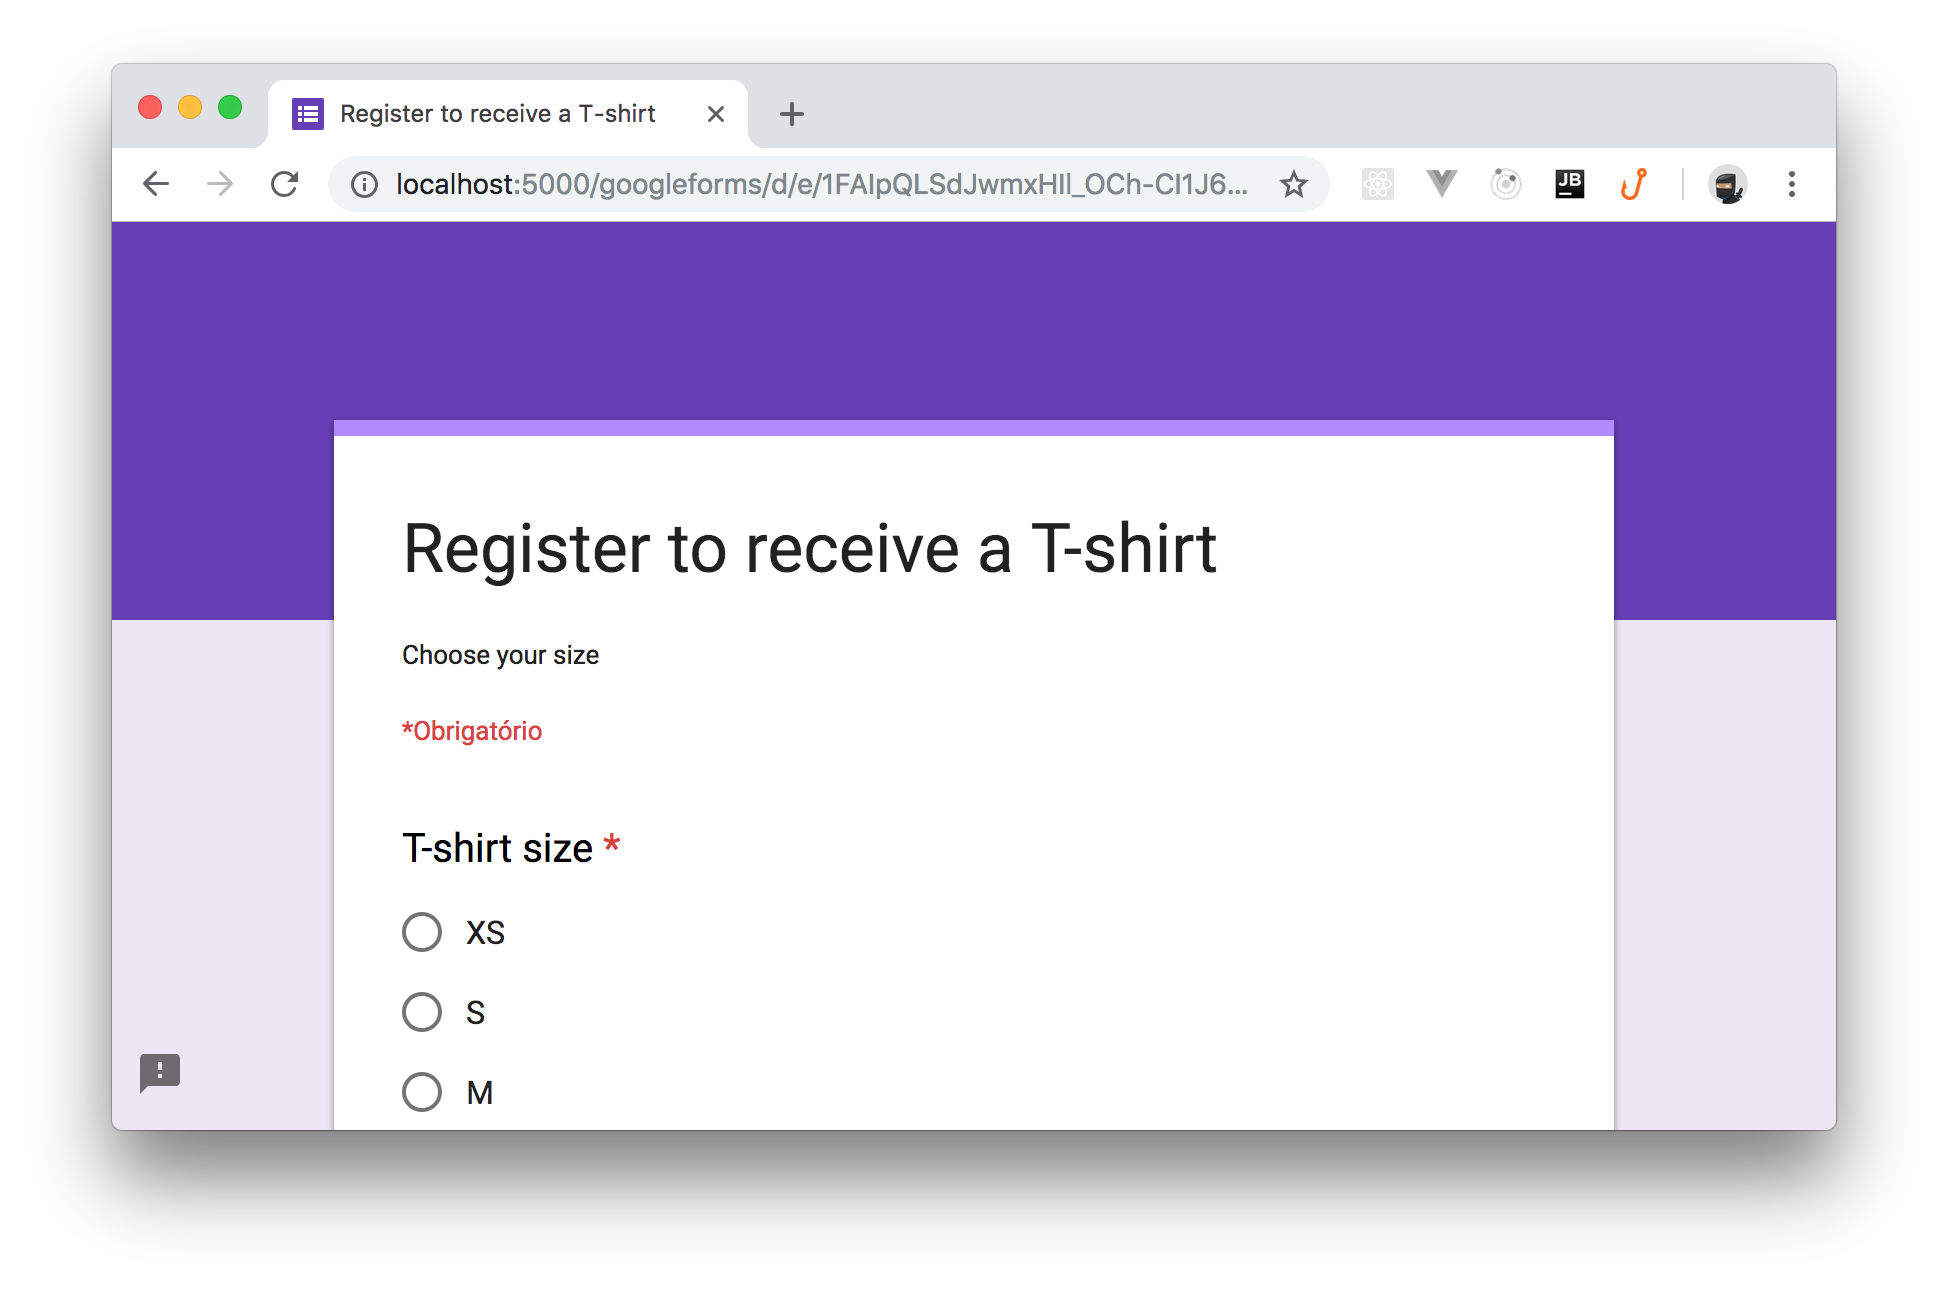
Awesome! It is working. Notice that the URL in the address bar remains inside your application domain.
However, if you try to select the size of the T-shirt or to add a comment, you feel that something is wrong. Actually, if you open the developer tools of your browser, you get a lot of error messages:
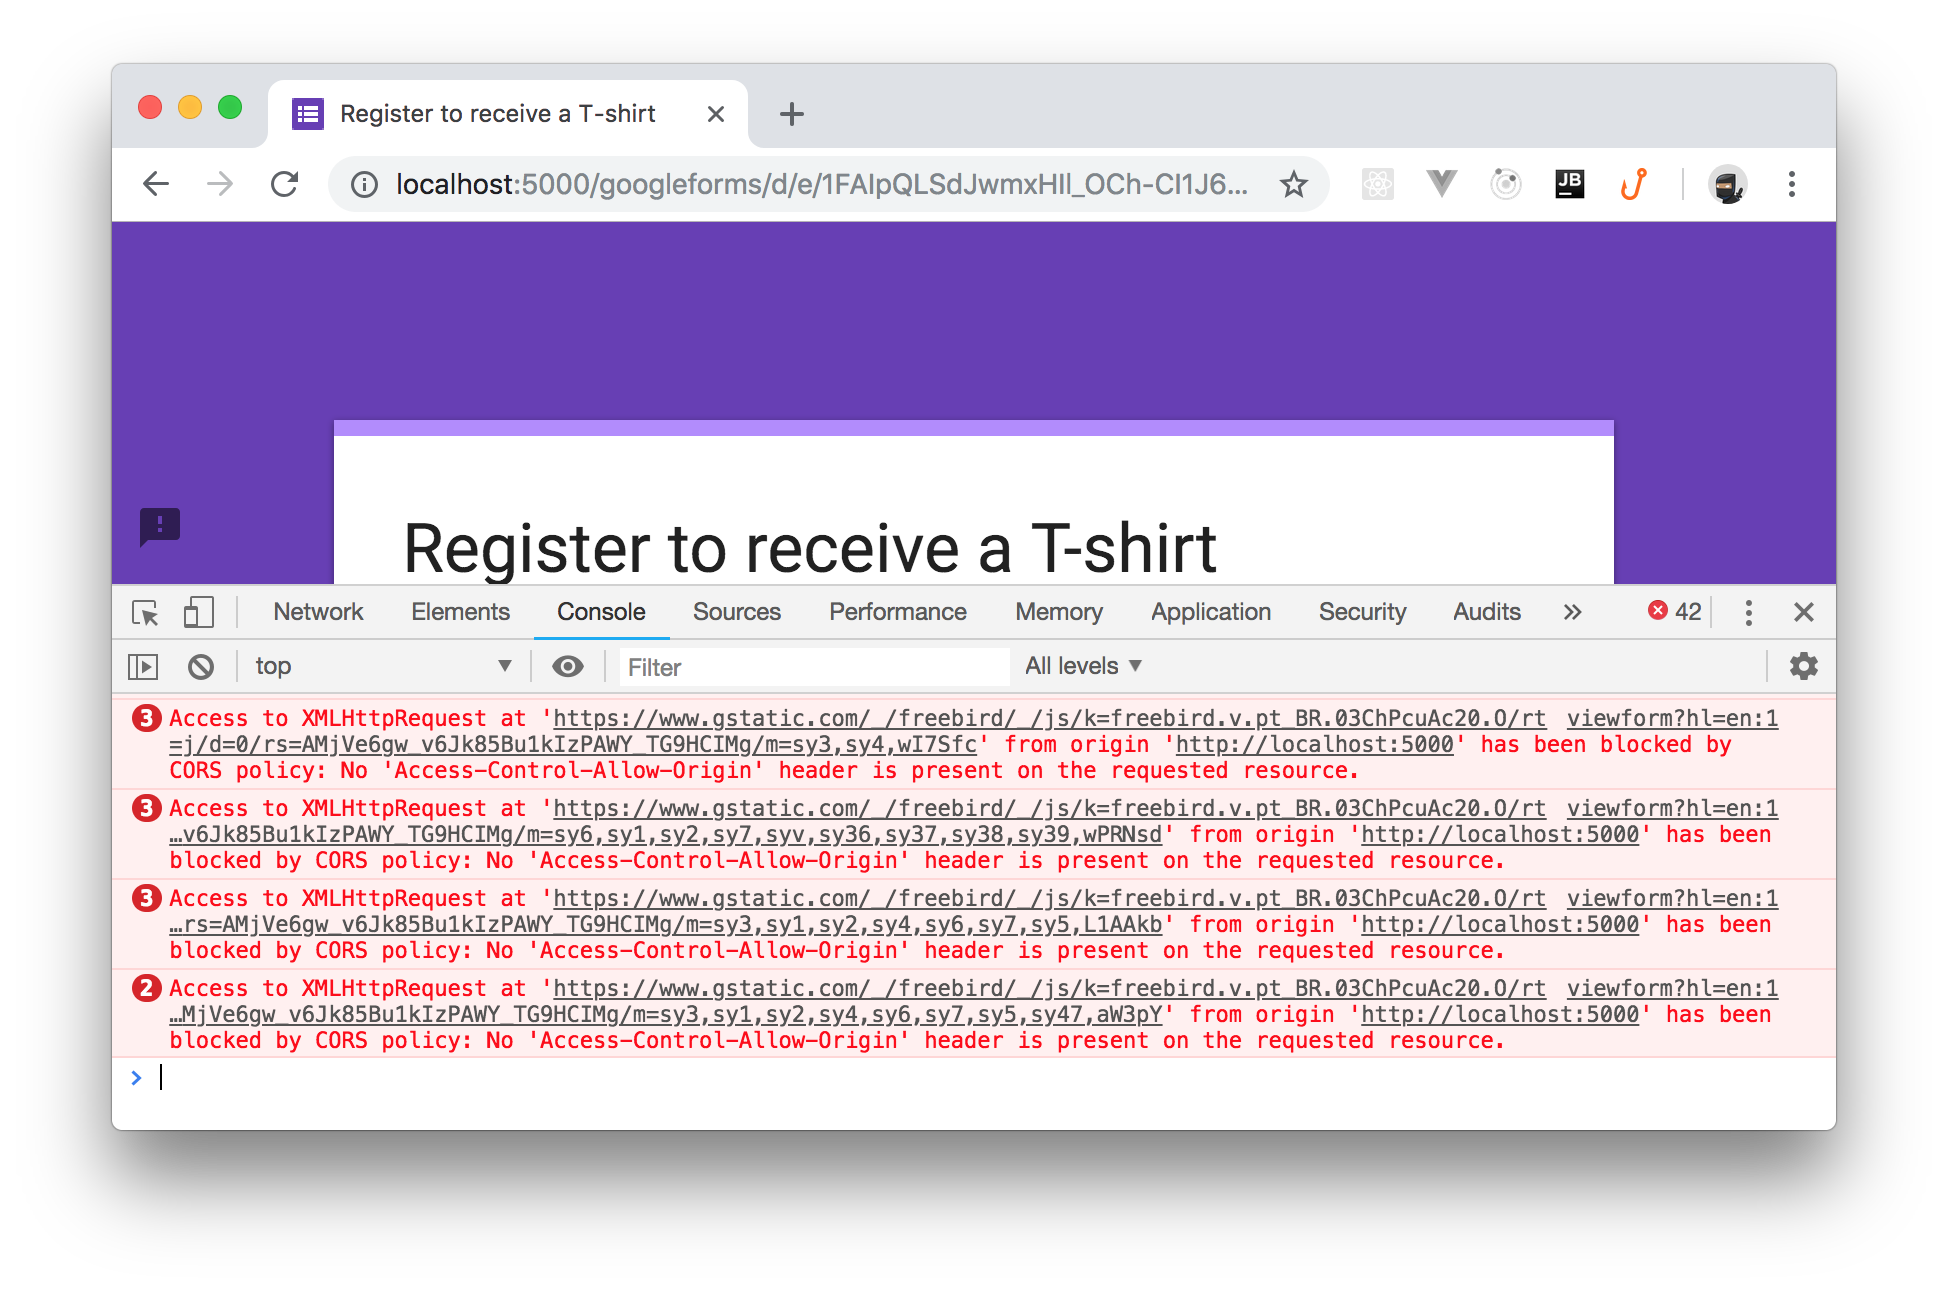
What is happening? Why there are so many errors?
Your reverse proxy passed the resources coming from the https://docs.google.com/forms domain to your browser, but some of these resources are JavaScript script containing Ajax requests to another domain: https://www.gstatic.com. This is correctly interpreted by your browser as an attempt to breach the same-origin policy.
Processing the Response of the Target Server
To avoid the error due to the the same-origin policy violation, you should make the scripts performing the Ajax requests to be loaded through the reverse proxy. In addition, you should also ensure that even the Ajax requests will be submitted to the target server through the reverse proxy. This ensures Ajax calls to comply with the browsers' same-origin policy, while the reverse proxy directs the HTTP requests to the correct servers.
Checking the network requests, you find that the scripts are loaded from the domains https://www.google.com and https://www.gstatic.com. So, you need to capture the references to these domains inside the HTML and JavaScript content coming from the target server and replace it with a prefix in your domain, say /google and /googlestatic. In order to get this result, you need to change the Invoke() method of the ReverseProxyMiddleware class. In particular, you need to replace its body with the following:
// ReverseProxyApplication/ReverseProxyMiddleware.cs
public async Task Invoke(HttpContext context)
{
  var targetUri = BuildTargetUri(context.Request);

  if (targetUri != null)
  {
    var targetRequestMessage = CreateTargetMessage(context, targetUri);

    using (var responseMessage = await _httpClient.SendAsync(targetRequestMessage, HttpCompletionOption.ResponseHeadersRead, context.RequestAborted))
    {
      context.Response.StatusCode = (int)responseMessage.StatusCode;
      CopyFromTargetResponseHeaders(context, responseMessage);
      await ProcessResponseContent(context, responseMessage);
    }
    return;
  }
  await _nextMiddleware(context);
}
The only difference from the previous version is the call to the ProcessResponseContent() instead of the statement await responseMessage.Content.CopyToAsync(context.Response.Body). This is a new private method responsible for processing the response coming from the target server. Add its implementation to the ReverseProxyMiddleware class:
// ReverseProxyApplication/ReverseProxyMiddleware.cs
private async Task ProcessResponseContent(HttpContext context, HttpResponseMessage responseMessage)
{
  var content = await responseMessage.Content.ReadAsByteArrayAsync();

  if (IsContentOfType(responseMessage, "text/html") ||
      IsContentOfType(responseMessage, "text/javascript"))
  {
    var stringContent = Encoding.UTF8.GetString(content);
    var newContent = stringContent.Replace("https://www.google.com", "/google")
        .Replace("https://www.gstatic.com", "/googlestatic")
        .Replace("https://docs.google.com/forms", "/googleforms");;
    await context.Response.WriteAsync(newContent, Encoding.UTF8);
  } else {
    await context.Response.Body.WriteAsync(content);
  }
}
Note: You will have to add
using System.Text;to the top of theReverseProxyMiddleware.csfile in order to useEncoding.UTF8.
As you can see, this method extracts the content of the response from the target server and checks its content type. If the response body contains HTML markup or JavaScript code, then any occurrence of the domains detected above are replaced by the respective prefixes, and the response is changed accordingly. Otherwise, the original content is forwarded to the client.
This new method, depends on another one called IsContentOfType. Add it to your ReverseProxyMiddleware class as follows:
// ReverseProxyApplication/ReverseProxyMiddleware.cs
private bool IsContentOfType(HttpResponseMessage responseMessage, string type)
{
  var result = false;

  if (responseMessage.Content?.Headers?.ContentType != null)
  {
      result = responseMessage.Content.Headers.ContentType.MediaType == type;
  }

  return result;
}
Now, still in the same class, you will also need to change the BuildTargetUri() private method, so that these new path prefixes are processed accordingly. This is the new version of the method:
// ReverseProxyApplication/ReverseProxyMiddleware.cs
private Uri BuildTargetUri(HttpRequest request)
{
  Uri targetUri = null;
  PathString remainingPath;

  if (request.Path.StartsWithSegments("/googleforms", out remainingPath))
  {
    targetUri = new Uri("https://docs.google.com/forms" + remainingPath);
  }

  if (request.Path.StartsWithSegments("/google", out remainingPath))
  {
    targetUri = new Uri("https://www.google.com" + remainingPath);
  }

  if (request.Path.StartsWithSegments("/googlestatic", out remainingPath))
  {
    targetUri = new Uri(" https://www.gstatic.com" + remainingPath);
  }

  return targetUri;
}
Now you can run the application (dotnet run), and this time you should be able to successfully register to receive a brand new T-shirt without leaving your application's domain.
Processing the Original Request
As per initial specifications, you should display the registration form to the user with some pre-filled data, such as the user's name. The Google Forms application allows prefilling a form by passing the field name and its value in the query string. So, you can inspect the generated form markup and get the input element's name, as shown by the following picture:
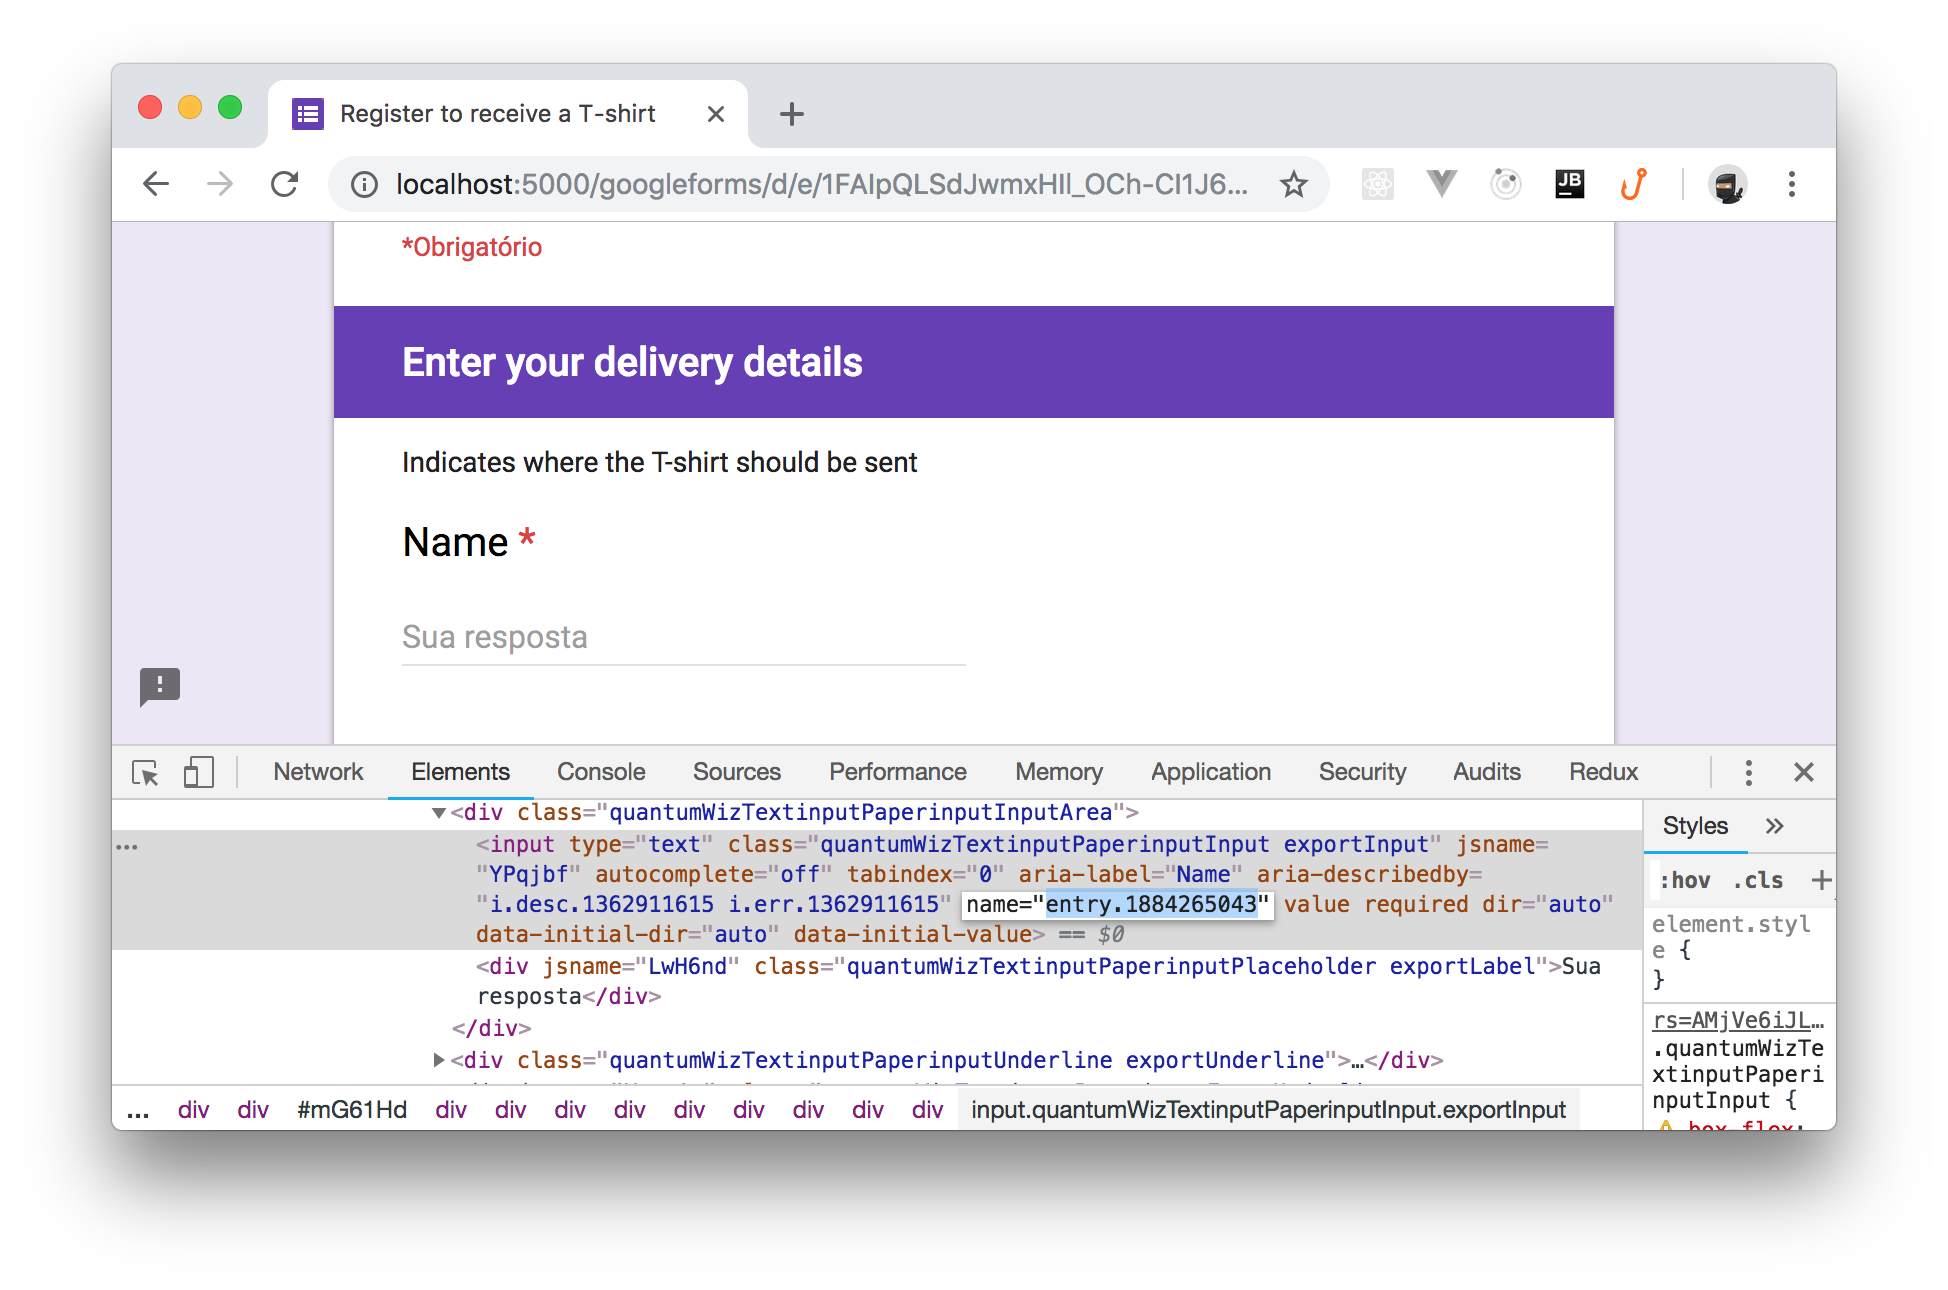
Having this information, you should simply append to the query string of the original request Uri the fragment entry.1884265043=John%20Doe, assuming that John Doe is the actual name of the current user.
So, change the CreateTargetMessage() private method of the ReverseProxyMiddleware class as follows:
// ReverseProxyApplication/ReverseProxyMiddleware.cs
private HttpRequestMessage CreateTargetMessage(HttpContext context, Uri targetUri)
{
  var requestMessage = new HttpRequestMessage();

  CopyFromOriginalRequestContentAndHeaders(context, requestMessage);

  targetUri = new Uri(QueryHelpers.AddQueryString(targetUri.OriginalString,
             new Dictionary<string, string>() { { "entry.1884265043", "John Doe" } }));

  requestMessage.RequestUri = targetUri;
  requestMessage.Headers.Host = targetUri.Host;
  requestMessage.Method = GetMethod(context.Request.Method);

  return requestMessage;
}
Note: You will have to add
using System.Collections.Generic;andusing Microsoft.AspNetCore.WebUtilities;to the top of theReverseProxyMiddleware.csfile to be able to useUriandDictionary.
In the new version of the CreateTargetMessage method, you added the targetUri re-definition statement, where you added the query string fragment. For simplicity, here you assigned a constant string value as the name of the current user. In a real case, you should retrieve the name of the user in a more complex way (e.g., from the session data, from a database, etc.).
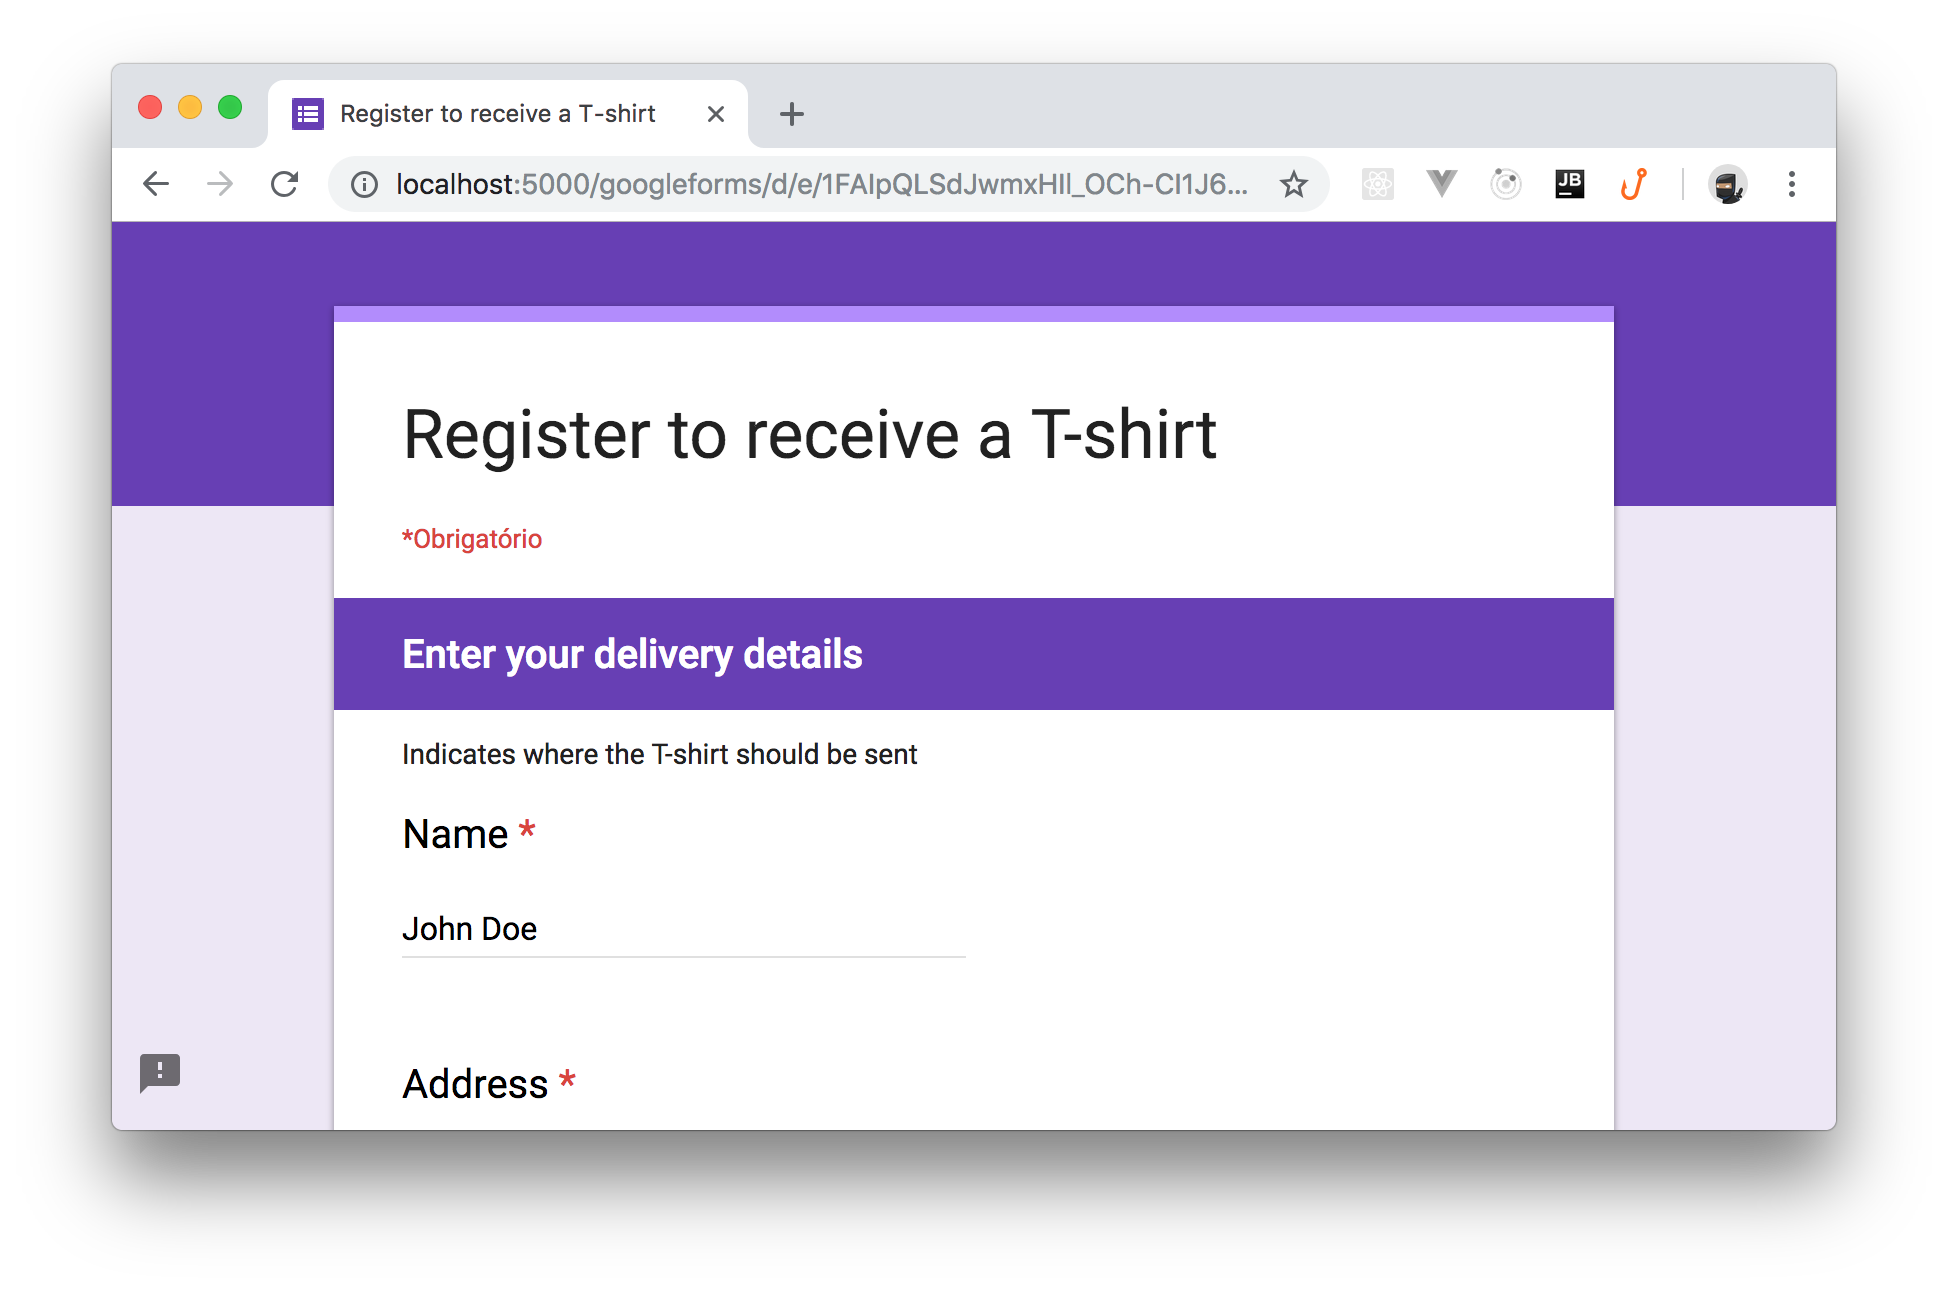
Now, you can run the Web application again and, when you go to the second page of the form, you will find the pre-filled text-box, as shown in the following picture:
Aside: Securing ASP.NET Core with Auth0
Securing ASP.NET Core applications with Auth0 is easy and brings a lot of great features to the table. With Auth0, you only have to write a few lines of code to get a solid identity management solution, single sign-on, support for social identity providers (like Facebook, GitHub, Twitter, etc.), and support for enterprise identity providers (like Active Directory, LDAP, SAML, custom, etc.).
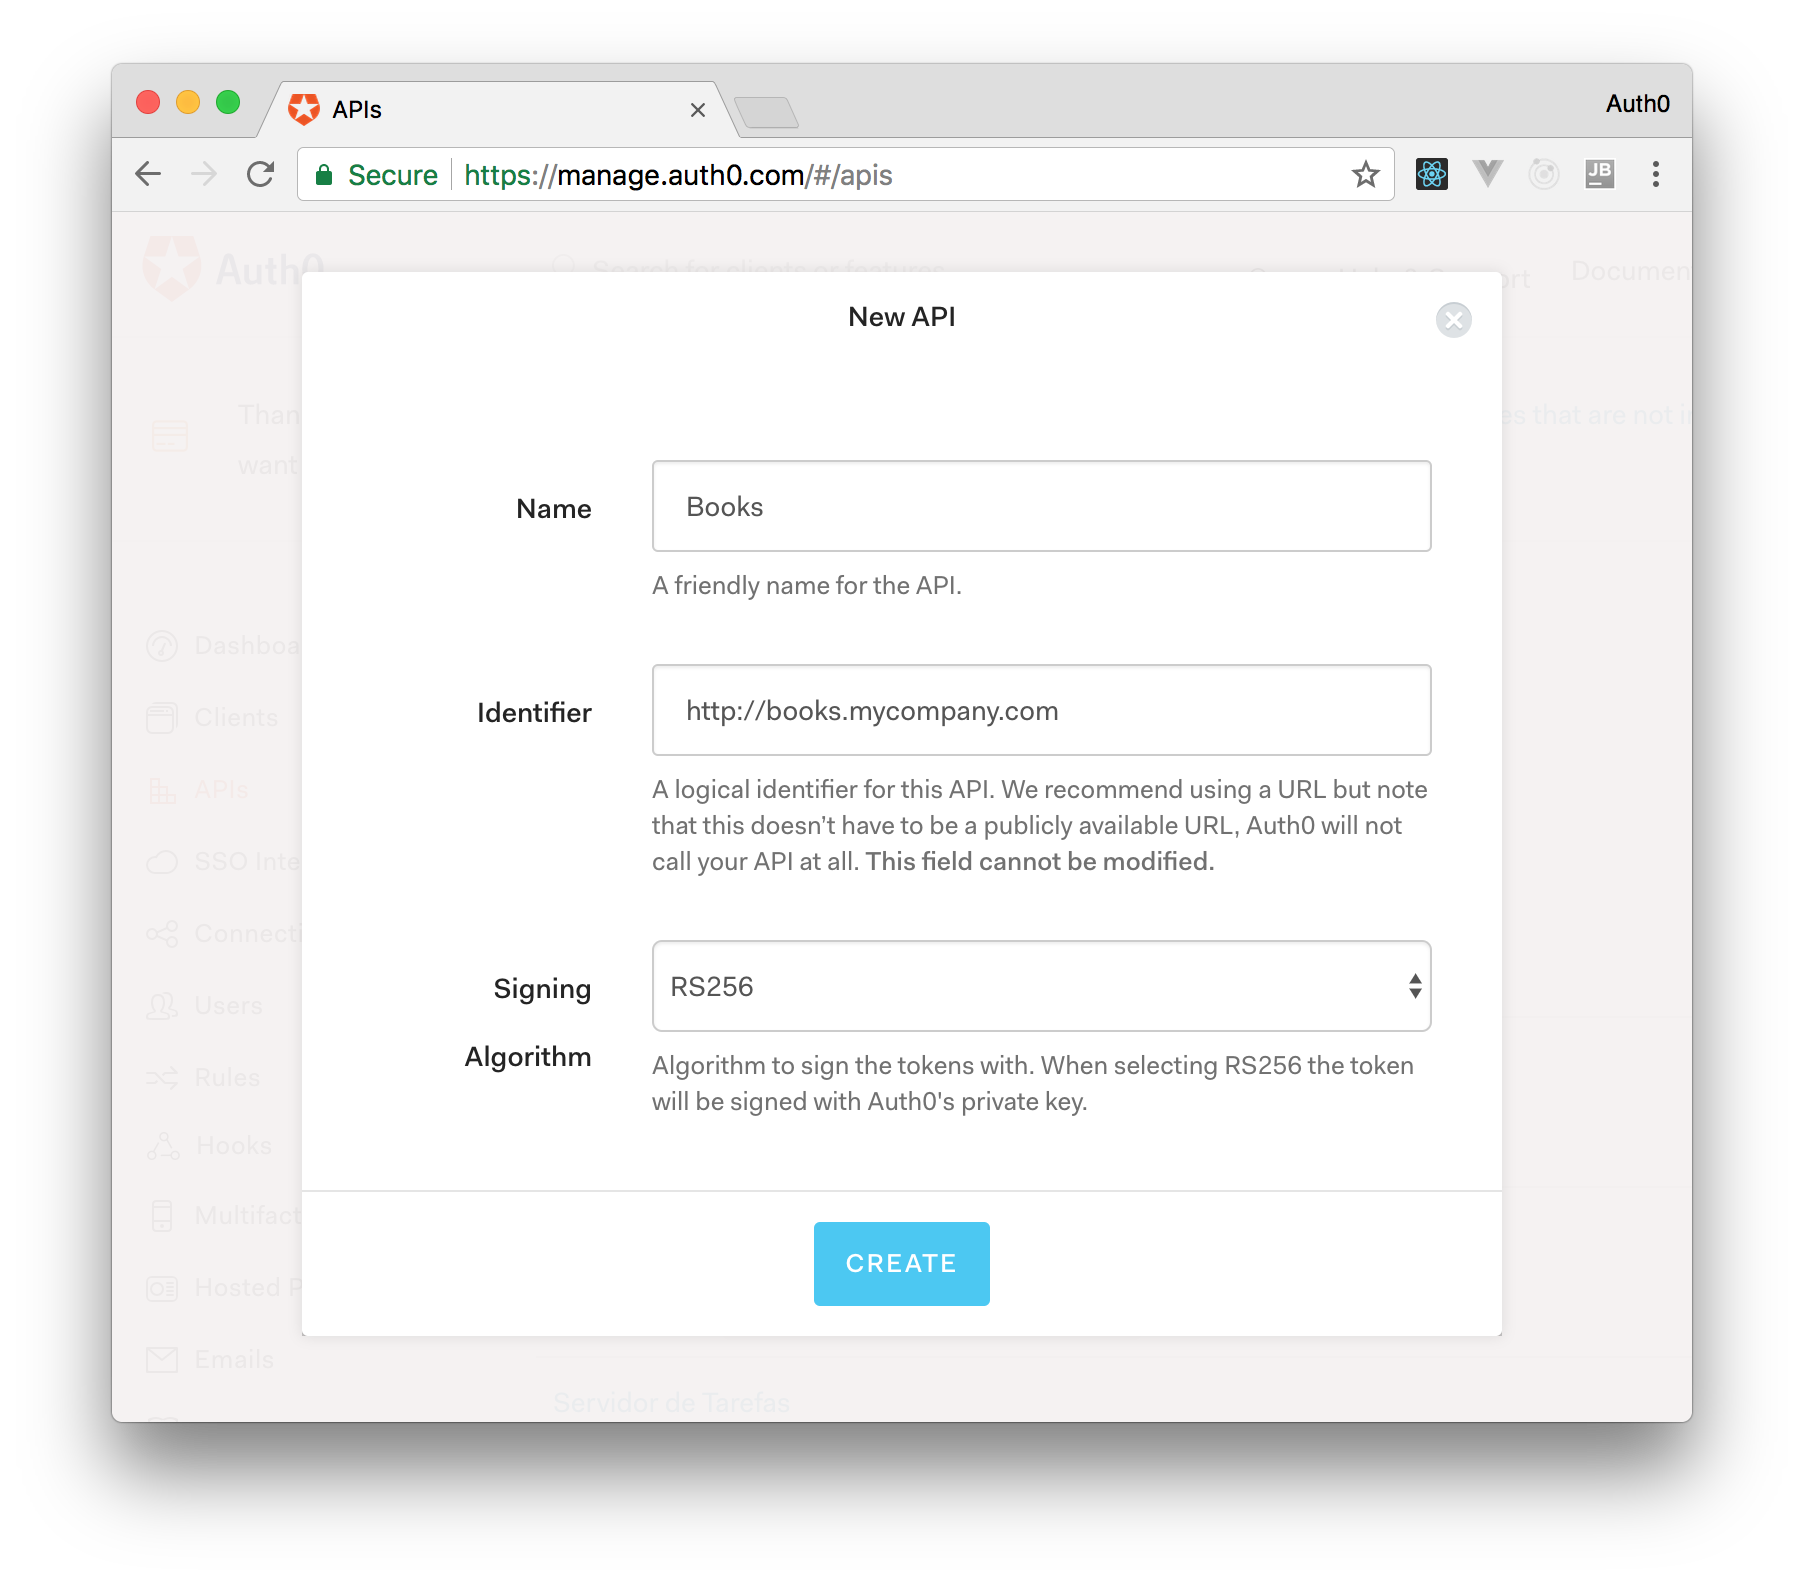
On ASP.NET Core, you need to create an API in your Auth0 Management Dashboard and change a few things on your code. To create an API, you need to sign up for a free Auth0 account. After that, you need to go to the API section of the dashboard and click on "Create API". On the dialog shown, you can set the Name of your API as "Books", the Identifier as "http://books.mycompany.com", and leave the Signing Algorithm as "RS256".
After that, you have to add the call to services.AddAuthentication() in the ConfigureServices() method of the Startup class as follows:
string authority = $"https://{Configuration["Auth0:Domain"]}/";
string audience = Configuration["Auth0:Audience"];

services.AddAuthentication(options =>
{
  options.DefaultAuthenticateScheme = JwtBearerDefaults.AuthenticationScheme;
  options.DefaultChallengeScheme = JwtBearerDefaults.AuthenticationScheme;
}).AddJwtBearer(options =>
{
  options.Authority = authority;
  options.Audience = audience;
});
In the body of the Configure() method of the Startup class, you also need to add an invocation to app.UseAuthentication() and app.UseAuthorization() as shown below:
app.UseRouting();
app.UseAuthentication();
app.UseAuthorization();
app.UseEndpoints(endpoints =>
{
    endpoints.MapControllers();
});
Make sure you invoke these methods in the order shown above. It is essential so that everything works properly.
Finally, add the following element to the appsettings.json configuration file:
{
  "Logging": {
    // ...
  },
  "Auth0": {
    "Domain": "YOUR_DOMAIN",
    "Audience": "YOUR_AUDIENCE"
  }
}
Note: Replace the placeholders
YOUR_DOMAINandYOUR_AUDIENCEwith the actual values for the domain that you specified when creating your Auth0 account and the Identifier you assigned to your API.
Summary
After exploring what a reverse proxy is, when using it, and why you would need to implement a custom one, you started setting up an ASP.NET Core application to learn how to implement it. You created a middleware to act as a reverse proxy that captures specific requests and submits them to the target servers. In the application example, the target servers were a few Google's servers. During the implementation, you explored how to process the target server's responses in order to avoid violations of the same-origin policy of the browser and how to process the original requests in order to get a pre-filled form.
You can find the final code of the project developed throughout this article on this GitHub repository.
About the author

Andrea Chiarelli
Principal Developer Advocate
I have over 20 years of experience as a software engineer and technical author. Throughout my career, I've used several programming languages and technologies for the projects I was involved in, ranging from C# to JavaScript, ASP.NET to Node.js, Angular to React, SOAP to REST APIs, etc.
In the last few years, I've been focusing on simplifying the developer experience with Identity and related topics, especially in the .NET ecosystem.