In the first part of this series, we built a simple agent that helps a manager track their employees' expense reports. For simplicity, the expense agent responded using hardcoded sample data, so every manager saw the same three reports. That's obviously not correct for a real system: managers should only see expenses from their own direct reports. And the agent should search through potentially thousands of records, not a fixed list.
This post solves both problems by:
- Replacing the mock data with expense reports stored in a vector database by building a Retrieval-Augmented Generation (RAG) system.
- Giving the agent a semantic search tool.
- Applying Fine-Grained Authorization (FGA) to ensure the search results are filtered before the LLM ever sees them.
The filtering is the critical part. A common mistake with RAG is to retrieve data first and then check permissions on what came back from LLM. That approach leaks data: the LLM receives context it shouldn't have, even if the final answer is filtered. The pattern here is different: ask Auth0 FGA which expense reports this manager is allowed to read, and pass that list as a filter into the vector search. The LLM only receives the necessary context based on what the manager has access to.
Adding the Vector Store Package
Let's start by adding the package needed to store and search expense reports as vectors.
Make sure to follow the steps outlined in the previous post to set up the sample app.
Go to the ExpenseAgent folder of your .NET solution and run the following command:
dotnet add package CommunityToolkit.VectorData.InMemory
CommunityToolkit.VectorData.InMemory is the in-memory provider for Microsoft.Extensions.VectorData, maintained by the .NET Community Toolkit. Embeddings are generated directly via the OpenAI SDK's EmbeddingClient, which is already available through the Azure.AI.OpenAI package you added in the first part of this series.
The same Azure AI Foundry resource you deployed gpt-4.1-mini to in part 1 also serves embedding models. In the Azure AI Foundry portal, go back to Explore Models and deploy text-embedding-3-small. Then add it to appsettings.json as shown below:
// ExpenseAgent/appsettings.json

{
  "Auth0": {
    "Domain": "YOUR_AUTH0_DOMAIN",
    "ClientId": "YOUR_CLIENT_ID"
  },
  "AzureOpenAI": {
    "Endpoint": "https://YOUR-RESOURCE.openai.azure.com",
    "ApiKey": "YOUR_AZURE_OPENAI_API_KEY",
    "ChatDeployment": "gpt-4.1-mini",
    //👇new setting
    "EmbeddingDeployment": "text-embedding-3-small"
    //👆new setting
  }
}
The Expense Report Model
Now, let's build our vector store. Let's start with the expense report model.
In the ExpenseAgent folder, create a subfolder Models and add a new file named ExpenseReport.cs with the following code:
// ExpenseAgent/Models/ExpenseReport.cs

using Microsoft.Extensions.VectorData;

namespace ExpenseAgent.Models;

public class ExpenseReport
{
    [VectorStoreKey]
    public string Id { get; set; } = string.Empty;

    [VectorStoreData]
    public string EmployeeEmail { get; set; } = string.Empty;

    [VectorStoreData]
    public decimal Amount { get; set; }

    [VectorStoreData]
    public string Merchant { get; set; } = string.Empty;

    [VectorStoreData]
    public string Justification { get; set; } = string.Empty;

    [VectorStoreData]
    public string SubmittedAt { get; set; } = string.Empty;

    [VectorStoreVector(dimensions: 1536, DistanceFunction = DistanceFunction.CosineSimilarity)]
    public ReadOnlyMemory<float> Embedding { get; set; }
}
The attributes attached to each property of the ExpenseReport class come from Microsoft.Extensions.VectorData. This is the same abstraction package every provider (in-memory, Azure AI Search, PostgreSQL, and so on) builds on, which is why swapping providers later won't touch this file. The [VectorStoreVector] attribute marks the field that holds the embedding. The argument dimensions: 1536 matches the output of OpenAI's text-embedding-3-small model (more on embedding dimensions).
The Expense Report Service
The next step is to create an ExpenseReportService that deals with expense reports represented as embeddings. The ExpenseReportService data uses Microsoft.Extensions.VectorData for storage and the OpenAI SDK directly for embeddings.
Create a Services folder in the ExpenseAgent folder and add a ExpenseReportService.cs file with the following code:
// ExpenseAgent/Services/ExpenseReportService.cs

using ExpenseAgent.Models;
using CommunityToolkit.VectorData.InMemory;
using Microsoft.Extensions.VectorData;
using System.ClientModel;
using Azure.AI.OpenAI;
using OpenAI.Embeddings;

namespace ExpenseAgent.Services;

public class ExpenseReportService
{
    private readonly EmbeddingClient _embeddingClient;
    private readonly VectorStoreCollection<string, ExpenseReport> _collection;

    public ExpenseReportService(IConfiguration config)
    {
        var endpoint = new Uri(config["AzureOpenAI:Endpoint"]!);
        var apiKey = new ApiKeyCredential(config["AzureOpenAI:ApiKey"]!);
        var embeddingDeployment = config["AzureOpenAI:EmbeddingDeployment"] ?? "text-embedding-3-small";

        _embeddingClient = new AzureOpenAIClient(endpoint, apiKey)
            .GetEmbeddingClient(embeddingDeployment);

        var vectorStore = new InMemoryVectorStore();
        _collection = vectorStore.GetCollection<string, ExpenseReport>("expense-reports");
    }

    public async Task EnsureCollectionAsync()
        => await _collection.EnsureCollectionExistsAsync();

    public async Task IngestAsync(ExpenseReport report)
    {
        var text = BuildSearchText(report);
        var result = await _embeddingClient.GenerateEmbeddingAsync(text);
        report.Embedding = result.Value.ToFloats();
        await _collection.UpsertAsync(report);
    }

    public async Task<IReadOnlyList<ExpenseReport>> SearchAsync(string query, int maxResults = 5)
    {
        var queryEmbedding = await _embeddingClient.GenerateEmbeddingAsync(query);
        var queryVector = queryEmbedding.Value.ToFloats();

        var results = new List<ExpenseReport>();
        await foreach (var result in _collection.SearchAsync(queryVector, top: maxResults))
        {
            results.Add(result.Record);
        }

        return results;
    }

    private static string BuildSearchText(ExpenseReport r) =>
        $"Expense {r.Id}. Employee: {r.EmployeeEmail}. " +
        $"Amount: {r.Amount:C}. Merchant: {r.Merchant}. " +
        $"Justification: {r.Justification}. Submitted: {r.SubmittedAt}.";
}
InMemoryVectorStore, from the CommunityToolkit.VectorData.InMemory package, holds everything in memory, which resets on restart. This is fine for a tutorial, but in production, swap it for a persistent provider (Azure AI Search, PostgreSQL with pgvector, etc.) by using a different VectorStore implementation. The SearchAsync() signature on ExpenseReportService stays the same regardless of the backing store.
Notice there's no authorization here yet: SearchAsync() searches every record in the collection. That's the next problem you are going to solve.
Updating the Search Tool
Let's update the agent tools by modifying the Agent/ExpenseAgentTools.cs file as shown in the following code block:
// ExpenseAgent/Agent/ExpenseAgentTools.cs

using System.ComponentModel;
using System.Text.Json;
using ExpenseAgent.Services;  //👈 new code

namespace ExpenseAgent.Agent;

public class ExpenseAgentTools
{
    private readonly string _managerId;
    private readonly ExpenseReportService _expenseService; //👈 new code

    //👇changed signature
    public ExpenseAgentTools(string managerId, ExpenseReportService expenseService)
    {
        _managerId = managerId;
        _expenseService = expenseService; //👈 new code
    }

    //👇changed code
    [Description("Get the list of expense reports submitted by the manager's direct reports.")]
    public async Task<string> GetExpenseReports(
        [Description("Optional keyword to filter expense reports by description or merchant.")] string? query = null)
    {
        var reports = await _expenseService.SearchAsync(query ?? "expense report");
        return JsonSerializer.Serialize(reports);
    }
    //👆changed code
}
You added the dependency on the ExpenseReportService and removed the hardcoded list of expense reports. The _managerId variable is still unused, just like in the initial part of the series. It's captured now so it's ready when you wire it into FGA in a few sections.
The Expense Service in the Chat Component
Update the Components/Pages/Chat.razor as follows:
// ExpenseAgent/Components/Pages/Chat.razor

@page "/chat"
@attribute [Authorize]
@rendermode InteractiveServer

@using Microsoft.AspNetCore.Authorization
@using Microsoft.AspNetCore.Components.Authorization
@using ExpenseAgent.Agent
@using ExpenseAgent.Services  //👈 new code

@inject ExpenseAgentService AgentService
@inject ExpenseReportService ExpenseService  //👈 new code

@* ...existing code... *@

@code {
    //...existing code...

    private async Task SendMessage()
    {
        var text = _inputText.Trim();
        if (string.IsNullOrEmpty(text) || _userId is null) return;

        _inputText = "";
        _messages.Add(("You", text));
        _thinking = true;

        try
        {
            //👇changed signature
            var tools = new ExpenseAgentTools(_userId, ExpenseService);
            var reply = await AgentService.ChatAsync(_userId, text, _userName, tools);
            _messages.Add(("Agent", reply));
        }
        finally
        {
            _thinking = false;
        }
    }

    //...existing code...
}
This change added the ExpenseService dependency and used the service in the tool construction line.
Registering the Expense Service
To complete the report service implementation, register it and seed the vector store at startup. Add the highlighted lines to the ExpenseAgent/Program.cs file:
// ExpenseAgent/Program.cs

//...existing code...
using ExpenseAgent.Agent;
using ExpenseAgent.Models;    //👈 new code
using ExpenseAgent.Services;  //👈 new code

//...existing code...

//👇new code
builder.Services.AddSingleton<ExpenseReportService>();
//👆new code

var app = builder.Build();

//...existing code...
Then seed the data as shown below:
// ExpenseAgent/Program.cs

//...existing code...

var app = builder.Build();

//👇new code
// Seed expense data on startup
using (var scope = app.Services.CreateScope())
{
    var expenseService = scope.ServiceProvider.GetRequiredService<ExpenseReportService>();
    await expenseService.EnsureCollectionAsync();

    await expenseService.IngestAsync(new ExpenseReport
    {
        Id = "exp-001", EmployeeEmail = "alice@example.com",
        Amount = 450.00m, Merchant = "Marriott Hotels",
        Justification = "Client dinner during NYC conference", SubmittedAt = "2026-06-10"
    });
    await expenseService.IngestAsync(new ExpenseReport
    {
        Id = "exp-002", EmployeeEmail = "bob@example.com",
        Amount = 0m, Merchant = "Delta Airlines",
        Justification = "", SubmittedAt = "2026-06-12"
    });
    await expenseService.IngestAsync(new ExpenseReport
    {
        Id = "exp-003", EmployeeEmail = "carol@example.com",
        Amount = 120.50m, Merchant = "",
        Justification = "Team lunch", SubmittedAt = "2026-06-14"
    });
}
//👆new code
This implementation is for a tutorial purpose only. In fact, the expense report submission process is out of the scope of this tutorial so we are assuming expense reports are somehow available to the approval agent. In production, you should implement the expense report submission process and run ingestion as a background job triggered when an employee submits a new expense.
Everyone Sees Everything (For Now)
Start the app, log in as any manager, as you did in the first part of this series, and navigate to /chat. Ask: "Show me all expense reports."
The agent calls GetExpenseReports(), which now runs a real semantic search over the vector store instead of returning hardcoded data. But log in as a different manager and ask the same question: you'll get the exact same three reports back. There's no authorization check yet, so every manager sees every employee's expenses.
It's time to fix it with Auth0 FGA.
Setting Up Auth0 FGA
Before writing more code, configure your FGA store by following these steps:
- Go to the Auth0 FGA Dashboard and create an FGA store named "ExpenseAgent".
- Create a new authorized client.
- Take note of your Store ID, API URL, API Audience, API Token Issuer, Client ID, and Client Secret.
In the ExpenseAgent folder of the .NET solution, add the FGA package:
dotnet add package OpenFga.Sdk
Add the FGA configuration to appsettings.json:
// ExpenseAgent/appsettings.json

{
  //...existing settings...

  //👇new settings
  "Fga": {
    "StoreId": "YOUR_FGA_STORE_ID",
    "ClientId": "YOUR_FGA_CLIENT_ID",
    "ClientSecret": "YOUR_FGA_CLIENT_SECRET",
    "ApiUrl": "YOUR_FGA_API_URL",
    "ApiTokenIssuer": "YOUR_API_TOKEN_ISSUER",
    "ApiAudience": "YOUR_API_AUDIENCE"
  }
  //👆new settings
}
Define the Authorization Model
In the FGA Dashboard, go to Model Explorer and paste this schema:
model
  schema 1.1

type user

type expense
  relations
    define can_read: [user]
This says: an expense object has a can_read relation, and only user type objects can hold it. You can extend it later with indirect relationships (e.g., a manager group), but starting flat makes the mechanics easier to follow.
Don't forget to save the schema before you leave this page.
Write the Permission Tuples
In the FGA Dashboard, go to Tuple Management and add:
user:auth0|manager1   can_read   expense:exp-001
user:auth0|manager1   can_read   expense:exp-002
user:auth0|manager2   can_read   expense:exp-003
Replace auth0|manager1 and auth0|manager2 with the actual Auth0 sub values for your test users (visible in the Auth0 Dashboard under User Management > Users).
In production, you'd write these tuples programmatically when an employee is assigned to a manager's team. Check out this article to learn how to add tuples to an FGA model programmatically. Here, setting them up manually focuses attention on the authorization pattern itself.
The FGA Service
Now go to the Services folder and add an FgaService.cs file with the following code:
// ExpenseAgent/Services/FgaService.cs

using OpenFga.Sdk.Client;
using OpenFga.Sdk.Client.Model;
using OpenFga.Sdk.Configuration;

namespace ExpenseAgent.Services;

public class FgaService
{
    private readonly OpenFgaClient _client;

    public FgaService(IConfiguration config)
    {
        _client = new OpenFgaClient(new ClientConfiguration
        {
            ApiUrl = config["Fga:ApiUrl"]!,
            StoreId = config["Fga:StoreId"]!,
            Credentials = new Credentials
            {
                Method = CredentialsMethod.ClientCredentials,
                Config = new CredentialsConfig
                {
                    ClientId = config["Fga:ClientId"]!,
                    ClientSecret = config["Fga:ClientSecret"]!,
                    ApiAudience = config["Fga:ApiAudience"]!,
                    ApiTokenIssuer = config["Fga:ApiTokenIssuer"]!
                }
            }
        });
    }

    public async Task<IReadOnlyList<string>> GetAuthorizedExpensesAsync(string managerId)
    {
        var response = await _client.ListObjects(new ClientListObjectsRequest
        {
            User = $"user:{managerId}",
            Relation = "can_read",
            Type = "expense"
        });

        return response.Objects
            .Select(o => o.Replace("expense:", ""))
            .ToList();
    }
}
The ListObjects() method evaluates the authorization model and returns every object of the given type this user can reach via the given relation. Not just tuples written exactly as user:X can_read expense:Y, but also any indirect path you add later (like a manager group). The result is the complete set of expense IDs this manager may access, regardless of how many exist in the vector store.
This is the pre-filter implementation: the authorized IDs come from FGA before you query the vector store. If the list is empty (no reports assigned to this manager), the search short-circuits. The LLM receives an empty context meaning there is no authorized data and replies with something like "There are currently no expense reports submitted by your direct reports."
Updating the Expense Report Service
Now that FGA can tell you which expenses a manager is allowed to see, update SearchAsync() in Services/ExpenseReportService.cs to receive that allow-list and filter against it:
// ExpenseAgent/Services/ExpenseReportService.cs

//...existing code...

//👇changed code
public async Task<IReadOnlyList<ExpenseReport>> SearchAsync(
    string query,
    IReadOnlyList<string> authorizedIds,
    int maxResults = 5)
{
    if (authorizedIds.Count == 0)
    {
        return Array.Empty<ExpenseReport>();
    }

    var queryEmbedding = await _embeddingClient.GenerateEmbeddingAsync(query);
    var queryVector = queryEmbedding.Value.ToFloats();

    var options = new VectorSearchOptions<ExpenseReport>
    {
        Filter = r => authorizedIds.Contains(r.Id)
    };

    var authorized = new List<ExpenseReport>();
    await foreach (var result in _collection.SearchAsync(queryVector, top: maxResults, options))
    {
        authorized.Add(result.Record);
    }

    return authorized;
}
//👆changed code

//...existing code...
You go through the results of semantic search and get the reports whose IDs are in the allow-list.
Everything else in ExpenseReportService stays the same.
One implementation detail worth noting here:
InMemoryVectorStoreevaluatesFilterby compiling and running the lambda directly against each record, soauthorizedIds.Contains(r.Id)is guaranteed to work. However, other providers translate the filter expression into their own native filter syntax, and support forIReadOnlyList<string>.Contains-style "in" clauses varies by provider.
Adding FGA to the Search Tool
Let's adapt ExpenseAgentTools.cs to take into account the new version of SearchAsync(), which needs to pull in FgaService and use it before searching:
// ExpenseAgent/Agent/ExpenseAgentTools.cs

//...existing code...

public class ExpenseAgentTools
{
    private readonly string _managerId;
    private readonly ExpenseReportService _expenseService;
    private readonly FgaService _fgaService; //👈 new code

    public ExpenseAgentTools(
        string managerId,
        ExpenseReportService expenseService,
        FgaService fgaService)  //👈 new code
    {
        _managerId = managerId;
        _expenseService = expenseService;
        _fgaService = fgaService;  //👈 new code
    }

    [Description("Get the list of expense reports submitted by the manager's direct reports.")]
    public async Task<string> GetExpenseReports(
        [Description("Optional keyword to filter expense reports by description or merchant.")] string? query = null)
    {
        //👇changed code
        var authorizedIds = await _fgaService.GetAuthorizedExpensesAsync(_managerId);

        if (authorizedIds.Count == 0)
            return "No expense reports found for your direct reports.";

        var reports = await _expenseService.SearchAsync(
            query ?? "expense report", authorizedIds);
        //👆changed code

        return JsonSerializer.Serialize(reports);
    }
}
The FGA Service in the Chat Component
The Chat component now injects FgaService too and passes it to ExpenseAgentTools. Update Components/Pages/Chat.razor accordingly:
// ExpenseAgent/Components/Pages/Chat.razor

@* ...existing code... *@

@inject ExpenseReportService ExpenseService
@inject FgaService FgaService  //👈 new code

@* ...existing code... *@

@code {
    //...existing code...

    private async Task SendMessage()
    {
       //...existing code...

        try
        {
            // 👇changed code
            var tools = new ExpenseAgentTools(_userId, ExpenseService, FgaService);
            var reply = await AgentService.ChatAsync(_userId, text, _userName, tools);
            _messages.Add(("Agent", reply));
        }
        finally
        {
            _thinking = false;
        }
    }

    //...existing code...
}
Registering the FGA Service
Finally, register FgaService in the ExpenseAgent/Program.cs file:
// ExpenseAgent/Program.cs

//...existing code...

builder.Services.AddSingleton<ExpenseReportService>();
//👇new code
builder.Services.AddSingleton<FgaService>();
//👆new code

//...existing code..
You are done!
Testing the Authorization
Start the app and log in as the user whose Auth0 sub maps to auth0|manager1 in your FGA tuples.
Ask: "Show me all expense reports."
The agent calls GetExpenseReports(). The tool queries FGA and gets back ["exp-001", "exp-002"]. The vector search returns semantically relevant results, filtered down to those two IDs. The LLM sees Alice's hotel dinner and Bob's incomplete airline report. It does not see Carol's team lunch, which belongs to manager2:
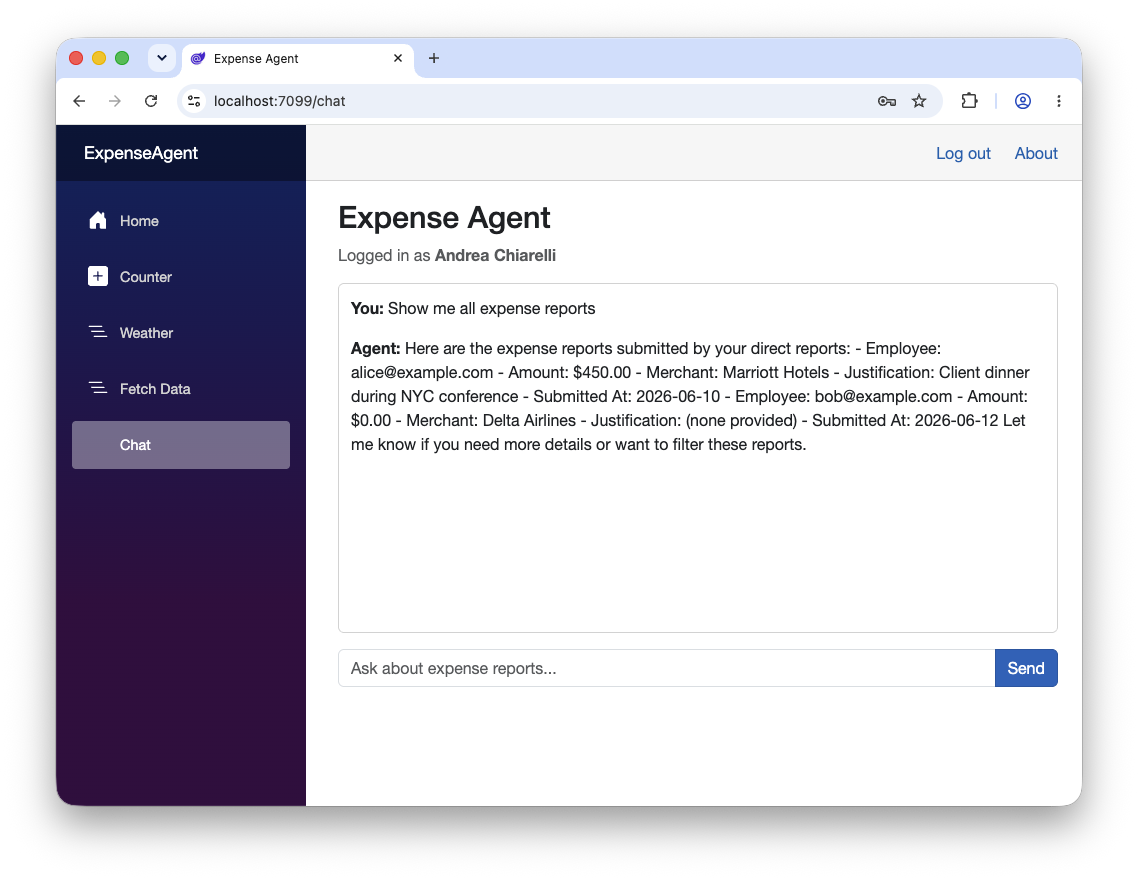
Log out and log in as manager2. Ask the same question. The agent now only returns exp-003.
You might wonder what stops someone from passing a different user ID to the tool. Nothing needs to stop them: the managerId comes from ClaimTypes.NameIdentifier, which is the verified claim in the Auth0 session. It's set from the token the agent received after login, not from anything the user can control. The agent always operates under the identity of the authenticated user, as guaranteed by the Auth0 signature on the ID token's JWT.
Where This Leaves Us
What you've built here matches the agentic RAG pattern described in the Microsoft Architecture Center: retrieval is a function tool the agent calls on demand, with tool descriptions precise enough that the agent selects it for the right queries. The FGA pre-filter adds the authorization layer: the agent's retrieval tool is authorization-aware by design.
The AI agent now:
- Retrieves expense reports from a vector database using semantic search
- Applies Auth0 FGA to filter results before the LLM sees them
- Enforces data isolation between managers
There's still a gap: as you saw in the previous part, the agent can tell you what's missing from exp-002 and exp-003, but can't take action to fix them. That changes in the third part of this series, where you'll wire up Auth0 Token Vault and Gmail so the agent can email the employee on the manager's behalf.
About the author

Andrea Chiarelli
Principal Developer Advocate
I have over 20 years of experience as a software engineer and technical author. Throughout my career, I've used several programming languages and technologies for the projects I was involved in, ranging from C# to JavaScript, ASP.NET to Node.js, Angular to React, SOAP to REST APIs, etc.
In the last few years, I've been focusing on simplifying the developer experience with Identity and related topics, especially in the .NET ecosystem.