In the previous two parts of this series (part 1 and part 2), we progressively built an AI agent capable of displaying expense reports from a manager's direct reports and identifying missing information. However, at the current stage, the agent can't act on this knowledge. The manager must still manually email employees to request missing details and then remember to follow up. That's exactly the kind of overhead an AI agent should absorb.
In this part, you will equip the agent with a SendMissingDataEmail() tool. When the agent identifies a missing required field, such as amount, merchant, or justification, it will automatically send an email to the employee using the manager's Gmail account. The manager themselves don't need to touch the email client, the agent will act on the manager’s behalf.
How the agent gets Gmail access is the interesting part. Rather than storing Google OAuth tokens in your application database, you will use Auth0 Token Vault. After a one-time authorization by the manager, Auth0 securely acquires and stores the Google access and refresh tokens. When the agent needs to send an email, it requests a short-lived access token from Auth0, uses it, and immediately discards it, ensuring the token never resides in your application state.
Here's a security detail that matters too: the Gmail token must never reach the LLM. If it appears in a tool argument or response, the model could leak it. To prevent this, we use constructor injection: the token is captured by the tool class before the agent runs, keeping it invisible to the tool's schema.
Configuring Auth0 and Your Agent for Token Vault
Let's start the journey by configuring Auth0 for using the Token Vault. This is a secure storage system for access and refresh tokens from external providers, such as Google, GitHub, Microsoft, etc. When a user authorizes an external provider via OAuth, Auth0 stores those tokens in the Token Vault. Your application can then exchange a valid Auth0 token for an external provider's token, allowing it to call external APIs on the user's behalf, without you needing to build custom integrations for each provider.
The Token Vault setup for using Gmail API requires five steps:
- Registering your agent with Google services. This lets Google know about your app and its intentions to use Gmail to send emails.
- Enabling the Token Vault for the Google connection. This step enables your Google connection in Auth0 to use the Token Vault.
- Enabling the Token Vault for your application. This enables your application in Auth0 to use the Token Vault.
- Enabling My Account API for connected accounts. This step ensures that the manager's account on Auth0 and their Google account are linked so that they are not required to re-authenticate to Google when requesting an access token for Gmail.
- Updating Auth0 authentication configuration in your application code. This is about adjusting your application configuration.
Register your agent with Google services
To use the Gmail API with Auth0, first create an OAuth 2.0 client in the Google Developer Console. Then, use those settings to configure the Google connection in your Auth0 dashboard. For details, refer to Auth0's Google integration guide or watch the video below:
Ensure you have enabled the https://www.googleapis.com/auth/gmail.send scope for your client in the Google Console.
Enable Token Vault on the Google connection
In the Auth0 dashboard, follow these steps:
- Go to Authentication > Social and select "Google".
- If you didn't do so during the Google services registration step, make sure you enter your Google OAuth client credentials.
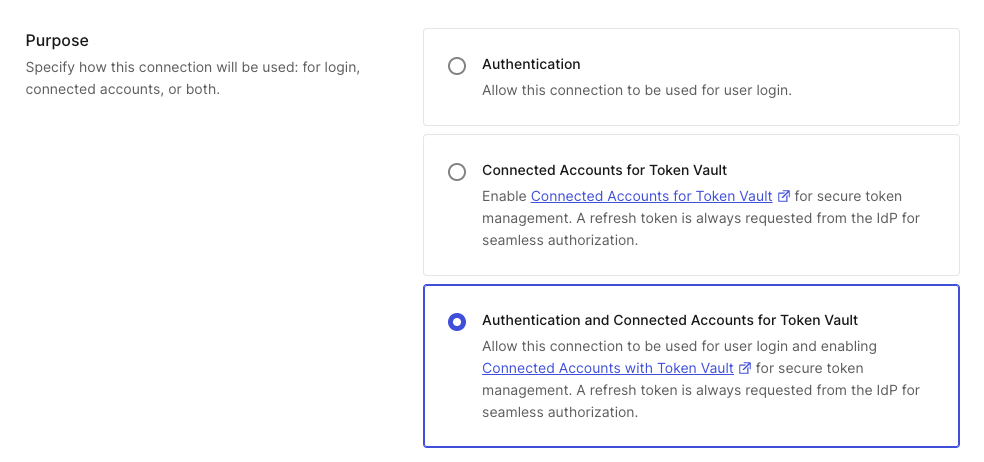
- In the Purpose section, select Authentication and Connected Account for Token Vault:
- Under Permissions, check the Offline Access checkbox in the Access Type subsection. This ensures Google returns a refresh token, which Token Vault needs to get fresh access tokens without re-prompting the user.
- Still under Permissions, check the
Gmail.Sendpermission in the Gmail subsection: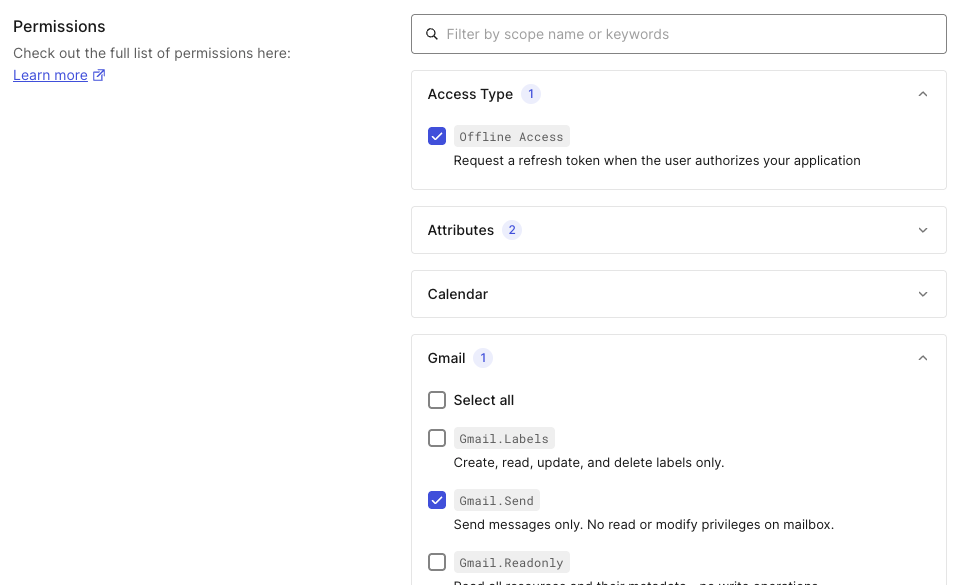
- Save the settings you changed.
Enable Token Vault on your application
Now, to enable the Token Vault for the expense agent:
- Go to the Applications section of the dashboard and select the expense agent.
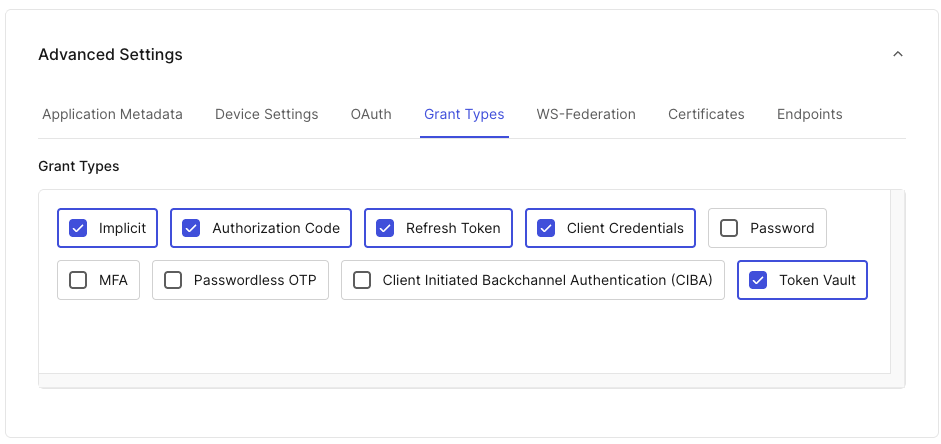
- In the Settings tab, scroll down to the Advanced Settings section and select the Grant Types tab.
- Enable Token Vault:
- Make sure to save changes.
While in the Settings tab of the expense agent, take note of the Client Secret. We are going to use it.
Enable the My Account API for Connected Accounts
Later in this article, the manager will link Gmail after logging in. Authorizing Gmail access happens separately from login itself. That path goes through Auth0's My Account API, which needs its own one-time setup:
Go to Applications > APIs and locate the My Account API entry. Select Activate if it isn't already active:
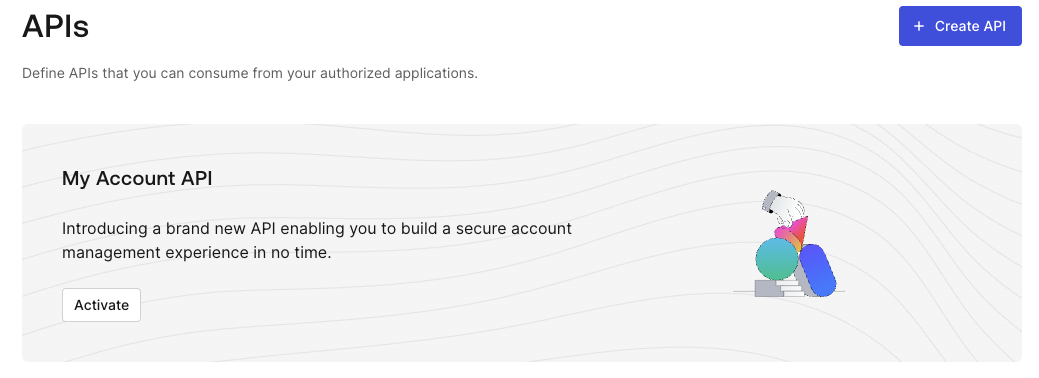
Its audience is
https://YOUR_AUTH0_DOMAIN/me/.- Create a Client Grant authorizing the expense agent application to call the My Account API with the
create:me:connected_accountsscope. From Applications > APIs > My Account API, select the Application Access tab and locate the expense agent application. Click the corresponding Edit button, select thecreate:me:connected_accountspermission and click the Grant Access button: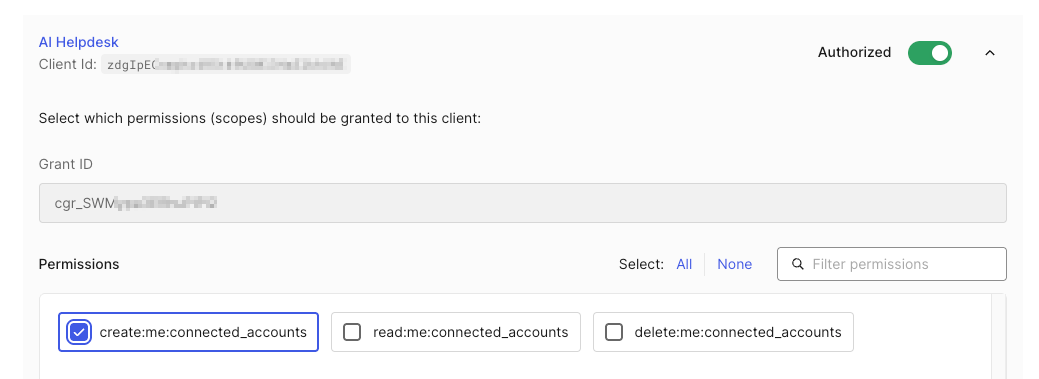 Finally save the changes.
 Configure a Multi-Resource Refresh Token (MRRT) policy on the application so the manager's existing login refresh token can be silently exchanged for a My Account API token, without prompting them to log in again. Navigate to Applications > Applications and select the expense agent. In the Settings tab, scroll down to reach the Multi-Resource Refresh Token section. Click the Edit Configuration button and then enable the MRRT toggle for the Auth0 My Account API.:
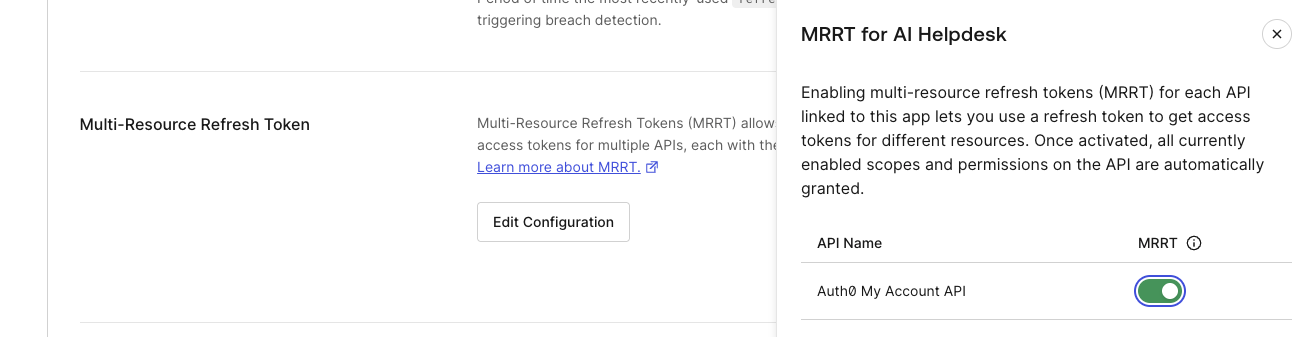
Save the changes on the settings page.
With this in place, your server can turn the manager's existing session into a My Account API token on demand. This is the same "fetch it right before you need it" pattern you're already using for Gmail tokens via Token Vault, but targeting a different resource.
See our introduction to the My Account API and the Connected Accounts for Token Vault reference.
Update the Auth0 authentication configuration
To complete the setup, let's make a couple of changes in the server-side code of the expense agent.
Until now, you only needed an ID token for authentication. Requesting an access token plus a refresh token means the application has to authenticate against Auth0's authorization server, which is why you now need the client secret.
Also, while the Auth0 ASP.NET Core Authentication SDK sends the openid, profile, and email scopes by default, now you need to add the offline_access scope too so Auth0 requests a refresh token to Google during login. Update the code as shown below:
// ExpenseAgent/Program.cs

//...existing code...

builder.Services.AddAuth0WebAppAuthentication(options =>
{
    options.Domain = builder.Configuration["Auth0:Domain"]!;
    options.ClientId = builder.Configuration["Auth0:ClientId"]!;
    //👇new code
    options.ClientSecret = builder.Configuration["Auth0:ClientSecret"]!;
    options.Scope = "openid profile email offline_access";
    //👆new code
})
//👇new code
.WithAccessToken(options =>
{
    options.UseRefreshTokens = true;
});
//👆new code

//...existing code...
In summary, the first time a manager logs in after this change, Auth0 will redirect to Google's consent screen asking for Gmail permission. After they grant it, Token Vault holds the refresh token and handles silent renewal from that point on.
The .WithAccessToken(...) call turns on the SDK's MRRT support: UseRefreshTokens = true exchanges the manager's stored refresh token for an access token scoped to a different audience (like the My Account AP) entirely server-side, without a second login round trip. You'll use this later, when a manager who didn't log in with Google needs to link Gmail separately.
Edit the appsettings.json file and add the client secret setting as shown in the following code snippet:
// ExpenseAgent/appsettings.json

{
  //...existing settings

  "Auth0": {
    "Domain": "YOUR_AUTH0_DOMAIN",
    "ClientId": "YOUR_CLIENT_ID",
    "ClientSecret": "YOUR_CLIENT_SECRET"  //👈 new setting
  },

  //...existing settings
}
Checking Gmail Link Status
Everything is configured to request a Gmail access token from Google and manage it through the Token Vault. Let's start building the flow to get the tokens and send the email when an expense report is missing some data.
To access the Token Vault features through the Auth0 SDK, make sure you have installed Auth0.AspNetCore.Authentication v1.9.0 or later.
As mentioned before, a manager who didn't log in with Google needs to link Gmail separately. You need a way to let the manager authorize your agent to access Gmail. Let's start by creating a GmailLinkContext.cs file in the Services folder:
// ExpenseAgent/Services/GmailLinkContext.cs

namespace ExpenseAgent.Services;

public class GmailLinkContext
{
    public bool NeedsLink { get; set; } = true;
    public string? Cookie { get; set; }
}
This service holds two small things. NeedsLink tracks whether the manager still needs to authorize Gmail access; the UI banner reads it. Cookie captures the manager's raw authentication cookie during the initial render, so the interactive SignalR circuit can later authenticate a call back to your own server. You will learn why you need this infrastructure in a moment.
Register the service as a scoped service as shown below:
// ExpenseAgent/Program.cs

//...existing code...

//👇new code
builder.Services.AddScoped<GmailLinkContext>();
//👆new code

var app = builder.Build();

//...existing code...
Make sure you register this service as a scoped service, not singleton: a singleton would leak one manager's cookie into every other manager's SignalR circuit.
Now, update ExpenseAgent/Components/App.razor to populate it during the initial render:
// ExpenseAgent/Components/App.razor

@* 👇new code *@
@using Auth0.AspNetCore.Authentication
@using ExpenseAgent.Services

@inject GmailLinkContext LinkContext
@*👆new code *@

@* ...existing head/body markup... *@

//👇new code
@code {
    [CascadingParameter]
    private HttpContext? HttpContext { get; set; }

    protected override async Task OnInitializedAsync()
    {
        if (HttpContext?.User.Identity?.IsAuthenticated == true)
        {
            LinkContext.Cookie = HttpContext.Request.Headers.Cookie.ToString();

            var token = await HttpContext.GetAccessTokenForConnectionAsync(
                new AccessTokenForConnectionRequest { Connection = "google-oauth2" });

            LinkContext.NeedsLink = token is null;
        }
    }
}
//👆new code
If the user is authenticated, the component calls GetAccessTokenForConnectionAsync() during the initial render. This method, provided by the Auth0 SDK, obtains an access token from the Token Vault, but in this context it is only used to answer one question: has this manager linked Gmail? The result is discarded immediately; only the yes/no answer survives, in LinkContext.NeedsLink.
HttpContext.Request.Headers.Cookie gives you the raw Cookie header the browser sent on this same request. That's what gets forwarded later, when the SignalR circuit needs to authenticate its own call back to the server.
Since Blazor relies on SignalR for client-server communication, you have some limitations on accessing
HttpContext.HttpContextis only populated during the initial, statically-rendered pass of a Razor component. This opens a problem for invokingGetAccessTokenForConnectionAsync()after the initial rendering. This is why we are capturing inLinkContextthe two pieces of state the rest of the app needs. This is done in theApp.razorcomponent, the one that handles the actual HTTP request for the page.
Building the Email Service
With the Gmail link status plumbing in place, build the actual email-sending logic. Add an EmailService.cs file to the Services folder with the following code:
// ExpenseAgent/Services/EmailService.cs

using System.Net.Http.Headers;
using System.Text;
using System.Text.Json;

namespace ExpenseAgent.Services;

public class EmailService
{
    private readonly IHttpClientFactory _httpClientFactory;

    public EmailService(IHttpClientFactory httpClientFactory)
    {
        _httpClientFactory = httpClientFactory;
    }

    public async Task SendAsync(
        string toEmail,
        string subject,
        string body,
        string gmailToken)
    {
        var rawMessage =
            $"To: {toEmail}\r\n" +
            $"Subject: {subject}\r\n" +
            $"Content-Type: text/plain; charset=utf-8\r\n\r\n" +
            $"{body}";

        // Gmail API requires base64url encoding
        var encoded = Convert.ToBase64String(Encoding.UTF8.GetBytes(rawMessage))
            .Replace('+', '-')
            .Replace('/', '_')
            .TrimEnd('=');

        var httpClient = _httpClientFactory.CreateClient();
        httpClient.DefaultRequestHeaders.Authorization =
            new AuthenticationHeaderValue("Bearer", gmailToken);

        var response = await httpClient.PostAsync(
            "https://gmail.googleapis.com/gmail/v1/users/me/messages/send",
            new StringContent(
                JsonSerializer.Serialize(new { raw = encoded }),
                Encoding.UTF8,
                "application/json"));

        if (!response.IsSuccessStatusCode)
        {
            var error = await response.Content.ReadAsStringAsync();
            throw new InvalidOperationException(
                $"Gmail send failed ({response.StatusCode}): {error}");
        }
    }
}
The SendAsync() method builds the message and encodes it with base64url encoding, as the Gmail messages/send endpoint requires (RFC 2822). Then it calls the Gmail endpoint passing the gmailToken.
Register the EmailService in Program.cs with the following code:
// ExpenseAgent/Program.cs

//...existing code...

builder.Services.AddScoped<GmailLinkContext>();
//👇new code
builder.Services.AddSingleton<EmailService>();
//👆new code

var app = builder.Build();

//...existing code...
Sending the Email
Now, you need a way to get the chat component to send the email message with the Gmail token. Due to the Blazor restrictions to HttpContext mentioned before, you can't invoke GetAccessTokenForConnectionAsync() in the context of the component itself. So you will add an endpoint that does the actual work: fetching a fresh token and calling Gmail.
Open the Program.cs file and add the lines of code highlighted below:
// ExpenseAgent/Program.cs

//...existing code...

//👇new code
app.MapPost("/api/send-missing-data-email", async (
    SendMissingDataEmailRequest request,
    HttpContext httpContext,
    EmailService emailService) =>
{
    var token = await httpContext.GetAccessTokenForConnectionAsync(
        new AccessTokenForConnectionRequest { Connection = "google-oauth2" });

    if (token is null)
    {
        return Results.Conflict(new { needsLink = true });
    }

    await emailService.SendAsync(request.EmployeeEmail, request.Subject, request.Body, token);
    return Results.Ok();
}).RequireAuthorization();
//👆new code

app.MapStaticAssets();
app.MapRazorComponents<App>()
    .AddInteractiveServerRenderMode()
    .AddInteractiveWebAssemblyRenderMode()
    .AddAdditionalAssemblies(typeof(ExpenseAgent.Client._Imports).Assembly);

app.Run();

//👇new code
public record SendMissingDataEmailRequest(string EmployeeEmail, string Subject, string Body);
//👆new code
.RequireAuthorization() means this endpoint only runs for an authenticated request. An anonymous caller gets a 401 before the handler body executes at all.
Inside the handler, httpContext is a real instance of request-scoped HttpContext, so GetAccessTokenForConnectionAsync() behaves exactly as it does in App.razor: it returns a token that's guaranteed fresh at the moment it's requested, refreshed silently from the stored Google refresh token if needed. That token exists only as a local variable for the lifetime of this one request. It's never assigned to a field, never cached anywhere, and never appears in the response.
On success you get 200 OK; if the manager hasn't linked Gmail, you get 409 Conflict with { needsLink: true }. Either way, the caller learns what happened without learning anything about the token itself.
This endpoint is meant to be called only by your own server code, not directly by a browser. That raises the obvious next question: a caller with no HttpContext of its own, i.e., the interactive SignalR circuit, needs some way to authenticate to it. This is what the cookie captured on page load is for, and in the next section you'll see how it is used.
Updating the Agent Tools
To enable your agent to send the email, you will add a new SendMissingDataEmail() tool. Open the ExpenseAgentTools.cs file in the ExpenseAgent/Agent folder and apply the changes highlighted in the following code block:
// ExpenseAgent/Agent/ExpenseAgentTools.cs

using System.ComponentModel;
using System.Text.Json;
using ExpenseAgent.Services;
using System.Net;            //👈 new code
using System.Net.Http.Json;  //👈 new code

namespace ExpenseAgent.Agent;

public class ExpenseAgentTools
{
    private readonly string _managerId;
    private readonly ExpenseReportService _expenseService;
    private readonly FgaService _fgaService;
    private readonly HttpClient _httpClient;  //👈 new code
    private readonly string? _cookie;         //👈 new code

    public ExpenseAgentTools(
        string managerId,
        ExpenseReportService expenseService,
        FgaService fgaService,
        HttpClient httpClient,  //👈 new code
        string? cookie)         //👈 new code
    {
        _managerId = managerId;
        _expenseService = expenseService;
        _fgaService = fgaService;
        _httpClient = httpClient;  //👈 new code
        _cookie = cookie;          //👈 new code
    }

    //...existing code...

    //👇new code
    [Description("Send an email to an employee asking them to provide missing information for their expense report.")]
    public async Task<string> SendMissingDataEmail(
        [Description("The employee's email address")] string employeeEmail,
        [Description("The expense report ID (e.g., exp-002)")] string expenseId,
        [Description("Comma-separated list of missing fields (e.g., 'amount, justification')")] string missingFields)
    {
        var subject = $"Action Required: Incomplete Expense Report {expenseId}";
        var body = $"""
            Hi,

            Your expense report {expenseId} is missing the following required fields: {missingFields}.

            Please update your submission with the missing information so it can be reviewed and approved.

            Thank you.
            """;

        using var request = new HttpRequestMessage(HttpMethod.Post, "/api/send-missing-data-email")
        {
            Content = JsonContent.Create(new { employeeEmail, subject, body })
        };

        if (_cookie is not null)
        {
            request.Headers.Add("Cookie", _cookie);
        }

        var response = await _httpClient.SendAsync(request);

        if (response.StatusCode == HttpStatusCode.Conflict)
        {
            return "I can't send this yet — the manager still needs to authorize Gmail access.";
        }

        if (!response.IsSuccessStatusCode)
        {
            return $"Sending the email to {employeeEmail} failed. Please try again.";
        }

        return $"Email sent to {employeeEmail} requesting: {missingFields}.";
    }
    //👆new code
}
The constructor of ExpenseAgentTools takes two new parameters: an HttpClient instance and the manager's cookie.
The new SendMissingDataEmail() tool will build the text of the email and invoke the sending endpoint you created earlier, including the authentication cookie.
Notice that from the LLM's point of view this is an ordinary tool invocation. No token is shared with it. It calls SendMissingDataEmail() with employeeEmail, expenseId, and missingFields, and gets back a short status string. How the email actually gets sent, i.e., the token fetch, the Gmail call, happens one hop away, inside /api/send-missing-data-email, invisible to both the model and this class.
Rule of thumb: never hand credentials to an LLM. Anything it can see, it can leak.
For more on why agents shouldn't hold secrets, see Want AI Agents That Don't Spill Secrets? Don't Give Them Secrets.
Updating the System Prompt
The agent needs explicit instructions for evaluating completeness. Without them, it might describe the problem but not act on it. Update the system prompt in Agent/ExpenseAgentService.cs as shown below:
// ExpenseAgent/Agent/ExpenseAgentService.cs

//...existing code...

var systemPrompt = """
    You are an expense approval assistant. You help managers review and process expense reports from their direct reports.

    For each expense report you review, check whether it includes all three required fields:
    1. Amount (must be greater than zero)
    2. Merchant name (must not be empty)
    3. Justification (must not be empty)

    If any required field is missing:
    - Call SendMissingDataEmail with the employee's email, the expense ID, and
      a comma-separated list of the missing field names.
    - Tell the manager what you did and which fields were missing.

    If all required fields are present:
    - Tell the manager the report looks complete and is ready for their decision.

    Be concise and professional. Address the manager by name when you know it.
    """;

//...existing code...
Updating the Chat Component
The chat component will read the manager's link status and cookie from GmailLinkContext, and build an HttpClient for ExpenseAgentTools to call the new endpoint with.
Update Components/Pages/Chat.razor as shown below:
@* ExpenseAgent/Components/Pages/Chat.razor *@

@* ...existing code... *@

@inject ExpenseAgentService AgentService
@inject ExpenseReportService ExpenseService
@inject FgaService FgaService
@inject GmailLinkContext LinkContext          //👈 new code
@inject IHttpClientFactory HttpClientFactory  //👈 new code
@inject NavigationManager Navigation          //👈 new code

<PageTitle>Expense Agent</PageTitle>

<h2>Expense Agent</h2>

<AuthorizeView>
    <Authorized Context="auth">
        <p class="text-muted">Logged in as <strong>@auth.User.Identity?.Name</strong></p>
    </Authorized>
</AuthorizeView>

@* 👇new code *@
@if (_needsGoogleLink)
{
    <div class="alert alert-warning">
        To send emails on your behalf, I need access to your Gmail account.
        <a href="/Account/ConnectGoogle" class="alert-link">Authorize Gmail access</a>
    </div>
}
@* 👆new code *@

@* ...existing markup... *@

@code {
    [CascadingParameter]
    private Task<AuthenticationState>? AuthState { get; set; }

    private readonly List<(string Role, string Text)> _messages = new();
    private string _inputText = "";
    private string? _userId;
    private string? _userName;
    private bool _thinking;
    private string? _cookie;         //👈 new code
    private bool _needsGoogleLink;   //👈 new code
    private HttpClient? _apiClient;  //👈 new code

    protected override async Task OnInitializedAsync()
    {
        if (AuthState is not null)
        {
            var state = await AuthState;
            _userId = state.User.FindFirst(System.Security.Claims.ClaimTypes.NameIdentifier)?.Value;
            _userName = state.User.FindFirst("name")?.Value
                ?? state.User.FindFirst(System.Security.Claims.ClaimTypes.GivenName)?.Value;
        }

        //👇new code
        _cookie = LinkContext.Cookie;
        _needsGoogleLink = LinkContext.NeedsLink;

        _apiClient = HttpClientFactory.CreateClient();
        _apiClient.BaseAddress = new Uri(Navigation.BaseUri);
        //👆new code
    }

    private async Task SendMessage()
    {
        var text = _inputText.Trim();
        //👇changed line
        if (string.IsNullOrEmpty(text) || _userId is null || _apiClient is null) return;

        _inputText = "";
        _messages.Add(("You", text));
        _thinking = true;

        try
        {
            //👇changed line
            var tools = new ExpenseAgentTools(
                _userId, ExpenseService, FgaService, _apiClient, _cookie);

            var reply = await AgentService.ChatAsync(_userId, text, _userName, tools);
            _messages.Add(("Agent", reply));
        }
        finally
        {
            _thinking = false;
        }
    }

    private async Task HandleKeyDown(KeyboardEventArgs e)
    {
        if (e.Key == "Enter") await SendMessage();
    }
}
IHttpClientFactory creates the HttpClient that calls back into your own app, and NavigationManager.BaseUri gives it a BaseAddress. That's not optional: a plain HttpClient in a Blazor Server circuit has no base address of its own, unlike a WebAssembly client, which resolves relative requests against the page it's running in. Without setting BaseAddress explicitly, a relative request like /api/send-missing-data-email throws InvalidOperationException before it ever leaves the process.
LinkContext.Cookie supplies the credential the internal call authenticates with. Chat.razor never sees a Gmail token, because there isn't one to see.
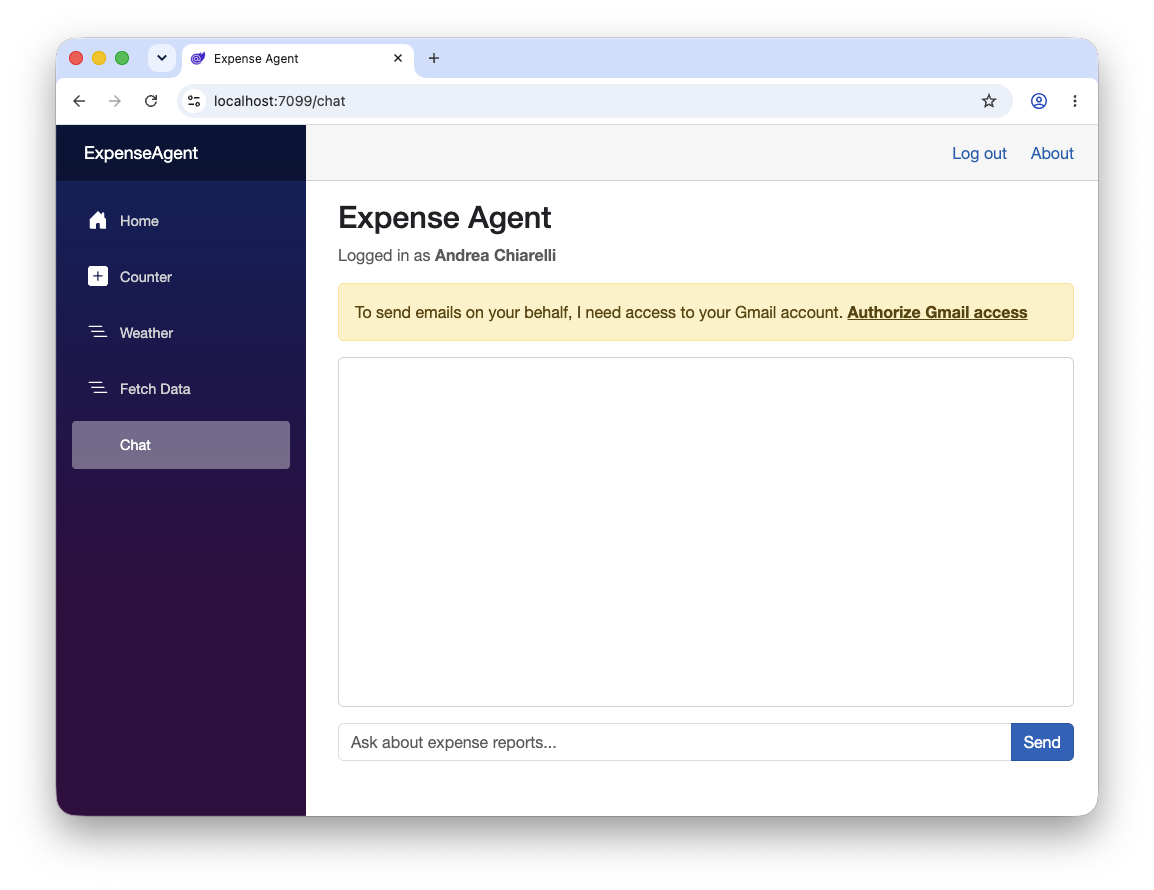
The "Authorize Gmail access" alert asks for user authorization for accessing Gmail. This is what the next section will focus on.
Handling the Google Connection Flow
To access your expense agent, the manager must prove who they are, and it's tied to whatever method they actually use to sign in: Google, a database connection, whatever your tenant offers on the Universal Login page.
Linking Gmail here is a different problem: the manager is already signed in, under whatever identity they used, and now wants to attach a Google account's tokens to that existing profile so the agent can act on their behalf. Auth0 keeps these two concerns separate. The mechanism for the second one is called Connected Accounts, and it's a distinct flow against a different API (the My Account API you already enabled and configured), not a variation on login.
This is the goal of the "Authorize Gmail access" link shown above the chat window if the agent has no Gmail access token yet:
The Connected Accounts handshake
Connecting an account is a three-step round trip against the My Account API:
- Initiate Connection. Your server uses the My Account API to start the flow. It passes to Auth0 the target connection (
google-oauth2in our case) and where to send the browser back to after approval on Google (redirectUri). The API returns a response containingConnectUri, a one-timeTicket, and anAuthSessionthat your server holds onto for step 3. - User Authorization. You redirect the browser to
ConnectUri?ticket=.... The manager consents on Google's authorization screen. - Complete Connection. Google redirects back to your
redirectUri. The single-useconnect_codeissued by Auth0 returns in the URL fragment (after#). A small snippet of client-side JavaScript extracts the fragment and posts it back to your backend endpoint. Your backend then invokes the My Account API to finalize account linking and save the credentials into Token Vault.
That fragment detail is the whole reason this needs a dedicated callback page instead of a plain redirect target: whatever handles the return trip has to run in the browser for at least one step, purely to pull connect_code out of window.location.hash before it disappears.
Both the Initiate and Complete Connection steps need to authenticate as the logged-in manager against the My Account API, which is a different audience (https://YOUR_AUTH0_DOMAIN/me/) than anything you've requested a token for so far. That's exactly what the .WithAccessToken(options => options.UseRefreshTokens = true) change from earlier in this article set up: HttpContext.GetAccessTokenAsync() can silently exchange the manager's existing login refresh token for a My Account API token, on demand, the same "ask right before you need it" pattern already used for Gmail tokens.
The Connected Account implementation
For the actual implementation of the flow, you will use the Auth0 My Account API SDK for .NET, which abstracts away lower-level HTTP request formatting, authorization header handling, and response schema parsing. In the ExpenseAgent folder install the SDK with the following command:
dotnet add package Auth0.MyAccountApi
At the time of writing, the Auth0 My Account API SDK for .NET is released in beta version. Make sure to update to the latest version in case you have any issues.
First, register the My Account client and its token provider in Program.cs:
// ExpenseAgent/Program.cs

//...existing code...

//👇new code
using System.Text.Json;
using Microsoft.Extensions.Caching.Distributed;
using Auth0.MyAccountApi;
//👆new code

//...existing code...

builder.Services.AddScoped<ExpenseAgentService>();

//👇new code
builder.Services.AddHttpContextAccessor();
builder.Services.AddSingleton(sp =>
{
    var domain = sp.GetRequiredService<IConfiguration>()["Auth0:Domain"]!;
    var httpContextAccessor = sp.GetRequiredService<IHttpContextAccessor>();

    return new MyAccountClient(new MyAccountClientOptions
    {
        Domain = domain,
        TokenProvider = new DelegateTokenProvider(async cancellationToken =>
        {
            var context = httpContextAccessor.HttpContext;
            if (context == null) return null;

            return await context.GetAccessTokenAsync(new AccessTokenRequest
            {
                Audience = $"https://{domain}/me/",
                Scope = "create:me:connected_accounts"
            });
        })
    });
});
//👆new code

//...existing code...
This code creates a singleton service for the MyAccountClient client, which will help you to make calls to the My Account API.
To implement the three steps outlined in the previous subsection, add the three endpoints shown below to Program.cs:
//...existing code... //👇new code app.MapGet("/Account/ConnectGoogle", async ( HttpContext ctx, IConfiguration config, MyAccountClient myAccountClient, IDistributedCache cache) => { // Initiate a connected account flow using the Auth0 My Account client. var correlationId = Guid.NewGuid().ToString("N"); var redirectUri = $"{ctx.Request.Scheme}://{ctx.Request.Host}/Account/ConnectGoogleCallback?cid={correlationId}"; try { var response = await myAccountClient.ConnectedAccounts.CreateAsync( new CreateConnectedAccountsRequestContent { Connection = "google-oauth2", RedirectUri = redirectUri, State = correlationId } ); // Cache the minimal pending state so the callback/complete flow can resume. await cache.SetStringAsync( $"connect:{correlationId}", JsonSerializer.Serialize(new { auth_session = response.AuthSession, redirect_uri = redirectUri }), new DistributedCacheEntryOptions { AbsoluteExpirationRelativeToNow = TimeSpan.FromMinutes(5) }); return Results.Redirect($"{response.ConnectUri}?ticket={response.ConnectParams.Ticket}"); } catch { return Results.Redirect("/chat"); } }).RequireAuthorization(); app.MapGet("/Account/ConnectGoogleCallback", (string cid) => Results.Content($$""" <!DOCTYPE html> <html> <body> <script> var connectCode = new URLSearchParams(window.location.hash.substring(1)).get('connect_code'); fetch('/Account/ConnectGoogleComplete', { method: 'POST', headers: { 'Content-Type': 'application/json' }, body: JSON.stringify({ cid: '{{cid}}', connectCode: connectCode }) }).then(() => { window.location.href = '/chat'; }); </script> Finishing Gmail authorization… </body> </html> """, "text/html")).RequireAuthorization(); app.MapPost("/Account/ConnectGoogleComplete", async ( HttpRequest req, HttpContext ctx, IConfiguration config, MyAccountClient myAccountClient, IDistributedCache cache) => { // Read JSON payload manually to avoid requiring a dedicated request type. using var sr = new StreamReader(req.Body); var body = await sr.ReadToEndAsync(); if (string.IsNullOrEmpty(body)) return Results.BadRequest(); var doc = JsonSerializer.Deserialize<JsonElement>(body); if (!doc.TryGetProperty("cid", out var cidProp) || !doc.TryGetProperty("connectCode", out var codeProp)) { return Results.BadRequest(); } var cid = cidProp.GetString()!; var connectCode = codeProp.GetString()!; var pendingJson = await cache.GetStringAsync($"connect:{cid}"); if (pendingJson is null) { return Results.BadRequest(); } var pending = JsonSerializer.Deserialize<JsonElement>(pendingJson); var authSession = pending!.GetProperty("auth_session").GetString(); var redirectUri = pending.GetProperty("redirect_uri").GetString(); try { await myAccountClient.ConnectedAccounts.CompleteAsync( new CompleteConnectedAccountsRequestContent { AuthSession = authSession!, ConnectCode = connectCode, RedirectUri = redirectUri! } ); await cache.RemoveAsync($"connect:{cid}"); return Results.Ok(); } catch { return Results.BadRequest(); } }).RequireAuthorization(); //👆new code app.MapStaticAssets(); //...existing code...
The /Account/ConnectGoogle endpoint is responsible for initiating the connected account flow. It calls the myAccountClient.ConnectedAccounts.CreateAsync() method and redirects the browser to the ConnectUri (Google in our case) with the specified ticket. The relevant data is stored in cache to be recovered later at completion time.
The /Account/ConnectGoogleCallback endpoint is where Google will redirect the manager after they approve Gmail usage on their behalf. It just returns a HTML page with a JavaScript code snippet that sends the correlation ID and the connectCode to the third endpoint: /Account/ConnectGoogleComplete.
Important: Add
https://YOUR_APP_URL/Account/ConnectGoogleCallbackto the application's Allowed Callback URLs in the Auth0 dashboard, alongside whatever callback path your login flow already uses: Auth0 validatesredirectUriagainst that list for this flow too.
The /Account/ConnectGoogleComplete endpoint gathers the three values needed to complete the connected account flow and invokes myAccountClient.ConnectedAccounts.CompleteAsync().
Each of these three endpoints must have .RequireAuthorization() and runs as a normal browser-initiated HTTP request (not a Blazor circuit call), so HttpContext.User is populated as usual from the manager's authentication cookie. There's no need for the cookie-forwarding trick ExpenseAgentTools uses elsewhere. That trick exists specifically because the SignalR circuit has no HttpContext of its own; a plain page navigation and a fetch() from that page both do.
One consequence of separating identity from Connected Accounts is worth spelling out. A manager who signs in with Google itself at Universal Login already goes through Google's consent screen at login time. The
offline_accessscope you added earlier means Token Vault already has a usable Google token before they reach the chat page.
GetAccessTokenForConnectionAsync()inApp.razorfinds one,NeedsLinkcomes backfalse, and the "Authorize Gmail access" banner never appears for them. The Connected Accounts flow in this section only comes into play for a manager who authenticates some other way (a database connection or a different social provider) and needs Gmail linked as a secondary account after the fact. Both paths land tokens in the same place in Token Vault; they just start from different logins.
Testing the Email Flow
Start the app and log in. Because offline_access is now in the scope, Auth0 will redirect to Google's consent screen on the first login after this change. Authorize Gmail access.
Once back in the app, navigate to /chat and ask: "Review all pending expense reports and handle any that are missing information."
The agent calls GetExpenseReports, retrieves the reports authorized for the current manager, and evaluates each one. For exp-002 (missing amount and justification), it calls SendMissingDataEmail. For exp-003 (missing merchant), it calls SendMissingDataEmail again.
Check the test employee email accounts: the messages arrive from the manager's Gmail address, not from any system-level email address. The agent acted on behalf of the manager, using their own account.
What Happened Under the Hood
Here's the full flow in one diagram, which is worth a look even after building it, because the sequence explains why each moving part exists:
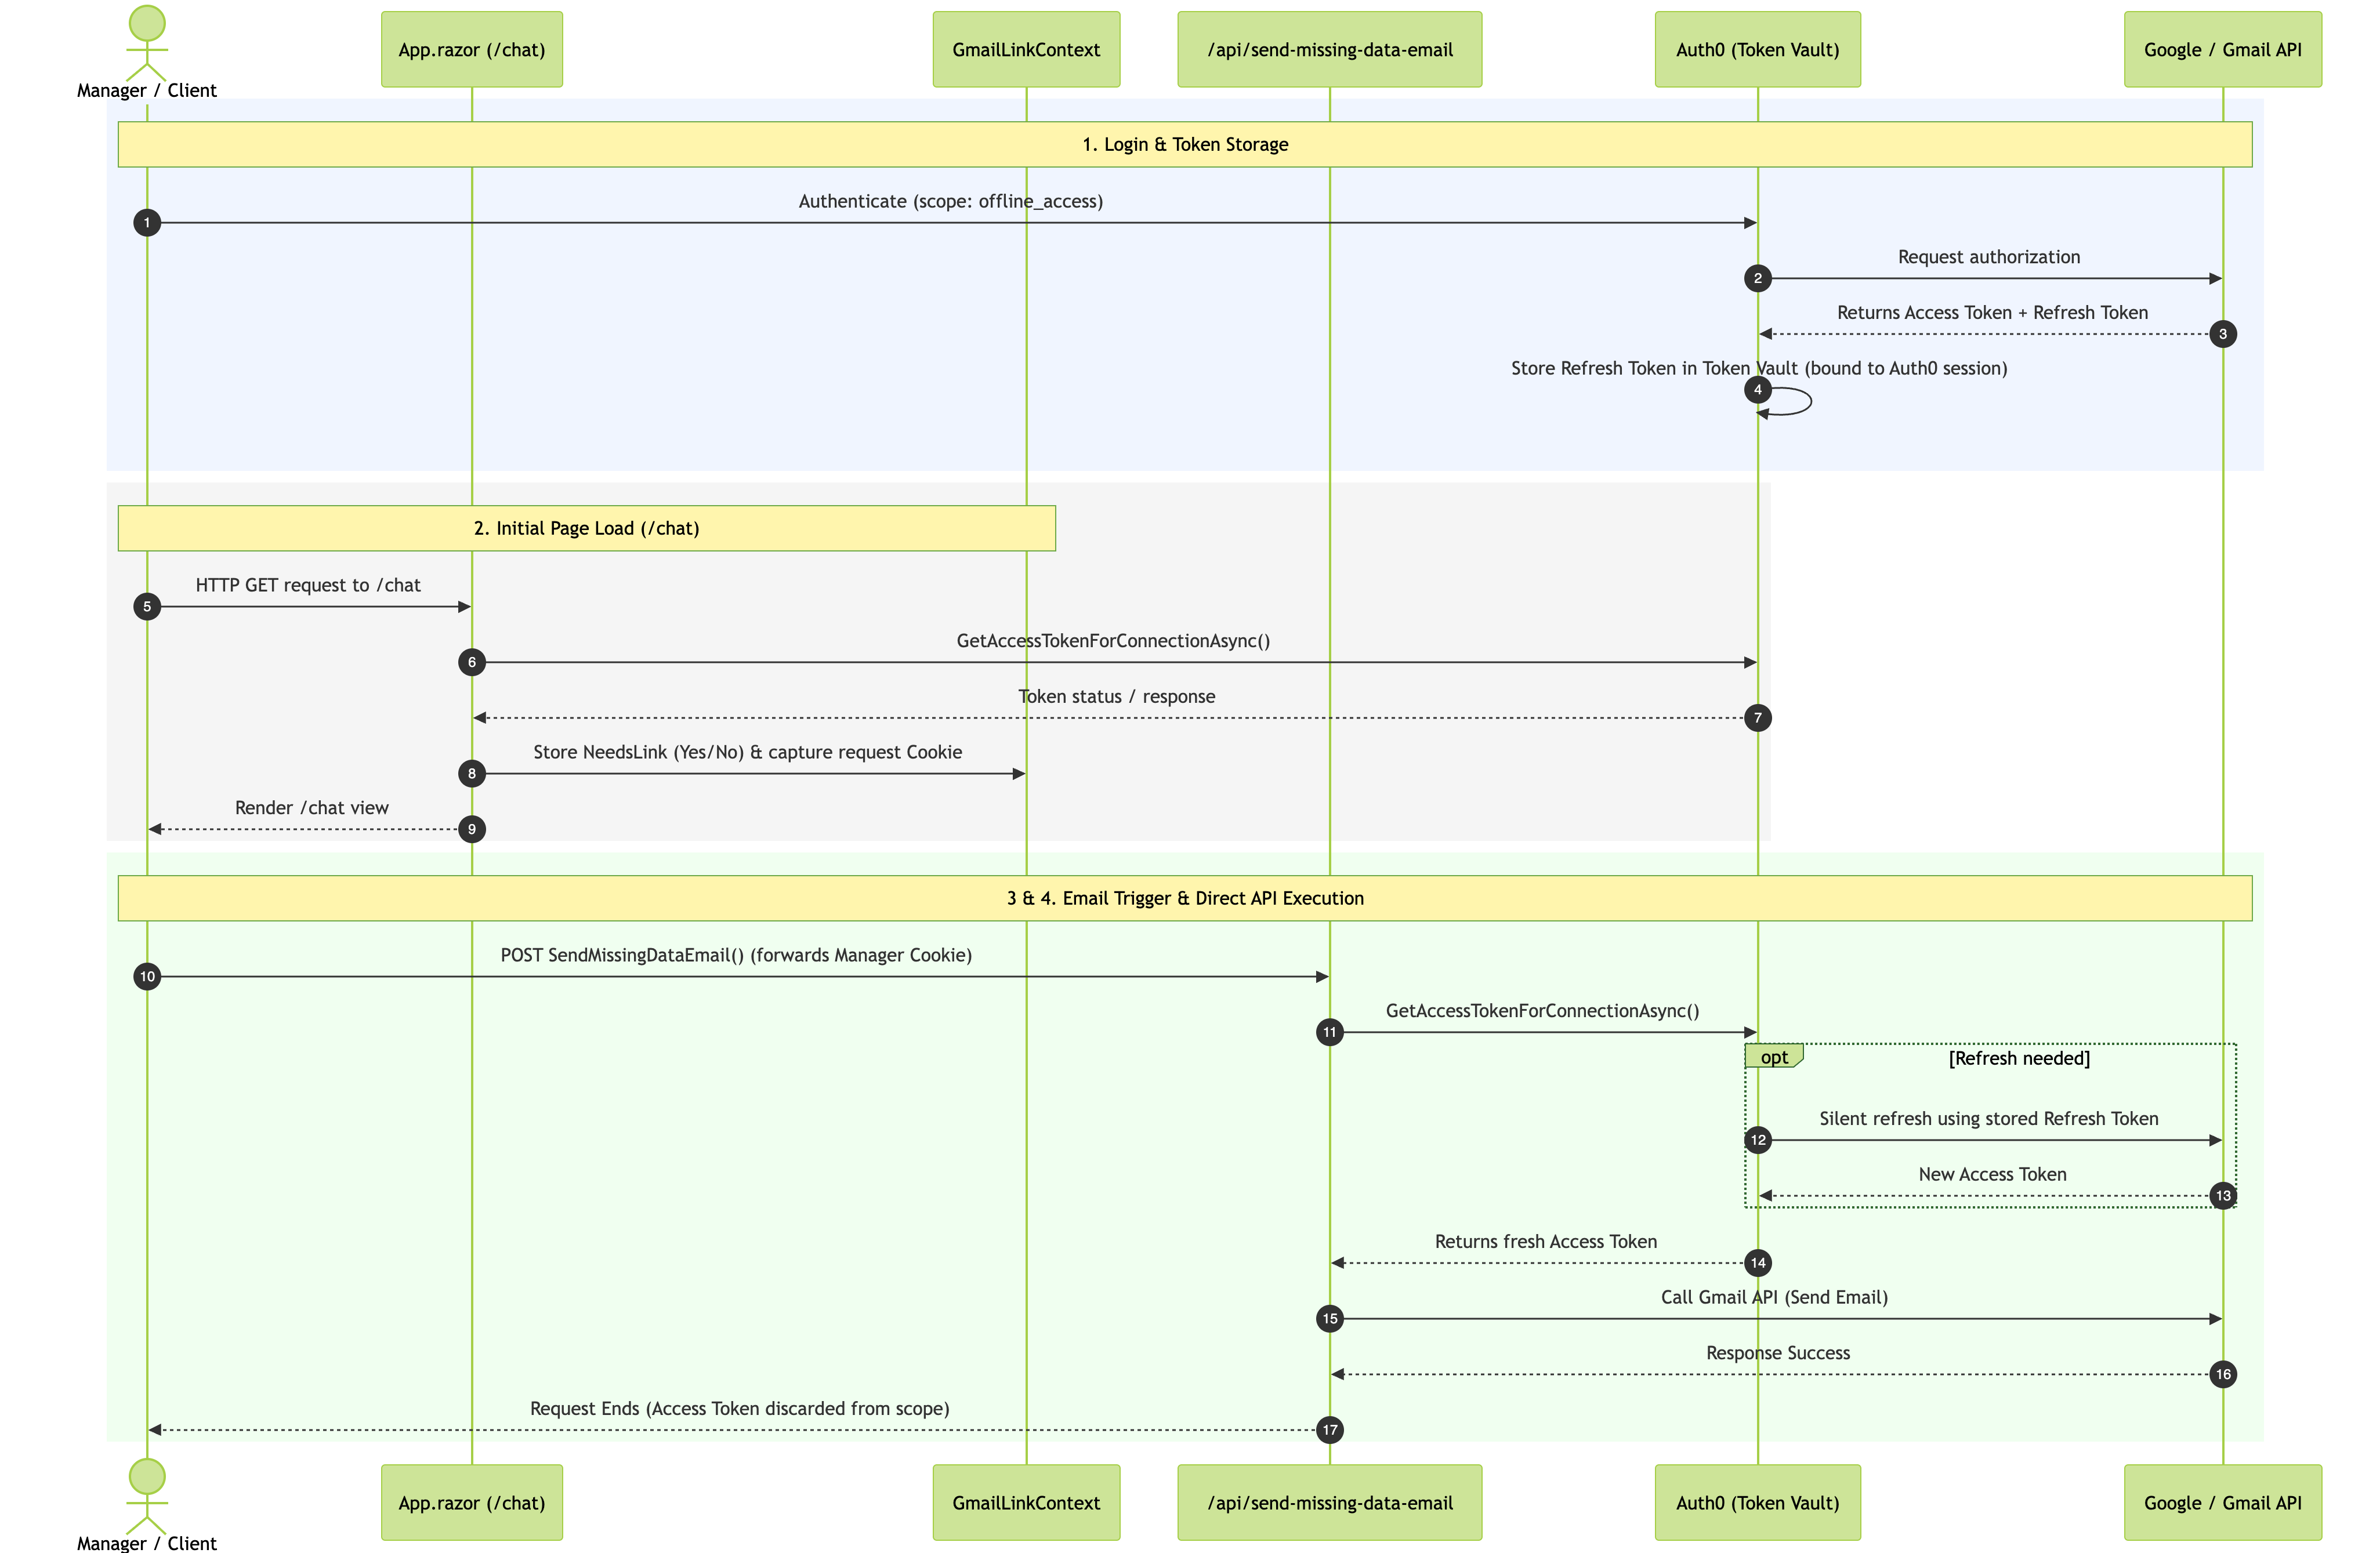
At login (1), offline_access in the scope (2) causes Google to return a refresh token alongside the access token (3). Auth0 stores them in the Token Vault, associated with the user's Auth0 session (4).
When the /chat page first loads (5), App.razor renders once with a real HttpContext, the one HTTP request in the whole Blazor Server lifecycle. It calls GetAccessTokenForConnectionAsync() purely to check whether the manager has linked Gmail (6), discards the result (7), and keeps only the yes/no answer in GmailLinkContext.NeedsLink. It also captures the request's Cookie header into GmailLinkContext.Cookie (8) and finally renders the chat view (9).
When the agent decides to send an email, SendMissingDataEmail() never touches Token Vault directly. It POSTs to /api/send-missing-data-email on your own server, forwarding the manager's cookie so the request authenticates as them (10).
That endpoint runs as a real, authenticated HTTP request with its own HttpContext. It calls GetAccessTokenForConnectionAsync() right there (11) and Token Vault returns a token that's fresh at that exact moment (14), silently refreshed from the stored refresh token if needed (12, 13). Then it uses that token to call Gmail (15), and lets it go out of scope the instant the request ends (16, 17).
Where This Leaves Us
After this walkthrough, the agent can now:
- Evaluate expense reports for completeness
- Email employees on the manager's behalf when data is missing
- Use the manager's own Gmail account, not a system address
- Acquire OAuth tokens without storing them in your application
Check out the source code in this branch of the GitHub repository.
The last piece is approval. exp-001 (Alice's hotel dinner) has all three required fields: amount, merchant, and justification. Right now, the agent just says "this one looks ready." In part 4, you'll give it the ability to send a push notification to the manager's phone and wait for an approval or rejection via CIBA.
About the author

Andrea Chiarelli
Principal Developer Advocate
I have over 20 years of experience as a software engineer and technical author. Throughout my career, I've used several programming languages and technologies for the projects I was involved in, ranging from C# to JavaScript, ASP.NET to Node.js, Angular to React, SOAP to REST APIs, etc.
In the last few years, I've been focusing on simplifying the developer experience with Identity and related topics, especially in the .NET ecosystem.