TL;DR: This article will show you how to use Laravel to implement a basic GraphQL API and how to secure it with Auth0. Throughout the article, you will learn how to implement the API step by step up to the final result. You can find the final code on this GitHub repository.
“Learn how to build GraphQL APIs with Laravel in a few steps.”
Tweet This
The API You Will Build
The project you are going to build is an API providing a list of wines from all over the world. As mentioned before, you will build the API following the GraphQL model. This model allows a client to request the exact data it needs, nothing more, nothing less. You will implement the GraphQL API by using Laravel, one of the most popular PHP frameworks that allows you to set up an application in minutes by exploiting its powerful infrastructure. Finally, you will learn how easy it is to secure your GraphQL API with Auth0.
Before starting the project, ensure you have PHP and MySQL installed on your machine. You will also need Composer, a dependency manager for PHP.
Once you have these tools installed on your machine, you are ready to build the Wine Store API.
Setting up the Laravel PHP Project
The first step to create a Laravel project is to run the following command in a terminal:
composer create-project --prefer-dist laravel/laravel winestore
This command asks Composer to create a Laravel project named winestore. The result is a new directory called winestore right where you ran the command. This directory will have a few files and subdirectories as shown in the following picture:
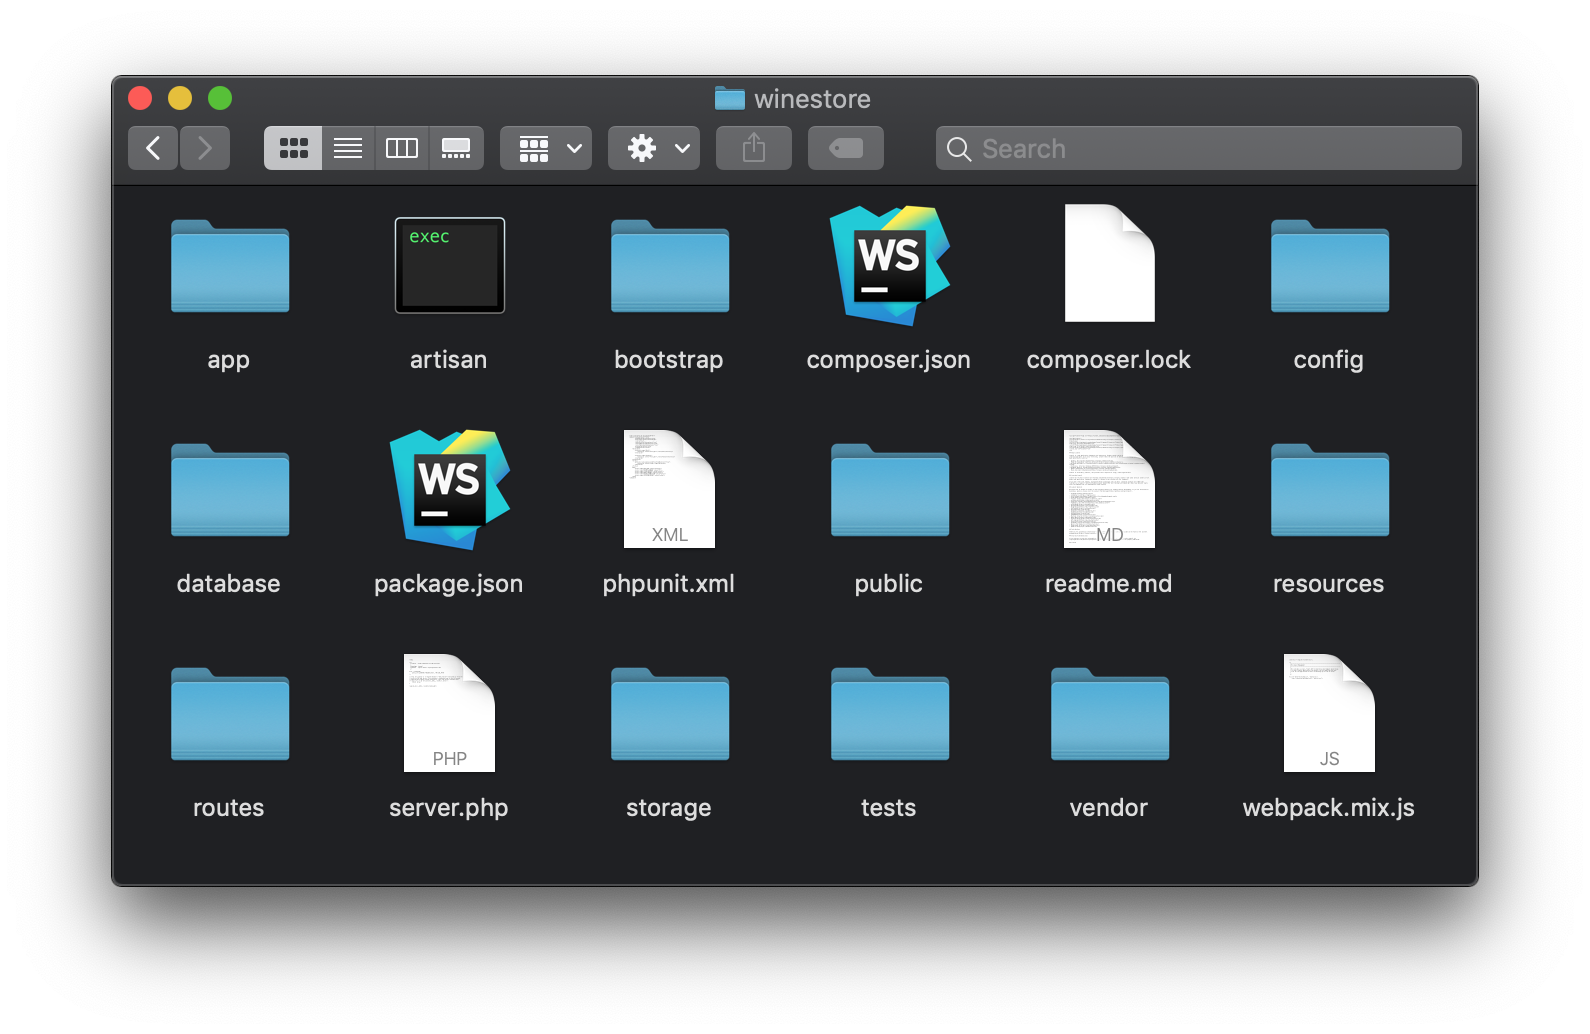
Don't worry if you are not acquainted with Laravel's structure. While you will build the application, you will learn the role of the most important directories and files.
Creating the Wine Store Model
Now you can start to modify the scaffolded project to implement the Wine Store data model.
Creating the Model and the Migration Script
For starters, you will need to use your terminal to move into the winestore project. After that you will run the following command:
# make sure you run it from the winestore directory
php artisan make:model Wine -m
This command will create the Wine model and, thanks to the -m flag, a migration script for database persistence.
The Wine model is implemented in the Wine.php file that you will find inside the app directory. In fact, the app directory contains the code representing the application's domain. The content of the Wine.php file will be as follows:
// ./app/Wine.php
<?php

namespace App;

use Illuminate\Database\Eloquent\Model;

class Wine extends Model
{
    //
}
As you can see, this file defines an empty class extending the Model class from Eloquent. Eloquent is the Object-Relational Mapping (ORM) library shipped with Laravel.
The make:model command you ran a few moments ago also generated a migration script that defines the table structure needed to persist wines in a database. You will find this migration script in the database/migrations directory. If you open this directory, you will find three files whose name starts with a timestamp.
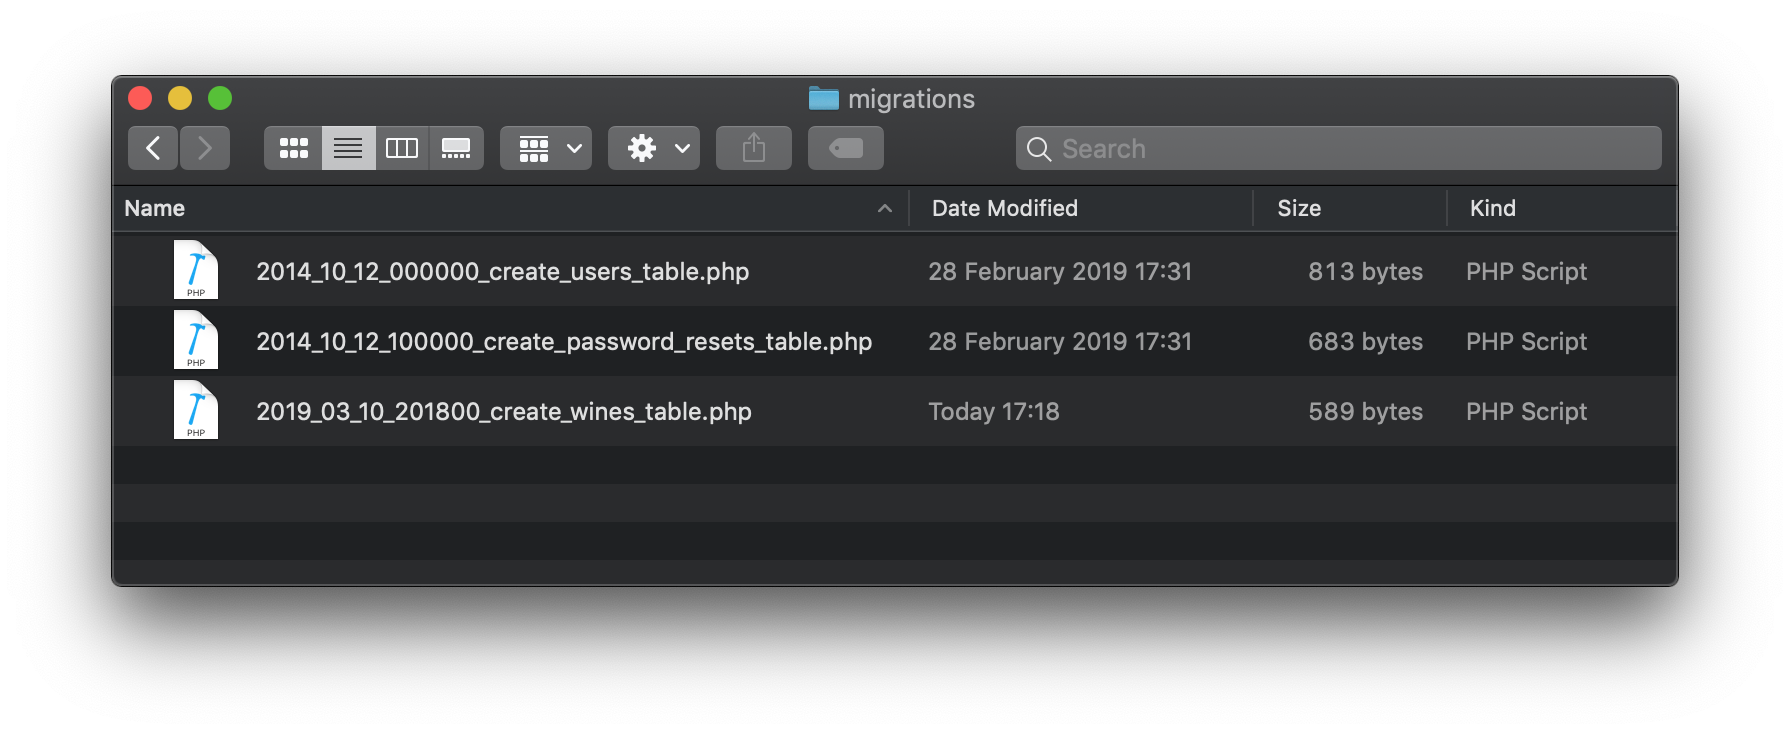
Laravel generated the first two files while initializing the project. These files and are related to the built-in user management feature provided by Laravel. The last file, ending with _create_wines_table.php, is the migration script for the Wine model. Migration scripts are used by Eloquent to create or update the schema of the tables in the application's database. The timestamp prefix for each file helps Eloquent identify which migrations it needs to apply and in which order.
Now, open the file ending with _create_wines_table.php and put the following code inside it:
//database/migrations/yyyy_mm_dd_hhMMss_create_wines_table.php
<?php

use Illuminate\Database\Migrations\Migration;
use Illuminate\Database\Schema\Blueprint;
use Illuminate\Support\Facades\Schema;

class CreateWinesTable extends Migration
{
    /**
     * Run the migrations.
     *
     * @return void
     */
    public function up()
    {
        Schema::create('wines', function (Blueprint $table) {
            $table->increments('id');
            $table->string('name', 50);
            $table->text('description');
            $table->string('color', 10);
            $table->string('grape_variety', 50);
            $table->string('country', 50);
            $table->timestamps();
        });
    }

    /**
     * Reverse the migrations.
     *
     * @return void
     */
    public function down()
    {
        Schema::dropIfExists('wines');
    }
}
Note: The
up()is executed when an upgrade is applied to the database and thedown()method is executed when a downgrade is applied.
As you can see, the code you inserted in this file is defining a few columns in your database (like name, description, and country). These columns will help you persist, in the database, the details of the wines.
Add Seeders to the Database
To test the API you are about to create, you need to feed some initial data to your database. To do this, you can create a seeder. Seeders are classes that populate database tables. To create a seeder, type the following command:
# from the winestore directory
php artisan make:seeder WinesTableSeeder
This command will generate a new file called WineTableSeeder.php file in the database/seeds directory. Open this file and change its content with the following one:
// ./database/seeds/WinesTableSeeder.php

<?php

use App\Wine;
use Illuminate\Database\Seeder;

class WinesTableSeeder extends Seeder
{
    /**
     * Run the database seeds.
     *
     * @return void
     */
    public function run()
    {
        Wine::create([
            'name' => 'Classic Chianti',
            'description' => 'A medium-bodied wine characterized by a marvelous freshness with a lingering, fruity finish',
            'color' => 'red',
            'grape_variety' => 'Sangiovese',
            'country' => 'Italy'
        ]);

        Wine::create([
            'name' => 'Bordeaux',
            'description' => 'A wine with fruit scents and flavors of blackberry, dark cherry, vanilla, coffee bean, and licorice. The wines are often concentrated, powerful, firm and tannic',
            'color' => 'red',
            'grape_variety' => 'Merlot',
            'country' => 'France'
        ]);

        Wine::create([
            'name' => 'White Zinfandel',
            'description' => 'Often abbreviated as White Zin, it is a dry to sweet wine, pink-colored rosé',
            'color' => 'rosé',
            'grape_variety' => 'Zinfandel',
            'country' => 'USA'
        ]);

        Wine::create([
            'name' => 'Port',
            'description' => 'A fortified sweet red wine, often served as a dessert wine',
            'color' => 'red',
            'grape_variety' => 'Touriga Nacional',
            'country' => 'Portugal'
        ]);

        Wine::create([
            'name' => 'Prosecco',
            'description' => 'It is a dry white wine (brut) sometimes with a sweet flavor of green apple, honeydew melon, pear, and honeysuckle',
            'color' => 'white',
            'grape_variety' => 'Glera',
            'country' => 'Italy'
        ]);
    }
}
The run() method of the WinesTableSeeder class creates instances of the Wine model based on the specified values. Now, edit the DatabaseSeeder.php file you find in the same folder and invoke the WinesTableSeeder class inside the run() method. The following is the resulting code:
//database/seeds/DatabaseSeeder.php
<?php
use Illuminate\Database\Seeder;
class DatabaseSeeder extends Seeder
{
    /**
     * Run the database seeds.
     *
     * @return void
     */
    public function run()
    {
        $this->call(WinesTableSeeder::class);
    }
}
Now, open the .env file (which resides in the project's root) and configure the database parameters shown below accordingly to your development environment:
DB_CONNECTION=mysql
DB_HOST=127.0.0.1
DB_PORT=3306
DB_DATABASE=homestead
DB_USERNAME=homestead
DB_PASSWORD=secret
Note: If you don't have a MySQL database available and you have Docker, you can run the following code to start one:
docker run --name mysql \
   -p 3306:3306 \
   -e MYSQL_ROOT_PASSWORD=myextremellysecretpassword \
   -e MYSQL_DATABASE=homestead \
   -e MYSQL_USER=homestead \
   -e MYSQL_PASSWORD=secret \
   -d mysql:5.7
`
After this preparation, you are ready to create the table schema and to populate it. Type the following in a console window:
php artisan migrate:fresh --seed
This command will clear the database, execute the migration scripts, and run the database seeder.
Note: You may ask how the
Winemodel defined in theWineclass can be mapped to thewinestable. This happens because, by convention, Eloquent maps a model to a table having the same lowercase name in the plural.
Introducing GraphQL
So far, you defined the model and its database persistence. Now you can build the GraphQL API upon that.
Why GraphQL
The API you are going to implement is based on GraphQL, a specification from Facebook defining a query language for APIs. With respect to classic REST APIs, GraphQL allows you to define a single endpoint providing multiple resources to the clients. This contributes to reduce network traffic and to potentially speed up client applications. In addition, GraphQL allows a client to request just the data it needs, avoiding to receive a resource with all possible information. Again, this reduces the network traffic and optimizes the data processing on the client side.
GraphQL achieves this result by defining an abstract language to describe queries, schemas, and types, in a similar way as in a database. As said before, GraphQL is a specification. This means that GraphQL is independent of any programming language. If you want to use it in your application, you need to choose among the several available implementations available in almost any language.
Installing the GraphQL Library
To support GraphQL in the application you're going to build you need to install a library that allows you to define schemas and queries in a simple way. The Laravel GraphQL library is one of the best for this purpose. To install it, issue the following command from the project root:
# issue this from the winestore directory:
composer require rebing/graphql-laravel
After the installation, you need to run the following command:
php artisan vendor:publish --provider="Rebing\GraphQL\GraphQLServiceProvider"
This command extracts the graphql.php configuration file from the vendor folder and put it into the config folder. This is a common approach that allows you to get one or more configuration files from a third party package so that you can change it for the needs of your application. You will use the graphql.php file later.
Creating the GraphQL API Schema
Since GraphQL is a query language, you need to know how you can build your query, what type of object you can receive as a response, and what fields you can request from the server. A GraphQL API endpoint provides a complete description of what your client can query. This description is called schema, a collection of data defining the queries that a client can request, the type of the returned resources, the allowed change requests to the resources, also known as mutations, and others.
To keep things simple, your API will allow you to retrieve the list of wines in the Wine Store and a specific wine. So its schema will consist of queries and types.
Creating the Wine Type
You will start by creating the API's schema by defining the resource returned. To do this, create the GraphQL directory inside the app directory. This directory will contain all the definitions you need for the GraphQL schema of the API. In the app/GraphQL directory, create the Types directory and put in it a file called WineType.php with the following content:
// ./app/GraphQL/Types/WineType.php
<?php

namespace App\GraphQL\Types;

use App\Wine;
use GraphQL\Type\Definition\Type;
use Rebing\GraphQL\Support\Type as GraphQLType;

class WineType extends GraphQLType
{
    protected $attributes = [
        'name' => 'Wine',
        'description' => 'Details about a wine',
        'model' => Wine::class
    ];

    public function fields()
    {
        return [
            'id' => [
                'type' => Type::nonNull(Type::int()),
                'description' => 'Id of the wine',
            ],
            'name' => [
                'type' => Type::nonNull(Type::string()),
                'description' => 'The name of the wine',
            ],
            'description' => [
                'type' => Type::nonNull(Type::string()),
                'description' => 'Short description of the wine',
            ],
            'color' => [
                'type' => Type::nonNull(Type::string()),
                'description' => 'The color of the wine',
            ],
            'grape_variety' => [
                'type' => Type::nonNull(Type::string()),
                'description' => 'The grape variety of the wine',
            ],
            'country' => [
                'type' => Type::nonNull(Type::string()),
                'description' => 'The country of origin of the wine',
            ]
        ];
    }
}
This file defines the WineType class by extending GraphQLType. Notice the definition of three protected attributes that assign the name of the type (Wine), a description ("Details about a wine"), and the model the type is associated with (the Wine class you defined before). The fields() method returns an array with the property definitions of the resources your API will expose.
Creating the GraphQL Queries
Now, create a Queries directory inside the ./app/GraphQL directory and put there a file called WinesQuery.php with the following content:
// ./app/GraphQL/Queries/WinesQuery.php

<?php

namespace App\GraphQL\Queries;

use App\Wine;
use GraphQL\Type\Definition\Type;
use Rebing\GraphQL\Support\Query;

class WinesQuery extends Query
{
    protected $attributes = [
        'name' => 'wines',
    ];

    public function type()
    {
        return Type::listOf(GraphQL::type('Wine'));
    }

    public function resolve($root, $args)
    {
        return Wine::all();
    }
}
The WinesQuery class defined in this file represents a query that returns the list of wines from the Wine Store. You see that the query's name is wines. The type() method returns the type of the resource returned by the query, expressed as a list of Wine type items. The resolve() method actually returns the list of wines by using the all() method of the Wine model.
In the same way, create a second file in the ./app/GraphQL/Queries directory called WineQuery.php (note that, this time, wine is singular). In this file, add the following code:
// ./app/GraphQL/Queries/WineQuery.php

<?php

namespace App\GraphQL\Queries;

use App\Wine;
use GraphQL\Type\Definition\Type;
use Rebing\GraphQL\Support\Query;

class WineQuery extends Query
{
    protected $attributes = [
        'name' => 'wine',
    ];

    public function type()
    {
        return GraphQL::type('Wine');
    }

    public function args()
    {
        return [
            'id' => [
                'name' => 'id',
                'type' => Type::int(),
                'rules' => ['required']
            ],
        ];
    }

    public function resolve($root, $args)
    {
        return Wine::findOrFail($args['id']);
    }
}
In this case, the WineQuery.php file contains the definition of the query returning a single wine identified by the id field. Notice that the definition of the id argument specifies that the argument must be an integer and that it is mandatory (required). You should be able to read the meaning of the other members of the WineQuery class: the query's name is wine, the returned type is Wine, and the returned resource is the wine identified by the id field.
Registering the Schema
After creating these types and queries, you need to register these items as the GraphQL schema in your API. So, open the graphql.php file (you will find it inside the config directory) and replace the current definition of 'schemas' with the following:
// ./config/graphql.php

// ...
    'schemas' => [
        'default' => [
               'query' => [
                   'wine' => App\GraphQL\Queries\WineQuery::class,
                'wines' => App\GraphQL\Queries\WinesQuery::class,
            ]
        ],
    ],
// ...
Here you are saying that the schema of your GraphQL API consists of two queries named wine and wines, mapped to WineQuery and WinesQuery classes respectively.
Then, in the same file, replace the current definition of 'types' with the following:
// ./config/graphql.php

// ...
    'types' => [
      'Wine' => App\GraphQL\Types\WineType::class,
  ],
// ...
This definition maps the type GraphQL Wine to the WineType class.
Testing the API with GraphiQL
At this point, you are ready to use your GraphQL API. You could test the API by using curl, Postman, or any other HTTP client. But a specialized client can help you to better appreciate the power and the flexibility of GraphQL. One client that you can use is Electron GraphiQL, which is available for Windows, Linux, and Mac.
To use it, head to the GraphiQL homepage and download the version available for your operating system. After downloading and installing it, open the tool and change the GraphQL endpoint to http://localhost:8000/graphql. Right now, as you are not running your project yet, you will see a message saying Error: connect ECONNREFUSED 127.0.0.1:8000 on the right-hand side of the tool.
To fix that, head back to your terminal and issue the following commands:
# create the tables needed to persist wine
php artisan migrate

# seed the database with the test data
php artisan db:seed

# run the server
php artisan serve
As described in the comments above, the first two commands will create the database schema and seed it with the test data. Then, the last command will make your Laravel project run.
Now, back to the GraphiQL tool, paste the following query and press the play button (or you can hit Control + Enter to issue the query):
{
  wines {
      name, color
    }
}
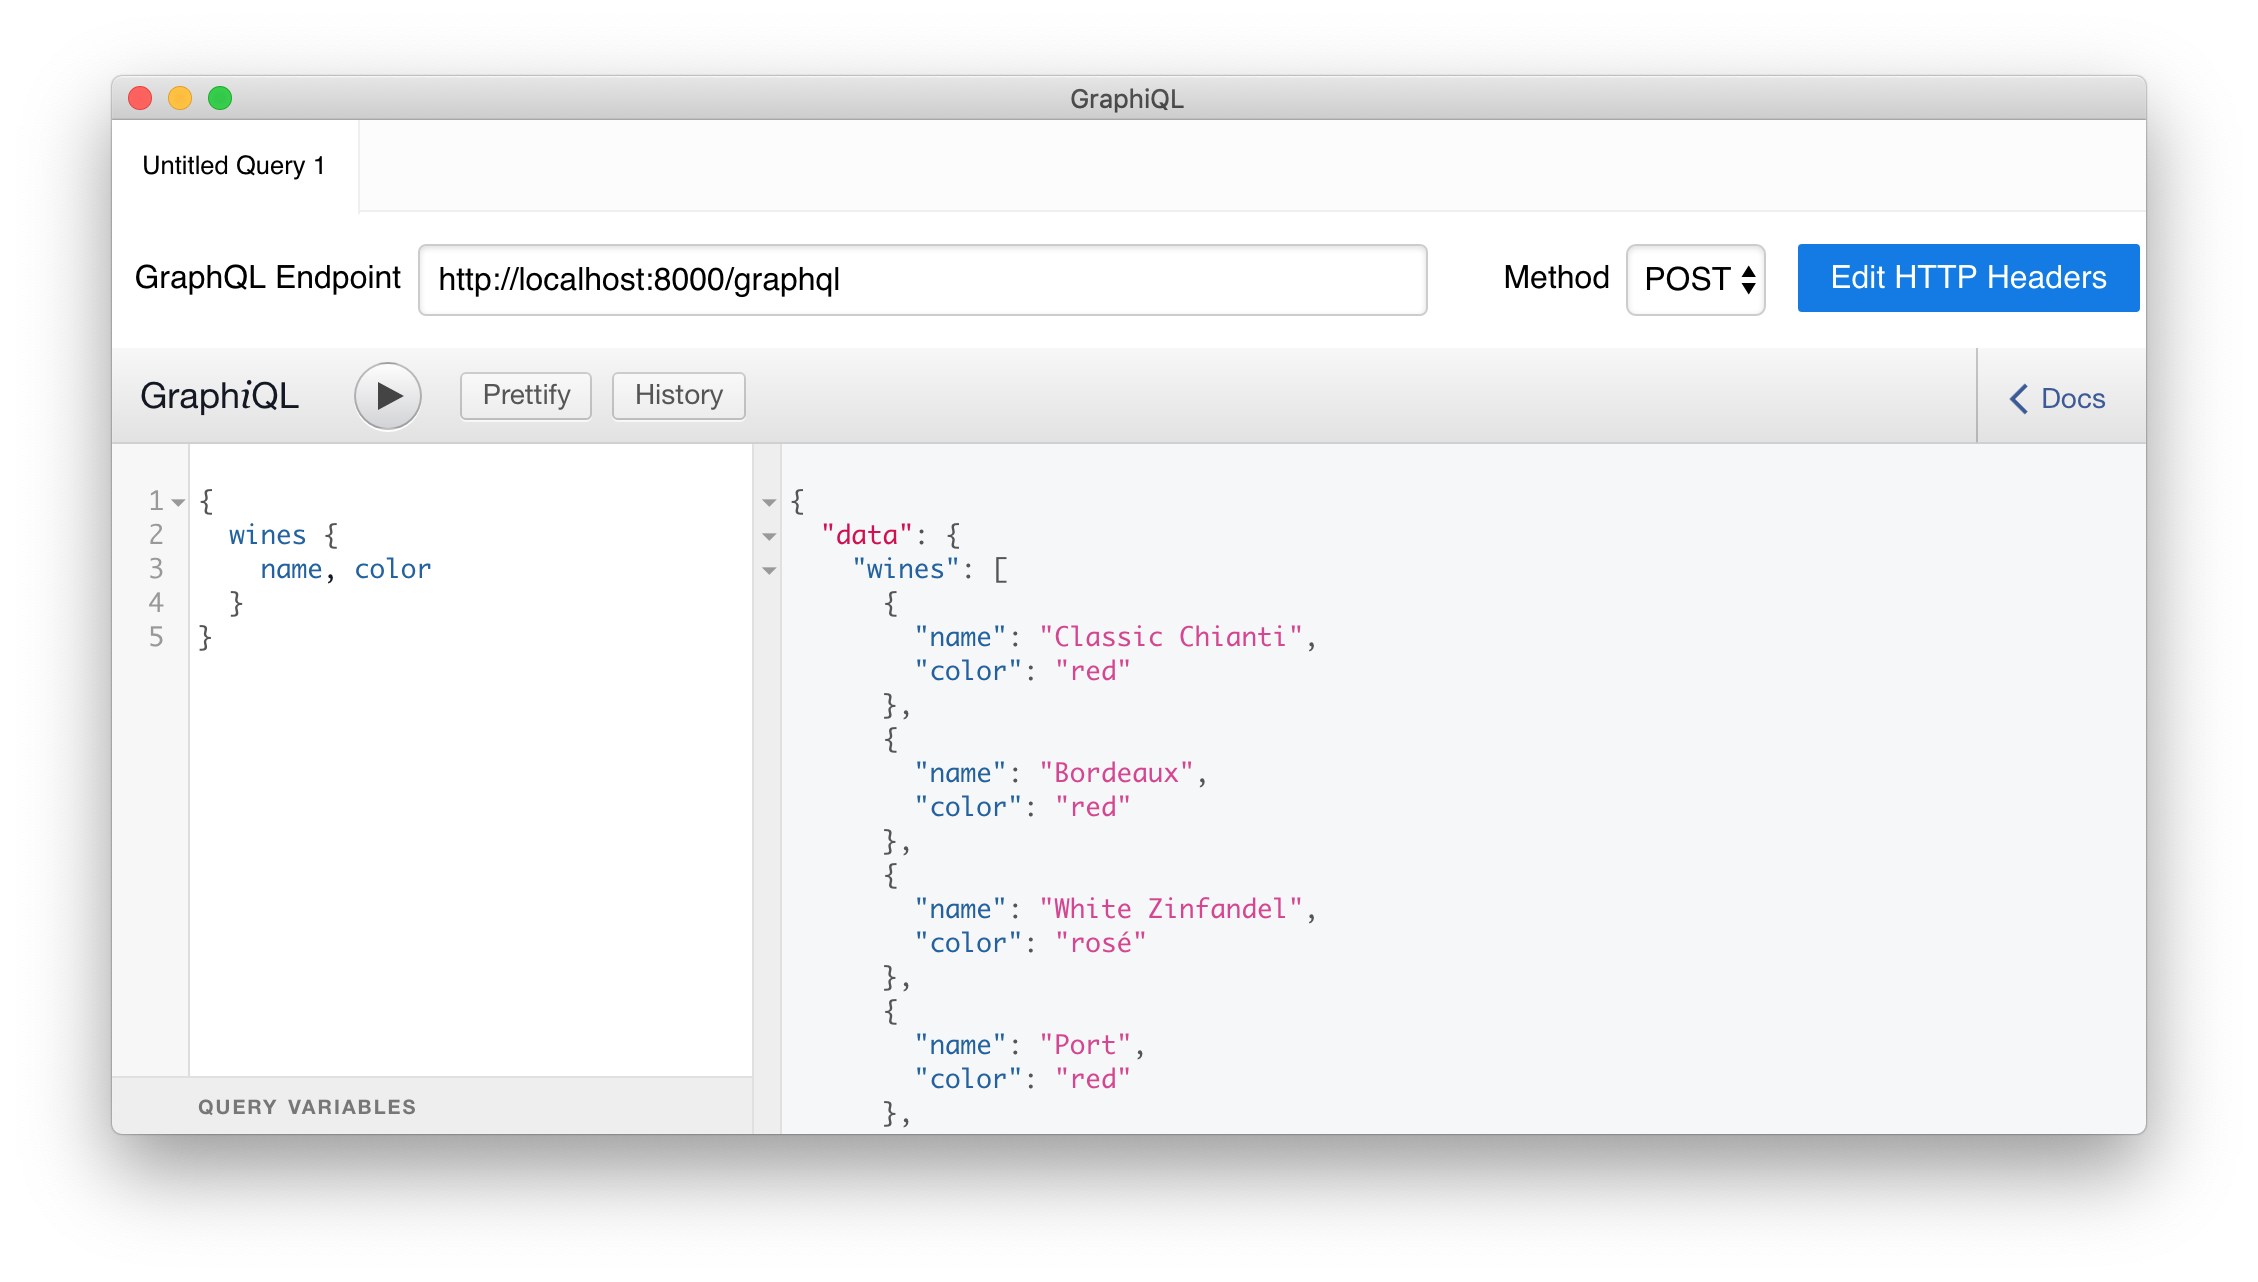
The expression above specifies the name of the query (wines) and the fields of the resource you are interested in (name and color). The response to this request is a JSON object containing an array of wines with the requested fields only. You can try adding another field, like id or description, and issuing the query again to see what happens.
Securing Your Laravel and GraphQL API with Auth0
Now that you have a working GraphQL API, you probably want to restrict the access to it so that only authorized clients can consume it. One easy way to secure your API is to integrate it with Auth0. In this article, you will create an Auth0 API to represent your GraphQL and Laravel API, then you will configure a GraphiQL tool to issue authenticated requests to it. If you are developing a client application, you will need to learn how to integrate them with Auth0 to be able to consume your API. The way you integrate a client application with Auth0 depends on what type of client you are developing. Check Auth0's docs to learn more.
Securing the API
The first step is to sign up for a free Auth0 account, if you don't have one yet. Then, from your Auth0 dashboard, head to the APIs section, click on the Create API button, and fill the form as follows:
- Name: "Laravel and GraphQL API"
- Identifier:
https://laravel-graphql-api - Signing Algorithm:
RS256
Note: Don't mind if
https://laravel-graphql-apidoes not point to a real URL, Auth0 will never call it.
After clicking on the Create button on this form, Auth0 will redirect you to the Quick Start section of your new API. From there, head to the Applications section of your dashboard and choose the "Laravel and GraphQL API (Test Application)" that Auth0 created for you. After clicking on it, Auth0 will show you a screen where you will see some properties of this application. Leave this page open and head back to your project.
Back in your project, open the .env file (you will find it in the project root) and add the following properties to it:
AUTH0_DOMAIN=https://<YOUR_DOMAIN>/
AUTH0_AUDIENCE=<YOUR_AUDIENCE>
You will have to replace <YOUR_DOMAIN> and <YOUR_AUDIENCE> with the properties from your Auth0 account. More specifically, you will have to replace the first placeholder with the Domain property of your Auth0 Application (e.g., blog-samples.auth0.com), and you will have to replace <YOUR_AUDIENCE> with your Auth0 API identifier (i.e., with https://laravel-graphql-api).
Now, you will have to create a middleware in your Laravel application to check if the HTTP requests sent to the API are authorized (i.e., if they contain valid access tokens). You can create a middleware by running the following command (you will need to stop the Laravel server by issuing Control + C first):
php artisan make:middleware CheckAccess
Issuing this command will create a new file called CheckAccess.php inside the ./app/Http/Middleware directory. Before changing this file, you will have to install the Auth0 PHP SDK:
composer require auth0/auth0-php
After installing this SDK, replace the contents of the ./app/Http/Middleware/CheckAccess.php file with this:
// ./app/Http/Middleware/CheckAccess.php

<?php

namespace App\Http\Middleware;

use Closure;
use Auth0\SDK\JWTVerifier;

class CheckAccess
{
    public function handle($request, Closure $next)
    {
        if (!empty(env('AUTH0_AUDIENCE')) && !empty(env('AUTH0_DOMAIN'))) {
            $verifier = new JWTVerifier([
                'valid_audiences' => [env('AUTH0_AUDIENCE')],
                'authorized_iss' => [env('AUTH0_DOMAIN')],
                'supported_algs' => ['RS256']
            ]);
            $token = $request->bearerToken();
            $decodedToken = $verifier->verifyAndDecode($token);
            if (!$decodedToken) {
                abort(403, 'Access denied');
            }
        }
        return $next($request);
    }
}
The handle() method of the CheckAccess middleware checks the access token only if you have configured your application by providing an Auth0 audience and domain (otherwise, it simply allows all requests). If that is the case, this method creates an instance of the JWTVerifier class based on the Auth0 configuration data you set in the .env file. Then this method retrieves the current bearer token from the HTTP request and verifies the JWTVerifier instance.
If the token is valid, the request is forwarded to GraphQL. Otherwise, an Access denied message is sent back.
Warning: If you are using Apache as web server, be aware that this server may remove the
Authorizationheader from incoming HTTP requests. To overcome this issue, you need to add the following lines in the.htaccessfile you find in the/publicdirectory:RewriteEngine On RewriteCond %{HTTP:Authorization} ^(.*) RewriteRule .* - [e=HTTP_AUTHORIZATION:%1]
Once you have defined this middleware, you need to register it. To do this, open the ./app/Http/Kernel.php file and add, to the $routeMiddleware list, a mapping between a key (checkAccess) and the newly created middleware class (CheckAccess):
// ./app/Http/Kernel.php

protected $routeMiddleware = [
  // ... other mappings ...
  'checkAccess' => \App\Http\Middleware\CheckAccess::class,
];
As a final step, associate the CheckAccess middleware to the GraphQL schema by changing the ./config/graphql.php file as follows:
// ./config/graphql.php

// ...
'schemas' => [
    'default' => [
        'query' => [
            'wine' => App\GraphQL\Queries\WineQuery::class,
            'wines' => App\GraphQL\Queries\WinesQuery::class,
        ],
        'middleware' => ['checkAccess']
    ],
],
// ...
The middleware declaration asserts that Laravel will execute the checkAccess middleware for each request to the GraphQL schema. With that in place, you have finished securing your Laravel and GraphQL API with Auth0. To confirm that everything is in order, try using the GraphiQL tool to issue the same request as before (you will need to restart the server by issuing php artisan serve). If your configuration works, you will get an error.
Authorizing the GraphiQL Client
To be able to fetch your GraphQL API again, you will need to issue, from the GraphiQL client, requests with access tokens. As mentioned before, the way you get an access token varies depending on what type of client you are developing. However, in this article, for testing purposes, you will use a test token.
To get this token, open the APIs section in your Auth0 dashboard, then click on the API you created ("Laravel and GraphQL API"). Now, click on the Test tab then, if you scroll down a little bit, you will see a button called Copy Token. Click on this button to get a copy of the access token in your clipboard.
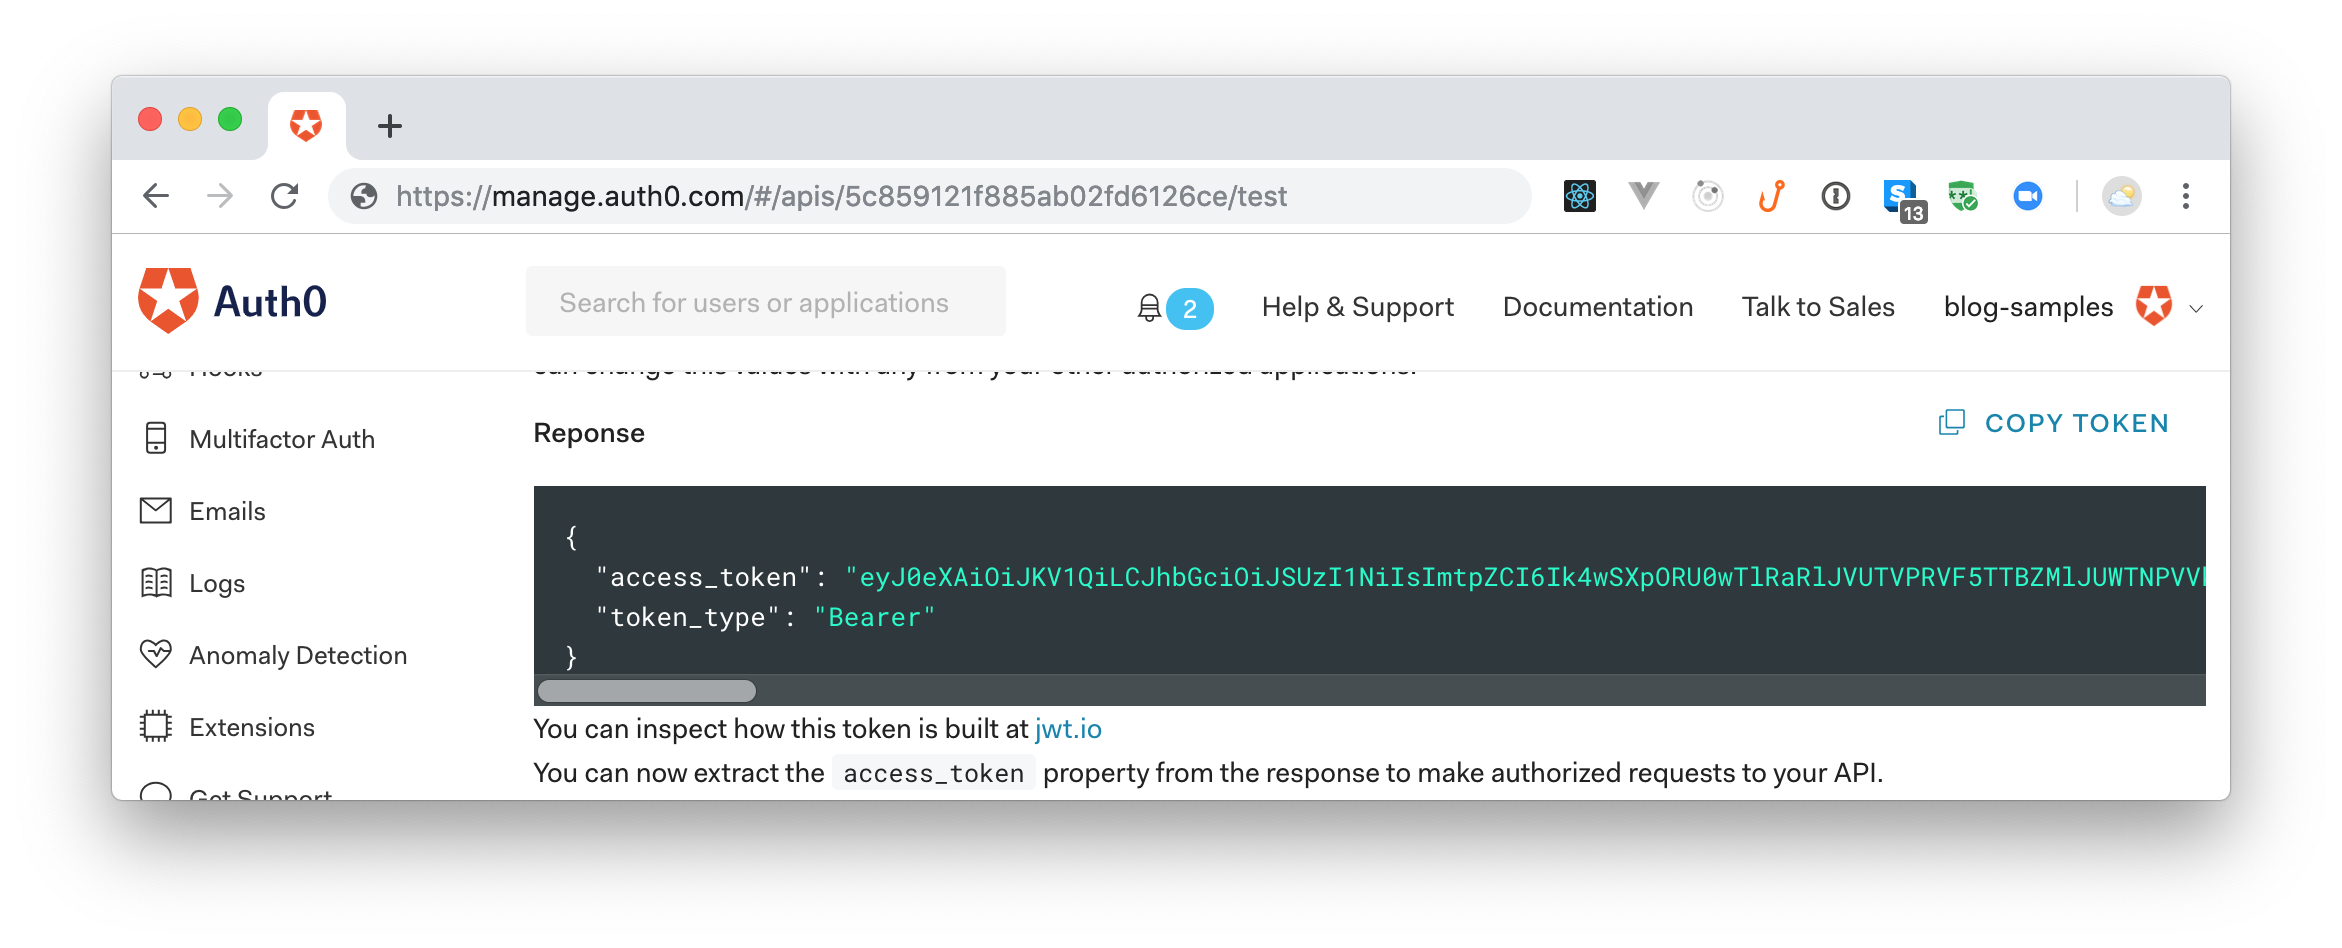
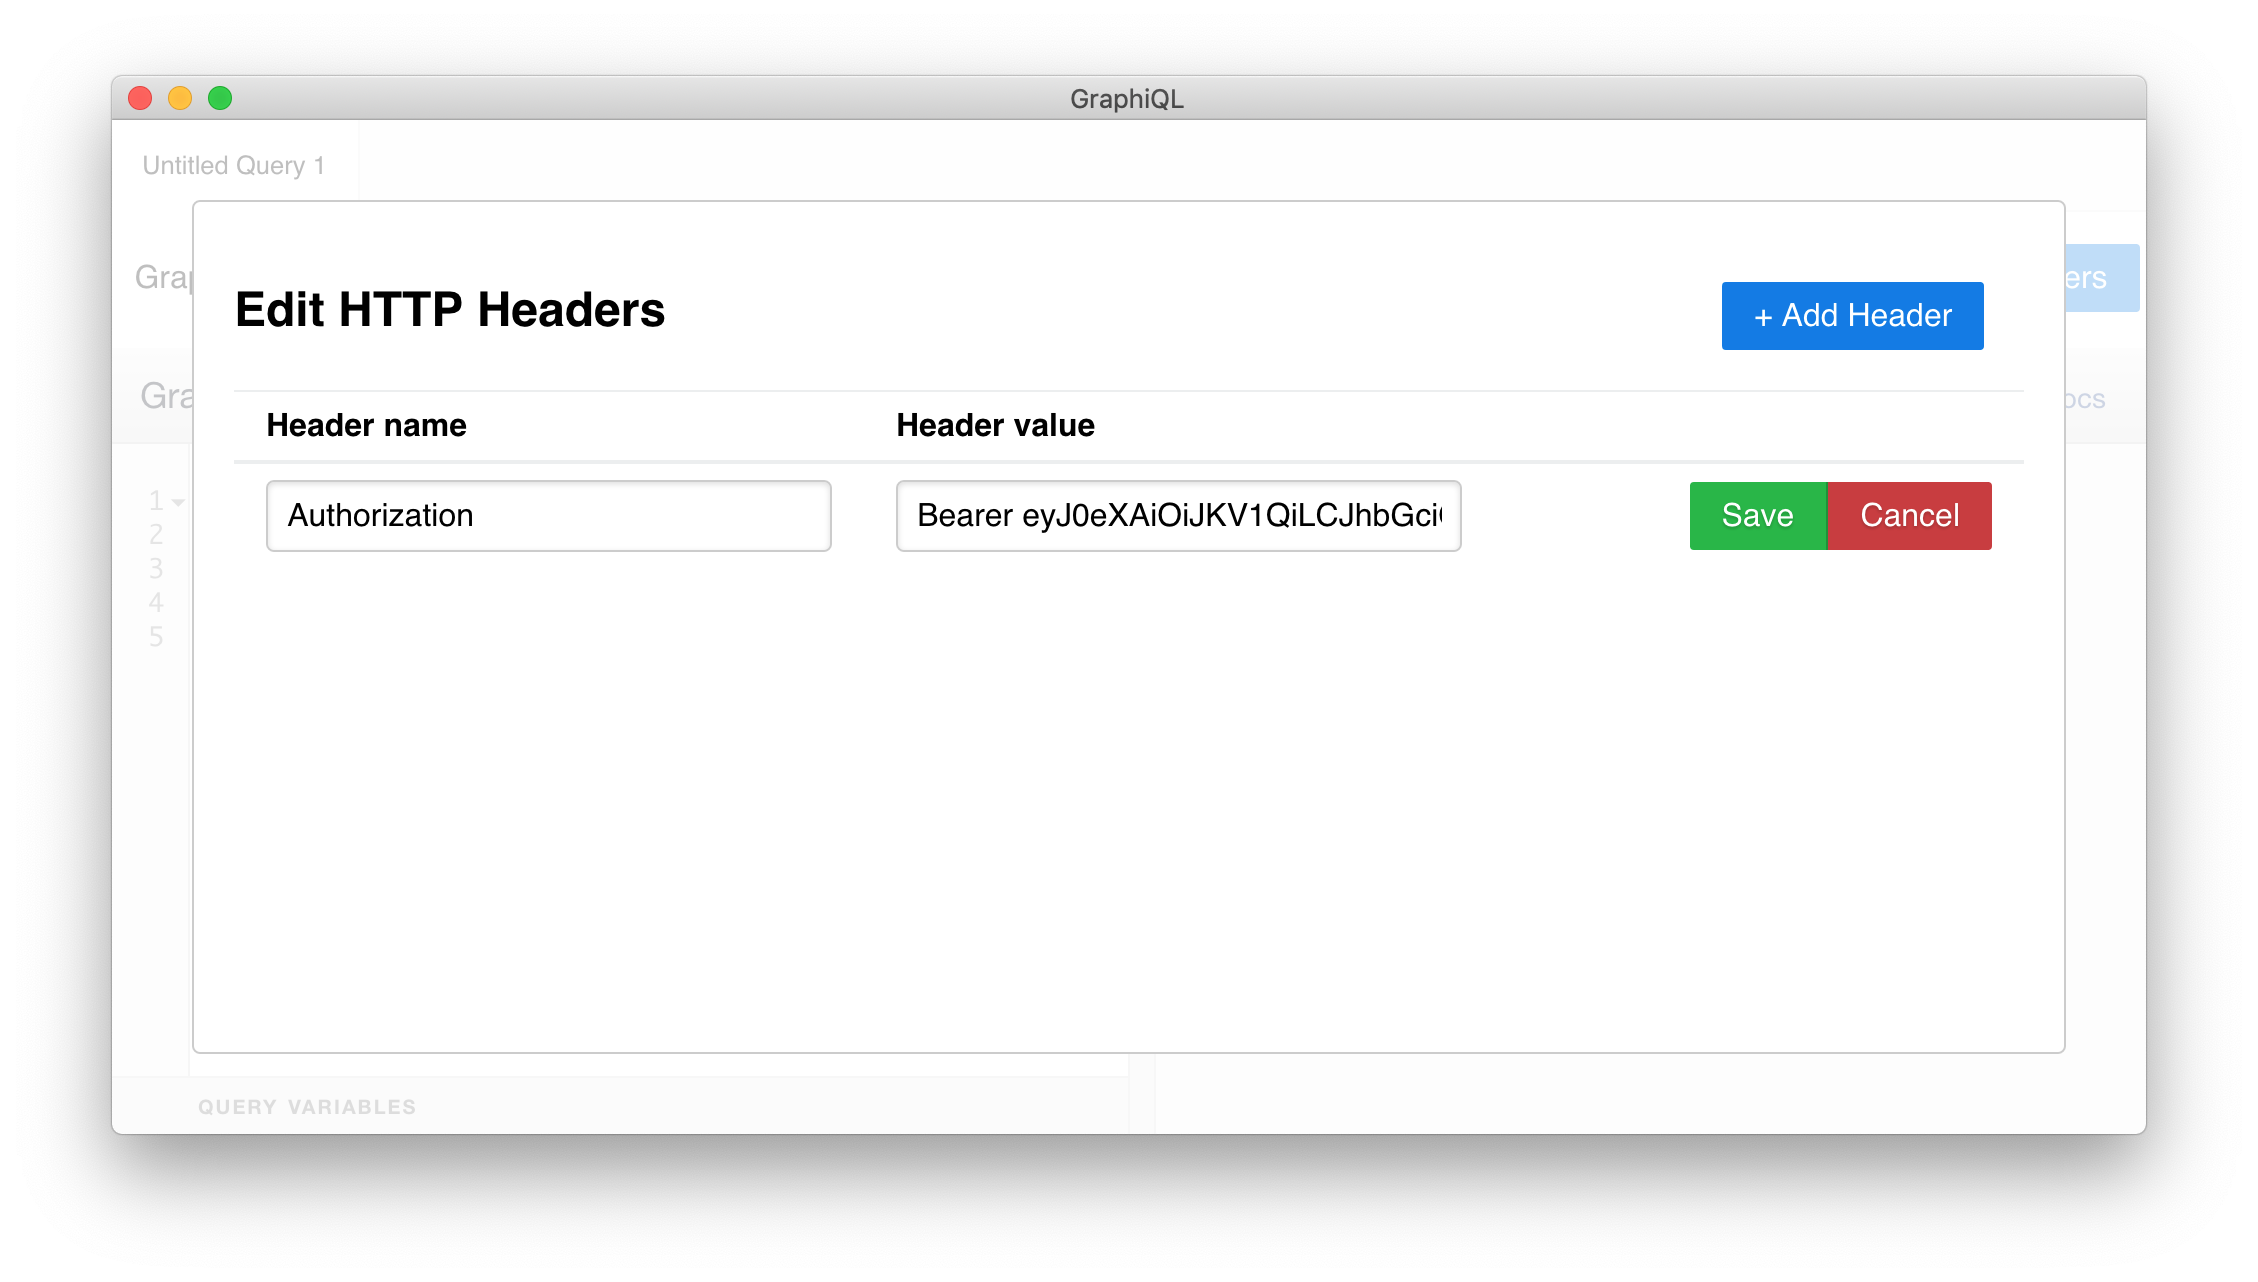
Now, head back to the GraphiQL tool, click on the blue Edit HTTP Headers button, click on the Add Header button, then add the following header:
- Header name:
Authorization - Header value:
Bearer eyJ...aEw
Make sure you use the access token you copied from your Auth0 dashboard (instead of eyJ...aEw), then hit save.
Now, click outside the dialog where you added the header, then hit the play button (or hit Control + Enter). If everything works as expected, you will see that you can fetch the list of wines again.
“I just built a GraphQL API with Laravel and Auth0.”
Tweet This
Summary
In this article, you learned how to create GraphQL APIs with Laravel and how to secure them with Auth0.
You started by creating a model with its migration scripts to persist data in a database. Besides that, you created a seeder for the model to populate the database with some initial test data. Then you continued to build your API by defining a GraphQL type and two GraphQL queries. After that, you used the GraphiQL browser-based client to test the GraphQL API interactively.
Finally, you used Auth0 to secure the GraphQL and to authorize the GraphQL client. What do you think about the process as a whole? Let us know on the comments box below.
About the author

Andrea Chiarelli
Principal Developer Advocate
I have over 20 years of experience as a software engineer and technical author. Throughout my career, I've used several programming languages and technologies for the projects I was involved in, ranging from C# to JavaScript, ASP.NET to Node.js, Angular to React, SOAP to REST APIs, etc.
In the last few years, I've been focusing on simplifying the developer experience with Identity and related topics, especially in the .NET ecosystem.