

TL;DR: In this article, you are going to learn how to develop modern APIs with Hapi.js and Node.js, while using Redis as the persistence layer. As it is not possible to release an API without a security layer, you will also learn how to secure your application with Auth0. If needed, you can find the final code developed throughout this article in this GitHub repository.
“Learn how to build modern APIs with ease by leveraging tools like @hapijs, #redis, and @nodejs.”
Tweet This
What is Hapi.js?
Hapi.js is a framework for creating backend APIs. What is nice about Hapi.js, when compared to other solutions like Express, is the coding-by-configuration architecture. As you will see, most of the "coding" is actually done by tweaking the vast configuration interface that Hapi.js provides to developers. This approach helps to split the common aspects of HTTP from the handler.
“What is cool about @hapijs is that it provides a coding-by-configuration approach that facilitates the development process.”
Tweet This
What Is Redis and What Will You Build?
Redis is an open-source, in-memory data store that provides an interface so applications can manipulate data based on a key-value approach. As everything in a Redis database is simply a value accessible through a key, fetching data from it is extremely fast. This characteristic of Redis makes this database perfect for applications like to-do lists.
So, in this article, you will use Redis to act as the persistence layer of a backend API that supports a to-do list application. You won't develop the frontend application in this article, but you will soon, on an upcoming one.
Note: In this article, you are going to use Hapi.js 17. This version has breaking changes from version 16.
What Is Docker and Why Do You Care?
To keep your machine clean, you are not going to install Redis directly on your operating system. Instead, you are going to run Redis inside a Docker container. Docker, if you don't know, is a solution that enables users to run programs that operate completely isolated from each other. Docker achieves this by containerizing these programs into engines that work similarly to virtual machines.
However, containers are way less expensive (i.e., more lightweight) when compared to traditional virtual machines. For example, you can easily bootstrap a container that uses NGINX in front of a Node.js instance to serve a web app with 16MB or less. Also, Docker uses a file called dockerfile that facilitates the process of sharing containers configuration with others.
In this article, you are going to download and use a pre-built Redis container that allows you to use Redis fresh out of the box, with no setup.
Bootstrapping a Hapi.js API
Your API will contain the main server setup and individual files for each route you will need to define. Basically, you will create a project that contains the following structure:
src/: A directory that will hold code related to the server setup.src/routes: A directory where you will define the endpoints of your API.
So, open a terminal, locate the directory where you want to store your project in, and run the following commands:
# e.g., move to your home dir (or anywhere else)
cd ~

# create a directory for your project
mkdir nodejs-hapijs-redis

# move into it
cd nodejs-hapijs-redis

# and create both subdirectories
mkdir -p src/routes
After that, you can initialize your main directory as an NPM project and install some dependencies on it:
# initialize this directory as an NPM project
npm init -y

# install your project's dependencies
npm install --save boom good good-console good-squeeze hapi hapi-auth-jwt2 hapi-require-https inert joi jwks-rsa lout node-env-file redis uuid vision
As you can see, you will need to install a considerable number of dependencies. Throughout this article, you will see how each one fits in. However, the following list gives a brief introduction to them:
boom: This is a library that tightly integrates with Hapi.js to throw HTTP-friendly error objects.good: This is a library that you will plug into Hapi.js to monitor and report on a variety of server events.good-console: This library is useful for turninggoodserver events into formatted strings.good-squeeze: This library is useful for filtering events based on thegoodevent options.hapi: This is the main package of Hapi.js itself.hapi-auth-jwt2: This is an authentication scheme/plugin for Hapi.js apps using JSON Web Tokens.hapi-require-https: This is a library that will help you force secure connections (i.e., HTTPS).inert: This is a library that helps you serve static file and directory handlers in your Hapi.js API.joi: This library introduces an object schema description language and a validator for JavaScript objects.jwks-rsa: This library retrieves RSA public keys from a JWKS (JSON Web Key Set) endpoint.lout: This library helps you create the API documentation for your Hapi.js backend.node-env-file: This library parses and loads environment files into a Node.js environment (i.e., into theprocess.envobject).redis: This is a Redis client for Node.js applications.uuid: This library generates RFC-compliant UUIDs in JavaScript.vision: This library enables templates rendering for Hapi.js.
Now that you know what you just installed, open the package.json file that NPM created for you and replace its scripts property with this:
"scripts": {
  "start": "node index.js"
}
Note: You might also want to start Git (or any other version control system) now and start committing your work. It's always a good idea to use tools like Git to manage your source code.
Initializing Redis with Docker
As mentioned, you will bootstrap a Redis instance in your local machine with the help of Docker. Therefore, before proceeding you will have to install Docker locally. After installing it, you can test the installation by running the following command:
docker --version
If everything goes fine, you can issue this command to run Redis locally (in a Docker container, of course):
docker run --name nodejs-hapijs-redis \
    -p 6379:6379 \
    -d redis
If this is the first time you are running Redis locally with the help of Docker, this command will output Unable to find image 'redis:latest' locally in your terminal and will start downloading a Redis image from Docker Hub. For this article, you don't need to learn how Docker works. Issuing the command above suffices for you to move along. However, after you finish with this article, make sure you learn more about Docker. The tool is amazing.
Signing Up to Auth0
To start with a secure backend from scratch, you will sign up for a free Auth0 account now (i.e., if you don't have one yet) and you will configure your project to use this identity provider.
If you don't know, Auth0 is a global leader in Identity-as-a-Service (IDaaS) that provides thousands of enterprise customers with modern identity solutions. Alongside with the classic username and password authentication process, Auth0 allows you to add features like Social Login, Multi-factor Authentication, and much more with just a few clicks.
So, after you sign up for Auth0, you can head to the APIs section of your dashboard and click on Create API. Then, on the dialog that Auth0 shows, you will have to provide a Name for your API (e.g., "Hapi.js Tutorial") and an Identifier (e.g., http://localhost:3000). The name of your API is just a label so you can easily remember what the API is about. The identifier is a string that you will use while configuring your backend. This identifier doesn't really have to be an URL, as Auth0 won't call it in any moment, but it's advised to use one.

After filling out the form, click on Create so Auth0 finishes the creation for you.
Creating an environment file
As you will have the configuration for your Auth0 account, you will keep it in a separate file so you can easily switch between a production and testing environment. As such, create a file called .env in your project root and put the following contents in it:
AUTH0_AUDIENCE=http://localhost:3000
AUTH0_DOMAIN=<YOUR_AUTH0_DOMAIN>
HOST=localhost
PORT=3000
REDIS_HOST=localhost
REDIS_PORT=6379
SSL=false
Replace <YOUR_AUTH0_DOMAIN> with the domain you chose while creating your Auth0 account (e.g., blog-samples.auth0.com). The other configuration variables will work in your local environment, unless you chose another identifier for your API. If that is the case, you will have to set the correct value to the AUTH0_AUDIENCE variable.
Note: The
SSLvariable above defines if your API will accept only requests through a secure channel (i.e., HTTPS) or not. This variable will be used by thehapi-require-httpslibrary that you installed before.
Creating the Hapi.js Server
With the environment variables properly defined, you will have to create a script to start your Hapi.js server. To do so, create a file called index.js in the project root (i.e., in the nodejs-hapijs-redis directory) and add the following code into it:
require('node-env-file')(`${__dirname}/.env`);

const redis = require('redis');
const createServer = require('./src/server');
const {promisify} = require('util');

const start = async () => {
  const server = await createServer(
    {
      port: process.env.PORT,
      host: process.env.HOST,
    },
    {
      enableSSL: process.env.SSL === 'true',
    }
  );

  const redisClient = redis.createClient(
    {
      host: process.env.REDIS_HOST,
      port: process.env.REDIS_PORT,
    }
  );

  redisClient.lpushAsync = promisify(redisClient.lpush).bind(redisClient);
  redisClient.lrangeAsync = promisify(redisClient.lrange).bind(redisClient);
  redisClient.llenAsync = promisify(redisClient.llen).bind(redisClient);
  redisClient.lremAsync = promisify(redisClient.lrem).bind(redisClient);
  redisClient.lsetAsync = promisify(redisClient.lset).bind(redisClient);

  redisClient.on("error", function (err) {
    console.error("Redis error.", err);
  });

  server.app.redis = redisClient;

  await server.start();

  console.log(`Server running at: ${server.info.uri}`);
  console.log(`Server docs running at: ${server.info.uri}/docs`);
};

process.on('unhandledRejection', (err) => {
  console.error(err);
  process.exit(1);
});

start();
As you can see, the first thing your script does is to load the environment variables you just defined. Then, it uses a function called createServer to, well, create a server. After that, the script creates a client to Redis and uses the promisify function provided by Node.js to make the functions provided by the client return JavaScript Promises (using promises, and the new async/await syntax, will make your life much easier). Also, you bind the Redis object to server.app.redis so you have access to it in the routes to store and retrieve data.
Perhaps you didn't realize (or perhaps you did), but the createServer function used in the script above doesn't exist yet. This function, as stated on line #4, is expected to be defined on a module called server in the src directory.
Therefore, you can create the src/server.js file and add the following code to it:
const Hapi = require('hapi');
const jwksRsa = require('jwks-rsa');

const validateFunc = async (decoded) => {
  return {
    isValid: true,
    credentials: decoded,
  };
};

module.exports = async (serverOptions, options) => {
  const server = Hapi.server(
    Object.assign({
      port: 3001,
      host: 'localhost',
      routes: {
        cors: {
          origin: ['*'],
        },
      },
    }, serverOptions),
  );

  // Redirect to SSL
  if (options.enableSSL) {
    console.log('Setting SSL');
    await server.register({plugin: require('hapi-require-https')});
  } else {
    console.log('Not setting SSL');
  }

  await server.register([
    require('vision'),
    require('inert'),
    {
      plugin: require('lout'),
      options: {
        endpoint: '/docs',
      },
    },
    {
      plugin: require('good'),
      options: {
        ops: {
          interval: 1000,
        },
        reporters: {
          consoleReporter: [
            {
              module: 'good-squeeze',
              name: 'Squeeze',
              args: [{response: '*'}],
            },
            {
              module: 'good-console',
            },
            'stdout',
          ],
        },
      },
    },
  ]);

  await server.register(require('hapi-auth-jwt2'));

  server.auth.strategy('jwt', 'jwt', {
    complete: true,
    key: jwksRsa.hapiJwt2KeyAsync({
      cache: true,
      rateLimit: true,
      jwksRequestsPerMinute: 5,
      jwksUri: `https://${process.env.AUTH0_DOMAIN}/.well-known/jwks.json`,
    }),
    verifyOptions: {
      audience: process.env.AUTH0_AUDIENCE,
      issuer: `https://${process.env.AUTH0_DOMAIN}/`,
      algorithms: ['RS256'],
    },
    validate: validateFunc,
  });

  server.auth.default('jwt');

  server.route(require('./routes.js'));

  return server;
};
The main export from this code is a function that creates and returns a valid Hapi.js server. This function starts by accepting arguments from the index.js file and by creating the server. Then, it provide some default configurations like port and host to make sure that everything goes fine if the caller doesn't specify these variables, but soon it replaces them with the ones provided by the caller (if any).
After creating the Hapi.js server (Hapi.server()), this script decides, based on the configuration passed, if it is going to use SSL or not. Then, the script configures the plugins you installed before (e.g., vision, inert, and lout) in your Hapi.js server.
Finally, the script secures the server by using the jwt strategy (server.auth.strategy('jwt', ...)) and by making it the default authentication method (server.auth.default('jwt')).
The function validateFunc (defined at the top of the script) is given users' credentials and returns an object telling Hapi.js whether these users have access to the current resource or not. In this simple example, you allow all users access if they have a valid token, but you can be more restrictive by refactoring this function.
The last thing this script does, besides returning an instance of the Hapi.js file, is to define that it will load the endpoint (also known as routes) from a module called routes. You will define this module in the next section.
Defining Routes on Hapi.js
Now, it is time to learn how to define endpoints (i.e., routes) in your Hapi.js server. In the server module, you called the server.route function, which accepts an array of routes for your server. As such, you could simply define these routes directly into the server module. However, to make the code more readable and organized, you will put each route in a different file.
To do so, create a file called src/routes.js and copy the following into it:
module.exports = [

  './routes/todo_get',
  './routes/todo_post',
  './routes/todo_delete',

].map((elem) => require(elem));
This code maps over each filename and returns an array of imported routes. As you can imagine, you still have to define these files and routes.
Defining a Route to Post new Items
For your first route, you will create an endpoint that enables users to add new items to their to-do lists. To do so, make a file called src/routes/todo_post.js with the following contents:
const Joi = require('joi');
const Boom = require('boom');

module.exports = {
  method: 'POST',
  path: '/todo',
  options: {
    auth: 'jwt',
    validate: {
      payload: {
        item: Joi.string().required().notes('Text to store in list')
      },
    },
    description: 'Add item',
    notes: 'Add an item to the list',
    tags: ['api'],
  },
  handler: async (request, h) => {
    let {sub: redispath} = request.auth.credentials;
    let {item: redisvalue} = request.payload;
    let {redis} = request.server.app;

    try {

      let count = await redis.lpushAsync(redispath, redisvalue);

      return h.response({
        count
      }).code(201);

    } catch (e) {
      return Boom.badImplementation(e);
    }
  }
};
The export from this file is a JSON object that represents a route for Hapi.js. The method and path properties tell Hapi.js what HTTP method and what route is required to call the handler code. In the options, you specify jwt as the authentication required to access this route. The description, notes, and tags document the route for others using it.
The validate object is an extremely useful courtesy of the joi library. This allows you to specify what inputs are required for the route and, if not met, Hapi.js will automatically throw an error for you. All that is required for this route is an item that comes as the payload of requests. This item must be a string and is required (string().required()).
Finally, the handler runs your route and returns a value to Hapi.js. You use the JWT subject as the key for the Redis key-value pair, and the value of this key is the string sent by the user. You use the new promisified Redis functions to add the item to Redis, and you return the number of items in the array (with a 201 response code).
If anything goes wrong, your Hapi.js server will send an HTTP error code back using the Boom library.
Defining a Route to Delete Items
To allow users to delete items, create a file called src/routes/todo_delete.js with the following contents:
const Joi = require('joi');
const Boom = require('boom');

module.exports = {
  method: 'DELETE',
  path: '/todo',
  options: {
    auth: 'jwt',
    validate: {
      payload: {
        index: Joi.number().min(0).required().notes('Index to delete'),
      },
    },
    description: 'Delete item',
    notes: 'Delete an item from the todo list',
    tags: ['api'],
  },
  handler: async (request, h) => {
    let {sub: redispath} = request.auth.credentials;
    let {index: redisindex} = request.payload;
    let {redis} = request.server.app;

    try {
      await redis.lsetAsync(redispath, redisindex, '__DELETE__');
      await redis.lremAsync(redispath, 1, '__DELETE__');

      return h.response({}).code(200);
    } catch (e) {
      return Boom.badImplementation(e);
    }
  }
};
The route is very similar to the POST route. You define the endpoint as an HTTP DELETE route with a required index parameter to delete a value from Redis. To delete the item from Redis by index, you first overwrite the value of that entry, and then delete entries with that new value.
What is Hypertext Application Language (HAL)?
When you define your final route for retrieving the todo items, you will borrow some features from the HAL specification. This spec is designed to make it easy to traverse APIs without having to guess endpoints.
For your case, you will page the results when retrieving items, so you will include a link to the next page of results in the response. This way, the client applications that use your API won't have to generate the links themselves.
Defining a Route to Get All Items
Finally, to define an endpoint where users will be able to get all their to-do items, create a file called src/routes/todo_get.js with the following contents:
const Joi = require('joi');
const Boom = require('boom');

module.exports = {
  method: 'GET',
  path: '/todo',
  options: {
    auth: 'jwt',
    validate: {
      query: {
        start: Joi.number().min(0).default(0).notes('Start index of results inclusive'),
        results: Joi.number().min(1).max(100).default(10).notes('Number of results to return'),
      },
    },
    description: 'Get items',
    notes: 'Get items from todo list paged',
    tags: ['api'],
  },
  handler: async (request, h) => {
    let {redis} = request.server.app;
    let {sub: redispath} = request.auth.credentials;
    let {start, results} = request.query;

    try {
      let value = await redis.lrangeAsync(redispath, start, start + (results - 1));
      let count = await redis.llenAsync(redispath);

      if (!value) value = [];

      return h.response({
        nextlink: `${request.url.pathname}?start=${start + results}&results=${results}`,
        value,
        count
      });
    } catch (e) {
      return Boom.badImplementation(e);
    }
  }
};
This module (or file) defines a GET HTTP route with two optional query string parameters (with default values set). By using these parameters, your client can specify the first element (start index) and the number of results they need. Note that this script gets the results from Redis and also the total number of results. This information is important so the client can display how many items the user has.
In the response, you add a nextlink property with the API URL to call for the next set of results.
Running and Using your Hapi.js API
That's it! You just finished creating your Node.js backend API with the help of Hapi.js and Redis. With all these files in place, you can take your API for a spin. To do so, issue the following command on the terminal (just make sure you are in the correct directory: nodejs-hapijs-redis):
npm start
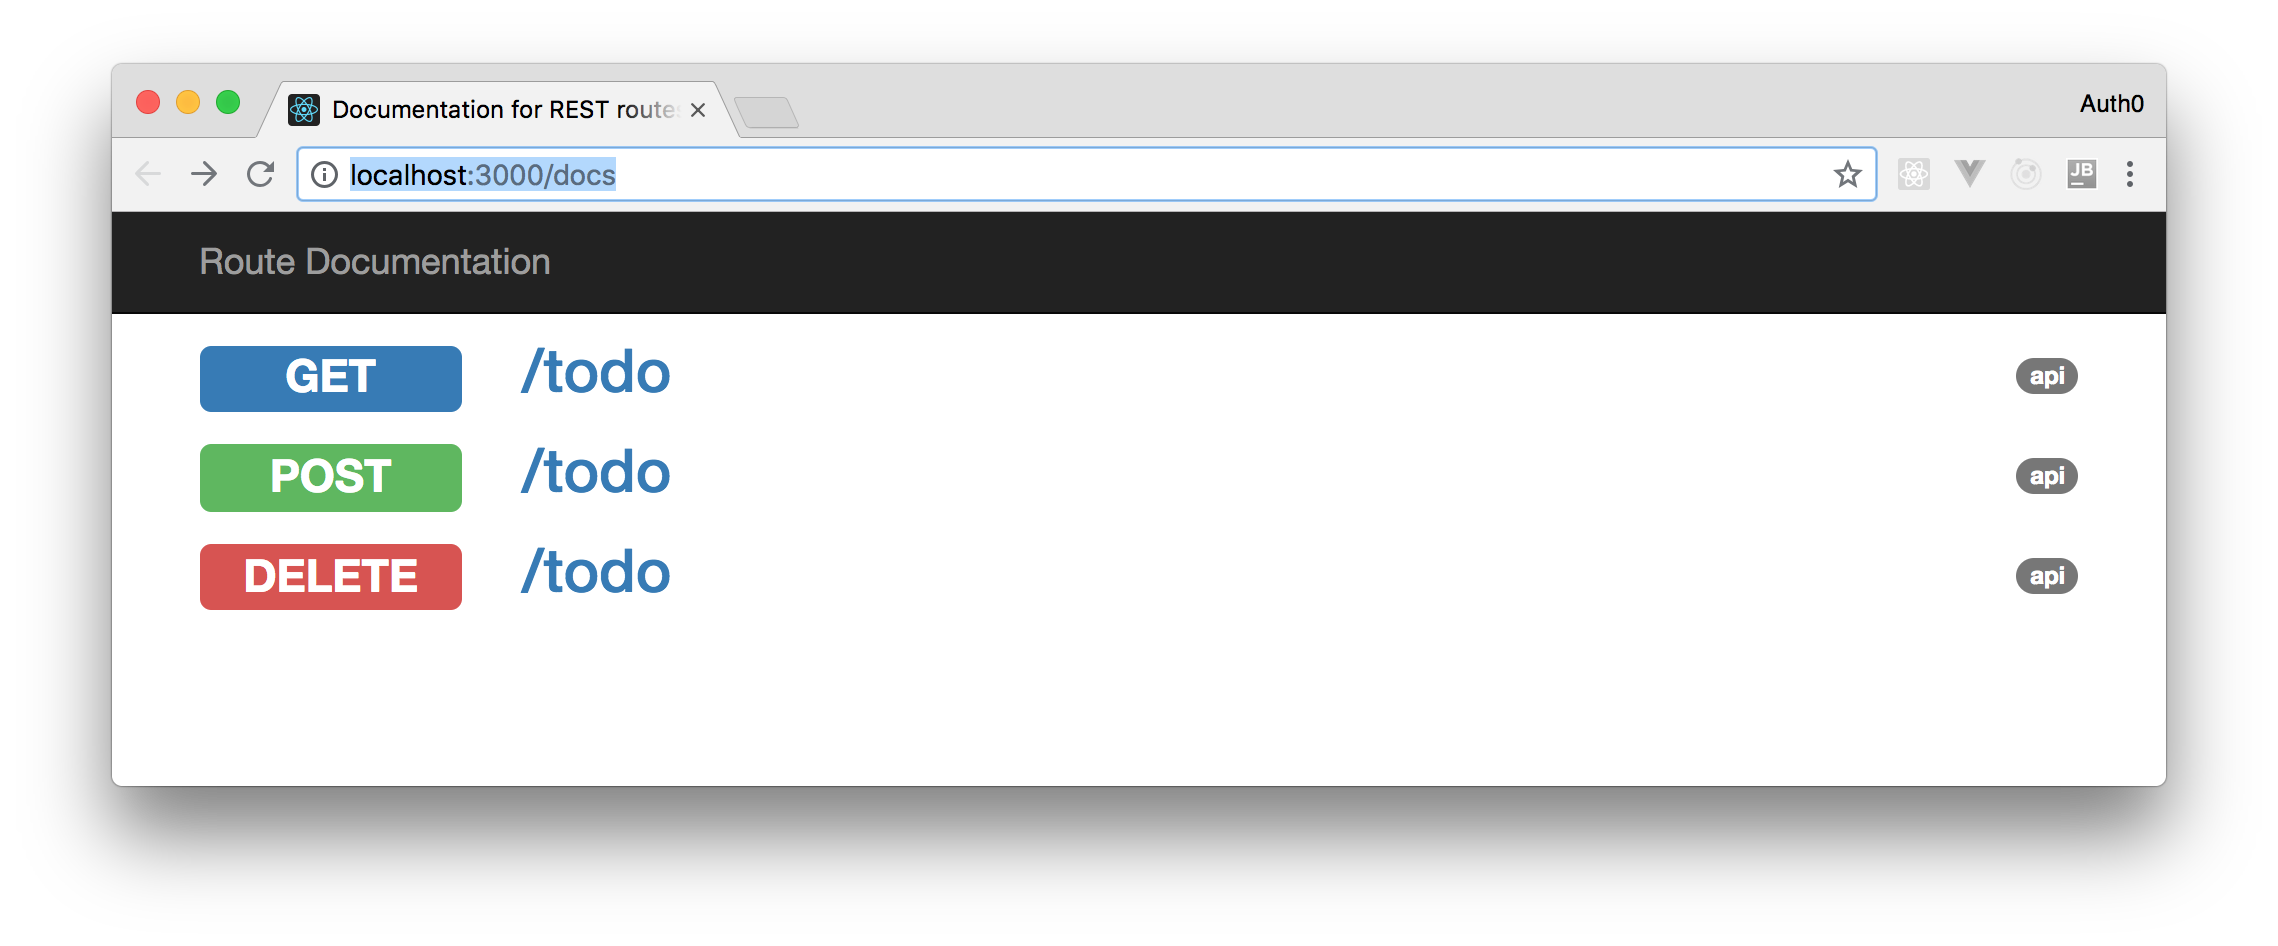
Then, if you go to the /docs resource, you will see the documentation of your Hapi.js API:
Now, to test if your endpoints are really secured, you can issue the following curl commands:
curl http://localhost:3000/todo

curl -X POST -H 'Content-Type: application/json' -d '{
  "item": "It should not work."
}' http://localhost:3000/todo
Both commands above should return the following response:
{
  "statusCode": 401,
  "error": "Unauthorized",
  "message": "Missing authentication"
}
That is, your server is telling you that it is expecting you to be authenticated somehow. The server doesn't specify that it's expecting an access token from Auth0 because you shouldn't be adding details like that about your services. However, you know that this is what you need.
So, there are multiple ways to fetch a token from Auth0. The strategy that you will use will depend on what context you are in. For example, if you are on a Single Page Application (SPA), you will use what is called the Implicit Grant. If you are on a native, mobile application, you will use the Authorization Code Grant Flow with PKCE. However, for a simple test like this one, you can use your Auth0 dashboard to get one.
So, head back to the APIs section in your Auth0 dashboard, click on the API you created before, and then click on the Test section of this API. There, you will find a button called Copy Token. Click on this button to copy an access token to your clipboard.
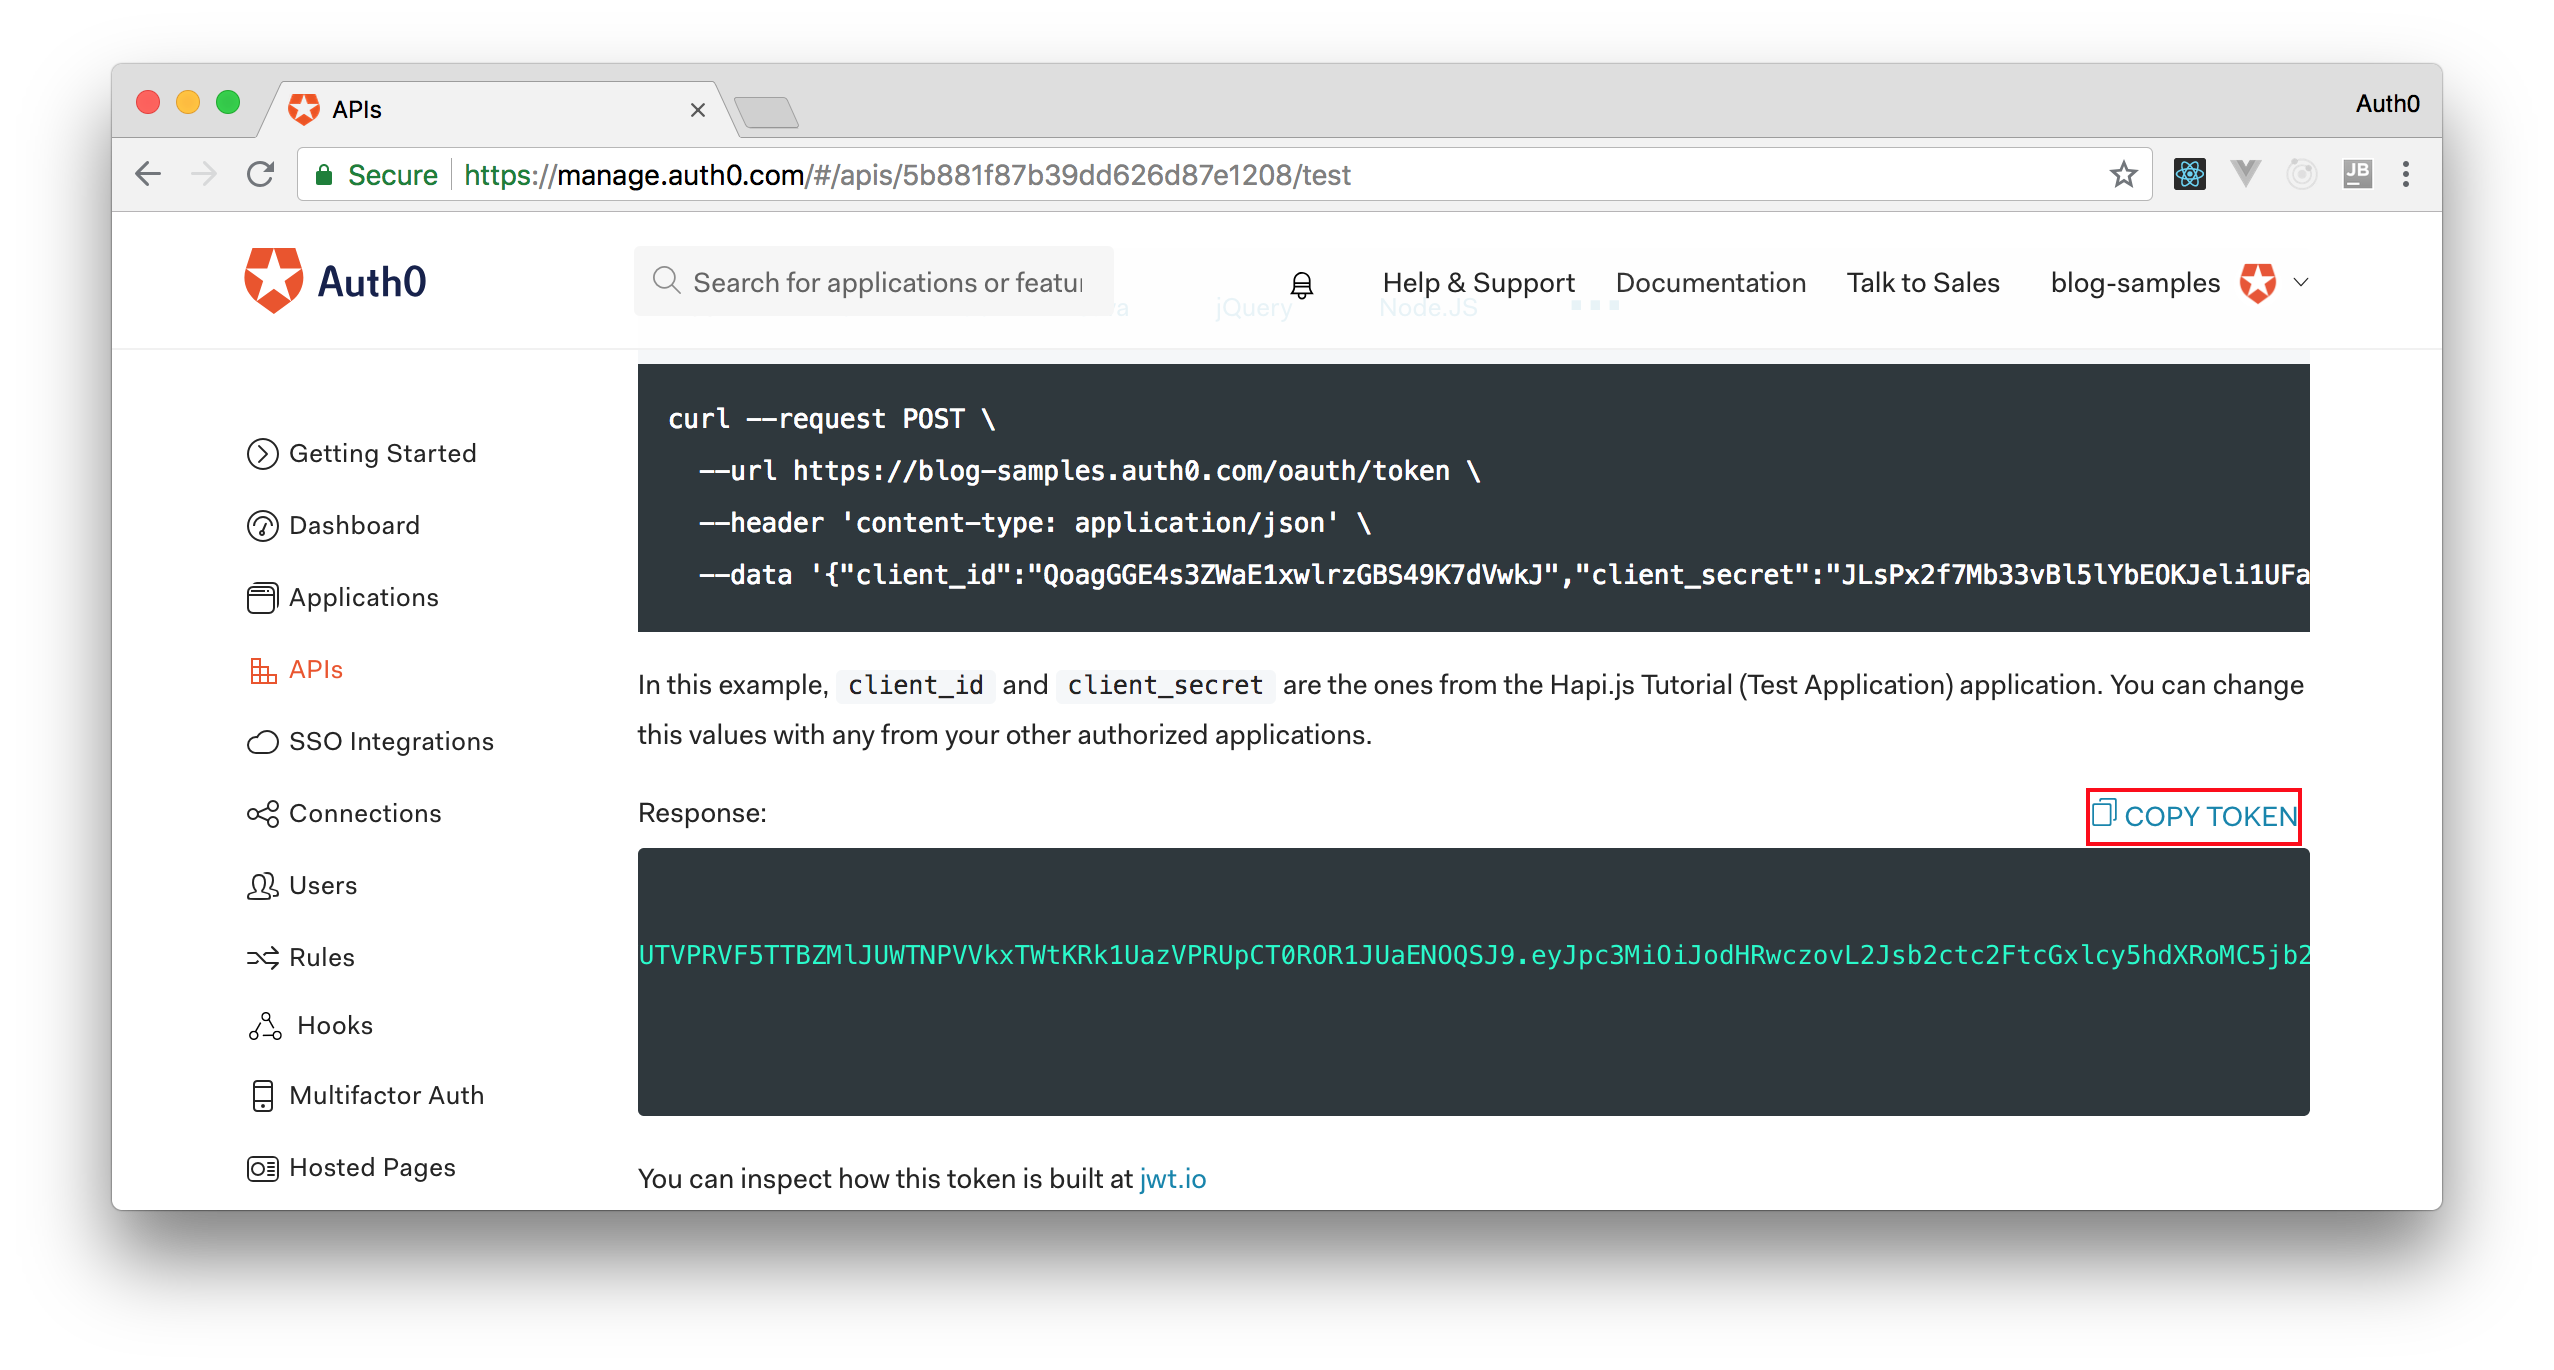
Then, with this token in your clipboard, go back to your terminal and execute the following commands:
# set a variable with your access token
ACCESS_TOKEN=<YOUR_ACCESS_TOKEN>

# use the token to insert an item
curl -X POST -H 'Content-Type: application/json' \
  -H 'Authorization: Bearer '$ACCESS_TOKEN -d '{
  "item": "Learn about more about Docker, Auth0, and Redis."
}' http://localhost:3000/todo
Note: You will have to replace
<YOUR_ACCESS_TOKEN>with the token copied from Auth0.
The second command, the one that issues an HTTP request with your token, will create a new item in your to-do list so you can remember that you have to "learn about more about Docker, Auth0, and Redis." As the response to this request, your API will send this to you:
{
  "count": 1
}
This answer tells you that you have a single record on your to-do list right now, as you would expect. Now, to see this item, you can issue the following command:
# in the same terminal because you need $ACCESS_TOKEN
curl -H 'Authorization: Bearer '$ACCESS_TOKEN http://localhost:3000/todo
This command will output the following response from the Hapi.js API:
{
  "nextlink": "/todo?start=10&results=10",
  "value": ["Learn about more about Docker, Auth0, and Redis."],
  "count": 1
}
As you can see, your to-do item was properly inserted. Now, to remove this item, you can issue this command:
curl -X DELETE -H 'Content-Type: application/json' \
  -H 'Authorization: Bearer '$ACCESS_TOKEN -d '{
  "index": 0
}' http://localhost:3000/todo
In this case, you are issuing a DELETE request with index equals 0 so your API remove the first element from your to-do list. Cool, you just used your API for the first time!
“In less than an hour, I managed to create a secure and modern API with @hapijs, #redis, and @nodejs.”
Tweet This
Conclusion and Next Steps
In this article, you learned how to create modern APIs with Hapi.js, Node.js, and Redis. Also, you learned how to integrate your API with Auth0 to take advantage of the state-of-the-art security provided by this company. All of that, without struggling too much.
However, you wouldn't expect end-users to use a REST API directly through the command-line interface or through generic HTTP clients like Postman, would you? As such, in the next article, you will learn how to create a Single Page Application to interact with your API. To create this application, you will use a modern approach based on web components and LitElement. Stay tuned!