
TL;DR: In this article, you will learn how to build well-organized APIs with Node.js, Restify, Joi, and MongoDB. You will also have a chance to learn how to use dependency injection on this stack. If needed, you can find the code developed throughout this article in this GitHub repository.
“Learn how to build well-organized APIs with @nodejs, Restify, Joi, and @MongoDB.”
Tweet This
Developing Well-Organized APIs with Node.js
In this article, you will build a birthdates API that lets you register and query birthdays from the people you know.
Structuring Node.js APIs has been a pain most beginner Node.js developers have been through. So, in the next sections, you will learn how to properly structure and organize a RESTful Node.js API with some cool tools like Restify, Joi, and MongoDB.
What Tools Will You Use
As mentioned, you will use tools like Restify, Joi, and MongoDB. This section provides a brief overview of these tools.
Restify
Restify is a Node.js web service framework optimized for building semantically-correct RESTful web services ready for production. If you check their official web page, you will see that big companies like Netflix and Pinterest use Restify in their applications.
Joi
You will use Joi to validate params, queries, and the body of requests. Joi, seating at the route level, basically check for correctness of the requests sent to the API. Only requests that are semantically correct reach the controllers of your application.
MongoDB
MongoDB is a cross-platform and open-source document-oriented database (also known as a NoSQL database). You will use MongoDB to persist and retrieve the data (birthdates) managed by the API that you will build throughout the article.
Building the Birthdates API
Firstly, you will need to check if you have Node.js, NPM, and a MongoDB instance installed on your development machine:
node --version
npm --version
mongo --version
If you don't have Node.js and NPM, go grab them from this URL. If you don't have MongoDB, you can find instructions on how to install it in this URL.
Birthdates API Endpoints
After checking the dependencies, you can start building your application. In the end, you will have an API with the following endpoints:
POST/users: An endpoint to create new users.GET/users/{username}: An endpoint to retrieve users by their usernames.POST/birthdates: And endpoint to register new birthdates.POST/birthdates/{username}: An endpoint to retrieve the birthdate of a certain user.
Setup the Project Structure
You will start the creation of your app from scratch. So, create a new directory called birthdates-api (this will be referenced as the project root) and execute the following commands:
# if you haven't yet, create the project root
mkdir birthdates-api

# move the terminal into it
cd birthdates-api

# create subdirectories
mkdir -p app/configs app/controllers app/lib app/middlewares \
  app/models app/routes app/services app/validations
Next, you will need to initialize the project with npm so you get a package.json file to describe your project and manage its dependencies. So, execute the command below in the project root and follow the prompt (set the entry point to server.js):
# answer all questions asked by NPM
npm init
Installing Dependencies
After initializing your project with NPM, you can install its dependencies:
npm install --save mongoose restify joi http-status restify-errors restify-url-semver winston@next dotenv
The list below provides a brief explanation of what these libraries do:
mongooseis a MongoDB object modeling tool designed to work in an asynchronous environment.http-statusis a utility to interact with HTTP status code.restify-errorsis a library that contains sets of error constructors to create new error objects with their default status codes.restify-url-semveris a library used for versioning the Restify API.winstonis a universal logging library with support for multiple transports. A transport is essentially a storage device for your logs.dotenvis a tiny package that loads environment variables from.envfile intoprocess.env.
Creating the App Configuration
An app’s configuration is everything that is likely to vary between environments. So, using environment variables makes it easy to change values of configs depending on the environment without having to change any code.
As such, you will create a new file called .env in the project root and add to it the following variables:
NODE_PATH=.
APPLICATION_ENV=development

APP_NAME=birthdate-api
APP_PORT=5000
LOG_PATH=logs/birthdate-api.log
LOG_ENABLE_CONSOLE=true

DB_PORT=27017
DB_HOST=localhost
DB_NAME=birthdates
Next, you will load these variables in a configs.js file. So, inside the ./app/configs directory, create the configs.js file and add the code below:
'use strict';

module.exports = () => ({
  app: {
    name: process.env.APP_NAME,
    port: process.env.APP_PORT || 8000,
    environment: process.env.APPLICATION_ENV,
    logpath: process.env.LOG_PATH,
  },
  mongo: {
    port: process.env.DB_PORT,
    host: process.env.DB_HOST,
    name: process.env.DB_NAME
  },
  application_logging: {
    file: process.env.LOG_PATH,
    level: process.env.LOG_LEVEL || 'info',
    console: process.env.LOG_ENABLE_CONSOLE || true
  }
});
Node.js environment variables are always loaded into the process.env object. So, to access any variable declared in .env file, all you need to do is to call process.env.VAR_NAME. That is, if you want to change a variable due to change in the environment, you don't need to modify the config file. You just need to modify the .env file.
Setting Up the Restify Server
The first thing you will do to set up your new Restify Server is to create a file called jsend.js in the ./app/lib directory. Inside this file, you will add the following code:
'use strict';

function formatJSend(req, res, body) {
  function formatError(res, body) {
    const isClientError = res.statusCode >= 400 && res.statusCode < 500;
    if (isClientError) {
      return {
        status: 'error',
        message: body.message,
        code: body.code
      };
    } else {
      const inDebugMode = process.env.NODE_ENV === 'development';

      return {
        status: 'error',
        message: inDebugMode ? body.message : 'Internal Server Error',
        code: inDebugMode ? body.code : 'INTERNAL_SERVER_ERROR',
        data: inDebugMode ? body.stack : undefined
      };
    }
  }

  function formatSuccess(res, body) {
    if (body.data && body.pagination) {
      return {
        status: 'success',
        data: body.data,
        pagination: body.pagination,
      };
    }

    return {
      status: 'success',
      data: body
    };
  }

  let response;
  if (body instanceof Error) {
    response = formatError(res, body);
  } else {
    response = formatSuccess(res, body);
  }

  response = JSON.stringify(response);
  res.header('Content-Length', Buffer.byteLength(response));
  res.header('Content-Type', 'application/json');

  return response;
}

module.exports = formatJSend;
The main function, formatJSend (the other two are used only by this function), checks the body of the response to see if it's an error type or not. If it is, it calls the formatError function that constructs a jsend compliant error response with the HTTP status code. Otherwise, the formatSuccess is called for every successful request transaction and formatted following the jsend JSON response specification.
Your formatter overrides the default Restify formatter for content-type of application/json.
Now, you can create a server.js file in the project root to start the Restify server and use your jsend formatter.
'use strict';

require('dotenv').config();
const config = require('./app/configs/configs')();
const restify = require('restify');
const versioning = require('restify-url-semver');

// Initialize and configure restify server
const server = restify.createServer({
  name: config.app.name,
  versions: ['1.0.0'],
  formatters: {
    'application/json': require('./app/lib/jsend')
  }
});

// Set API versioning and allow trailing slashes
server.pre(restify.pre.sanitizePath());
server.pre(versioning({prefix: '/'}));

// Set request handling and parsing
server.use(restify.plugins.acceptParser(server.acceptable));
server.use(restify.plugins.queryParser());
server.use(
  restify.plugins.bodyParser({
    mapParams: false
  })
);

// start server
server.listen(config.app.port, () => {
  console.log(`${config.app.name} Server is running on port -
    ${config.app.port}`);
});
The first thing you did was to load the variables from the .env file into process.env once the app starts up. Then, you started importing dependencies and creating the server with the configuration you created previously.
Unix users can use
export $(cat .env | sed -e /^$/d -e /^#/d | xargs)in the project root to load the.envvariables to shell environment.
Inside the project root, you can start the server with this command:
node server.js
If it was successful, you should see this in your console:

Setting up a Logger
Now, you will create a wrapper for the winston library to format the output of the logs and create transport based on the environment.
So, create a file called logger.js inside ./app/lib/ and add the following code:
'use strict';

const {createLogger, format, transports} = require('winston');
const {combine, timestamp, label, prettyPrint} = format;

const createTransports = function (config) {
  const customTransports = [];

  // setup the file transport
  if (config.file) {

    // setup the log transport
    customTransports.push(
      new transports.File({
        filename: config.file,
        level: config.level
      })
    );
  }

  // if config.console is set to true, a console logger will be included.
  if (config.console) {
    customTransports.push(
      new transports.Console({
        level: config.level
      })
    );
  }

  return customTransports;
};

module.exports = {
  create: function (config) {
    return createLogger({
      transports: createTransports(config),
      format: combine(
        label({label: 'Birthdates API'}),
        timestamp(),
        prettyPrint()
      )
    });
  }
};
For a better understanding of how to create Winston logger, you can have a look at the official Winston documentation.
For this tutorial, you created two transports; console and file. Both transports use the log level you set in your environment variable which can be overridden in the code with logger.log_level(...) (e.g. logger.info(...) instead of logger.log(...)).
Based on the environment, you can set the value of console logging to false or true in the .env file. Again, for this tutorial, you enabled logging to the console so you can see all your logs in the console without having to tail a log file. However, logging to the console is not advisable in a production environment.
Setting Up Dependency Injection
Instead of having your objects creating a dependency, you can pass the needed dependencies into the object externally. To achieve this, you can use an object higher up in the dependency graph or a dependency injector (library) to pass the dependencies.
For this tutorial, you will use a custom library called service_locator to inject dependencies into the objects that need to hold a reference to them.
So, create a file called service_locator.js inside the ./app/lib/ directory and add the following code:
'use strict';

function ServiceLocator() {
  this.dependencyMap = {};
  this.dependencyCache = {};
}

ServiceLocator.prototype.register = function (dependencyName, constructor) {
  if (typeof constructor !== 'function') {
    throw new Error(dependencyName + ': Dependency constructor is not a function');
  }

  if (!dependencyName) {
    throw new Error('Invalid depdendency name provided');
  }

  this.dependencyMap[dependencyName] = constructor;
};

ServiceLocator.prototype.get = function (dependencyName) {
  if (this.dependencyMap[dependencyName] === undefined) {
    throw new Error(dependencyName + ': Attempting to retrieve unknown dependency');
  }

  if (typeof this.dependencyMap[dependencyName] !== 'function') {
    throw new Error(dependencyName + ': Dependency constructor is not a function');
  }

  if (this.dependencyCache[dependencyName] === undefined) {
    const dependencyConstructor = this.dependencyMap[dependencyName];
    const dependency = dependencyConstructor(this);
    if (dependency) {
      this.dependencyCache[dependencyName] = dependency;
    }
  }

  return this.dependencyCache[dependencyName];
};

ServiceLocator.prototype.clear = function () {
  this.dependencyCache = {};
  this.dependencyMap = {};
};

module.exports = new ServiceLocator();
The following list provides a brief analysis of the code above:
- The
registermethod takes in the dependency name and its constructor, then proceeds to add it to thedependencyMapobject initialized in yourServiceLocatorconstructor. - The
getmethod retrieves a dependency from thedependencyMapobject that matches the name passed in as the function argument. If the requested dependency is not in the cache, it initializes the dependency and adds it to the cache then returns it. - The
clearmethod basically just removes all dependencies from the map and from the cache.
You will use the serviceLocator object to manage our app dependencies.
Now, you can proceed to create a file called di.js (Dependency Injection) inside the ./app/configs/ where you will initialize all your app dependencies.
'use strict';

const serviceLocator = require('../lib/service_locator');
const config = require('./configs')();

serviceLocator.register('logger', () => {
  return require('../lib/logger').create(config.application_logging);
});

serviceLocator.register('httpStatus', () => {
  return require('http-status');
});

serviceLocator.register('mongoose', () => {
  return require('mongoose');
});

serviceLocator.register('errs', () => {
  return require('restify-errors');
});

module.exports = serviceLocator;
Calling the register method adds a dependency to the dependency graph that can be retrieved by calling the get method with the dependencyName.
“Using Dependency Injection with @nodejs is easy. You don't even need an NPM package for this.”
Tweet This
Setting Up a Database
Before you proceed, you will need to start a MongoDB server in a separate terminal window and leave it running:
mongod
Note: You can also use a service like mLab or you can use Docker to initialize a MongoDB instance.
If the command above fails, check out their documentation on how to start the server for your OS.
Then, create a file called database.js inside the ./app/configs/directory with the following code:
'use strict';

const serviceLocator = require('../lib/service_locator');
const logger = serviceLocator.get('logger');

class Database {
  constructor(port, host, name) {
    this.mongoose = serviceLocator.get('mongoose');
    this._connect(port, host, name);
  }

  _connect(port, host, name) {
    this.mongoose.Promise = global.Promise;
    this.mongoose.connect(`mongodb://${host}:${port}/${name}`);
    const {connection} = this.mongoose;
    connection.on('connected', () =>
      logger.info('Database Connection was Successful')
    );
    connection.on('error', (err) =>
      logger.info('Database Connection Failed' + err)
    );
    connection.on('disconnected', () =>
      logger.info('Database Connection Disconnected')
    );
    process.on('SIGINT', () => {
      connection.close();
      logger.info(
        'Database Connection closed due to NodeJs process termination'
      );
      process.exit(0);
    });

    // initialize Model
    require('../models/Users');
  }
}

module.exports = Database;
This class has just a single method that connects to the running MongoDB server. Note that you added some listeners for series of events (like error or disconnected) that might occur in the server lifecycle. Lastly, in the _connect() method, you initialized your users model. You will create the ./app/models/Users module now.
For your Birthdates API, you need to define a model, Users, and a submodel, Birthdates. The Users model will hold the properties of the user using the API (e.g. username, birthdate, and birthdates). The birthdates submodel will define the fullname and birthdates of your friends and you will embed it as an array inside the Users model.
So, create the Users.js file inside the ./app/models/ directory and add this code:
'use strict';

const config = require('../configs/configs');
const serviceLocator = require('../lib/service_locator');
const mongoose = serviceLocator.get('mongoose');

const birthdatesSchema = new mongoose.Schema({
  fullname: {
    type: String,
    trim: true,
    required: true
  },
  birthdate: {
    type: Date,
    required: true
  }
});

const userSchema = new mongoose.Schema({
    username: {
      type: String,
      trim: true,
      required: true,
      unique: true,
      lowercase: true
    },
    birthdate: {
      type: Date,
      required: true
    },
    birthdates: [birthdatesSchema]
  },
  {
    timestamps: true
  }
);

module.exports = mongoose.model('Users', userSchema);
In this file, you defined two schemas:
birthdatesSchema: This used as a subdocument in the users model defining thefullnameof the person whose birthdates you want to save and thebirthdatesproperties.userSchema: You definedusernameof the user, theirbirthdate, and an array ofbirthdatesfrom thebirthdatesSchema. You also enabledtimestampwhich automatically addscreated_atandupdated_atproperties to every document.
Developing the API Source Code
Next, you will set up services, controllers, and routers to handle requests. Inside the ./app/services directory, you will create the user service to handle business related to the users endpoint (such as creating users, fetching users, etc). So, create a file called user.js inside this directory and add the following code to it:
'use strict';

class UserService {
  constructor(log, mongoose, httpStatus, errs) {
    this.log = log;
    this.mongoose = mongoose;
    this.httpStatus = httpStatus;
    this.errs = errs;
  }

  async createUser(body) {
    const Users = this.mongoose.model('Users');
    const {username} = body;
    const user = await Users.findOne({username});

    if (user) {
      const err = new this.errs.InvalidArgumentError(
        'User with username already exists'
      );
      return err;
    }

    let newUser = new Users(body);
    newUser.birthdate = new Date(body.birthdate);
    newUser = await newUser.save();

    this.log.info('User Created Successfully');
    return newUser;
  }

  async getUser(username) {
    const Users = this.mongoose.model('Users');
    const user = await Users.findOne({username});

    if (!user) {
      const err = new this.errs.NotFoundError(
        `User with username - ${username} does not exists`
      );
      return err;
    }

    this.log.info('User fetched Successfully');
    return user;
  }
}

module.exports = UserService;
This is a brief analysis of this file:
- The
constructorinitializes all the dependencies passed to it from your dependency injection file when creating the object. - The
createUsermethod checks if the user with the username in the request body exists then throws an error that 'User with username already exists' already exists. Otherwise, it proceeds to save the user and returns the result to the controller. - The
getUsermethod fetches the user that matches theusernameprovided and returns the result to the controller.
Now, you have the chunks of code to create a user and get a specified user. So, you can proceed to create the controller to implement this service.
By the way, noticed how you were able to receive and initialize the dependencies of the user service inside its constructor? The dependency injection makes that possible, you will get to that part soon.
Now, inside the ./app/controllers/ directory, create another user.js file. Now, insert this code inside it:
'use strict';

class UserController {
    constructor(log, userService, httpSatus) {
        this.log = log;
        this.userService = userService;
        this.httpSatus = httpSatus;
    }

    async create(req, res) {
        try {
            const { body } = req;
            const result = await this.userService.createUser(body);

            res.send(result);
        } catch (err) {
            this.log.error(err.message);
            res.send(err);
        }
    }

    async get(req, res) {
        try{
            const { username } = req.params;
            const result = await this.userService.getUser(username);

            res.send(result);
        } catch (err) {
            this.log.error(err.message);
            res.send(err);
        }
    }

}

module.exports = UserController;
The controller basically calls the services to perform particular actions and sends the response back to the client.
Now, you can create the birthdate service and controller to save and fetch birthdates. So, inside the ./app/services directory create a file called birthdates.js and add this:
'use strict';

class BirthdateService {
  constructor(log, mongoose, httpStatus, errs) {
    this.log = log;
    this.mongoose = mongoose;
    this.httpStatus = httpStatus;
    this.errs = errs;
  }

  async createBirthdate(username, body) {
    const Users = this.mongoose.model('Users');
    const user = await Users.findOne({username});
    const {birthdate, fullname} = body;

    if (!user) {
      const err = new this.errs.NotFoundError(
        `User with username - ${username} does not exists`
      );
      return err;
    }

    user.birthdates.push({
      birthdate: this.formatBirthdate(birthdate),
      fullname
    });

    return user.save();
  }

  formatBirthdate(date) {
    return new Date(date);
  }

  async getBirthdates(username) {
    const Users = this.mongoose.model('Users');
    const user = await Users.findOne({username});

    if (!user) {
      const err = new this.errs.NotFoundError(
        `User with username - ${username} does not exists`
      );
      return err;
    }

    return user.birthdates;
  }
}

module.exports = BirthdateService;
The following list provides a brief analysis of the code above:
- The
constructormethod initializes all the dependencies passed to it from your dependency injection file when creating the object. - The
createBirthdatemethod fetches the user that made the request, then saves thebirthdateswith thefullnameand returns the result to the Birthdate controller completing the request. - The
getBirthdatesmethod gets all thebirthdatesof the user that made the request and returns the result to the Birthdate controller.
Now, create the birthdates.js file inside the ./app/controllers/ directory with this code:
'use strict';

const serviceLocator = require('../lib/service_locator');

class BirthdateController {
  constructor(log, birthdateService, httpSatus) {
    this.log = log;
    this.birthdateService = birthdateService;
    this.httpSatus = httpSatus;
  }

  async create(req, res) {
    try {
      const {body} = req;
      const {username} = req.params;
      const result = await this.birthdateService.createBirthdate(
        username,
        body
      );
      if (result instanceof Error)
        res.send(result);
      else res.send(`${body.fullname}'s birthdate saved successfully!`)
    } catch (err) {
      this.log.error(err.message);
      res.send(err);
    }
  }

  async listAll(req, res) {
    try {
      const {username} = req.params;
      const result = await this.birthdateService.getBirthdates(username);
      res.send(result);
    } catch (err) {
      this.log.error(err.message);
      res.send(err);
    }
  }
}

module.exports = BirthdateController;
Now, you need to register the services and controllers you just created in your serviceLocator module. You will do this so you can inject dependencies with ease.
So, open up the ./app/configs/di.js file and insert the following code just before the last line (i.e. before module.exports = serviceLocator;):
// ... leave the rest above untouched ...

serviceLocator.register('birthdateService', (serviceLocator) => {
    const log = serviceLocator.get('logger');
    const mongoose = serviceLocator.get('mongoose');
    const httpStatus = serviceLocator.get('httpStatus');
    const errs = serviceLocator.get('errs');
    const BirthdateService = require('../services/birthdates');

    return new BirthdateService(log, mongoose, httpStatus, errs);
});

serviceLocator.register('userService', (serviceLocator) => {
    const log = serviceLocator.get('logger');
    const mongoose = serviceLocator.get('mongoose');
    const httpStatus = serviceLocator.get('httpStatus');
    const errs = serviceLocator.get('errs');
    const UserService = require('../services/user');

    return new UserService(log, mongoose, httpStatus, errs);
});

serviceLocator.register('birthdateController', (serviceLocator) => {
    const log = serviceLocator.get('logger');
    const httpStatus = serviceLocator.get('httpStatus');
    const birthdateService = serviceLocator.get('birthdateService');
    const BirthdateController = require('../controllers/birthdates');

    return new BirthdateController(log, birthdateService, httpStatus);
});

serviceLocator.register('userController', (serviceLocator) => {
    const log = serviceLocator.get('logger');
    const httpStatus = serviceLocator.get('httpStatus');
    const userService = serviceLocator.get('userService');
    const UserController = require('../controllers/user');

    return new UserController(log, userService, httpStatus);
});

module.exports = serviceLocator;
You are almost ready to take this baby for a spin!!! But, lastly, you have to set up routes and request validation with joi.
Setting Up Validation With Joi
If you are not familiar with Joi, you can check out their GitHub repo for a quick start. But, as you will see, it's easy to use Joi.
First, you will need to create blueprints or schemas for JavaScript objects (an object that stores information) to ensure validation of key information. Joi runs validation against the rule you declared in the schemas for all requests.
So, inside the ./app/validations/ directory, create a file called create_user.js and add this code to it:
'use strict';

const joi = require('joi');

module.exports = joi.object().keys({
  username: joi.string().alphanum().min(4).max(15).required(),
  birthdate: joi.date().required()
}).required();
The above schema defines the following constraints:
username- a required string;
- must contain only alphanumeric characters;
- at least 4 characters long but no more than 15;
birthdate- a required date field;
Now that you know how joi works, you can create validations for the remaining endpoints. So, create a file called create_birthdates.js inside the ./app/validations directory and add this code to it:
'use strict';

const joi = require('joi');

module.exports = joi.object().keys({
    fullname: joi.string().min(5).max(60).required(),
    birthdate: joi.date()
}).required();
Then, create a file called get_birthdates-user.js inside the same directory and add this:
'use strict';

const joi = require('joi');

module.exports = {
    username: joi.string().alphanum().min(4).max(30).required()
};
After defining the validation rules, you will need to create a tiny library to run the validation everytime request is made. So, inside the ./app/lib/ directory, create a file called validator.js and add this:
'use strict';

let httpStatus = require('http-status');
let errors = require('restify-errors');

module.exports.paramValidation = function (log, joi) {

  return function (req, res, next) {

    // always allow validation to allow unknown fields by default.
    let options = {
      allowUnknown: true
    };

    let validation = req.route.spec.validation; //validation object in route
    if (!validation) {
      return next(); // skip validation if not set
    }

    let validProperties = ['body', 'query', 'params'];

    for (let i in validation) {
      if (validProperties.indexOf(i) < 0) {
        log.debug('Route contains unsupported validation key');
        throw new Error('An unsupported validation key was set in route');

      } else {
        if (req[i] === undefined) {
          log.debug('Empty request ' + i + ' was sent');

          res.send(
            httpStatus.BAD_REQUEST,
            new errors.InvalidArgumentError('Missing request ' + i)
          );
          return;
        }

        let result = joi.validate(req[i], validation[i], options);

        if (result.error) {
          log.debug('validation error - %s', result.error.message);

          res.send(
            httpStatus.BAD_REQUEST,
            new errors.InvalidArgumentError(
              'Invalid request ' + i + ' - ' + result.error.details[0].message
            )
          );
          return;

        } else {
          log.info('successfully validated request parameters');
        }
      }
    }

    next();
  };
};
As you can see, firstly, the function retrieves the validation property defined in the route spec. Then, you proceed to check if the request object contains a valid property (key e.g. body, query or params). If it does, you validate the value obtained from the request object with the predefined set of rules (schema) for the request path. If the input is invalid, the result will be an Error object.
Now, you can define the routes and provide the validation rules for all the paths. So, inside ./app/routes/, create the routes.js file and add this:
'use strict';

module.exports.register = (server, serviceLocator) => {

  server.post(
    {
      path: '/users',
      name: 'Create User',
      version: '1.0.0',
      validation: {
        body: require('../validations/create_user')
      }
    },
    (req, res, next) =>
      serviceLocator.get('userController').create(req, res, next)
  );

  server.get(
    {
      path: '/users/:username',
      name: 'Get User',
      version: '1.0.0',
      validation: {
        params: require('../validations/get_birthdates-user.js')
      }
    },
    (req, res, next) =>
      serviceLocator.get('userController').get(req, res, next)
  );

  server.get(
    {
      path: '/birthdates/:username',
      name: 'Get Birthdates',
      version: '1.0.0',
      validation: {
        params: require('../validations/get_birthdates-user.js')
      }
    },
    (req, res, next) =>
      serviceLocator.get('birthdateController').listAll(req, res, next)
  );

  server.post(
    {
      path: '/birthdates/:username',
      name: 'Create Birthdate',
      version: '1.0.0',
      validation: {
        body: require('../validations/create_birthdates')
      }
    },
    (req, res, next) =>
      serviceLocator.get('birthdateController').create(req, res, next)
  );
};
Now, you have four endpoints defined:
POST/users;GET/users/{username};GET/birthdates/{username};POST/birthdates/{username};
After defining the route specification in the first arguments, you specify the controller to handle the request to that particular path.
“Joi can help you keep your data consistent by validating requests in @nodejs applications.”
Tweet This
Handling Restify Errors
Restify has built-in error event listener that gets fired when an Error is encountered by restify as part of a next(error) statement. So, now you need to add handlers for possible errors you want to listen for.
So, inside ./app/lib/, create error_handler.js and add this:
'use strict';

module.exports.register = (server) => {
    var httpStatusCodes = require('http-status');

    server.on('NotFound', (req, res) => {
        res.send(
            httpStatusCodes.NOT_FOUND,
            new Error('Method not Implemented', 'METHOD_NOT_IMPLEMENTED')
        );
    });

    server.on('VersionNotAllowed', (req, res) => {
        res.send(
            httpStatusCodes.NOT_FOUND,
            new Error('Unsupported API version requested', 'INVALID_VERSION')
        );
    });

    server.on('InvalidVersion', (req, res) => {
        res.send(
            httpStatusCodes.NOT_FOUND,
            new Error('Unsupported API version requested', 'INVALID_VERSION')
        );
    });

    server.on('MethodNotAllowed', (req, res) => {
        res.send(
            httpStatusCodes.METHOD_NOT_ALLOWED,
            new Error('Method not Implemented', 'METHOD_NOT_ALLOWED')
        );
    });

    server.on('restifyError', (req, res) => {
        res.send(httpStatusCodes.INTERNAL_SERVER_ERROR, err);
    });
};
Whenever an error is encountered in your application, the appropriate error handler is called. If an error not defined above occurs, the last handler you declared, restifyError, will catch it.
Wrapping Up
To wrap up your Node.js API, you will need to update the server.js file to initialize the route and our request validator. So, open this file and replace the code with this:
'use strict';

require('dotenv').config();
const config = require('./app/configs/configs')();
const restify = require('restify');
const versioning = require('restify-url-semver');
const joi = require('joi');

// Require DI
const serviceLocator = require('./app/configs/di');
const validator = require('./app/lib/validator');
const handler = require('./app/lib/error_handler');
const routes = require('./app/routes/routes');
const logger = serviceLocator.get('logger');
const server = restify.createServer({
  name: config.app.name,
  versions: ['1.0.0'],
  formatters: {
    'application/json': require('./app/lib/jsend')
  }
});

// Initialize the database
const Database = require('./app/configs/database');
new Database(config.mongo.port, config.mongo.host, config.mongo.name);

// Set API versioning and allow trailing slashes
server.pre(restify.pre.sanitizePath());
server.pre(versioning({ prefix: '/' }));

// Set request handling and parsing
server.use(restify.plugins.acceptParser(server.acceptable));
server.use(restify.plugins.queryParser());
server.use(
  restify.plugins.bodyParser({
    mapParams: false
  })
);

// initialize validator for all requests
server.use(validator.paramValidation(logger, joi));

// Setup Error Event Handling
handler.register(server);

// Setup route Handling
routes.register(server, serviceLocator);

// start server
server.listen(config.app.port, () => {
  console.log(`${config.app.name} Server is running on port -
    ${config.app.port}`);
});
That's it!!! You have just built a well-organized API with Restify. Time take your baby for a spin:
# make sure you are running this from the project root
node server.js
After running your application, you can issue the following create a User:
curl -H "Content-Type: application/json" -X POST -d '{
  "username": "biodunch",
  "birthdate": "12/2/2000"
}' localhost:5000/v1/users
Then, you can register a birthdate of a friend of this user with this command:
curl -H "Content-Type: application/json" -X POST -d '{
  "fullname": "Falomo Olumide",
  "birthdate":"10/3/2000"
}' localhost:5000/v1/birthdates/biodunch
Then, to fetch the birthdates saved by biodunch, you can issue this command:
curl localhost:5000/v1/birthdates/biodunch
This will get you a response similar to:
{
   "status":"success",
   "data":[
      {
         "_id":"5adbb5e59b09be4ea8da5903",
         "birthdate":"2000-10-02T23:00:00.000Z",
         "fullname":"Falomo Olumide"
      }
   ]
}
Securing your Node.js API with Auth0
Now that you have learned how to create a well-organized Node.js API, it's time to learn how to secure it properly. For that, you will use Auth0, a global leader in the Identity-as-a-Service (IDaaS) market that provides thousands of enterprise customers with modern identity solutions. With Auth0, you only have to write a few lines of code to get a solid identity management solution, support single sign-on, support for social identity providers (like Facebook, GitHub, Twitter, etc.), and support for enterprise identity providers (like Active Directory, LDAP, SAML, custom, etc.).
To follow along the instruction describe here, you will need an Auth0 account. If you don't have one yet, now is a good time to sign up for a free account.
Registering the API at Auth0
With your Auth0 account created, you will have to register your API on it to represent your backend. To do this, head to the API section of your management dashboard and click on Create API. On the dialog that appears, you can name your API as "Birthdates API" (the name isn't really important) and give it the following Identifier: https://birthdates-api.herokuapp.com/ (you will use this value later).
Integrating Restify with Auth0
Now that you have registered the API in your Auth0 account, you will move back to your code to secure the Restify API with Auth0. There, the first thing you will have to do is to install a few dependencies:
# from the birthdates-api directory
npm i express-unless jsonwebtoken jwks-rsa
Next, inside the app/lib directory, you will have to create a middleware to validate the access tokens issued by Auth0 and to set req.user with users' data. To do this, create a new file called restify-jwt.js in this directory and add the following code in it:
const jwt = require("jsonwebtoken");
const unless = require("express-unless");
const restify = require("restify");
const async = require("async");

const InvalidCredentialsError = require("restify-errors").InvalidCredentialsError;
const UnauthorizedError = require("restify-errors").UnauthorizedError;

const DEFAULT_REVOKED_FUNCTION = function (_, __, cb) {
  return cb(null, false);
};

const getClass = {}.toString;

function isFunction(object) {
  return object && getClass.call(object) === "[object Function]";
}

function wrapStaticSecretInCallback(secret) {
  return function (_, __, cb) {
    return cb(null, secret);
  };
}

module.exports = function (options) {
  if (!options || !options.secret) throw new Error("secret should be set");

  let secretCallback = options.secret;

  if (!isFunction(secretCallback)) {
    secretCallback = wrapStaticSecretInCallback(secretCallback);
  }

  const isRevokedCallback = options.isRevoked || DEFAULT_REVOKED_FUNCTION;

  const _requestProperty =
    options.userProperty || options.requestProperty || "user";
  const credentialsRequired =
    typeof options.credentialsRequired === "undefined"
      ? true
      : options.credentialsRequired;

  const middleware = function (req, res, next) {
    let token;

    if (
      req.method === "OPTIONS" &&
      req.headers.hasOwnProperty("access-control-request-headers")
    ) {
      const hasAuthInAccessControl = !!~req.headers[
        "access-control-request-headers"
        ]
        .split(",")
        .map(function (header) {
          return header.trim();
        })
        .indexOf("authorization");

      if (hasAuthInAccessControl) {
        return next();
      }
    }

    if (options.getToken && typeof options.getToken === "function") {
      try {
        token = options.getToken(req);
      } catch (e) {
        return next(e);
      }
    } else if (req.headers && req.headers.authorization) {
      const parts = req.headers.authorization.split(" ");
      if (parts.length === 2) {
        const scheme = parts[0];
        const credentials = parts[1];

        if (/^Bearer$/i.test(scheme)) {
          token = credentials;
        } else {
          return res.send(
            new InvalidCredentialsError(
              "Format is Authorization: Bearer [token]"
            )
          );
        }
      } else {
        return res.send(
          new InvalidCredentialsError(
            "Format is Authorization: Bearer [token]"
          )
        );
      }
    }

    if (!token) {
      if (credentialsRequired) {
        return res.send(
          new InvalidCredentialsError(
            "No authorization token was found"
          )
        );
      } else {
        return next();
      }
    }

    const idToken = jwt.decode(token, {complete: true});
    if (idToken === null)
      return res.send(
        new InvalidCredentialsError("Invalid token provided")
      );

    async.parallel(
      [
        function (callback) {
          const arity = secretCallback.length;
          if (arity === 4) {
            secretCallback(
              req,
              idToken.header,
              idToken.payload,
              callback
            );
          } else {
            // arity == 3
            secretCallback(req, idToken.payload, callback);
          }
        },
        function (callback) {
          isRevokedCallback(req, idToken.payload, callback);
        }
      ],
      function (err, results) {
        if (err) {
          return res.send(err);
        }
        const revoked = results[1];
        if (revoked) {
          return res.send(
            new UnauthorizedError("The token has been revoked.")
          );
        }

        const secret = results[0];

        jwt.verify(token, secret, options, function (err, decoded) {
          if (err && credentialsRequired)
            return res.send(
              new InvalidCredentialsError(err.message)
            );

          req[_requestProperty] = decoded;
          next();
        });
      }
    );
  };

  middleware.unless = unless;

  return middleware;
};
Note: The code in this file is quite long and complex, and you don't really need to how the whole thing works. It suffices to say that this is the Restify version of the
express-jwtlibrary provided by Auth0.
After that, still inside the app/lib, create a file called auth0.js with the following code:
const jwt = require('../lib/restify-jwt');
const jwksRsa = require('jwks-rsa');

const tokenGuard = jwt({
  // Fetch the signing key based on the KID in the header and
  // the singing keys provided by the JWKS endpoint.
  secret: jwksRsa.expressJwtSecret({
    cache: true,
    rateLimit: true,
    jwksUri: `https://${process.env.AUTH0_DOMAIN}/.well-known/jwks.json`
  }),

  // Validate the audience and the issuer.
  audience: process.env.AUTH0_AUDIENCE,
  issuer: `https://${process.env.AUTH0_DOMAIN}/`,
  algorithms: ['RS256']
});

module.exports = function () {
  return function mid(req, res, next) {
    tokenGuard(req, res, (err) => {
      err ? res.status(500).send(err) : next();
    });
  }
};
The goal of this script is to export a Restify middleware that guarantees that requests have an access token issued by a trust-worthy party (in this case Auth0). Note that this script expects to find two environment variables:
AUTH0_AUDIENCE: The identifier of our API (https://birthdates-api.herokuapp.com).AUTH0_DOMAIN: Your domain at Auth0 (e.g.,biodunch.auth0.com).
You will set these variables soon, but it is important to understand that the domain variable defines how the middleware finds the signing keys.
After creating this middleware, you will have to open the app/routes/routes.js file and update it as follows:
'use strict';
const auth0 = require('../middlewares/auth0');

module.exports.register = (server, serviceLocator) => {

  // ... /users endpoint definition ...

  // ... /users/:username endpoint defition ...

  server.get(
    {
      path: '/birthdates/:username',
      name: 'Get Birthdates',
      version: '1.0.0',
      validation: {
        params: require('../validations/get_birthdates-user.js')
      }
    },
    auth0(),
    (req, res, next) =>
      serviceLocator.get('birthdateController').listAll(req, res, next)
  );

  server.post(
    {
      path: '/birthdates/:username',
      name: 'Create Birthdate',
      version: '1.0.0',
      validation: {
        body: require('../validations/create_birthdates')
      }
    },
    auth0(),
    (req, res, next) =>
      serviceLocator.get('birthdateController').create(req, res, next)
  );
};
In this case, you have replaced the previous definition of the last two endpoints to use the new middleware.
Running the application now is slightly different, as you need to set the environment variables:
export AUTH0_DOMAIN=<YOUR_AUTHO_DOMAIN>
export AUTH0_AUDIENCE="https://birthdates-api.herokuapp.com/"
node server.js
Note: You will have to replace
<YOUR_AUTHO_DOMAIN>in the code snippet above with your own Auth0 domain (e.g.,biodunch.auth0.com). You will also have to replace the value of theAUTH0_AUDIENCEenvironment variable if you set your Auth0 API with a different value other thanhttps://birthdates-api.herokuapp.com/.
Keep this API running before moving on.
Testing the Integration
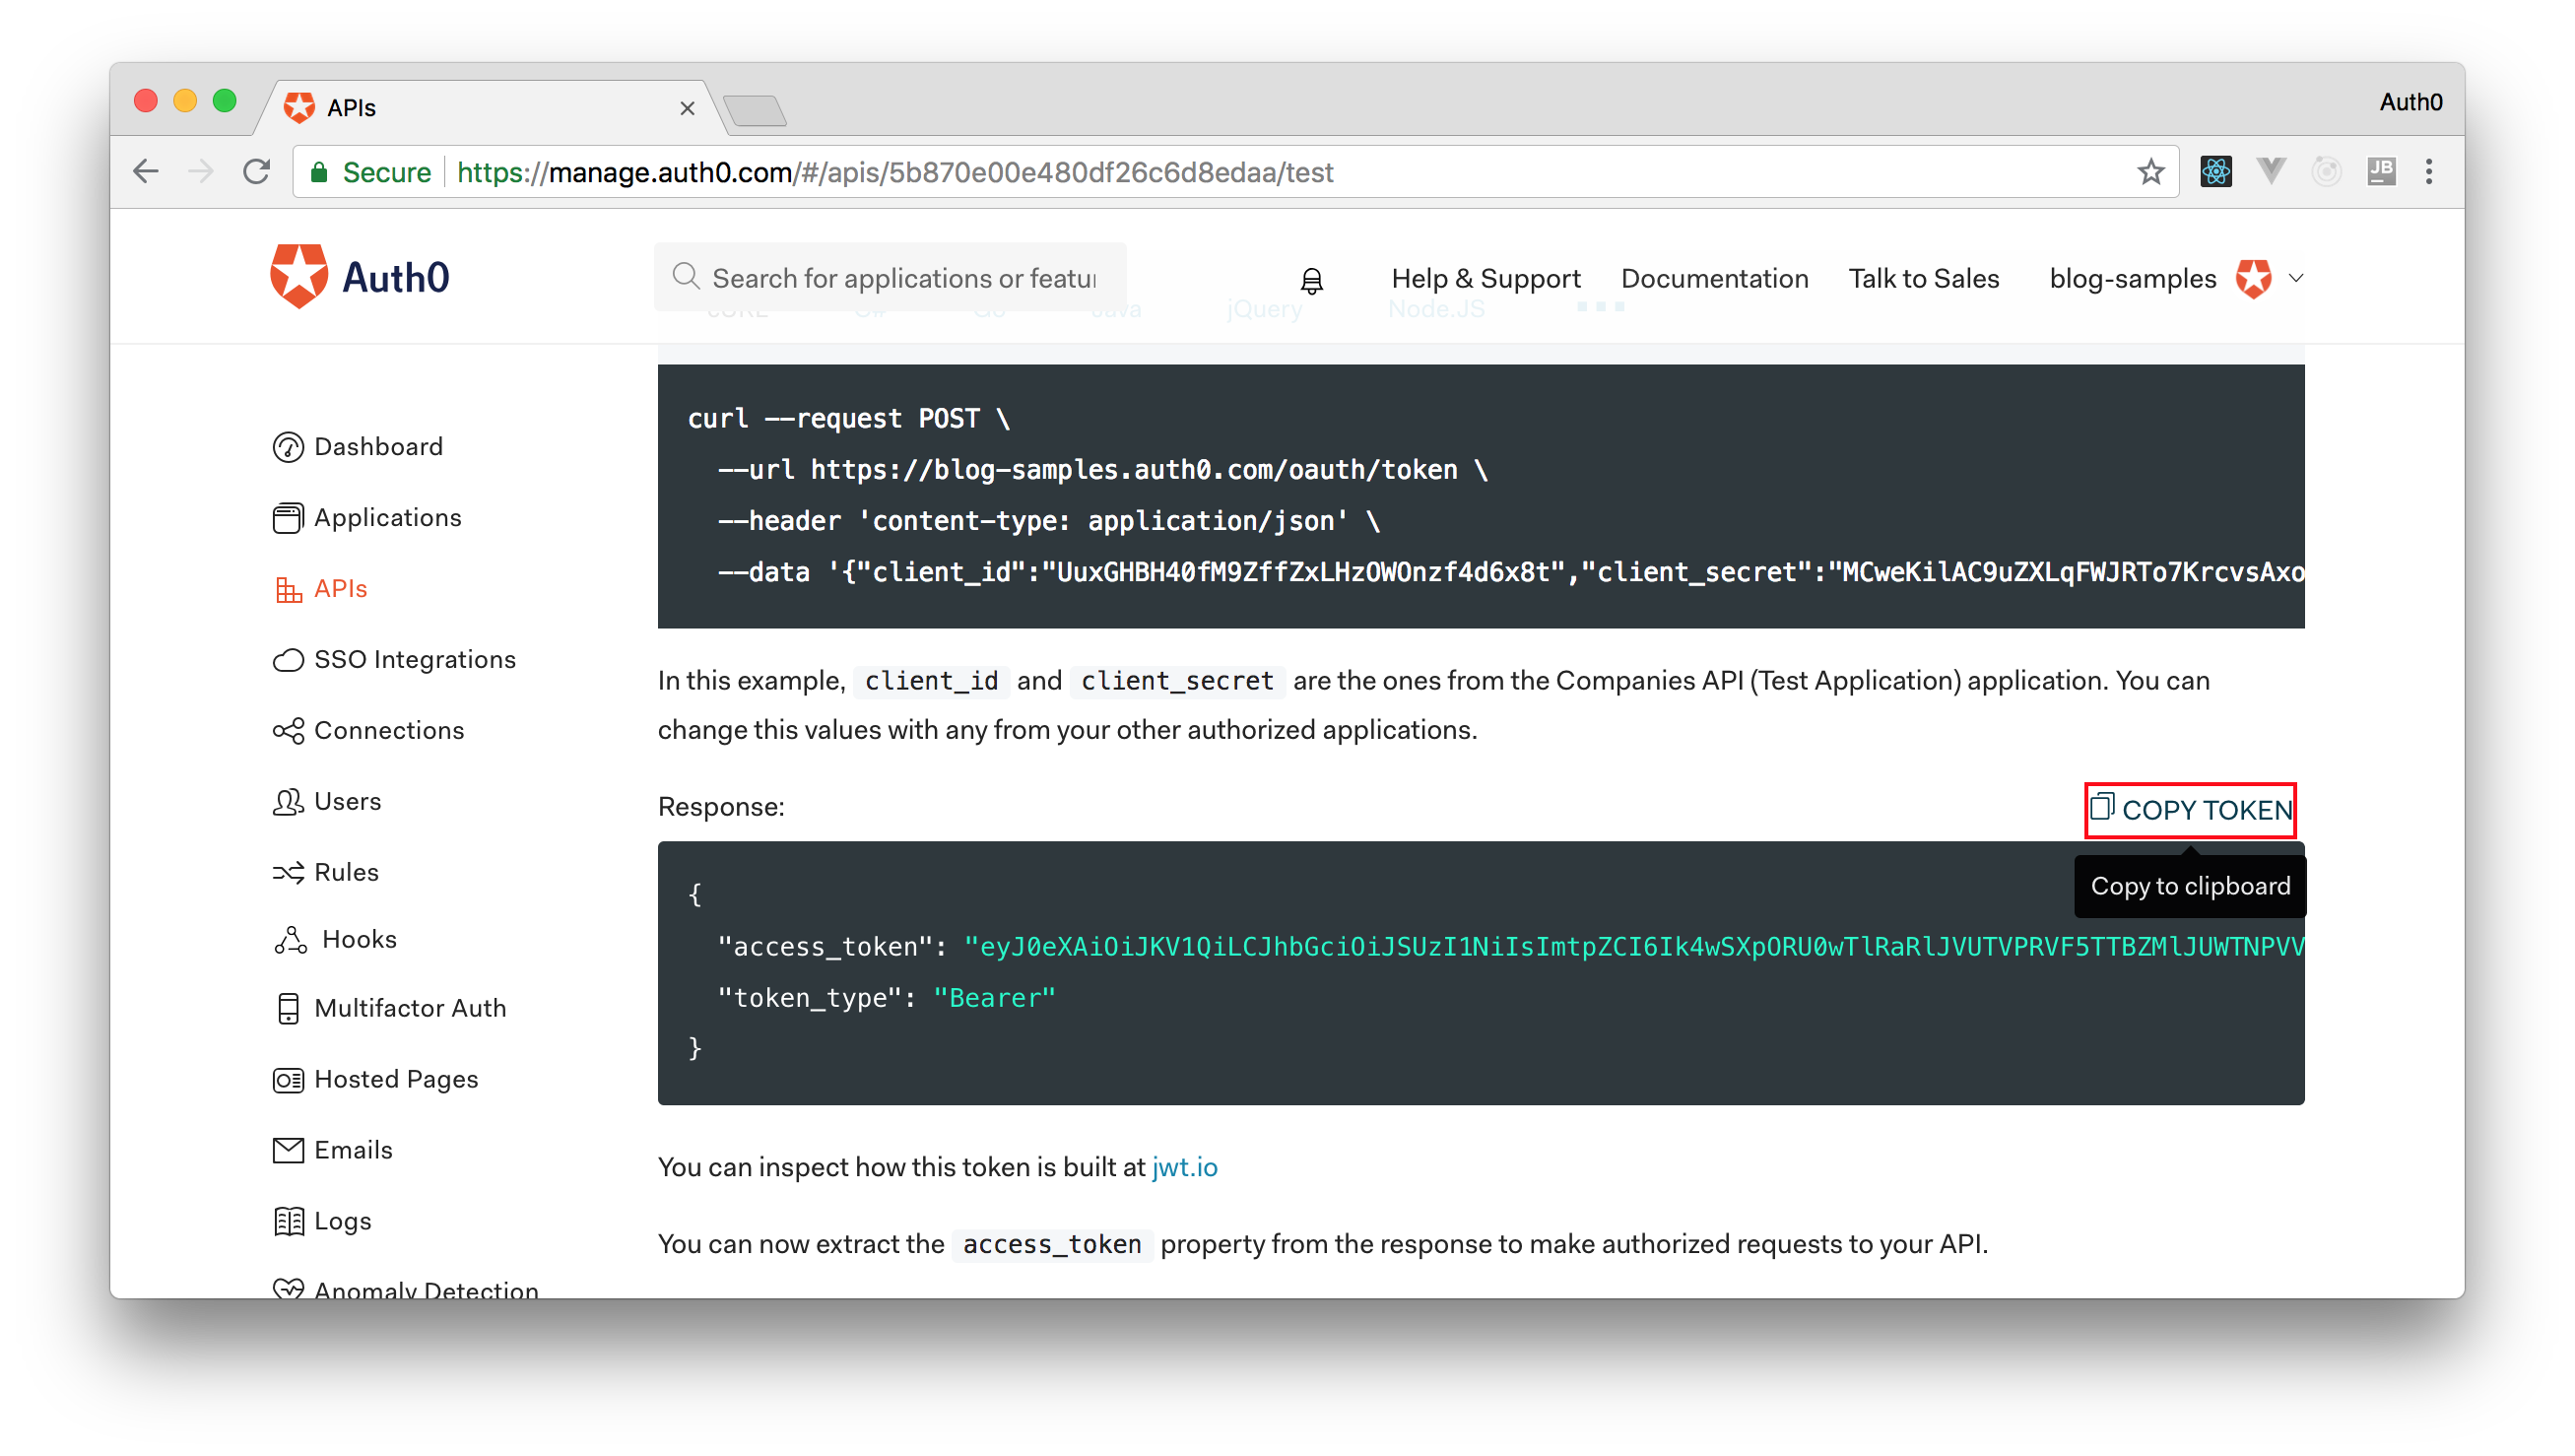
After creating your Auth0 API and refactoring your application to integrate it with Auth0, it is time to test if everything is working properly. For that, go to the APIs section of your Auth0 dashboard and choose the API you created a few moments ago. Then, move to the Test section of this API.
In this section, you will find instructions on how to fetch test tokens. You don't really need to follow the instructions there right now. For the moment, you can just click on the Copy Token button to put it in your clipboard.
Then, you can open a terminal and issue the following commands:
# create a variable with the token
$ACCESS_TOKEN=<PASTE_THE_TOKEN_COPIED>

# use the token on a POST request
curl -H "Content-Type: application/json" -H 'Authorization: Bearer '$ACCESS_TOKEN -X POST -d '{
  "fullname": "Bruno Krebs",
  "birthdate":"10/20/1984"
}' localhost:5000/v1/users

# confirm that the POST request worked
curl localhost:5000/v1/birthdates/biodunch
Note: You will have to replace
<PASTE_THE_TOKEN_COPIED>with the token you copied from your Auth0 API.
If everything works, the last command (which does not require an access token) will show all birthdays created in the other sections, plus the one you created with the ACCESS_TOKEN copied from the Auth0 dashboard.
Conclusion
In this article, you learned how to use great tools like Node.js, Mongoose, Restify, Joi, and Mongo to build well-organized RESTful APIs. You also learned that without too much effort you can integrate a simple module to handle the injection of dependencies on modules. Although lengthy, the content of this article is not hard to grasp and paves the way for more complex applications.
In a next opportunity, you will see how to integrate the project created here in a CI/CD (Continuous Integration and Continuous Delivery) workflow to automate the release process. Stay tuned!
About the author

Biodun Chris
Software Engineer, Murcul