
CLI tools are deeply embedded in modern developer workflows. But while browser-based authentication is naturally integrated into web applications, and desktop and mobile applications work well with it, CLI applications present a unique challenge: there is no available browser or redirect URL to complete a standard OAuth login flow.
This is exactly the problem the OAuth 2.0 Device Authorization Flow was designed to solve. Rather than redirecting users within the application, the CLI requests a temporary device code, displays a short verification URL and user code, and waits while the user authenticates in their browser. Once complete, the CLI receives tokens it can use for authenticated operations. You have likely encountered this flow before without realizing it. Smart TVs, IoT devices, and headless servers all rely on it when launching or redirecting to a browser is inconvenient or impossible.
In this tutorial, you will build a complete end-to-end system in Rust and Axum using Auth0. First, you will create a Rust CLI that authenticates users using the Auth0’s Device Authorization Flow and retrieves both an ID token and an access token. Then, you will build an Axum API to validate that access token before allowing access to a protected route. Together, these two pieces demonstrate the full authentication and authorization lifecycle: one application obtains trust, and another verifies it.
Prerequisites
To follow along with this tutorial, you will need:
- An Auth0 account. You can sign up for free here.
- The Rust toolchain installed on your system.
Configure Auth0
Start by creating a new Native Application in the Auth0 dashboard.
Open the Auth0 Dashboard, navigate to Applications > Applications, and click Create Application. Select Native and give the application a name like Rust CLI Demo, as you can see in the following screenshot.
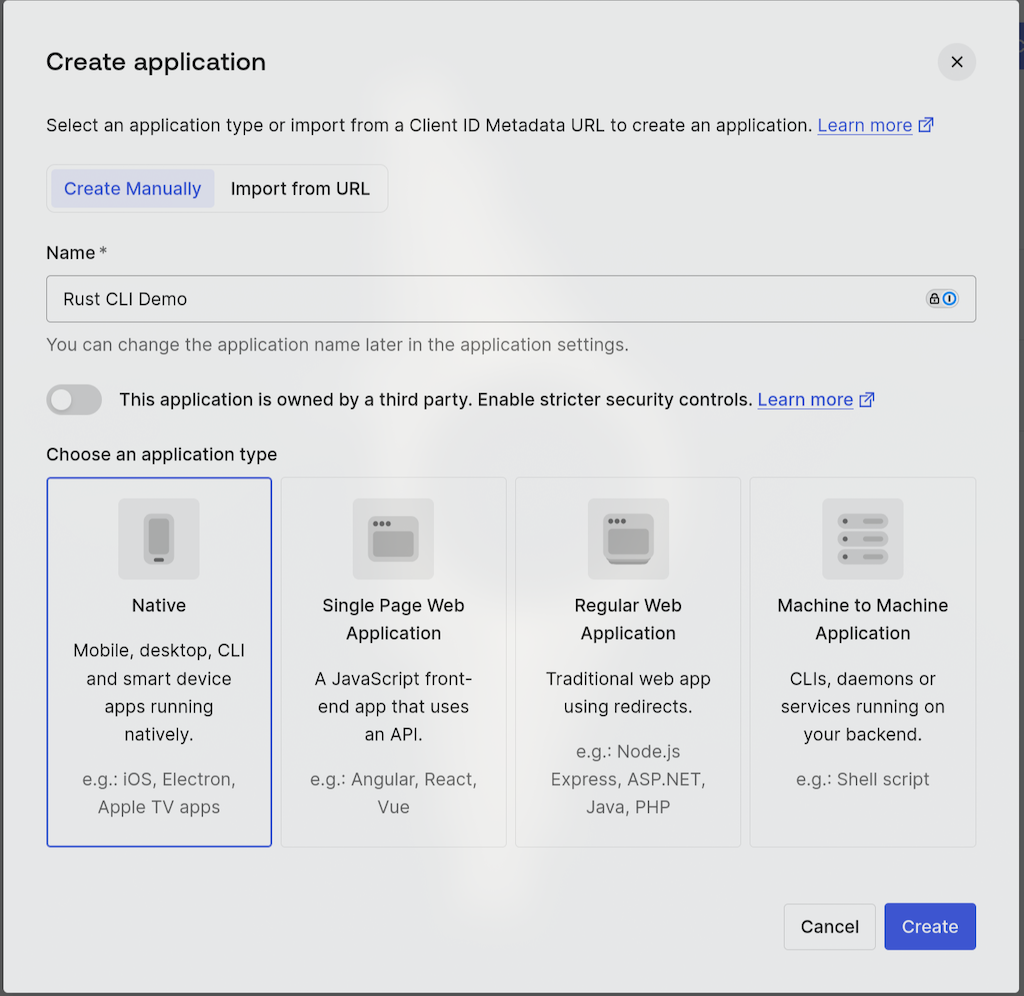
Native applications are designed specifically for desktop applications and CLI tools that cannot securely store a client secret.
Once the application is created, open the Settings tab, scroll to Advanced Settings > Grant Types, and enable Device Code as illustrated in the screenshot below.
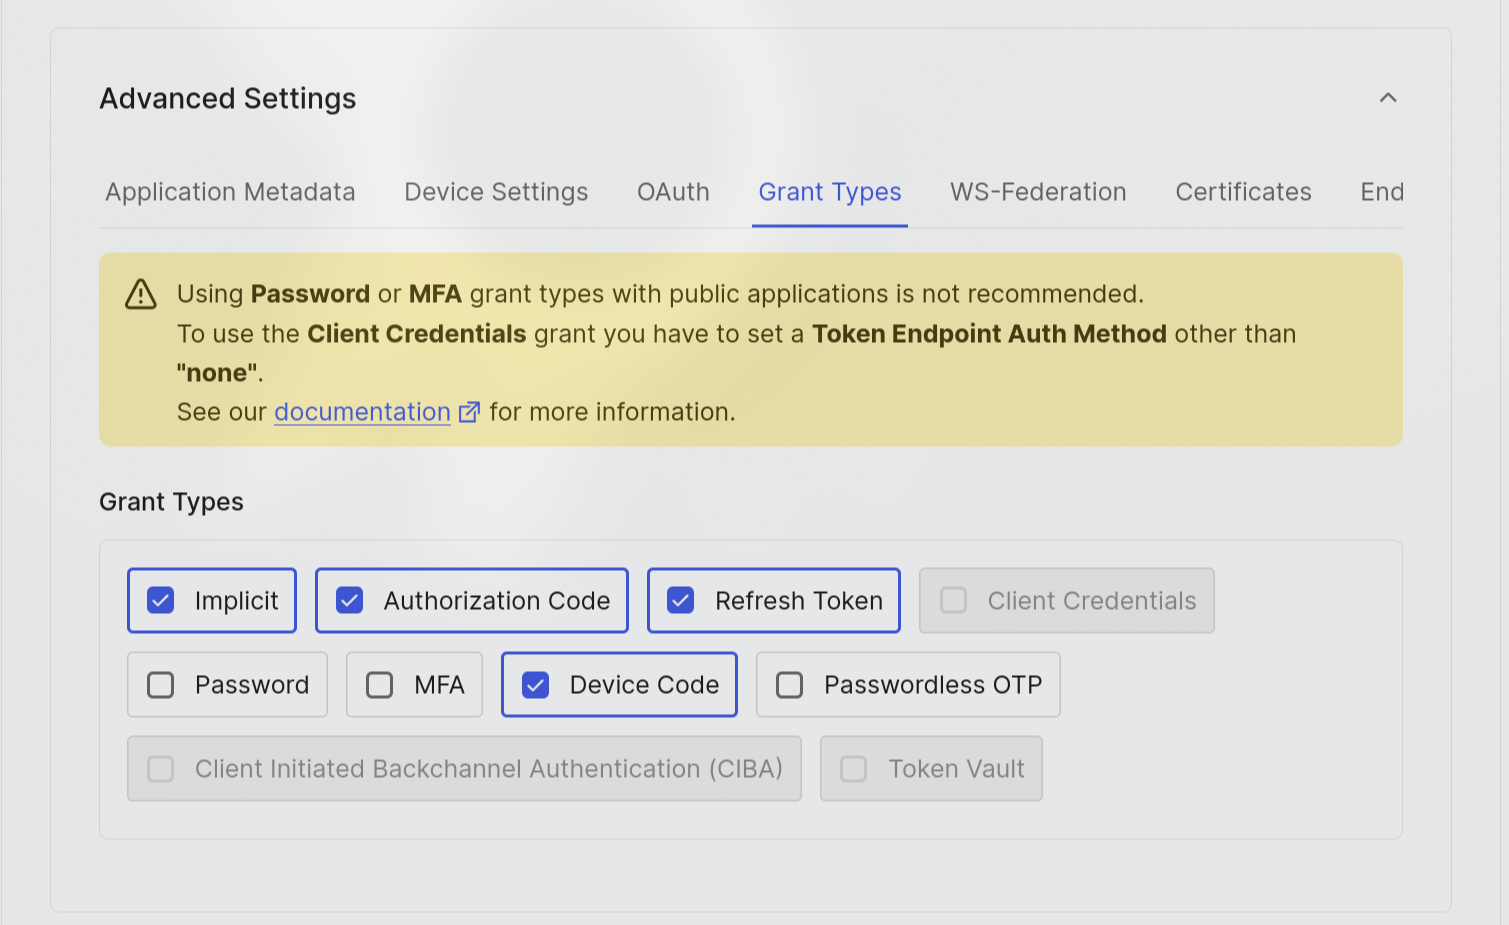
This step is critical because Auth0 disables the Device Authorization grant by default. If you skip it, the token polling request will fail with an unauthorized_client error that is difficult to diagnose if you do not already know the grant type is disabled.
Now, save your changes.
You will also need to copy the Domain and Client ID values from the Settings page. Store these somewhere safe, as you will need them later.
Next, you will create an API in Auth0. This represents the secure API that you will access. Navigate to Applications > APIs, click Create API, give it a name, and set an identifier such as [https://rust-api-demo.example.com](https://rust-api-demo.example.com), as shown in the following screenshot.
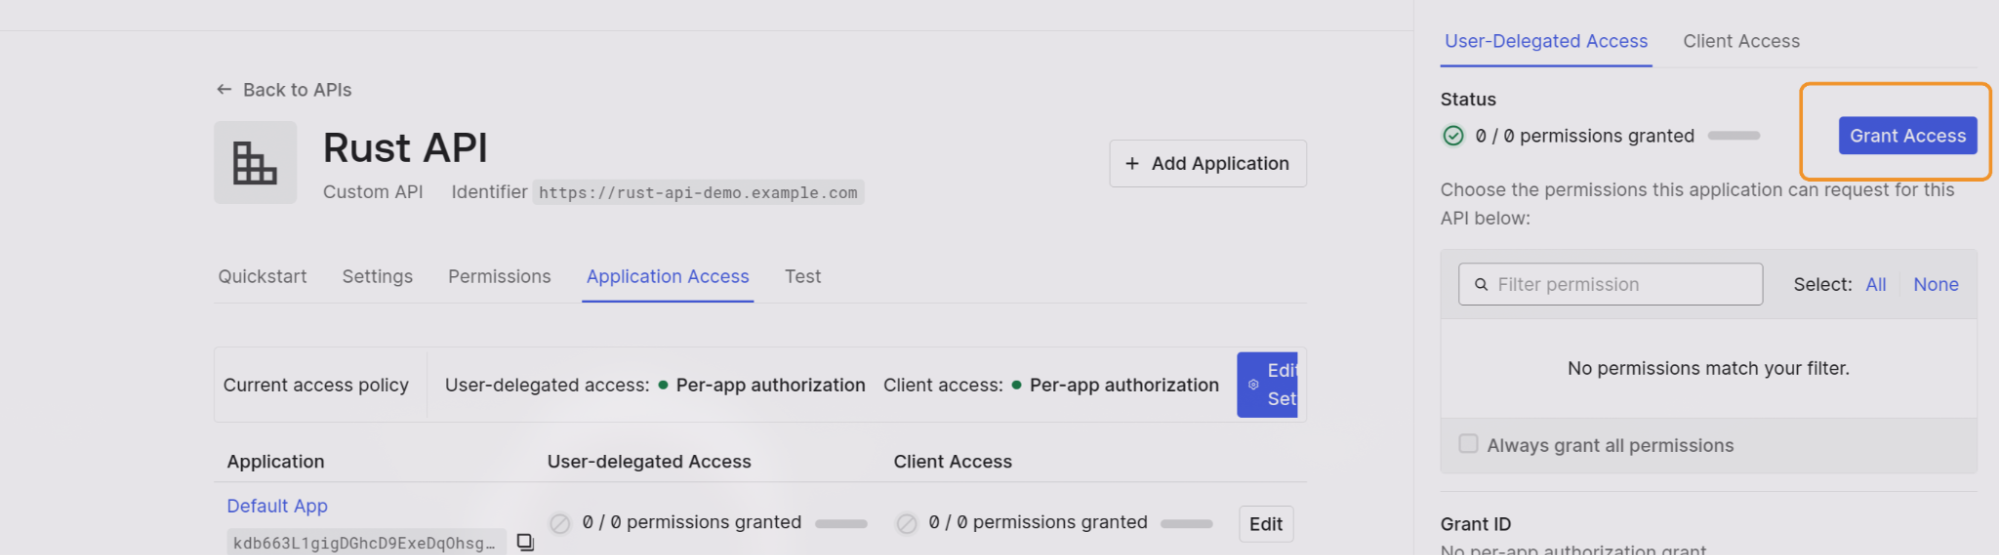
This API identifier becomes the audience for your access tokens.
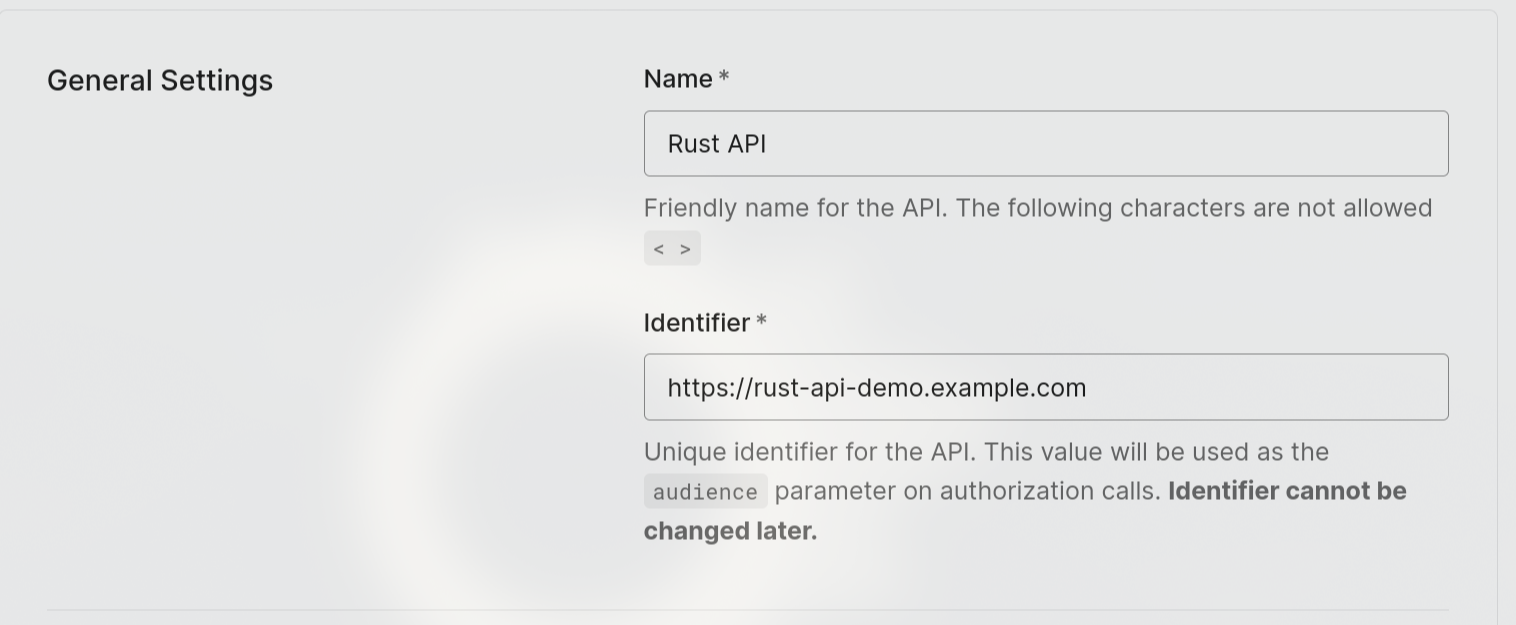
Now, you need to give your application access to the API. Go to Application Access and click Edit next to the name of your application. In the User-Delegated Access tab, click Grant Access. Your screen should look like the screenshot below.
Create a CLI in Rust
With Auth0 configured, you can now start writing the Rust code. The first thing you need to create is a Rust CLI that uses the Device Authorization Flow to authenticate with Auth0.
Create a new Rust workspace:
mkdir rust-auth0-demo
cd rust-auth0-demo

cargo new auth-lib --lib
cargo new auth0-cli
cargo new auth0-api
These commands create a rust-auth0-demo directory and three Rust projects within it.
Configure the workspace root Cargo.toml:
[workspace]
resolver = "2"

members = [
    "auth-lib",
    "auth0-cli",
    "auth0-api"
]
Build the Shared Authentication Library
The token verification logic lives in the shared auth-lib library crate used by both the CLI and API.
Inside auth-lib/Cargo.toml, add the following dependencies:
[dependencies]
anyhow = "1.0.102"
jsonwebtoken = { version = "10.4.0", features = ["rust_crypto"] }
reqwest = { version = "0.13.4", features = ["form", "json"] }
serde = { version = "1.0.228", features = ["derive"] }
serde_json = "1.0.150"
These dependencies each serve particular functions:
anyhow: Simplifies error handling and propagation across the application.jsonwebtoken: Validates and decodes JWTs using Rust-based cryptographic verification.reqwest: Sends HTTP requests to Auth0 APIs with form and JSON support.serde: Serializes and deserializes Rust structs to and from JSON.serde_json: Provides JSON parsing, generation, and thejson!macro for structured responses.
Create the following structure in the auth-lib directory:
auth-lib/
├── src/
│   ├── lib.rs
│   ├── auth.rs
│   └── models.rs
Define typed models
Inside auth-lib/src/models.rs, define the data models, which eliminate entire categories of bugs:
use serde::{Deserialize, Serialize};

#[derive(Debug, Deserialize)]
pub struct DeviceCodeResponse {
    pub device_code: String,
    pub user_code: String,
    pub verification_uri: String,
    pub verification_uri_complete: String,
    pub expires_in: u64,
    pub interval: u64,
}

#[derive(Debug, Deserialize)]
pub struct TokenResponse {
    pub access_token: String,
    pub id_token: String,
    pub expires_in: u64,
    pub token_type: String,
}

#[derive(Debug, Deserialize)]
pub struct TokenError {
    pub error: String,
    pub error_description: Option<String>,
}

#[derive(Debug, Serialize, Deserialize)]
#[serde(untagged)]
pub enum Audience {
    Single(String),
    Multiple(Vec<String>),
}

#[derive(Debug, Serialize, Deserialize)]
pub struct UserClaims {
    pub sub: String,
    pub name: Option<String>,
    pub email: Option<String>,
    pub iss: String,
    pub aud: Audience,
    pub exp: usize,
}

#[derive(Debug, Deserialize)]
pub struct Jwk {
    pub kid: String,
    pub n: String,
    pub e: String,
}

#[derive(Debug, Deserialize)]
pub struct Jwks {
    pub keys: Vec<Jwk>,
}
Without these typed structs, authentication code often becomes fragile JSON parsing logic with unchecked assumptions about response fields. Here, every expected field is explicit and validated during deserialization.
Implement JWT Validation
Inside auth-lib/src/auth.rs, add the logic that verifies the JWT:
use anyhow::Result;
use jsonwebtoken::{
    decode,
    decode_header,
    Algorithm,
    DecodingKey,
    Validation,
};
use reqwest::Client;

use crate::models::{Jwks, UserClaims};

const DOMAIN: &str = "YOUR_DOMAIN";

pub async fn validate_token(
    token: &str,
    audience: &str,
) -> Result<UserClaims> {

    // Decode JWT header
    let header = decode_header(token)?;

    let kid = header
        .kid
        .ok_or_else(|| anyhow::anyhow!("Missing kid"))?;

    // Fetch JWKS
    let client = Client::new();

    let jwks: Jwks = client
        .get(format!(
            "https://{}/.well-known/jwks.json",
            DOMAIN
        ))
        .send()
        .await?
        .json()
        .await?;

    // Find matching key
    let jwk = jwks
        .keys
        .into_iter()
        .find(|k| k.kid == kid)
        .ok_or_else(|| anyhow::anyhow!("No matching JWK"))?;

    // Build RSA decoding key
    let decoding_key = DecodingKey::from_rsa_components(
        &jwk.n,
        &jwk.e,
    )?;

    // Configure validation
    let mut validation =
        Validation::new(Algorithm::RS256);

    validation.set_audience(&[audience]);

    validation.set_issuer(&[
        &format!("https://{}/", DOMAIN)
    ]);

    // Decode and validate
    let token_data = decode::<UserClaims>(
        token,
        &decoding_key,
        &validation,
    )?;

    Ok(token_data.claims)
}
The validate_token function verifies that a JWT was genuinely issued by Auth0 and has not been tampered with. It fetches Auth0’s public signing keys (JWKS), selects the correct key using the token’s kid, validates the token signature and claims such as issuer and audience, and finally deserializes the payload into a strongly typed UserClaims struct.
Here, you can again see Rust’s strong typing in action. The deserialization into the UserClaims struct guarantees the presence of all the required fields. If any field is absent, you get a hard error instead of silently failing parsing.
Finally, export the modules in auth-lib/src/lib.rs:
pub mod auth;
pub mod models;
Build the CLI and Device Authorization Flow
To start building the CLI and device authorization flow, first, move into the CLI project:
cd auth0-cli
Add the following dependencies in Cargo.toml:
[dependencies]
anyhow = "1.0.102"
jsonwebtoken = { version = "10.4.0", features = ["rust_crypto"] }
reqwest = { version = "0.13.4", features = ["form", "json"] }
serde = { version = "1.0.228", features = ["derive"] }
serde_json = "1.0.150"
tokio = { version = "1.52.3", features = ["full"] }
auth-lib = { path = "../auth-lib" }
Request the device code
Before you can add a function to request the device code, which is the first step in the authorization flow, you need to add the following imports and variables inside auth0-cli/src/main.rs:
use anyhow::Result;

use auth_lib::{
    auth::validate_token,
    models::{
        DeviceCodeResponse,
        TokenError,
        TokenResponse,
    },
};

const DOMAIN: &str = "YOUR_DOMAIN";
const CLIENT_ID: &str = "YOUR_CLIENT_ID";
const AUDIENCE: &str = "YOUR_AUDIENCE";
Make sure you replace the placeholder values with the data from Auth0.
Add the request_device_code() function in main.rs to request the device code and start the Device Authorization Flow:
async fn request_device_code() -> Result<DeviceCodeResponse> {

    let client = reqwest::Client::new();

    let response = client
        .post(format!(
            "https://{}/oauth/device/code",
            DOMAIN
        ))
        .form(&[
            ("client_id", CLIENT_ID),
            ("scope", "openid profile email"),
            ("audience", AUDIENCE),
        ])
        .send()
        .await?;

    let device_code = response
        .json::<DeviceCodeResponse>()
        .await?;

    Ok(device_code)
}
This endpoint makes a request to /oauth/device/code in your Auth0 domain with the client ID, scope, and audience data. Auth0 returns a short-lived device code along with instructions for the user.
Poll for the token
Once the code is retrieved, the next step is to show the user the code and the login URL. Since a CLI has no redirect URL or callback mechanism, the only way to know when the authorization is finished is to poll for the status in regular intervals.
Add the following code in main.rs:
async fn poll_for_token(
    device_code: &str,
    interval: u64,
) -> Result<TokenResponse> {

    let client = reqwest::Client::new();
    let mut interval = interval;

    loop {

        let response = client
            .post(format!(
                "https://{}/oauth/token",
                DOMAIN
            ))
            .form(&[
                (
                    "grant_type",
                    "urn:ietf:params:oauth:grant-type:device_code"
                ),
                ("device_code", device_code),
                ("client_id", CLIENT_ID),
            ])
            .send()
            .await?;

        if response.status().is_success() {
            return Ok(
                response
                    .json::<TokenResponse>()
                    .await?
            );
        }

        let error = response
            .json::<TokenError>()
            .await?;

        match error.error.as_str() {

            "authorization_pending" => {
                println!("Waiting for authentication...");
            }

            "slow_down" => {
                println!("Slowing polling interval...");
                interval += 5;
            }

            "expired_token" => {
                anyhow::bail!("Device code expired");
            }

            "access_denied" => {
                anyhow::bail!("User denied access");
            }

            other => {
                anyhow::bail!(
                    "Unhandled error: {}",
                    other
                );
            }
        }

        tokio::time::sleep(
            tokio::time::Duration::from_secs(interval)
        )
        .await;
    }
}
The poll_for_token function repeatedly checks Auth0’s token endpoint to see whether the user has completed authentication in the browser. This function:
- Sends the device code obtained earlier
- Handles all possible OAuth device authorization flow responses such as
authorization_pending,slow_down, andaccess_denied - Waits between polling attempts using Tokio’s async sleep
- Returns the access and ID tokens once authentication succeeds.
Once again, the strong typing ensures that the JSON has all the required fields.
OAuth device authorization flow responses are inherently asynchronous, and Rust forces you to consciously handle every possible outcome using the match statement instead of silently ignoring error states.
Wire the two functions
Finally, wire these two functions together in the main function:
#[tokio::main]
async fn main() -> Result<()> {

    let device =
        request_device_code().await?;

    println!(
        "Visit:n{}",
        device.verification_uri_complete
    );

    println!(
        "Code: {}",
        device.user_code
    );

    let token = poll_for_token(
        &device.device_code,
        device.interval,
    )
    .await?;

    println!("Access Token: {}", token.access_token);

    Ok(())
}
The main function calls the request_device_code function, prints the verification URL and the device code, and calls the poll_for_token function. The access token returned from this function is printed.
You can run the CLI by executing cargo run. You should see an output like this:
Visit:
https://your-tenant.auth0.com/activate?user_code=ABCD-EFGH
Code: ABCD-EFGH
Waiting for authentication...
Waiting for authentication...
Waiting for authentication...
Once you visit the URL in your browser, you will be prompted to log in with Auth0. You can use an existing Auth0 account to log in or create a new account. Once you log in, Auth0 generates a token, which your code will automatically fetch. You will see the access token printed in the terminal:
Access Token: eyJhbGciOiJSUzI1NiIsIn....
Note that this example prints the access token for demo purposes only. In a real-world application, you should never log the access token.
Fetch the Authenticated User
The token returned from the poll_for_token function also includes an ID token, which contains information about the user's identity. The CLI can validate the ID token and extract information about the user, like name or email.
Add the following function in the same file:
fn say_hi(claims: &auth_lib::models::UserClaims) {

    let name = claims
        .name
        .as_deref()
        .unwrap_or("user");

    println!("Welcome, {}!", name);
}
This function extracts the name field from a UserClaims object and prints a greeting.
You can also fetch the user info from the /userinfo endpoint by passing the access token.
Change the main function to call the validate_token function and pass the returned claims to say_hi:
#[tokio::main]
async fn main() -> Result<()> {

    let device =
        request_device_code().await?;

    println!(
        "Visit:n{}",
        device.verification_uri_complete
    );

    println!(
        "Code: {}",
        device.user_code
    );

    let token = poll_for_token(
        &device.device_code,
        device.interval,
    )
    .await?;

    let claims = validate_token(
        &token.id_token,
        CLIENT_ID,
    )
    .await?;

    say_hi(&claims);

    println!(
        "Access token:n{}",
        token.access_token
    );

    Ok(())
}
Now, when you run it, you will see the user's name being printed:
Visit:
https://your-tenant.auth0.com/activate?user_code=ABCD-EFGH
Code: ABCD-EFGH
Waiting for authentication...
Waiting for authentication...

Welcome, Alice!

Access token: eyJhbGciOiJSUzI1NiIsInR5cCI6IkpXVCJ9...
At this stage, you have a fully authenticated CLI application using Auth0’s Device Authorization Flow.
Protect an Axum API Route with Auth0
Now that the CLI can retrieve an access token, the next step is building a protected API accessible through it.
Move into the API project:
cd ../auth0-api
Add dependencies to Cargo.toml:
[dependencies]
auth-lib = { path = "../auth-lib" }

axum = "0.8"
tokio = { version = "1", features = ["full"] }
serde_json = "1"
Axum is a modern asynchronous web framework for Rust built on top of Tokio and Hyper. With its simple and modular design, Axum makes it easy to route requests to handlers with a macro-free API and generate responses with minimal boilerplate. This tutorial uses Axum to create a protected API route that validates Auth0 access tokens before allowing access to authenticated users.
Create a JWT extractor
The first step in protecting your API route is creating a JWT extractor middleware that reads the Authorization header, extracts the Bearer token, validates the JWT, and rejects invalid tokens with 401 Unauthorized.
Inside auth0-api/src/main.rs, add the following code:
use axum::{
    extract::FromRequestParts,
    http::{request::Parts, StatusCode},
    routing::get,
    Json,
    Router,
};

use serde_json::json;

use auth_lib::{
    auth::validate_token,
    models::UserClaims,
};

const AUDIENCE: &str = "YOUR_AUDIENCE";

pub struct AuthUser(pub UserClaims);

impl<S> FromRequestParts<S> for AuthUser
where
    S: Send + Sync,
{
    type Rejection = (
        StatusCode,
        Json<serde_json::Value>,
    );

    async fn from_request_parts(
        parts: &mut Parts,
        _state: &S,
    ) -> Result<Self, Self::Rejection> {

        let auth_header = parts
            .headers
            .get("Authorization")
            .and_then(|v| v.to_str().ok())
            .ok_or((
                StatusCode::UNAUTHORIZED,
                Json(json!({
                    "error":
                    "Missing authorization header"
                })),
            ))?;

        let token = auth_header
            .strip_prefix("Bearer ")
            .ok_or((
                StatusCode::UNAUTHORIZED,
                Json(json!({
                    "error":
                    "Invalid bearer token"
                })),
            ))?;

        let claims = validate_token(
            token,
            AUDIENCE,
        )
        .await
        .map_err(|err| (
            StatusCode::UNAUTHORIZED,
            Json(json!({
                "error": "Invalid token",
                "details": err.to_string(),
            })),
        ))?;

        Ok(AuthUser(claims))
    }
}
This middleware centralizes authentication logic so that protected routes only execute if validation succeeds.
Create the protected route
The API validates the access token. If the token is valid, a message is shown:
async fn protected(
    AuthUser(claims): AuthUser,
) -> Json<serde_json::Value> {

    Json(json!({
        "message":
            "You are seeing a protected route",

        "subject": claims.sub,
    }))
}
Create the main function to set up the router:
#[tokio::main]
async fn main() {

    let app = Router::new()
        .route("/protected", get(protected));

    let listener = tokio::net::TcpListener
        ::bind("0.0.0.0:3000")
        .await
        .unwrap();

    println!("Server listening on port 3000");

    axum::serve(listener, app)
        .await
        .unwrap();
}
Call the API from the CLI
The final step of the whole flow is for the CLI to call the API and pass the access token in the Authorization header. Add the following function in auth0-cli/src/[main.rs](http://main.rs):
async fn call_api(access_token: &str) -> anyhow::Result<()> {
    let client = reqwest::Client::new();

    let response = client
        .get("http://localhost:3000/protected")
        .bearer_auth(access_token)
        .send()
        .await?;

    if response.status().is_success() {
        let body: serde_json::Value = response.json().await?;

        println!("API response:");
        println!(
            "{}",
            serde_json::to_string_pretty(&body)?
        );
    } else {
        println!(
            "API returned {}",
            response.status()
        );

        let body = response.text().await?;
        println!("{}", body);
    }

    Ok(())
}
This code calls the protected route you created in the previous step, passes the access token, and prints the response in the terminal.
Test the Full Flow
To test the flow, first, run the API server from the auth0-api directory:
cargo run
Authenticate using the CLI as before. The CLI will call the API, and you should see the success response:
{
  "message": "You are seeing a protected route",
  "subject": "google-oauth2|123456789"
}
You can find the full app on GitHub.
Rust, Auth0, and Axum Bring Type-Safe Authentication to Your CLI
In this tutorial, you built a complete authentication flow in Rust using Auth0 and Axum. The CLI used Auth0’s Device Authorization Flow to securely authenticate users in a browserless environment, while the Axum API validated the resulting access token before allowing access to protected endpoints. Rust’s type system plays an important role throughout the implementation, with typed API responses preventing malformed OAuth responses from slipping through silently.
From here, you could add refresh token support to keep the CLI authenticated across sessions, extend the Axum server with role-based authorization using Auth0 custom claims, or explore fine-grained authorization for relationship-based access control.
The same Auth0 platform that powers this example also scales to MFA, enterprise SSO, and multi-tenant B2B identity as your needs grow. Check out the Auth0 documentation and the Device Authorization Flow guide to keep building.
About the author

Aniket Bhattacharyea
Web Developer