
The redirect-based OAuth 2.0 flows assume one thing: the user has a browser on the same device where your app runs. Smart TVs, IoT sensors, and CLI tools break that assumption. If your application runs somewhere a browser isn't practical or doesn't exist, you need a different mechanism.
The Device Authorization Flow (standardized in RFC 8628) was designed for exactly this scenario. It lets a constrained device initiate authentication and then wait while the user completes it on a separate device with a browser.
By the end of this tutorial, you'll have a working .NET 10 console application that authenticates users through Auth0 without requiring a browser on the device itself.
How the Device Authorization Flow Works
The flow introduces two parallel channels. The device handles polling; the user handles authorization in a browser. These two channels synchronize through a short-lived code.
Here's how those two channels interact:
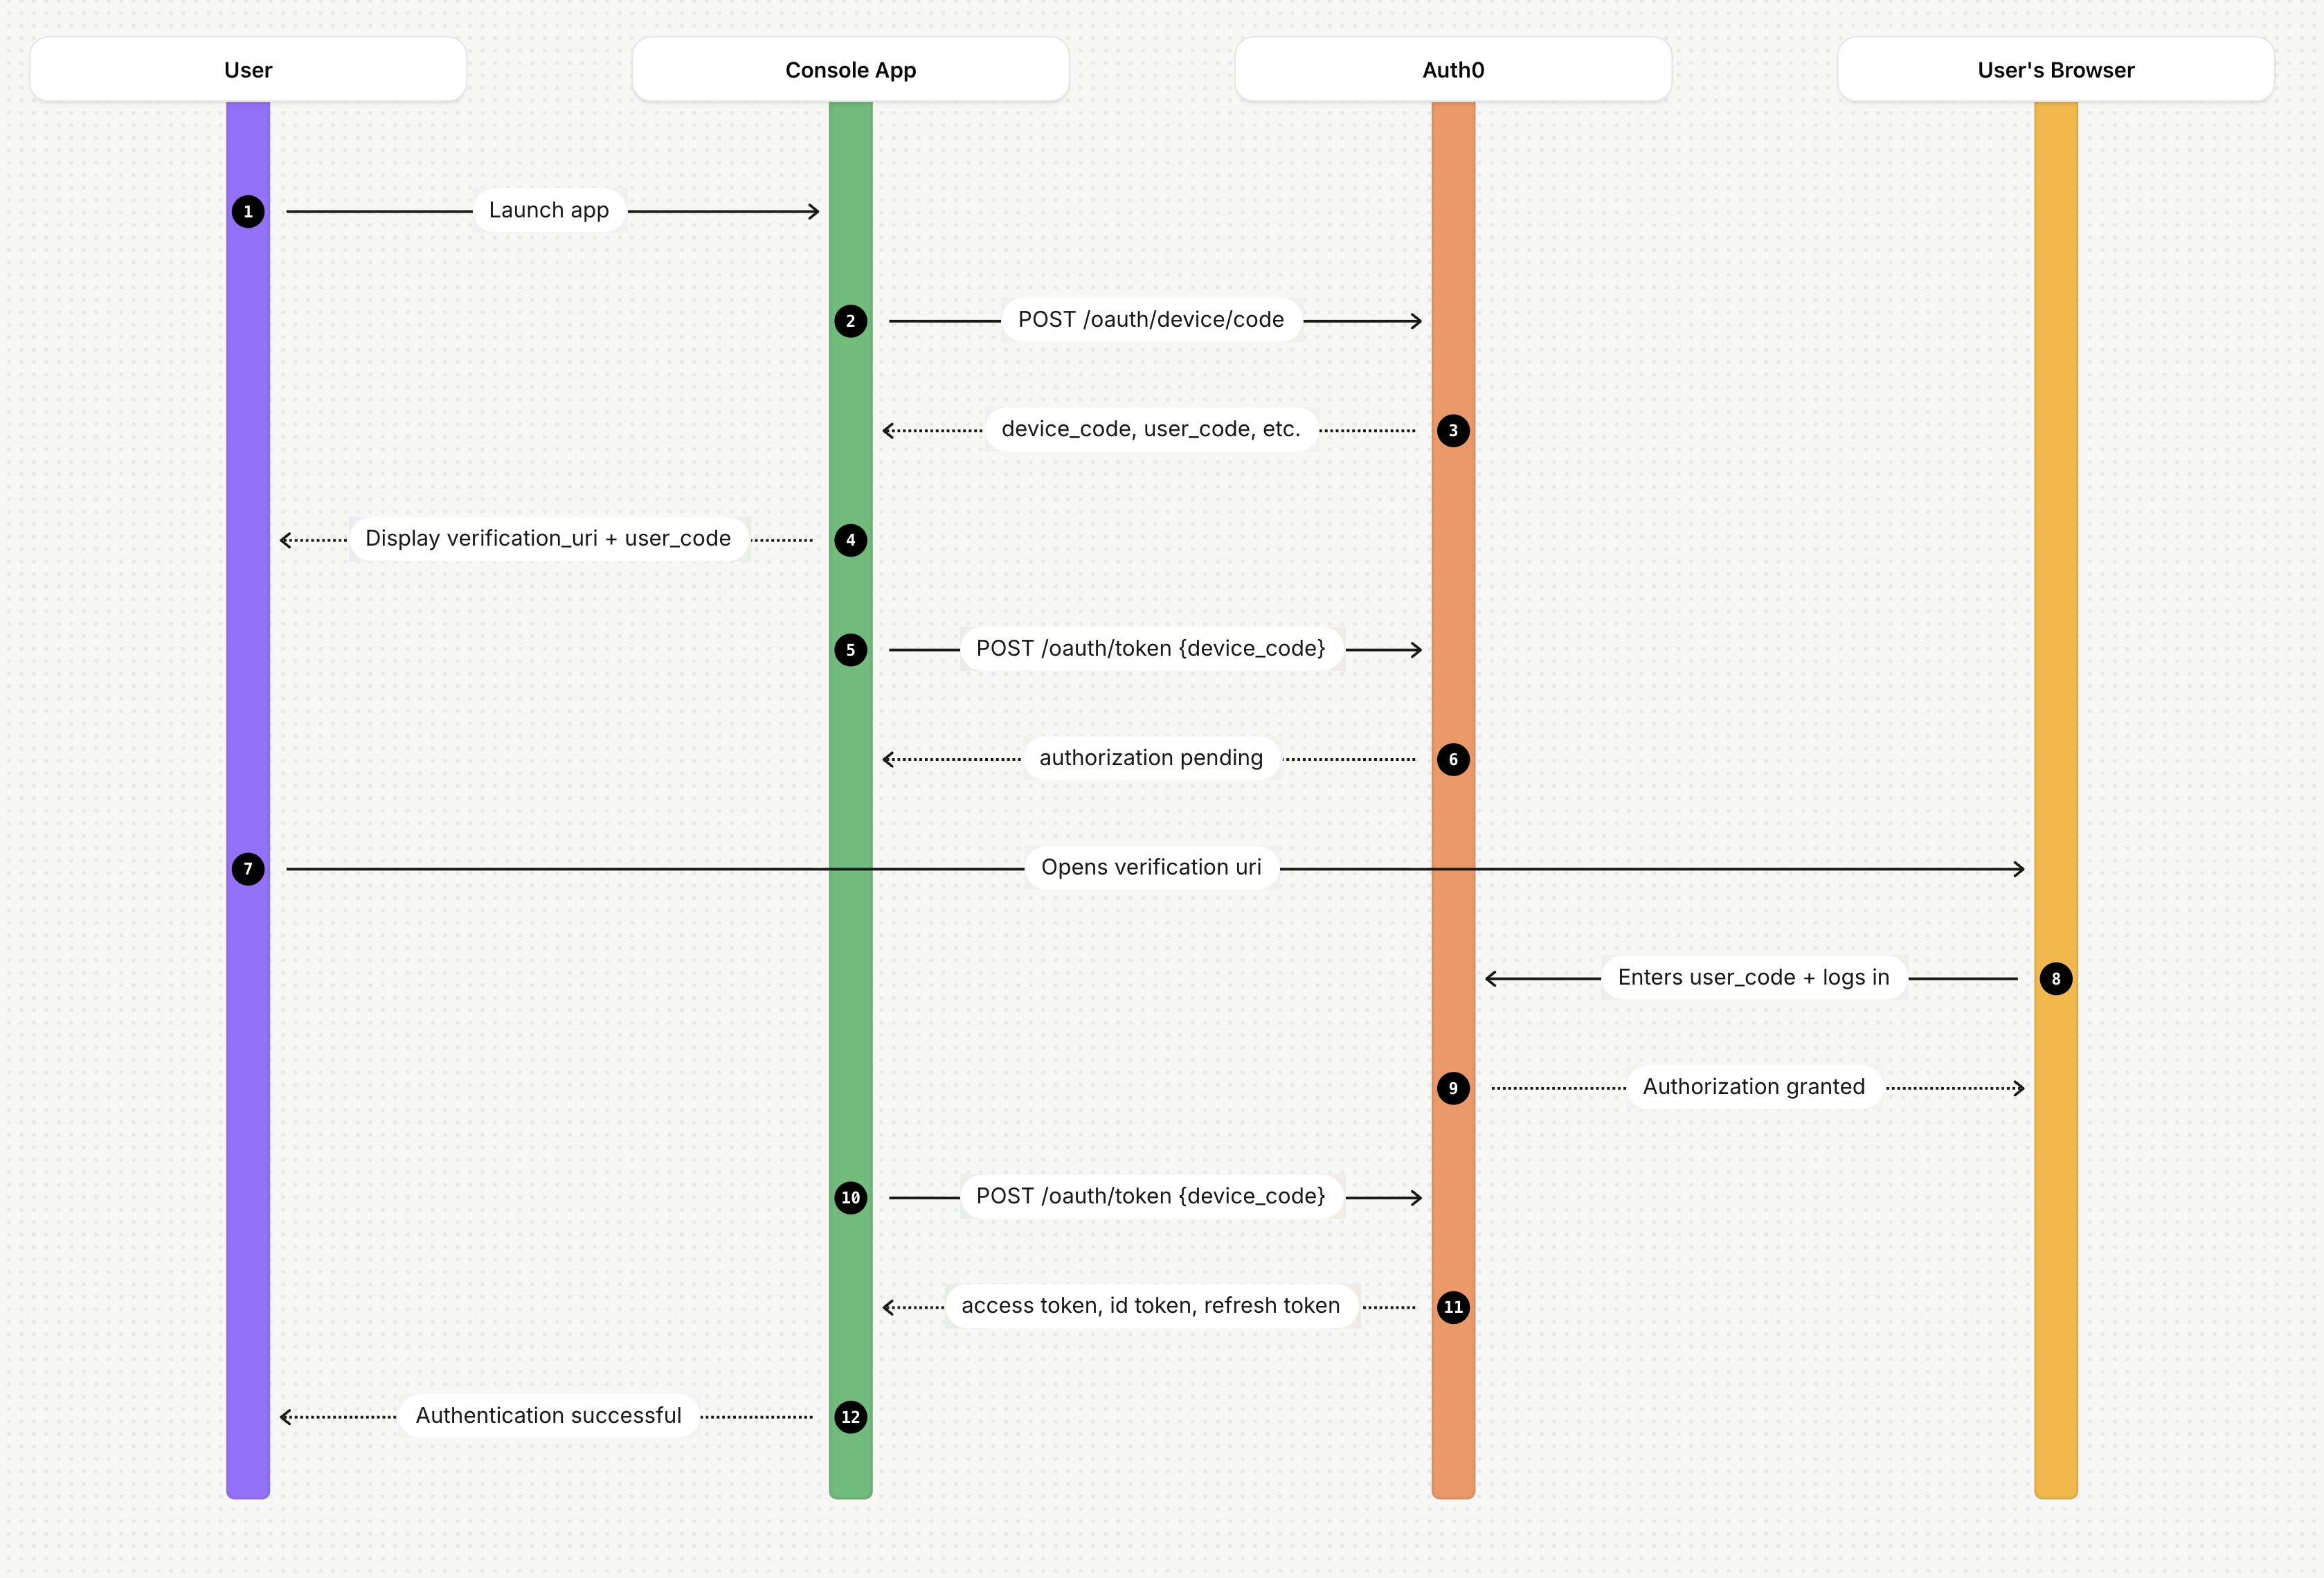
Let's walk through what each step does:
- The user launches your app.
- Device code request. Your app sends its
client_idto Auth0's/oauth/device/codeendpoint. - Auth0 responds with a
device_code(used internally for polling), a shortuser_code(shown to the user), averification_uri(where the user will navigate to authorize the device), and a pollingintervalin seconds. - User activation. Your app displays the
verification_urianduser_code. - Polling. While waiting for user authentication, your app polls
/oauth/tokenwith thedevice_code. - Until the user completes authorization, Auth0 returns
{"error": "authorization_pending"}. Theintervalfield in the initial response specifies the minimum seconds between polls. - The user opens a browser on any convenient device (a phone, laptop, anything with a browser) navigates to that URL.
- The user enters the code.
- The user is confirmed that the device has been authorized.
- Token delivery. Once the user authenticates and approves the device, the next successful poll returns an access token, an ID token, and optionally a refresh token.
Polling faster than the specified interval triggers a slow_down response. When that happens, increase your interval.
A key point to understand: Auth0 never issues tokens to the device until a real user explicitly approves the request in a browser. The user_code is the artifact that ties the device's session to the browser's session. If there is no code exchange, there’s no token.
The Sample Project
Now that you have a good understanding of the Device Authorization flow, let’s build a .NET 10 console application that:
- Requests device authorization from Auth0
- Displays the activation URL and user code to the operator
- Polls Auth0 until the user completes authorization
- Retrieves and displays the authenticated user's profile using the resulting access token
The complete sample uses the Auth0 .NET Authentication API SDK (Auth0.AuthenticationApi), which wraps the device authorization endpoints directly.
Register with Auth0
Before writing any code, you need an Auth0 application configured for the Device Authorization flow.
If you don’t have an Auth0 account, you can sign up for free! Then, follow these steps:
- Log in to your Auth0 Dashboard and go to Applications > Applications.
- Click Create Application, name it (e.g., "Device Flow Demo"), and select Native as the application type. Click Create.
- On the Settings tab, copy your Domain and Client ID: you'll need both shortly.
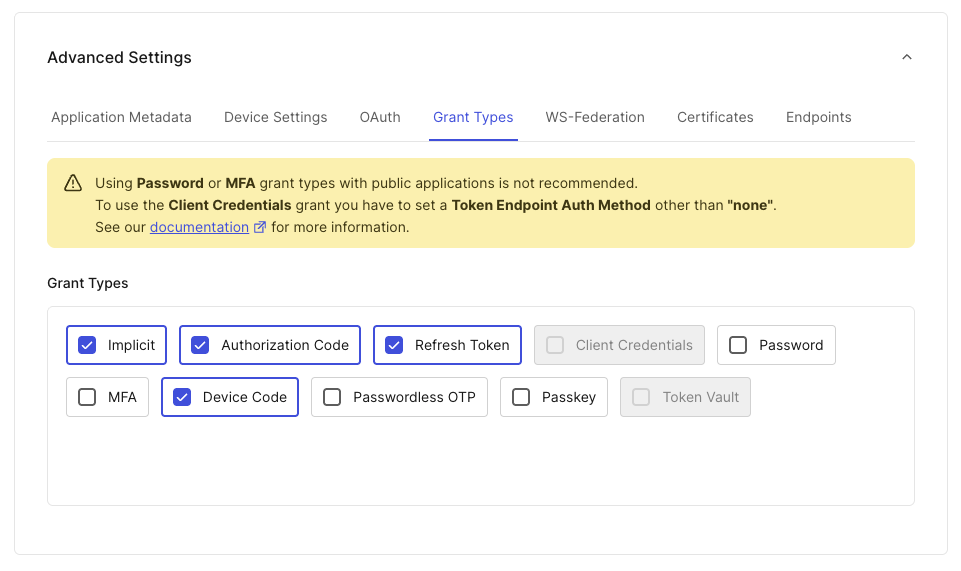
- Scroll down to Advanced Settings > Grant Types. Make sure Device Code is enabled (see the picture below). Save any changes.
That's all the configuration the Device Authorization flow requires. Unlike redirect-based flows, this one doesn't need callback URLs or allowed origins, because no browser redirect happens on the device.
Add the Device Authorization Flow to Your App
Now you are ready to implement the Device Authorization flow in your console application. Create a new console project and add the Auth0 .NET Authentication SDK by running the following commands in a terminal window:
dotnet new console -n DeviceFlowApp
cd DeviceFlowApp
dotnet add package Auth0.AuthenticationApi
Open Program.cs and replace its contents with the following code:
// Program.cs

using Auth0.AuthenticationApi;
using Auth0.AuthenticationApi.Models;
using Auth0.Core.Exceptions;

var domain = "YOUR_AUTH0_DOMAIN";
var clientId = "YOUR_CLIENT_ID";

using var client = new AuthenticationApiClient(domain);

var deviceCodeResponse = await client.StartDeviceFlowAsync(new DeviceCodeRequest
{
   ClientId = clientId,
   Scope = "openid profile email"
});

Console.WriteLine("Activate this device:");
Console.WriteLine($"  Visit:      {deviceCodeResponse.VerificationUri}");
Console.WriteLine($"  Enter code: {deviceCodeResponse.UserCode}");
Console.WriteLine();
Console.WriteLine($"  Or open: {deviceCodeResponse.VerificationUriComplete}");
This first block requests the device code and displays the activation instructions.
Replace YOUR_AUTH0_DOMAIN and YOUR_CLIENT_ID placeholders with the values you got in the Auth0 dashboard.
The StartDeviceFlowAsync() method calls the /oauth/device/code endpoint and returns a DeviceCodeResponse containing the activation details. The Scope = "openid profile email" requests the standard OpenID Connect claims needed to read user profile information. Adjust this based on what your app needs.
After receiving the response from Auth0, the application shows the verification URI and the code that the user must provide to authorize your application running on this device. The VerificationUriComplete embeds the user code in the URL directly, which makes it suitable for QR code generation on devices with a display.
Get an Access Token
With the device code in hand, the next step is to poll Auth0 until the user authorizes the device. Start with the basic polling structure:
// Program.cs

//...existing code...

var pollingInterval = TimeSpan.FromSeconds(deviceCodeResponse.Interval);
AccessTokenResponse? tokenResponse = null;

Console.Write("\nWaiting for authorization");

while (tokenResponse == null)
{
   await Task.Delay(pollingInterval);

   tokenResponse = await client.GetTokenAsync(new DeviceCodeTokenRequest
   {
       ClientId = clientId,
       DeviceCode = deviceCodeResponse.DeviceCode
   });
}
This works for the happy path, but GetTokenAsync() will throw an exception when Auth0 returns authorization_pending or slow_down. Replace the while block with this version:
// Program.cs

//...existing code...

while (tokenResponse == null)
{
   await Task.Delay(pollingInterval);

   // 👇changed code
   try
   {
       tokenResponse = await client.GetTokenAsync(new DeviceCodeTokenRequest
       {
           ClientId = clientId,
           DeviceCode = deviceCodeResponse.DeviceCode
       });
   }
   catch (ErrorApiException ex) when (ex.ApiError?.Error == "authorization_pending")
   {
       Console.Write(".");
   }
   catch (ErrorApiException ex) when (ex.ApiError?.Error == "slow_down")
   {
       pollingInterval += TimeSpan.FromSeconds(5);
       Console.Write(".");
   }
}
Here are the main points of this code:
authorization_pendingis the expected response while the user hasn't acted yet. It's not a terminal error; it means keep waiting.slow_downmeans you exceeded the polling rate. The OAuth spec requires adding at least 5 seconds to the interval when this occurs.deviceCodeResponse.Intervalgives the minimum polling interval Auth0 requires, typically 5 seconds. Starting from this value keeps you within rate limits from the first poll.
Once you receive the access token, use it to get the user profile information. Add the following code after the loop:
// Program.cs

//...existing code...

Console.WriteLine("\n\nDevice authorized!");

var userInfo = await client.GetUserInfoAsync(tokenResponse.AccessToken);
Console.WriteLine($"Signed in as: {userInfo.FullName} ({userInfo.Email})");
Console.WriteLine($"Access token: {tokenResponse.AccessToken[..20]}...");
GetUserInfoAsync() calls Auth0's /userinfo endpoint using the access token and returns the profile claims you requested in Scope. This confirms the token works and identifies the authenticated user.
Test Your Application
Now, run your application with dotnet run. The initial expected output will be similar to the following:
Activate this device:
  Visit:      https://YOUR_AUTH0_DOMAIN/activate
  Enter code: HBTC-NDWC

  Or open: https://YOUR_AUTH0_DOMAIN/activate?user_code=HBTC-NDWC

Waiting for authorization...
Open a browser on another device, or click the link if you are on a machine with a browser. You will see the following screen: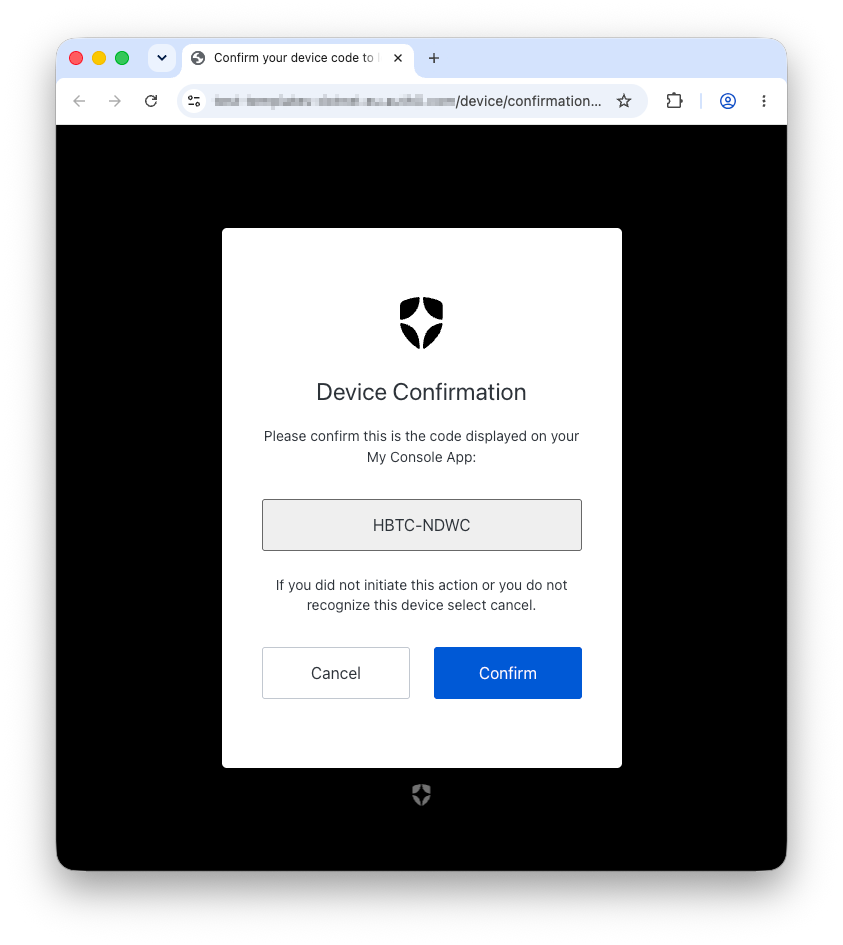
You will be asked to log in to confirm the code. After authentication, the polling loop picks up the tokens on its next iteration and exits. The following message will be added to your application’s output:
Device authorized!
Signed in as: Jane Smith (jane@example.com)
Access token: eyJhbGciOiJkaXIiLCJl...
Get an Access Token for Calling a Protected API
The access token obtained with the current code only allows you to query the Auth0 /userInfo endpoint to retrieve user profile information. In reality, this call is not strictly necessary: you'd typically read user profile claims directly from the ID token rather than making a round trip to /userInfo. The call above is useful for confirming the token is valid and seeing who authenticated. If you want to inspect the raw ID token, print tokenResponse.IdToken and decode it at jwt.io. You can do this as an exercise.
If your application needs to access a protected API, you will need an access token for that specific API. Getting an access token for this is pretty easy: once you have the API’s audience identifier, simply add the setting highlighted below to your authorization request:
// Program.cs

using System.Net.Http.Headers;  //👈 new using

//...existing code...

var deviceCodeResponse = await client.StartDeviceFlowAsync(new DeviceCodeRequest
{
   ClientId = clientId,
   Scope = "openid profile email",
   Audience = "YOUR_API_AUDIENCE"  //👈 new setting
});

//...existing code...
You should also add the scopes you need for accessing the API based on the business logic of your application.
That’s it! Now your application can call the protected API like in the following example:
// Program.cs

//...existing code...

using var httpClient = new HttpClient();
var request = new HttpRequestMessage(HttpMethod.Get, "https://your-api.com/endpoint");
request.Headers.Authorization = new AuthenticationHeaderValue("Bearer", tokenResponse.AccessToken);

var response = await httpClient.SendAsync(request);
Console.WriteLine($"\nAPI response status: {(int)response.StatusCode} {response.ReasonPhrase}");
A new Auth0-powered .NET app in less than a minute? Try out our templates
Install the NuGet package
Where To Go Next?
You now have a working foundation for Device Authorization Flow in .NET. A few directions from here:
- Refresh tokens. If your app needs to stay authenticated across sessions, configure your Auth0 application to issue refresh tokens and use
GetTokenAsync(new RefreshTokenRequest { ... })to renew the access token without user interaction. - Handling token expiry. The device code itself expires (
deviceCodeResponse.ExpiresInseconds from issuance). Handle theexpired_tokenerror from the polling loop and restart the flow when needed. - Auth0 .NET SDK reference. The Authentication API SDK documentation lists all available methods and models, including request options for
StartDeviceFlowAsync()andGetTokenAsync(). - The spec. RFC 8628 is concise and readable. If your production implementation needs to handle edge cases (concurrent sessions, revocation, device re-authorization) it's worth consulting directly.
About the author

Andrea Chiarelli
Principal Developer Advocate
I have over 20 years of experience as a software engineer and technical author. Throughout my career, I've used several programming languages and technologies for the projects I was involved in, ranging from C# to JavaScript, ASP.NET to Node.js, Angular to React, SOAP to REST APIs, etc.
In the last few years, I've been focusing on simplifying the developer experience with Identity and related topics, especially in the .NET ecosystem.