
Spam registrations are annoying, costly, and can skew your user analytics. Preventing them can be tricky and requires a measured approach to do so effectively without compromising the end-user experience. In the world of Customer Identity, practitioners must carefully balance the scales between convenience and security to provide the smoothest user journeys without allowing malicious entities through the front door. In this post, we will discuss a simple, yet effective defense you can add to your toolkit.
The Swiss Cheese Model
The Swiss Cheese Model is often used in risk management. It describes systems as multiple slices of Swiss cheese, which have randomly placed and sized holes in each slice, stacked side by side, in which the risk of a threat becoming a reality is mitigated by the different types of defenses which are "layered" behind each other. In the world of digital experiences, with a specific lens on fraudulent registrations, a layered defense is exactly what you need to protect yourself from this form of abuse. Each layer will strengthen your posture as we spread the risk across many components to avoid any single point of failure.
Imperva released their 2025 Bad Bot Report which states, “Automated threats are rising at an unprecedented rate, with bad bots now making up 37% of all internet traffic. AI is not only being used by attackers to create more advanced, evasive bots that target APIs, exploit business logic, and fuel fraud, but it is also lowering the barrier to entry for attackers resulting in an increase in volumes of simple bot attacks. For the first time in a decade, automated traffic has surpassed human activity, accounting for 51% of all web traffic.”
With all of this in mind, app builders must consider the fact that automated traffic will be a persistent threat and will take on many shapes and forms. Auth0 natively has many robust capabilities such as Bot Detection and Brute Force Protection to help combat these malicious Non-Human Identities (NHIs), but there is ultimately no silver bullet in today’s internet landscape. A layered defense is the most prudent approach when working to secure your digital systems.
A simple, yet effective layer you can add to your defenses is The Honeypot.
What is a Honeypot?
A honeypot is a trap for malicious traffic. In our scenario, they are bots that wish to masquerade as humans and submit your signup form. The concept of honeypots in the cybersecurity realm has been around for a long time and has grown to be a quite complex framework used by top defenders against some of the most sophisticated attacks. But, sometimes a simple honeypot can also provide a lot of protection as well.
In terms of preventing simple bots from performing signup attacks, we can place a honeypot in our signup form through the use of a hidden checkbox. This input can be hidden with CSS or placed far out of view where a real human would never know it existed, thus allowing bots to proceed forward none the wiser. However, simple automated bots don't process CSS. They parse the raw HTML, see an input field, and, in their eagerness to submit the form, fill it out. If this specific, hidden field is checked, we know it's a bot. We then can use Auth0’s extensible platform to detect this and prevent the signup transaction right as it’s happening.
The Auth0 Components We Will Use
This Honeypot implementation relies on two core features of the Auth0 platform: Universal Login with Signup Partials and Pre-User Registration Action.
Universal Login with Signup Partials
Auth0 Universal Login (UL) defines your login flow, which is the key feature of an authorization server. Whenever a user needs to prove their identity, your applications redirect to Universal Login, and then Auth0 will do what is needed to guarantee the user's identity.
When using Universal Login, you don't have to do any integration work to handle different methods of authentication. You can start off using a simple username and password, and then add other features, such as social login and multi-factor authentication (MFA).
Configuring Universal Login is dynamic (and does not require application-level changes) because all functionality is driven by the web pages served by the centralized Authentication Server. Your applications benefit from any improvements Auth0 makes in the login flow without the need for you to change your code.
You can create a consistent, branded login experience by customizing the login page appearance and behavior from the Auth0 Dashboard. For advanced use cases, you can even change the code of each page.
The UL allows you to customize the Signup Prompts through the use of Partials. These are snippets of custom HTML you can insert directly into the signup template within your Auth0 Dashboard. The data submitted through these partials is automatically bundled with the registration request.
Pre-user registration Action
Actions are secure, tenant-specific, versioned functions written in Node.js that execute at certain points within the Auth0 platform. Actions are used to customize and extend Auth0’s capabilities with custom logic. The processes that can be extended in this way are called triggers. Trigger groupings represent the logical pipeline through which information moves during a single point in the Auth0 journey. In our story today, we will focus on the Pre-User Registration Trigger. This event will fire anytime a signup form is submitted, allowing custom logic to be run before the user is created in the Auth0 database.
When using the signup prompts, any element with an HTML attribute of name='ulp-*' will be exposed to you on the request body inside of the pre-user registration Action event object. This then allows us to detect what elements were present on the signup form when it was submitted. We can use this mechanic to now implement our honeypot!
Step-by-Step Honeypot Implementation
Let's dive into how to use these Auth0 features in practice to implement our honeypot.
Step 1: Add the Honeypot to the HTML partial
HTML Partials can be set by leveraging Auth0’s Management API. Assuming we have already set up a Custom Domain on our tenant, we can leverage the Prompts endpoint to insert our honeypot. We are leveraging the signup-id prompt so it will be immediately fetched by any bot hitting your signup endpoint. We are giving it a seemingly normal name so as to not flag any suspicion. The key style tag hiding the element will prevent any human users from being able to accidentally check this input.
Insert the following HTML. The CSS is essential:
POST /api/v2/prompts/signup-id/partials

<div class='ulp-field' style="display: none;">
    <input type='checkbox' name='ulp-email-consent' id='email-consent'>
    <label for='email-consent'>I agree to email consent</label>
</div>
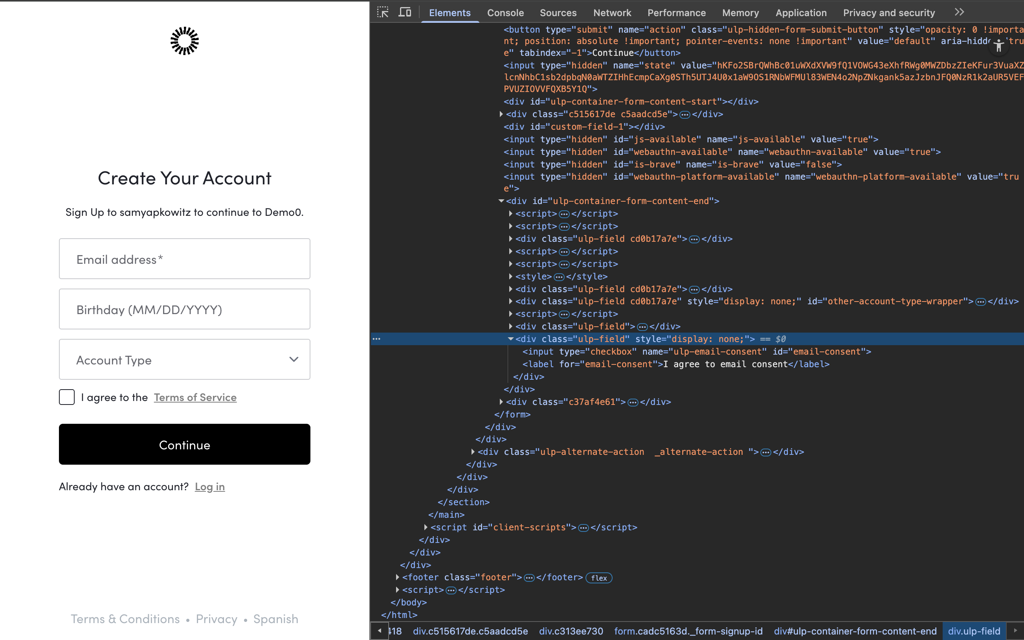
We can see how we’ve set this in our signup prompt but a user won’t see it when we render the screen, but also see how the element does exist on the DOM when we use the devtools to inspect the source of this page.
Step 2: Create the pre-user registration Action
Now we build the logic to catch the bot.
Go to Auth0 Dashboard -> Actions -> Triggers and select Pre User Registration. Create a new Action and paste the following code:
/**
 * Executes after a user submits a registration form,
 * but before the user is created.
 * @param {Event} event - Details about the user and the context.
 * @param {PreUserRegistrationAPI} api - Interface to set the response.
  */
exports.onExecutePreUserRegistration = async (event, api) => {

  // 1. Get the data from the Signup Partial.
  const emailHoneyPot = event.request.body['ulp-email-consent'];

  if (emailHoneyPot) {
  // 2. If we detect the honeypot has been checked, deny the signup attempt
    api.validation.error("error", "Sorry, something has gone wrong");
  }

  // If the honeypotField is null or undefined, registration proceeds normally.
};
After doing so, make sure to save and deploy the Action. Once you’ve done that, we need to bind it to the Pre User Registration Trigger. And that’s it! Now, our honeypot is ready to go!
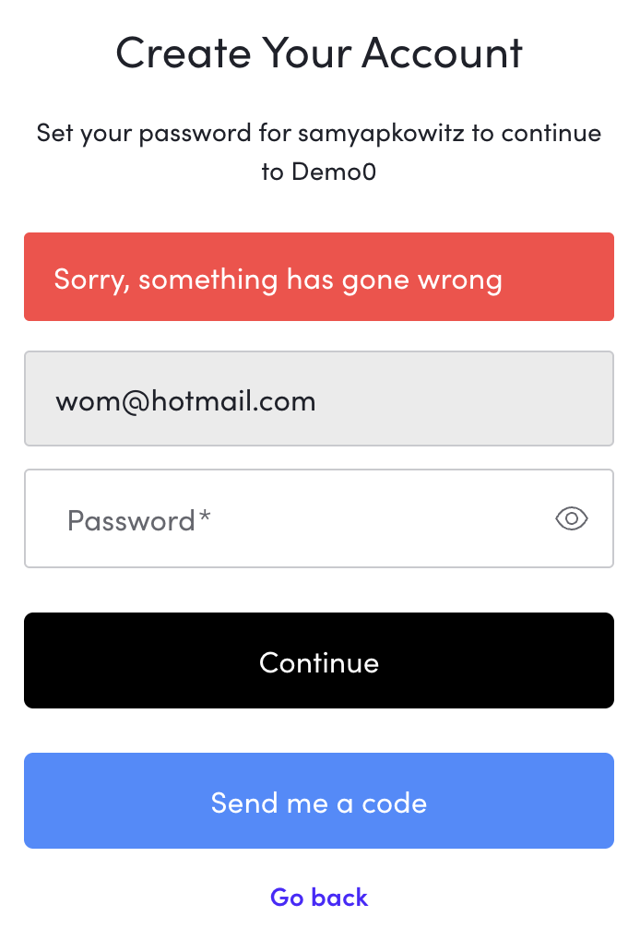
The code here is simple, but powerful. We inspect the request body which exposes all our custom fields defined previously in our Partials. We can simply determine whether our honeypot input has been checked, and if so we can leverage Auth0’s built in api object to deny the transaction before user creation. The api.validation.error() method is the authoritative way to halt any Auth0 signup flow and will prevent the bot from proceeding to your application. When this condition is met, we will render an error on the Universal Login with whatever message you provide in the arguments for this function. You can test this by modifying the CSS and clicking the checkbox yourself.
The Honeypot is One Layer of Your Defense
This Honeypot technique is excellent because it's invisible, frictionless, and requires no external services. However, it's just one tool.
The best defense is always a layered defense.
- Layer 1 (Network): Auth0's built-in Attack Protection.
- Layer 2 (Form/Client): Our Honeypot catches unsophisticated bots.
- Layer 3 (Advanced): If needed, custom rules checking for suspicious email patterns or integrating a third-party risk service via an Action.
By utilizing Auth0 Actions and Signup Partials, you can quickly deploy custom security features without modifying your core application code, keeping your user onboarding safe and clean!
About the author

Sam Yapkowitz
Senior Solutions Engineer