
User session management allows developers to implement features ranging from controlling session concurrency to monitoring and terminating sessions. In this article, we will discuss the Session Management API, which allows you to manage user sessions in applications that integrate with Auth0.
The Need for Managing User Sessions
When a user logs in to your application using Auth0, at least two sessions are initiated:
- The Local Session (Application Session). This session exists on your application's side. It typically uses cookies or similar mechanisms to store information like the user's login status, preferences, or any other data relevant to your application's functionality. Its primary role is to indicate to your application whether the user is currently logged in and authorized to access specific resources or features.
- The Authorization Server Session (Auth0 Session). This session is managed by Auth0's servers. It's typically stored in a cookie within the auth0.com domain or a custom domain associated with your Auth0 tenant. It's primarily used by Auth0 to facilitate features like Single Sign-On (SSO) and to determine if a user needs to re-authenticate when accessing other applications within the same Auth0 tenant.
In case the user authenticates using a third-party Identity provider, such as Google, Facebook, GitHub, or others, you have a third session, the 3d party IdP session, which tracks the interactions between the user and that Identity provider. See this document for more info.
Your application's sessions are entirely in your hands, although Auth0 SDKs can help you with session creation. Auth0's session management is under Auth0's control. However, thanks to the new Session Management API, you can now manage Auth0 sessions from your application as well. The ability to manage authenticated user sessions in Auth0 can meet a few needs, such as:
- You can allow users to list their active sessions and close them by remotely logging out.
- You can allow an administrator to list all the user sessions and possibly force any of them to log out for security reasons.
- You can limit the number of concurrent user sessions.
Let's explore how you can use this new API.
Set Up Access to the Session Management API
To use the Session Management API, you need the Enterprise plan. If you don't have this plan but want to test the API, you can create a new tenant and get a free trial period.
You can use the Session Management API as you do with all the Management API: basically, you need to enable your client application, get an access token, and call the API endpoints.
Enable your client
As a first step, you need to enable your client application to use the required scopes to use the Session Management API. In particular:
- The scope
read:sessionsenables your client to list sessions and get details about them. - The scope
delete:sessionsallows your client to close a session, i.e., logging a user out.
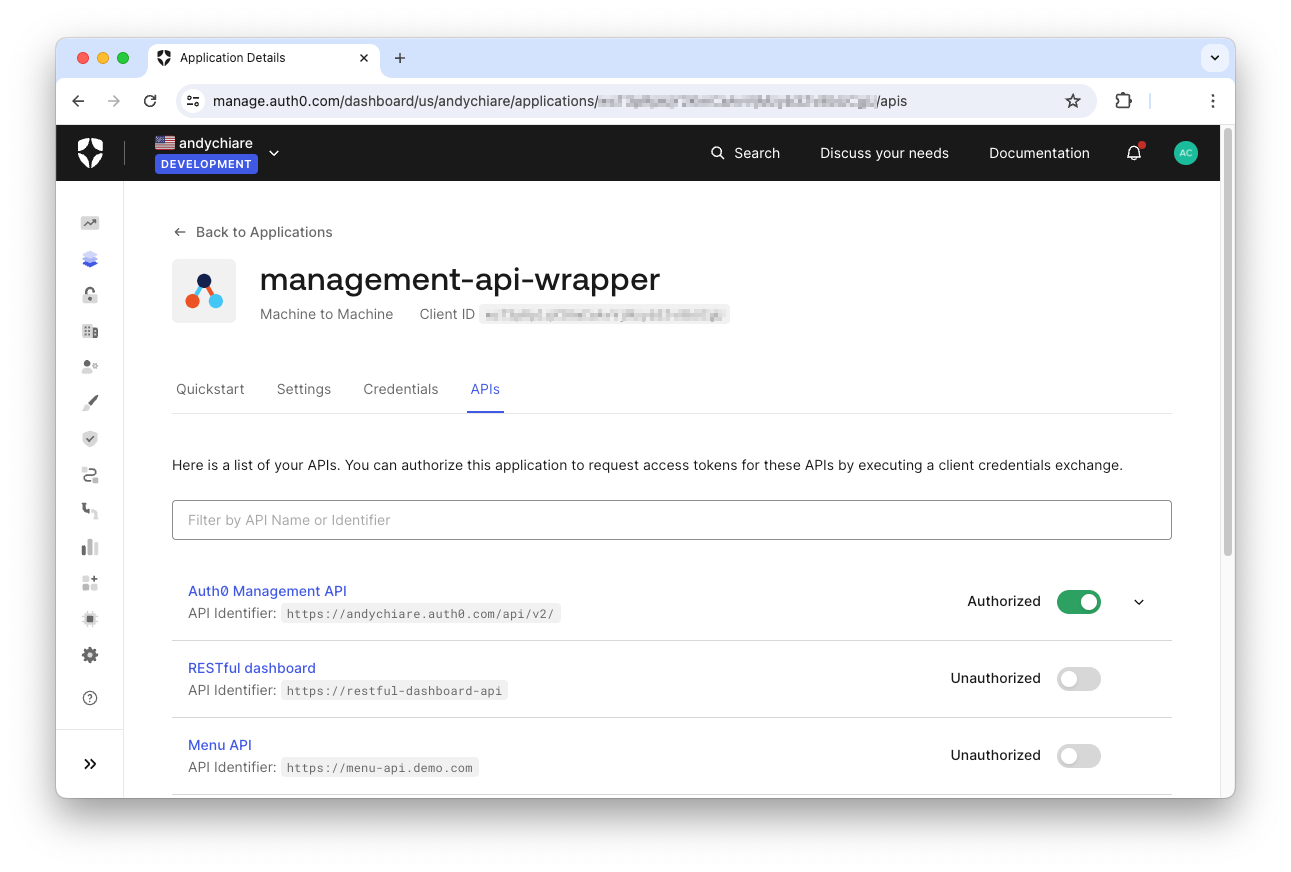
To enable a client to these scopes, go to your Auth0 dashboard and select the application you want to enable. Make sure this is a Machine to Machine application. Select the APIs tab on the application page and then toggle the Authorized switch button corresponding to the Auth0 Management API, as shown in the following picture:
Then, expand the Auth0 Management API section and filter the permissions list using the session keyword. You should get the read:sessions and delete:sessions items. Check them as shown in the following picture:
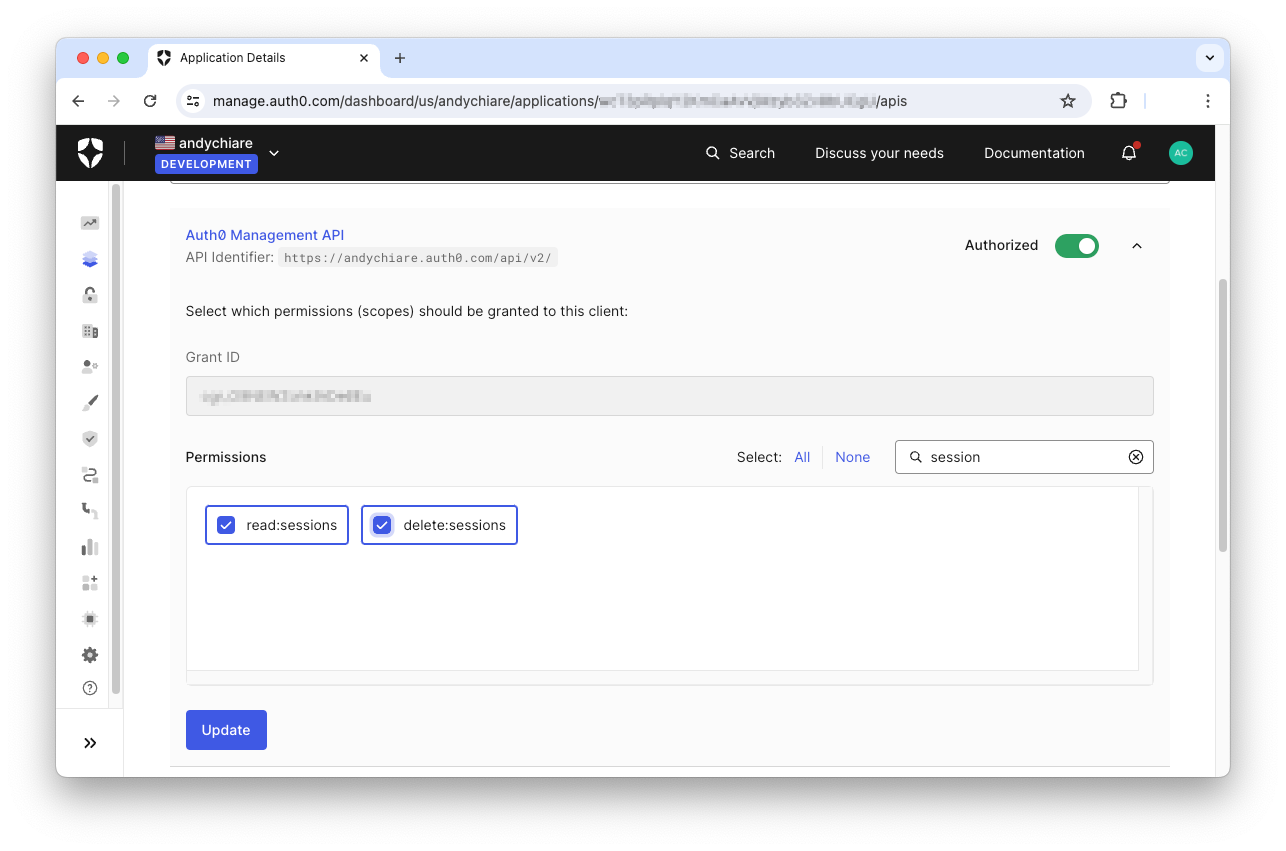
Don't forget to click the Update button to save your changes.
Get an access token
Now, your application must request an access token to call the Management API. Depending on your specific scenario, you can get an access token in different ways. For example, in a test scenario you can get it manually from the Auth0 dashboard or you can use cURL, while in a production scenario, your application must request an access code programmatically.
For demonstration purposes, let's see how you can request an access token via cURL:
curl --request POST \
  --url https://YOUR_AUTH0_DOMAIN/oauth/token \
  --header 'content-type: application/json' \
  --data '{"client_id":"YOUR_CLIENT_ID","client_secret":"YOUR_CLIENT_SECRET","audience":"https://YOUR_AUTH0_DOMAIN/api/v2/","grant_type":"client_credentials"}'
Replace the placeholders YOUR_AUTH0_DOMAIN, YOUR_CLIENT_ID, and YOUR_CLIENT_SECRET with the respective values from your client configuration.
This request generates a response as the following:
{ "access_token":"eyJhbGci...",
  "scope":"read:sessions delete:sessions",
  "expires_in":86400,
  "token_type":"Bearer"
}
You will use the value of the access_token property to demonstrate that you are authorized to call the Management API.
Call the API
Now that you have the access token, you can call the API endpoints by passing it in the Authorization header, as shown in the following cURL request:
curl --request GET \
  --url 'https://YOUR_AUTH0_DOMAIN/api/v2/AUTH0_API_ENDPOINT' \
  --header 'Authorization: Bearer YOUR_ACCESS_TOKEN' \
  --header 'content-type: application/json'
Replace the placeholders YOUR_AUTH0_DOMAIN, YOUR_ACCESS_TOKEN, and AUTH0_API_ENDPOINT with the respective values.
Managing the User Sessions
Once we have enabled the client and obtained the access token, let's see how to actually use the Session Management API.
Let's start by listing the active sessions of a specific user. You can use the /api/v2/users/{userId}/sessions endpoint as shown in the following example:
curl --request GET \
  --url 'https://YOUR_AUTH0_DOMAIN/api/v2/users/auth0%7C8374f7459j7493u84335/sessions' \
  --header 'Accept: application/json' \
  --header 'Authorization: Bearer YOUR_ACCESS_TOKEN'
In this example, you send a GET request to the endpoint by specifying your Auth0 domain, the user ID, and the access token. As a response, you will get a JSON object like the following:
{
  "sessions": [{
    "id": "2Lw8dT76wJpOl924",
    "user_id": "auth0|8374f7459j7493u84335",
    "created_at": "2024-05-10T12:04:22.3452",
    "updated_at": "2024-05-10T12:04:22.3452",
    "authenticated_at": "2024-05-21T11:29:12.4251",
    "authentication": { "methods":[
      {
        "name": "pwd",
        "timestamp": "2024-05-21T11:29:12.4251"
      }
    ]},
    "idle_expires_at": "2024-05-21T12:29:12.4251",
    "expires_at": "2024-05-21T18:29:12.4251",
    "device": {
      "initial_ip": "142.250.184.206",
      "last_ip": "142.250.184.206",
      "user_agent": "Mozilla/5.0...",
      "initial_asn": "8612",
      "last_asn": "8612"
    },
    "clients":[ {"client_id": "Hwo482a51heU632d34"} ]
    }
  ]
}
This is an object with the sessions array that lists the user's active sessions. Each session is represented by an object with some properties: the session ID (id), the user ID (user_id), the time stamp of their authentication (authenticated_at), the authentication method (authentication), the device on which the session is active (device), the application client used by the user (clients), etc.
In the example above, only one session is returned for that user.
If you have a session ID, you can access the data about that session by using the /api/v2/sessions/{id} endpoint. You can get a session ID from the sid claim of the ID or Logout token. The following example shows how to get the session details given its ID:
curl --request GET \
  --url 'https://YOUR_AUTH0_DOMAIN/api/v2/sessions/2Lw8dT76wJpOl924' \
  --header 'Accept: application/json' \
  --header 'Authorization: Bearer YOUR_ACCESS_TOKEN'
You will receive a JSON object representing that single session, as shown in the following:
{
  "id": "2Lw8dT76wJpOl924",
  "user_id": "auth0|8374f7459j7493u84335",
  "created_at": "2024-05-10T12:04:22.3452",
  "updated_at": "2024-05-10T12:04:22.3452",
  "authenticated_at": "2024-05-21T11:29:12.4251",
  "authentication": { "methods":[
    {
      "name": "pwd",
      "timestamp": "2024-05-21T11:29:12.4251"
    }
  ]},
  "idle_expires_at": "2024-05-21T12:29:12.4251",
  "expires_at": "2024-05-21T18:29:12.4251",
  "device": {
    "initial_ip": "142.250.184.206",
    "last_ip": "142.250.184.206",
    "user_agent": "Mozilla/5.0...",
    "initial_asn": "8612",
    "last_asn": "8612"
  },
  "clients":[ {"client_id": "Hwo482a51heU632d34"} ]
}
Forcing Session Termination
In addition to getting information about the user sessions, you can also terminate them if your application has the delete:sessions scope enabled. You can call both endpoints /api/v2/users/{userId}/sessions and /api/v2/sessions/{id} using the DELETE method. For example, the following cURL command terminates a specific user session:
curl --request DELETE \
  --url 'https://YOUR_AUTH0_DOMAIN/api/v2/sessions/2Lw8dT76wJpOl924' \
  --header 'Authorization: Bearer YOUR_ACCESS_TOKEN'
The following command deletes all the sessions of a specific user:
curl --request DELETE \
  --url 'https://YOUR_AUTH0_DOMAIN/api/v2/users/auth0%7C8374f7459j7493u84335/sessions' \
  --header 'Authorization: Bearer YOUR_ACCESS_TOKEN'
Session termination does not automatically log a user out of the application. As mentioned earlier, multiple sessions are involved in an application, and logout must be handled properly. Read this article to get an idea of logout complexity.
In particular, session termination events are connected to the OpenID Connect Back-Channel Logout mechanism. Therefore, to trigger application logout through the Session Management API, your application must be configured to use the session-revoked initiator. Read this document to learn how to configure your application to use the session-revoked initiator.
Sessions and Refresh Tokens
Session termination forces the user logout. However, if an application requests a refresh token at login time, this refresh token is still available to the application even after the user session terminates.
This may be an intended or unintended situation, depending on the application's specific requirements. For example, consider an application that needs to call an API on a scheduled basis. It needs a refresh token to ensure an access token even if the user does not have an active session. On the other hand, your application can use a refresh token only to renew an access token with a limited lifetime, but you do not want the refresh token to survive the user session.
In the first case, terminating a user session will work as shown so far. You don't need to take an extra step to revoke the refresh token.
In the second case, the session termination is not enough. You also need a way to invalidate the current refresh token. For this purpose, you can use a few endpoints to help you manage refresh tokens.
To enable your client application to manage refresh tokens, you have to add the
read:refresh_tokensanddelete:refresh_tokensscopes to the Management API configuration in the Auth0 dashboard.
The following command shows how to list all the refresh tokens associated with a given user:
curl --request GET \
  --url 'https://YOUR_AUTH0_DOMAIN/api/v2/users/auth0%7C8374f7459j7493u84335/refresh-tokens' \
  --header 'Accept: application/json' \
  --header 'Authorization: Bearer YOUR_ACCESS_TOKEN'
You get a JSON object containing the list of the refresh tokens with all the details, as in the following example:
{
  "refresh_tokens": [{
    "id": "6srfsU4dh510",
    "user_id": "auth0|8374f7459j7493u84335",
    "client_id": "Hwo482a51heU632d34",
    "created_at": "2024-05-10T12:04:22.3452",
    "updated_at": "2024-05-10T12:04:22.3452",
    "idle_expires_at": "2024-05-21T12:29:12.4251",
    "expires_at": "2024-06-21T18:29:12.4251",
    "session_id": "2Lw8dT76wJpOl924",
    "rotating": true,
    "resource_servers": [{ audience: "http://myapi.com", scopes:"read:users"}]
  }]
}
To delete this specific refresh token, you can call the /api/v2/refresh-tokens/{tokenId} endpoint as in the following example:
curl --request DELETE \
  --url 'https://YOUR_AUTH0_DOMAIN/api/v2/refresh-tokens/6srfsU4dh510' \
  --header 'Accept: application/json' \
  --header 'Authorization: Bearer YOUR_ACCESS_TOKEN'
Notice how you specify the ID of the refresh token to delete.
If you want to delete all the refresh tokens associated to a user, you can use the following command:
curl --request DELETE \
  --url 'https://YOUR_AUTH0_DOMAIN/api/v2/users/auth0%7C8374f7459j7493u84335/refresh-tokens' \
  --header 'Accept: application/json' \
  --header 'Authorization: Bearer YOUR_ACCESS_TOKEN'
Consider that refresh token revocation through the
DELETEcommand on the endpoints shown above runs asynchronously. This means that refresh tokens are not immediately revoked when the command finishes running.
Summary
This article has given you an overview of Auth0's Session Management API with some examples of endpoint invocation via cURL. We started with activating the client application and getting the access token, then moved on to getting a user's session list and terminating a specific session.
You then learned about the relationship between sessions and refresh tokens and how to revoke refresh tokens associated with a user.
Now that you have a basic understanding of how to use the Session Management API, you can build a better security experience for your users.
About the author

Andrea Chiarelli
Principal Developer Advocate
I have over 20 years of experience as a software engineer and technical author. Throughout my career, I've used several programming languages and technologies for the projects I was involved in, ranging from C# to JavaScript, ASP.NET to Node.js, Angular to React, SOAP to REST APIs, etc.
In the last few years, I've been focusing on simplifying the developer experience with Identity and related topics, especially in the .NET ecosystem.