
Retrieval-Augmented Generation (RAG) has emerged as a game-changing architecture for building powerful AI applications. By connecting a Large Language Model (LLM) to a private knowledge base, developers can create chatbots that provide accurate, context-aware answers from specific data sources. This is a massive leap forward from generic, public-knowledge chatbots.
However, this power comes with a critical responsibility: sensitive information disclosure. This is the second of the OWASP top 10 risks for LLMs and Gen AI apps, just after prompt injection. Imagine an internal HR chatbot built with RAG. It has access to the public employee handbook, but also to confidential salary information and performance reviews. A simple question from an employee like, "What is John Doe’s salary?" could lead to a data leak if the RAG system doesn't understand who is asking and what they are allowed to see.
Simply placing an authentication wall in front of your AI application isn't enough. The AI's retrieval mechanism itself must be constrained by user-level permissions that allow fine-grained access control.
In this article, we will start by building a RAG-powered chatbot using the latest .NET AI Template and Blazor. We will then secure the application, first by adding user authentication with Auth0, and then by implementing document-level authorization using Auth0 FGA.
Building the AI Chatbot
Let's begin by scaffolding a functional RAG application. The new .NET AI template provides a ready-to-run starting point.
Prerequisites
Before you start, ensure you have the following installed on your machine:
- .NET 10 SDK or a later version.
- The .NET AI templates. If you don't have them, install them with the following command:
dotnet new install Microsoft.Extensions.AI.Templates
Creating the Blazor chat app
Open your terminal and create a new project using the aichatweb template, as shown below:
dotnet new aichatweb -o MyChatBot
This template creates a Blazor Web App with a backend service configured for RAG. The template is pre-configured to use gpt-4o-mini as the AI model via GitHub Models. It also uses a local ingestion service based on SQLite. This is enough for testing purposes, but you can customize it based on your needs. Take a look at Microsoft documentation to learn more.
The only missing thing to run the application is your credentials for the AI model. Since we are using GitHub Models, you just need to generate a fine-grained personal access token on your GitHub profile. Make sure to include the Model permission with Access: Read-only.
Once you have generated your token, navigate into the newly created project folder (MyChatBot, if you kept the suggested name) and store it into the secret manager with the following command:
dotnet user-secrets set GitHubModels:Token YOUR-GITHUB-TOKEN
Make sure to replace the placeholder YOUR-GITHUB-TOKEN with your personal access token.
That’s it! Your AI chatbot is ready to run. So, type dotnet run within the project folder in your terminal and point your browser to the application’s URL. You will see the following screen:
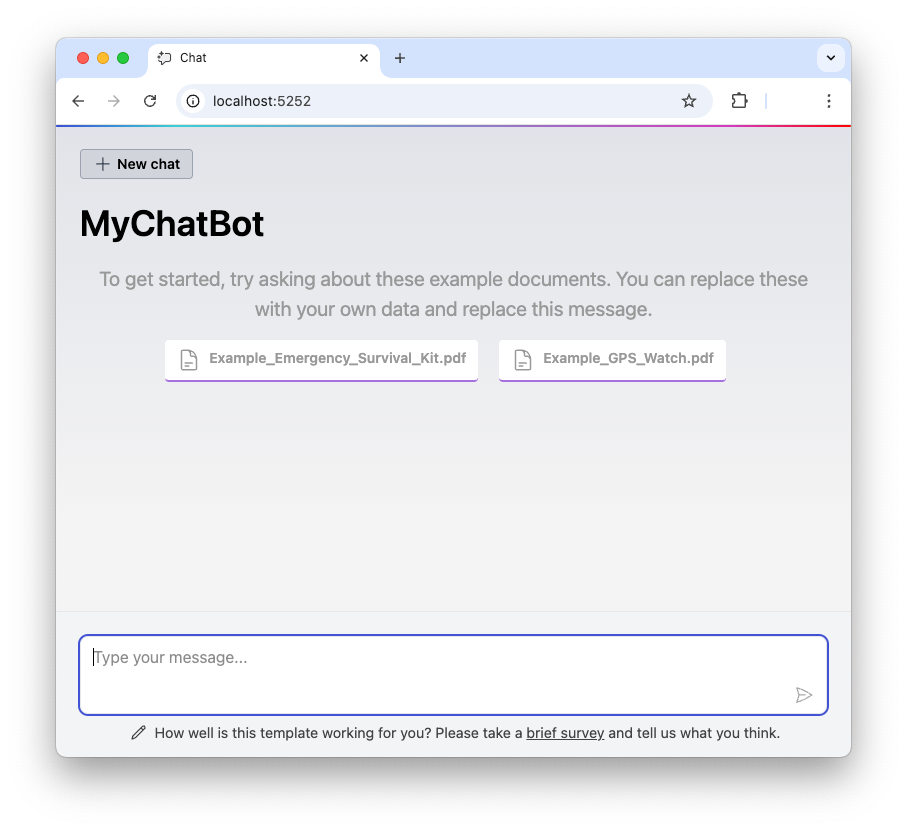
You can ask questions about the content of the two documents provided with the template. For example, you can ask “What are the essential tools in a survival kit?” and get the answer.
This demonstrates the baseline behavior: any user can ask about any document loaded into the system. Our goal is to restrict this.
A new Auth0-powered .NET app in less than a minute? Try out our templates
Install the Nugget package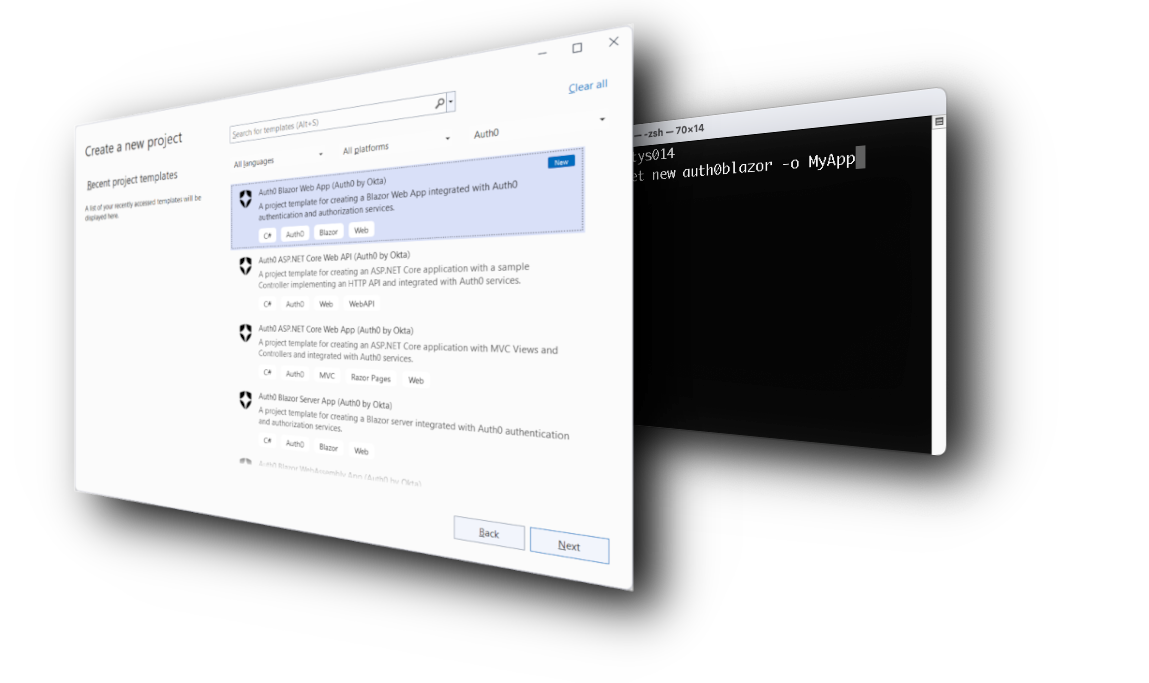
The Anatomy of Our RAG Application
Before securing the application, we first need to understand how it works. We will not go into the details, but we want to highlight a few core points that we will modify in the rest of the article.
The ingestion step
The aichatweb template sets up a classic RAG pipeline. The ingestion step is implemented in the SemanticSearch class, through the LoadDocumentsAsync() method:
// SemanticSearch.cs

using MyChatBot.Services.Ingestion;
using Microsoft.Extensions.VectorData;

namespace MyChatBot.Services;

public class SemanticSearch(
    VectorStoreCollection<string, IngestedChunk> vectorCollection,
    [FromKeyedServices("ingestion_directory")] DirectoryInfo ingestionDirectory,
    DataIngestor dataIngestor)
{
    private Task? _ingestionTask;

    public async Task LoadDocumentsAsync() => await (
        _ingestionTask ??= dataIngestor.IngestDataAsync(
            ingestionDirectory,
            searchPattern: "*.*"
            )
        );

//...other code...

}
The LoadDocumentsAsync() method invokes the IngestDataAsync() method of the DataIngestor service to process all the files in the folder represented by the ingestionDirectory variable. The value for the ingestionDirectory variable is set in Program.cs and is /wwwroot/Data. If you take a look at that folder in your project, you will find two sample files: a PDF and a markdown file. You can replace or add your own files there to customize the application’s knowledge.
The LoadDocumentsAsync() method is invoked within the Chat.razor component, in a method with the same name that is configured as a tool used by the LLM:
@* Chat.razor *@

@*...UI markup...*@

@code {

    //...other code...

    protected override void OnInitialized()
    {
        statefulMessageCount = 0;
        messages.Add(new(ChatRole.System, SystemPrompt));
        chatOptions.Tools = [
            AIFunctionFactory.Create(LoadDocumentsAsync),
            AIFunctionFactory.Create(SearchAsync)
        ];
    }

    //...other code...


    private async Task LoadDocumentsAsync()
    {
        await InvokeAsync(StateHasChanged);
        await Search.LoadDocumentsAsync();
    }

    //...other code...

}
In other words, the ingestion step will start as soon as you start your chat with the application.
The DataIngestor process, part of the .NET AI template, uses the filename as the unique document ID for all text chunks extracted from that file. We will use this same filename as the object identifier in our authorization rules.
The RAG Query Loop
When a user submits a question to your application, here is what happens:
- Query Embedding: The user's question is also converted into a vector using the same embedding model.
- Vector Search: The application performs a similarity search in the vector store. It looks for the stored text chunk vectors that are closest (most similar) to the question's vector. This is the Retrieval part of RAG.
- Context Augmentation: The top N most relevant text chunks are retrieved. These chunks are then formatted and inserted into a prompt that is sent to the LLM. The prompt effectively says: "Answer the user's question based only on the following context..."
- Generation: The LLM receives the augmented prompt and generates a natural language answer based on the provided context. This is the Generation part of RAG.
The critical security flaw in this default flow is that the vector search in step 2 is "user-blind." In our application, the code responsible for this search is in the Chat.razor component:
@page "/"

//...using and inject declarations...

<PageTitle>Chat</PageTitle>

@*...UI markup...*@

@code {

  //...other code...

  private async Task<IEnumerable<string>> SearchAsync(string searchPhrase, string? filenameFilter = null)
  {
    await InvokeAsync(StateHasChanged);
    var results = await Search.SearchAsync(searchPhrase, filenameFilter, maxResults: 5);
    return results.Select(result =>
        $"<result filename="{result.DocumentId}">{result.Text}</result>");
  }

  //...other code...

}
The SearchAsync() method is the tool used by the chatbot whenever a user submits a question. This method relies on the method with the same name implemented in the SemanticSearch.cs file:
// SemanticSearch.cs

//...other code...


public class SemanticSearch(/* parameters */)
{
    //...other code...

    public async Task<IReadOnlyList<IngestedChunk>> SearchAsync(string text, string? documentIdFilter, int maxResults)
    {
        await LoadDocumentsAsync();

        var nearest = vectorCollection.SearchAsync(text, maxResults, new VectorSearchOptions<IngestedChunk>
        {
            Filter = documentIdFilter is { Length: > 0 } ? record => record.DocumentId == documentIdFilter : null,
        });

        return await nearest.Select(result => result.Record).ToListAsync();
    }
}
It searches across all documents without any knowledge of who is asking the question. We'll fix this by integrating authentication first and then fine-grained authorization.
Adding User Authentication with Auth0
To enforce user-specific permissions, we first need to reliably identify our users. Auth0 provides a robust solution for adding authentication to Blazor applications.
While the full authentication integration process is detailed in this blog post, here's a summary of the key steps to get your Blazor app secured:
1 - Create an Auth0 Application: In your Auth0 dashboard, create a new "Regular Web Application" and take note of the Domain and Client ID.
2 - Install the SDK: Add the Auth0 ASP.NET Core Authentication SDK to your project with the following command:
dotnet add package Auth0.AspNetCore.Authentication
3 - Set configuration values. Configure your Blazor application by adding the following keys to the appsettings.json file:
{
  "Logging": {
    "LogLevel": {
      "Default": "Information",
      "Microsoft.AspNetCore": "Warning"
    }
  },
  "AllowedHosts": "*",
  "Auth0": {
    "Domain": "YOUR_AUTH0_DOMAIN",
    "ClientId": "YOUR_CLIENT_ID"
  }
}
Replace the YOUR_AUTH0_DOMAIN and YOUR_CLIENT_ID placeholders with the actual values.
4 - Configure Program.cs: In your project's Program.cs file, register the Auth0 authentication service:
// Program.cs

//...existing code...
using Microsoft.AspNetCore.Authentication;         // 👈 new code
using Microsoft.AspNetCore.Authentication.Cookies; // 👈 new code
using Auth0.AspNetCore.Authentication;             // 👈 new code

var builder = WebApplication.CreateBuilder(args);

//👇new code
builder.Services.AddAuth0WebAppAuthentication(options =>
{
    options.Domain = builder.Configuration["Auth0:Domain"];
    options.ClientId = builder.Configuration["Auth0:ClientId"];
});

builder.Services.AddCascadingAuthenticationState();
//👆new code

//...existing code...
5 - Add Login and Logout: Create Blazor components and corresponding backend endpoints to handle the login and logout flows, which redirect the user to and from the Auth0 Universal Login page.
6 - Access User Identity: Once a user is logged in, you can access their identity and claims using the AuthenticationStateProvider in your Blazor components. This is crucial for our next step.
For a complete, step-by-step walkthrough of this process, please follow the blog post Add Auth0 Authentication to Blazor Web Apps.
After completing these steps, your application will have a secure login system. You can now require users to be authenticated to access the chat page and, most importantly, you can retrieve a unique ID for the logged-in user.
Defining Permissions with Auth0 FGA
Now that we know who the user is, we can define what they can see. This is where Auth0 FGA comes in. It allows you to create a flexible authorization model and manage permissions centrally without cluttering your application code with complex authorization logic.
Why Auth0 FGA?
Traditional authorization systems like Role-Based Access Control (RBAC) often fall short for scenarios like this. You could create roles like SurvivalKit_Reader and GPSWatch_Reader, but this becomes unmanageable as the number of documents and permission combinations grows.
Auth0 FGA uses Relationship-Based Access Control (ReBAC), which is a perfect fit. You can define direct relationships between users and objects, like "anne can read document survival_kit." This is more granular, scalable, and intuitive.
To learn more about Auth0 FGA and how to use it in your applications, read the Auth0 FGA documentation.
The authorization model
In your Auth0 FGA dashboard, you'll first define a simple authorization model. It's a text-based representation of your permission rules. For our use case, the model is incredibly simple:
model
  schema 1.1

type user

type document
  relations
    define can_read: [user]
This model declares two types (user and document) and a relation named can_read on the document type. This relation specifies that a user can be associated with a document via the can_read permission.
Creating relationship tuples
The authorization model is just the blueprint. The actual permissions are defined by relationship tuples. These are the actual statements that grant permissions. You can add these via the Auth0 FGA dashboard or its API.
For our specific case, let's assume we have two users, Anne and Bob.
- Anne should be able to read both documents.
- Bob should only be able to read the Emergency Survival Kit document.
The corresponding tuples would be:
User          Relation          Object
user:anne     can_read          document:Example_Emergency_Survival_Kit.pdf
user:anne     can_read          document:Example_GPS_Watch.pdf
user:bob      can_read          document:Example_Emergency_Survival_Kit.pdf
Notice that the object ID in the tuple (e.g., Example_Emergency_Survival_Kit.pdf) should be a stable identifier for your document that you can use in your application's metadata.
For a detailed guide on setting up the Auth0 FGA SDK in ASP.NET Core and managing models and tuples, please refer to this article: Fine-Grained Authorization in ASP.NET Core with Auth0 FGA.
Securing the RAG Pipeline
We have all the pieces in place: an identified user and a centralized permission system. Now, we'll modify our RAG pipeline to enforce these permissions. The flow will change as follows:
- An authenticated user submits a question.
- The application gets the question and the user's ID.
- The application calls Auth0 FGA and asks, "What is the list of all documents this user can read?" (authorization check)
- The application uses this list of authorized documents to filter the search query against the vector database. Only chunks from these documents are considered. (filtered retrieval)
- The RAG pipeline continues as before, but now with a context that is guaranteed to be from a permitted document.
Retrieve the user’s ID
Let’s start by modifying the Chat.razor component to retrieve the ID of the current authenticated user. Here are the main changes to the component’s code:
@page "/"
@using System.ComponentModel
//👇new code
@using Microsoft.AspNetCore.Components.Authorization

//...existing code...

@code {
  //...other private declarations...

  [CascadingParameter]
  private Task<AuthenticationState>? authenticationState { get; set; }

  //...existing code...


  //👇changed code
  private async Task<IEnumerable<string>> SearchAsync(string searchPhrase, string? filenameFilter = null)
  {
    await InvokeAsync(StateHasChanged);
    IEnumerable<string> results = Enumerable.Empty<string>();

    if (authenticationState is not null)
    {
      var authState = await authenticationState;
      var userId = authState.User.Identity?.Name;
      if (!string.IsNullOrEmpty(userId))
      {
        var searchResults = await Search.SearchAsync(searchPhrase, filenameFilter, maxResults: 5);
        results = searchResults.Select(result =>
                $"<result filename="{result.DocumentId}">{result.Text}</result>");
      }
    }

    return results;
  }
  //👆changed code

  //...existing code...
}
You declared the authenticationState service in the code section of the Razor component. Then, you modified the SearchAsync() method to leverage the authenticationState service to get the user’s ID. Basically, your application will access the ingested files to augment the generated answer only if there is a valid authentication state and user ID.
Note: In this example, we use the username (
User.Identity.Name) as the user’s identifier for simplicity. In a production application, you should use a stable and unique claim to identify the user, such as thesubclaim provided in the Auth0 ID token. Ensure that this unique identifier is the one you use in your Auth0 FGA relationship tuples.
Create the authorization service
To learn what documents the user is authorized to access, your application needs to call Auth0 FGA. Let’s create a service for this purpose.
First, add the OpenFga.Sdk package to your project with the following command:
dotnet add package OpenFga.Sdk
Now, go to the Settings section of your Auth0 FGA dashboard and create a client by following the instructions described here. You will be asked for a name for the client and the permissions you want to assign to it. For our purpose, the Read and query permissions will be sufficient.
Take note of the settings generated in the Auth0 FGA dashboard and add a new section named Auth0Fga to the appsettings.json file and store these values as shown below:
{
  //...existing settings...

  "Auth0Fga": {
    "ApiUrl": "YOUR_API_URL",
    "StoreId": "YOUR_STORE_ID",
    "ApiTokenIssuer": "YOURAPI_TOKEN_ISSUER",
    "ApiAudience": "YOUR_API_AUDIENCE",
    "ClientId": "YOUR_CLIENT_ID",
    "ClientSecret": "YOUR_CLIENT_SECRET"
  }
}
Add a new file named Auth0FgaService.cs to the Services folder of the project with the following code:
using OpenFga.Sdk.Client;
using OpenFga.Sdk.Configuration;
using OpenFga.Sdk.Client.Model;

public class Auth0FgaService
{
    private readonly OpenFgaClient fgaClient;
    public Auth0FgaService(IConfiguration configuration)
    {
        var config = new ClientConfiguration()
        {
            ApiUrl = configuration["Auth0Fga:ApiUrl"],
            StoreId = configuration["Auth0Fga:StoreId"],
            Credentials = new Credentials()
            {
                Method = CredentialsMethod.ClientCredentials,
                Config = new CredentialsConfig()
                {
                    ApiTokenIssuer = configuration["Auth0Fga:ApiTokenIssuer"],
                    ApiAudience = configuration["Auth0Fga:ApiAudience"],
                    ClientId = configuration["Auth0Fga:ClientId"],
                    ClientSecret = configuration["Auth0Fga:ClientSecret"],
                }
            }
        };

        fgaClient = new OpenFgaClient(config);
    }

    public async Task<IEnumerable<string>> GetAuthorizedDocumentsAsync(string userId)
    {
        var response = await fgaClient.Read(new ClientReadRequest
        {
            User = $"user:{userId}",
            Relation = "can_read",
            Object = "document:"
        });

        return response.Tuples
            .Select(t => t.Key.Object.Replace("document:", ""))
            .ToList();
    }
}
This service uses the Auth0 FGA settings from the application configuration and creates an FGA client. The service has a GetAuthorizedDocumentsAsync() method with the value of the user ID as a parameter. It queries Auth0 FGA to find the documents the user can access and returns the list.
As a final step, register the service as a singleton in the Program.cs file:
//...existing code...

builder.Services.AddSingleton<Auth0FgaService>();
//👆new code

var app = builder.Build();

//...existing code...
Filter the documents
Now, let’s use the Auth0 FGA service to filter the documents your chatbot must consider when running the RAG query loop. Open Chat.razor once again and apply the changes highlighted below:
//...existing usings and injects...
@inject Auth0FgaService FgaService
//👆new code

//...existing code...

@code {
  //...existing code...

  private async Task<IEnumerable<string>> SearchAsync(string searchPhrase, string? filenameFilter = null)
  {
    await InvokeAsync(StateHasChanged);
    IEnumerable<string> results = Enumerable.Empty<string>();

    if (authenticationState is not null)
    {
      var authState = await authenticationState;
      var userId = authState.User.Identity?.Name;
      if (!string.IsNullOrEmpty(userId))
      {
        //👇changed code
        var authorizedDocuments = await FgaService.GetAuthorizedDocumentsAsync(userId);

        var filenameFilterList = string.IsNullOrEmpty(filenameFilter) ?
            authorizedDocuments.ToList() :
            authorizedDocuments.Where(doc => doc.Equals(filenameFilter, StringComparison.OrdinalIgnoreCase)).ToList();
        if (filenameFilterList.Any())
        {
          var searchResults = await Search.SearchAsync(searchPhrase, filenameFilterList, maxResults: 5);
          results = searchResults.Select(result =>
                $"<result filename="{result.DocumentId}">{result.Text}</result>");
          //👆changed code
        }
      }
    }

    return results;
  }

//...existing code...
}
You injected the Auth0FgaService service and modified the code to execute when an authenticated user is available. Specifically, you used the Auth0FgaService service to get the list of documents the user can access. Then you combined this list with the possible additional filter passed to the SearchAsync() method and invoked the inner Search.SearchAsync() method with the final filtering list. This implements the security measure we were looking for!
We only need to fix one final problem. Before the changes we’ve just made, the Search.SearchAsync() method accepted a single filename as a filter. Now we pass a list of filenames: filenameFilterList. We need to adapt the implementation of this method so that it takes a list of strings as a parameter.
Open the SemanticSearch.cs file under the Services folder and replace the current implementation of the method with the following:
//...existing code...

public class SemanticSearch(
    VectorStoreCollection<string, IngestedChunk> vectorCollection)
{
  public async Task<IReadOnlyList<IngestedChunk>> SearchAsync(string text, IEnumerable<string>? documentIdFilters, int maxResults)
  {
    var nearest = vectorCollection.SearchAsync(text, maxResults, new VectorSearchOptions<IngestedChunk>
    {
      Filter = documentIdFilters.Any() ? record => documentIdFilters.Contains(record.DocumentId) : null,
    });


    return await nearest.Select(result => result.Record).ToListAsync();
  }
}
Test your secure chatbot
Now you can submit a question to your chatbot and it will answer by considering only the documents you are authorized to read according to your Auth0 FGA authorization model.
For example, the following screenshot shows an answer given by the chatbot when the user has no access permissions to the GPS Watch document: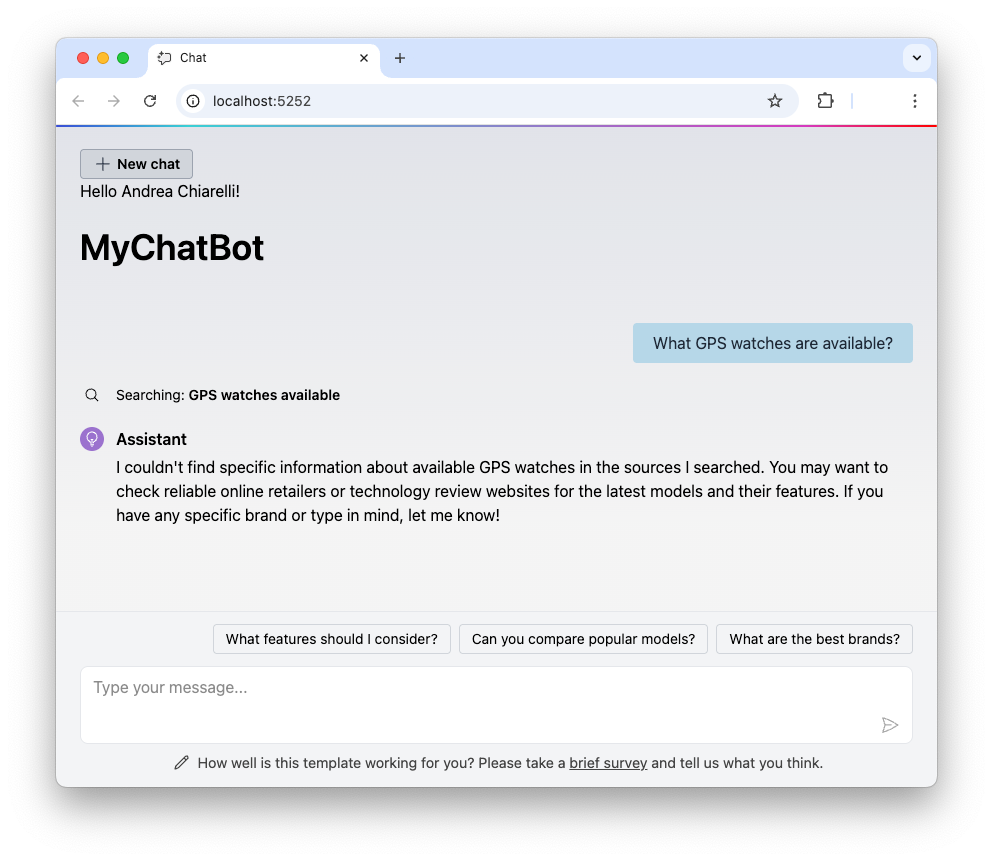
Conversely, this is the response received when the user asks questions related to the document he has access to:
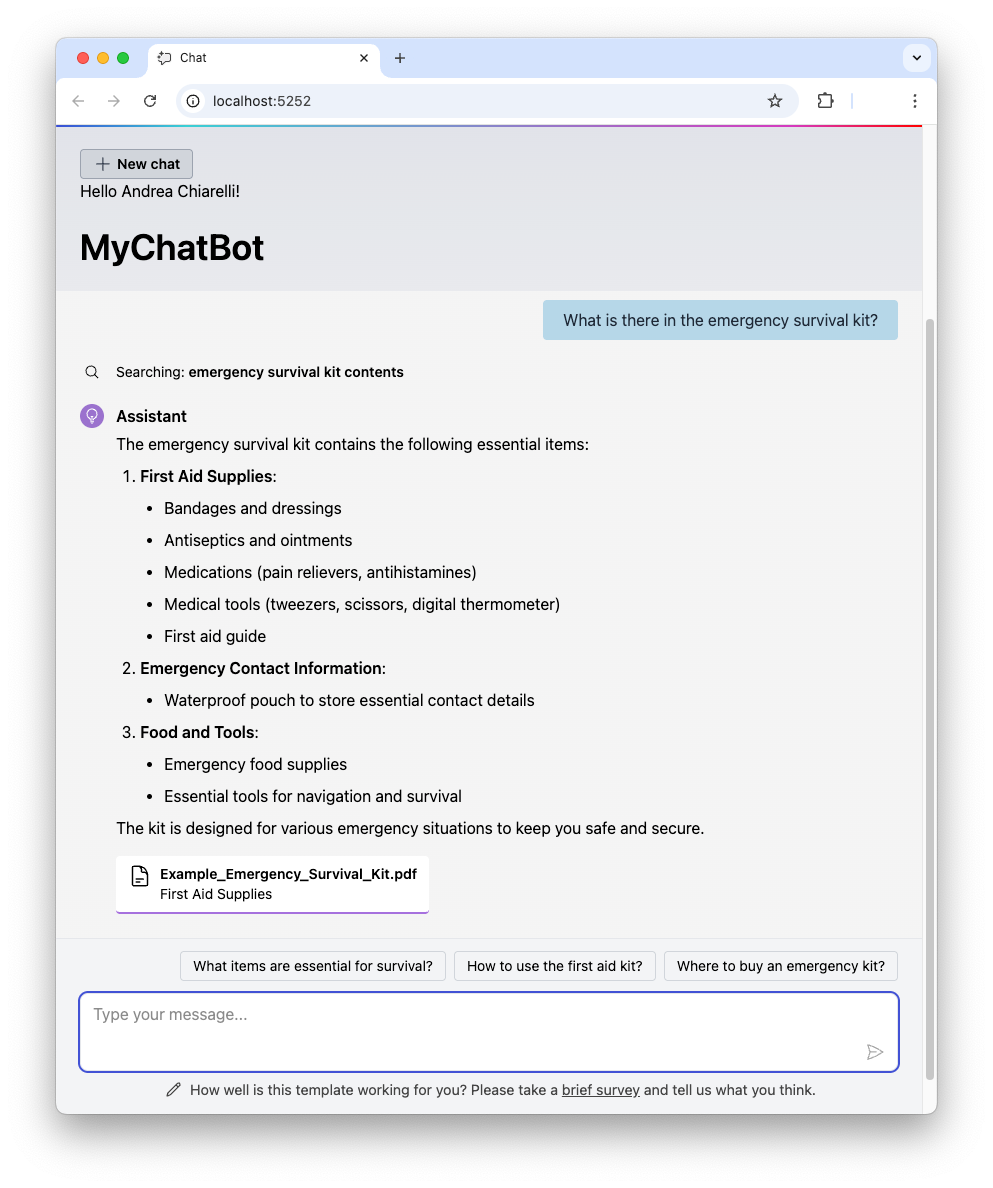
Notice the reference to the document used to provide the answer, as requested by the system prompt.
Leverage Auth0's authentication and authorization services in your .NET applications.
DOWNLOAD THE FREE EBOOK
Recap
We have successfully evolved a simple, generic .NET RAG chatbot into a sophisticated and secure AI assistant. By integrating Auth0 for authentication and Auth0 FGA for authorization, we have implemented a robust, scalable, and centrally managed security model that enforces permissions at the most critical point: the data retrieval step.
The pre-filtering pattern ensures that our LLM is never exposed to data the user isn't authorized to see, effectively eliminating a whole class of potential data leakage vulnerabilities. As AI applications become more and more prevalent in our businesses, building them with a security-first mindset is not just best practice, it is an absolute requirement. With modern tools like the .NET AI template, Blazor, and Auth0 FGA, developers are better equipped than ever to build AI that is not only intelligent but also secure by design.
You can download the code of the sample project built in this article from this GitHub repository.
About the author

Andrea Chiarelli
Principal Developer Advocate
I have over 20 years of experience as a software engineer and technical author. Throughout my career, I've used several programming languages and technologies for the projects I was involved in, ranging from C# to JavaScript, ASP.NET to Node.js, Angular to React, SOAP to REST APIs, etc.
In the last few years, I've been focusing on simplifying the developer experience with Identity and related topics, especially in the .NET ecosystem.