TL;DR: One of the most critical aspects of modern software delivery is security. In the era of open-source projects, it is challenging and not easy to control every vulnerability and make sure that our solution does not use a package with serious vulnerabilities. Today's threat to supply chain security is unpatched software. In this article, we will learn how to improve code security with GitHub security features.
Security Role in the Software Supply Chain
Application implementation nowadays looks slightly different than a few years ago. Open-source software has become a standard. Using open-source libraries in different kinds of projects is something normal nowadays, and we do not have to write every part of our application from scratch.
When using some open-source code or a library, it is worth not forgetting about security aspects. Industry data suggests that 99 percent of codebases contain open-source code. This is a lot! With this fact, we have to remember about dangers related to vulnerabilities and bugs that can lead to bad consequences. Many examples can be provided where an open-source library was used, but then serious vulnerability was discovered, and in the end, there were problems with keeping security at the right level.
Before we discuss the role of security in the software supply chain, we have to find out what it is. Software supply chain is anything that goes into or affects the source code from development through Continuous Integration and Delivery pipelines until it gets deployed into production and used broadly. Any examples? The software supply chain includes information about who wrote a specific fragment of code, which tools were used to apply security scanning, what is the infrastructure used to host our solution, or what dependencies are used.
When a solution is being developed, often security part is missed or left as the last step in the whole process of the software supply chain. One of the biggest threats to supply chain security nowadays is unpatched software. This is why we should not include security assessment as the last step of our software supply chain. Security should be an ongoing part of software development to make sure that any potential vulnerabilities can be quickly mitigated.
Keeping an eye on every security aspect can be challenging, especially for developers who are focused on the code implementation rather than scanning and searching for vulnerabilities. Also, it is important to provide security feedback to developers right away so that any potential vulnerabilities are eliminated as quickly as possible.
In the following, we will focus on the security features available on GitHub to make sure that our software supply chain is more secure.
The Sample Application
To present some of the security features in action, you can use the sample application that is available on this GitHub repository. This repository contains a simple web game written as an ASP .NET Core MVC application in .NET 5. We will not focus on the implementation details in this article. Our goal is to discover and understand different security features available on GitHub and see security scanning in action. With this repository, you can try security features on your own. Use the for-security-features-testing branch as a starting point by running the following command on your machine:
git clone -b for-security-features-testing https://github.com/auth0-blog/Globomantics-Games.git
GitHub Security Features to Keep Secure Your Repository
GitHub provides a few built-in tools to keep our source code security at the right level. However, we can also integrate third-party tools. Let's start by discussing GitHub's built-in security features first.
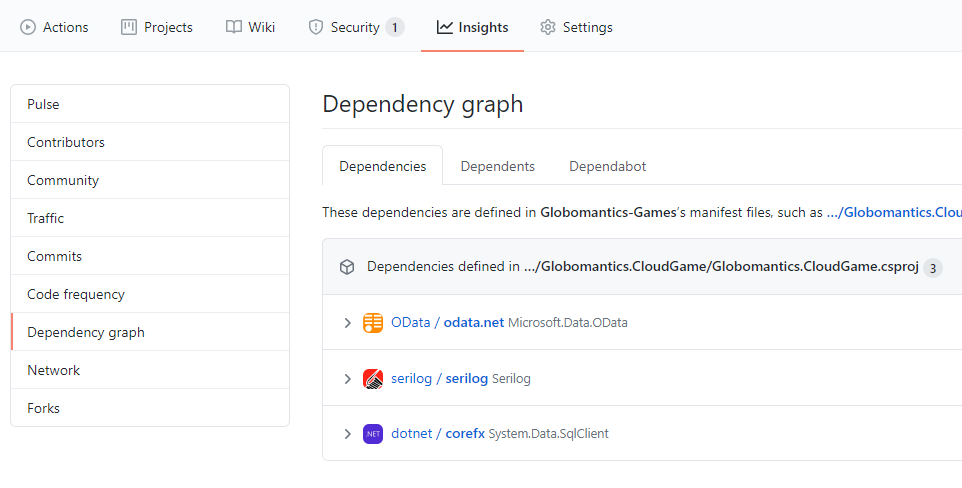
Repository dependency graph
When using open-source libraries in our project, it is sometimes hard to track all dependencies. Of course, we can open our package managers (like NuGet) and see all the open-source packages added to the project. But what about a deeper knowledge about other packages used by the packages we referenced? Confusing and challenging, right? This is where the GitHub repository dependency graph can be helpful. With a dependency graph, we can recursively track all of the dependencies used in the project.
We can find the dependency graph by opening our repository's main page on GitHub, under the Insights tab as in the picture below.
The dependency graph is enabled by default for each repository hosted on GitHub. It can scan common package manifests like:
package.jsonrequirements.txtpackages.config.csprojfiles
Automated dependency scanning
Once we know what dependencies are used in our project, it would be nice to scan them automatically and detect potential vulnerabilities. This is where automated dependency scanning can help. GitHub provides automated dependency alerts (using Dependabot) that watch dependency graphs. It cross-references the target versions of your project's dependencies with the versions on known vulnerability lists aggregated in the GitHub Advisory Database.
When a risk is detected, the project is alerted as presented in the picture below.
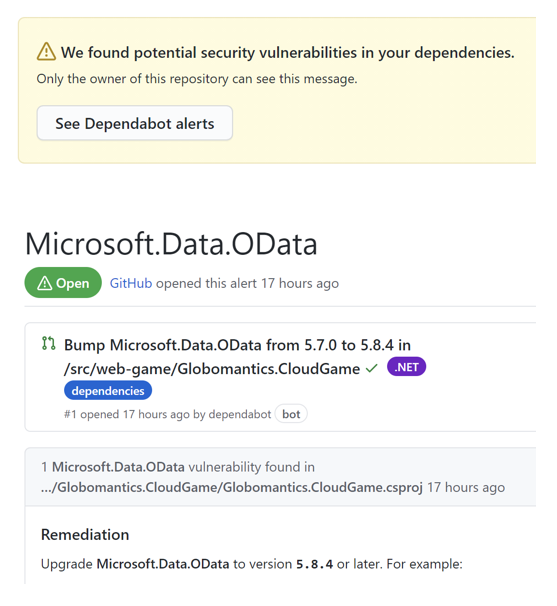
This is not enough. To make it easier for developers, once a vulnerability is detected in one of the libraries used, an automatic pull request is created, which contains the upgraded version of that library.
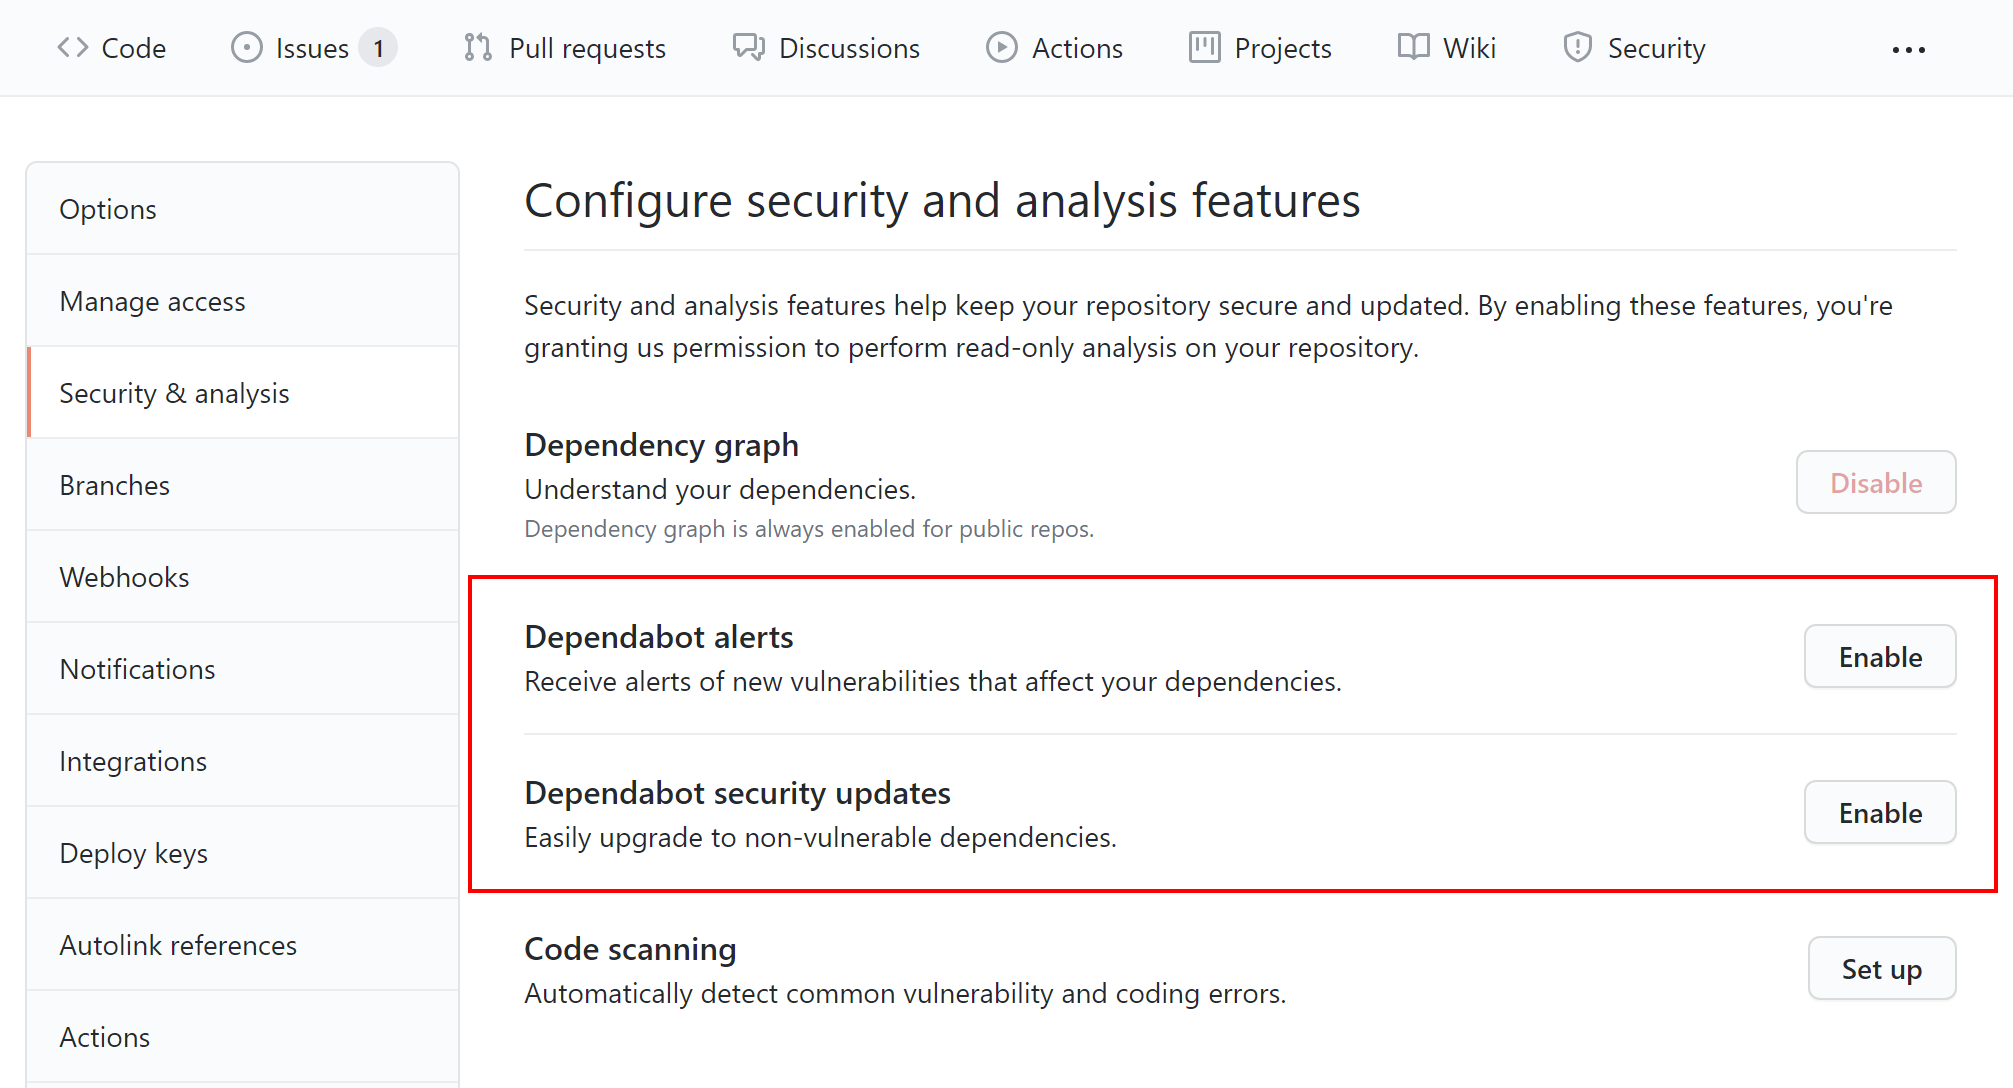
We can enable the Dependabot alerts and the Dependabot security updates features accessing the Security & analysis section under the Settings tab on GitHub, as in the picture below:
Secret scanning
Storing secrets and credentials in any source code repository is a bad practice. When a push is done to a public repository, GitHub scans the content of the commits for secrets and credentials.
What is more, GitHub detects known types of secrets from different providers like Adobe, Microsoft Azure, Atlassian, Dropbox, and so on.
When a secret is detected, the repository owner is alerted. The below picture presents the scanning flow.
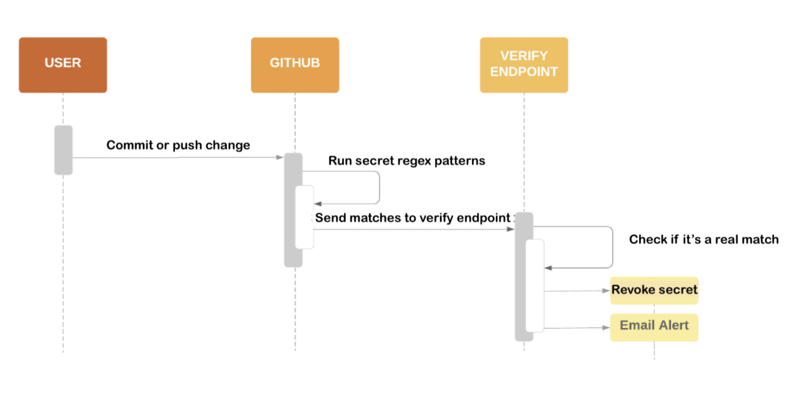
Once a new push with a secret embedded in the source code is done, GitHub applies regex scanning to verify if there is any secret with a known pattern. If a secret is detected, GitHub sends the found secret value to a service provider's verify endpoint. If verification is successful, the secret is revoked and an email alert is sent to the source code repository owner.
Secret scanning is available for all public repositories and for private repositories owned by organizations where GitHub Advanced Security is enabled. You can read more about the secret scanning partner program here.
Security policy
Automated scanning is helpful, but it is also important to provide a way for other developers and people who use/contribute to our project, in general, to report found vulnerabilities. We can facilitate reporting security issues by providing a SECURITY.md file in the repository's root, docs, or .github folders. This file provides guidance on how to report vulnerability and contact the repository owner or which versions are supported with security updates. Providing guidance through this file can speed up the resolution of critical issues. When someone creates an issue in our repository, they will see a link to our project's security policy.
The following picture shows the document you can find in our sample project:

By convention, the SECURITY.md file lives in the root of our GitHub repository. There is no default template for security policy. However, we should try to put at least our contact information and explain how reported security issues can be verified. The security policy file is part of default community health files on GitHub, so it means that we have to name it exactly in this way: SECURITY.md.
Automated code scanning
With GitHub Actions, we can enable automated code scanning so that each time a new merge is done, our code will be scanned. With code scanning enabled, we can analyze and find security vulnerabilities and errors in the code hosted in our GitHub repository.
GitHub provides a built-in code scanning tool called CodeQL, but we can integrate other third-party tools, of course. Adding code scanning is useful to help prevent developers from introducing any new security problems into the source code. Code scanning can also help improve our code quality.
At a high level, CodeQL is an analysis engine used by developers to automate security checks, and by security researchers to perform variant analysis. In the following section, we will discover how to enable code scanning with CodeQL and what configuration options are available. To learn more about CodeQL, check out the official documentation.
Repository Code Scanning with CodeQL
When using CodeQL, our source code is treated as data. Security vulnerabilities, bugs, and other errors are modeled as queries that can be executed against databases extracted from source code. There are three main steps in CodeQL analysis:
- Preparation, preparing the code by creating a CodeQL database.
- Analysis, running CodeQL queries against the database.
- Interpretation, interpreting the query results to check if any vulnerabilities or code bugs were found.
CodeQL can be used to scan many different languages like C++, C#, Java, or Phyton. We can use multiple queries when CodeQL scanning is done. To make it easier, we can use query suites. CodeQL query suites are .qls files that allow us to pass multiple queries to CodeQL without having to specify the path to each query file individually.
In the following, we are going to see how to use the Security and Quality query suite to detect bugs and security issues in the source code.
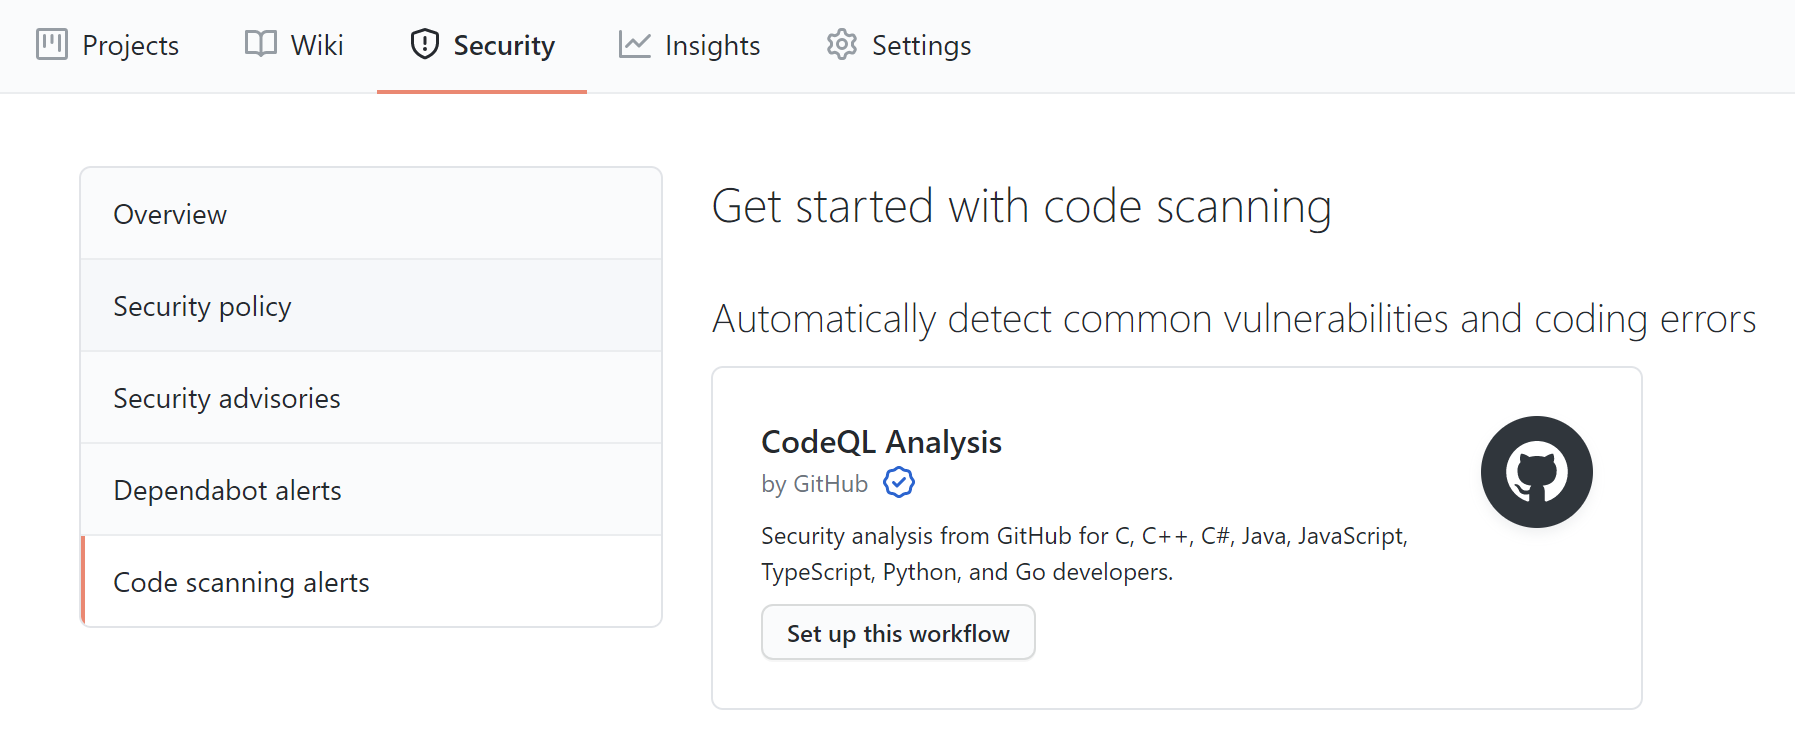
To enable CodeQL scanning, we open the Security section and select Code scanning alerts. Then we click the Setup this workflow button within the CodeQL Analysis item.
Now, replace the default code of the workflow with the following.
name: "Build and scan project with CodeQL"

on:
  pull_request:
    branches: [ main ]

jobs:
  analyze:
    name: analyze
    runs-on: ubuntu-latest
    permissions:
      actions: read
      contents: read
      security-events: write

    strategy:
      fail-fast: false
      matrix:
        language: [ 'csharp' ]

    steps:
    - name: Checkout repository
      uses: actions/checkout@v2

    - name: Initialize CodeQL
      uses: github/codeql-action/init@v1
      with:
        languages: ${{ matrix.language }}
        config-file: .github/workflows/codeql/codeql-config.yml

    - name: Autobuild
      uses: github/codeql-action/autobuild@v1

    - name: Perform CodeQL Analysis
      uses: github/codeql-action/analyze@v1
Once replacing the existing code, we can commit the codeql-analysis.yml generated file. Now, let's discuss its structure.
First of all, we can decide when to run the scanning. In our case, the scanning is executed once a pull request is created to merge changes into the main branch. In the jobs section, we declare a runner environment specified by runs-on. By specifying the permission within a job definition, you can configure a different set of permissions for the GITHUB_TOKEN for each job, if required. You can read more about job permissions in the official documentation.
In the strategy section, we can declare the languages for which scanning should be applied in the project. In our case, we want to scan for the C# language. We declare the languages in the matrix section. With fail-fast set to false, we avoid breaking the whole workflow if scanning fails for one of the declared languages.
In the steps section, there are the steps of the full process:
- Checkout repository, to checkout project's code for scanning.
- Initialize CodeQL, to initialize CodeQL scanning for the languages declared in the
matrixsection. In theconfig-filesection, we can provide a path to thecodeql-config.ymlfile where we declare the query suites which to use during the scanning. In this case, we use thesecurity-and-qualityquery suite. Thecodeql-config.ymlfile is not mandatory, but it helps to keep the CodeQL scanning script more readable. We can also use this file to disable the default queries and to specify which directories to scan during the analysis. - Autobuild, to build source code.
- Perform CodeQL Analysis, to perform the analysis and publish the report.
Here is the content of the codeql-config.yml file:
name: "Security and Quality"

queries:
  - name: Security and Quality
    uses: security-and-quality
Once the scanning is completed, we can check the report under the Security tab in the Code scanning alerts section:
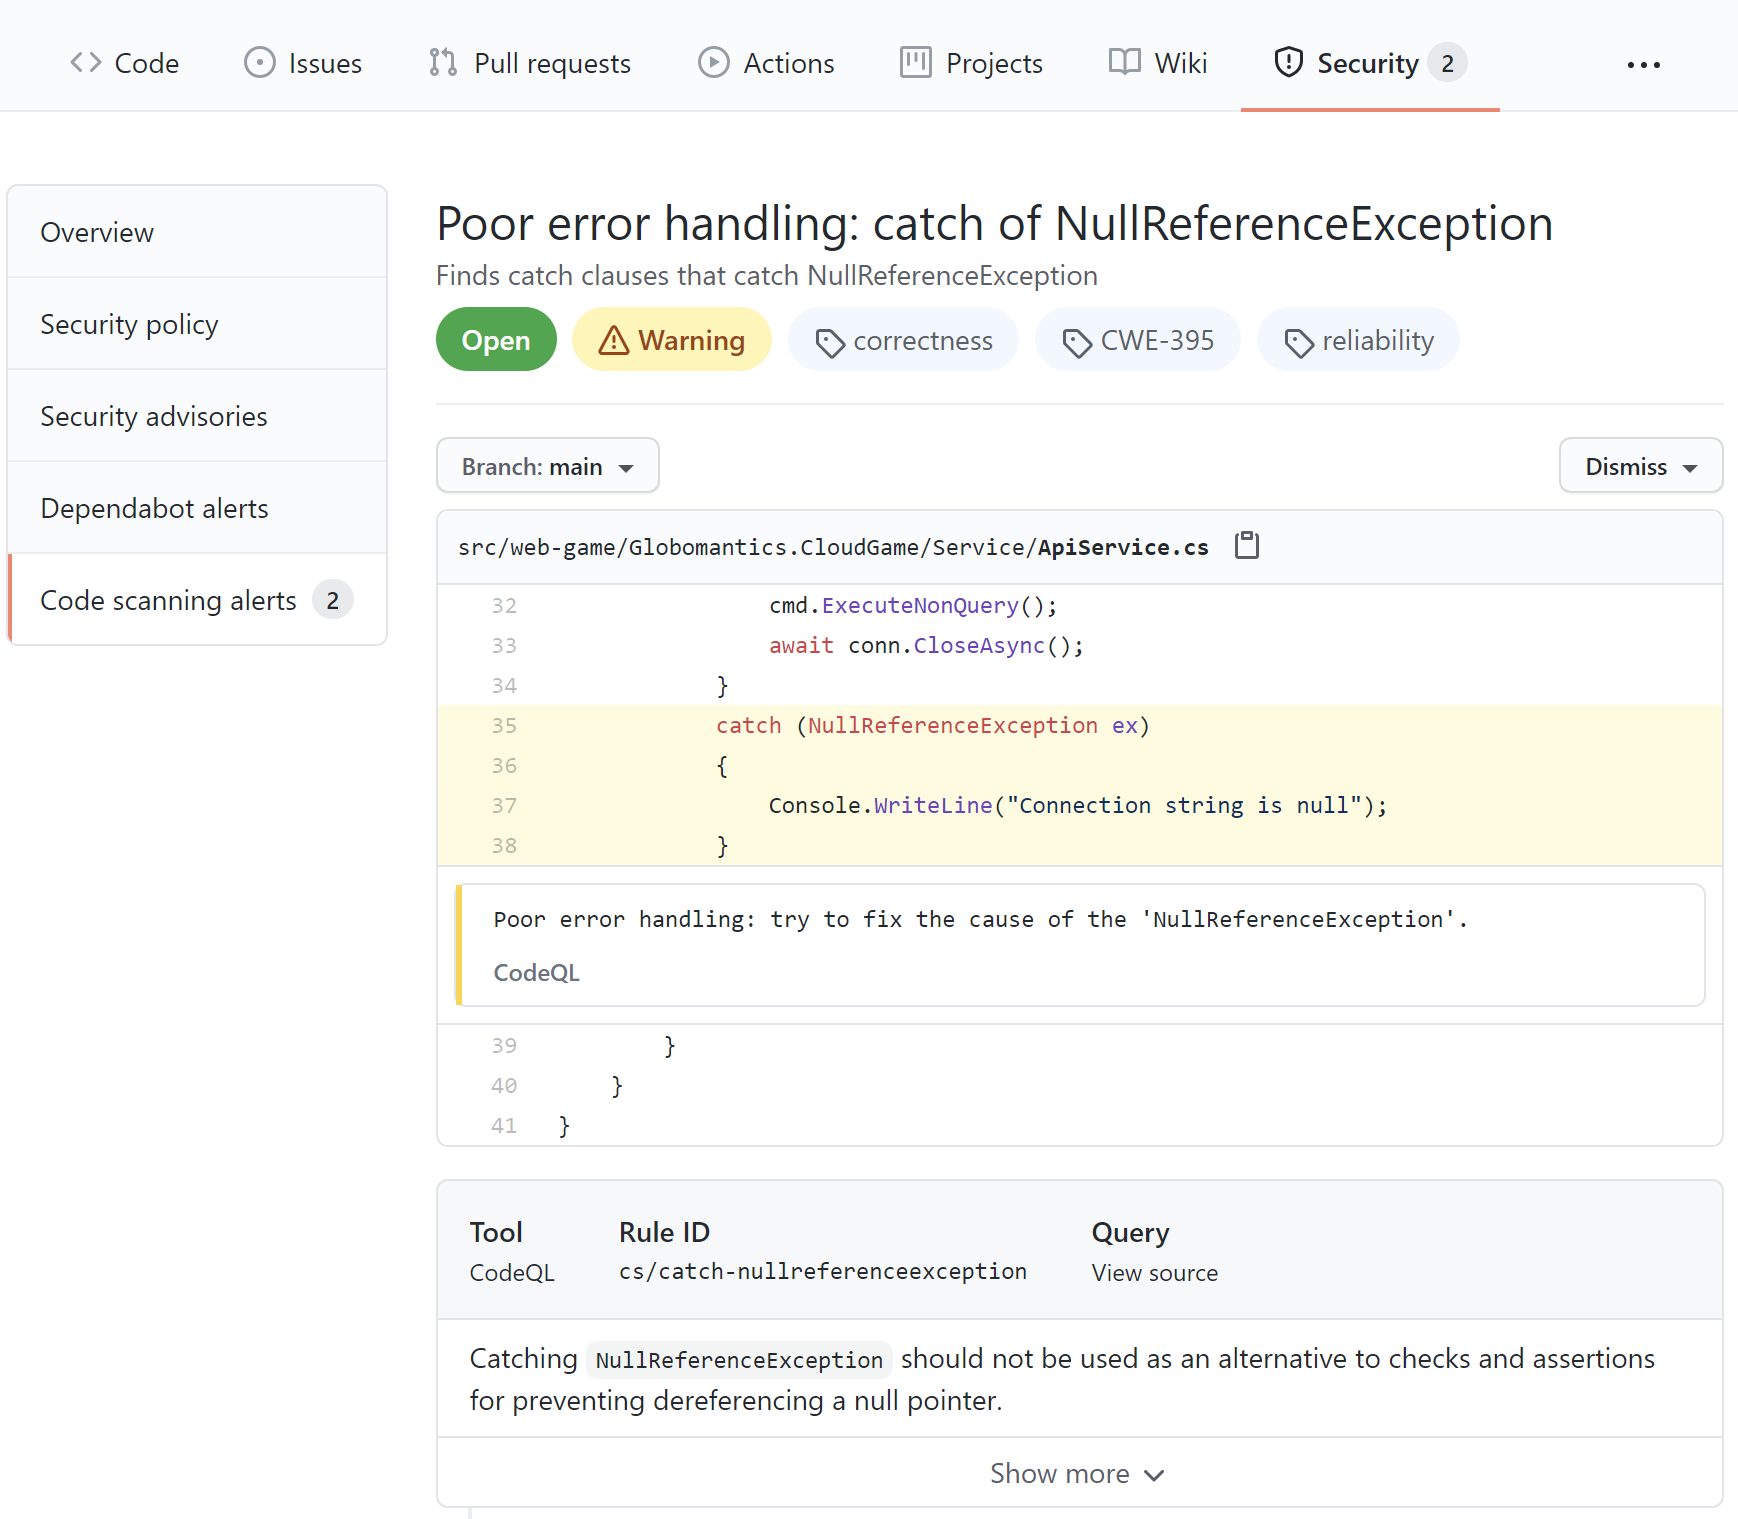
In the report above, we can see a recommendation to check if the variable is null first and then try to access it instead of catching a NullReferenceException. With CodeQL, we can discover many different security issues and get hints on how to improve our code quality and eliminate potential bugs. I recommend learning more about CodeQL analysis by reading the official documentation.
Learn web security through a hands-on exploration of some of the most notorious threats.
Download the free ebook
License Compliance Management
When talking about open-source software, it is important to remember about license compliance. There are many different types of licenses, and we have to carefully verify them before we use an open-source library in one of our projects. The most commonly used open-source licenses are:
- GNU General Public License (GPL)
- The Apache License
- MIT License
- GNU Less General Public License (LGPL)
For instance, GPL is a copyleft license. Using a copyleft license means that software products containing an open source copyleft license must be released with the same copyleft license. So, if we use a GPL-licensed library in our software, we cannot distribute it with an MIT license, for example.
MIT is a permissive license. Software licensed under the MIT license can be used and modified without limits — as long as a copy of the original MIT license and a copyright notice are added to it.
So, we have to be careful in this case because this can be problematic when we want to commercialize our software product.
GitHub does not provide a license scanning feature by default. Third-party tools can be used to set up license scanning. For example, Snyk is one of these third-party tools. With Snyk Open Source License Compliance Management, we can scan our project and verify what licenses are used in the libraries we use.
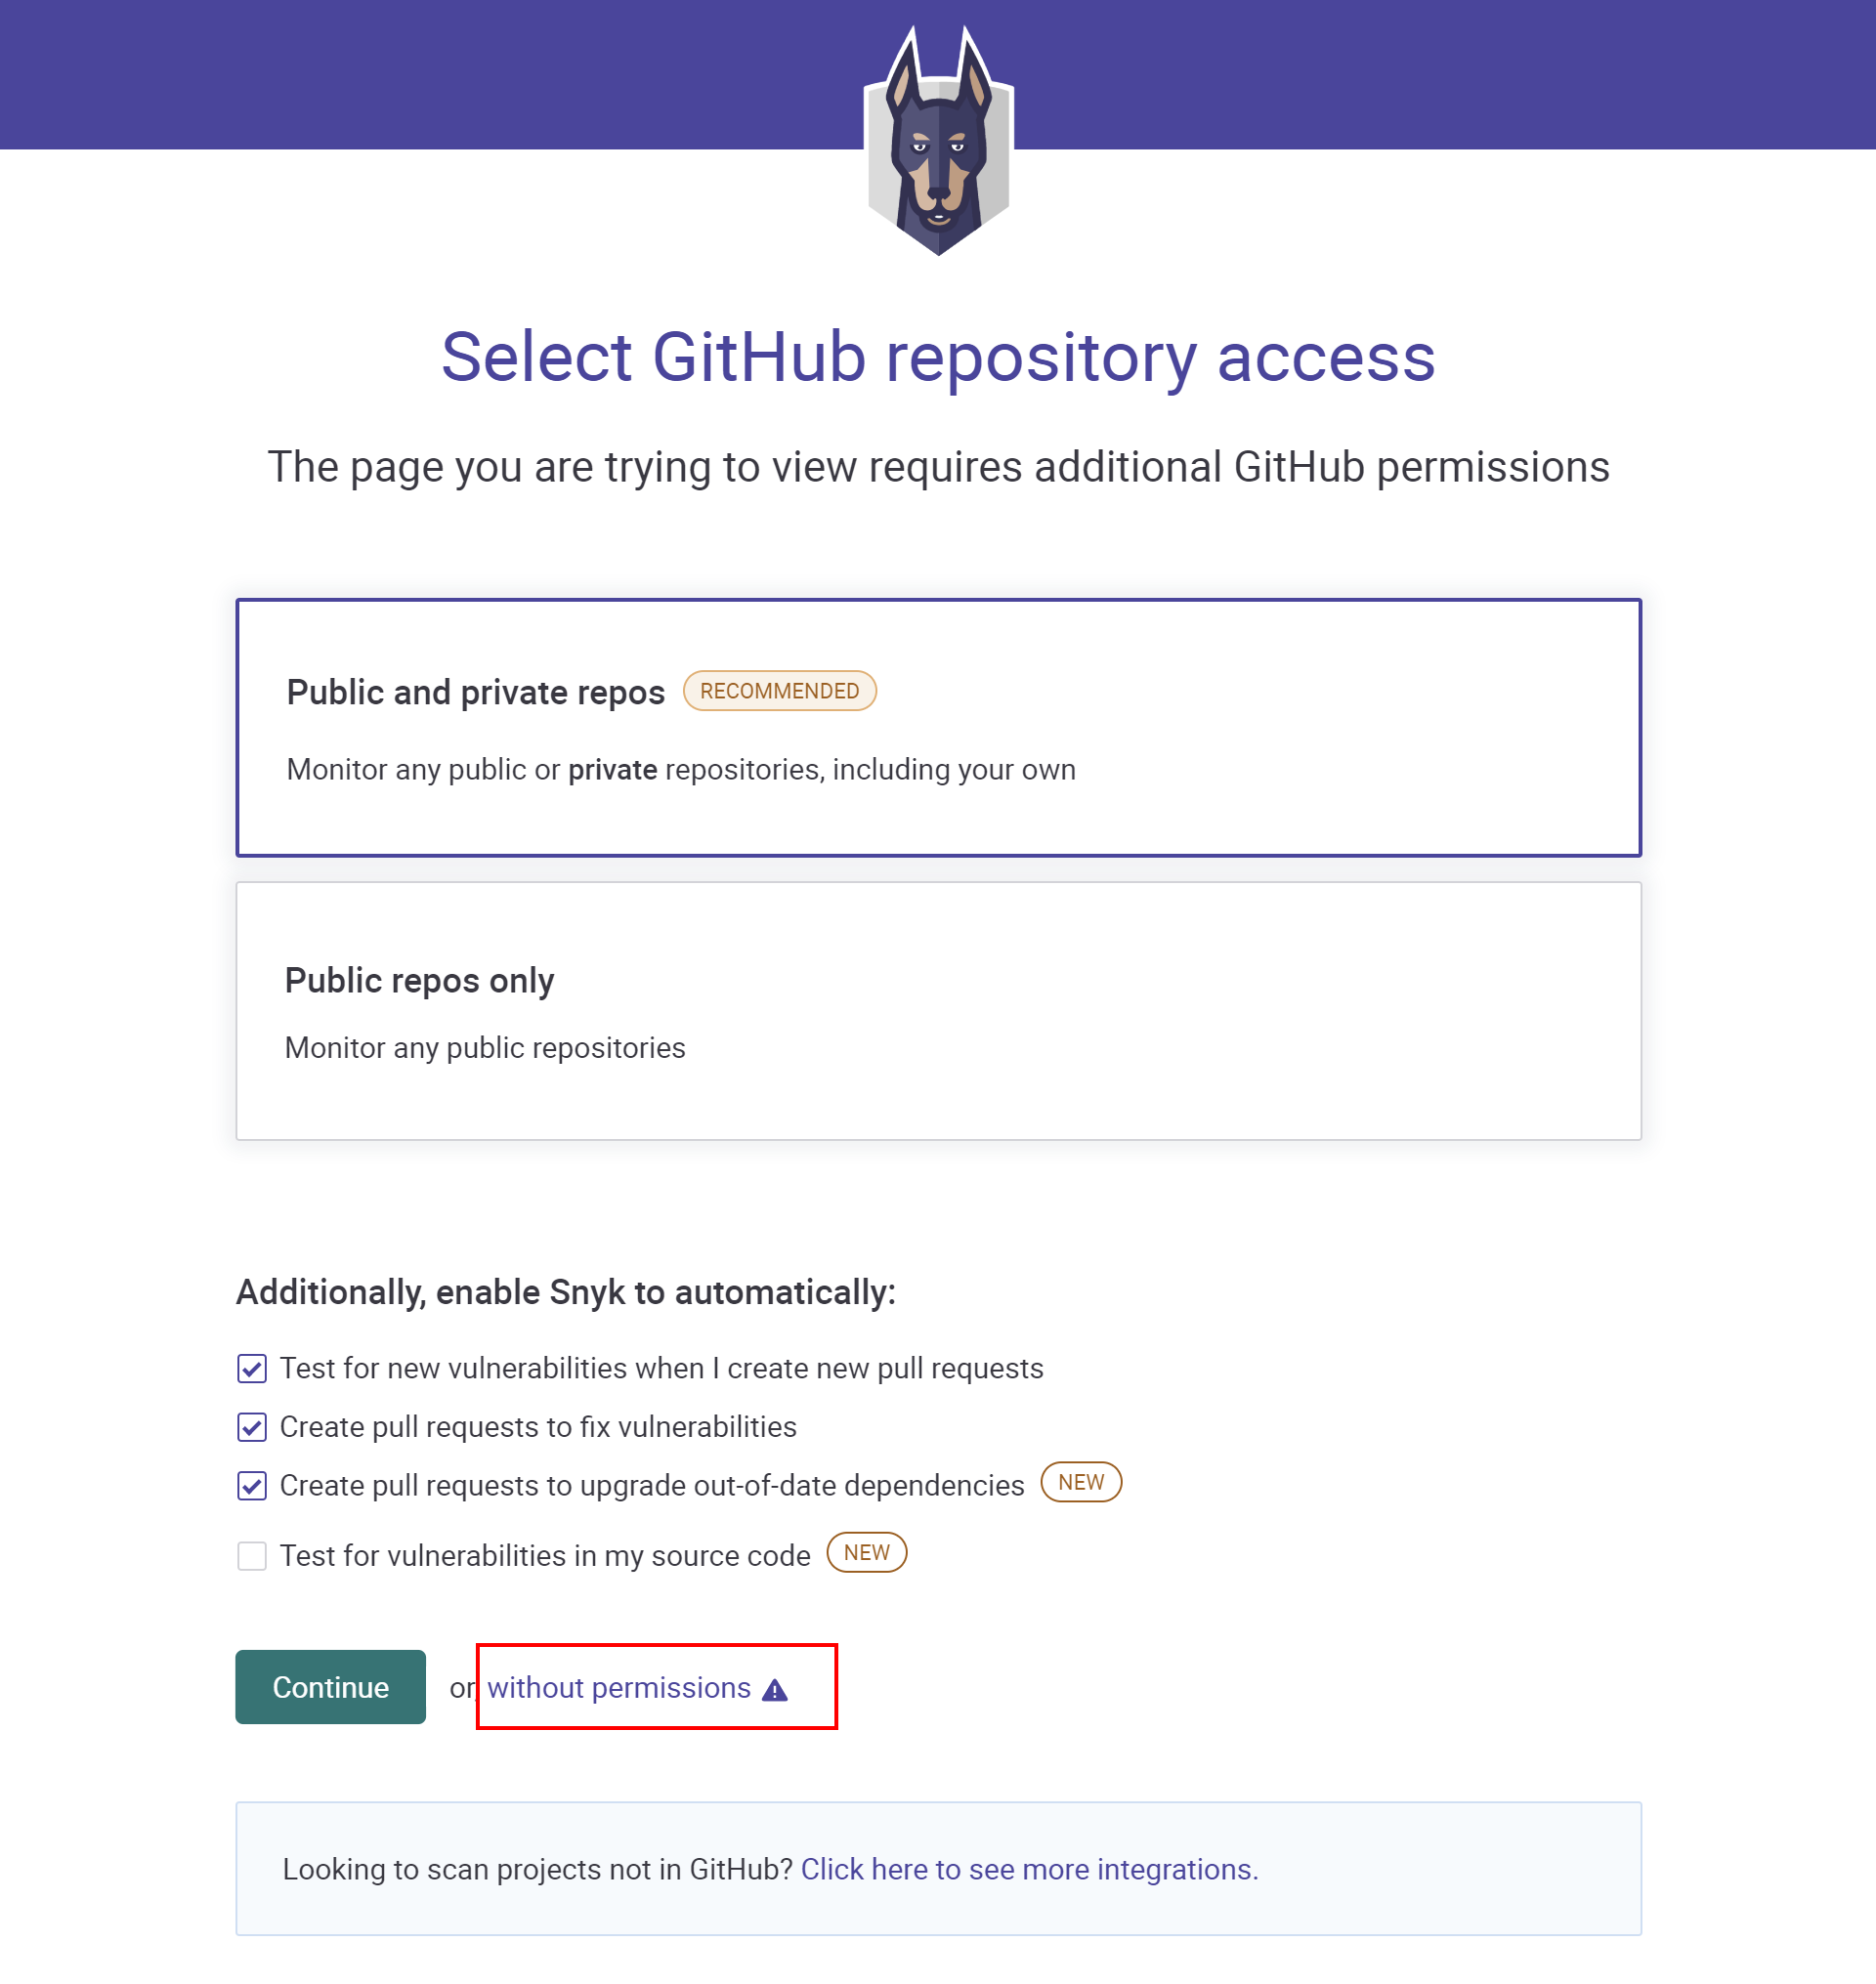
Snyk license scanning is available in the paid plan, but a 14 days trial version is also available. Once we sign in to app.snyk.io using a GitHub account, we can select which project we would like to scan. In our case, let's continue using Snyk without granting direct permissions to the repository on GitHub. We will see how to connect GitHub to the Snyk API in a while. So, let's click Continue without permissions as presented below:
In the next section, we provide the URL to our public repository on GitHub. In our case, it is https://github.com/auth0-blog/Globomantics-Games). Then, let's click the Import 1 repository button. Once we are signed in, we can activate the 14 days trial by clicking the Start free trial button.
At this point, let's click the gear icon in the right top corner of the Snyk website. From the left bar, we have to switch to Licenses. This is where we can see the list of all available licenses discovered in our project once the Snyk license scanning is applied.
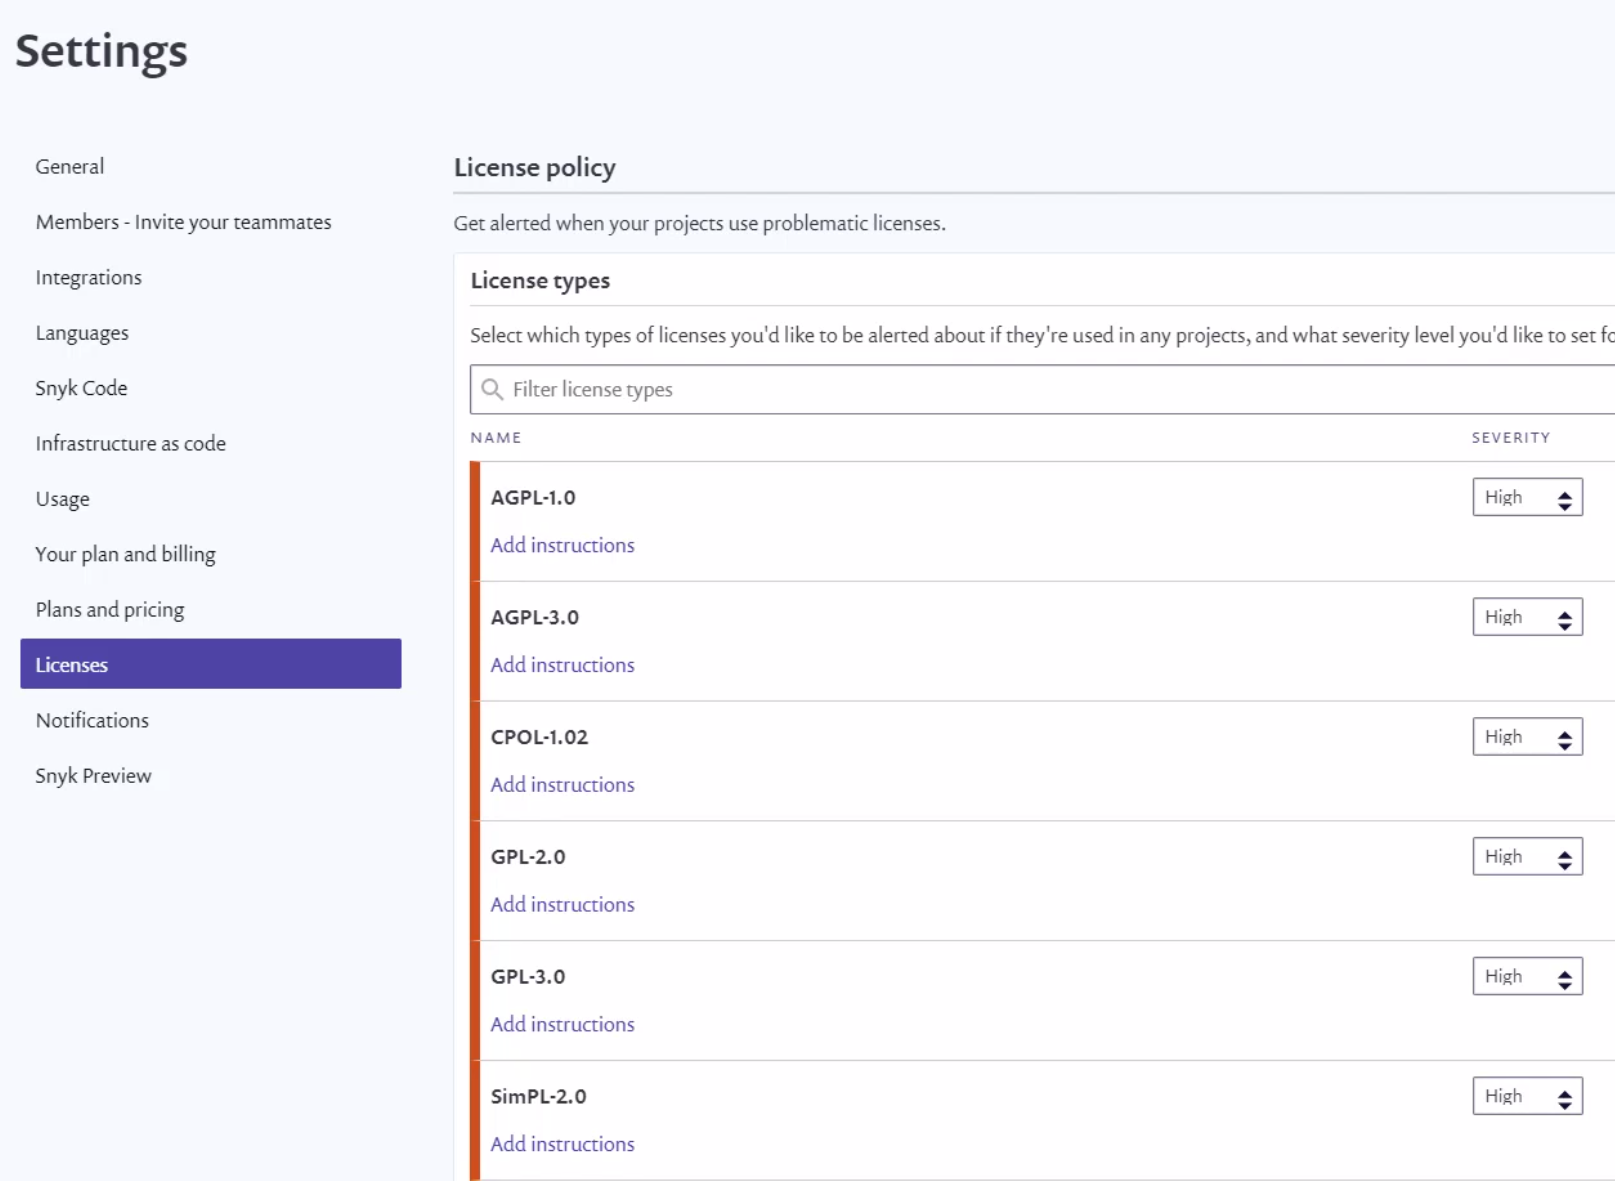
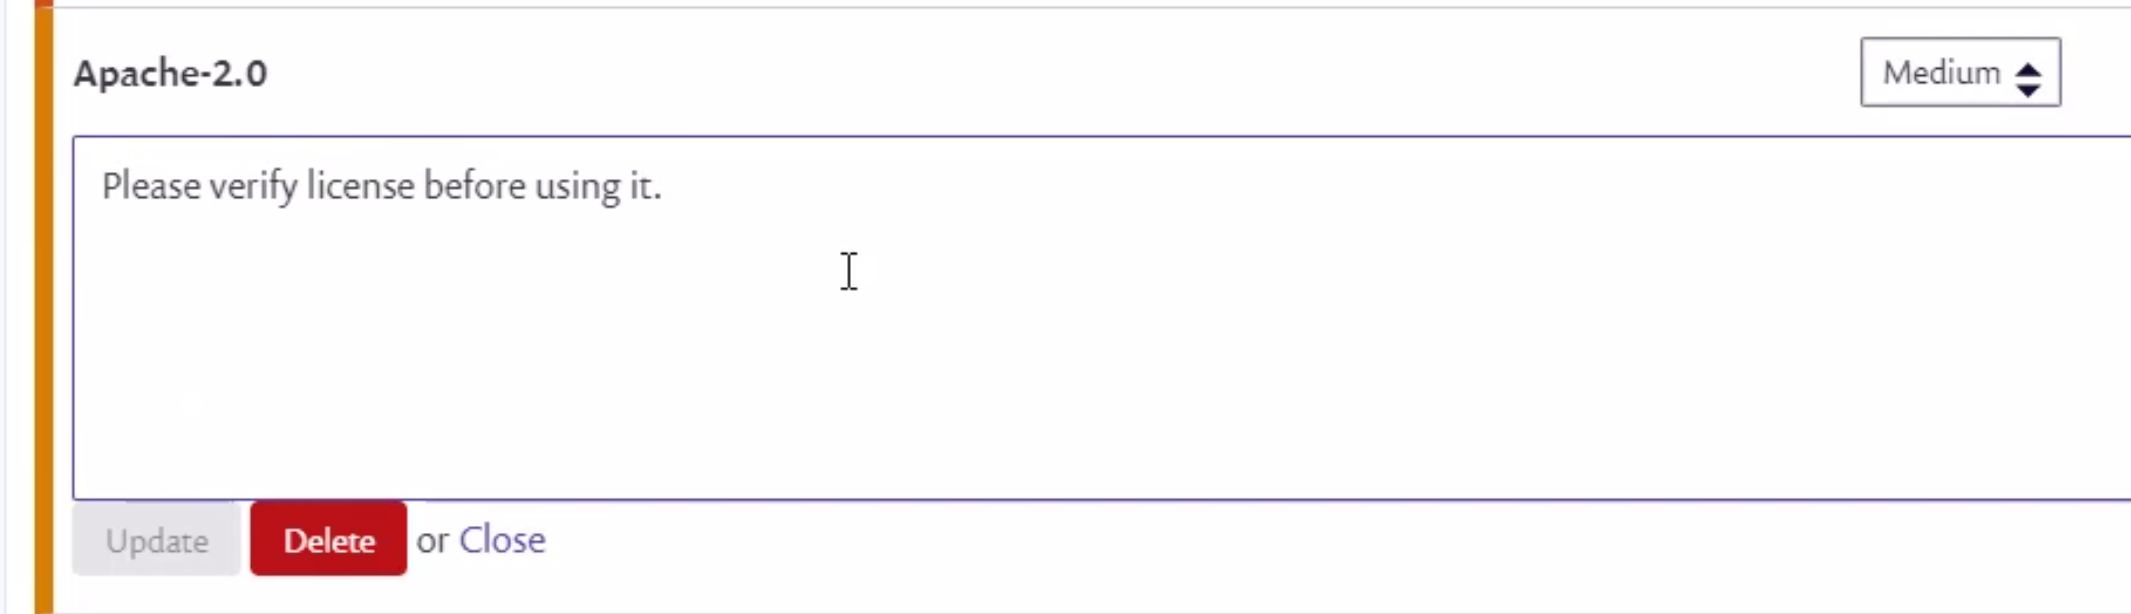
As we can see in the picture above, we can assign different levels of severity to specific license types (None, Low, Medium, or High). Let's select the Apache-2.0 license from the list. We can add instructions on what should be exactly verified when this type of license is found in our project. Notice that Severity is set to Medium.
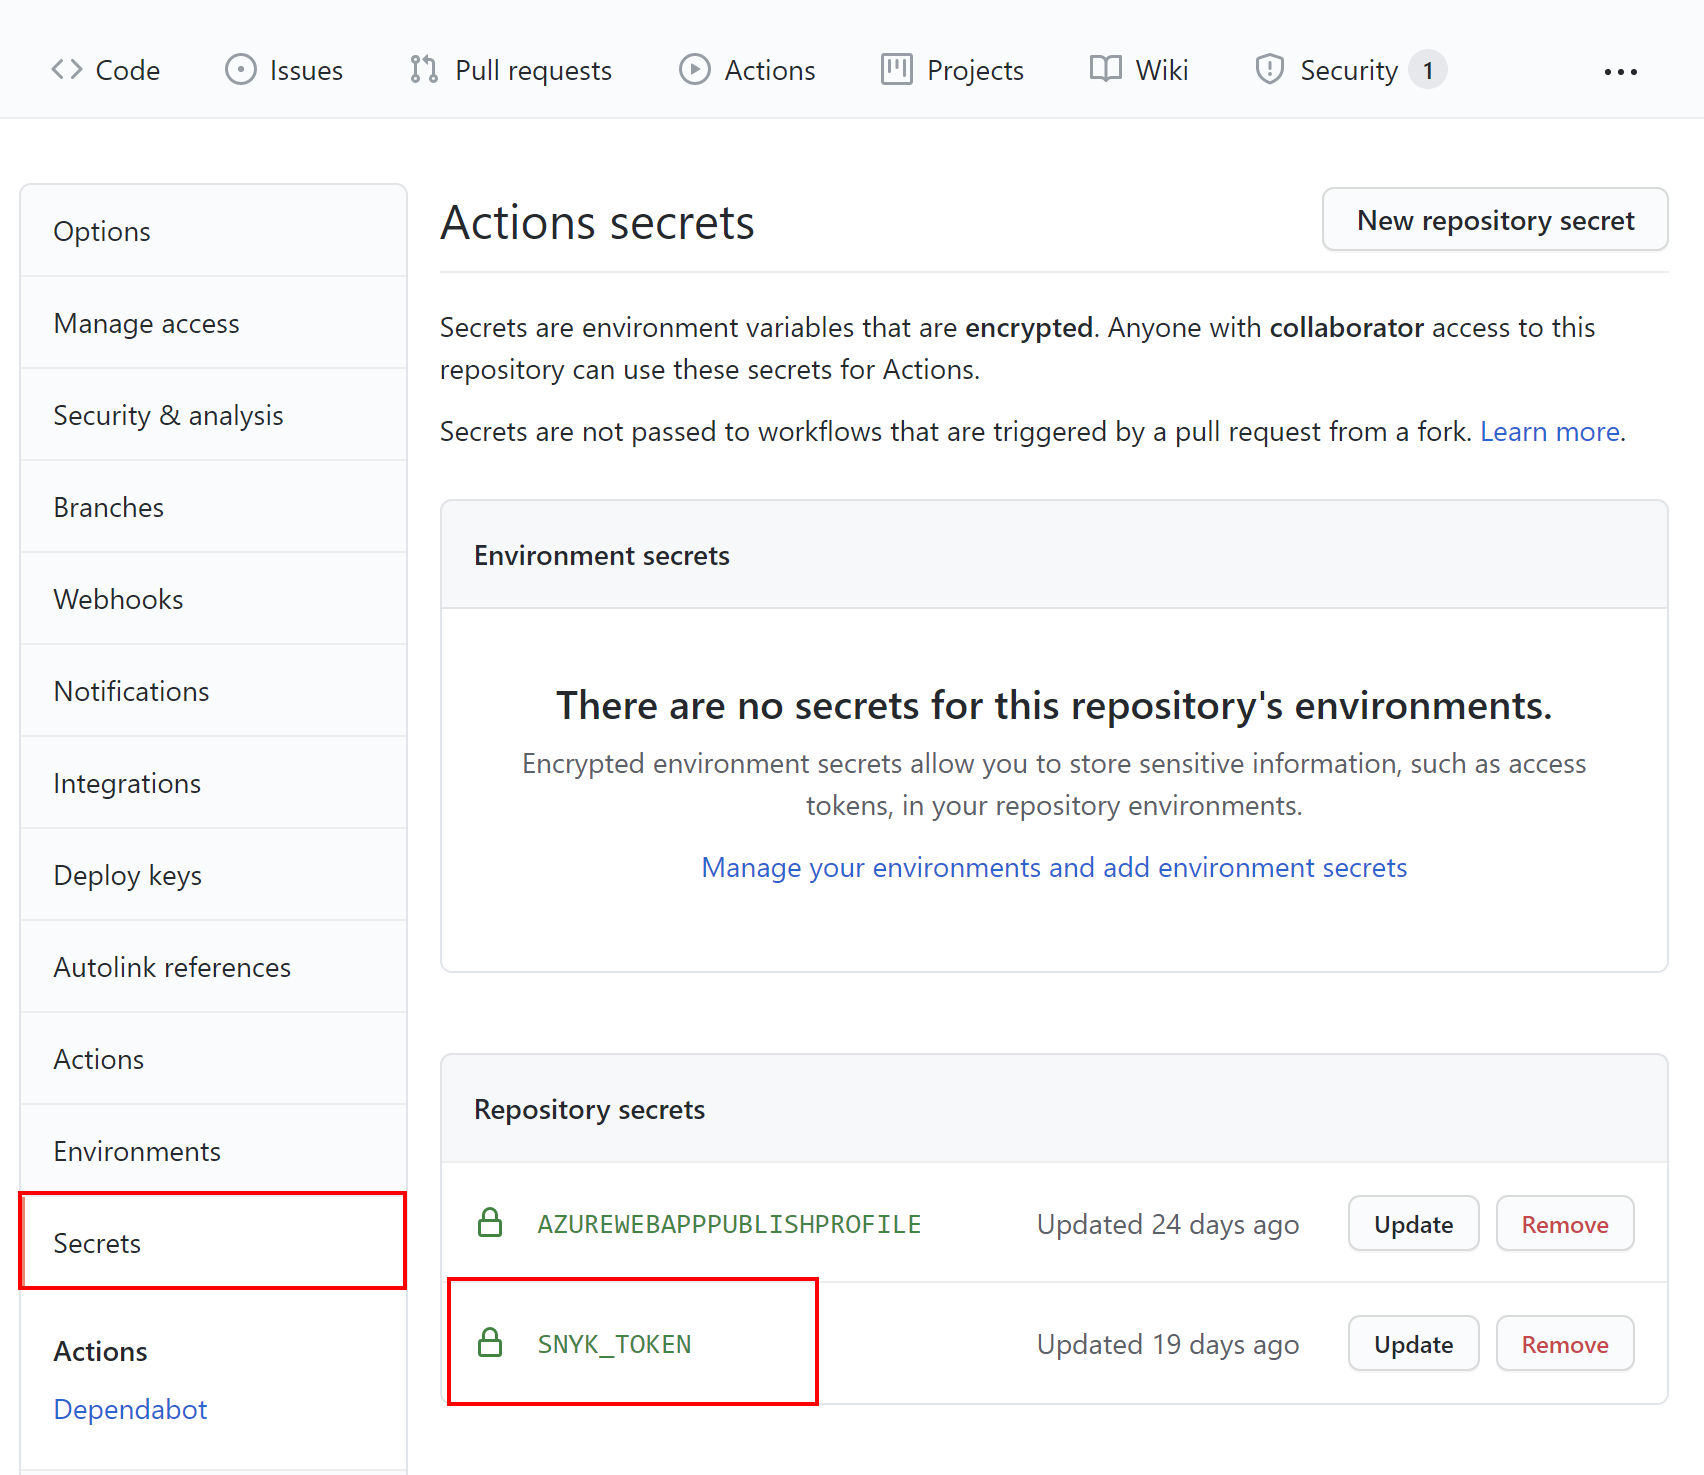
Now, to enable Snyk scanning on our code, we need to obtain an access token from Synk and store it under the Secrets section on GitHub. So, let's click the avatar in the right top corner, and from the list, select Account settings. Under the Auth Token section, let's click Click to show to display the token. Finally, let's copy the token so that we can use it in the GitHub Actions workflow responsible for the license scanning.
Back on GitHub, we click the Secrets tab and select Secrets. We paste the token obtained from Snyk by using the New repository secret button. Once the secret is saved, it should be displayed on the list.
Now it is time to add the Snyk scanning workflow using GitHub Actions. Under the .github/workflows folder (the same where we put codeql-analysis.yml file for CodeQL scanning), we have to place the snyk-license-scanning.yml file with the following content:
name: "Build and scan project with Snyk"

on:
  push:
    branches: [ main ]

jobs:
  build-and-scan:
    runs-on: ubuntu-latest

    steps:
    - uses: actions/checkout@v2

    - name: Setup .NET
      uses: actions/setup-dotnet@v1
      with:
        dotnet-version: 5.0.x
    - name: Restore dependencies
      run: dotnet restore ./src/web-game/Globomantics.sln
    - name: Build
      run: dotnet build ./src/web-game/Globomantics.sln --no-restore
    - name: Test
      run: dotnet test ./src/web-game/Globomantics.sln --no-build --verbosity normal


    - name: Run Snyk to check for vulnerabilities
      uses: snyk/actions/dotnet@master
      continue-on-error: true # To make sure that SARIF upload gets called
      env:
        SNYK_TOKEN: ${{ secrets.SNYK_TOKEN }}
      with:
        args: --sarif-file-output=snyk.sarif --file=./src/web-game/Globomantics.sln --severity-threshold=medium


    - name: Upload result to GitHub Code Scanning
      uses: github/codeql-action/upload-sarif@v1
      with:
        sarif_file: snyk.sarif
Let's discuss its structure. We want to execute the scanning when a push to the main branch occurs. In the jobs section, we declare a runner environment specified by runs-on. In the steps section, there are a few required steps:
- Checkout repository, to checkout project's code for scanning.
- Setup .NET, which includes restoring dependencies with the
dotnet restorecommand, thendotnet buildto build project, anddotnet testto run tests if they exist in the solution. - Run Snyk to check for vulnerabilities, which communicates with the Snyk API to apply the code scanning. Notice that we have to fill
SNYK_TOKENwith the value we put in theSecretssection. There are also a few arguments:- The
--sarif-file-output=snyk.sarifargument provides the name of the file which contains the scanning report. - The
--file=./src/web-game/Globomantics.slnargument provides the path to the project/solution. - The
--severity-threshold=medium- parameter is used to report alerts with severityMediumand above.
- The
- Upload result to GitHub Code Scanning, which is responsible for uploading the scanning result so that we can see it under the Security tab.
Once we push any changes to the main branch, the scanning will be triggered. Let's check the scanning report shown below:
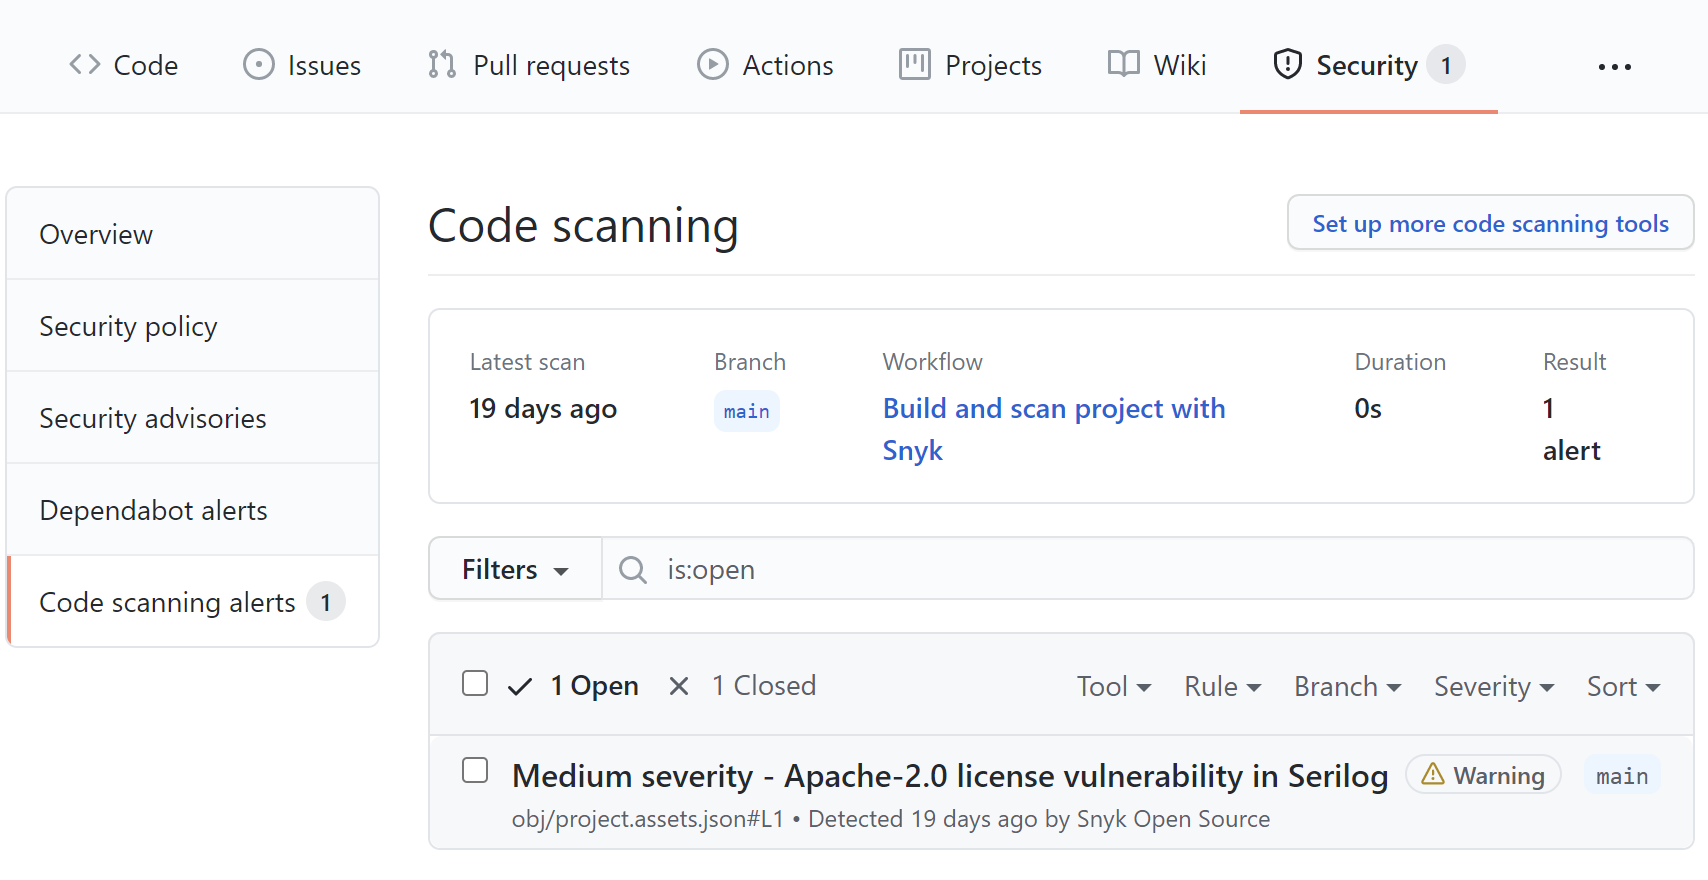
As we can see above, the Apache-2.0 license was found in one of the libraries we use: Serilog. Once we click on the alert, we can see the details shown below:
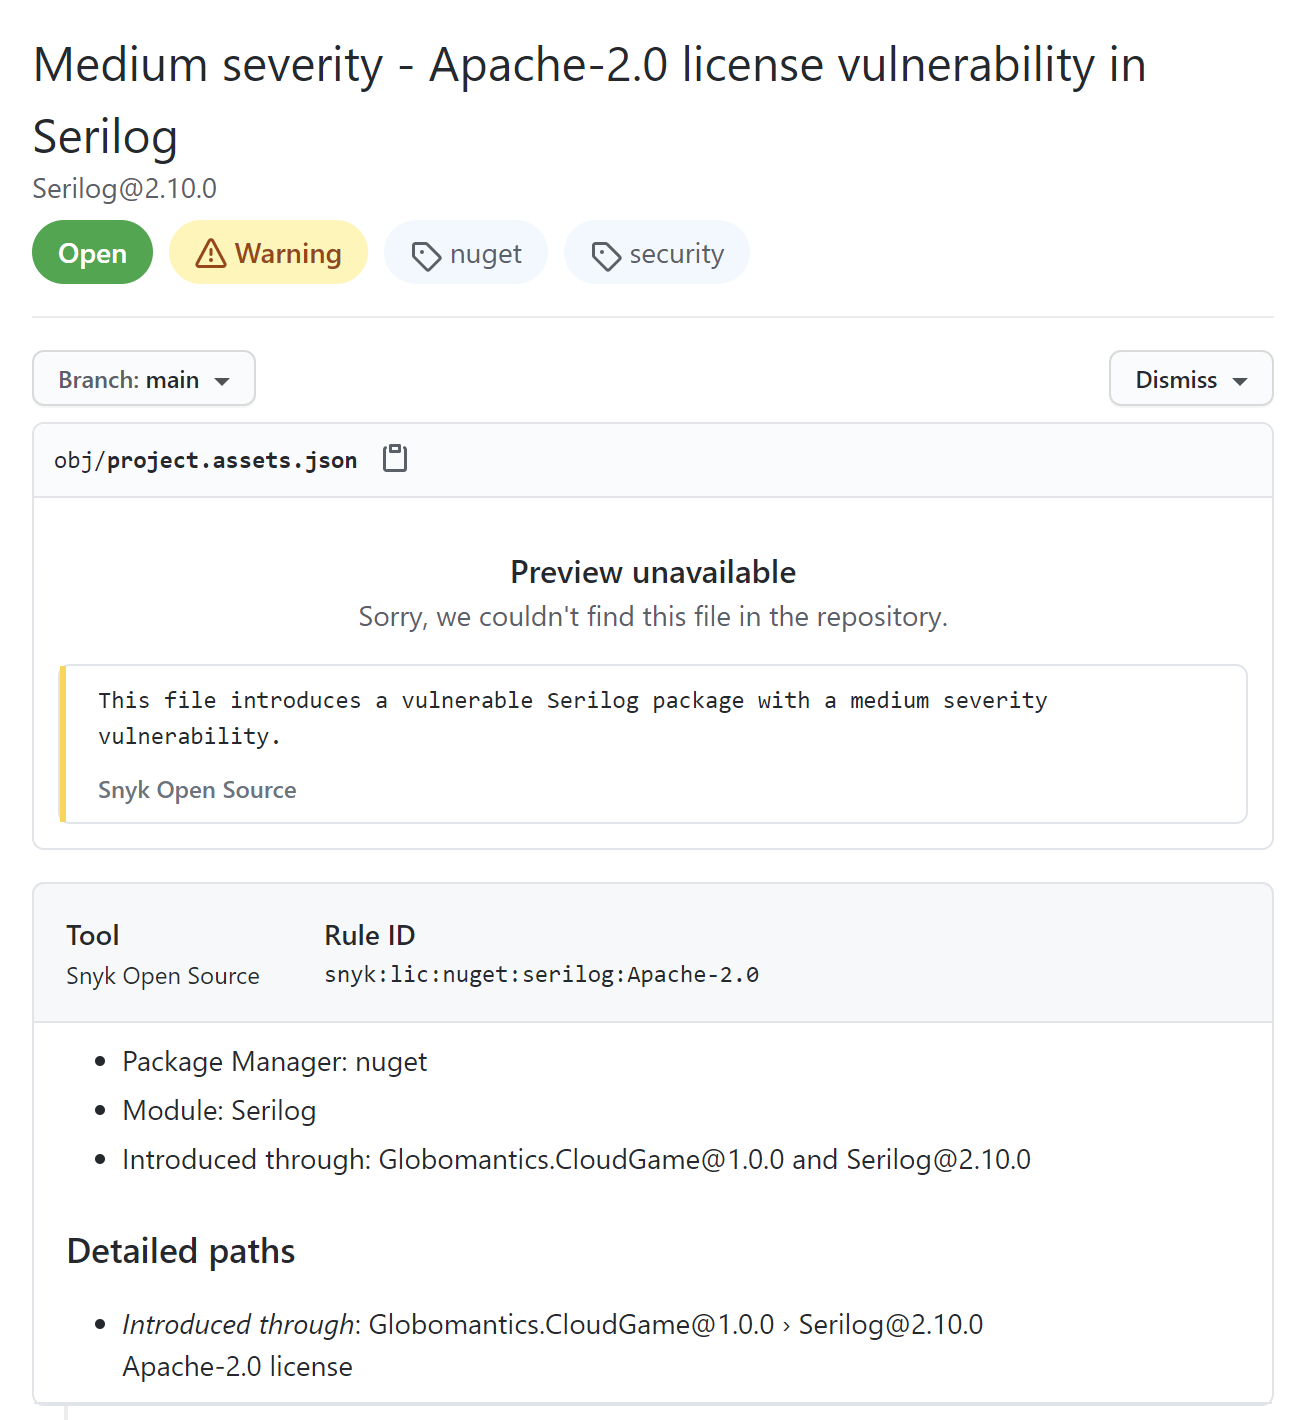
We can see that the Serilog library uses Apache-2.0 license, and we included this package in the Globomantics.CloudGame project using the NuGet package manager. The reason why we see this alert is the fact that we set the --severity-threshold parameter to Medium. In this case, we will be alerted whenever there is a library used in our project with the license for which we set the severity to Medium in the Snyk configuration.
Conclusion
In this article, we discovered how to enable and use GitHub security features to improve code security and software supply chain. We learned how to enable automated dependency scanning and updates, enable scanning with CodeQL, and verify license compliance using Snyk.
If you want to know more about what learned in this article, please check out the following documentation:
- Achieving DevSecOps with GitHub Advanced Security
- Configuring CodeQL runner in your CI system
- DevSecOps in GitHub
- Maintain a secure repository by using GitHub best practices
Aside: Securing ASP.NET Core with Auth0
Securing ASP.NET Core applications with Auth0 is easy and brings a lot of great features to the table. With Auth0, you only have to write a few lines of code to get a solid identity management solution, single sign-on, support for social identity providers (like Facebook, GitHub, Twitter, etc.), and support for enterprise identity providers (like Active Directory, LDAP, SAML, custom, etc.).
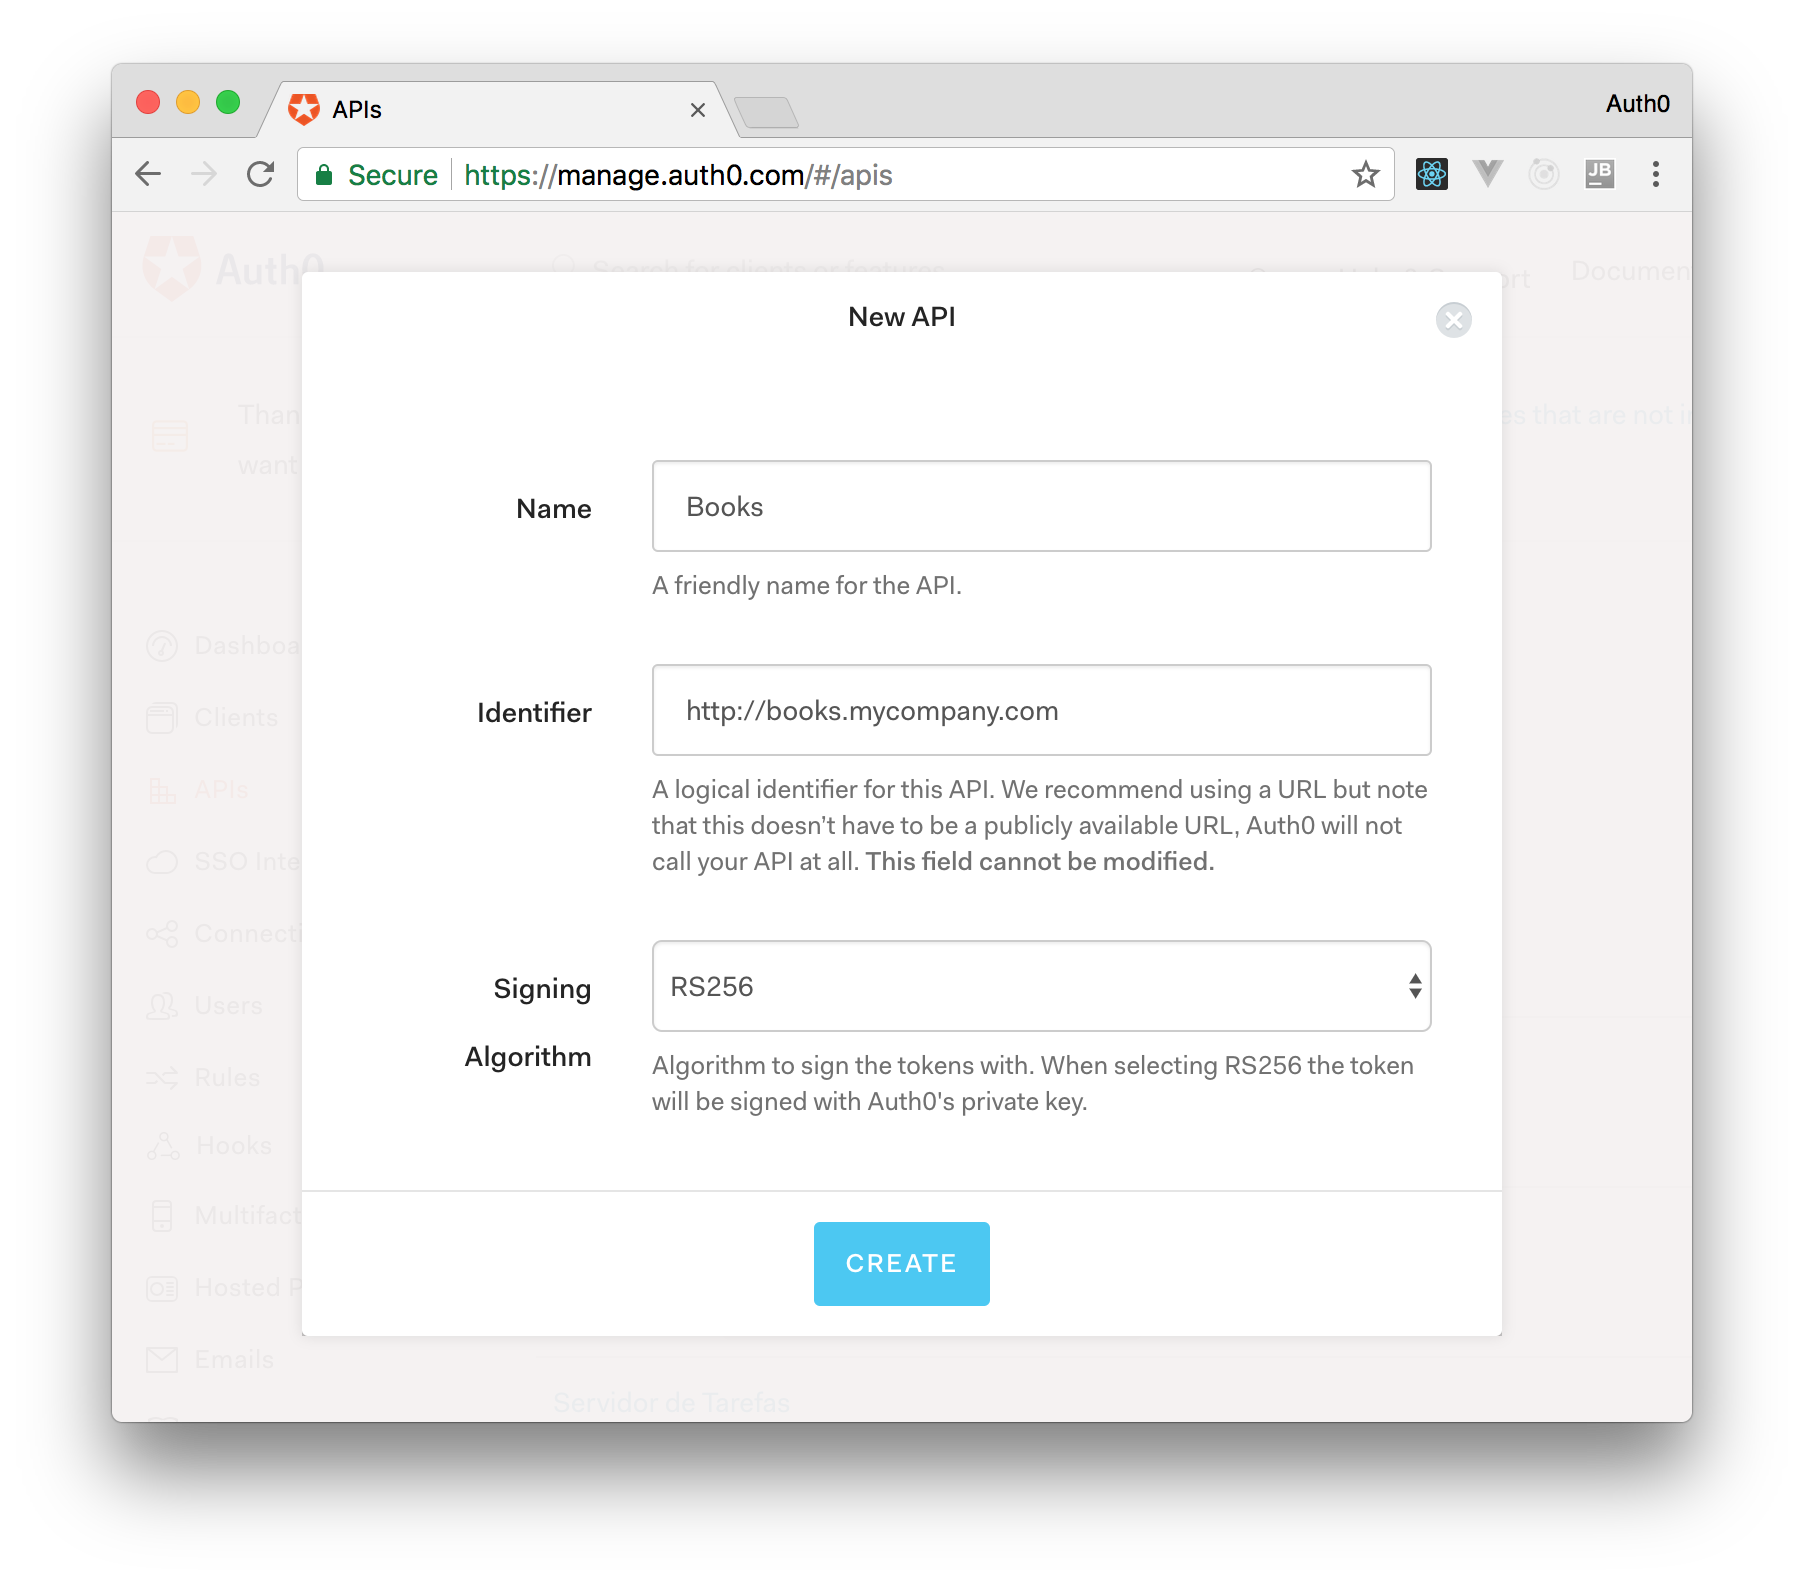
On ASP.NET Core, you need to create an API in your Auth0 Management Dashboard and change a few things on your code. To create an API, you need to sign up for a free Auth0 account. After that, you need to go to the API section of the dashboard and click on "Create API". On the dialog shown, you can set the Name of your API as "Books", the Identifier as "http://books.mycompany.com", and leave the Signing Algorithm as "RS256".
After that, you have to add the call to services.AddAuthentication() in the ConfigureServices() method of the Startup class as follows:
string authority = $"https://{Configuration["Auth0:Domain"]}/";
string audience = Configuration["Auth0:Audience"];

services.AddAuthentication(options =>
{
  options.DefaultAuthenticateScheme = JwtBearerDefaults.AuthenticationScheme;
  options.DefaultChallengeScheme = JwtBearerDefaults.AuthenticationScheme;
}).AddJwtBearer(options =>
{
  options.Authority = authority;
  options.Audience = audience;
});
In the body of the Configure() method of the Startup class, you also need to add an invocation to app.UseAuthentication() and app.UseAuthorization() as shown below:
app.UseRouting();
app.UseAuthentication();
app.UseAuthorization();
app.UseEndpoints(endpoints =>
{
    endpoints.MapControllers();
});
Make sure you invoke these methods in the order shown above. It is essential so that everything works properly.
Finally, add the following element to the appsettings.json configuration file:
{
  "Logging": {
    // ...
  },
  "Auth0": {
    "Domain": "YOUR_DOMAIN",
    "Audience": "YOUR_AUDIENCE"
  }
}
Note: Replace the placeholders
YOUR_DOMAINandYOUR_AUDIENCEwith the actual values for the domain that you specified when creating your Auth0 account and the Identifier you assigned to your API.
About the author

Daniel Krzyczkowski
Tech Mind Factory
Founder of Tech Mind Factory. Works as a Cloud & Identity Engineer, helping organizations design, build, and deploy modern identity solutions and secure cloud applications.
View profile