


Today, there is no standardized blueprint for securely building AI agents. Without adequate security, integrating these agents introduces a significant new attack surface to your AI agents. AI agents now handle sensitive user data, interact with APIs, automate decision-making, and act on behalf of users. Therefore, these agents require:
- Principle of Least Privilege: the agent must comprehend the user's defined access levels and operate strictly within those boundaries.
- Non-static access credentials: should be used when acting on behalf of a user. A common secret mustn't be shared among users or tools.
- Fine-grained access control: the mechanism for precisely managing access between an agent and a tool.
- A "Human-in-the-Loop" manual action/intervention: a step in a process requiring human involvement, typically for verification or decision-making.
In this comprehensive guide, we will provide a step-by-step demonstration of how to secure an Amazon Bedrock AgentCore Agent using Auth0 capabilities. The need for robust security in the realm of AI agents is paramount, and this guide will help demonstrate it.
Authentication and Authorization for AI agents.
Building secure AI agents currently lacks a standard blueprint. Without proper security, incorporating agentic AI introduces a significant new attack surface to applications. Modern AI applications handle sensitive user data, but they go beyond mere processing; they actively interact with APIs, automate decisions, and perform actions on a user's behalf. Consequently, these agents require least-privileged access to user data, non-static access credentials, and fine-grained access control.
Developing secure AI agents is a struggle, exacerbated by a lack of industry standards and emerging vulnerabilities. GenAI applications' role in handling sensitive user data, interacting with APIs, and automating decisions makes granular, dynamic, and least-privileged access essential. Several common misunderstandings about GenAI security often undermine these efforts:
- AI agents do not have inherent knowledge of the user's identity or context.
- Standard API keys are unsuitable for agents as they lack per-user context.
- Relying solely on prompt engineering is insufficient for ensuring LLM safety.
- A simple "Yes" is not adequate consent for performing sensitive actions.
- Role-based access control proves ineffective given the dynamic nature of information discovery.
- LLMs must never be allowed to access or handle credentials.
These misunderstandings frequently result in unauthorized data access, outdated permissions, compliance failures, weak authorization, exposure of secrets, and privacy breaches. Current, often flawed, developer practices, whether deliberate or accidental, are significant obstacles to the deployment of AI agents at scale.
Solution Prerequisites
Before starting, you need accounts for Auth0 for AI Agents, Auth0 FGA, and Amazon Web Services.
- Creating an Auth0 for AI Agents Account: If you are new to Auth0, create an account to start using, or if you already have an account, log in using your existing Auth0 credentials.
- Creating an AWS Account: If you already have an AWS account, you can use the same credentials to log in to the AWS Console; if you don't have one, create one on AWS.
- Creating an Auth0 FGA Account: If you already have an Auth0 account, you can use the same credentials to log in to the Auth0 FGA dashboard at dashboard.fga.dev. If you don't have an Auth0 account, hop over to dashboard.fga.dev and create a free account.
Auth0 for AI Agents
Auth0 for AI Agents ensures robust security for AI deployments and meets stringent authentication and authorization requirements. The agent's interactions are protected by Auth0, which requires authenticated users to provide secure, limited access. Auth0 stops unauthorized actions and stops data breaches.
Amazon Bedrock AgentCore
Amazon Bedrock AgentCore provides a streamlined pathway for building, deploying, and managing AI agents. It serves as a fully managed orchestration layer that eliminates the need to manually provision infrastructure, allowing developers to focus on defining the agent's logic and capabilities.
Architecture of an Auth0-Secured Amazon Bedrock AgentCore
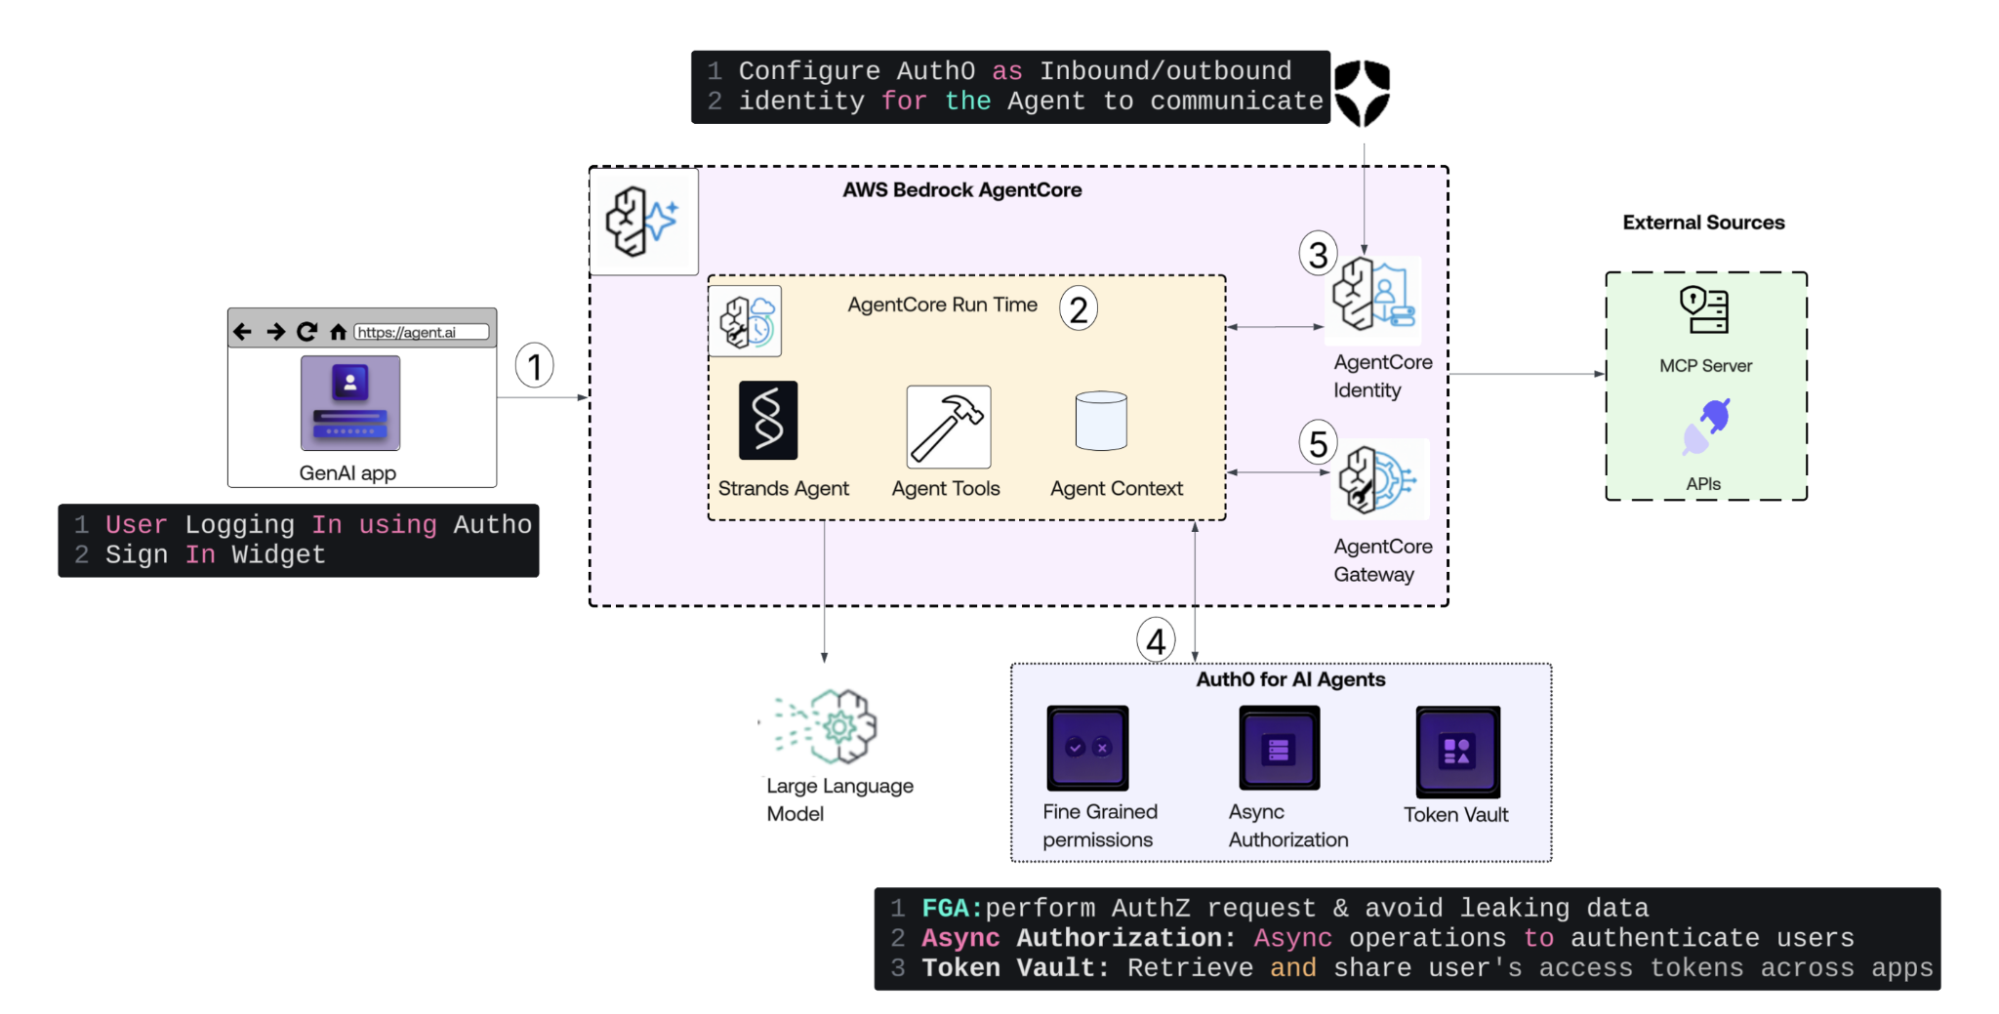
This diagram and the rest of the document outline the process by which Auth0 for AI Agents, integrated with Amazon Bedrock AgentCore, enables applications and agents to interact with Okta resources on behalf of a user.
- User Authentication: A user logs into the GenAI web application via the Auth0 Sign-In Widget. The application receives an access token, and includes it in the request to invoke the AI agent.
- Agent Invocation & Runtime: ‘The Strands Agent’ receives the request within the AgentCore Run Time. It manages the conversation context and selects the appropriate tools based on the user's intent.
- Inbound Identity Validation: The AgentCore Identity component validates the incoming access token against Auth0. This step ensures that only authenticated users can trigger the agent.
- Advanced Security Controls: The agent leverages Auth0 for AI Agents to manage complex security requirements:
- Fine-Grained Authorization (FGA): The agent checks specific authorization policies to verify if the user has the exact permissions required for the requested action.
- Async Authorization: For high-stakes or "elevated" actions, the system triggers a Human-in-the-Loop flow. The agent pauses execution until a human operator approves the request via an asynchronous authentication flow.
- Token Vault: The agent retrieves user-delegated OAuth tokens from a secure vault. This allows the agent to act on the user's behalf when calling third-party services without exposing raw credentials.
- Secure External Interaction: When the agent needs to fetch data or perform actions, it communicates through the AgentCore Gateway. The gateway ensures that only requests backed by a valid Auth0 identity can reach External APIs or MCP Servers.
How to build it?
Let's explore the solution's components, understanding their interrelations and contributions to securing Amazon Bedrock agents.
We will break our build process into five sections:
- Configuring Auth0 for Securing Agents: covers creating the app, grant types, and enterprise connections.
- Setting Up the Supporting AWS Infrastructure: covers IAM credentials and the Amazon DynamoDB table, AWS Secrets Manager, and AWS Lambda for MCP Gateway
- Building the Amazon Bedrock AgentCore Agent: covers creating and deploying the agent.
- Implementing Fine-Grained Authorization: covers the FGA model and tuple configuration.
- Configuring and Testing the Application: covers the Flask app setup and test plan.
By the end of this guide, you will have a fully secured Amazon Bedrock AgentCore Agent, protected by Auth0 for AI Agents,
Part 1: Configuring Auth0 for Secure Authentication
To demonstrate the user experience, we will develop a web application that integrates an Amazon Bedrock AgentCore Agent. This agent will engage with user inquiries and inputs.
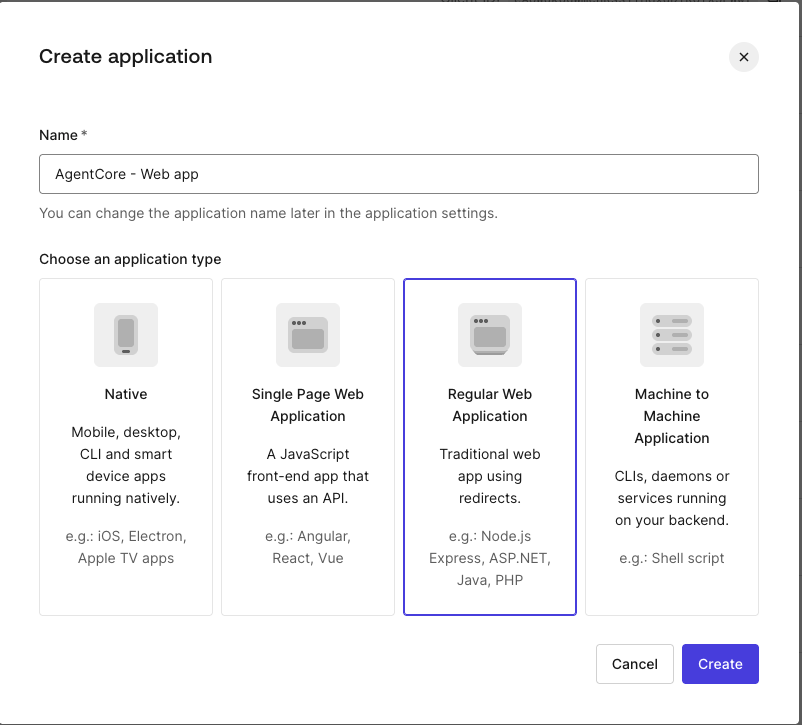
Create an application
After logging in to your Auth0 tenant, navigate to Applications. Click +Create Application, then provide a name and select Regular Web application in the Create Application dialog, and click Create. The application we will build is a Python/Flask application.
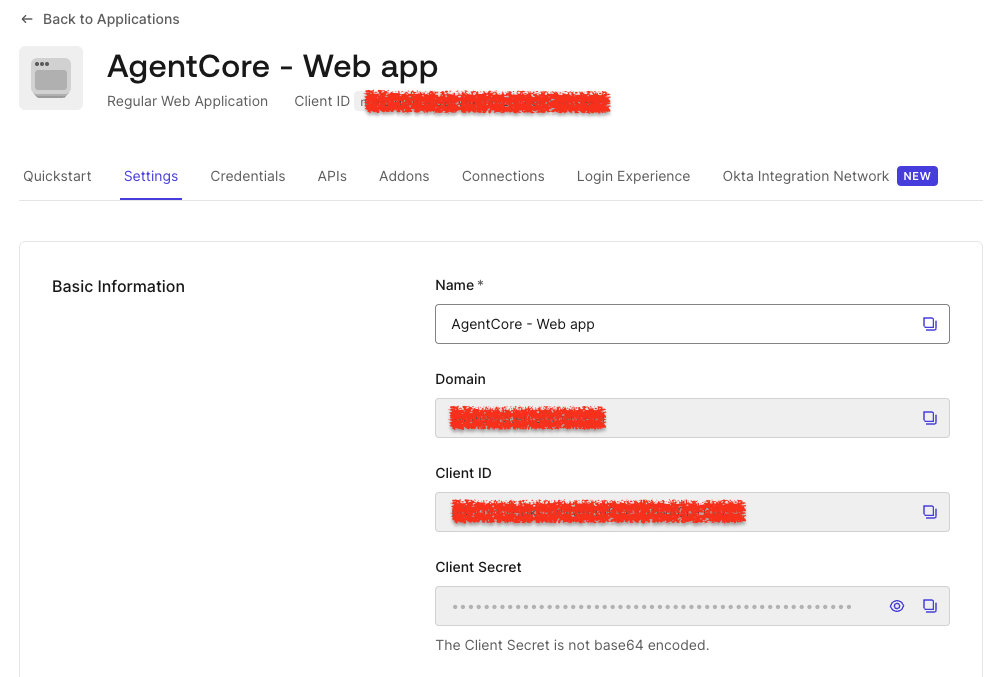
Configure an application
As the next step, choose the application framework; we will create this app in Python. The following screen displays sample code to expedite development.
Click on the Settings screen to access essential configuration parameters. Note down the ClientID, Client Secret, and Domain values; they will be used in the Flask codebase.
Go to the bottom of the Advanced Settings section and click Grant Types; make sure the Token Vault and CIBA checkboxes are checked.
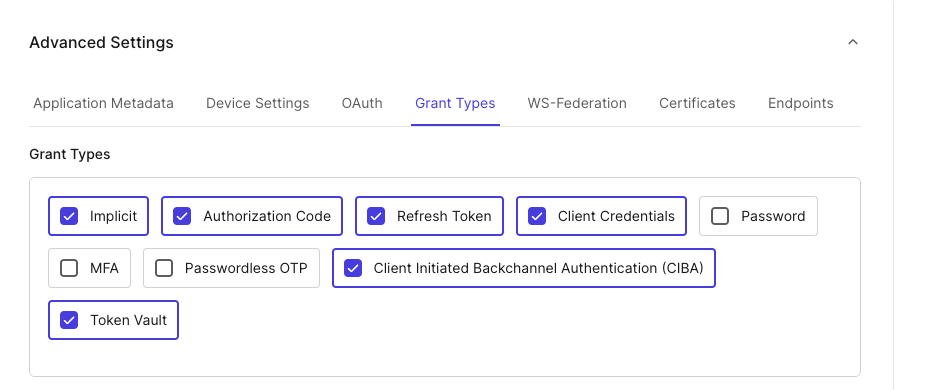
Click Save at the bottom right of the page.
Creating an enterprise connection
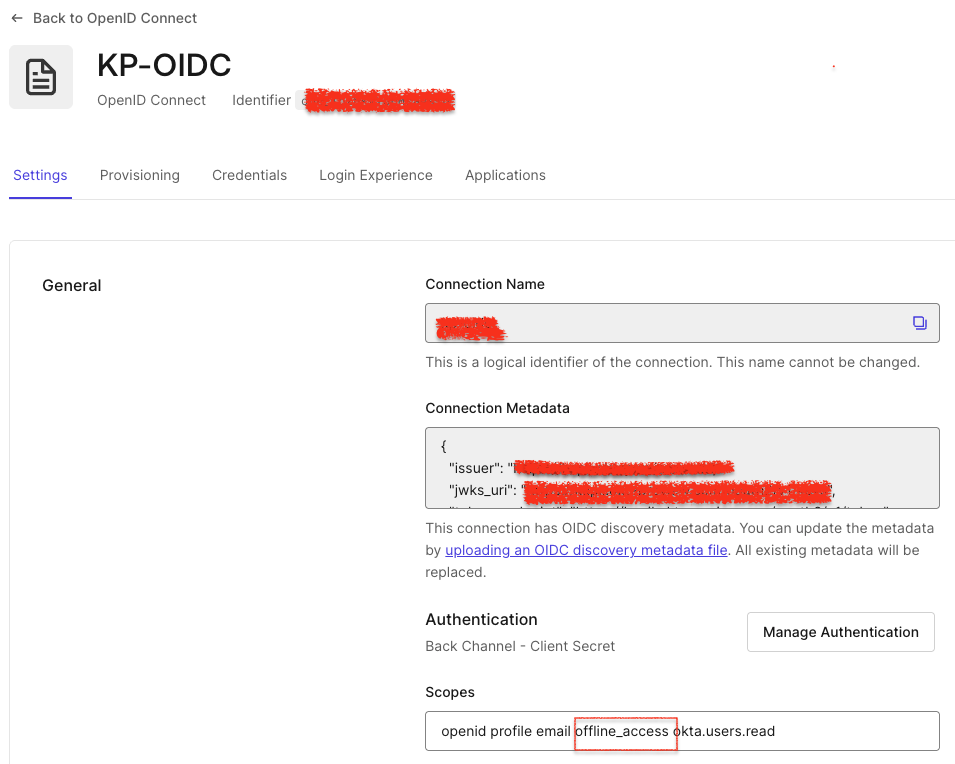
Follow these instructions to create an Okta OIDC connection. Once configured, navigate to your OIDC connection from Authentication-> Enterprise-> OIDC, and ensure offline_scope is enabled.
Now, go to the Applications Tab of the OIDC connection created, and assign the connection to the app you created earlier.

Now that your application is ready, note all configurations. We will use these configurations in the web application that serves as our interface to interact with Amazon Bedrock AgentCore. For the application files and setting-related information, please refer to the agentcore-auth0-webapp GitHub repo. Use all Auth0 Settings and configurations in the .env file.
Enabling My Account API for Token Vault
When a user connects with an external identity provider (such as Okta), Auth0 adds the 'connected account' to the user profile, allowing applications to access external APIs through a single Auth0 profile.
Auth0 stores the necessary access and refresh tokens in the Token Vault. Applications retrieve these tokens via a secure token exchange, allowing them to call external APIs without requiring custom provider integrations.
The Connected Accounts flow uses the My Account API to create and manage a user's accounts across supported external providers. User can initiate a Connected Accounts request and use the My Account API
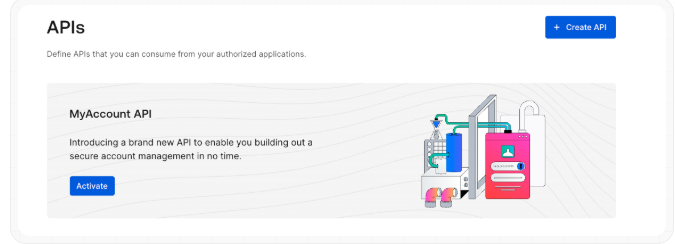
To enable My Accounts API, go to Applications > APIs and locate the MyAccount API banner and select Activate.
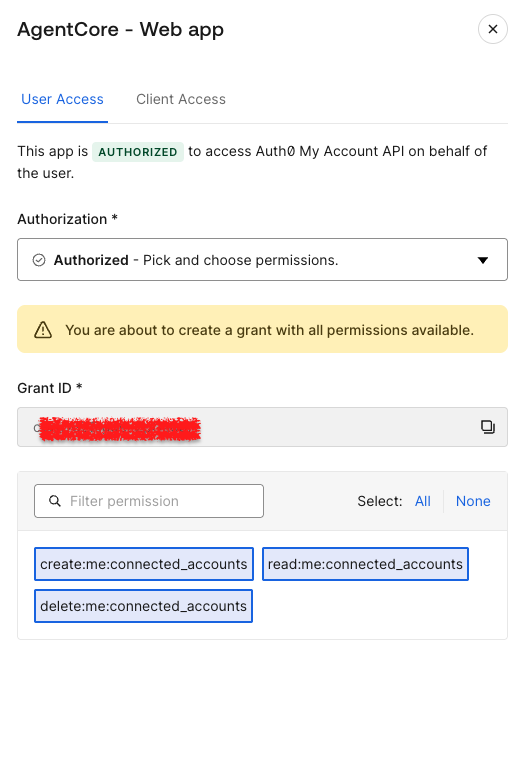
Once activated, select the Application Access tab, then click Edit next to the app just created.
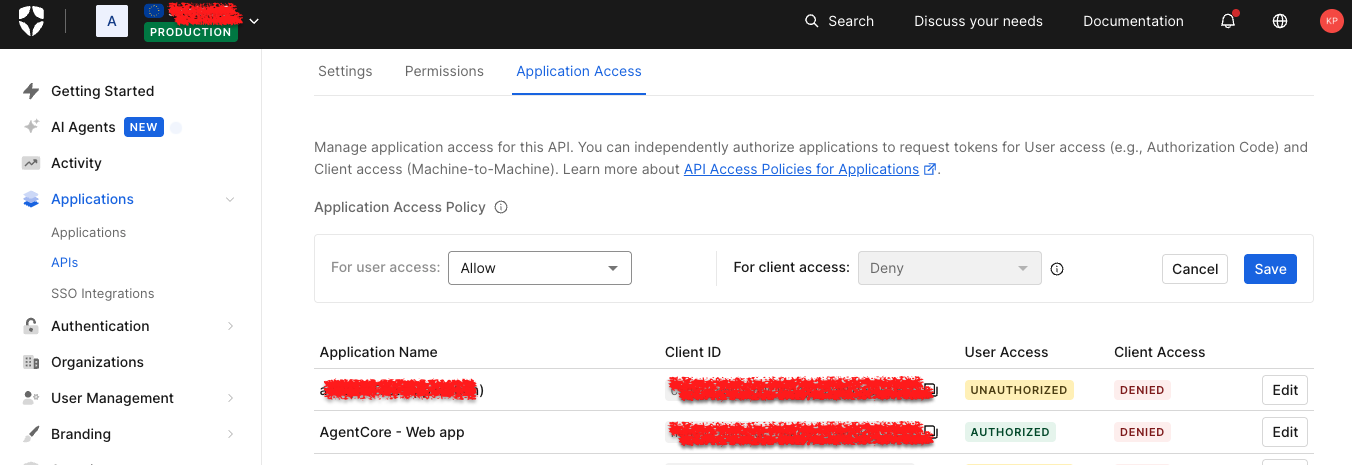
Then select the User Access tab, select all the Connected Accounts scopes for the application, and click Save.
Find more information about how Token Vault and My Account API work together.
Part 2: Setting Up AWS Infrastructure and Components
As part of the setup, we will install supporting AWS infrastructure components.
Setting up AWS credentials
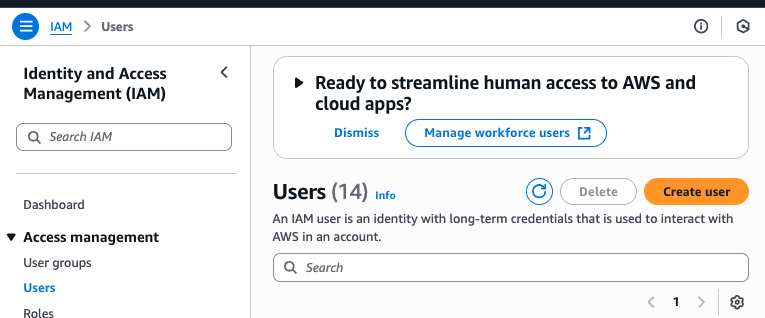
To enable communication between the web application and the Amazon Bedrock AgentCore agent, AWS credentials are required. These credentials will be utilized within the web application to interact with the Amazon Bedrock AgentCore agent. Begin by navigating to the AWS IAM console, then select User, and then select Create User.
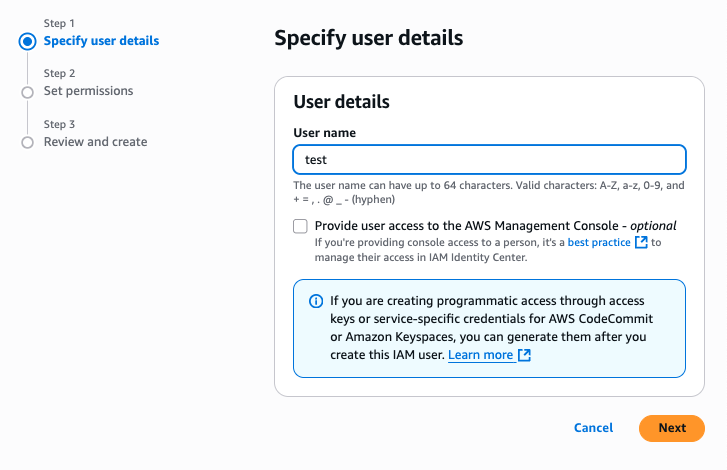
Enter the Username and click Next.
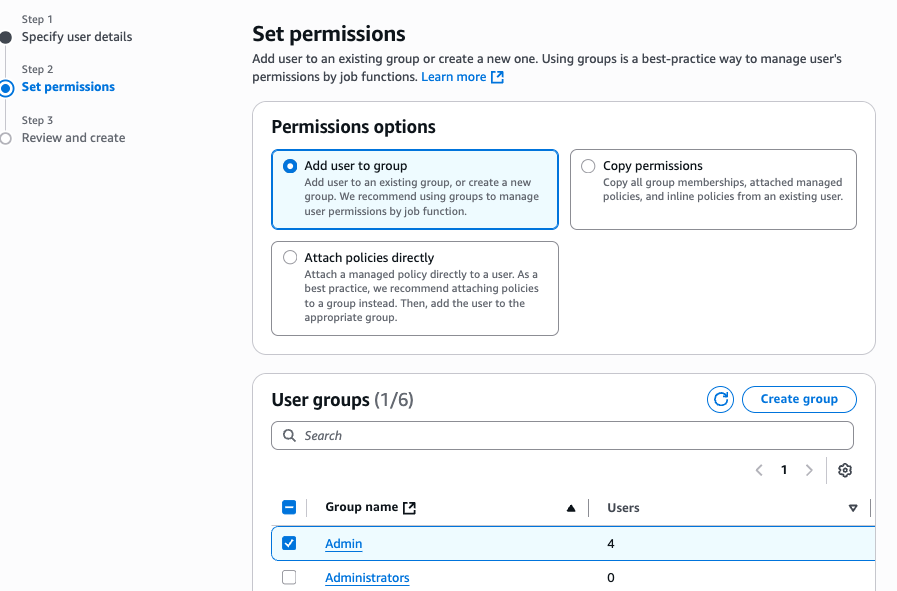
Select Permissions; for demo purposes only, I am selecting Admin permission.
Note: It is crucial to emphasize that, in a production environment, developers should follow the principle of least privilege and create an IAM role with only the minimum required permissions (for example, bedrock: InvokeAgent, dynamodb: GetItem, lambda: InvokeFunction, etc.). This least privilege role can be assigned where the app is hosted.
Click Create User, go to the newly created user, access the Security Credentials tab, and click Create Access Key.
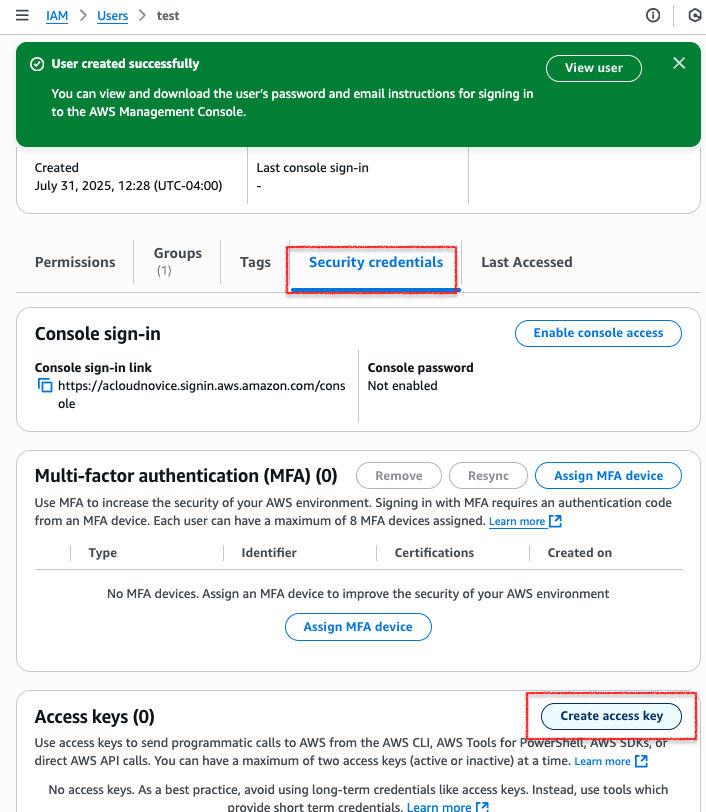
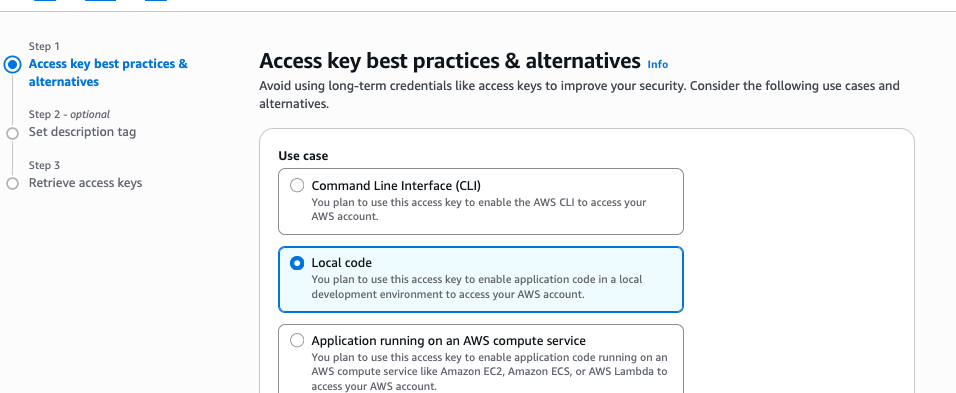
In here, click on Local code and then Next; Add description tag/value and click next.
Retrieve and save these credentials immediately, as you will not be able to view the secret access key again. You will need these credentials in the Flask App's environment variables.

Setting up Amazon DynamoDB table
To maintain security, sensitive information such as JSON Web Tokens (JWT) and secrets must not be exposed to a Large Language Model (LLM), as passing access tokens to these models is inherently insecure.
In this specific demonstration, federated access tokens from the Auth0 Token Vault will be securely managed. They will be stored in a DynamoDB table so that a runtime agent can retrieve them safely. While DynamoDB is used here as an example, any suitable alternative, such as Vault or another caching solution, can be utilized.
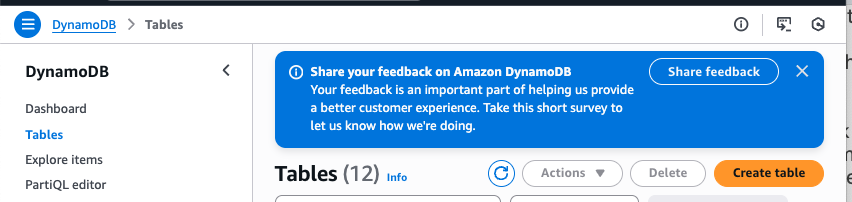
Go to the DynamoDB table and click on Create table.
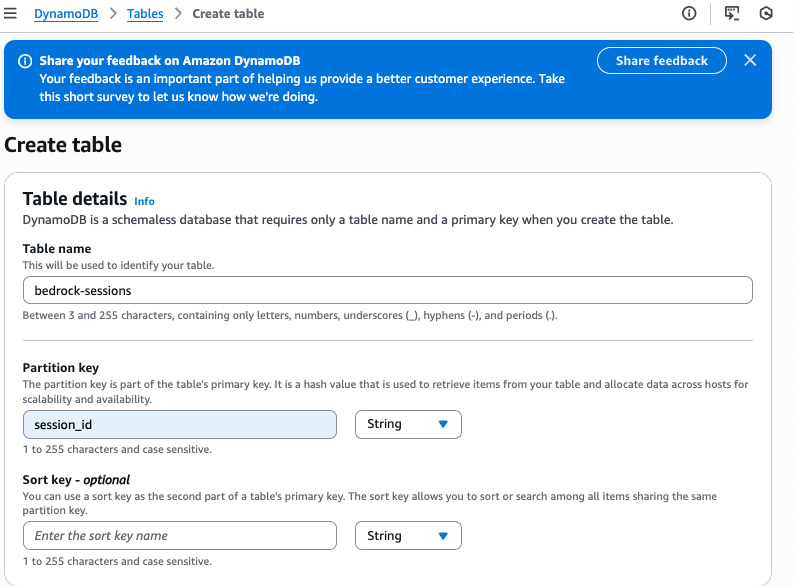
In the following dialog, enter the table name as “bedrock-sessions” and use the Partition key as session_id.
Setting up the AWS Secrets Manager
Sensitive credentials are never hard coded directly into the agent's scripts or baked into container images. To maintain the security posture, we ensure critical data is retrieved securely at runtime. The agent utilizes dedicated secret management services, specifically AWS Secrets Manager, for this essential function.
We will leverage AWS Secrets Manager to manage secrets from a single, auditable location, providing a clear history of access and modifications.
Access to secrets can be controlled using an AWS IAM role, ensuring that only authorized agent roles can retrieve the necessary credentials for their operations.
This architecture ensures that private data and credentials are not exposed in source code repositories, configuration files, or image layers, thereby eliminating a significant vector for security breaches and complying with industry-standard best practices for secure application development.
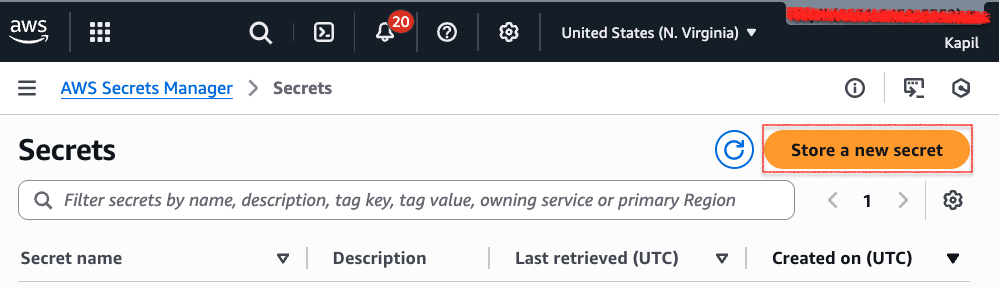
Go to AWS Secrets Manager, click Secrets, then click Store a new secret.
Select the option Other type of Secret.
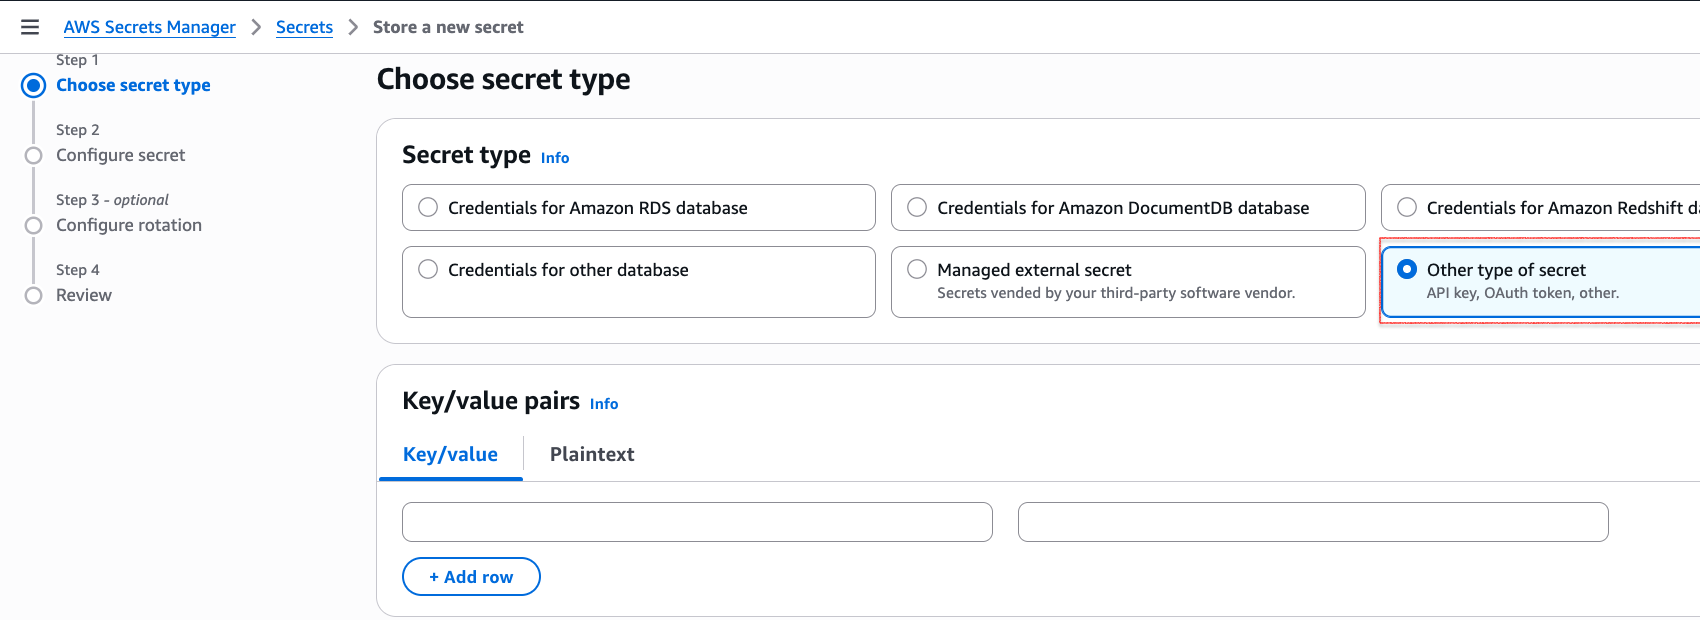
Enter key, value pairs in the format. You will need to obtain these values from the various configurations mentioned throughout this guide, as you did with the secrets in Part 1.
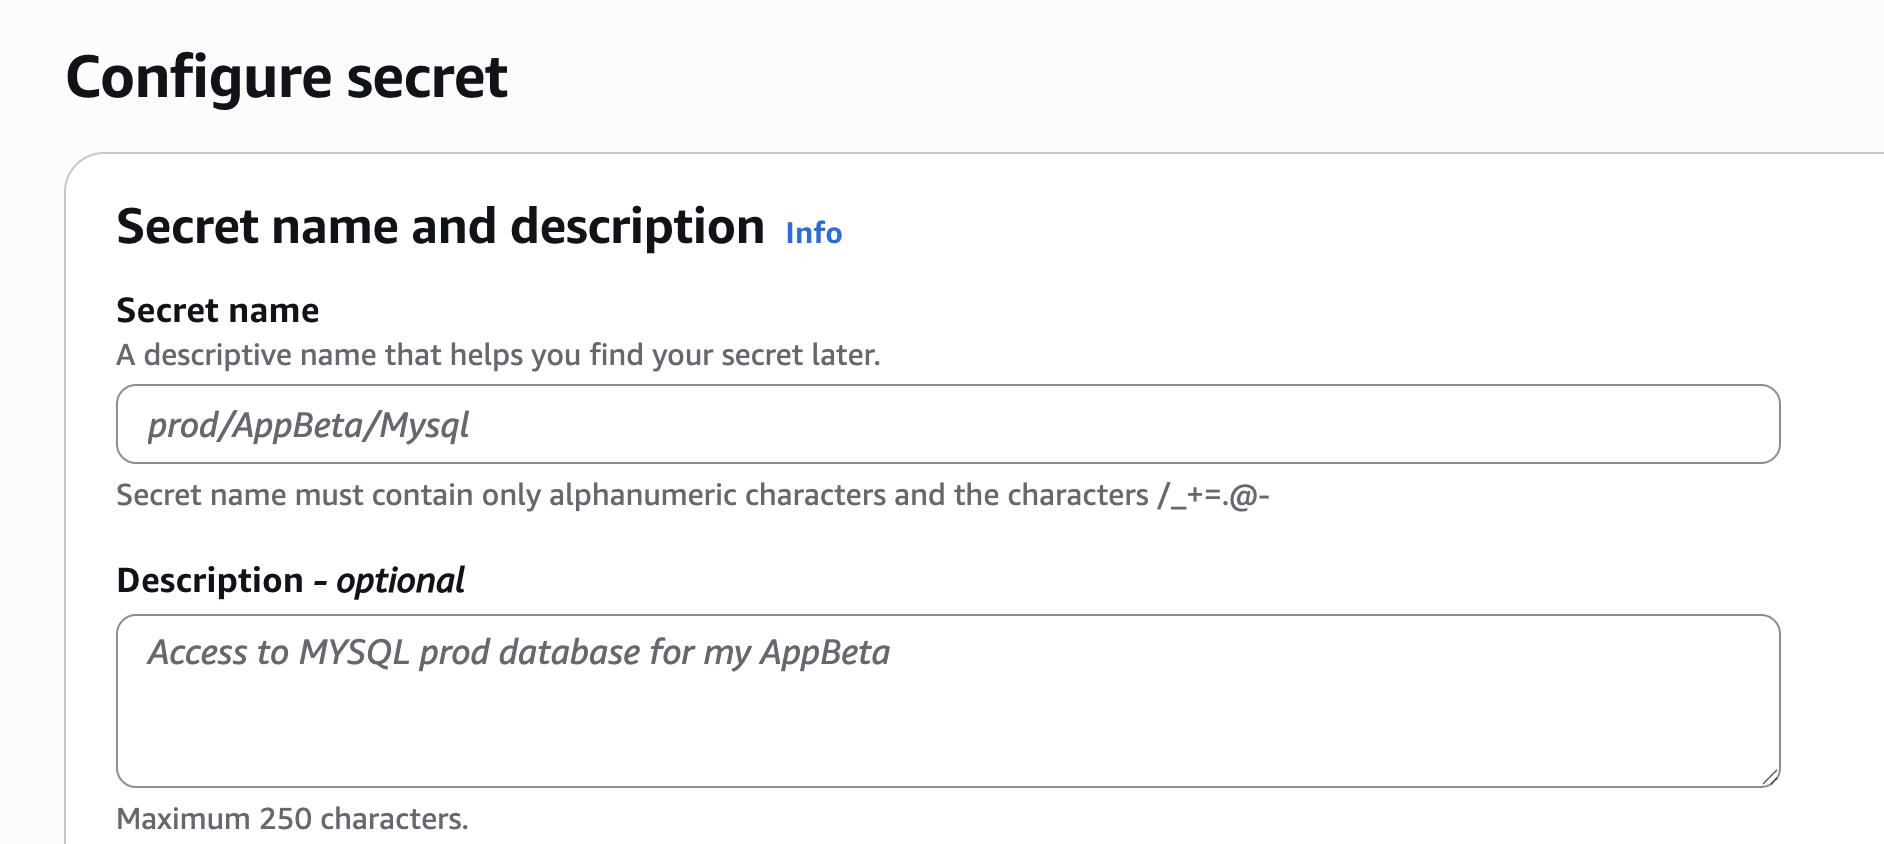
Click Next and keep the Configure rotation - optional, and click Next. On this final screen, click Store, and this will save the AWS secrets and related values
Creating an AWS Lambda function
To begin, you will create a Lambda function that will serve as the HTTP API for the AWS BedRock AgentCore Gateway. Write a simple Python function to be used within this Lambda. After the function is created, be sure to note its ARN, as it is essential for the AWS BedRock AgentCore Configuration.
import json
def lambda_handler(event, context):
   # --- Return the Response ---
   return {
       'statusCode': 200,
       'body': json.dumps({
           'message': 'Tasks retrieved successfully',
           'Task ID': "task1",
           'Task Description':'Update the OAuth Flow with XAA details'
       })
   }
Using AWS Lambda for MCP Gateway
The AgentCore Runtime uses the Gateway, a managed Model Context Protocol (MCP) server, to connect AI agents with external tools like AWS Lambda or REST APIs. Inbound Identity protects the Gateway and serves as the OAuth resource server. It supports IAM-based authorization (using AWS identities) and JWT-based authorization (using external tokens, such as those from Auth0). The Gateway verifies the token's signature, expiration, and scopes, ensuring only authorized entities can access and execute the tools.
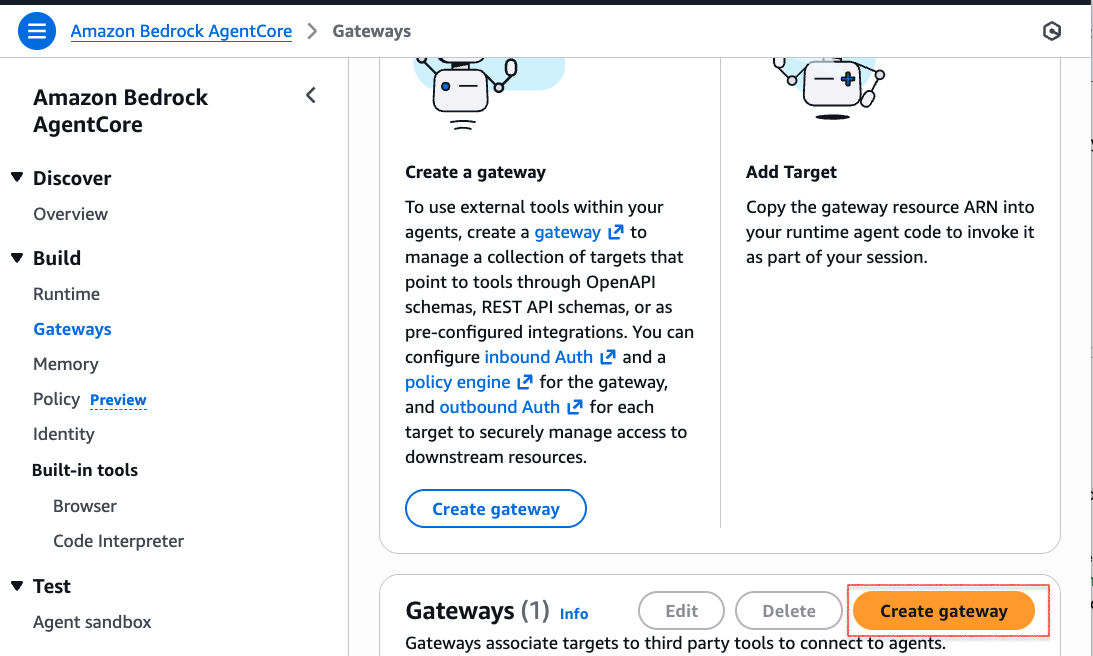
Go to the Amazon Bedrock AgentCore service, click on Gateways, and click Create Gateway.
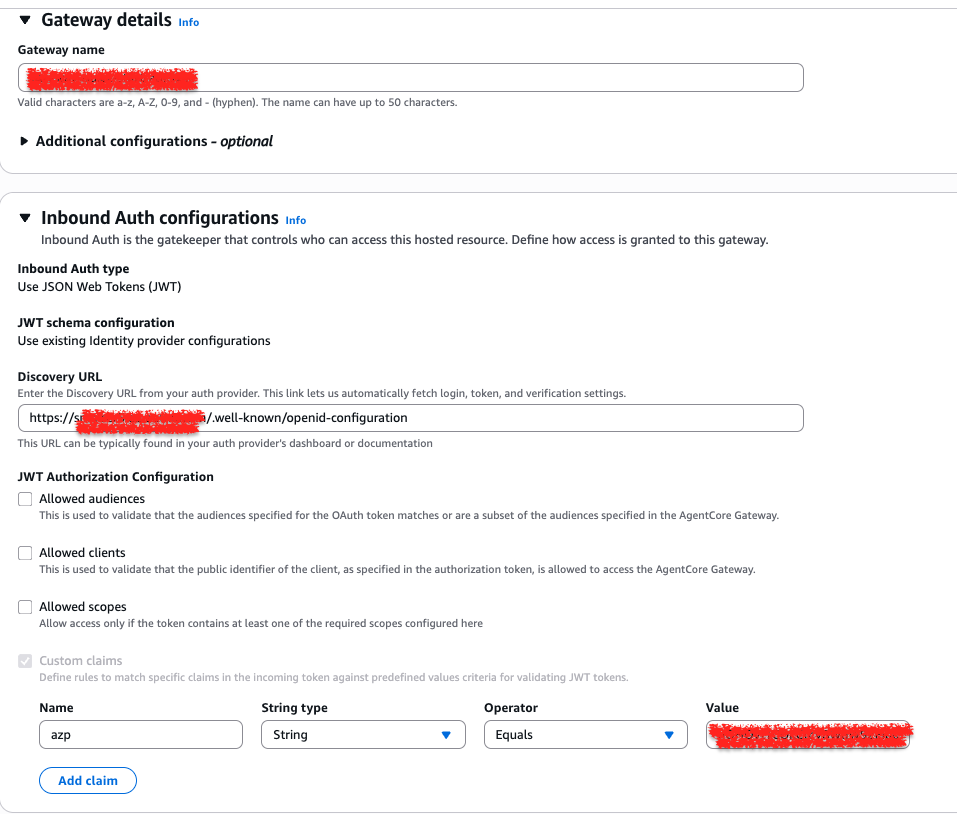
In the Gateway Details, enter the name of the Gateway.
Configure Inbound Authentication:
- Navigate to Inbound Auth Configurations.
- Enter the Discovery URL using the following format:
https://<<auth0_domain>>.auth0.com/.well-known/openid-configuration
Add Custom Claim:
- Select Custom claims.
- Enter the following values:
- Name:
azp - String Type:
String - Value: The Client ID value from Part 1-> Configure an Auth0 application section.
- Name:
This custom claim is essential for user identity validation. It ensures the azp claim is present in the JWT token when the token is generated for the user, as this claim is required for validation.
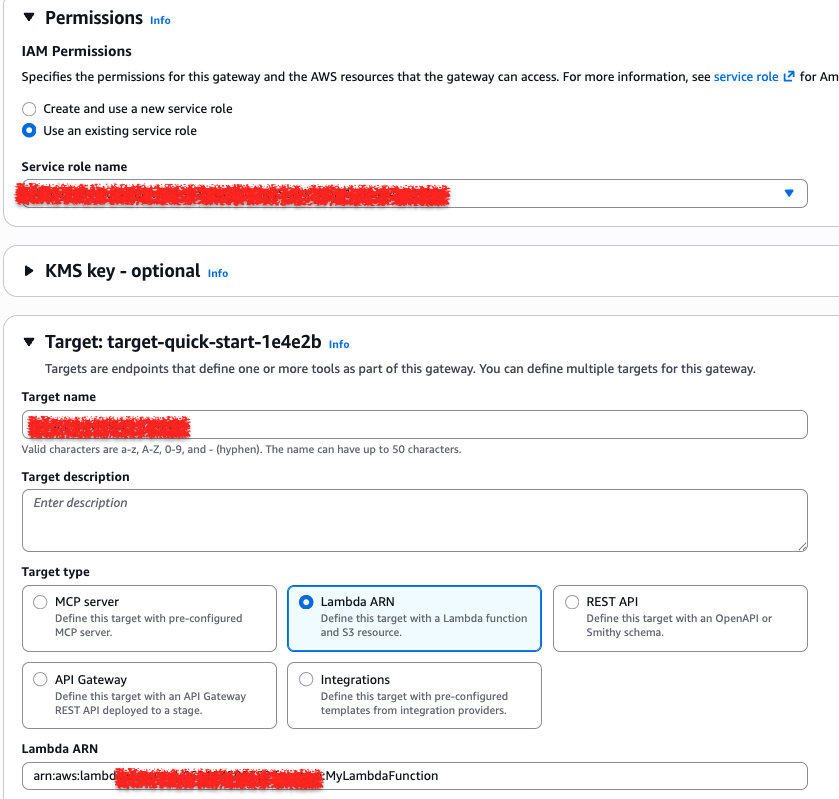
Configure permissions
The Permissions section specifies the identity that the Gateway uses to interact with other AWS services, such as AWS Lambda. As depicted in the provided screenshot, select the option to "Use an existing service role." Alternatively, you can create a new AWS role if you do not yet have one.
Define the Target Endpoint
The Target configuration links the Gateway to the backend service (an AWS Lambda function) that it will expose to AI agents.
To define this connection:
- Target Name: Provide a unique identifying name for the target you are creating.
- Target Type: Select Lambda ARN to specify that this target is a particular AWS Lambda function.
- Lambda ARN: Enter the complete Amazon Resource Name (ARN) for the Lambda function you created in an earlier step.
In the AgentCore Gateway, the Target Schema is the structural blueprint that defines how an AI agent understands and interacts with an AWS Lambda function. It serves as a translation layer that turns a standard serverless function into a MCP compatible tool.
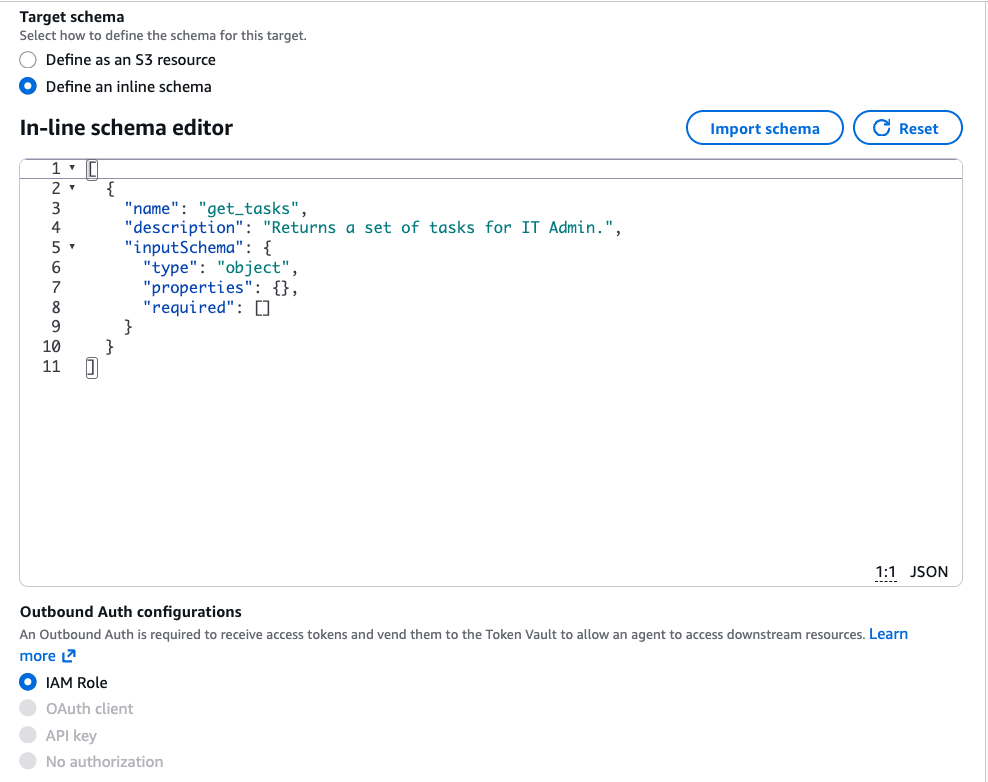
[
  {
    "name": "get_tasks",
    "description": "Returns a set of tasks for IT Admin.",
    "inputSchema": {
      "type": "object",
      "properties": {},
      "required": []
    }
  }
]
Keep the rest of the options as-is and hit save.
Part 3: Building and Deploying the Amazon Bedrock AgentCore Agent
The Auth0 for AI Agents and Amazon Bedrock AgentCore integration leverages the agentcore-auth0-webapp repository as the foundational blueprint for the programmatic construction, configuration, and deployment of a sophisticated, task-oriented agent.
This specialized agent is engineered to interact with users and proficiently process a range of complex inquiries, focusing on the following core functionalities:
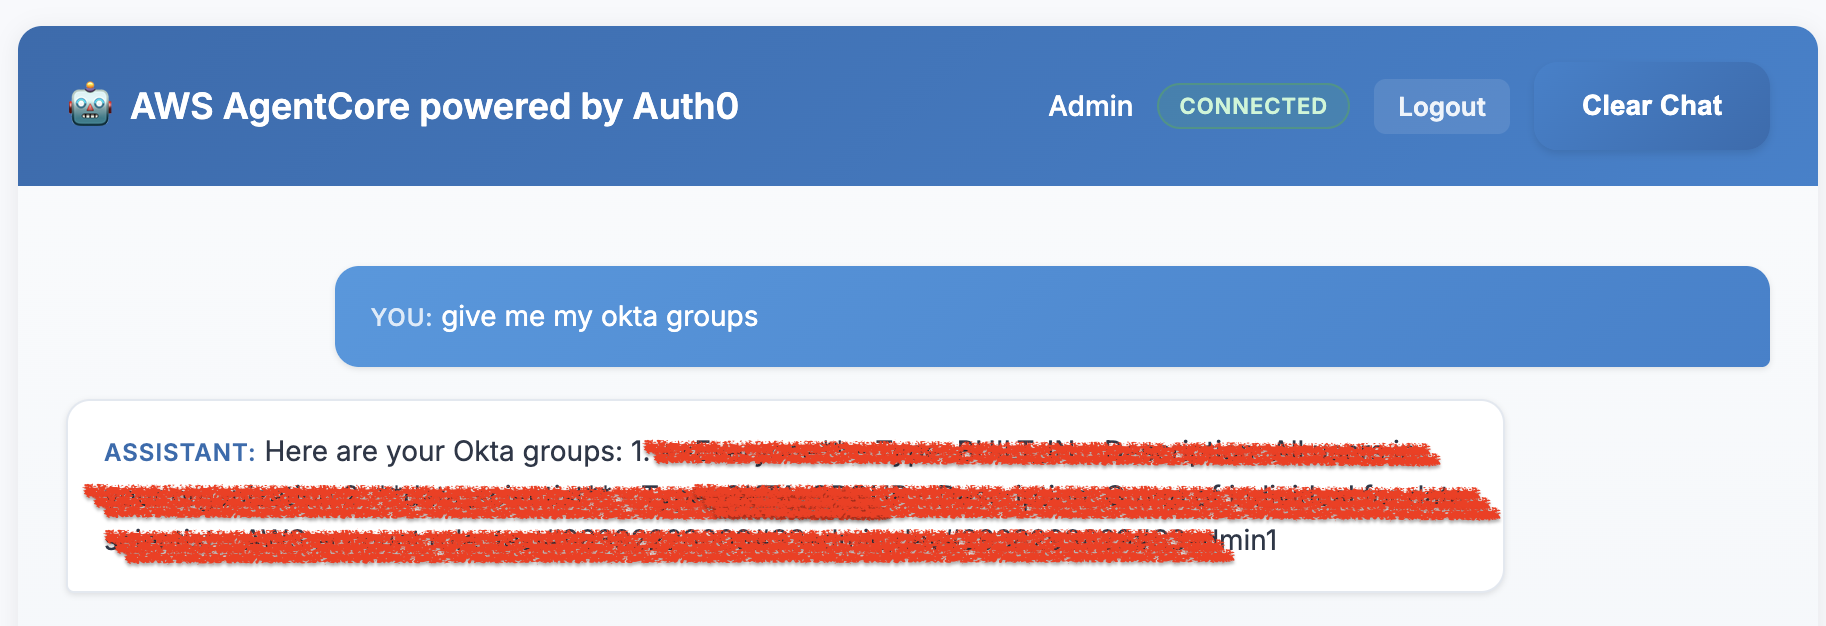
- Okta Group Assignment Retrieval: The agent can query and accurately identify all Okta groups currently assigned to the inquiring user.
- Client-Initiated Backchannel Authentication (CIBA) Flow Initiation for Elevated Operations: Recognizing the need for enhanced security during sensitive tasks, the agent intelligently triggers a CIBA flow. This action ensures a strong, out-of-band authentication method is used before proceeding with the high-impact task.
- Utilizing MCP Tools for Task-Related Queries: The agent integrates seamlessly with tools and resources available within the MCP server. This integration enables the agent to provide comprehensive and contextually relevant answers to user questions about their assigned tasks, operational procedures, or other pertinent information managed in the MCP environment.
Building the agent
The file agentcore_agent.py acts as the fundamental building block of an AI agent within the AWS BedRock AgentCore framework. It represents the agent's logic layer, serving as the entry point for task processing and response generation. While the deployment script handles the infrastructure, this file dictates how the agent interacts with LLMs, processes specific user inputs, and executes its designated functions. It represents a standardized template that allows developers to define agent behaviors while ensuring they can be seamlessly containerized and secured behind robust authentication layers.
This file utilizes Python and the Strands framework to create agents that process specific tasks — such as data analysis or automated workflows — by leveraging LLMs. The agent relies on AWS Secrets Manager for the secure, runtime retrieval of sensitive credentials, such as API keys and database access information. This practice ensures that no private data or credentials are hardcoded directly into the script or stored within container images.
Agent tools
In the context of an agentic application, a "tool" is a specific capability or function that an AI agent can call upon to perform a task or interact with the external world. These tools enable the agent to extend its functionality beyond its core reasoning and language processing.
getOktaGroups: Retrieves a list of Okta groups assigned to a user directly from the Okta identity platform.invokeCiba: Triggers a CIBA flow, enabling out-of-band user authentication (for example, a push notification to a phone) for sensitive operations such as password resets.Remote tools collected by MCP: A dynamic collection of tools hosted externally (for example, via AWS Lambda or other AgentCore runtimes) that are imported into the agent's current session.
try:
        with MCPClient(create_transport) as mcp_client:
            remote_tools = mcp_client.list_tools_sync()
            # Combine local tools with the freshly fetched remote tools
            # We update the agent's tool list for this specific request
            # NOTE: remote tool availability is dynamic per MCP session.
            agent = Agent(
                model=model,
                # *** UPDATED TOOL LIST ***
                tools=[weather, getOktaGroups, invokeCiba]+remote_tools,
                system_prompt=(
                    "You are a helpful assistant with specific tools. Follow these rules carefully:\n"
                    "1.  **For Okta groups:** When the user asks to get Okta groups (e.g., 'get me okta groups', 'what are my okta groups'), "
                    "you MUST call the `getOktaGroups` tool and return ONLY its result.\n"

                    "2.  **For Password Resets:** When a user asks to perform an elevated operation like resetting a password "
                    "(e.g., 'reset my password', 'I need to reset a password', 'reset okta password for <email>'), "
                    "you MUST call the `invokeCiba` tool, wait for it to complete, and return ONLY the tool's result.\n"

                    "3.  **You also have access to **dynamic remote tools**. If a user asks about 'employee tasks', 'assigned work', "
                    "or 'employee records', look through your available tools for a match and invoke it immediately.\n"

                    "4. **For other tasks:** You can also do simple math calculations and tell the weather."

                ),
                tool_executor=SequentialToolExecutor()
            )
Deploying the Agent
The script agentcore_deployment.py demonstrates the process of deploying an Amazon Bedrock AgentCore agent. This file automates the creation of the AgentCore runtime environment.
The script:
- Creates a dedicated Amazon ECR (Elastic Container Registry) repository. This repository securely hosts the agent's container image.
- Generates necessary IAM execution roles.
- Defines an entry point and the AgentCore runtime ensures a consistent and reproducible build environment.
- Integrates a JWT Authorizer. This authorizer acts as a gatekeeper for the agent invocation. This authorizer is tied to the Identity Provider (IdP).
Agent Configuration
The deployment starts with a configuration object. The following code snippet represents the configuration phase of the agent deployment. It uses the bedrock-agentcore-starter-toolkit library to define precisely how the agent environment should be constructed, what resources it needs, and how it will be secured.
response = agentcore_runtime.configure(
    entrypoint="agentcore_agent.py",
    auto_create_execution_role=True,
    auto_create_ecr=True,
    requirements_file="requirements.txt",
    region=region,
    agent_name=agent_name,
    authorizer_configuration={
        "customJWTAuthorizer": {
            "discoveryUrl": f"https://{os.getenv("AUTH0_DOMAIN")}/.well-known/openid-configuration",
            "allowedClients": [os.getenv("AUTH0_CLIENT_ID")],
            "allowedAudience": [os.getenv("AUTH0_AUDIENCE")]
        }
    }
)
Breakdown of configuration parameters
1. Runtime and Infrastructure
entrypoint="agentcore_agent.py": This specifies the "Agent" file. When the container starts, this script runs first to initialize the agent.auto_create_execution_role=True: This automates the security permissions (IAM roles) to access other cloud services without you having to write complex policies manually.auto_create_ecr=True: ECR stands for Elastic Container Registry. This tells the system to automatically set up a private storage space for the Docker image it's about to build.
2. Environment Dependencies
requirements_file="requirements.txt": The runtime will look at this file to install necessary Python libraries into the container.region=region: Defines the physical AWS location where the agent will live.
3. Security and Identity (The Auth0 Integration)
The authorizer_configuration block is where it uses JWT validation via Auth0:
discoveryUrl: The agent uses this link to call Auth0 and download the public keys needed to verify that a user's login token is genuine.allowedClientsandallowedAudience: These act as a guest list.- Clients: Only requests coming from your specific Auth0 application are allowed.
- Audience: Ensures the token was actually intended for this specific agent API, preventing a token from another app from being reused here (a common security vulnerability).
Part 4: Implementing Fine-Grained Authorization
Auth0 FGA uses an authorization model to manage all relationships between users and the operations they can perform. This section demonstrates how an Agentcore agent can leverage an FGA Model created for our specific use case to make authorization decisions based on the logged-in user.
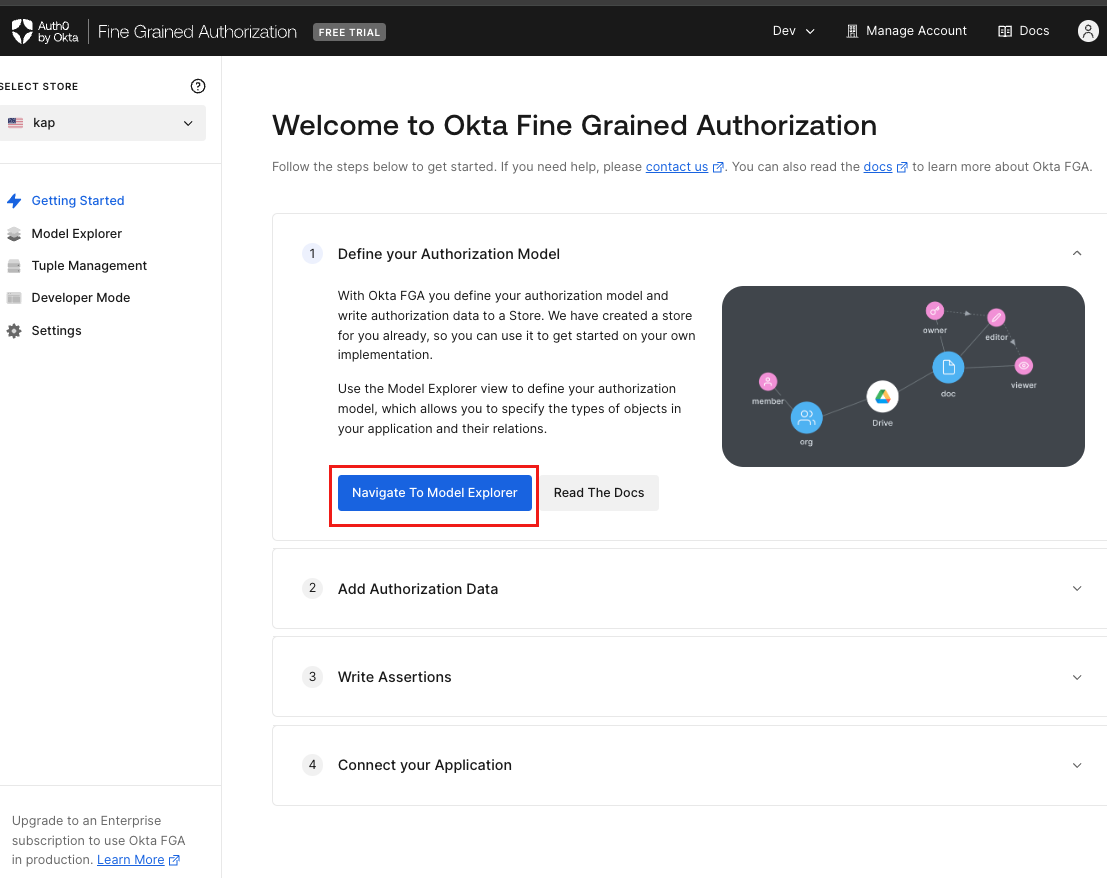
Add the following model to the model editor, then click Save.
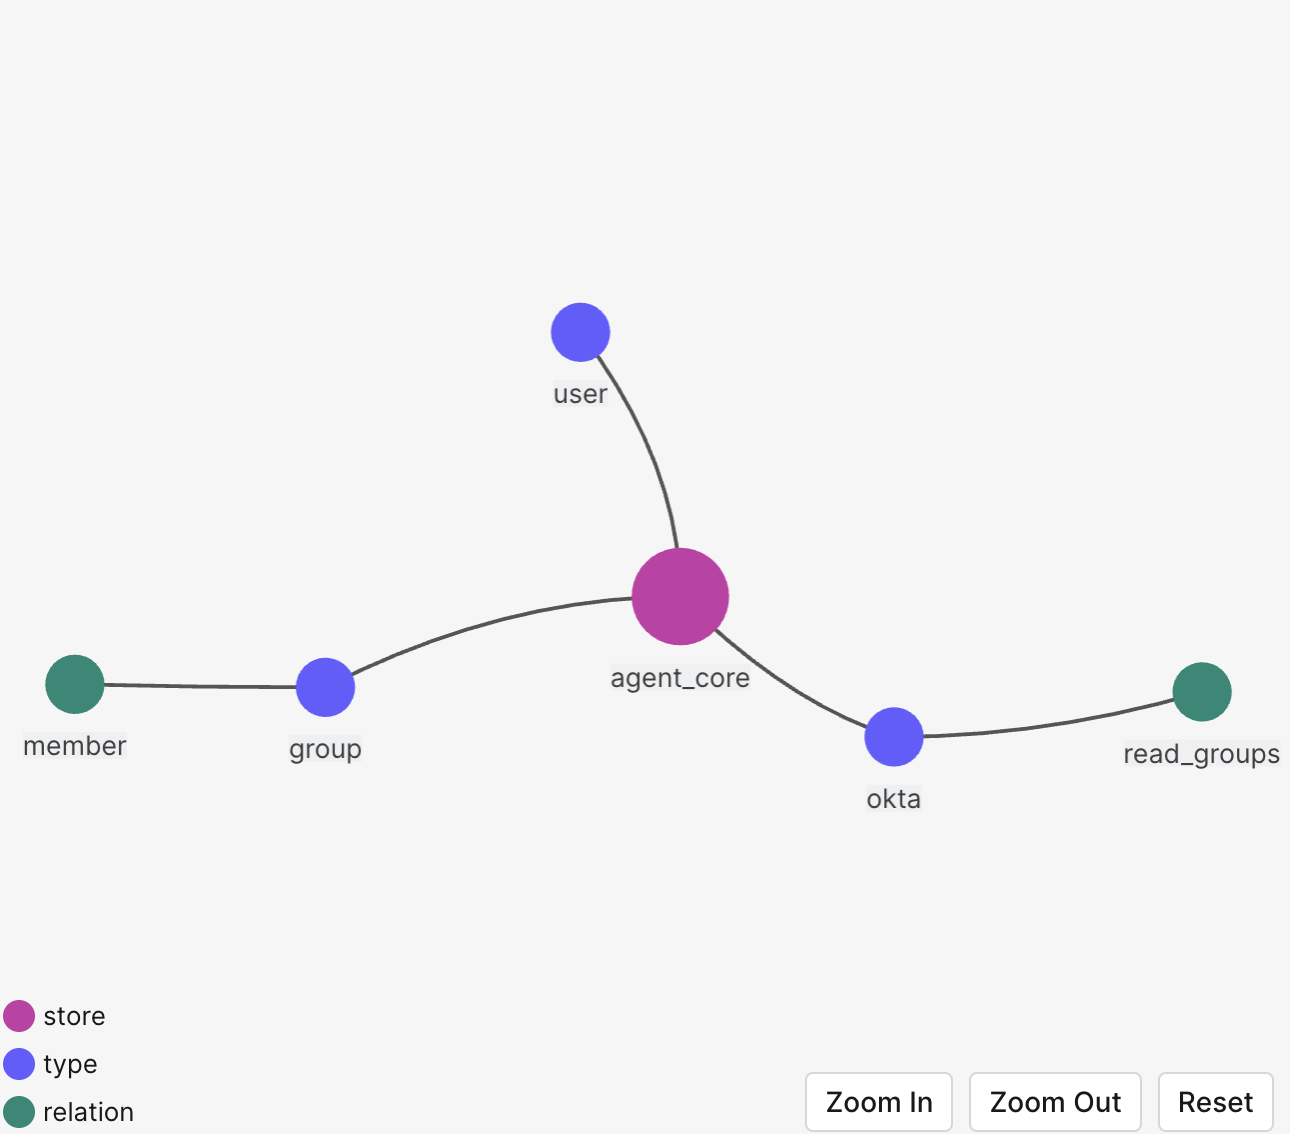
 model
 schema 1.1

type user

type group
 relations
   define member: [user]

type okta
 relations
   define read_okta: [user, group#member]
After saving the model, you will see its preview and authorization model.
Go to the Tuple Management section, accessible from the main dashboard, to define users and their relationships to various application objects.
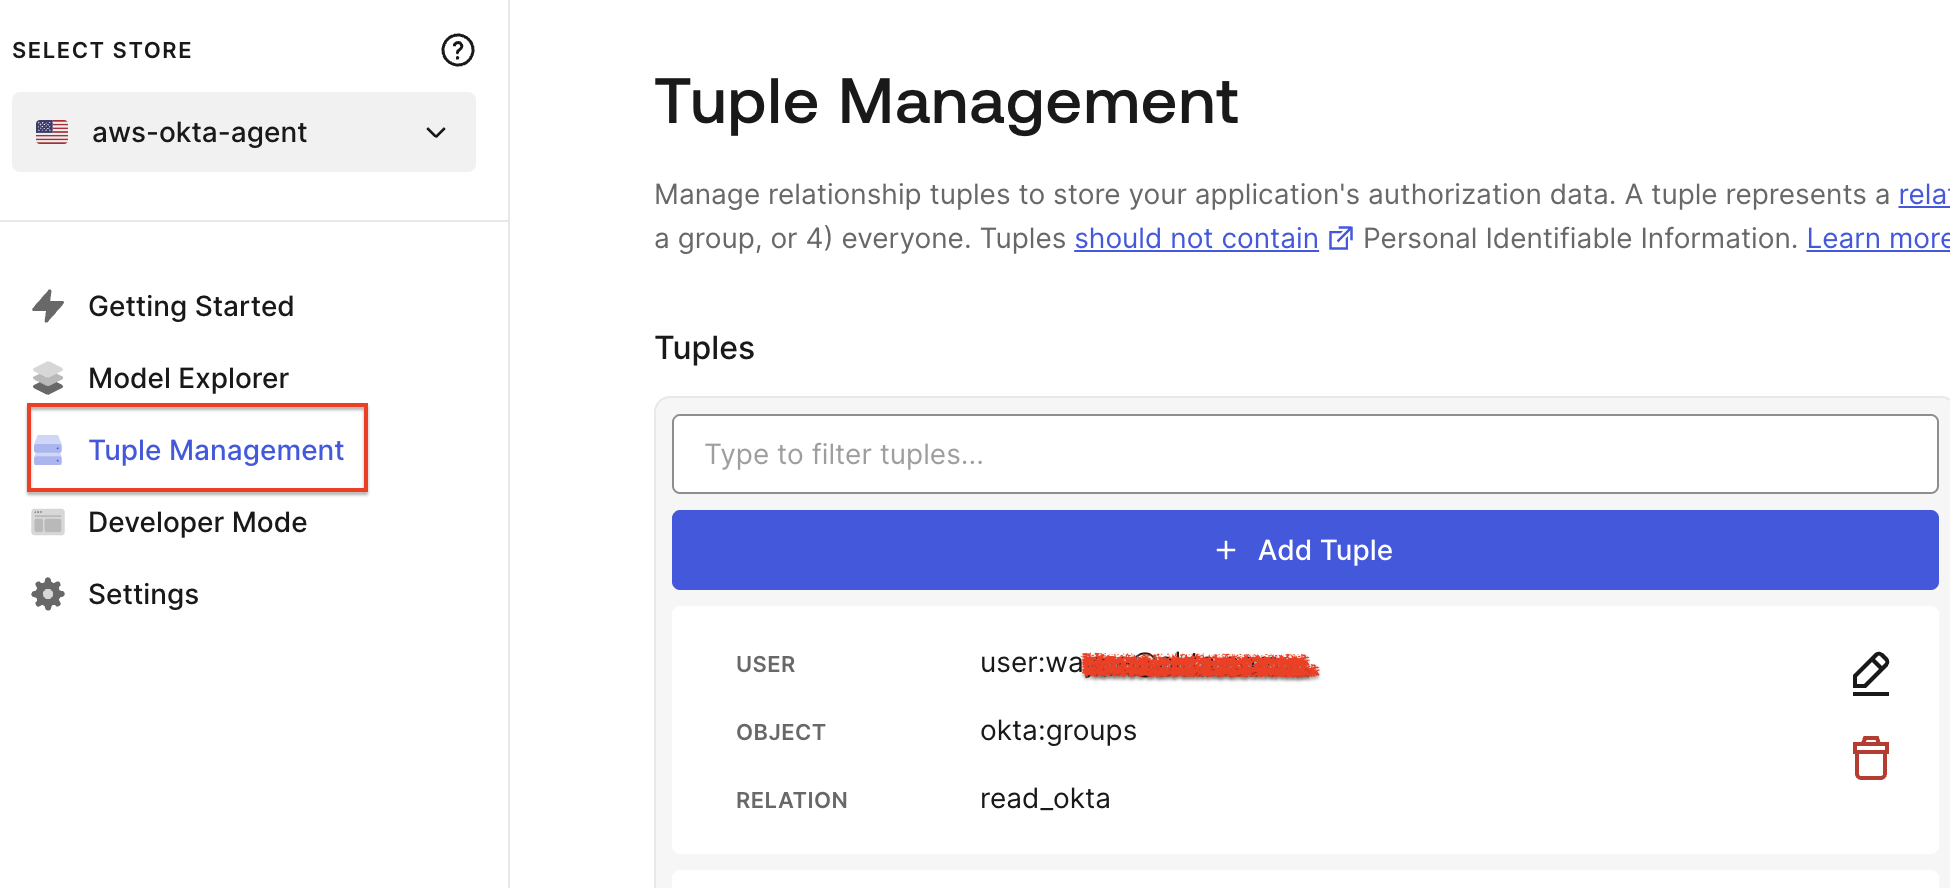
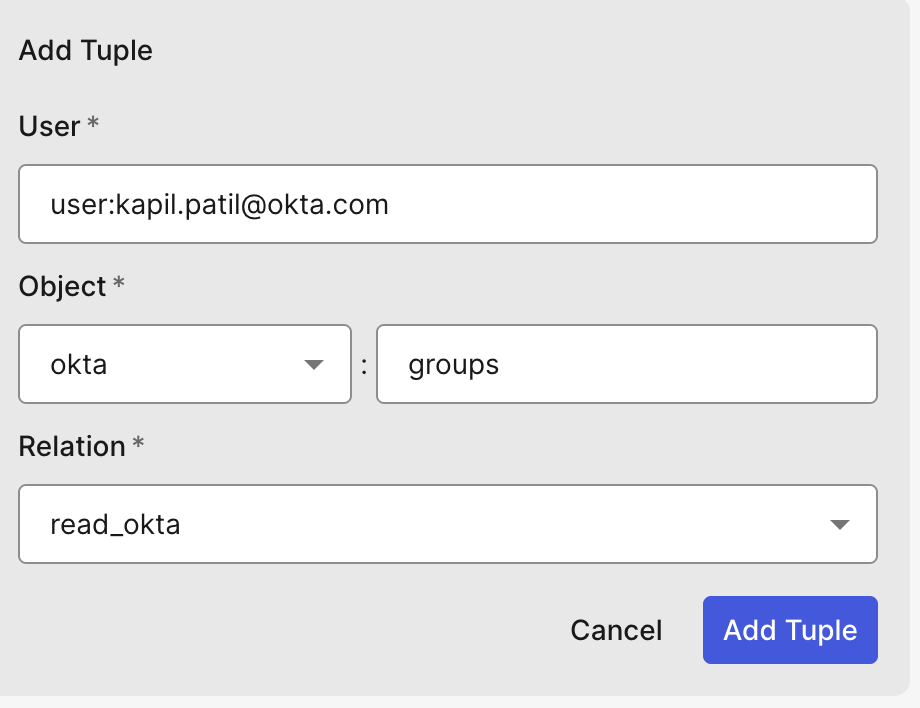
Click the Add Tuple button to add relationship data, then add a tuple to demonstrate. The following tuple represents that user kapil.patil@okta.com can read Okta groups.
So far, we have the Okta FGA Authorization Model and all the relationships ready.
Configuring the FGA authorization model
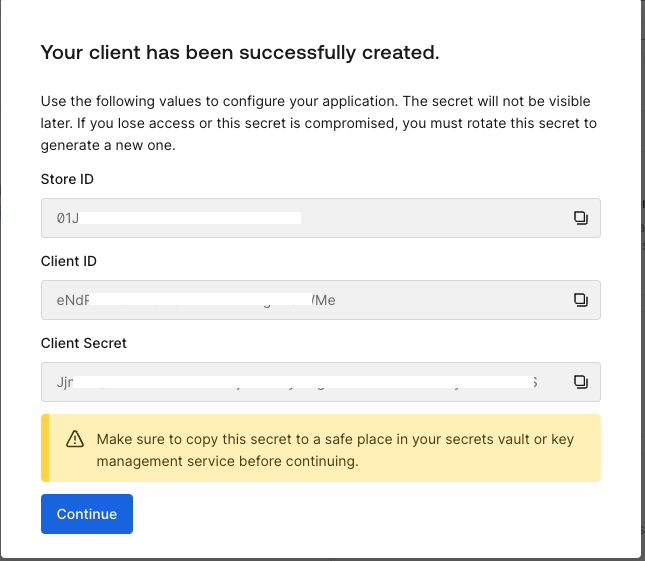
To configure the Authorized Client for the authorization model, which will help to connect to the application, click on the settings menu of the Authorization model you are working on, and click on + Create Client.
Select the appropriate set of permissions your application needs, then click Create.
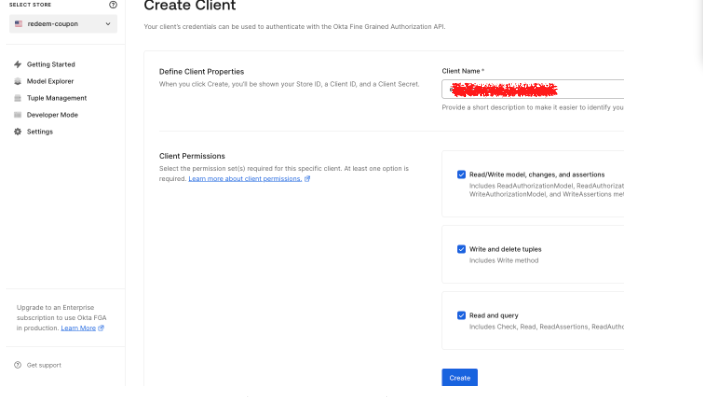
This step creates the credentials your app needs. Make sure to save these values before clicking on the continue button.
This authorization model will be implemented to support authorization decisions for Amazon Bedrock AgentCore. Specifically, AgentCore Agent will leverage FGA to assess and control the actions a user is authorized to perform within the agent.
Part 5: Configuring and Testing the Application
We have now configured all the necessary components for the demo. So far, we have set up an Auth0 App, an Auth0 FGA model, and Amazon Bedrock AgentCore. The next step is to integrate these elements by configuring our Flask application.
Start by creating a Flask web application using the provided aws-bedrock-auth0-genai GitHub repository. This application will communicate with the Amazon Bedrock agent you created in earlier steps.
How to test the application:
- Open the Web App URL in your browser and login using your Auth0 credentials.
Expected Result: You are prompted to provide consent and enroll in MFA via Auth0 Guardian; the login is completed successfully. - In a new tab, go to the Auth0 Dashboard, navigate to Security → Multi-factor Auth, and set the MFA policy to "None".
Expected Result: MFA is now disabled for your account and will not be triggered during future logins. This change will ensure the token vault works as expected. - Return to the Web App and verify that the chatbot interface is visible.
Expected Result: A chatbot UI should load and be ready for interaction. - In the chatbot input box, type "Give me Okta groups for a user ?" and send the message. Expected Result: The chatbot should respond with a list of Okta groups associated with your account.
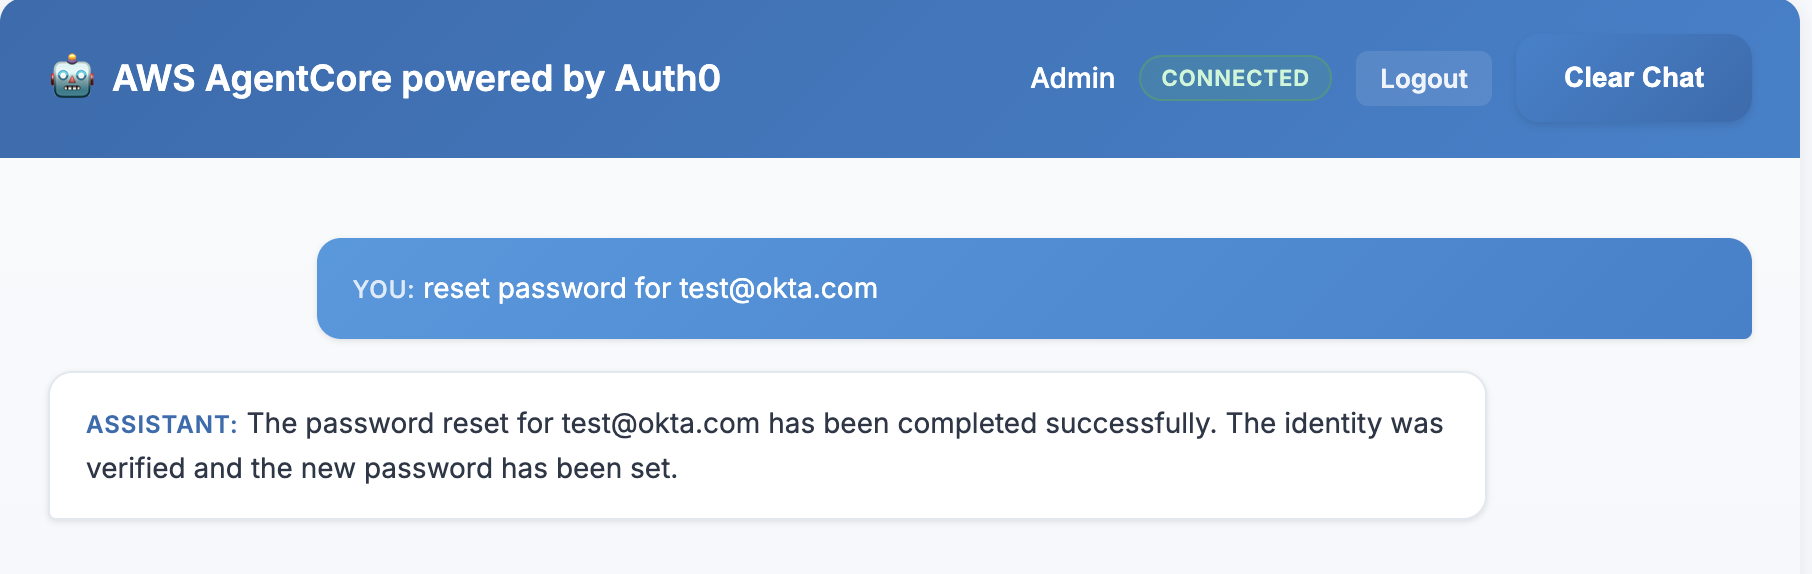
- In the chatbot, type "How do I reset my password?" and send the message.
Expected Result: The user gets a prompt on the Guardian app. Upon approving the prompt in the Guardian app, your identity will be confirmed, and the action will be executed. This action represents a flow and does not actually reset your password.
In the chatbot, type "List all my assigned tasks" and send the message.
Expected Result: The user would see a task/tasks based on what is configured in the AWS Lambda function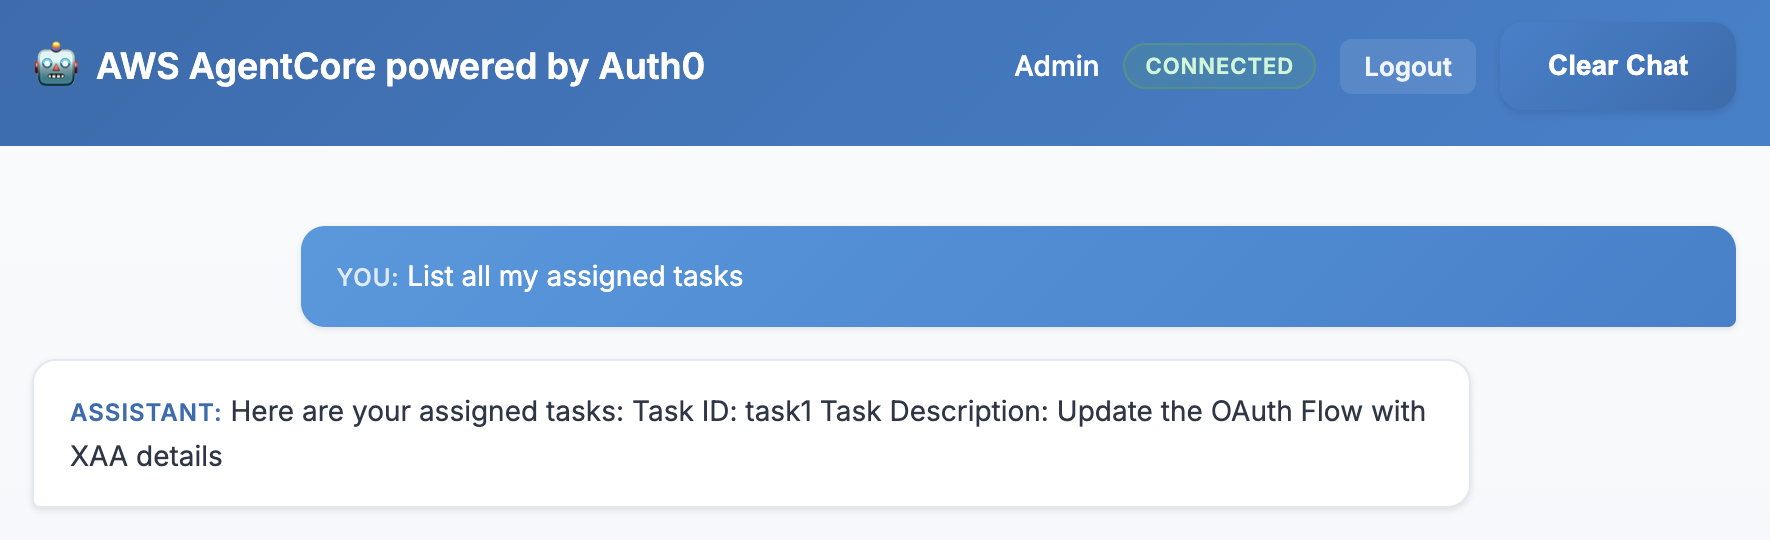
- Log in to the FGA Console, locate your user entry, and remove the permission to access Okta group data.
Expected Result: Your access to group information is revoked and no longer valid. - Return to the chatbot and ask again, "What are my Okta groups?"
Expected Result: The chatbot should respond with an "Access Denied" or "Not allowed" message, confirming FGA enforcement is working.
Secure and Identity-Aware AI Agents With Auth0 for AI Agents and Amazon BedRock AgentCore
This solution demonstrates the powerful synergy between Auth0 for AI Agents and Amazon BedRock AgentCore, enabling the creation of secure and identity-aware AI agents. By leveraging Auth0's robust identity and access management capabilities, including secure user login, API delegation, fine-grained authorization, and support for asynchronous interactions, applications built with Amazon BedRock AgentCore agents can operate with enhanced security and accountability. This integration ensures that AI agents can act on users' behalf without compromising sensitive data, apply real-time authorization checks, and maintain user context across complex, multi-step operations.