


Auth0 supports Native Login with passkeys for iOS apps — currently in Limited Early Access. This means your iOS app can create and use passkeys without redirecting users to a browser. The entire authentication flow happens natively, using Apple's AuthenticationServices framework and the Auth0.swift SDK.
In this tutorial, you'll build an iOS app that lets users sign up, log in, and log out with passkeys. By the end, you'll have a working app that creates passkeys on signup, authenticates with them on login, and stores Auth0 tokens securely in the Keychain.
If you're looking for the Android equivalent, check out How to Sign Up and Log In with Passkeys in Android Using Auth0's Native Login.
Passkeys on iOS
iOS supports passkeys through Apple's AuthenticationServices framework — specifically the ASAuthorizationPlatformPublicKeyCredentialProvider class. This is Apple's implementation of the WebAuthn standard, and it's what enables passkeys to work across your Apple devices via iCloud Keychain.
When you use passkeys with Auth0, your app acts as the client, Auth0 acts as the relying party, and Apple's passkey provider (iCloud Keychain) acts as the authenticator.
Sign up
The passkey signup flow has three steps:
- Your app calls Auth0's
/passkey/registerendpoint. Auth0 returns aPasskeySignupChallengecontaining the WebAuthn registration options — the relying party ID, a cryptographic challenge, and user information. - Your app passes the challenge to
ASAuthorizationPlatformPublicKeyCredentialProvider, which prompts the user to create a passkey via Face ID or Touch ID. Apple creates a new public-private key pair and returns a registration credential. - Your app sends the registration credential back to Auth0, which verifies it and returns OAuth tokens (access token, ID token, and refresh token).
Login
The passkey login flow follows the same three-step pattern:
- Your app calls Auth0's
/passkey/challengeendpoint. Auth0 returns aPasskeyLoginChallengewith the relying party ID and a cryptographic challenge. - Your app passes the challenge to
ASAuthorizationPlatformPublicKeyCredentialProvider, which prompts the user to authenticate with an existing passkey. Apple signs the challenge with the stored private key and returns an assertion credential. - Your app sends the assertion credential back to Auth0, which verifies the signature and returns OAuth tokens.
The key difference: signup uses createCredentialRegistrationRequest (creates a new key pair), while login uses createCredentialAssertionRequest (uses an existing one). Both flows converge on the same Auth0 /oauth/token endpoint for the token exchange.
Get the Starter App
Clone the sample app to follow along:
git clone https://github.com/auth0-blog/auth0-ios-native-login-passkeys
The starter project is a SwiftUI app with two screens: a login screen where users enter their email and choose to sign up or log in, and a home screen that displays their name and ID token after authentication.

Prerequisites
- An Auth0 account. Native Login with passkeys is in Limited Early Access — contact Auth0 support to enable it for your tenant.
- An Auth0 Native Application.
- Xcode 16 or later.
- A physical iOS device running iOS 16.6+, or a simulator with iCloud Keychain configured. Passkeys are backed by iCloud Keychain, so they work most reliably on real devices.
- An Apple Developer account (required for the Associated Domains capability).
Configure Auth0 with Your iOS App
Before writing any code, you need to configure four things in the Auth0 Dashboard and one thing in Xcode.
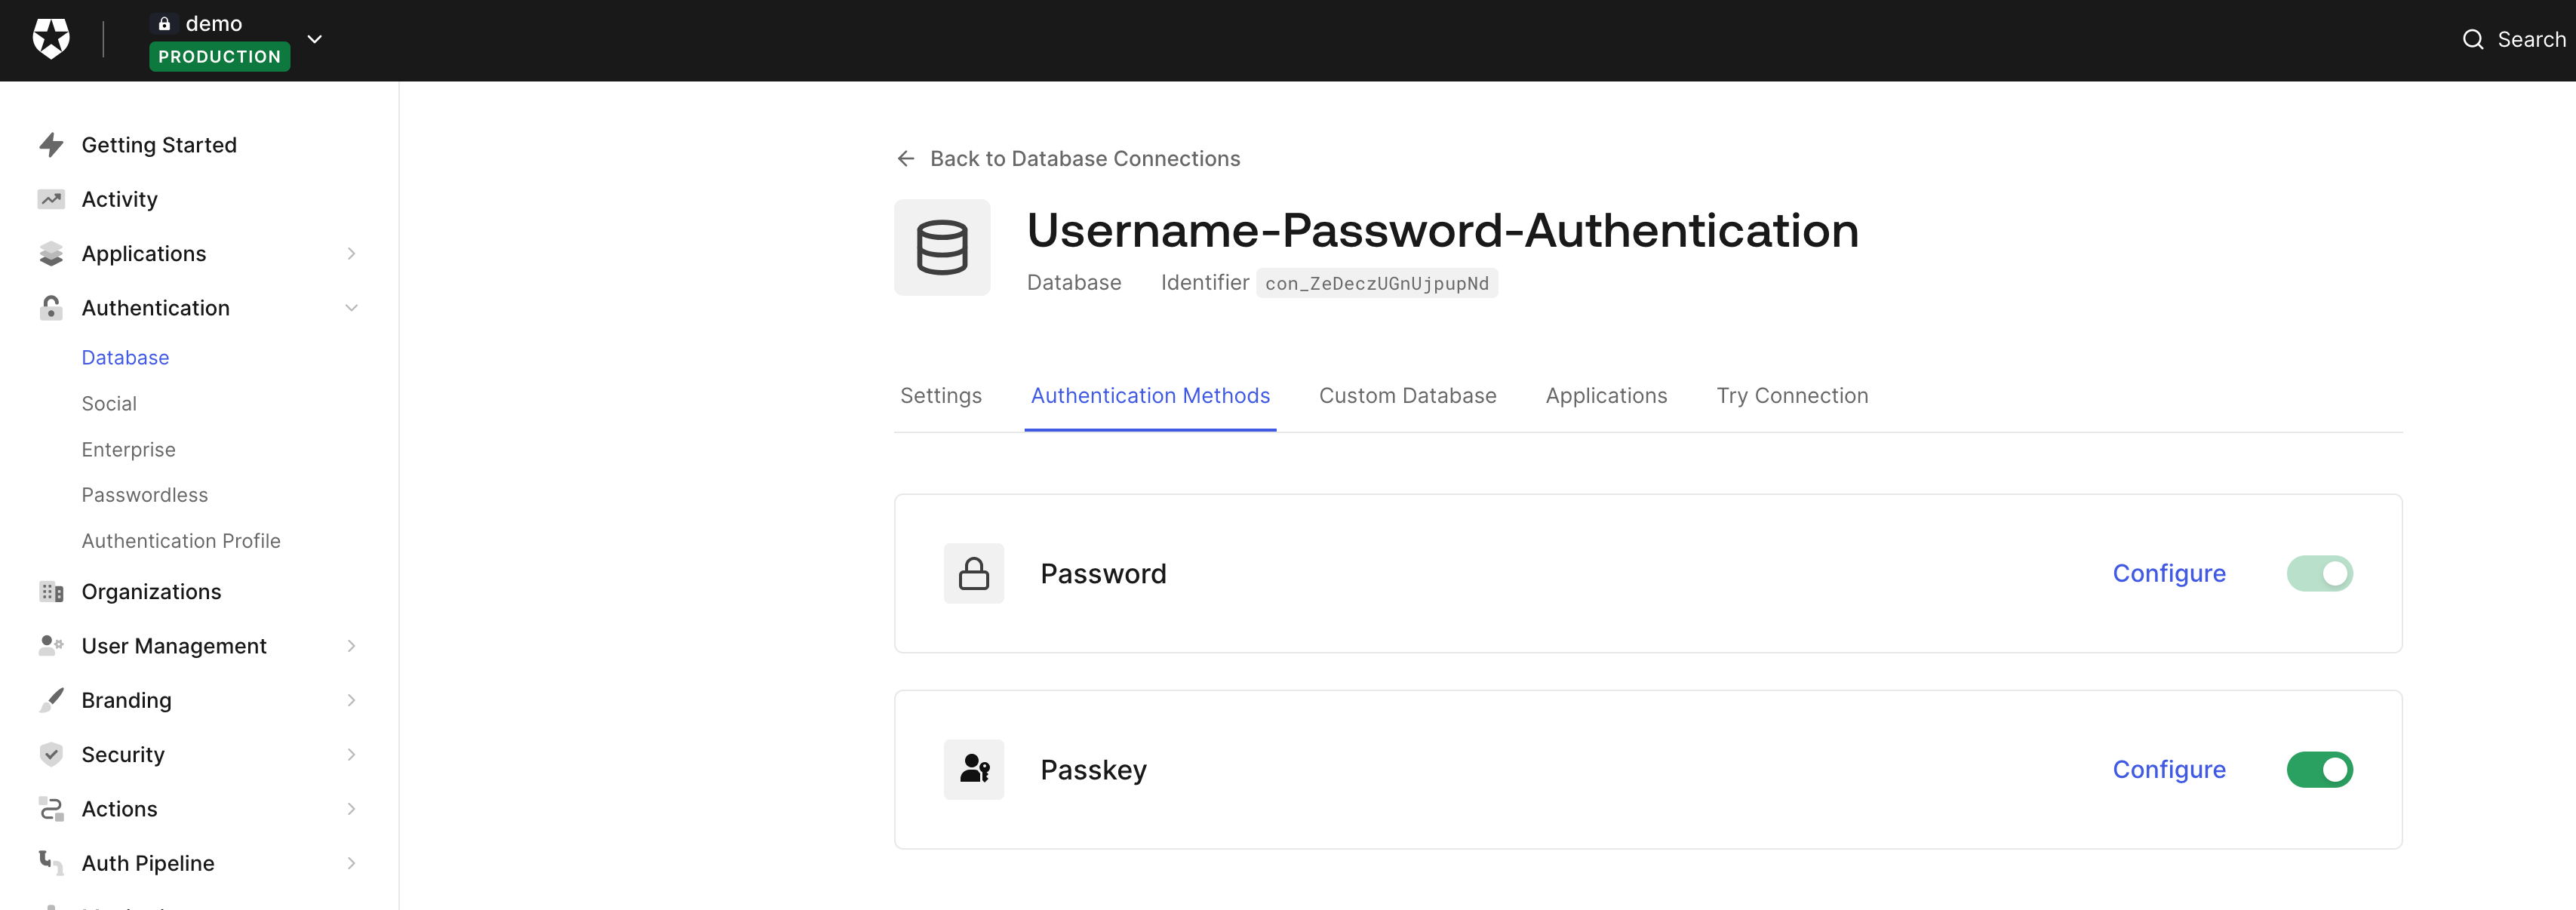
Enable passkeys in Auth0
Enable passkeys on your Auth0 database connection. Go to Authentication > Database > your connection and toggle passkeys on.
For a detailed walkthrough, see Configure Passkey Policy for Database Connections.
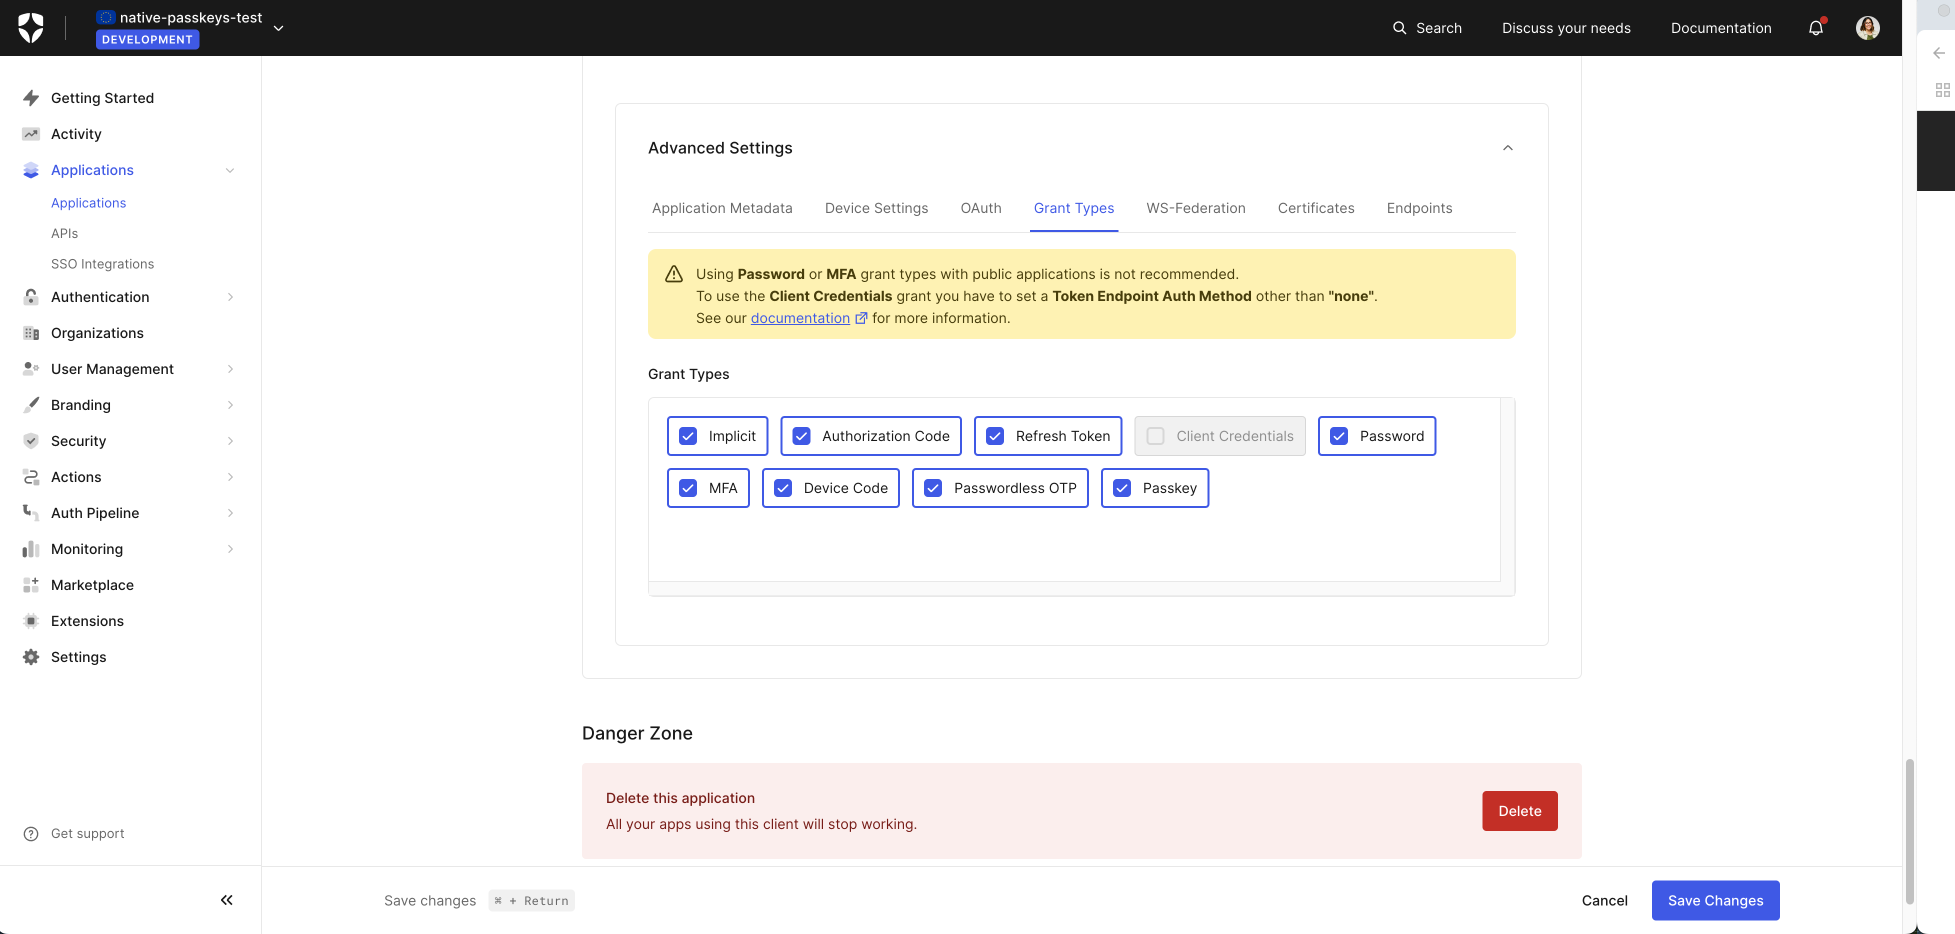
Enable passkey grant
Your Auth0 Native Application needs the passkey grant type enabled:
- Go to Applications > Applications and select your native app.
- Scroll down to Advanced Settings > Grant Types.
- Check Passkey.
- Click Save Changes.
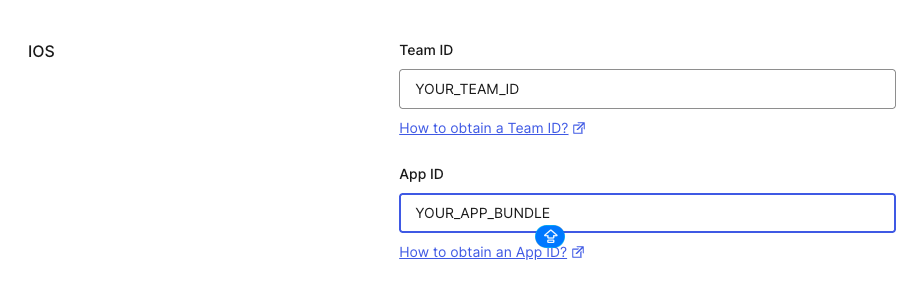
Configure iOS device settings
Auth0 needs your app's identity to serve the correct Apple App Site Association (AASA) file. This is what lets iOS verify that your app is associated with your Auth0 custom domain:
- In your application settings, go to Advanced Settings > Device Settings.
- Under the iOS section, add your Apple Team ID and your app's Bundle Identifier.
- Click Save.
Configure a custom domain
Passkeys are bound to a relying party domain. Auth0's default *.auth0.com domains won't work — you need a custom domain.
If you don't have one set up yet, go to Branding > Custom Domains and follow the steps. Auth0 offers managed certificates so you don't need to bring your own — and custom domains are included in the free plan.
Configure Associated Domains in Xcode
The final configuration step happens in your Xcode project. Associated Domains tell iOS that your app is linked to your Auth0 custom domain for passkey operations:
- Open your project in Xcode.
- Select your target, then go to Signing & Capabilities.
- Click + Capability and add Associated Domains.
- Add:
webcredentials:YOUR_AUTH0_CUSTOM_DOMAIN
For example, if your custom domain is login.example.com, add webcredentials:login.example.com.
You can verify the AASA file is being served correctly by visiting:
https://YOUR_AUTH0_CUSTOM_DOMAIN/.well-known/apple-app-site-association
Sign Up with a Passkey in Auth0
Now let's build the app. Start by adding the Auth0.swift SDK to your project.
Add Dependencies
In Xcode, go to File > Add Package Dependencies and add:
https://github.com/auth0/Auth0.swift
Set the version to 2.12.0 or later — this is the first version with passkey support. Add both the Auth0 and JWTDecode libraries to your target.
Configure Auth0.plist
Create an Auth0.plist file in your project with your Auth0 credentials:
<?xml *version*="1.0" *encoding*="UTF-8"?>
<!DOCTYPE *plist* PUBLIC "-//Apple//DTD PLIST 1.0//EN"
 "http://www.apple.com/DTDs/PropertyList-1.0.dtd">
<plist *version*="1.0">
<dict>
   <key>ClientId</key>
   <string>YOUR_AUTH0_CLIENT_ID</string>
   <key>Domain</key>
   <string>YOUR_AUTH0_CUSTOM_DOMAIN</string>
</dict>
</plist>
Important: Use your custom domain here, not the default
.auth0.comdomain. Passkeys won't work without it.
Build the LoginView
The login screen has an email field (needed for signup) and two buttons — one for login, one for signup:
import SwiftUI

struct LoginView: View {
   @ObservedObject var viewModel: AuthViewModel
   @State private var email = ""

   var body: some View {
       VStack(spacing: 24) {
           Spacer()

           Image(systemName: "person.badge.key.fill")
               .font(.system(size: 80))
               .foregroundStyle(.blue)

           Text("Welcome to Native Loginnwith Passkeys!")
               .font(.title2)
               .fontWeight(.semibold)
               .multilineTextAlignment(.center)

           TextField("Email", text: $email)
               .textFieldStyle(.roundedBorder)
               .textContentType(.emailAddress)
               .keyboardType(.emailAddress)
               .autocorrectionDisabled()
               .textInputAutocapitalization(.never)
               .padding(.horizontal)

           if viewModel.isLoading {
               ProgressView()
           }

           if let error = viewModel.error {
               Text(error)
                   .foregroundStyle(.red)
                   .font(.caption)
                   .padding(.horizontal)
           }

           Button("Login") {
               Task { await viewModel.loginWithPasskey() }
           }
           .buttonStyle(.borderedProminent)
           .controlSize(.large)
           .disabled(viewModel.isLoading)

           Text("or")
               .foregroundStyle(.secondary)

           Button("Sign Up") {
               Task { await viewModel.signUpWithPasskey(email: email) }
           }
           .buttonStyle(.bordered)
           .controlSize(.large)
           .disabled(email.isEmpty || viewModel.isLoading)

           Spacer()
       }
       .padding()
   }
}
The Login button doesn't need an email — passkeys are discoverable credentials, so iOS will show all available passkeys for the relying party. The Sign Up button requires an email because Auth0 needs it to create the user account.
Create the AuthViewModel
All the passkey logic lives in a single AuthViewModel class. It handles the Auth0 API calls, the Apple passkey prompts, and credential storage:
import AuthenticationServices
import Auth0
import JWTDecode
import combine
@MainActor
class AuthViewModel: NSObject, ObservableObject {

   @Published var isAuthenticated = false
   @Published var isLoading = false
   @Published var error: String?
   @Published var userName = ""
   @Published var idToken = ""

   private let authentication = Auth0.authentication()
   private let credentialsManager: CredentialsManager
   private let connection = "Username-Password-Authentication"

   // 👇 Used to bridge ASAuthorizationController's delegate callbacks into async/await
   private var authorizationContinuation: CheckedContinuation<ASAuthorizationCredential, Error>?

   override init() {
       self.credentialsManager = CredentialsManager(authentication: Auth0.authentication())
       super.init()
       self.isAuthenticated = credentialsManager.hasValid()
   }

   // ... signup and login methods go here
}
The AuthViewModel inherits from NSObject because it needs to conform to ASAuthorizationControllerDelegate — Apple's delegate protocol for handling passkey responses. The authorizationContinuation property is the key to making the delegate pattern work with async/await, which we'll get to shortly.
On initialization, the view model checks credentialsManager.hasValid() to skip the login screen if the user already has valid stored credentials.
Implement signUpWithPasskey
Here's the complete signup method:
func signUpWithPasskey(email: String) async {
   isLoading = true
   error = nil

   do {
       // 1. Request a signup challenge from Auth0
       let challenge = try await authentication
           .passkeySignupChallenge(email: email, connection: connection)
           .start()

       // 2. Create a new passkey using Apple's ASAuthorization API
       let provider = ASAuthorizationPlatformPublicKeyCredentialProvider(
           relyingPartyIdentifier: challenge.relyingPartyId
       )
       let registrationRequest = provider.createCredentialRegistrationRequest(
           challenge: challenge.challengeData,
           name: challenge.userName,
           userID: challenge.userId
       )
       let credential = try await performAuthorizationRequest(registrationRequest)

       guard let registration = credential
               as? ASAuthorizationPlatformPublicKeyCredentialRegistration else {
           throw PasskeyError.unexpectedCredentialType
       }

       // 3. Complete signup by exchanging the passkey for Auth0 tokens
       let credentials = try await authentication
           .login(passkey: registration, challenge: challenge, connection: connection)
           .start()

       _ = credentialsManager.store(credentials: credentials)
       isAuthenticated = true
   } catch ASAuthorizationError.canceled {
       // User cancelled the passkey prompt — no error to show
   } catch {
       self.error = error.localizedDescription
   }

   isLoading = false
}
In step 1, passkeySignupChallenge calls Auth0's POST /passkey/register endpoint. Auth0 returns a PasskeySignupChallenge containing the relyingPartyId, challengeData, userId, and userName — everything Apple needs to create the passkey.
In step 2, ASAuthorizationPlatformPublicKeyCredentialProvider takes the relying party ID and creates a registration request with the challenge, user name, and user ID from Auth0. The performAuthorizationRequest helper (shown below) presents the Face ID / Touch ID prompt and returns the credential.
In step 3, the Auth0.swift SDK makes this clean: ASAuthorizationPlatformPublicKeyCredentialRegistration conforms to the SDK's SignupPasskey protocol automatically, so you pass it directly to authentication.login(passkey:challenge:connection:). No JSON serialization, no manual mapping — the SDK handles the WebAuthn response encoding under the hood. This calls POST /oauth/token with the urn:okta:params:oauth:grant-type:webauthn grant type and returns standard OAuth credentials.
Using Apple's ASAuthorization API
The one piece of plumbing you need is a way to bridge ASAuthorizationController's delegate pattern into async/await. The performAuthorizationRequest method does this using withCheckedThrowingContinuation:
private var authorizationContinuation: CheckedContinuation<ASAuthorizationCredential, *Error*>?

private func performAuthorizationRequest(
   _ request: ASAuthorizationRequest
) async throws -> ASAuthorizationCredential {
   try await withCheckedThrowingContinuation { continuation in
       self.authorizationContinuation = continuation
       let controller = ASAuthorizationController(authorizationRequests: [request])
       controller.delegate = self
       controller.presentationContextProvider = self
       controller.performRequests()
   }
}
When the user completes (or cancels) the Face ID / Touch ID prompt, ASAuthorizationController calls one of the delegate methods. These resume the continuation, which unblocks the await:
extension AuthViewModel: ASAuthorizationControllerDelegate {

   func authorizationController(
       controller: ASAuthorizationController,
       didCompleteWithAuthorization authorization: ASAuthorization
   ) {
       authorizationContinuation?.resume(returning: authorization.credential)
       authorizationContinuation = nil
   }

   func authorizationController(
       controller: ASAuthorizationController,
       didCompleteWithError error: Error
   ) {
       authorizationContinuation?.resume(throwing: error)
       authorizationContinuation = nil
   }
}
You also need to provide a presentation anchor — the window where the passkey sheet appears:
extension AuthViewModel: ASAuthorizationControllerPresentationContextProviding {

   func presentationAnchor(
       for controller: ASAuthorizationController
   ) -> ASPresentationAnchor {
       UIApplication.shared.connectedScenes
           .compactMap { $0 as? UIWindowScene }
           .flatMap { $0.windows }
           .first { $0.isKeyWindow } ?? ASPresentationAnchor()
   }
}
This helper and the delegate extensions are reused for both signup and login — you write them once and both flows use them.
Login with a Passkey in Auth0
The login flow mirrors signup, but instead of creating a new passkey, it retrieves an existing one:
func loginWithPasskey() async {
   isLoading = true
   error = nil

   do {
       // 1. Request a login challenge from Auth0
       let challenge = try await authentication
           .passkeyLoginChallenge(connection: connection)
           .start()

       // 2. Retrieve an existing passkey using Apple's ASAuthorization API
       let provider = ASAuthorizationPlatformPublicKeyCredentialProvider(
           relyingPartyIdentifier: challenge.relyingPartyId
       )
       let assertionRequest = provider.createCredentialAssertionRequest(
           challenge: challenge.challengeData
       )
       let credential = try await performAuthorizationRequest(assertionRequest)

       guard let assertion = credential
               as? ASAuthorizationPlatformPublicKeyCredentialAssertion else {
           throw PasskeyError.unexpectedCredentialType
       }

       // 3. Complete login by exchanging the passkey for Auth0 tokens
       let credentials = try await authentication
           .login(passkey: assertion, challenge: challenge, connection: connection)
           .start()

       _ = credentialsManager.store(credentials: credentials)
       isAuthenticated = true
   } catch ASAuthorizationError.canceled {
       // User cancelled the passkey prompt — no error to show
   } catch {
       self.error = error.localizedDescription
   }

   isLoading = false
}
Spot the differences from signup:
- Step 1 calls
passkeyLoginChallengeinstead ofpasskeySignupChallenge. The login challenge (PasskeyLoginChallenge) is simpler — it only hasrelyingPartyIdandchallengeData. No user information, because the authenticator already knows which credentials exist for this relying party. - Step 2 calls
createCredentialAssertionRequestinstead ofcreateCredentialRegistrationRequest. The assertion request only needs the challenge — no user name or user ID. iOS shows the user a list of available passkeys for the domain. - Step 3 casts to
ASAuthorizationPlatformPublicKeyCredentialAssertion(which conforms toLoginPasskey) instead of the registration type. The SDK has two overloads oflogin(passkey:challenge:connection:)— one forLoginPasskey, one forSignupPasskey— so the code reads the same either way.
Both flows use the same performAuthorizationRequest helper and the same delegate callbacks. Both end with storing credentials and navigating to the home screen.
Store Auth0 credentials
After both signup and login, the app stores the returned credentials using Auth0's CredentialsManager:
private let credentialsManager: CredentialsManager

// In init():
self.credentialsManager = CredentialsManager(authentication: Auth0.authentication())

// After successful authentication:
_ = credentialsManager.store(credentials: credentials)
CredentialsManager persists tokens in the iOS Keychain via SimpleKeychain. It also handles token refresh automatically when you call credentials() — if the access token has expired but a refresh token is available, it renews the tokens transparently.
Build the HomeView
The home screen shows the authenticated user's name, their raw ID token, and a logout button:
import SwiftUI

struct HomeView: View {
   @ObservedObject var viewModel: AuthViewModel

   var body: some View {
       VStack(spacing: 20) {
           Text("Welcome, (viewModel.userName)!")
               .font(.title)
               .fontWeight(.bold)
               .padding(.top)

           ScrollView {
               Text(viewModel.idToken)
                   .font(.system(.caption, design: .monospaced))
                   .padding()
                   .frame(maxWidth: .infinity, alignment: .leading)
                   .background(Color(.systemGray6))
                   .clipShape(RoundedRectangle(cornerRadius: 8))
           }

           Button("Logout", role: .destructive) {
               viewModel.logout()
           }
           .buttonStyle(.borderedProminent)
           .controlSize(.large)
           .padding(.bottom)
       }
       .padding()
       .task {
           await viewModel.loadUserProfile()
       }
   }
}
Load the user profile
When HomeView appears, it calls loadUserProfile() to retrieve the stored credentials and decode the user's name from the ID token:
func loadUserProfile() async {
   do {
       let credentials = try await credentialsManager.credentials()
       idToken = credentials.idToken
       let jwt = try decode(jwt: credentials.idToken)
       userName = jwt["name"].string ?? jwt["email"].string ?? "User"
   } catch {
       self.error = error.localizedDescription
       isAuthenticated = false
   }
}
credentialsManager.credentials() returns the stored tokens. If the access token has expired, it automatically refreshes using the refresh token before returning. The decode(jwt:) function comes from JWTDecode.swift, which is included as a dependency of Auth0.swift.
Wire up navigation
The app entry point switches between LoginView and HomeView based on the authentication state:
import SwiftUI

@main
struct NativePasskeysApp: App {
   @StateObject private var viewModel = AuthViewModel()

   var body: some Scene {
       WindowGroup {
           if viewModel.isAuthenticated {
               HomeView(viewModel: viewModel)
           } else {
               LoginView(viewModel: viewModel)
           }
       }
   }
}
Because isAuthenticated is @Published, SwiftUI automatically handles the transition when it changes.
Logout
Logging out clears the stored credentials and resets the view model:
func logout() {
   _ = credentialsManager.clear()
   isAuthenticated = false
   userName = ""
   idToken = ""
}
credentialsManager.clear() removes the tokens from the Keychain. Setting isAuthenticated = false triggers SwiftUI to navigate back to the login screen.
Note: This clears the local session only. It doesn't revoke the tokens on the Auth0 side. For a production app, you may want to call
credentialsManager.revoke()instead, which revokes the refresh token with Auth0 before clearing local storage.
Summary
You've built an iOS app that uses Auth0's Native Login to:
- Sign up with a passkey — Auth0 generates the WebAuthn challenge, Apple creates the passkey via Face ID / Touch ID, and Auth0 verifies the credential and returns tokens.
- Log in with a passkey — same three-step flow, but retrieving an existing passkey instead of creating a new one.
- Log out — clear stored credentials from the Keychain.
The Auth0.swift SDK handles the API communication and WebAuthn encoding, while Apple's ASAuthorizationPlatformPublicKeyCredentialProvider handles the on-device passkey ceremony. The protocol conformances between the two (ASAuthorizationPlatformPublicKeyCredentialRegistration conforms to SignupPasskey, ASAuthorizationPlatformPublicKeyCredentialAssertion conforms to LoginPasskey) mean there's no manual JSON serialization involved.
Native Login with passkeys is currently in Limited Early Access. For the latest status and documentation, see Native Passkeys for Mobile Applications.
You can find the complete code for this tutorial on GitHub.