TL;DR: Apple recently announced that the company is going to release its identity provider service called Sign in with Apple (SIWA). This provider can be a great addition to apps and users because they will be able to exchange identity information more easily and securely. On the other hand, this also can become a headache for developers because Apple is going to require all apps that rely on other social providers to support their own. However, as you will see in this article, if you choose the right tools and services, supporting Sign in with Apple can be an easy task.
What is Sign in with Apple?
Last quarter, Apple announced its new identity provider service, Sign in with Apple. According to the company, this service introduces multiple benefits that will enhance the experience and the privacy of Apple users. For example, by using Sign in with Apple, users will be able to:
- enjoy a frictionless sign-in experience with Touch ID and Face ID to access third-party apps;
- and hide their real email addresses behind a temporary one that Apple creates on a per-app basis.
Although this announcement is indeed interesting for the multiple benefits it brings for Apple users, adding support to Sign in with Apple can be a burden. As the IT community knows, when it comes to identity management and the security of user data, things can get tricky. If they make a mistake, they can end up jeopardizing entire businesses. Besides that, since the first announcement, the company has made it clear that it will be mandatory for apps supporting third-party sign-in (such as Facebook and Google) to support Sign in with Apple as well.
Two weeks ago, Apple announced that, from that day on, new apps submitted to the App Store must support Sign in with Apple. Also, the company have stated that existing apps and app updates must support this service by April 2020. So, during the next 6 months, companies will have to face this real challenge. They will have to switch their focus, get back to a sensitive feature that deals with user data, learn how to integrate with the new provider, and release a new version hoping that they didn't make any mistake. However, if they choose the right tools for the job, they won't face that many problems to support this new provider. They will be able to enjoy only the good parts of this new service and they will be able to get back to their businesses in no time.
As Matias Woloski, CTO and co-founder of Auth0, said:
"Sign in with Apple is an exciting development and speaks to the overall demand for customizable login methods with a focus on confidentiality and privacy of personal information. [...] This is a big event in the industry, and its integration in our platform represents the versatility of our platform and how our customers can quickly deploy new features with ease using Universal Login."
Prerequisites for Implementing SIWA
To follow along with the instructions in this article, you will need to configure a few things first. For starters, you will need to create (if you don't have one yet) an Auth0 account and configure it. Then, you will have to make sure some dependencies are available in your local machine.
Configuring the Auth0 account
To be able to use Auth0 to integrate iOS apps with Sign in with Apple, there are a few prerequisites you will have to match. First, you will need an Auth0 account. If you already have one, you can reuse it. Otherwise, you can use the previous link to create one. Besides that, you will need to configure your Auth0 account with a Custom Domain. While using Auth0, for most situations at least, you don't need a Custom Domain (which is a paid feature). However, to be able to do the Domain Verification step while configuring Sign in with Apple in your Apple Developer account, you won't be able to use an Auth0 subdomain (which is provided for free). So, follow the instructions in this article to set up a custom domain in your Auth0 account.
With that in place, you can follow the Setting up Sign in with Apple article. There, you will see, step by step, how to configure Sign in with Apple on your Apple Developer dashboard.

At the end of the article, you will have all the information you need to finish the configuration on your Auth0 dashboard. So, when you get the token at the last step of this article, you can head to the Add Sign in with Apple to Your App article and follow the instructions there.
Installing the dependencies in your local environment
Now that you have your Auth0 account and your Apple Developer account properly configured, you will need to install some dependencies locally. First, you will have to install Xcode 11 (or greater). After that, you will also have to install CocoaPods in your machine.
With these two dependencies in place, the next thing you will need is an iOS 13 device. The easiest way to get one is by using iOS simulators, which are included by default on Xcode. If you have all that, you are ready to move on.
Using Auth0 to Integrate iOS Apps with Apple
After preparing your local environment, you can start integrating an iOS app with Sign in with Apple with the help of Auth0. For starters, as you can imagine, you will need an iOS project. If you already have one, you can adjust the instructions in this section to use it. Otherwise, you can create a brand new project to see the process from scratch.
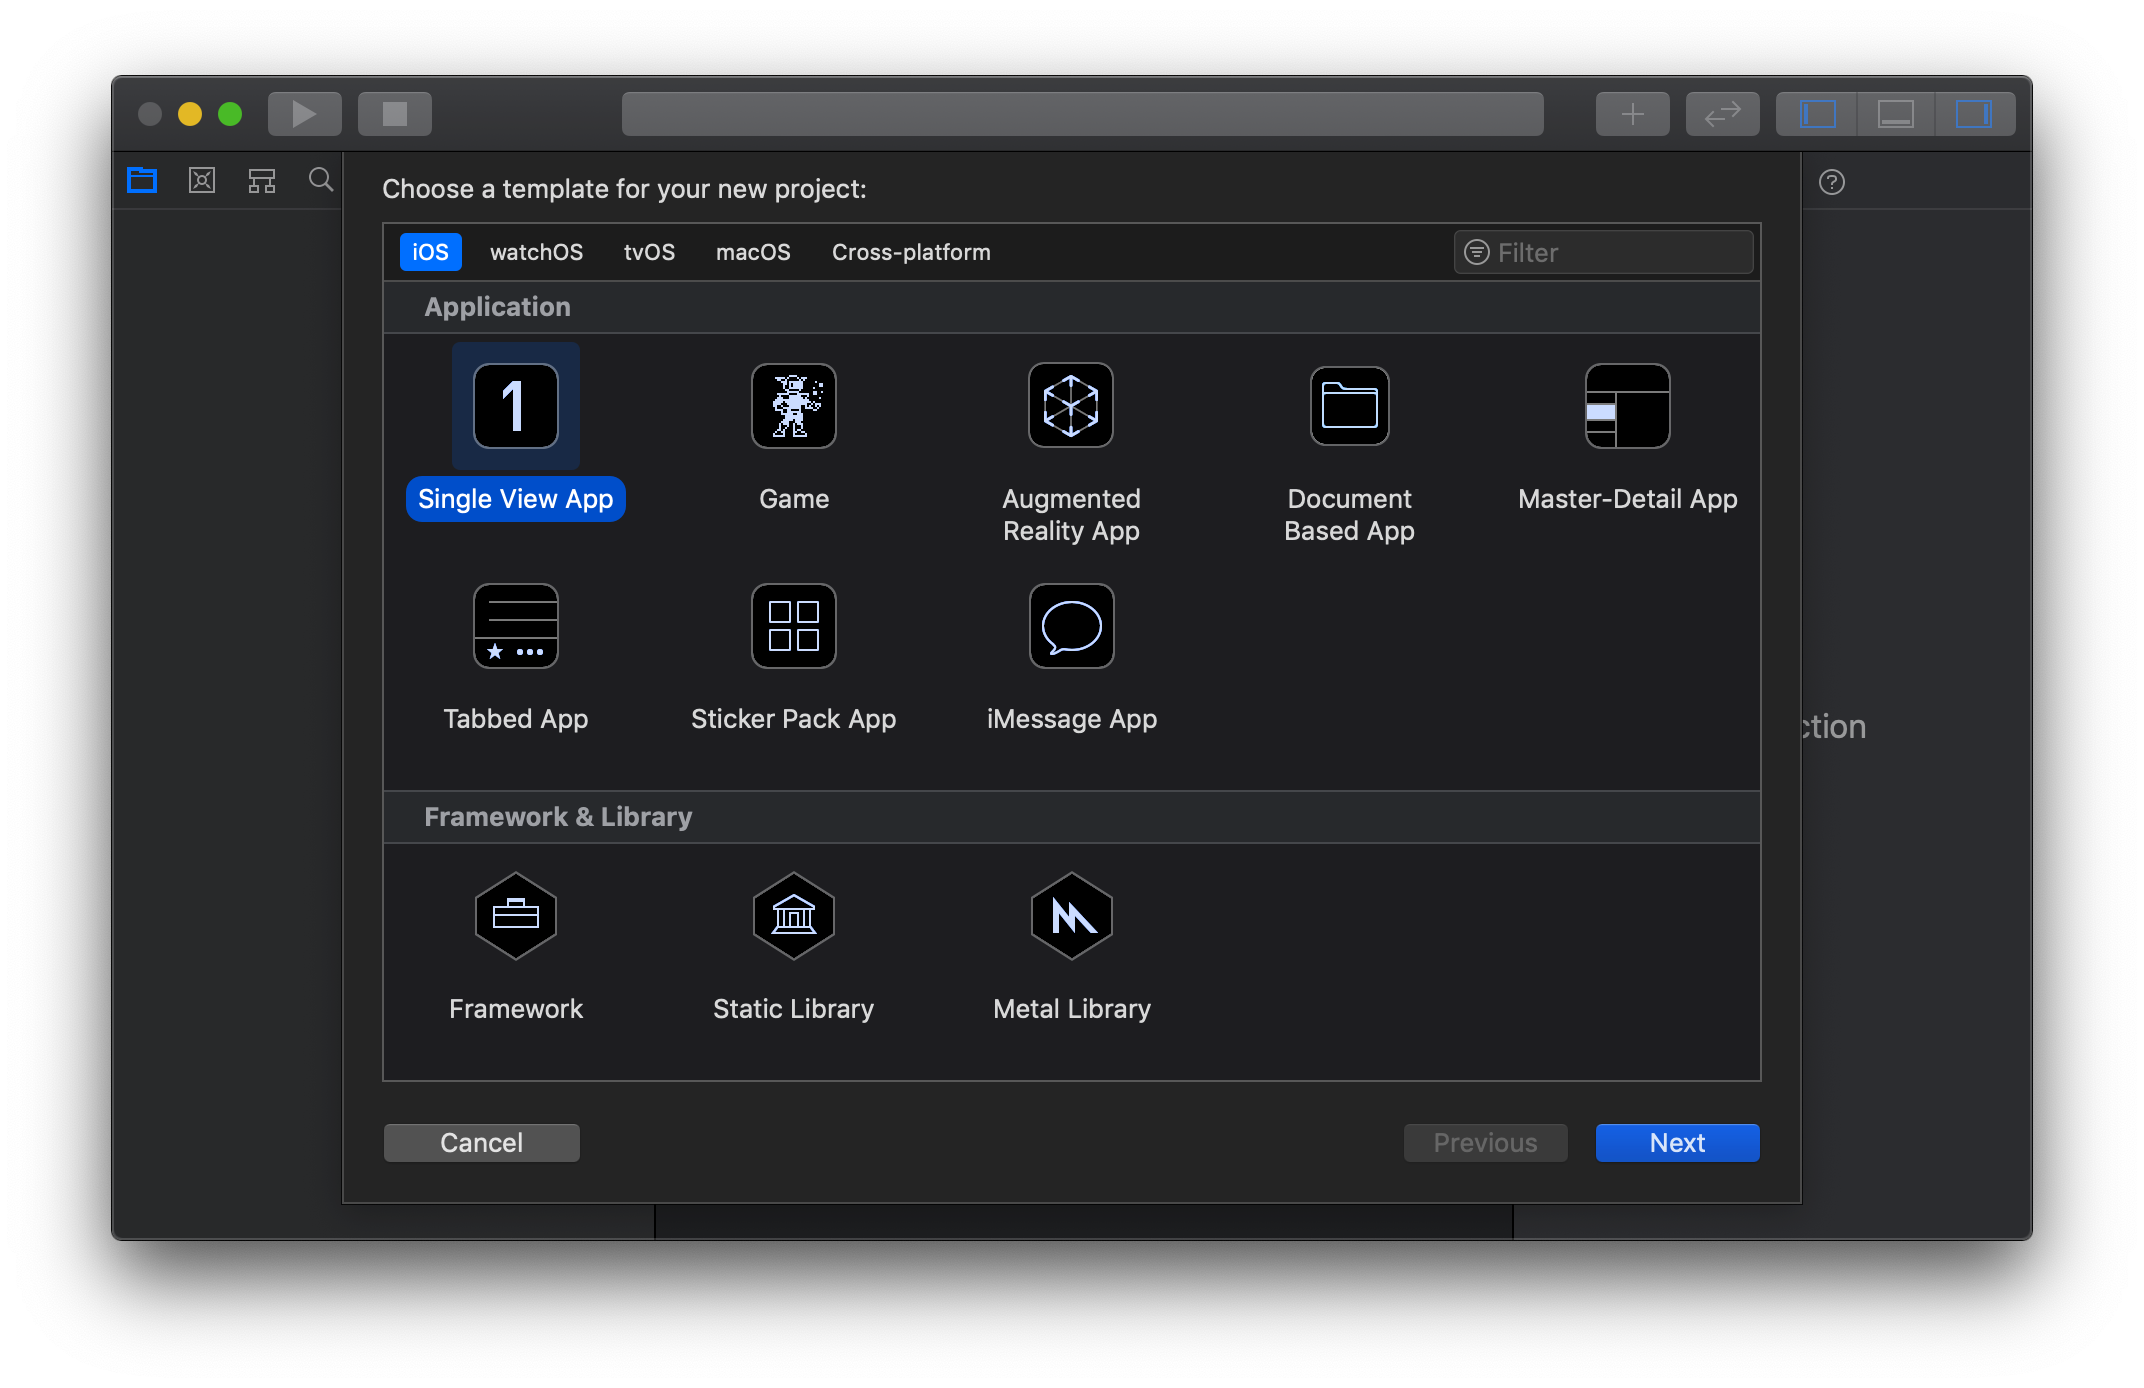
To create a new project, open Xcode, and choose "File" > "New" > "Project". When the IDE asks you what template you want to use, choose "Single View App". Then, click "Next".
After that, Xcode will show you a form asking some questions about your project. Fill this form as follows:
- Project Name: Type something meaningful, like "SIWA Native".
- Team: Choose your Apple Developer team.
- Organization Name: Type some meaningful name for your organization.
- Organization Identifier: It might be useful to type your domain backwards. For example:
br.com.digituz - Language: Choose "Swift"
- User Interface: "Choose Storyboard"

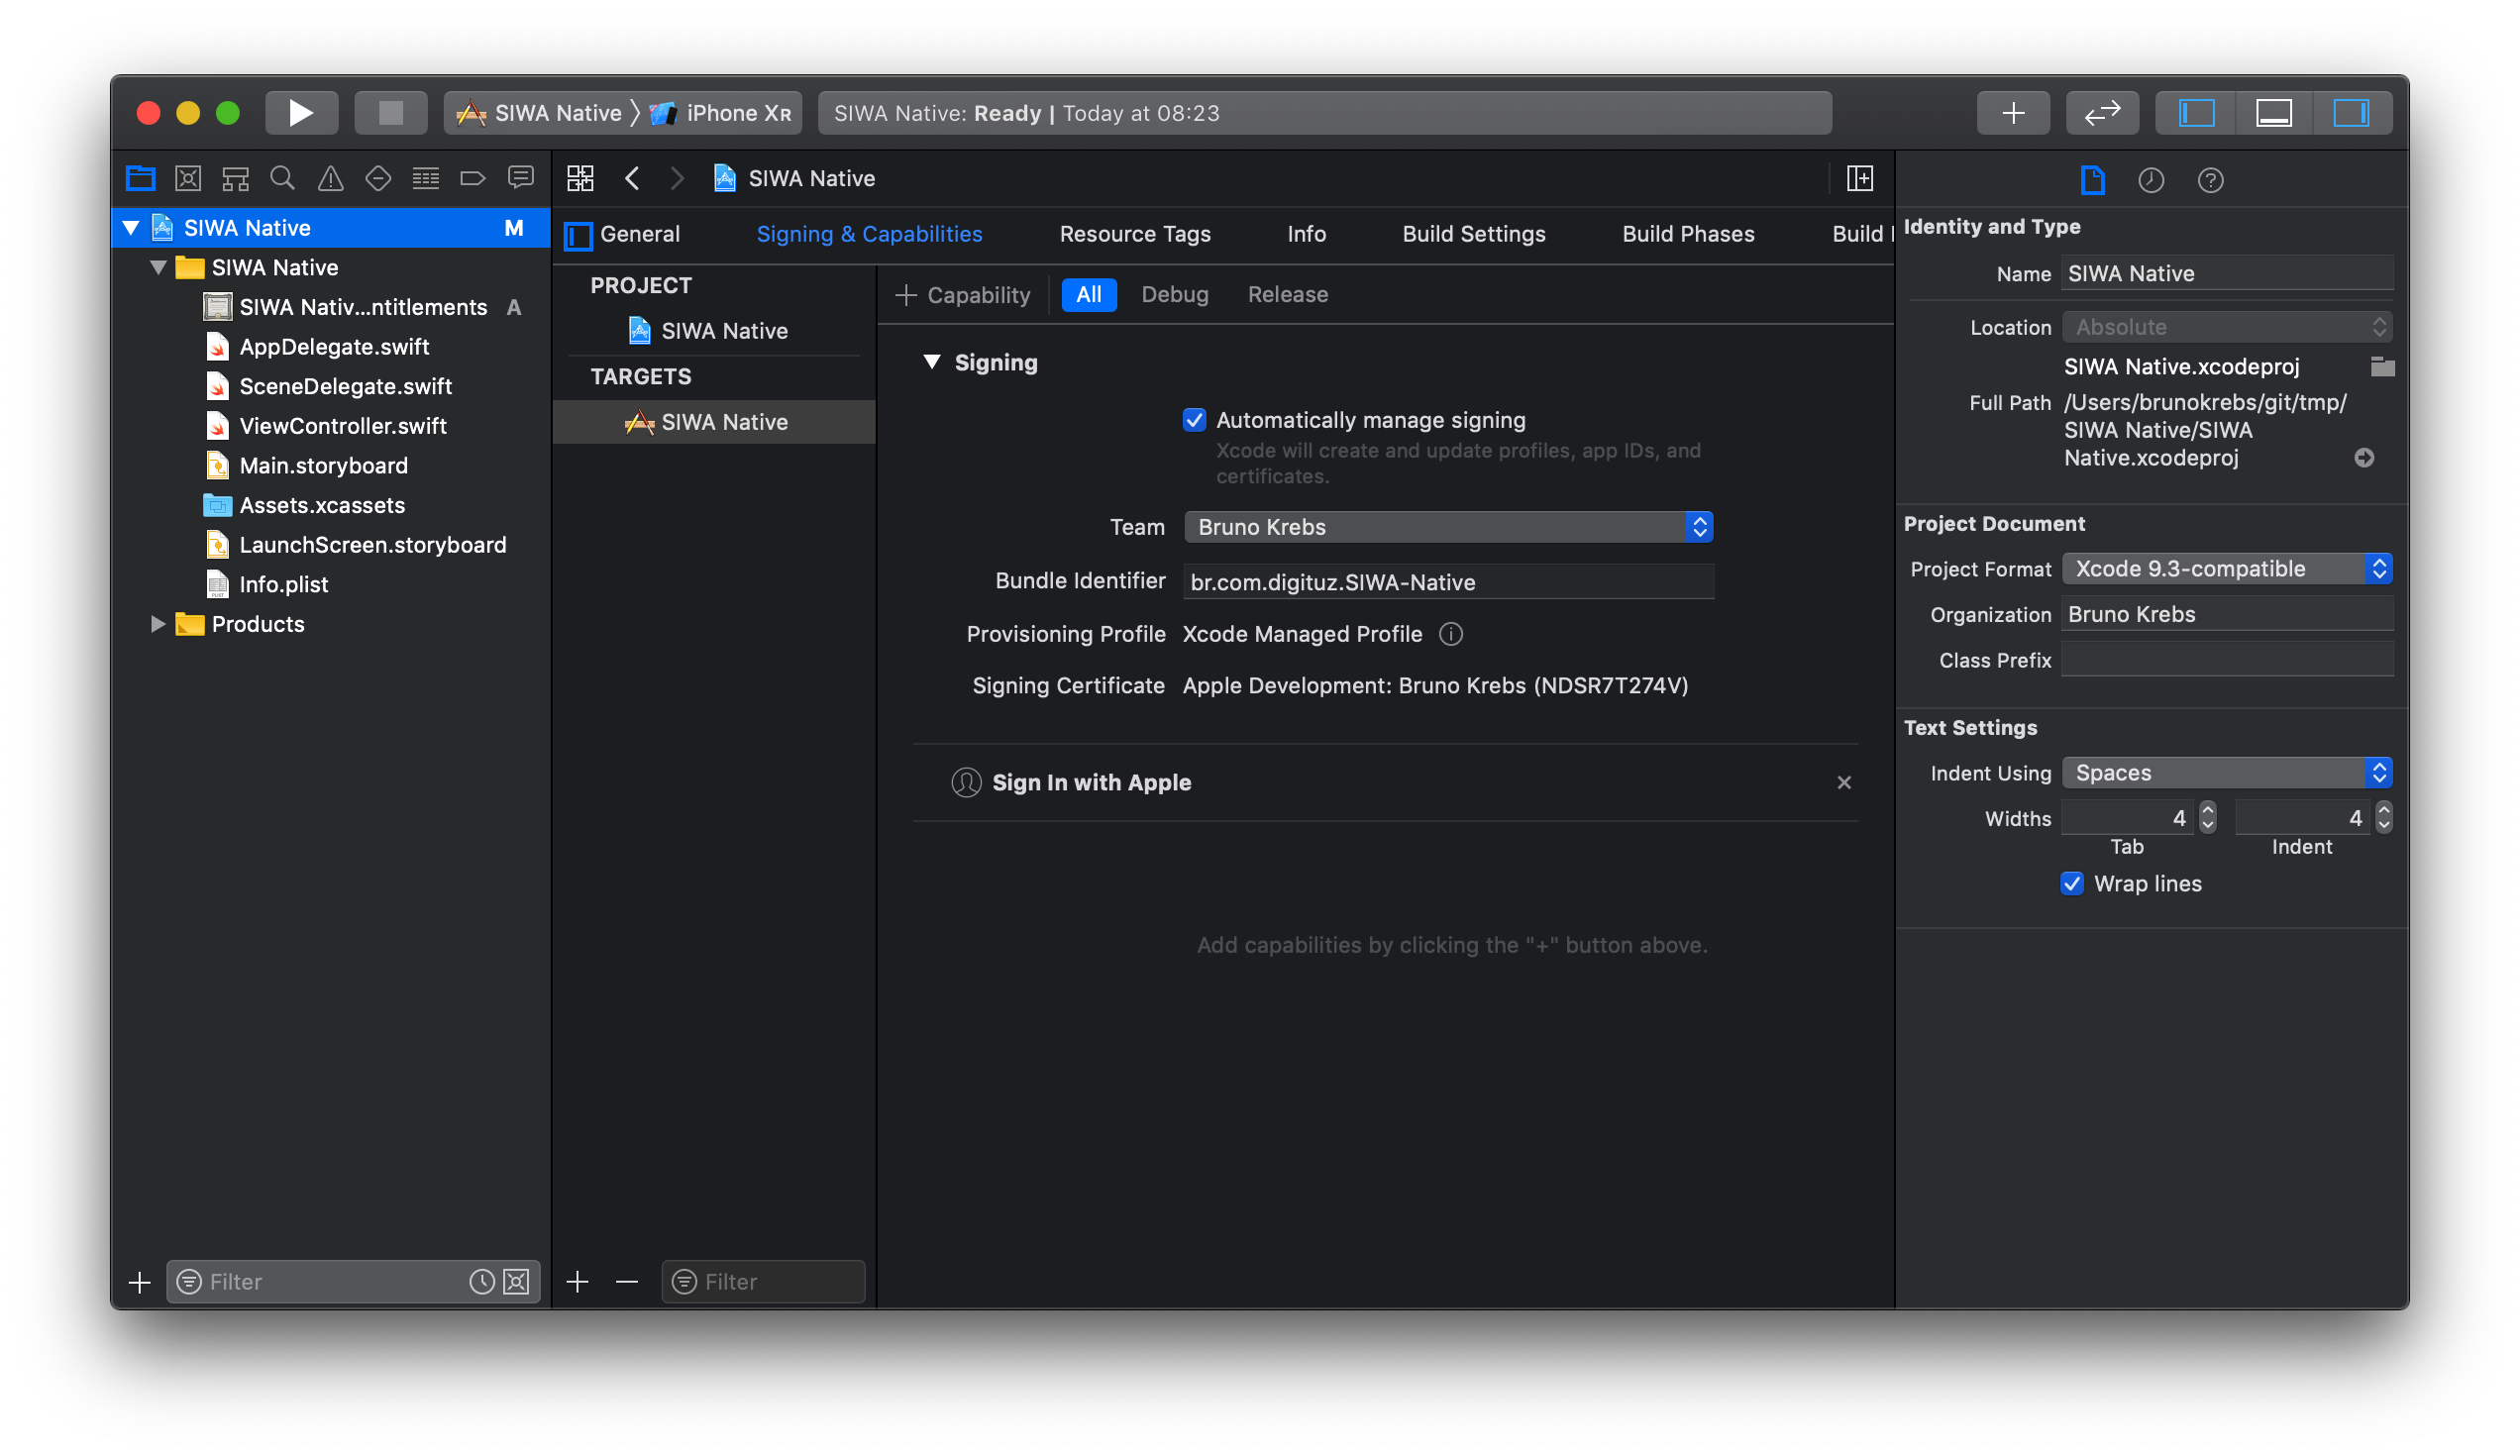
Then, leaving the four checkboxes below unchecked, you can click "Next". Now, choose a place to store your project and hit "Create". When the IDE finishes creating your project, it will show you the project settings of your new app. From there, you can open the "Signing & Capabilities" tab and on the "+ Capability" button. This will make Xcode open a dialog with all the capabilities you can add to your project.
On this dialog, search for the "Sign in with Apple" option and double click on it. When you do so, Xcode will provision a profile and a signing certificate in your Apple Developer account.
With that in place, head to the "General" tab and, under the "Frameworks, Libraries, and Embedded Content" section, click the "+" (plus) button to add the "AuthenticationServices.framework" framework. After adding this framework, you will have to configure CocoaPods to import Auth0's SDK. To do this, the first thing you will do is to issue the following command from the project root to activate CocoaPods in it:
# execute from the project root
pod init
Then, open the Podfile that was created and replace its contents with this:
target 'SIWA Native' do
  # Comment the next line if you don't want to use dynamic frameworks
  use_frameworks!

  # Pods for SIWA Native
  pod 'Auth0', "~> 1.18"
end
Note: You might have to update the file with the name of your project if you ended up choosing another name to it.
Now, execute the following command from the project root to make CocoaPods install the new dependency:
# execute from the project root
pod install
When CocoaPods completes the installation phase, it will create a new file on the project root that has the .xcworkspace suffix. From now on, this will be the file you will use to develop your app. So, close the current project on Xcode, and double click this file to load the new workspace.
Registering the app on Auth0
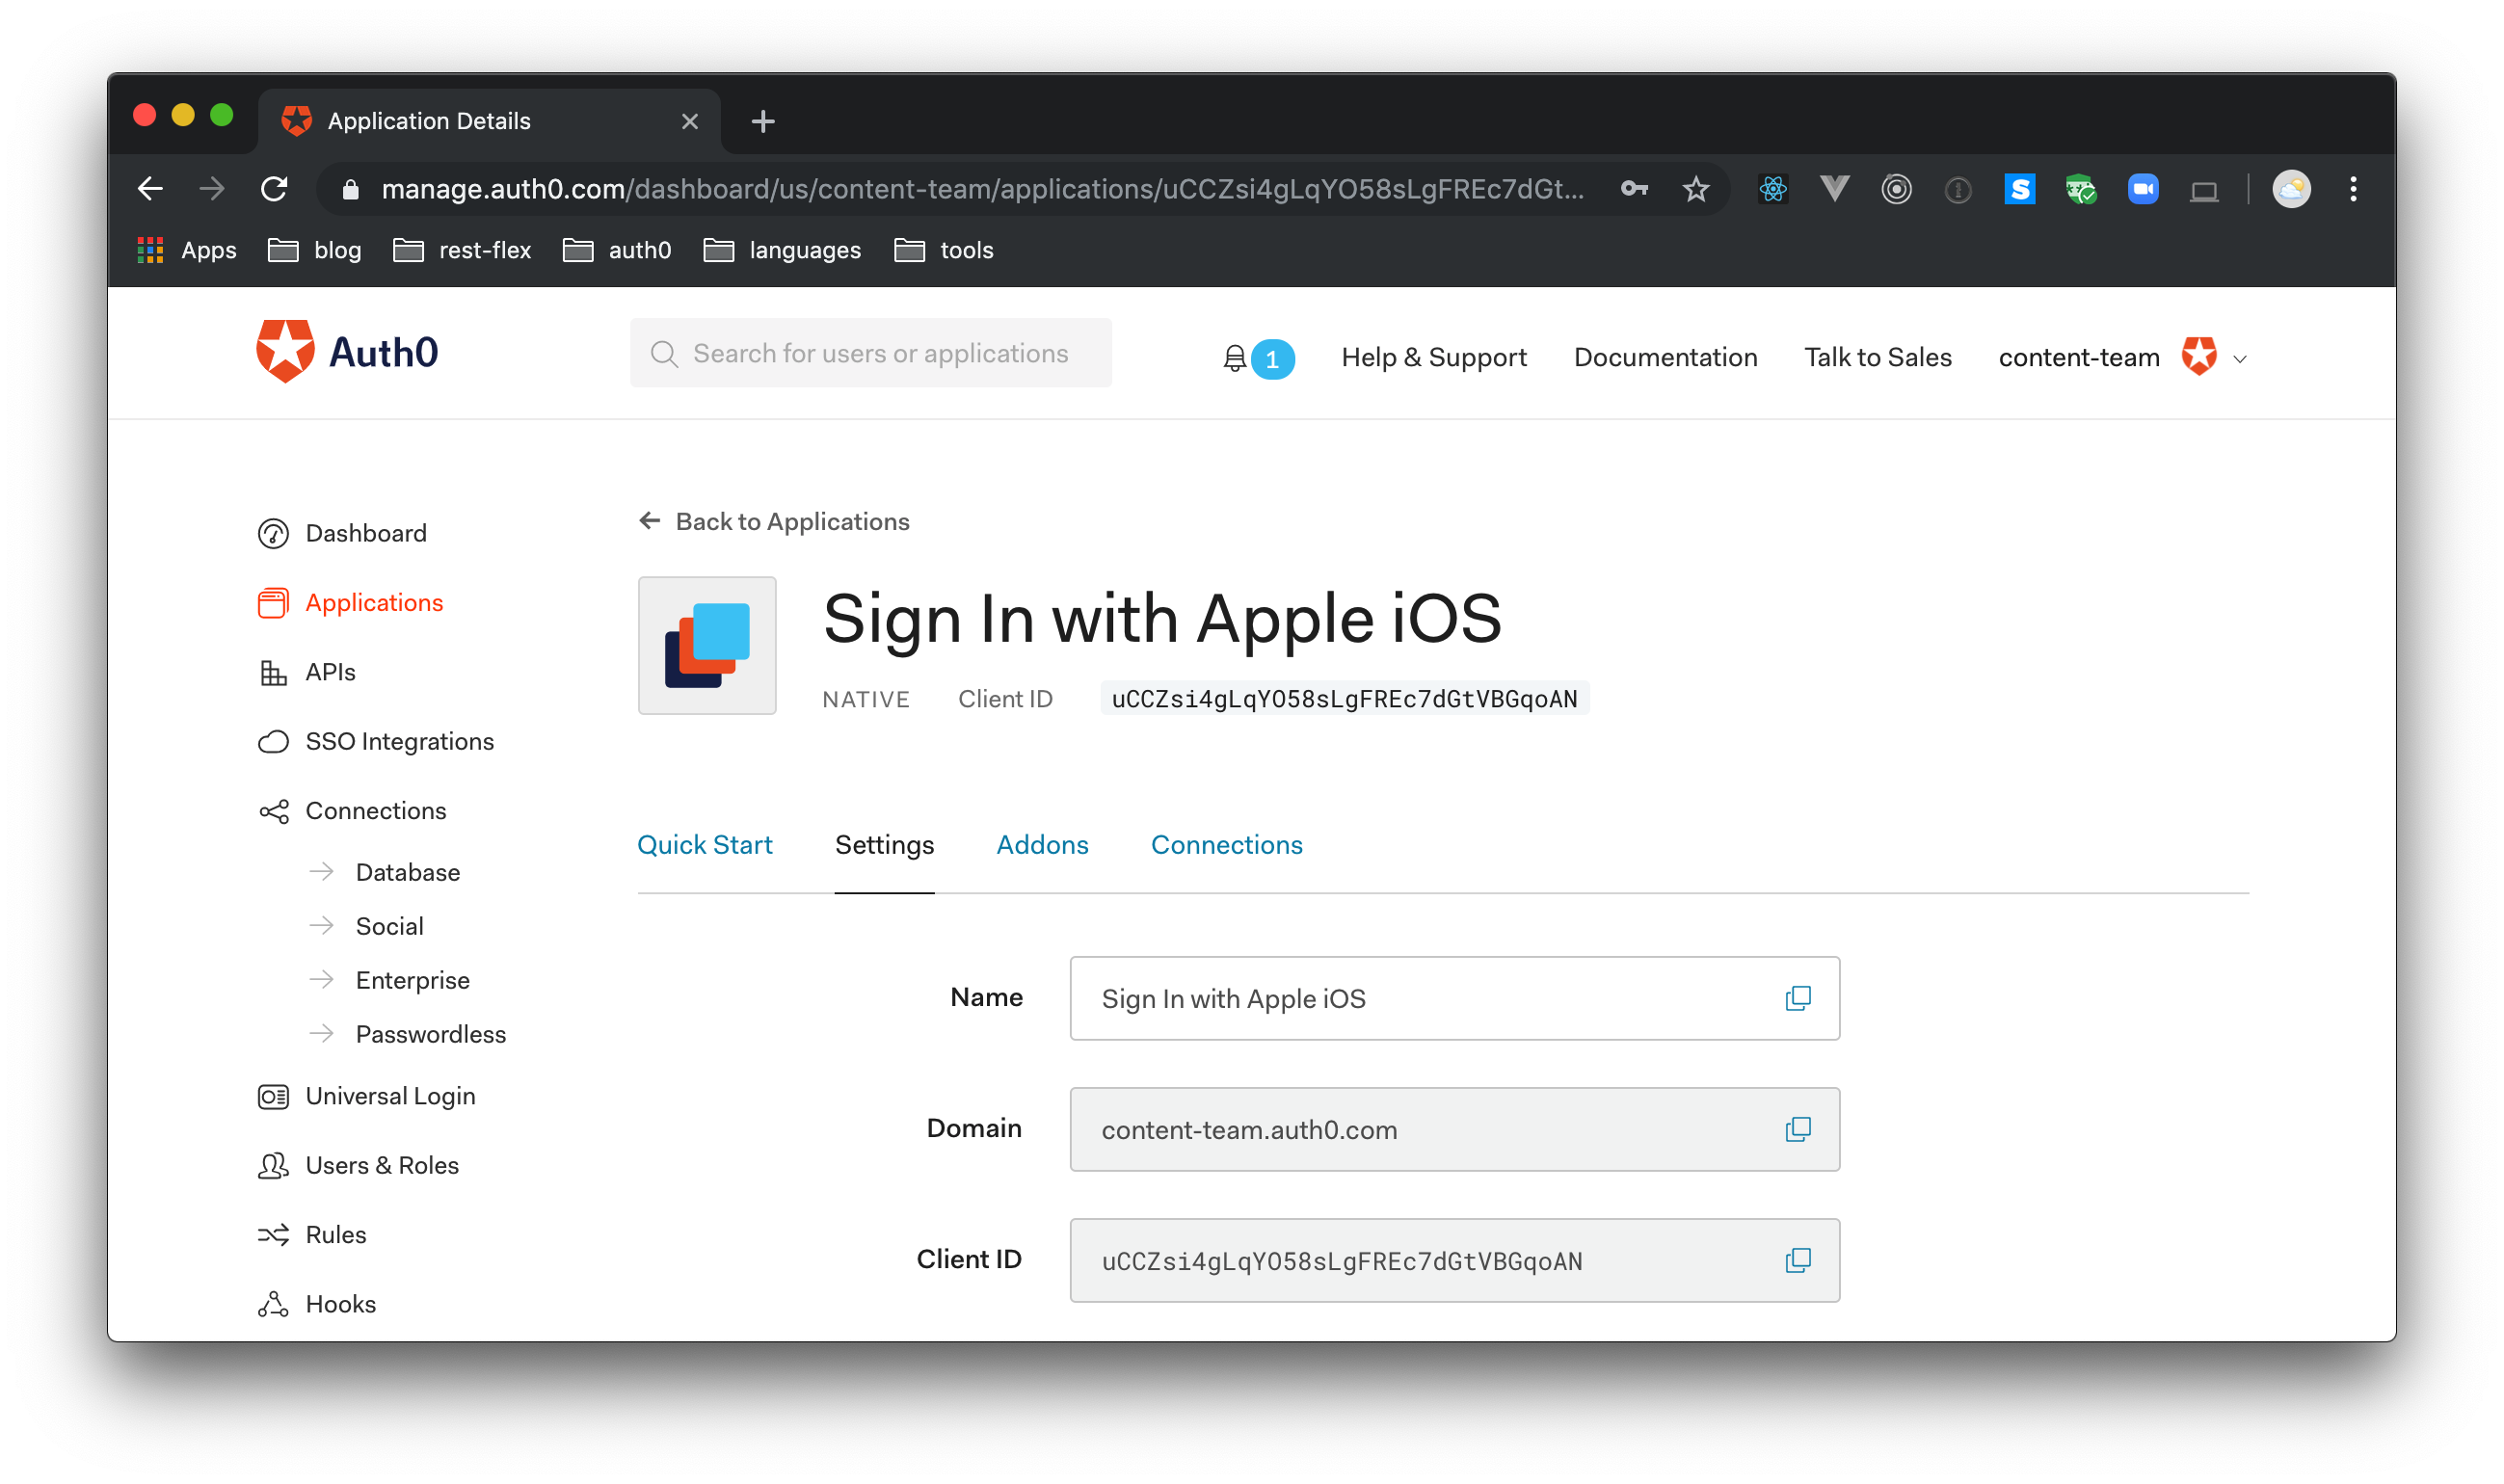
After bootstrapping the project and doing some initial configuration, you will have to register it in your Auth0 tenant. To do so, head to the Application sections and click on "Create Application". Then, on the dialog shown, type a name for your application (e.g., "Sign in with Apple Native"), choose "Native" as the application type, and click on "Create".
After doing so, head to the "Settings" tab of the application on your Auth0 dashboard and add the following value to the "Allowed Callback URLs" field:
${PRODUCT_BUNDLE_IDENTIFIER}://YOUR_DOMAIN/ios/${PRODUCT_BUNDLE_IDENTIFIER}/callback
For the two ${PRODUCT_BUNDLE_IDENTIFIER} placeholders, you will have to use your project bundle ID. To find this value, click on the project main file on Xcode and, on the General tab, check the "Bundle Identifier" field.
For example, if the "Bundle Identifier" field shows br.com.digituz.SIWA-Native, then you will have to set the "Allowed Callback URLs" field with this:
br.com.digituz.samples.Auth0Sample://digituz.com.br/ios/br.com.digituz.samples.Auth0Sample/callback
To complete the process, scroll to the bottom of this page and hit "Save Changes".
Integrating the app with Auth0
After opening it on Xcode and registering the app in your Auth0 dashboard, you will do some work to prepare your app integration with Auth0 and the Sign in with Apple feature. For starters, open the Info.plist file and add the following configuration at the end of the <dict> element:
<dict>
  <!-- ... leave the other elements untouched ... -->
  <key>CFBundleURLTypes</key>
  <array>
      <dict>
          <key>CFBundleTypeRole</key>
          <string>None</string>
          <key>CFBundleURLName</key>
          <string>auth0</string>
          <key>CFBundleURLSchemes</key>
          <array>
              <string>$(PRODUCT_BUNDLE_IDENTIFIER)</string>
          </array>
      </dict>
  </array>
</dict>
This will register your iOS Bundle Identifier as a custom scheme.
Note: If your
Info.plistfile is not in the format shown above, you can right-click on it in Xcode and select "Open As > Source Code".
Next, you will have to create a file called Auth0.plist (i.e., a Property List file) right next to the Info.plist one. Inside this file, you will add the following code:
<?xml version="1.0" encoding="UTF-8"?>
<!DOCTYPE plist PUBLIC "-//Apple//DTD PLIST 1.0//EN" "http://www.apple.com/DTDs/PropertyList-1.0.dtd">
<plist version="1.0">
<dict>
    <key>Domain</key>
    <string>${YOUR_AUTH0_DOMAIN}</string>
    <key>ClientId</key>
    <string>${YOUR_AUTH0_CLIENT_ID}</string>
</dict>
</plist>
Then, you will have to make sure you replace ${YOUR_AUTH0_DOMAIN} and ${YOUR_AUTH0_CLIENT_ID} with your Auth0 Native Application values. That is, you will have to replace ${YOUR_AUTH0_DOMAIN} with the Domain value shown in your Auth0 dashboard and ${YOUR_AUTH0_CLIENT_ID} with the Client ID value.
Preparing the User Interface
Then, after configuring the property list files, you will have to right-click on the Main.storyboard file and choose "Open As > Source Code". When Xcode shows the XML file, you can replace the contents with this:
<?xml version="1.0" encoding="UTF-8"?>
<document type="com.apple.InterfaceBuilder3.CocoaTouch.Storyboard.XIB" version="3.0" toolsVersion="13122.16" targetRuntime="iOS.CocoaTouch" propertyAccessControl="none" useAutolayout="YES" useTraitCollections="YES" useSafeAreas="YES" colorMatched="YES" initialViewController="BYZ-38-t0r">
    <device id="retina6_1" orientation="portrait" appearance="light"/>
    <dependencies>
        <plugIn identifier="com.apple.InterfaceBuilder.IBCocoaTouchPlugin" version="13104.12"/>
        <capability name="Safe area layout guides" minToolsVersion="9.0"/>
        <capability name="documents saved in the Xcode 8 format" minToolsVersion="8.0"/>
    </dependencies>
    <scenes>
        <!--View Controller-->
        <scene sceneID="tne-QT-ifu">
            <objects>
                <viewController id="BYZ-38-t0r" customClass="ViewController" customModule="signinwithapple" customModuleProvider="target" sceneMemberID="viewController">
                    <view key="view" contentMode="scaleToFill" id="8bC-Xf-vdC">
                        <rect key="frame" x="0.0" y="0.0" width="414" height="896"/>
                        <autoresizingMask key="autoresizingMask" widthSizable="YES" heightSizable="YES"/>
                        <subviews>
                            <stackView opaque="NO" contentMode="scaleToFill" axis="vertical" distribution="fillEqually" alignment="center" spacing="5" translatesAutoresizingMaskIntoConstraints="NO" id="woG-Y8-rRn">
                                <rect key="frame" x="50" y="414" width="314" height="78"/>
                            </stackView>
                        </subviews>
                        <color key="backgroundColor" xcode11CocoaTouchSystemColor="systemBackgroundColor" cocoaTouchSystemColor="whiteColor"/>
                        <constraints>
                            <constraint firstItem="woG-Y8-rRn" firstAttribute="top" secondItem="6Tk-OE-BBY" secondAttribute="top" priority="500" constant="370" id="2ZD-pZ-Xmn"/>
                            <constraint firstItem="woG-Y8-rRn" firstAttribute="leading" secondItem="6Tk-OE-BBY" secondAttribute="leading" priority="500" constant="50" id="NEK-ZK-a6o"/>
                            <constraint firstItem="6Tk-OE-BBY" firstAttribute="bottom" secondItem="woG-Y8-rRn" secondAttribute="bottom" priority="500" constant="370" id="kon-OS-LZt"/>
                            <constraint firstItem="6Tk-OE-BBY" firstAttribute="trailing" secondItem="woG-Y8-rRn" secondAttribute="trailing" priority="500" constant="50" id="zoY-No-zc2"/>
                        </constraints>
                        <viewLayoutGuide key="safeArea" id="6Tk-OE-BBY"/>
                    </view>
                    <connections>
                        <outlet property="loginProviderStackView" destination="woG-Y8-rRn" id="pi0-0f-uqs"/>
                    </connections>
                </viewController>
                <placeholder placeholderIdentifier="IBFirstResponder" id="dkx-z0-nzr" sceneMemberID="firstResponder"/>
            </objects>
        </scene>
    </scenes>
</document>
Don't worry too much about what is happening there. This isn't that important as it is only preparing the interface to receive the button that will trigger the Sign in with Apple feature.
Integrating the app with Sign in with Apple
Cool, you have finished preparing the app for the integration. Now you will do the heavy work. For that, open the ViewController.swift file and insert the following two import statements on the top:
import AuthenticationServices
import Auth0
As you can see, you are just making sure that both SDKs (Auth0 and AuthenticationServices) are available in this class. Make sure you don't remove UIKit from this file.
Then, inside the ViewController class, add the following class field:
// ... leave the import statements untouched ...
class ViewController: UIViewController {

  @IBOutlet weak var loginProviderStackView: UIStackView!

}
This class field references the view that will render the button that triggers the Sign in with Apple feature. After defining this field, replace the viewDidLoad function with the following:
// ... leave the import statements untouched ...
class ViewController: UIViewController {

  // ... leave the rest untouched ...

  override func viewDidLoad() {
      super.viewDidLoad()
      // Do any additional setup after loading the view.
      setupProviderLoginView()
  }
}
From now on, when this view loads, it will trigger setupProviderLoginView. You don't have this function yet so, right after the viewDidLoad, define it as follows:
// ... leave the import statements untouched ...
class ViewController: UIViewController {

  // ... leave the rest untouched ...

  func setupProviderLoginView() {
      // Create Button
      let authorizationButton = ASAuthorizationAppleIDButton()

      // Add Callback on Touch
      authorizationButton.addTarget(self, action: #selector(handleAuthorizationAppleIDButtonPress), for: .touchUpInside)

      //Add button to the UIStackView
      self.loginProviderStackView.addArrangedSubview(authorizationButton)
  }
}
This function isn't doing much. All it does is to define the button that will trigger the process, defining what will happen when the button is clicked (in this case it will trigger handleAuthorizationAppleIDButtonPress, which you will define next), and it adds it to the view.
Now, to define what will happen when this button is pressed, add the following function to your class:
// ... leave the import statements untouched ...
class ViewController: UIViewController {

  // ... leave the rest untouched ...

  @objc
  func handleAuthorizationAppleIDButtonPress() {
      // Create the authorization request
      let request = ASAuthorizationAppleIDProvider().createRequest()

      // Set Scopes
      request.requestedScopes = [.email, .fullName]

      // Setup a controller to display the authorization flow
      let controller = ASAuthorizationController(authorizationRequests: [request])

      // Set delegate to handle the flow response.
      controller.delegate = self
      controller.presentationContextProvider = self

      // Action
      controller.performRequests()
  }
}
As you can see, this function is relying on the AuthenticationServices SDK to createRequest to Apple ID (ASAuthorizationAppleIDProvider). It is also defining that the app wants to get access to the .email and .fullName scopes. Lastly, the function triggers the request to start the authentication process.
With that in place, the next thing you will have to do is to make ViewController extend ASAuthorizationControllerDelegate to be able to handle the authentication callback. So, at the bottom of the ViewController.swift file, add the following code:
extension ViewController: ASAuthorizationControllerDelegate {

  // Handle authorization success
  func authorizationController(controller: ASAuthorizationController, didCompleteWithAuthorization authorization: ASAuthorization) {

    if let appleIDCredential = authorization.credential as? ASAuthorizationAppleIDCredential {
      print("User Identifier: (appleIDCredential.user)")
      print("Full Name: (appleIDCredential.fullName?.givenName ?? "No Name")")
      print("Email: (appleIDCredential.email ?? "No Email Provided")")
      print("Real Person Status: (appleIDCredential.realUserStatus.rawValue)")
      print("ID Token: (String(data: appleIDCredential.identityToken!, encoding: .utf8) ?? "No ID Token Returned")")
      print("AuthorizationCode: (String(data: appleIDCredential.authorizationCode!, encoding: .utf8) ?? "No Authorization Code Returned")")

      // Convert Data -> String
      guard let authorizationCode = appleIDCredential.authorizationCode, let authCode = String(data: authorizationCode, encoding: .utf8) else
      {
        print("Problem with the authorizationCode")
        return
      }

      // Auth0 Token Exchange
      Auth0
        .authentication()
        .tokenExchange(withAppleAuthorizationCode: authCode).start { result in
          switch(result) {
          case .success(let credentials):
            print("Auth0 Success: (credentials)")
          case .failure(let error):
            print("Exchange Failed: (error)")
          }
      }
    }
  }

  // Handle authorization failure
  func authorizationController(controller: ASAuthorizationController, didCompleteWithError error: Error) {
    print("SIWA Authorization Failed: (error)")
  }
}
Although lengthy, this code is somewhat simple. The following list summarizes what it does:
First, the
authorizationControllerchecks if the type ofappleIDCredentialisASAuthorizationAppleIDCredential(just a type cast).Then, the code prints a bunch of information about the user that just signed in. In this case, it prints: the user identifier; name; email; the
identityToken(which contains profile information); and theauthorizationCode.After that, the code converts the
authorizationCodeinto a string representation of it.Lastly, the code uses Auth0 SDK to exchange the
authorizationCodeApple sent it for Auth0 tokens.
After fetching Auth0's tokens for the current user, you can decide how to proceed in your app. For example, you can render a view with profile information. Or, if you want to do something more interesting, you can use access tokens to make the app consume APIs on behalf of the current user. That is, from now on, you already know who your user is and you can keep using Auth0 services to perform access control as you are used to doing.S
Sign in with Apple and Auth0? Why?
As you were able to see throughout this article, integrating Apple identity provider and Auth0 is quite easy. However, if you are not acquainted with Auth0 yet, you might be wondering, why would you use Auth0 to implement the Sign in with Apple feature? Why not implementing it directly in your app without using Auth0?
The answers to these questions can be quite long because Auth0 ships a lot of nice features that can help you increase customer retention, application security, and so on. However, there are a few features that worth mentioning in this case.
For starters, if you have custom APIs that you want your apps to consume, at some point, you will need to allow limited access to users, servers, or servers on behalf of users. With Auth0 you can manage the authorization requirements for server-to-server and application-to-server applications. However, you wouldn't be able to enable apps to consume these APIs if all they had was the ID Token provided by Apple. In this case, the steps above help you exchange Apple's ID Token for the access tokens you need to consume these APIs.
Another reason is that, by using Auth0, Sign in with Apple becomes just another identity provider. That is, with just a few clicks, you can let users decide if they want to use their Apple id, if they want to use another social provider like Facebook and Google, or if they to use some enterprise connection like Active Directory and G Suite. In fact, at the time of writing, Auth0 provides out-of-the-box integration with more than 30 social identity providers and more than 10 enterprise identity providers.
This brings another nice Auth0 feature into evidence. With this service, you can perform account linking quite easily. This feature allows users to authenticate with any of their accounts and still be recognized by your app and associated with the same user profile.
Another cool feature that you can leverage while using Auth0 is its extensibility capabilities. For example, while using Auth0 you can execute JavaScript functions on Auth0's environment (these functions are called Rules) to do things like enrich user profiles and create authorization rules
Conclusion
In this article, you learned how easy it is to support Sign in with Apple natively in your iOS applications. You saw that, Auth0, as a global leader in Identity-as-a-Service (IDaaS), helps you integrating this identity provider in an easy and secure way and that it also helps you and your company to support more features that enhance user experience and data security. With this knowledge, you don't have to fear the release of Sign in with Apple, and you can focus again on what makes your business unique, knowing that your users and your app are in good hands.
If you have questions regarding Sign in with Apple or any other topic, please, use the comments area below to talk to us.
"Stay Hungry. Stay Foolish." - Steve Jobs
About the author

Bruno Krebs
R&D Content Architect (Auth0 Alumni)