

Introduction
Writing tests is an integral part of application development. Testing results in software that has fewer bugs, more stability, and is easier to maintain. In this article, we'll look at how to test a React application using the Jest testing framework.
Jest is a JavaScript test runner maintained by Facebook. A test runner is software that looks for tests in your codebase, runs them and displays the results (usually through a CLI interface).
The following are some of the features that Jest offers.
- Performance
- Jest run tests in parallel processes thus minimizing test runtime.
- Mocking
- Jest allows you to mock objects in your test files. It supports function mocking, manual mocking and timer mocking. You can mock specific objects or turn on automatic mocking with automock which will mock every component/object that the component/object test depends on.
- Snapshot testing
- When using Jest to test a React or React Native application, you can write a snapshot test that will save the output of a rendered component to file and compare the component's output to the snapshot on subsequent runs. This is useful in knowing when your component changes its behaviour.
- Code coverage support
- This is provided with Jest with no additional packages or configuration.
- Test isolation and sandboxing
- With Jest, no two tests will ever conflict with each other, nor will there ever be a global or module local state that is going to cause trouble. Sandboxed test files and automatic global state resets for every test.
- Integrates with other testing libraries
Jest is a Node-based runner which means that it runs tests in a Node environment as opposed to a real browser. Tests are run within a fake DOM implementation (via jsdom) on the command line.
You should note though that while Jest provides browser globals such as window by using jsdom, their behavior is only an approximation of their counterparts on a real browser. Jest is intended for unit testing an application's logic and components rather than for testing it for any DOM quirks it might encounter. For this, it is recommended that you use a separate tool for browser end-to-end tests. This is out of scope of this article.
Setting up the Sample Project
Before looking at how tests are written, let's first look at the application we'll be testing. It can be downloaded here. In the downloaded folder, you will find three projects - one named starter with no test files, another named completed with the test files included and another named completed_with_auth0 which contains test files and also adds authentication to the application. In this article, we'll start with the starter project and proceed to add tests to it.
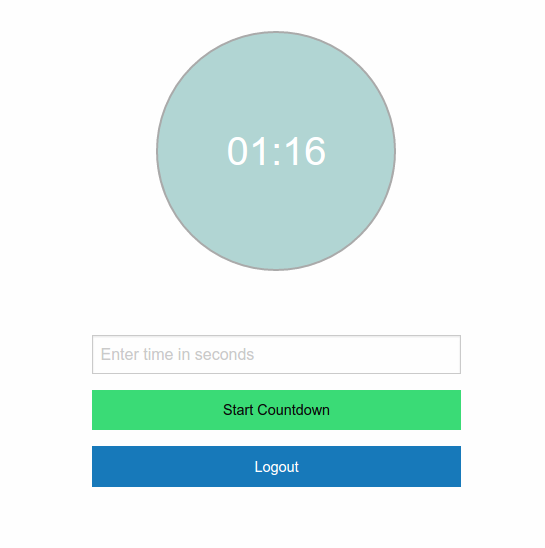
The sample application is a simple countdown timer created in React. To run it, first navigate to the root of the starter project:
$ cd path/to/starter/CountdownTimer
Install the necessary libraries:
$ npm install
Run Webpack:
$ webpack
Then run the application with:
$ npm start
Navigate to http://localhost:3000/ in you browser. You should see the following.
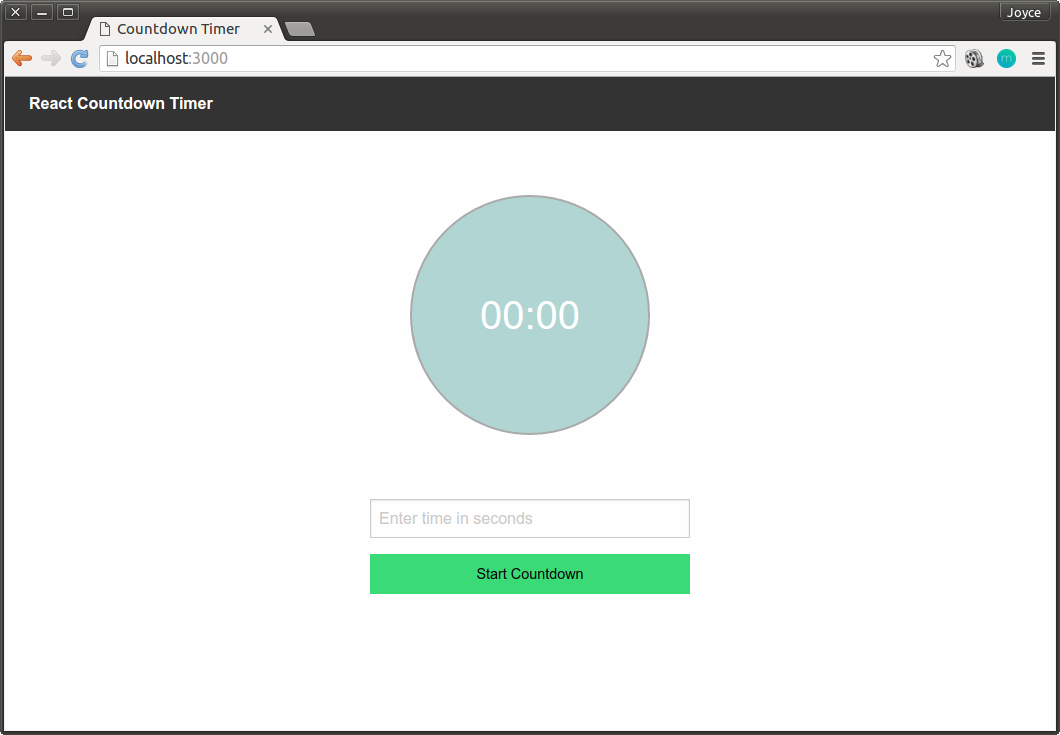
You can set a time in seconds and start the countdown by clicking on the Start Countdown button.
The functionality of the countdown timer has been separated into three components stored in the app/components folder namely Clock.jsx, Countdown.jsx and CountdownForm.jsx.
The Clock component is responsible for rendering the clock face and formatting the user's input to an MM:SS format. The CountdownForm component contains a form that takes the user input and passes it to the Countdown component which starts decrementing the value every second, passing the current value to the Clock component for display.
Having looked at the sample application, we'll now proceed with writing tests for it.
Writing Tests
Let's start by installing and configuring Jest.
Run the following command to install Jest and the babel-jest library which is a Jest plugin for Babel. The application uses Babel for transpiling JSX and ES6 so the plugin is needed for the tests to work.
$ npm install --save-dev jest babel-jest
With babel-jest added, Jest will be able to work with the Babel config file .babelrc to know which presets to run the code through. The sample application already has this file. You can see its contents below.
{
    "presets": ["es2015", "react"]
}
The react preset is used to transform JSX into JavaScript and es2015 is used to transform ES6 JavaScript to ES5.
With that done, we are now ready to write our first test.
Jest looks for tests to run using the following conventions:
- Files with .test.js suffix.
- Files with .spec.js suffix.
- Files with .js suffix inside a folder named tests.
Other than .js files, it also automatically considers files and tests with the jsx extension.
For our project, we'll store the test files inside a tests folder. In the app folder, create a folder named __tests__.
For the first test, we'll write a simple test that ensures that Jest was set up correctly and that it can run a test successfully.
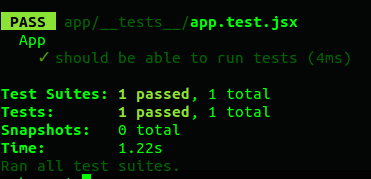
Create a file inside the app/__tests__ folder, name it app.test.jsx and add the following to the file.
describe('App', () => {
    it('should be able to run tests', () => {
        expect(1 + 2).toEqual(3);
    });
});
To create a test, you place its code inside an it() or test() block, including a label for the test. You can optionally wrap your tests inside describe() blocks for logical grouping.
Jest comes with a built-in expect() global function for making assertions. The above test checks if the expression 1 + 2 is equal to 3. Read this for a list of assertions that can be used with expect()
Next, modify the test property of the package.json file as shown.
"test": "jest"
You can now run the added test with npm test and see the results in the Terminal.
You can also run Jest in watch mode which will keep it running in the terminal and save you from having to start the tests yourself when you make changes to the code. For this use the npm test -- --watch command. Anything that is placed after the first -- is passed to the underlying command, therefore npm test -- --watch is similar to jest --watch.
We only have one test so far, but as you go further into testing your application and add more tests, you might want to exclude some from running. Jest allows you to either exclude some tests from running or focus on specific tests. To exclude a test from being executed, use xit() instead of it(). To focus on a specific test without running other tests, use fit().
Now that we know the application can run tests, let's move on to testing its components.
Testing Components
In the __tests__ folder, add another folder named components and inside that folder, add a file named Clock.test.jsx. Then add the following to the file.
import React from 'react';
import ReactDOM from 'react-dom';
import Clock from 'Clock';

describe('Clock', () => {
    it('renders without crashing', () => {
        const div = document.createElement('div');
        ReactDOM.render(<Clock/>, div);
    });
});
This test mounts a component and checks that it doesn't throw an exception during rendering.
If you run the test, it will fail with the error message Cannot find module 'Clock' from 'Clock.test.jsx'.
In the application we specify aliases for some files so that we don't have to write their full path every time we import them in another file. The aliases and the files they represent are specified in the webpack.config.js file.
resolve: {
    root: __dirname,
    alias: {
        applicationStyles: 'app/styles/app.scss',
        Clock: 'app/components/Clock.jsx',
        Countdown: 'app/components/Countdown.jsx',
        CountdownForm: 'app/components/CountdownForm.jsx'
    },
    extensions: ['', '.js', '.jsx']
}
Other test runners like karma are able to pick up the application's setting from the Webpack config file, but this is not the case with Jest. Jest doesn't automatically work with Webpack. In the above case, Jest doesn't know how to resolve the aliases specified in the Webpack config file.
To solve this, you can either use a third party tool like jest-webpack-alias or babel-plugin-module-resolver, or you can add the aliases in Jest's configuration settings. I prefer the latter solution as it is easier to setup and it requires the least modification to the app. With this, Jest settings are separate from the app's settings. If I ever wanted to change the test runner used, I would just need to delete Jest settings from package.json (or from the Jest config file) and won't have to edit the Webpack config file and Babel config file.
You can define Jest's configuration settings either in the package.json or create a separate file for the settings and then add the --config <path/to/config_file> option to the jest command. In the spirit of separation of concerns, we'll create a separate file. Create a file at the root of the project named jest.config.js and add the following to it.
{
    "moduleFileExtensions": [
        "js",
        "jsx"
    ],
    "moduleNameMapper": {
        "Clock": "<rootDir>/app/components/Clock.jsx",
        "CountdownForm": "<rootDir>/app/components/CountdownForm.jsx",
        "Countdown": "<rootDir>/app/components/Countdown.jsx"
    }
}
moduleFileExtensions specifies an array of file extensions your modules use. By default it includes ["js", "json", "jsx", "node"] (if you require modules without specifying a file extension, Jest looks for these extensions) so we don't really need the setting in the above file as js and jsx are included. I wanted to include it so you know that it is necessary if your project consists of files with other extensions e.g. if you are using TypeScript, then you would include ["js", "jsx", "json", "ts", "tsx"].
In moduleNameMapper, we map different files to their respective aliases. rootDir is a special token that gets replaced by Jest with the root of the project. This is usually the folder where the package.json file is located, unless you specify a custom rootDir option in your configuration.
If you are interested in finding out other options that you can set for Jest, check out the documentation.
In package.json modify the value of test as shown.
"test": "jest --config jest.config.js"
Run the test again with npm test and it should now pass. We now know that the component tested renders without throwing an exception.
Testing Business Logic
We've written a test that assures us that our component renders properly. This however is not an indicator that the component behaves as it should and produces the correct output. To test for this, we'll test the component's functions and make sure they are doing what they should be doing.
For this we'll use the Enzyme library to write the tests. Enzyme is a JavaScript Testing utility for React created by Airbnb that makes it easier to assert, manipulate, and traverse a React Component's output. It is unopinionated regarding which test runner or assertion library used, and is compatible with the major test runners and assertion libraries available.
To install Enzyme, run the following command:
$ npm install --save-dev enzyme react-addons-test-utils
Then modify Clock.test.jsx as shown.
import React from 'react';
import ReactDOM from 'react-dom';
import { shallow } from 'enzyme';
import Clock from 'Clock';

describe('Clock', () => {
    it('renders without crashing', () => {
        const div = document.createElement('div');
        ReactDOM.render(<Clock/>, div);
    });

    describe('render', () => {
        it('should render the clock', () => {
            const clock = shallow(<Clock timeInSeconds={63}/>);
            const time = <span className="clock-text">01:03</span>;

            expect(clock.contains(time)).toEqual(true);
        });
    });

    describe('formatTime', () => {
        it('should format seconds', () => {
            const clock = shallow(<Clock/>);
            const seconds = 635;
            const expected = '10:35';
            const actual = clock.instance().formatTime(seconds);

            expect(actual).toBe(expected);
        });

        it('should format seconds when minutes or seconds are less than 10', () => {
            const clock = shallow(<Clock/>);
            const seconds = 65;
            const expected = '01:05';
            const actual = clock.instance().formatTime(seconds);

            expect(actual).toBe(expected);
        });
    });
});
The first test remains the same, but since we are using Enzyme you could simplify it by using shallow() or mount() to render it, like so:
import { mount } from 'enzyme';

it('renders without crashing', () => {
    mount(<Clock/>);
});
The difference between shallow() and mount() is that shallow() tests components in isolation from the child components they render while mount() goes deeper and tests a component's children. For shallow() this means that if the parent component renders another component that fails to render, then a shallow() rendering on the parent will still pass.
The remaining tests test the Clock.jsx render() and formatTime() functions, placed in separate describe blocks.
The Clock component's render() function takes a props value of timeInSeconds, passes it to formatTime() and then displays the returned value inside a <span> with a class of clock-text. In the test with the describe label of render, we pass in the time in seconds to Clock and assert that the output is as expected.
The formatTime describe contains two tests. The first checks to see if the formatTime() function returns a formatted time if given a valid input and the second ensures that the function prefixes the minutes or seconds value with 0 if the value is less than 10.
To call the component's function with Enzyme, we use clock.instance().formatTime(seconds). instance() returns the instance of the component being rendered as the root node passed into mount() or shallow().
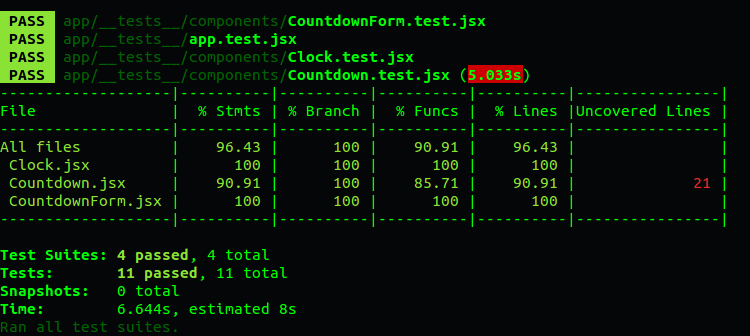
Run the tests and they should all pass.
Next we'll add tests for the Countdown component.
Create a file named Countdown.test.jsx in the app/__tests__/components folder. Add the following to the file.
import React from 'react';
import ReactDOM from'react-dom';
import TestUtils from 'react-addons-test-utils';

import Countdown from 'Countdown';

describe('Countdown', () => {
    it('renders without crashing', () => {
        const div = document.createElement('div');
        ReactDOM.render(<Countdown/>, div);
    });

    describe('handleSetCountdownTime', () => {
        it('should set countdown time and start countdown', (done) => {
            const countdown = TestUtils.renderIntoDocument(<Countdown/>);
            countdown.handleSetCountdownTime(10);

            expect(countdown.state.count).toBe(10);
            expect(countdown.state.countdownStatus).toBe(1);

            setTimeout(() => {
                expect(countdown.state.count).toBe(9);
                done();
            }, 1001)
        });

        it('should never set countdown time to less than zero', (done) => {
            const countdown = TestUtils.renderIntoDocument(<Countdown/>);
            countdown.handleSetCountdownTime(1);

            setTimeout(() => {
                expect(countdown.state.count).toBe(0);
                done();
            }, 3000)
        });
    });
});
The first test is similar to what we had in Clock.test.jsx, it just checks that the Countdown component rendered okay. The rest of the tests test the handleSetCountdownTime() function of this component. This function is called when the form is submitted and is passed the number of seconds entered (if valid). It then uses this to set the component's state which consists of two values - the count and the countdownStatus. componentDidUpdate() checks if the countdownStatus was changed and if so calls the tick() function which starts decrementing the value of count every second.
In the above we use TestUtils to test the component. We could have used Enzyme functions here as well, but we wanted to showcase another great tool that makes testing React components easier. Facebook recommends both Enzyme and TestUtils, so you can decide which you prefer; or you can use them both (in fact, when using Enzyme, you are essentially using TestUtils as well since Enzyme wraps around the react-addons-test-utils library).
With TestUtils, components are rendered with TestUtils.renderIntoDocument().
The first test in the block ensures that the countdownStatus of the component is changed when a valid time is passed to handleSetCountdownTime() and that the count has been decremented by 1 after a second.
The second test ensures that handleSetCountdownTime() stops counting down at 0.
Testing Events
The last component remaining to test is CountdownForm. This contains a form that the user uses to enter the time to be count down. We'll test it to make sure that when a user submits the forms, the listener will call onSetCountdownTime() only if the input is valid.
Create a file named CountdownForm.test.jsx in the app/__tests__/components folder. Add the following to the file.
import React from 'react';
import ReactDOM from 'react-dom';
import TestUtils from 'react-addons-test-utils';

import CountdownForm from 'CountdownForm';

describe('CountdownForm', () => {
    it('renders without crashing', () => {
        const div = document.createElement('div');
        ReactDOM.render(<CountdownForm/>, div);
    });

    it('should call onSetCountdownTime if valid seconds entered', () => {
        const spy = jest.fn();
        const countdownForm = TestUtils.renderIntoDocument(<CountdownForm onSetCountdownTime={spy}/>);
        const form = TestUtils.findRenderedDOMComponentWithTag(countdownForm, 'form');

        countdownForm.refs.seconds.value = '109';
        TestUtils.Simulate.submit(form);

        expect(spy).toHaveBeenCalledWith(109);
    });

    it('should not call onSetCountdownTime if invalid seconds entered', () => {
        const spy = jest.fn();
        const countdownForm = TestUtils.renderIntoDocument(<CountdownForm onSetCountdownTime={spy}/>);
        const form = TestUtils.findRenderedDOMComponentWithTag(countdownForm, 'form');

        countdownForm.refs.seconds.value = '1H63';
        TestUtils.Simulate.submit(form);

        expect(spy).not.toHaveBeenCalled();
    });
});
In the above we use TestUtils to simulate the form submit event.
Jest comes with spy functionality that enables us to assert that functions are called (or not called) with specific arguments.
A test spy is a function that records arguments, return value, the value of this and exception thrown (if any) for all its calls. Test spies are useful to test both callbacks and how certain functions are used throughout the system under test. To create a spy in Jest, we use const spy = jest.fn(). This provides a function we can spy on and ensure that it is called correctly.
We then render the CountdownForm component and pass in the spy as the value of the onSetCountdownTime props. We then set the form's seconds value and simulate a submission. If the value for seconds is valid, the spy will be called, otherwise it won't.
Run the tests and everything should pass.
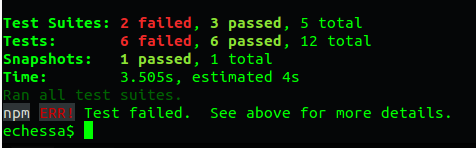
Coverage Reporting
As mentioned earlier, Jest has an integrated coverage reporter that works well with ES6 and requires no further configuration. You can run it with npm test -- --coverage. Below you can see the coverage report of our tests.
Snapshot Testing
Snapshot testing is another feature of Jest which automatically generates text snapshots of your components and saves them to disk so if the UI output changes later on, you will get notified without manually writing any assertions on the component output.
When running a snapshot test for the first time, Jest renders the component and saves the output as a JavaScript object. Each time the test is run again, Jest will compare its output to the saved snapshot and if the component's output is different from the snapshot, the test will fail. This may be an indicator that the component has a bug somewhere and you can go ahead and fix it until its output matches the snapshot, or you might have made the changes to the component on purpose and so it is the snapshot that will need updating. To update a snapshot you run jest with the -u flag.
With snapshot testing, you will always know when you accidentally change a component's behaviour and it also saves you from writing a lot of assertions that check if your components are behaving as expected.
We'll include one snapshot test for the Clock component in the sample app. You can include the snapshot test in the Clock.test.js file, but I prefer to have my snapshot tests in separate files.
Create a file named Clock.snapshot.test.jsx in the app/__tests__/components folder. Add the following to the file.
import React from 'react';
import Clock from 'Clock';
import renderer from 'react-test-renderer';

describe('Clock component renders the clock correctly', () => {
  it('renders correctly', () => {
    const seconds = 63;
    const rendered = renderer.create(
      <Clock timeInSeconds={seconds}/>
    );

    expect(rendered.toJSON()).toMatchSnapshot();
  });
});
The above renders the Clock (with a value of 63 seconds passed into it) and saves the output to a file.
Before running the test, install the following package. It provides a React renderer that can be used to render React components to pure JavaScript objects.
$ npm install --save-dev react-test-renderer
Run your tests and the output will show that a snapshot has been added.
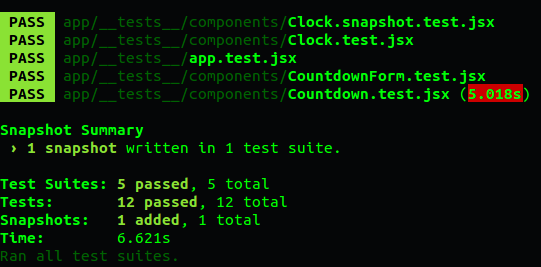
When you look at your project, there will be a __snapshots__ folder inside the app/__tests__/components folder with a file named Clock.snapshot.test.jsx.snap inside it. The following are its contents.
exports[`Clock component renders the clock correctly renders correctly 1`] = `
<div
  className="clock">
  <span
    className="clock-text">
    01:03
  </span>
</div>
`;
As you can see, it shows the expected result of having passed 63 to the Clock component.
With the snapshot test that we just added, we don't need the test in Clock.test.jsx that checks if the rendered output contains a <span> with a certain string in it.
You should include the __snapshots__ folder in your versioning system to ensure that all team members have a correct snapshot to compare with.
Aside: Using React with Auth0
Before concluding the article, let's take a look at how you can add authentication to the React app and ensure the tests work with this. We'll change the app so that it requires the user to be logged in before they can start the countdown timer. In the process, we'll take a look at a caveat that Jest has as a Node-based test runner that runs its tests on jsdom.
To get started, first sign up for an Auth0 account, then navigate to the Dashboard. Click on the New Client button and fill in the name of the client (or leave it at its default. Select Single Page Web Applications from the Client type list. On the next page, select the Settings tab where the client ID, client Secret and Domain can be retrieved. Set the Allowed Callback URLs and Allowed Origins (CORS) to http://localhost:3000/ and save the changes with the button at the bottom of the page.
Auth0 offers a generous free tier to get started with modern authentication.
We'll add the Auth0 Lock widget to our app, which provides an interface for the user to login and/or signup.
Create a folder named utils in the app folder and add a AuthService.js file to it. Add the following to the file.
import React from 'react';
import Auth0Lock from 'auth0-lock';
import decode from 'jwt-decode';

export default class AuthService {

    constructor() {
        // Configure Auth0
        this.clientId = 'YOUR_CLIENT_ID';
        this.domain = 'YOUR_CLIENT_DOMAIN';

        this.lock = new Auth0Lock(this.clientId, this.domain, {});
        // Add callback for lock `authenticated` event
        this.lock.on('authenticated', this._doAuthentication.bind(this));
        // binds login functions to keep this context
        this.login = this.login.bind(this);
    }

    _doAuthentication(authResult){
        // Saves the user token
        this.setToken(authResult.idToken);
    }

    getLock() {
        // An instance of Lock
        return new Auth0Lock(this.clientId, this.domain, {});
    }

    login() {
        // Call the show method to display the widget.
        this.lock.show();
    }

    loggedIn() {
        // Checks if there is a saved token and it's still valid
        const idToken = this.getToken();
        return idToken && !this.isTokenExpired(idToken);
    }

    setToken(idToken){
        // Saves user token to localStorage
        localStorage.setItem('id_token', idToken);
    }

    getToken(){
        // Retrieves the user token from localStorage
        return localStorage.getItem('id_token');
    }

    logout(){
        // Clear user token and profile data from localStorage
        localStorage.removeItem('id_token');
    }

    getTokenExpirationDate(encodedToken) {
        const token = decode(encodedToken);
        if (!token.exp) { return null; }

        const date = new Date(0);
        date.setUTCSeconds(token.exp);

        return date;
    }

    isTokenExpired(token) {
        const expirationDate = this.getTokenExpirationDate(token);
        return expirationDate < new Date();
    }
}
Authentication will be handled by this class. The code contains comments that explain what is happening at each step, so I won't go over it here.
Replace YOUR_CLIENT_ID and YOUR_CLIENT_DOMAIN in the above code with your Auth0 client details.
Install the following two packages.
$ npm install --save auth0-lock jwt-decode
auth0-lock provides the Lock widget while jwt-decode is used in the code to decode a JSON Web token before checking if its expiration date has passed.
Modify CountdownForm.jsx as shown:
import React from 'react';
import AuthService from '../utils/AuthService'

class CountdownForm extends React.Component {
    constructor(props) {
        super(props);
        this.state = { loggedIn: false };
    }

    componentDidMount() {
        this.auth = new AuthService();
        this.setState({ loggedIn: this.auth.loggedIn() });
        // instance of Lock
        this.lock = this.auth.getLock();
        this.lock.on('authenticated', () => {
            this.setState({ loggedIn: this.auth.loggedIn() });
        });
    }

    login() {
        this.auth.login();
    }

    logout() {
        this.auth.logout();
        this.setState({ loggedIn: this.auth.loggedIn() });
    }

    onSubmit(e) {
        e.preventDefault();
        if (this.state.loggedIn) {
            var secondsStr = this.refs.seconds.value;

            if (secondsStr.length > 0 && secondsStr.match(/^[0-9]*$/)) {
                this.refs.seconds.value = '';
                this.props.onSetCountdownTime(parseInt(secondsStr, 10));
            }
        } else {
            alert("You need to log in first");
        }
    }

    render() {
        const authButton = this.state.loggedIn ? <div><button className="button expanded" onClick={this.logout.bind(this)}>Logout</button></div> : <div><button className="button expanded" onClick={this.login.bind(this)}>Login</button></div>;

        return (
            <div>
                <form ref="form" onSubmit={this.onSubmit.bind(this)} className="countdown-form">
                    <input type="text" ref="seconds" placeholder="Enter time in seconds"/>
                    <input type="submit" className="button success expanded" value="Start Countdown"/>
                </form>
                { authButton }
            </div>
        );
    }
}

export default CountdownForm;
In the above, we add a loggedIn state to the component that will keep track of the user's authentication status. We instantiate a AuthService object and use this to make an instance of the lock widget. We set a callback function that will be called after authentication with this.lock.on('authenticated', cb) and in this function we change the loggedIn state to true. On log out, this will be set to false.
In the render button, we check the loggedIn state and add a Login button if its value is false and a Logout button otherwise. These buttons are bound to the login() and logout() functions respectively.
When the form is submitted, we first check if the user is authenticated before proceeding with the countdown. If they aren't, an alert is displayed that lets them know they need to be logged in.
Note: If you want to use Auth0 authentication to authorize API requests, note that you'll need to use a different flow depending on your use case. Auth0 idToken should only be used on the client-side. Access tokens should be used to authorize APIs. You can read more about making API calls with Auth0 here.
Run Webpack to process and bundle the JavaScript files and then start the app.
$ webpack
$ npm start
When you navigate to http://localhost:3000/, you will see the added Login button.

On clicking the button, the Lock widget will be displayed.
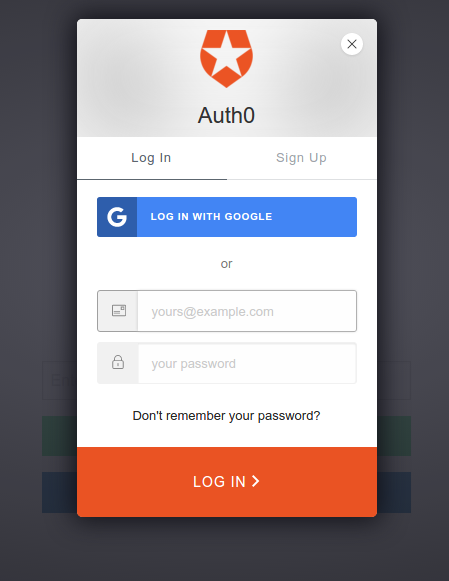
Use its Sign Up tab to create an account. After signing up, you will be automatically logged in, therefore you will be able to perform a countdown and the bottom button will now be the Logout button.
That works fine, but if you run the tests, there will be several failing ones.
If you take a look at the error messages, you will see ReferenceError: localStorage is not defined several times.
We mentioned earlier that Jest is a Node-based runner that runs its tests in a Node environment, simulating the DOM with jsdom. jsdom does a great job in replicating a lot of DOM features, but it lacks some browser features; for example, at the time of writing this, the current version of jsdom doesn't support localStorage or sessionStorage. This is a problem for us because our app saves the authentication token it gets back from Auth0 to localStorage.
To get around this limitation, we can either create our own implementation of localStorage or use a third party one like node-localstorage. Since we only require a simple version of localStorage, we'll create our own implementation. To be able to save, retrieve and remove a token to localStorage, we only require the setItem(key, value), getItem(key) and removeItem(key) functions of the the Storage interface. If your application requires other localStorage features, it's better to use the third party option.
Create a file in the utils folder named localStorage.js and add the following to it.
module.exports = {
    setLocalStorage: function() {
        global.localStorage = {
            getItem: function (key) {
                return this[key];
            },
            setItem: function (key, value) {
                this[key] = value;
            },
            removeItem: function (key) {
                delete this[key];
            }
        };

        const jwt = require('jsonwebtoken');
        const token = jwt.sign({ foo: 'bar', exp: Math.floor(Date.now() / 1000) + 3000 }, 'shhhhh');
        localStorage.setItem('id_token', token);
    }
};
In the above, we create an object with the three required functions and assign it to global.localStorage. We then create a token, set an expiration date to it and save it in localStorage as the value of the id_token key. The token will be decoded in AuthService and its exp attribute checked to determine if it has expired. You should note that jwt-decode doesn't validate tokens; any well formed JWT will be decoded. If your app uses tokens to authorize API calls, you should validate the tokens in your server-side logic by using something like express-jwt, koa-jwt, Owin Bearer JWT, etc.
You can create a test account and perform a real Login during testing, but I prefer to not make unneccesary network calls during testing. Since we aren't testing the Login functionality, I deem it unnecessary to perform authentication with the Auth0 server, therefore we create a 'fake' token with a exp attribute that will be checked by the app.
Install the following package.
$ npm install --save-dev jsonwebtoken
Add the following to the CountdownForm.test.jsx and Countdown.test.jsx components inside their outer describe() blocks before all the it() and inner describe() blocks.
beforeAll(() => {
    const ls = require("../../utils/localStorage.js");
    ls.setLocalStorage();
});
Run the tests with npm test and they should all pass.
Auth0 provides the simplest and easiest to use User interface tools to help administrators manage user identities including password resets, creating and provisioning, blocking and deleting users.
Conclusion
We've looked at how to use Jest as a test runner when testing a React application. For more on Jest, be sure to check its documentation.