
In Part One of this tutorial, you created an Android project based on Jetpack Compose, the new reactive and declarative UI framework. It has two screens, a “logged in” screen and a “logged out” one, and you switch between the two by pressing a button.
In this part of the tutorial, you’ll improve the architecture with a ViewModel and add Auth0 authentication to the app.
Look for the 🛠 emoji if you’d like to skim through the content while focusing on the build and execution steps.
Add a ViewModel
Currently, the MainView composable does two things:
- It keeps track of the app state as the owner of the
userIsAuthenticatedandappJustLaunchedvariables. - It draws the app’s main view, using the app state to determine what parts of the user interface to draw and their properties.
Whenever possible, composables should not maintain a state — they should be stateless. Instead, they should receive enough state information to emit their user interface elements properly and respond appropriately to user actions and changes in state. Statelessness makes composables easier to maintain, reuse, and test.
State hoisting is the term for moving a state out of a composable. It’s called hoisting because it involves moving a composable’s state variables “upward” into the function that is called the composable. In this part of the exercise, we’ll hoist state from MainView into the function that called it, the onCreate() method of MainActivity.
We won’t just hoist userIsAuthenticated and appJustLaunched from MainView into onCreate(). We’ll also encapsulate them in a ViewModel, an object whose lifecycle is longer than the UI’s and which will store the UI’s state and encapsulate business logic related to that state, such as logging the user in and out. It will be a subclass of the ViewModel class, which is part of the Android API and simplifies defining and instantiating ViewModels.
Right now, changing state is simply a process of toggling userIsAuthenticated and appJustLaunched, but it will become more complicated when we implement actual authentication with Auth0. Using a ViewModel allows us to have a “single source of truth” for the login/logout logic and its associated state.
It’s time to add a ViewModel to the project!
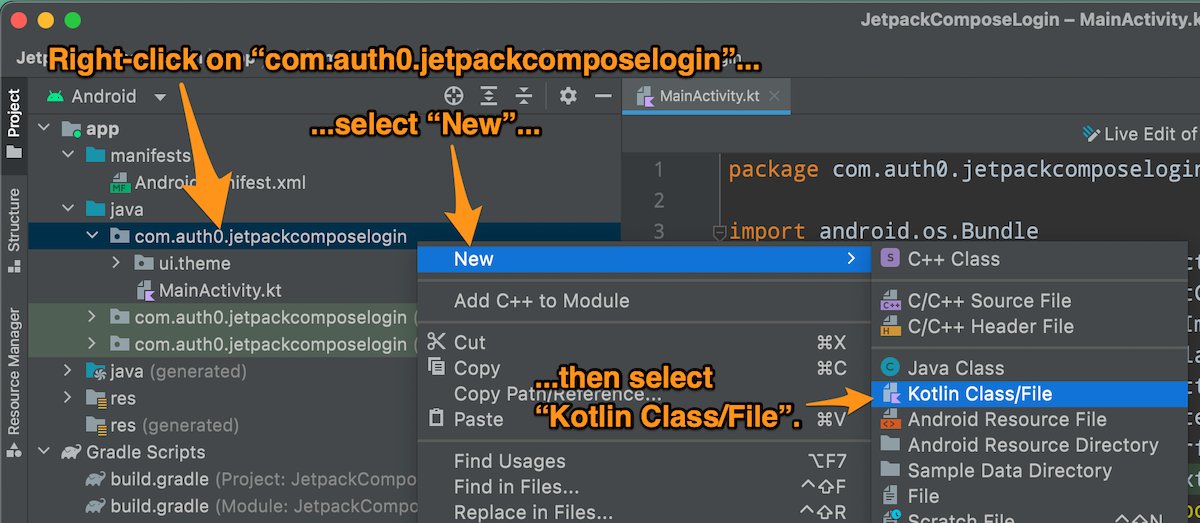
🛠 In Android Studio’s Project pane, right-click on com.auth0.jetpackcomposelogin. Select New from the menu that appears, then select Kotlin Class/File from the submenu.
You’ll go to this dialog box:
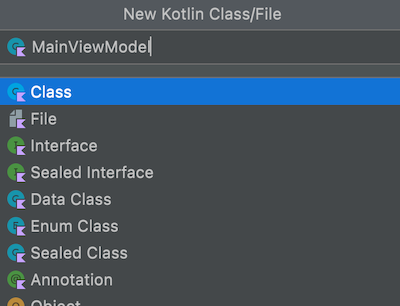
🛠 Select Class from the menu and enter MainViewModel for the filename. This will add a new file, MainViewModel.kt, to the project. In Android Studio’s Project pane, it will appear as MainViewModel.
🛠 Open MainViewModel and replace its contents with the following:
// 📄 MainViewModel.kt

package com.auth0.jetpackcomposelogin

import androidx.compose.runtime.getValue
import androidx.compose.runtime.mutableStateOf
import androidx.compose.runtime.setValue
import androidx.lifecycle.ViewModel


// 1
class MainViewModel: ViewModel() {

    // 2
    var appJustLaunched by mutableStateOf(true)
    var userIsAuthenticated by mutableStateOf(false)

    // 3
    fun login() {
        userIsAuthenticated = true
        appJustLaunched = false
    }

    // 4
    fun logout() {
        userIsAuthenticated = false
    }

}
Here are the notes for the numbered comments above:
- The ViewModel,
MainViewModel, inherits from Android’sViewModelclass. - These are the state variables currently in the
MainViewcomposable inMainActivity. They still use themutableStateOf()function so that Jetpack Compose observes them for changes to their values. There’s no longer any need to useremember, as they’re no longer local variables of a function but instance variables of a ViewModel class. They will retain their values as long as the ViewModel instance exists, and the ViewModel instance will exist as long as its corresponding view exists. - The button, when in “Log In” mode, will call this method when pressed. This method will eventually contain additional code to use Auth0 to log the user in.
- The button, when in “Log Out” mode, will call this method when pressed. This method will eventually contain additional code to use Auth0 to log the user out.
🛠 Add this import statement to MainActivity.kt. This adds support for the ViewModel’s delegated properties:
// 📄 MainActivity.kt

import androidx.activity.viewModels
🛠 It’s time to connect our ViewModel, MainViewModel, to its corresponding view, MainActivity. Do this by updating MainActivity as shown below:
// 📄 MainActivity.kt

class MainActivity : ComponentActivity() {
    /// 👇🏽👇🏽👇🏽 1. New code
    private val mainViewModel: MainViewModel by viewModels()
    /// 👆🏽👆🏽👆🏽

    override fun onCreate(savedInstanceState: Bundle?) {
        super.onCreate(savedInstanceState)
        setContent {
            JetpackComposeLoginTheme {
                // A surface container using the 'background' color from the theme
                Surface(
                    modifier = Modifier.fillMaxSize(),
                    color = MaterialTheme.colors.background
                ) {
                    /// 👇🏽👇🏽👇🏽 2. Updated code
                    MainView(mainViewModel)
                    /// 👆🏽👆🏽👆🏽
                }
            }
        }
    }
}
These notes correspond to the numbered “New code” and “Updated code” comments above:
- This sets up an instance of the ViewModel...
- ...and this passes that instance to the
MainViewcomposable, which will use for state management and behavior.
🛠 Update MainView so that it uses the ViewModel instance that MainActivity will pass to it, as shown in the code below:
// 📄 MainActivity.kt

@Composable
/// 👇🏽👇🏽👇🏽 Updated code
fun MainView(
    viewModel: MainViewModel
) {
/// 👆🏽👆🏽👆🏽
    /// 👇🏽👇🏽👇🏽 Updated code
    /// Remove the declarations for the variables
    /// “userIsAuthenticated” and “appJustLaunched”
    /// 👆🏽👆🏽👆🏽

    Column(
        modifier = Modifier.padding(20.dp),
        horizontalAlignment = Alignment.CenterHorizontally,
        verticalArrangement = Arrangement.Center,
    ) {
        // Title
        // -----
        /// 👇🏽👇🏽👇🏽 Updated code
        val Title = if (viewModel.userIsAuthenticated) {
        /// 👆🏽👆🏽👆🏽
            stringResource(R.string.logged_in_title)
        } else {
            /// 👇🏽👇🏽👇🏽 Updated code
            if (viewModel.appJustLaunched) {
            /// 👆🏽👆🏽👆🏽
                stringResource(R.string.initial_title)
            } else {
                stringResource(R.string.logged_out_title)
            }
        }
        Title(
            /// 👇🏽👇🏽👇🏽 Updated code
            text = Title
            /// 👆🏽👆🏽👆🏽
        )

        // User info
        // ---------
        /// 👇🏽👇🏽👇🏽 Updated code
        if (viewModel.userIsAuthenticated) {
        /// 👆🏽👆🏽👆🏽
            UserInfoRow(
                label = stringResource(R.string.name_label),
                value = "Name goes here",
            )
            UserInfoRow(
                label = stringResource(R.string.email_label),
                value = "Email goes here",
            )
                url = stringResource(R.string.user_icon_url),
                description = "Description goes here",
            )
        }

        // Button
        // ------
        val buttonText: String
        val onClickAction: () -> Unit
        /// 👇🏽👇🏽👇🏽 Updated code
        if (viewModel.userIsAuthenticated) {
        /// 👆🏽👆🏽👆🏽
            buttonText = stringResource(R.string.log_out_button)
            /// 👇🏽👇🏽👇🏽 Updated code
            onClickAction = { viewModel.logout() }
            /// 👆🏽👆🏽👆🏽
        } else {
            buttonText = stringResource(R.string.log_in_button)
            /// 👇🏽👇🏽👇🏽 Updated code
            onClickAction = { viewModel.login() }
            /// 👆🏽👆🏽👆🏽
        }
        LogButton(
            text = buttonText,
            onClick = onClickAction,
        )
    }
}
🛠 Run the app. It shouldn’t look different or work differently, but as I’ve said before, it will be much easier to integrate with Auth0 when the time comes — and that time is now!
It’s time to make the app more “real” by integrating it with Auth0 to give it actual login and logout functionality!
Auth0 and the Auth0.Android library

Adding login and logout to an app may seem like a simple task — until you try it. You have to handle the many ways to log in, confirm email addresses and passwords, manage users, and handle security and scalability. Each issue has dozens of considerations, risks, and edge cases.
Auth0 solves this problem. With Auth0 and a few lines of code, your app can have a full-featured system that supports logging in with a username/password combination, single sign-on and social accounts, passwordless login, biometrics, and more. You won’t have to handle the “behind the scenes” issues! Instead, you can focus on your app’s main functionality.
Auth0.Android is a client-side library that you can use in your Android apps to authenticate users and access Auth0 APIs.
The latest version of Auth0.Android at the time of writing, version 2.8.0, works with both Java and Kotlin and incorporates what we’ve learned from securing applications on Android devices over the past few years. It requires Java 8 or later and runs on Android API 21 (a.k.a. Android 5.0 or “Lollipop”) and later versions.
Register the app with Auth0
🚨 To perform this step, you’ll need an Auth0 account. 🚨
That’s because your app will delegate the login/logout process to Auth0 so that you can focus your effort, energy, and time on what your app actually does instead of worrying about authenticating users and all the edge cases that come with it.
In this process, you will:
- Add the app to your Auth0 dashboard’s list of registered applications.
- Gather two pieces of information the app will need to delegate login/logout to Auth0: your tenant’s domain and the client ID that Auth0 will assign to the app.
- Provide Auth0 with the necessary callback URLs to contact the app: one to call at the end of the login process and the other to call at the end of the logout process.
🛠 If you already have an Auth0 account, log in, skip the next section, and proceed to the part titled Add the app to the Applications list.
If you don’t have an Auth0 account yet...
🛠 ...go ahead and sign up for one! It’s free, and we’ve taken great care to make the process as painless as possible.
Add the app to the Applications list
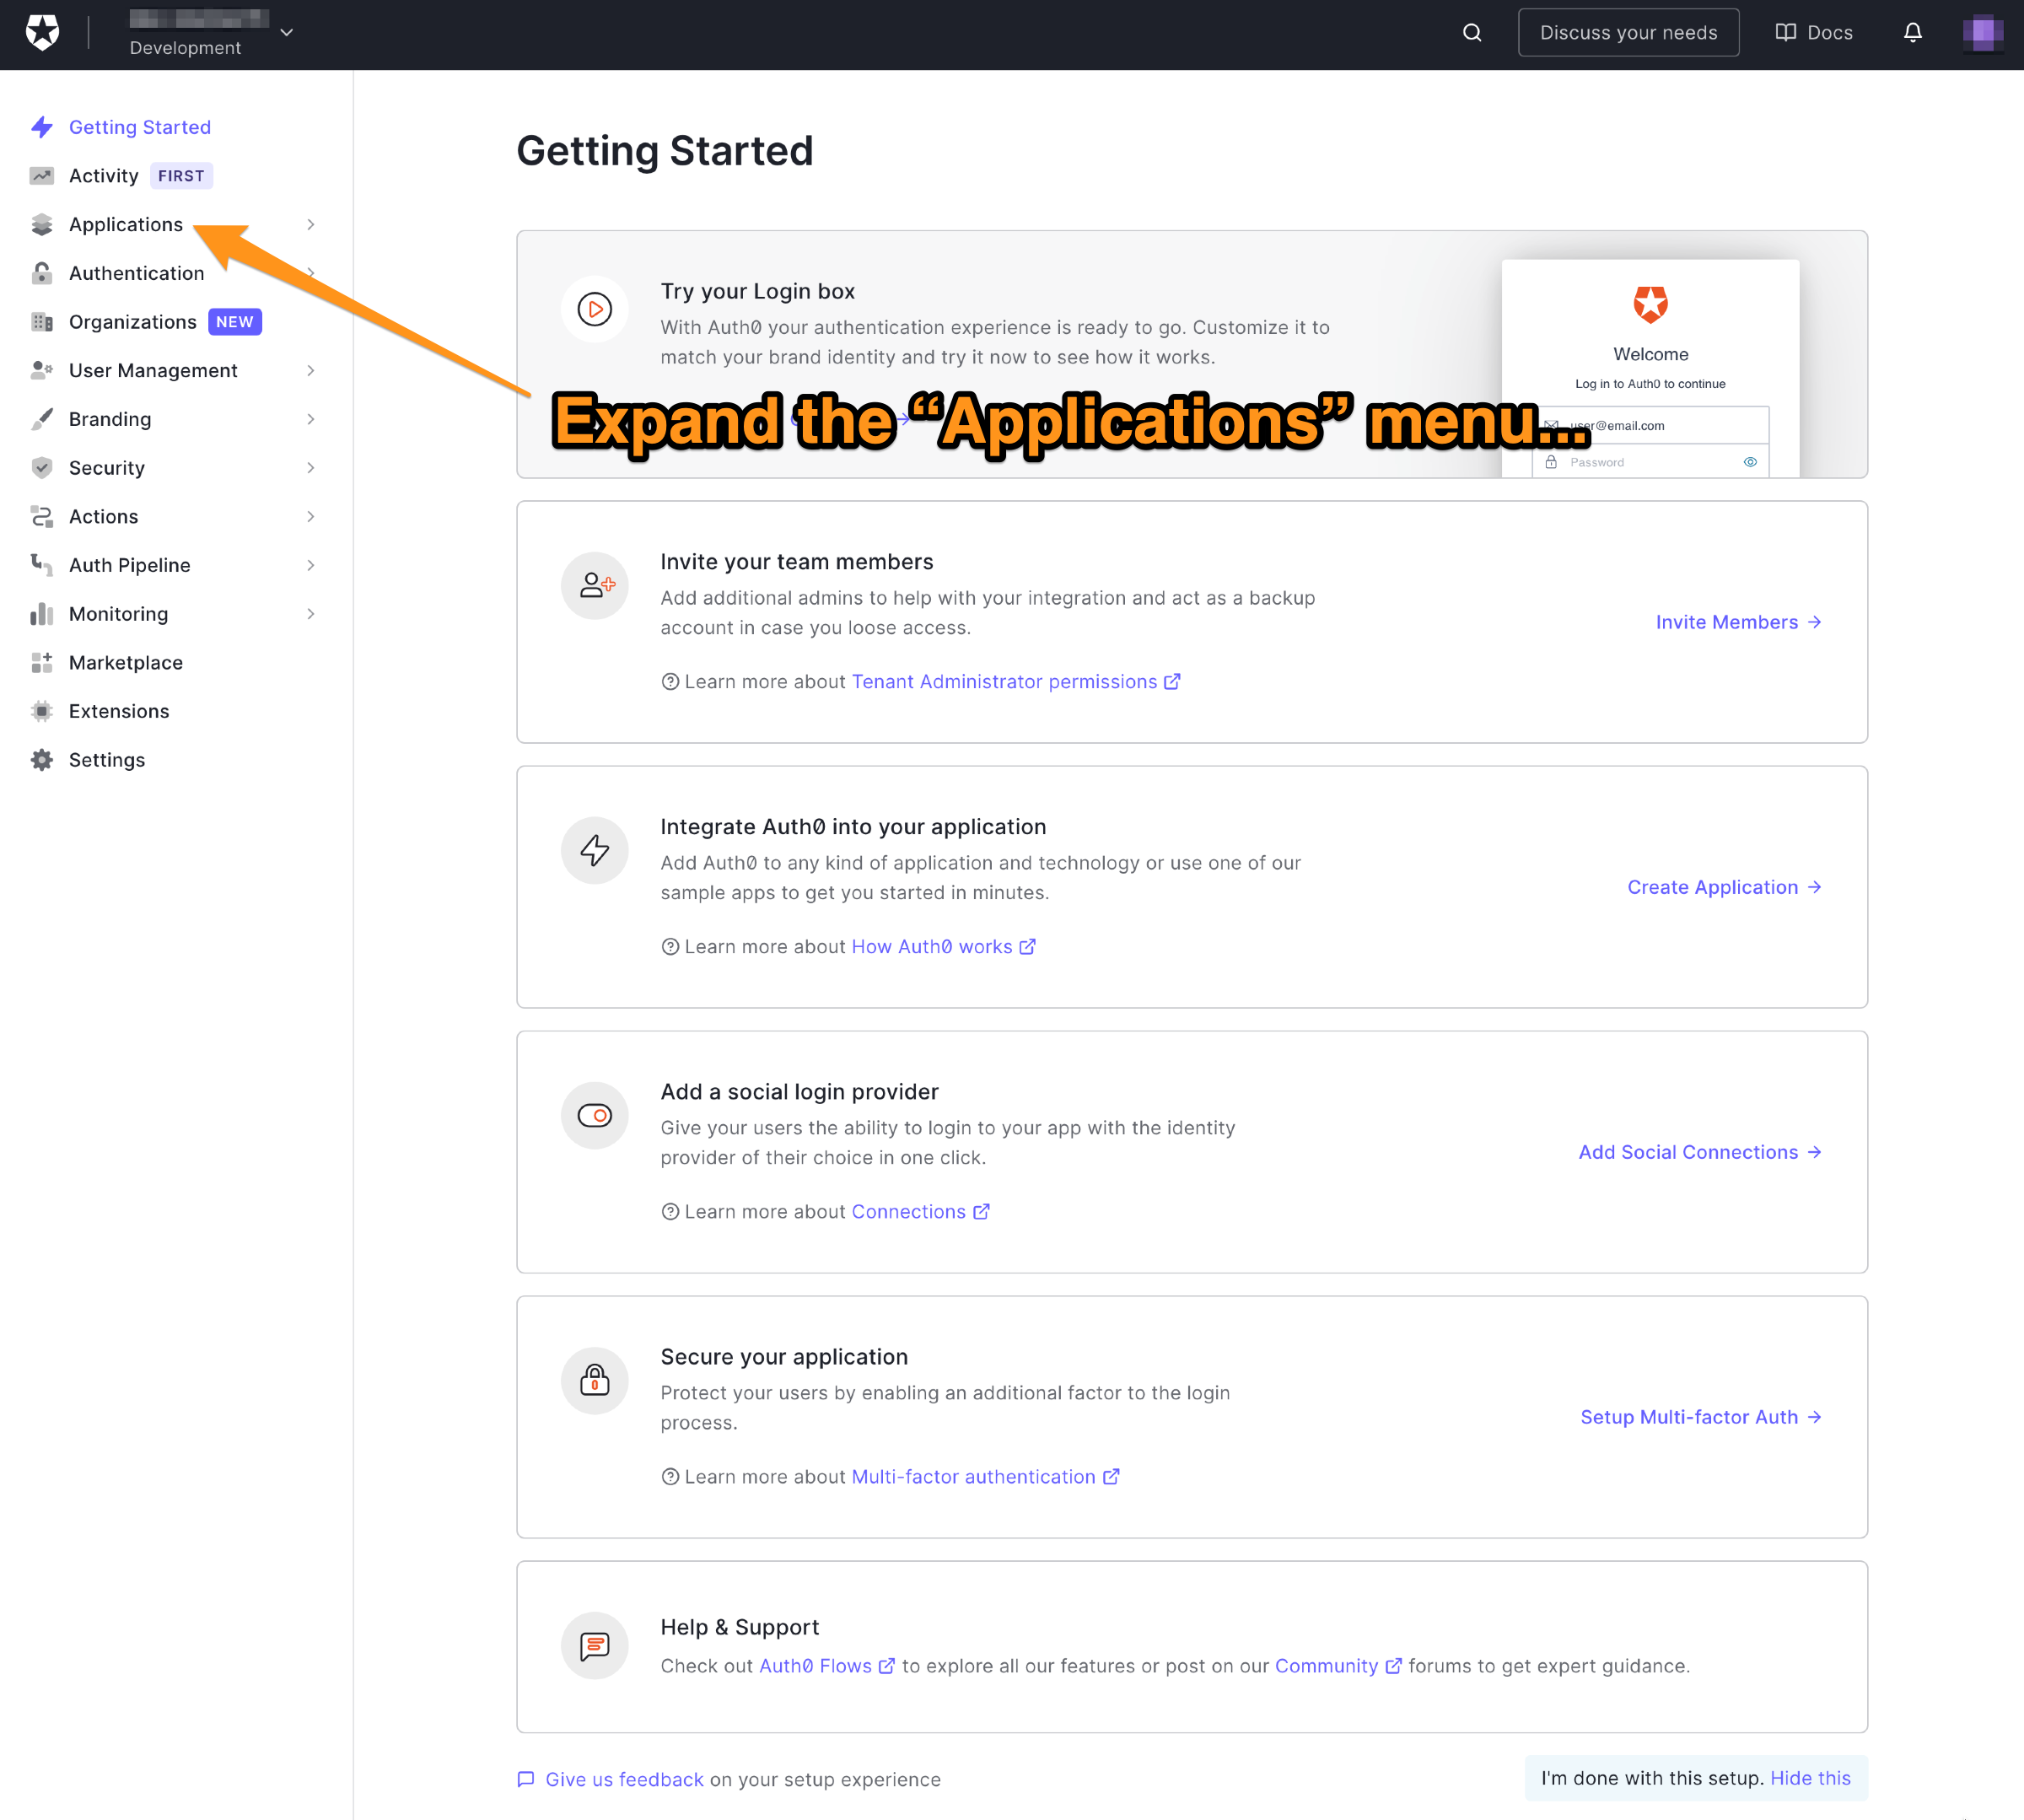
🛠 In the left side menu of the Auth0 dashboard, click on Applications:
🛠 This will expand the Applications menu. Select the first item in that menu, which also has the name Applications:
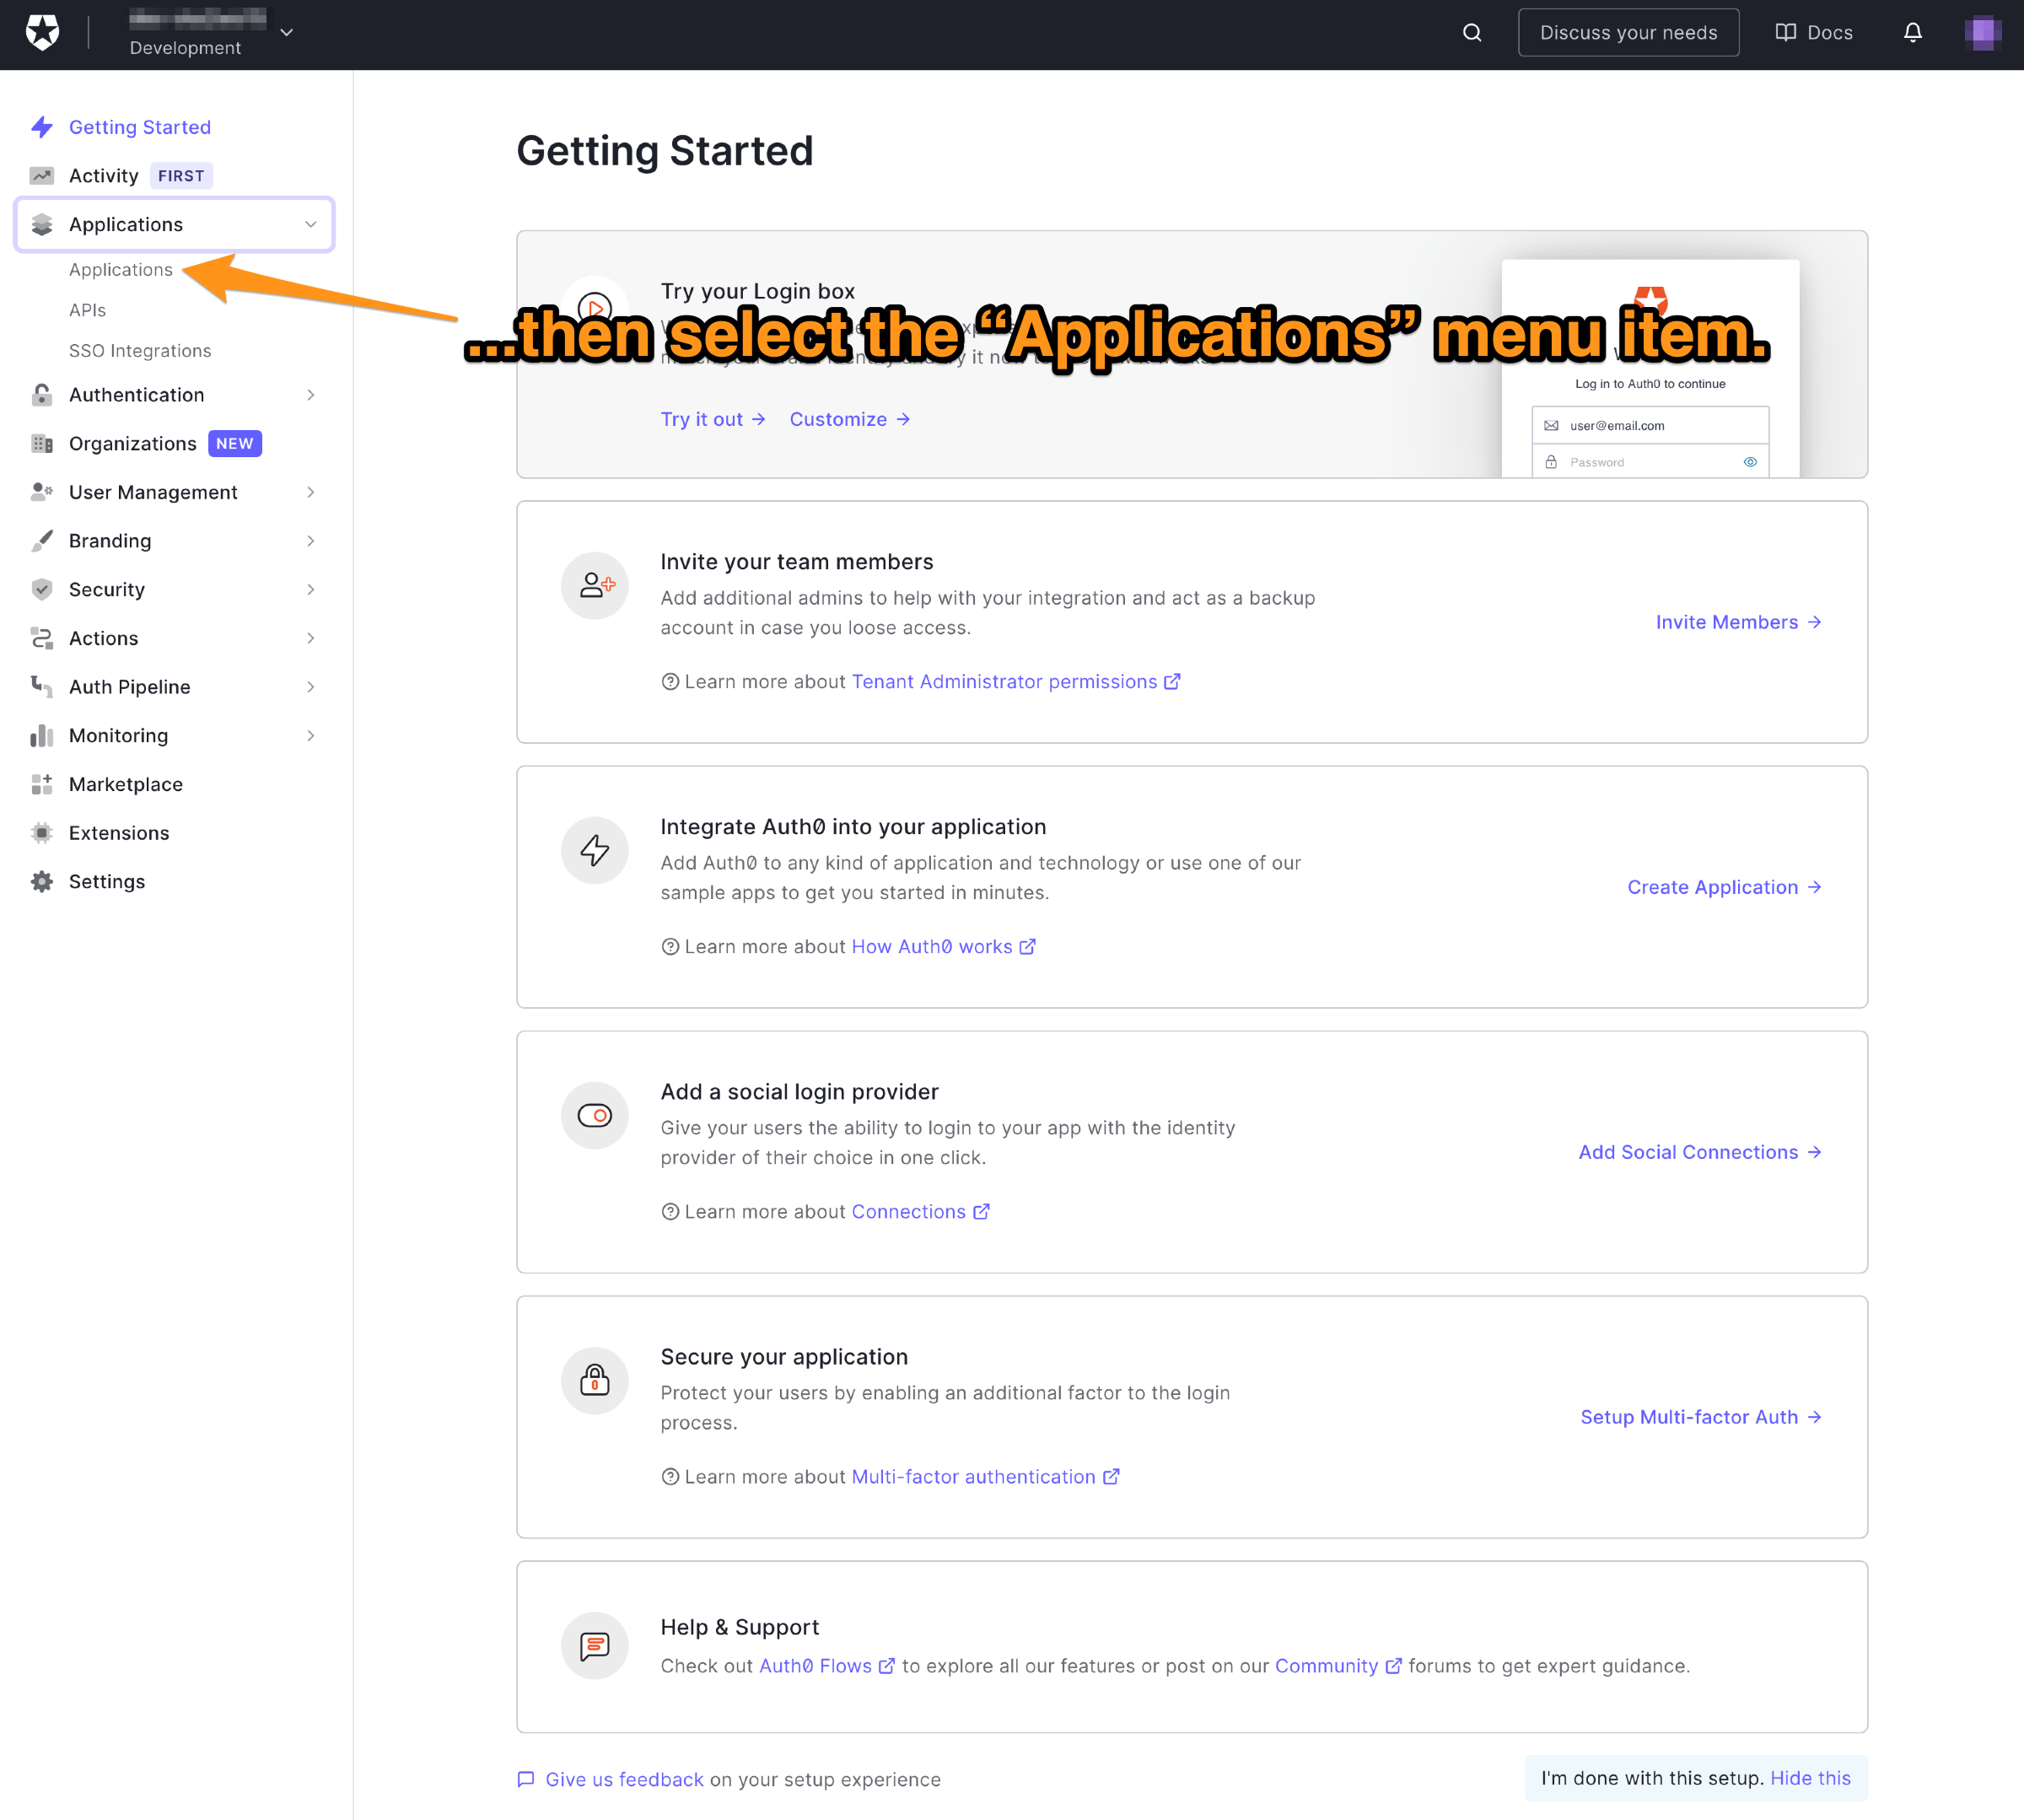
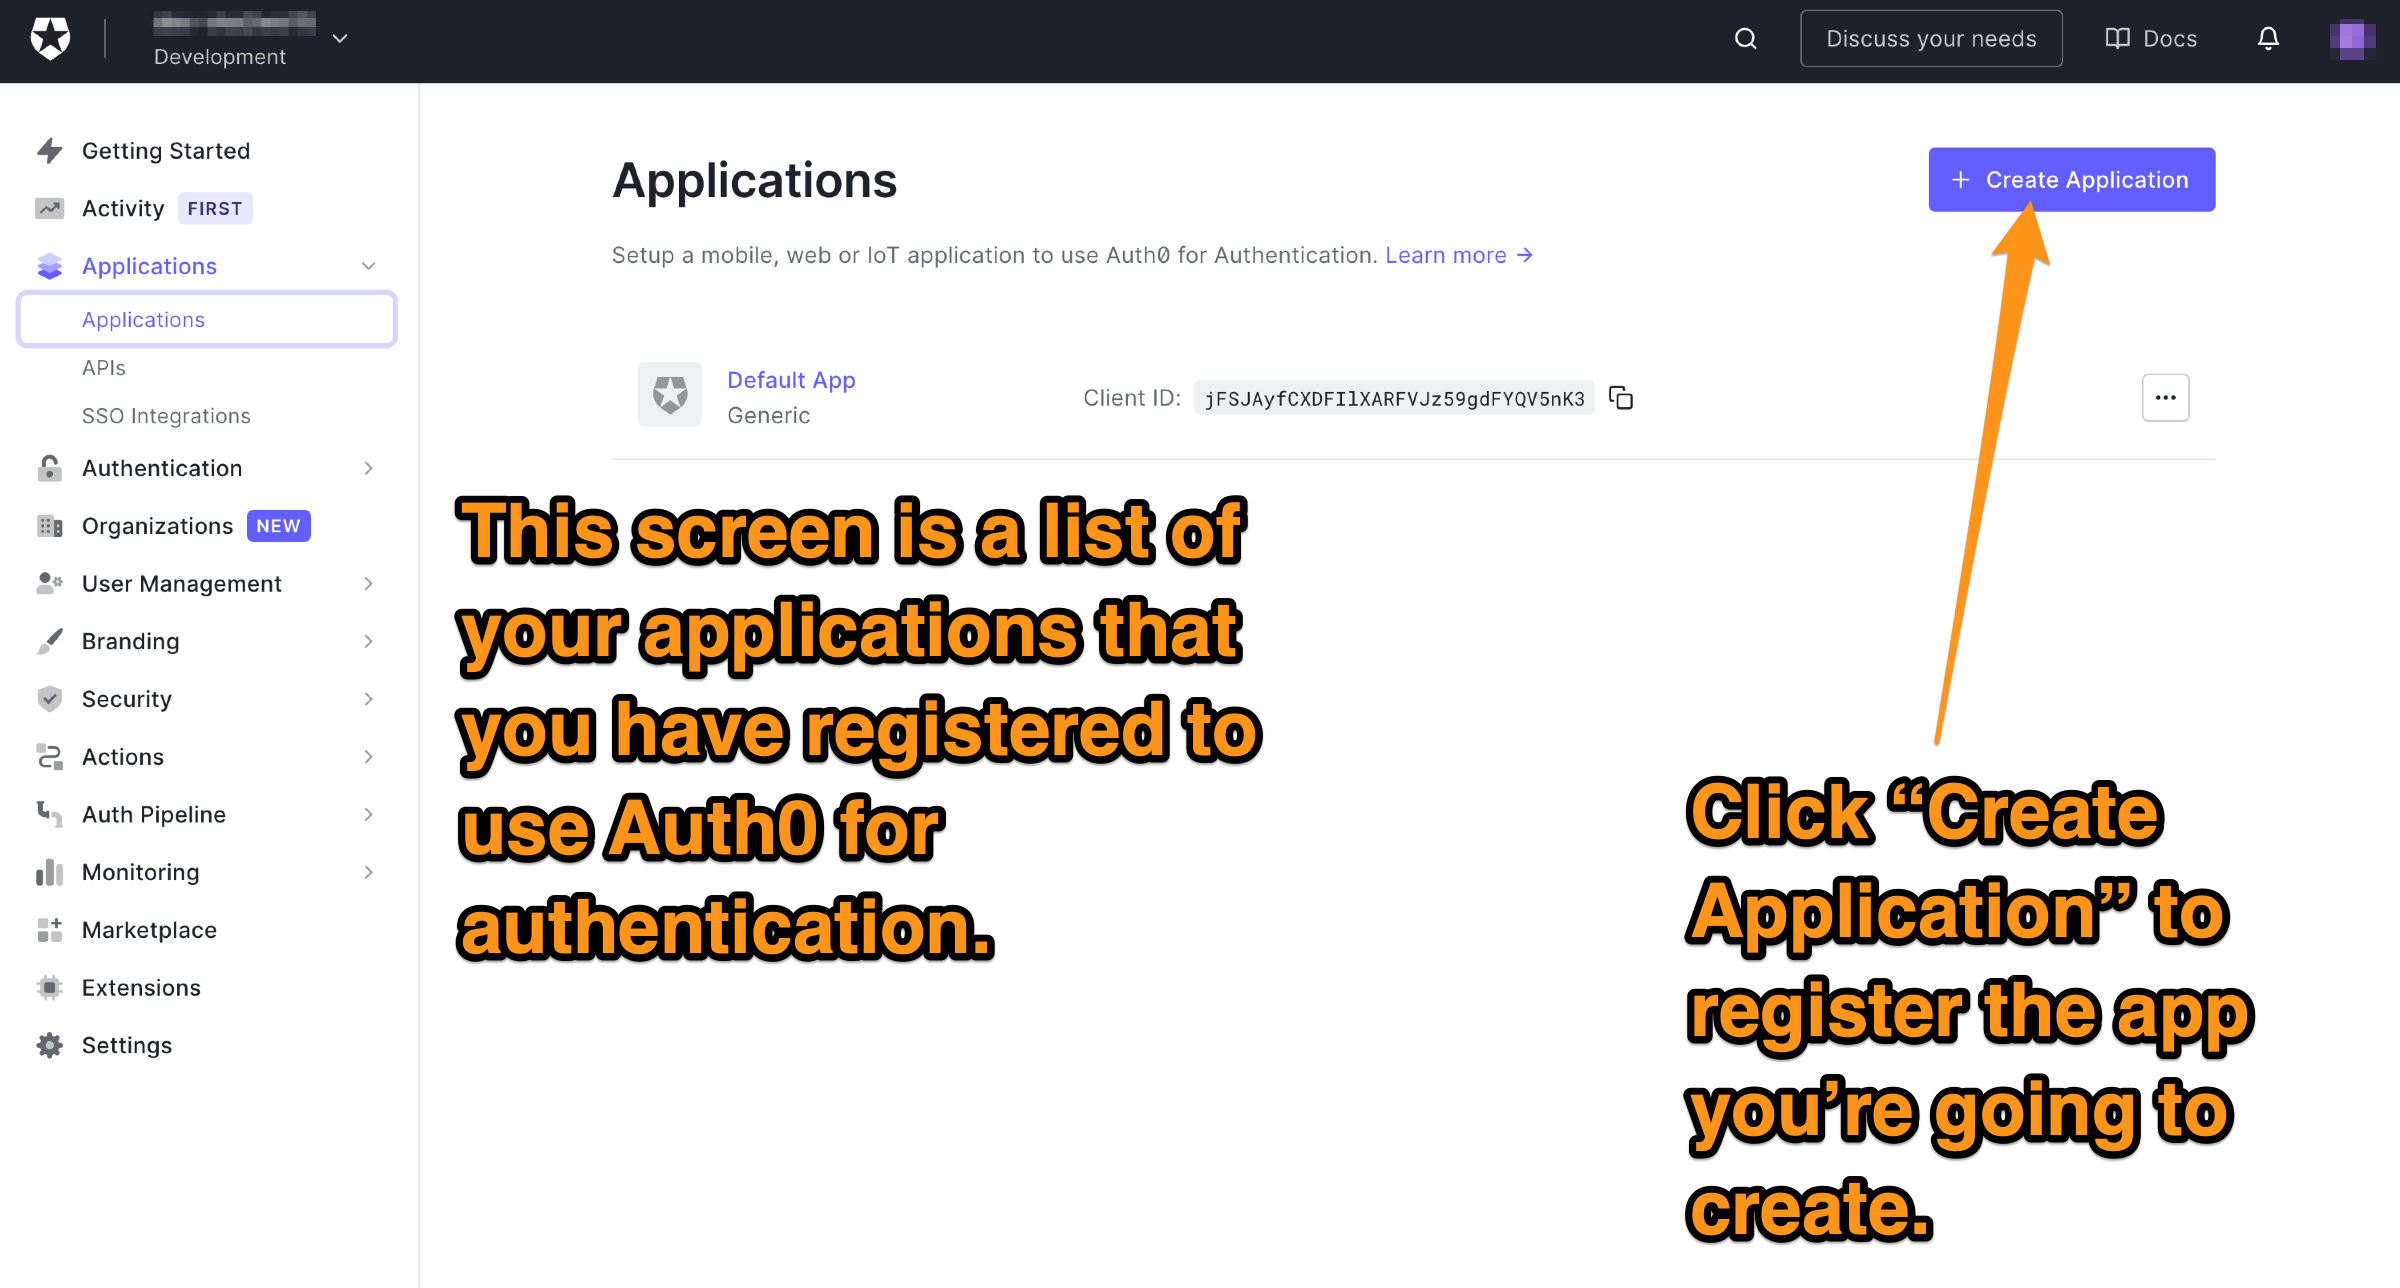
You will now be on the Applications page. It lists all the applications that you have registered to use Auth0 for authentication and authorization.
🛠 Let’s register the app. Do this by clicking the Create application button near the top right of the page:
You’ll see this dialog appear:
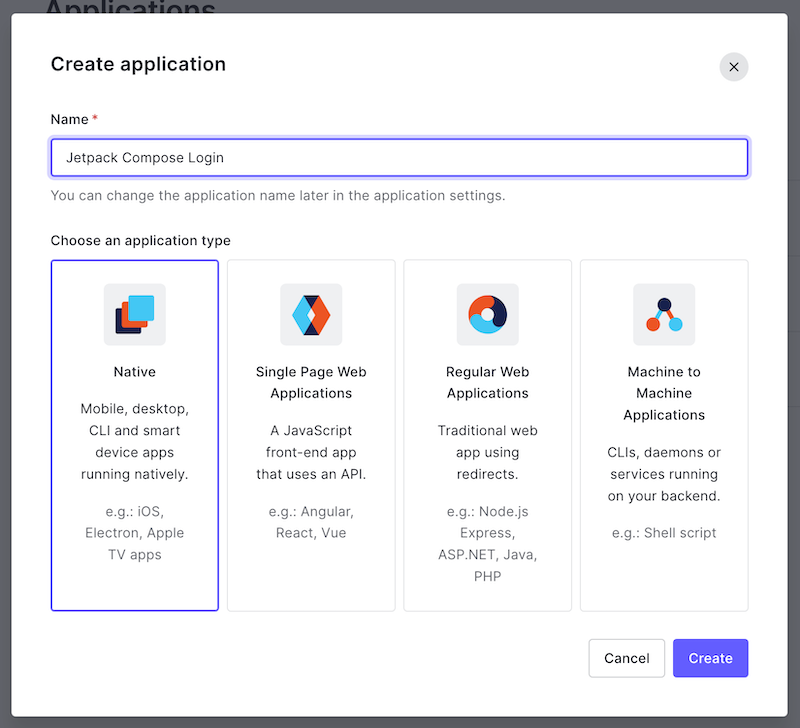
🛠 You’ll need to provide two pieces of information to continue:
- Enter a name for the app in the name field. It might be simplest to use the same name as your Android Studio project (if you’ve been following my example, use the name
Jetpack Compose Login). - Specify the application type: Native.
Click Create. The Quick Start page for the app will appear:
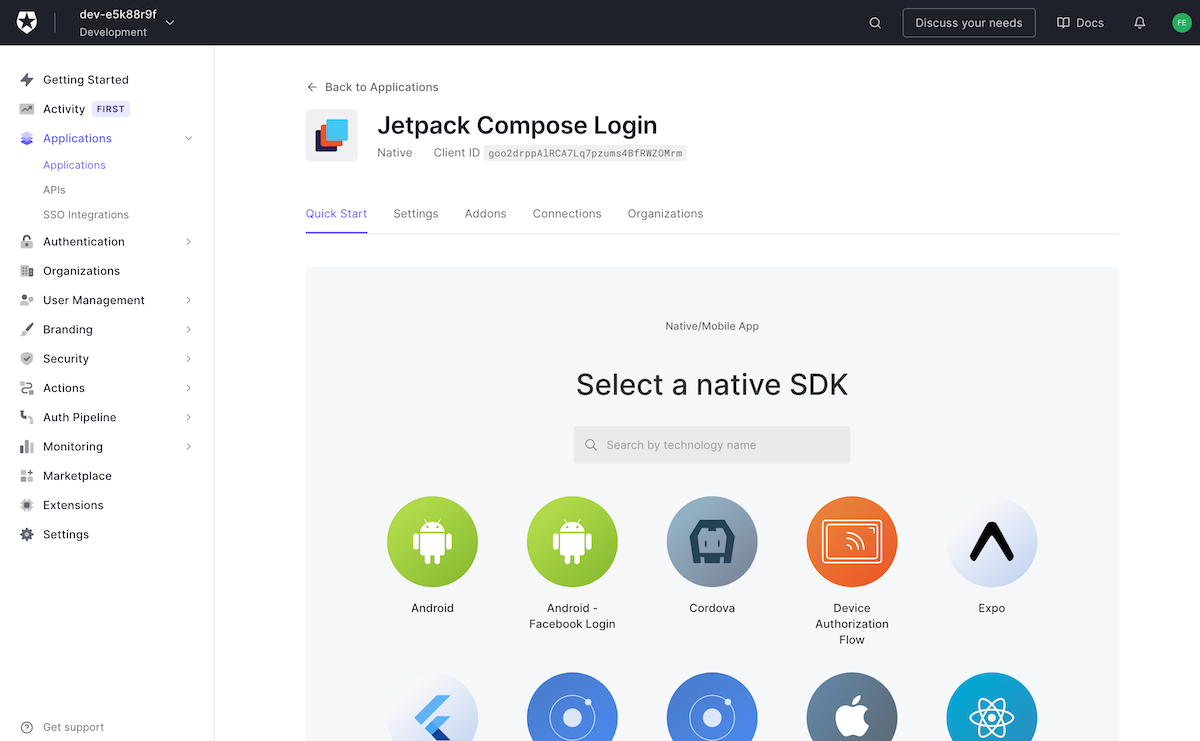
This page provides ready-made projects for several different platforms you can use as the basis for an application that delegates login/logout to Auth0. You won’t use any of them in this exercise; instead, you’ll use a couple of Auth0 libraries and write the code yourself. It’s more educational — and, more importantly, fun — that way.
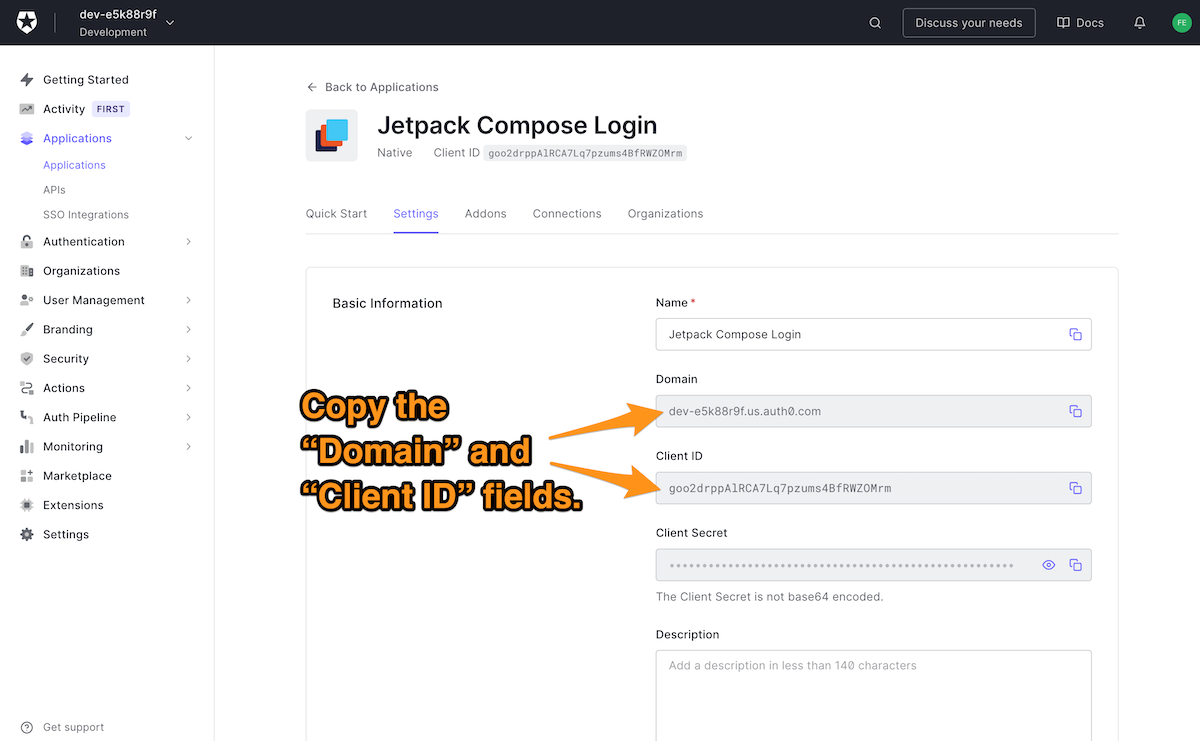
🛠 Click the Settings tab, which will take you to this page:
You’re going to do two critical things on this page:
- Get information that the app needs to know about Auth0, and
- Provide information that Auth0 needs to know about the app.
Let’s take care of the first one, i.e., getting the information that the app needs, namely:
- The domain. You need it to build the URL the app will use to contact Auth0. It uniquely identifies your Auth0 tenant, a collection of applications, users, and other information you have registered with your Auth0 account.
- The client ID. The identifier that Auth0 assigned to the app. It’s how Auth0 knows which app it’s working with.
🛠 Get this information by copying the contents of the Domain and Client ID fields for later reference. You’ll enter them into your Android Studio project soon.
🛠 Scroll down the page to the Application URIs section:
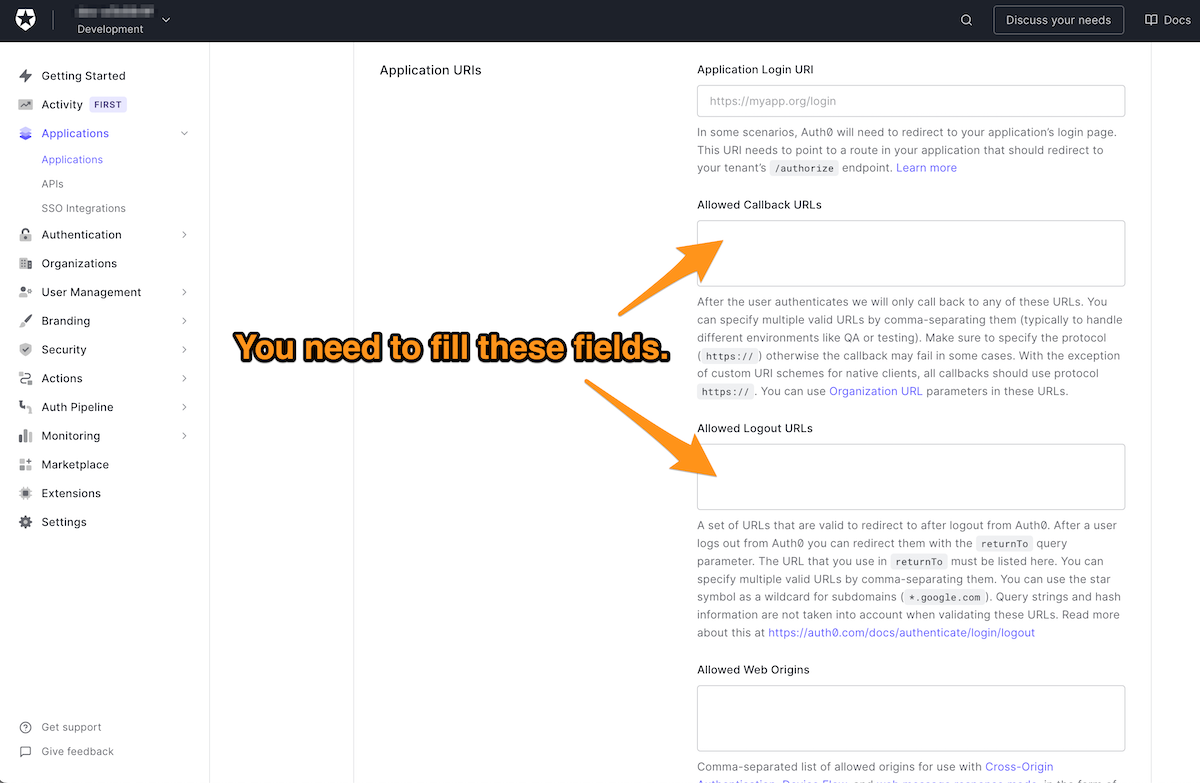
This is where you provide two pieces of information that Auth0 needs to know about the app, which are:
- A callback URL: the URL that Auth0 will redirect to after the user successfully logs in. There can be more than one of these.
- A logout URL: the URL that Auth0 will redirect to after the user logs out. There can be more than one of these.
In case you were wondering what the difference between a URI and a URL is, we have answers for you in this article: URL, URI, URN: What's the Difference?
You’re probably thinking: “Wait a minute — I’m writing an Android app. It doesn’t have web pages that you navigate to using URLs, but Views with underlying code in Controllers!”
You’re absolutely right. In the case of native applications, the callback and logout URLs are identical strings, and Auth0 sends that string to the app to inform it that a user has logged in or logged out.
The string that native Android apps use for both the callback URL and the logout URL follows this format:
{SCHEME}://{YOUR_DOMAIN}/android/{YOUR_APP_PACKAGE_NAME}/callback
🛠 To construct the string, do the following:
- Replace
{SCHEME}withapp.{SCHEME}is the URL’s protocol, and if you were writing a web app, this value would behttp, or better,https. Since this is an Android native app, you can pick any string for this value. I like to useapp. - Replace
{YOUR_DOMAIN}with the value from the Domain field you saw earlier on this page. - Replace
{YOUR_APP_PACKAGE_NAME}with the app’s bundle identifier. If you didn’t change the package name in the starter project, this value iscom.auth0.jetpackcomposelogin.
🛠 Enter the URL you just constructed into both the Allowed Callback URLs and Allowed Login URLs fields. Remember, the same URL goes into both fields.
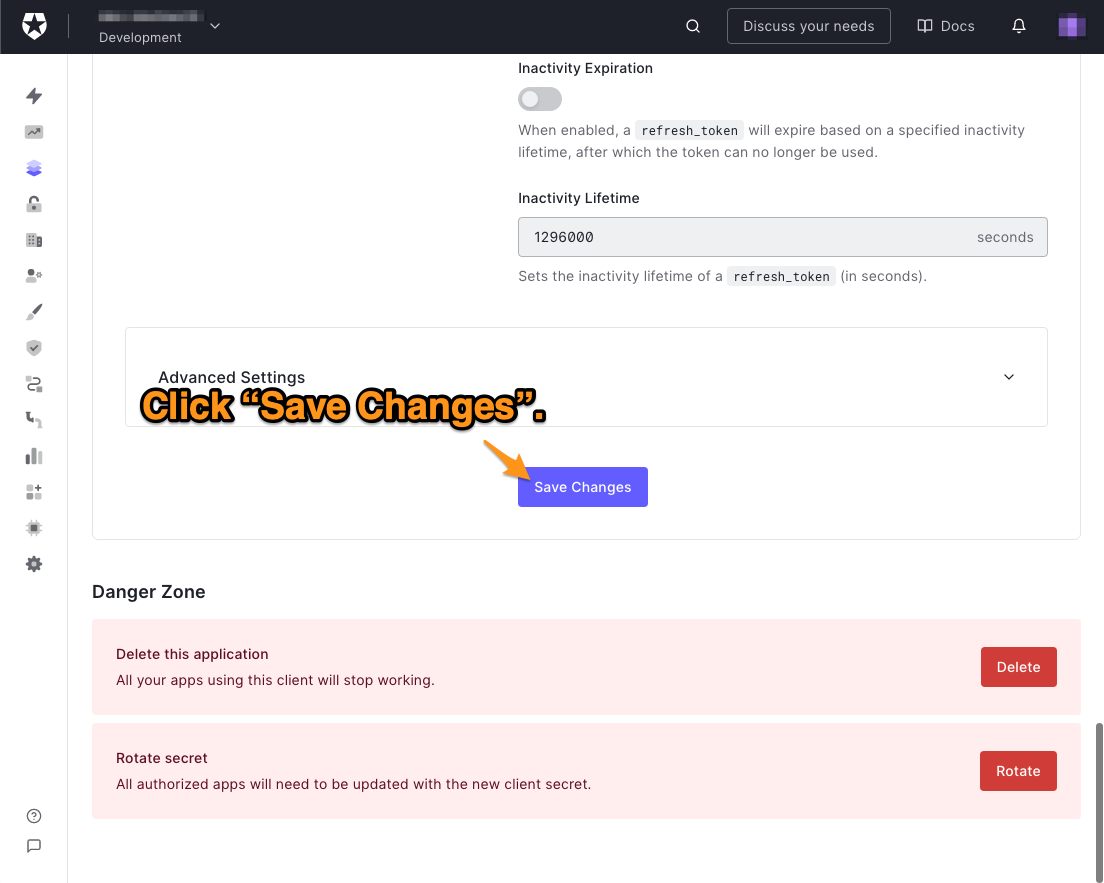
🛠 You’ve done everything you need to do on this page. Scroll down to the bottom of the page and click the Save Changes button:
Create a user if your tenant doesn’t have any
If you just created an Auth0 account, your tenant is brand new. It won’t have any user accounts, so there won’t be any way to log in to the app. If this is the case, follow these steps to create a user.
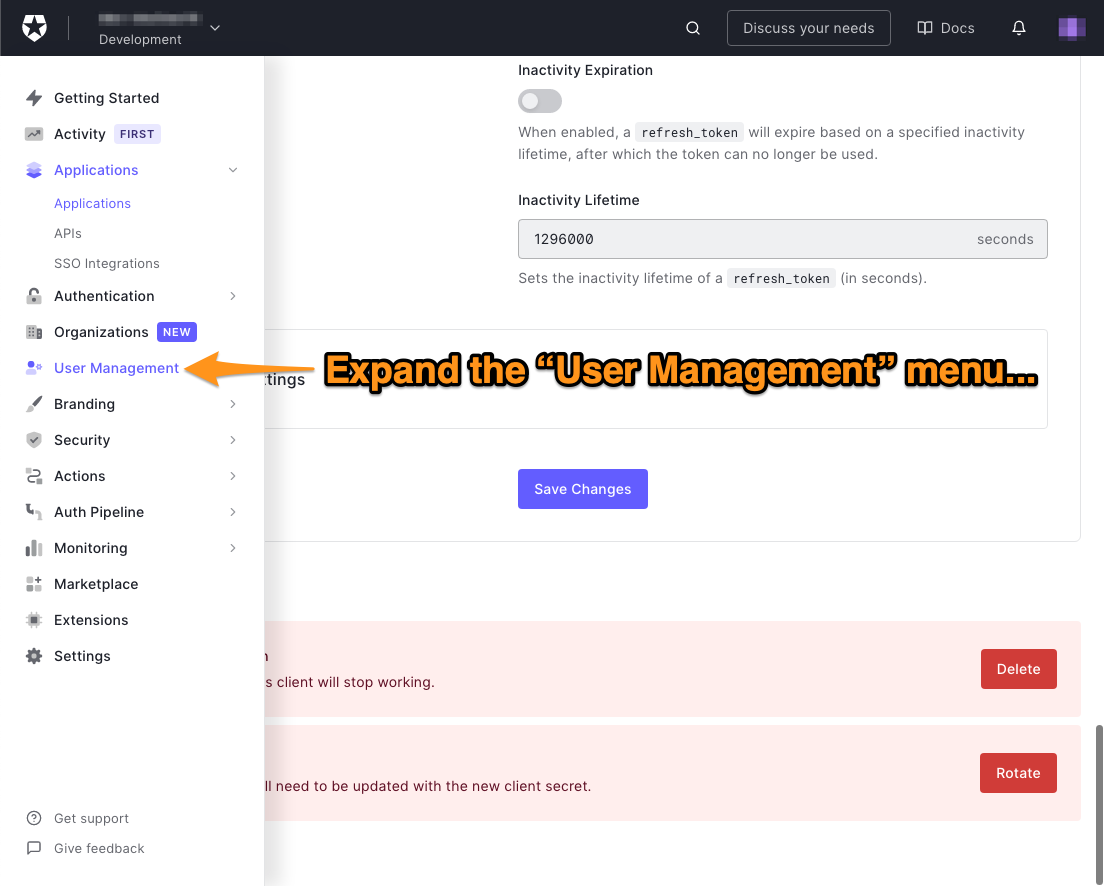
🛠 In the menu on the left side of the Auth0 dashboard, click on User Management:
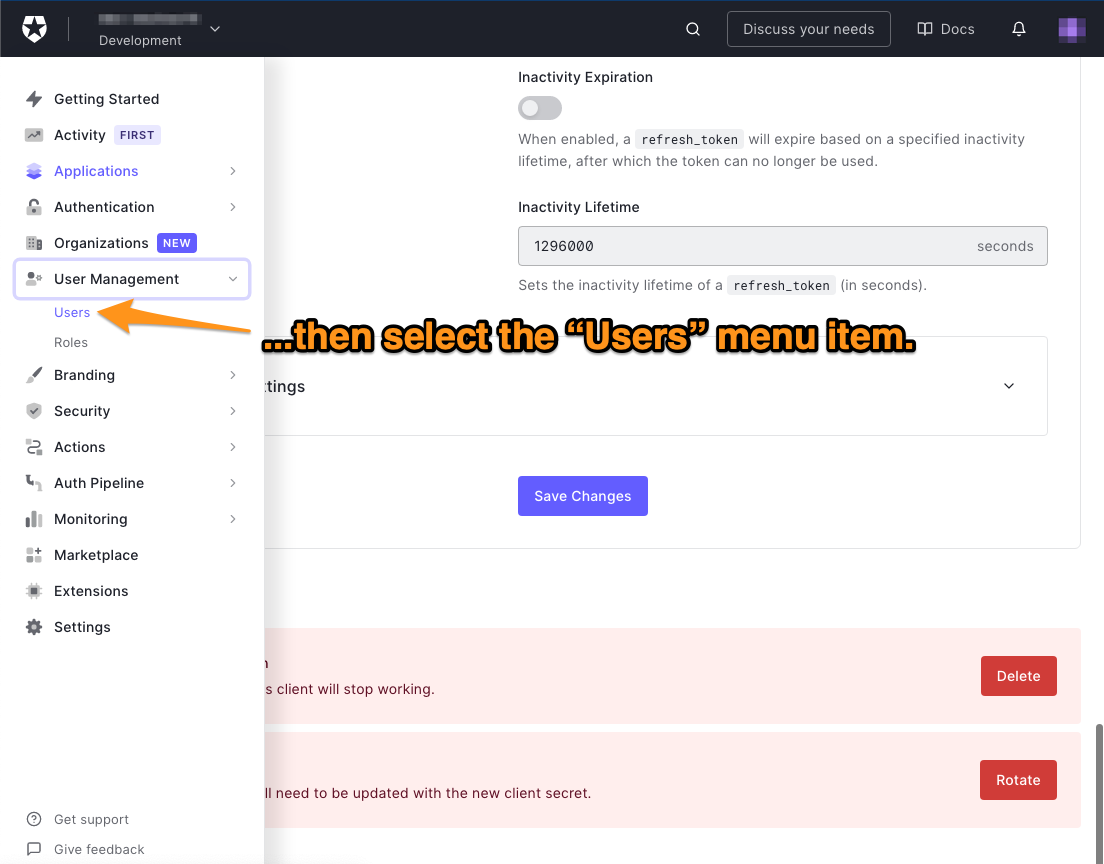
🛠 This will expand the User Management menu. Select the Users item in that menu:
The Users page will appear. It lists all the users registered to your tenant. You’ll see the “You don’t have any users yet” message if there are no users.
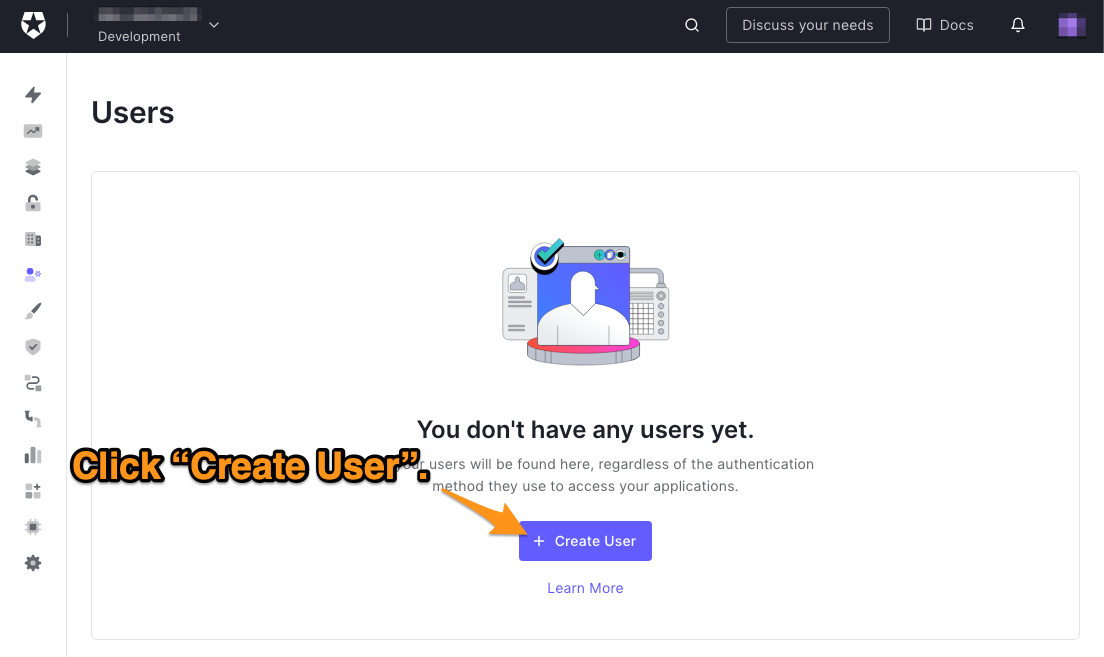
🛠 Click the Create User button to create a new user.
Configure the App
Before you can start coding, you’ll need to configure the app to communicate with Auth0.
Store the domain and client ID in the Auth0 resource file
Earlier in this exercise, you registered the app in the Auth0 dashboard, which gives Auth0 the information it needs to interact with the app. It’s time to do the same thing on the app side of the equation and give it the information it needs to interact with Auth0, namely:
- Your tenant’s domain, which the app will use to determine the URL it will use to contact Auth0.
- The app’s client ID, which the app will use to identify itself to Auth0.
You should store this information in a string resource file, the preferred place to store text strings for Android projects. We’ll follow the recommended practice of using a separate string resource file named auth0.xml to store Auth0-specific strings.
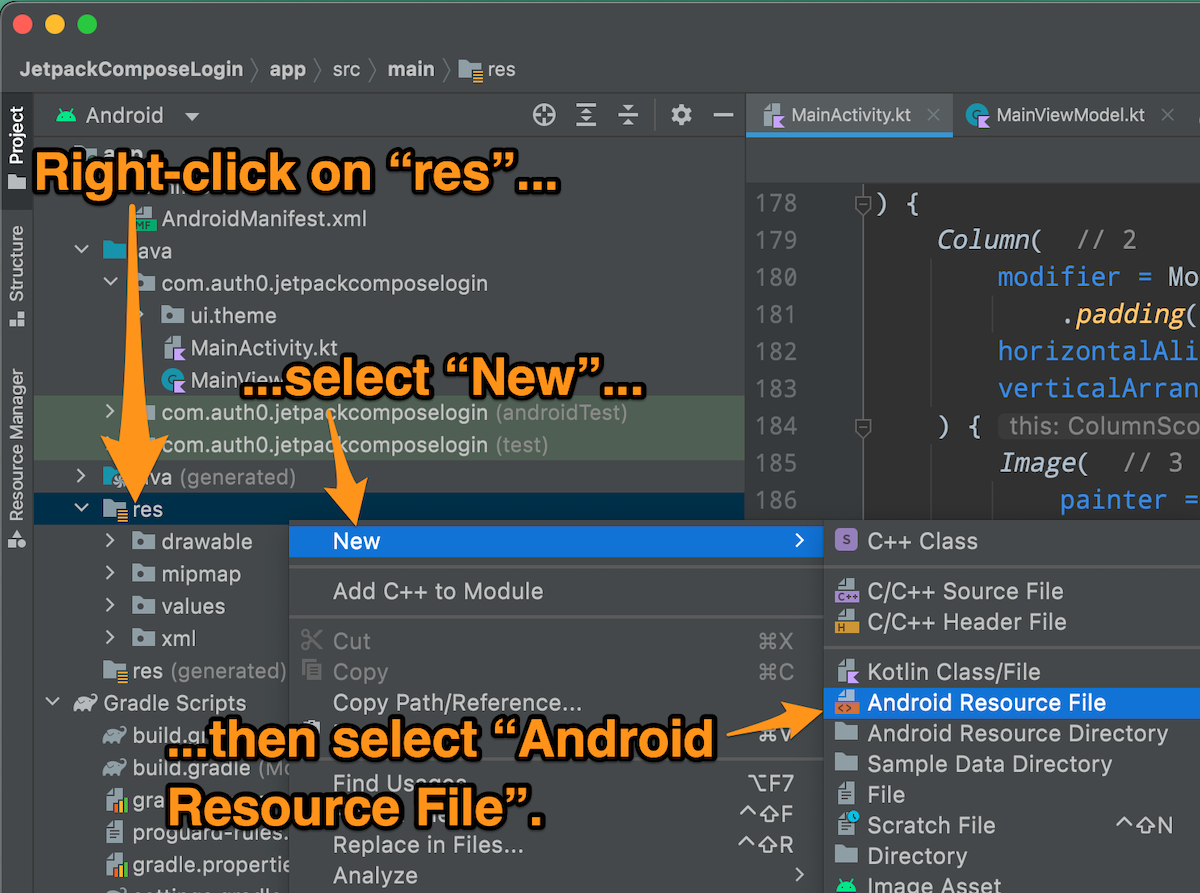
🛠 In Android Studio’s Project pane, right-click on the res folder. Select New from the menu that appears, then select Android Resource File from the submenu.
This dialog box will appear:
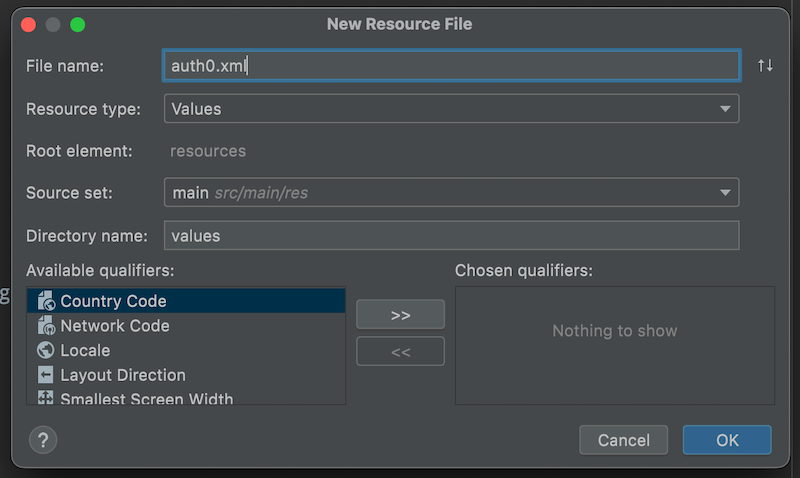
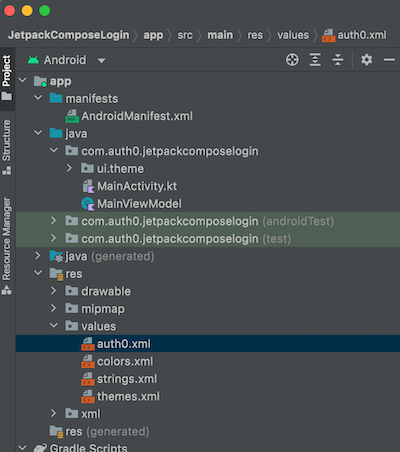
Enter auth0.xml into the File name: text field and click OK. In the Project pane, you’ll see the auth0.xml file in the values subfolder of the res folder:
🛠 Open auth0.xml and replace its contents with the following:
<!-- 📄 app/res/values/auth0.xml -->

<?xml version="1.0" encoding="utf-8"?>
<resources>

    <!--
    Auth0 identifiers and settings
    ==============================
    These values are required to connect to Auth0 for authorization,
    which is why we're storing them in their own string resource file.
    -->

    <string name="com_auth0_scheme">app</string>
    <string name="com_auth0_domain">TODO: Enter your tenant’s domain name here.</string>
    <string name="com_auth0_client_id">TODO: Enter your app’s client ID here.</string>

</resources>
🛠 Change the contents of the <string name="com_auth0_domain"> tag from TODO: Enter your tenant’s domain name here. to your tenant’s domain, which you copied from the Settings page of the Auth0 dashboard.
🛠 Change the contents of the <string name="com_auth0_client_id"> tag from TODO: Enter your app’s client ID here. to your app’s client ID, which you copied from the Settings page of the Auth0 dashboard.
Enable the app to respond to the callback and logout URLs
Another thing you did earlier in this exercise was create the callback and logout URLs that Auth0 uses to notify the app that a user has logged in or logged out. In this step, you’ll make it possible for the app to respond to these URLs.
🛠 Open the app’s build.gradle file (in Android Studio’s Project pane, it’s the build.gradle (Module: JetpackComposeLogin.app) file under Gradle Scripts; in the filesystem, it’s /app/build.gradle). Update the defaultConfig block as shown below:
// 📄 /app/build.gradle

// (Other code here)

android {
    compileSdk 32

    defaultConfig {
        applicationId "com.auth0.androidlogin"
        minSdk 21
        targetSdk 32
        versionCode 1
        versionName "1.0"

        /// 👇🏽👇🏽👇🏽 New code
        manifestPlaceholders = [auth0Domain: "@string/com_auth0_domain", auth0Scheme: "@string/com_auth0_scheme"]
        /// 👆🏽👆🏽👆🏽

        testInstrumentationRunner "androidx.test.runner.AndroidJUnitRunner"
        vectorDrawables {
            useSupportLibrary true
        }
    }

    // (Other options here)
}

// (The rest of the file is here)
You just added manifest placeholders to the file. These variables within the manifest file define an intent filter, which determines how the app responds to intents. The app will interpret the callback and logout URLs as intents.
Install the Auth0 libraries
To make the app work with Auth0, you’ll need to install two libraries:
- The Auth0.Android package. This is a collection of libraries that enables Android apps to use Auth0’s APIs, including the Authentication API, which you’ll use to implement login and logout in your app.
- The JWTDecode.Android library. The app will use it to decode the user’s identity information, which is in JSON Web Token (JWT) format.
🛠 Install the libraries by adding two new items to the dependencies block in the app’s build.gradle (in Android Studio’s Project pane, it’s the build.gradle (Module: JetpackComposeLogin.app) file under Gradle Scripts; in the filesystem, it’s /app/build.gradle) as shown below:
// 📄 /app/build.gradle

// (Other code here)

dependencies {

    implementation 'androidx.core:core-ktx:1.7.0'
    implementation "androidx.compose.ui:ui:$compose_version"
    implementation "androidx.compose.material:material:$compose_version"
    implementation "androidx.compose.ui:ui-tooling-preview:$compose_version"
    implementation 'androidx.lifecycle:lifecycle-runtime-ktx:2.3.1'
    implementation 'androidx.activity:activity-compose:1.3.1'
    testImplementation 'junit:junit:4.13.2'
    androidTestImplementation 'androidx.test.ext:junit:1.1.3'
    androidTestImplementation 'androidx.test.espresso:espresso-core:3.4.0'
    androidTestImplementation "androidx.compose.ui:ui-test-junit4:$compose_version"
    debugImplementation "androidx.compose.ui:ui-tooling:$compose_version"
    debugImplementation "androidx.compose.ui:ui-test-manifest:$compose_version"

    // Coil image loading library
    // (see https://github.com/coil-kt/coil)
    implementation 'io.coil-kt:coil-compose:+'

    /// 👇🏽👇🏽👇🏽 New code
    // Auth0 dependencies
    implementation 'com.auth0.android:auth0:+'
    implementation 'com.auth0.android:jwtdecode:+'
    /// 👆🏽👆🏽👆🏽

}
Remember that we used
+instead of a version number to install the latest version of Coil. We’re doing the same thing to install the latest version of the Auth0 dependencies.
After making these changes to the Gradle file, you’ll need to synchronize the project with the new build configuration you defined. Android Studio will notify you that it detected the changes to the Gradle file and present you with the option to synchronize the project with the updated file.
🛠 Click the Sync Now link near the top right corner of the code pane to do so:
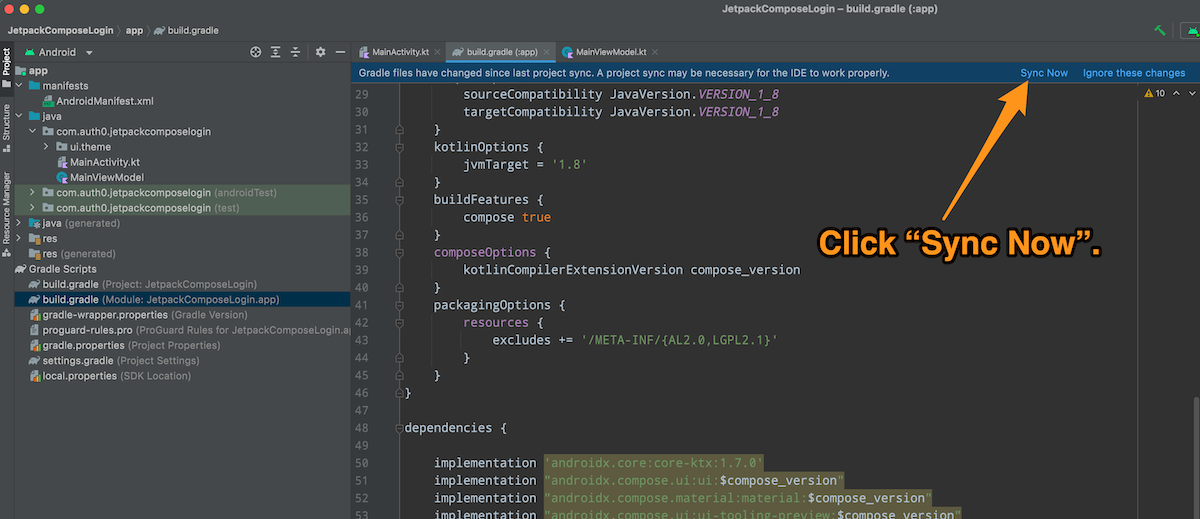
Android Studio will display the message “Gradle project sync in progress...” for a few moments, and then the sync will complete.
Add Authentication to the App
Now that you have configured your Auth0 tenant and app, you can add authentication. This requires updating the ViewModel.
Add the necessary import statements
🛠 Add the following import statements to MainViewModel.kt:
import android.content.Context
import com.auth0.android.Auth0
import com.auth0.android.provider.WebAuthProvider
import com.auth0.android.callback.Callback
import com.auth0.android.authentication.AuthenticationException
import com.auth0.android.result.Credentials
import android.util.Log
Each import statement makes available a class or object needed to authenticate users:
Context: Universal Login needs the context of an activity so that it knows what Activity to return to after the Universal Login window is dismissed.Auth0: Connects your app to your Auth0 account and tenant.WebAuthProvider: Displays the Universal Login web page and contains the methods for logging users in and out.Callback: An interface that lets your app react to callback results from Auth0.AuthenticationException: Represents errors that were captured when making a request to Auth0.Credentials: Contains the user’s credentials returned by Auth0 after a successful login.Log: We’ll use this to display messages in Logcat, Android Studio’s logging window.
Add properties to the ViewModel
🛠 Update ViewModel so that it includes additional properties, as shown in the code below:
// 📄 MainViewModel.kt

class MainViewModel: ViewModel() {

    var appJustLaunched by mutableStateOf(true)
    var userIsAuthenticated by mutableStateOf(false)

    /// 👇🏽👇🏽👇🏽 New code
    private val TAG = "MainViewModel"  // 1
    private lateinit var account: Auth0  // 2
    private lateinit var context: Context  // 3
    /// 👆🏽👆🏽👆🏽

    // (The rest of the class goes here)
In the code above, each new property has a numbered comment explaining its purpose:
TAGis thetagvalue for output to the Logcat console. The app will use this to show the content of the ID tag it receives from Auth0 and display any error messages.accountis an object containing your Auth0 account information, namely your tenant’s domain and the app’s client ID.contextis the context of the activity to which this ViewModel belongs,MainActivity. TheWebAuthProviderobject provided by the Auth0 library needs this value to initiate login and logout.
🛠 The ViewModel needs to provide the Activity with a way to initialize the account and context properties. Add the following method to the ViewModel after the properties and before the login() method:
// 📄 MainViewModel.kt

    fun setContext(activityContext: Context) {
        context = activityContext
        account = Auth0(
            context.getString(R.string.com_auth0_client_id),
            context.getString(R.string.com_auth0_domain)
        )
    }
Update the login() method
🛠 It’s time to add real login to the app. Update the ViewModel’s login() method to the following:
// 📄 MainViewModel.kt

    fun login() {
        WebAuthProvider
            .login(account)
            .withScheme(context.getString(R.string.com_auth0_scheme))
            .start(context, object : Callback<Credentials, AuthenticationException> {

                override fun onFailure(error: AuthenticationException) {
                    // The user either pressed the “Cancel” button
                    // on the Universal Login screen or something
                    // unusual happened.
                    Log.e(TAG, "Error occurred in login(): $error")
                }

                override fun onSuccess(result: Credentials) {
                    // The user successfully logged in.
                    val idToken = result.idToken

                    // TODO: 🚨 REMOVE BEFORE GOING TO PRODUCTION!
                    Log.d(TAG, "ID token: $idToken")

                    userIsAuthenticated = true
                    appJustLaunched = false
                }

            })
    }
login() uses Auth0.Android’s WebAuthProvider object, which opens a dedicated browser window to the Auth0 Universal Login page and supplies the methods for authenticating users.
Although login() is formatted to span several lines, it’s just a single line of code. The single line is made of a call to a chain of WebAuthProvider’s methods starting with login(). If you ignore all the comments and parameters, the method chain looks like this:
WebAuthProvider
    .login()
    .withScheme()
    .start()
This is an example of the Builder design pattern. Each method in the chain takes an argument that provides additional information about the login, using that information to create a WebAuthProvider object that it passes to the next method in the chain:
login()initiates the login process and specifies the Auth0 account used by the application.withScheme()specifies the scheme to use for the URL that Auth0 redirects to after a successful login. For web apps, the scheme ishttporhttps. This value is arbitrary for native mobile apps, so we useappto make it clear to other developers and other people who may use the Auth0 settings for this app that the redirect is not to a web page.start()takes theWebAuthProviderobject constructed by all the previous methods in the chain and opens the browser window to display the login page.
start() takes two parameters:
- A context — a reference to the Activity that’s initiating the browser window. This value is contained in the ViewModel’s
contextproperty. - An anonymous object with two callback methods:
onFailure(): Executes when the user returns from the browser login screen without successfully logging in. This typically happens when the user closes the browser login screen or taps the “back” button while on that screen.onSuccess(): Executes when the user returns from the browser login screen after successfully logging in. The app processes the successful response and updates the UI to its “logged in” state. It also displays the value of the user’s ID token in the Logcat window (I’ll explain what the ID token does shortly).
Update the logout() method
🛠 Just as you updated the login() method to use Auth0, it’s time to do the same for logout(). Update the ViewModel’s logout() method to the following:
// 📄 MainViewModel.kt

    fun logout() {
        WebAuthProvider
            .logout(account)
            .withScheme(context.getString(R.string.com_auth0_scheme))
            .start(context, object : Callback<Void?, AuthenticationException> {

                override fun onFailure(error: AuthenticationException) {
                    // For some reason, logout failed.
                    Log.e(TAG, "Error occurred in logout(): $error")
                }

                override fun onSuccess(result: Void?) {
                    // The user successfully logged out.
                    userIsAuthenticated = false
                }

            })
    }
Like login(), logout() also uses Auth0.Android’s WebAuthProvider class is a one-liner that uses the Builder pattern. This time, that \line calls a shorter chain of WebAuthProvider ’s methods starting with logout(). If you ignore all the parameters, the method chain looks like this:
WebAuthProvider
    .logout()
    .withScheme()
    .start()
This time, instead of login(), this method uses WebAuthProvider’s logout() method, which initiates the logout process and specifies the Auth0 account used by the application. The account should be the same as the one used to log in.
Update the Main Activity
🛠 Switch to the main activity and update its onCreate() method as shown below.
// 📄 MainActivity.kt

    override fun onCreate(savedInstanceState: Bundle?) {
        super.onCreate(savedInstanceState)
        /// 👇🏽👇🏽👇🏽 New code
        mainViewModel.setContext(this)
        /// 👆🏽👆🏽👆🏽

        setContent {
            JetpackComposeLoginTheme {
                // A surface container using the 'background' color from the theme
                Surface(
                    modifier = Modifier.fillMaxSize(),
                    color = MaterialTheme.colors.background
                ) {
                    MainView(mainViewModel)
                }
            }
        }
    }
This addition passes the main activity’s context to the ViewModel, which needs to communicate with Auth0.
🛠 Run the app. This time, when you press the Log In button, the Universal Login screen will appear:
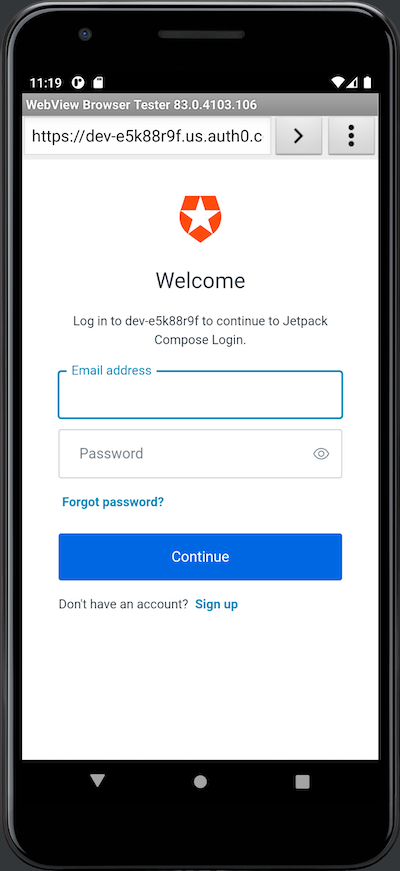
🛠 Log in using one of the users registered in your tenant. The Universal Login screen will be replaced by the app’s “logged in” screen:

The next step is to update the “You’re logged in!” screen to display the user’s information, which we’ll extract from the ID token. Before we do that, let’s take a closer look at the ID token.
Examine the ID Token
If you look at the onSuccess() method in the anonymous object in MainViewModel’s login() method, you’ll see this call to the Log.d() logging method:
// TODO: 🚨 REMOVE BEFORE GOING TO PRODUCTION!
Log.d(TAG, "ID token: $idToken")
These functions’ output will appear in Android Studio’s Logcat area:
If the Logcat area isn’t visible, open the View menu and select Tool Windows → Logcat.
You’ll see the contents of the ID token property, which should look similar to this:
eyJhbGciOiJSUzI1NiIsInR5cCI6IkpXVCIsImtpZCI...
The ID token is data that proves that the user is authenticated. It also contains information about the user that we’ll extract and display on the “logged in” screen.
Remember that the ID token contains personally identifiable information about the user, which includes their name and email address. This why there’s a TODO comment reminding you to remove the Log.d() call before putting the app into production — logging the ID token could leak this sensitive information, even in a compiled production app.
Want to know more about ID tokens and access tokens? We explain all in our article, ID Token and Access Token: What's the Difference?
What’s in the ID token?
To see what’s in the ID token, copy its value from Logcat, go to Auth0’s JWT.io site, and paste that value into the Encoded text area on the left side of the page. JWT.io will decode the ID token from its JWT form and display its decoded contents in the Decoded area on the page’s right side:
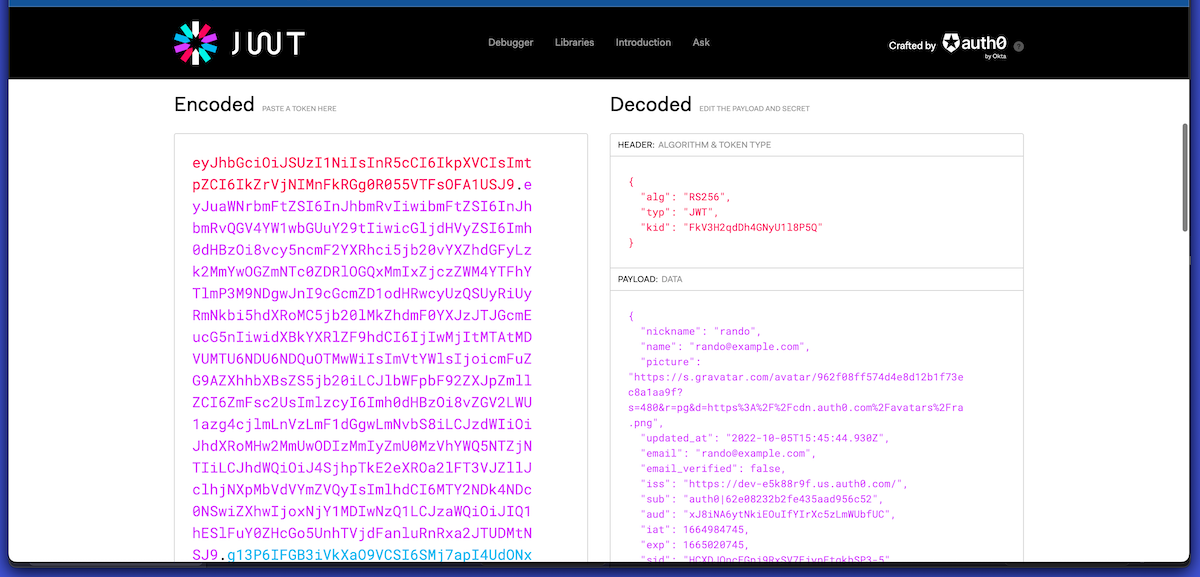
In the Decoded area’s Payload section, you’ll see the decoded user information from the ID token, including the data that we want the app to display: the user’s name, email address, and picture.
In the next step, we’ll give the app the same ID token-decoding capability as JWT.io’s.
Auth0 has plenty of information about JWTs. In addition to the main JWT.io page, you should visit JWT.io’s Introduction to JSON Web Tokens and download our free JWT Handbook.
Show the User’s Information
It’s time for the final step in this tutorial: showing the user’s name, email address, and picture on the app’s “logged in” screen.
Create the User class
Right now, the app only “knows” whether the user is logged in or logged out. It also has the ID token, which you’ve seen has information about the user’s identity encoded within. Let’s create a new class to extract this user information and use it to display the user’s name, email address, and picture when the user is logged in.
🛠 Create a new class for the project and give it the name User. Open that class file and replace its contents with the following:
// 📄 User.kt

package com.auth0.jetpackcomposelogin

import android.util.Log
import com.auth0.android.jwt.JWT


data class User(val idToken: String? = null) {

    private val TAG = "User"

    var id = ""
    var name = ""
    var email = ""
    var emailVerified = ""
    var picture = ""
    var updatedAt = ""

    init {
        if (idToken != null) {
            try {
                // Attempt to decode the ID token.
                val jwt = JWT(idToken ?: "")

                // The ID token is a valid JWT,
                // so extract information about the user from it.
                id = jwt.subject ?: ""
                name = jwt.getClaim("name").asString() ?: ""
                email = jwt.getClaim("email").asString() ?: ""
                emailVerified = jwt.getClaim("email_verified").asString() ?: ""
                picture = jwt.getClaim("picture").asString() ?: ""
                updatedAt = jwt.getClaim("updated_at").asString() ?: ""
            } catch (error: com.auth0.android.jwt.DecodeException) {
                // The ID token is NOT a valid JWT, so log the error
                // and leave the user properties as empty strings.
                Log.e(TAG, "Error occurred trying to decode JWT: ${error.toString()} ")
            }
        } else {
            // The User object was instantiated with a null value,
            // which means the user is being logged out.
            // The user properties will be set to empty strings.
            Log.d(TAG, "User is logged out - instantiating empty User object.")
        }
    }

}
This new class imports the JWT class, which is a wrapper for values contained inside JWTs. We’ll use an instance of this class to extract the user’s information from the ID token returned by Auth0 after a successful login.
When you instantiate User with a valid ID token string, its initializer extracts its embedded values about the user’s identity, which include their name, email address, and the URL for their picture from the token. These values are called claims. If you don’t provide User with a valid ID token string, its properties remain empty strings.
To find out more about claims, see this article: Identity, Claims, & Tokens – An OpenID Connect Primer, Part 1 of 3.
Extract the user’s information during login
Now that we have the User class, we can use it to extract user information from the ID token.
🛠 Give MainViewModel access to the User class with the following import statement:
import com.auth0.jetpackcomposelogin.User TODO: *** See if it works without this
🛠 Add an observed instance of User to the properties of the MainViewModel class. The start of the class should look like this:
// 📄 MainViewModel.kt

class MainViewModel: ViewModel() {

    var appJustLaunched by mutableStateOf(true)
    var userIsAuthenticated by mutableStateOf(false)
    /// 👇🏽👇🏽👇🏽 Updated code
    var user by mutableStateOf(User())
    /// 👆🏽👆🏽👆🏽
🛠 Update the login() method to update the MainViewModel’s User instance using the ID token it receives from Auth0. It’s a one-line change inside the onSuccess() method inside login():
// 📄 MainViewModel.kt

    fun login() {
        WebAuthProvider
            .login(account)
            .withScheme(context.getString(R.string.com_auth0_scheme))
            .start(context, object : Callback<Credentials, AuthenticationException> {

                override fun onFailure(error: AuthenticationException) {
                    // The user either pressed the “Cancel” button
                    // on the Universal Login screen or something
                    // unusual happened.
                    Log.e(TAG, "Error occurred in login(): ${error.toString()} ")
                }

                override fun onSuccess(result: Credentials) {
                    // The user successfully logged in.
                    val idToken = result.idToken

                    // TODO: 🚨 REMOVE BEFORE GOING TO PRODUCTION!
                    Log.d(TAG, "ID token: $idToken")

                    /// 👇🏽👇🏽👇🏽 Updated code
                    user = User(idToken)
                    /// 👆🏽👆🏽👆🏽
                    userIsAuthenticated = true
                    appJustLaunched = false
                }

            })
    }
🛠 Update the logout() method to reset MainViewModel’s instance of User so that its properties are all empty strings when the user logs out. Once again, this is a one-line change:
// 📄 MainViewModel.kt

    fun logout() {
        WebAuthProvider
            .logout(account)
            .withScheme(context.getString(R.string.com_auth0_scheme))
            .start(context, object : Callback<Void?, AuthenticationException> {

                override fun onFailure(error: AuthenticationException) {
                    // For some reason, logout failed.
                    Log.e(TAG, "Error occurred in logout(): ${error.toString()} ")
                }

                override fun onSuccess(result: Void?) {
                    // The user successfully logged out.
                    /// 👇🏽👇🏽👇🏽 Updated code
                    user = User()
                    /// 👆🏽👆🏽👆🏽
                    userIsAuthenticated = false
                }

            })
    }
Display the user’s information
Now that the ViewModel contains information about the logged-in user, you can replace the placeholders on the “logged-in” screen.
🛠 Update the MainView composable to replace the placeholders for the user’s name, email address, and picture URL with the actual values from the ViewModel:
// 📄 MainActivity.kt

@Composable
fun MainView(
    viewModel: MainViewModel
) {
    Column(
        modifier = Modifier.padding(20.dp),
        horizontalAlignment = Alignment.CenterHorizontally,
        verticalArrangement = Arrangement.Center,
    ) {
        // Title
        // -----
        val title = if (viewModel.userIsAuthenticated) {
            stringResource(R.string.logged_in_title)
        } else {
            if (viewModel.appJustLaunched) {
                stringResource(R.string.initial_title)
            } else {
                stringResource(R.string.logged_out_title)
            }
        }
        Title(
            text = title
        )

        // User info
        // ---------
        if (viewModel.userIsAuthenticated) {
            UserInfoRow(
                label = stringResource(R.string.name_label),
                /// 👇🏽👇🏽👇🏽 Updated code
                value = viewModel.user.name,
                /// 👆🏽👆🏽👆🏽
            )
            UserInfoRow(
                label = stringResource(R.string.email_label),
                /// 👇🏽👇🏽👇🏽 Updated code
                value = viewModel.user.email,
                /// 👆🏽👆🏽👆🏽
            )
            UserPicture(
                /// 👇🏽👇🏽👇🏽 Updated code
                url = viewModel.user.picture,
                description = viewModel.user.name,
                /// 👆🏽👆🏽👆🏽
            )
        }

        // Button
        // ------
        val buttonText: String
        val onClickAction: () -> Unit
        if (viewModel.userIsAuthenticated) {
            buttonText = stringResource(R.string.log_out_button)
            onClickAction = { viewModel.logout() }
        } else {
            buttonText = stringResource(R.string.log_in_button)
            onClickAction = { viewModel.login() }
        }
        LogButton(
            text = buttonText,
            onClick = onClickAction,
        )
    }
}
🛠 Run the app and log in. The “logged in” screen will now display actual user information instead of the placeholders:
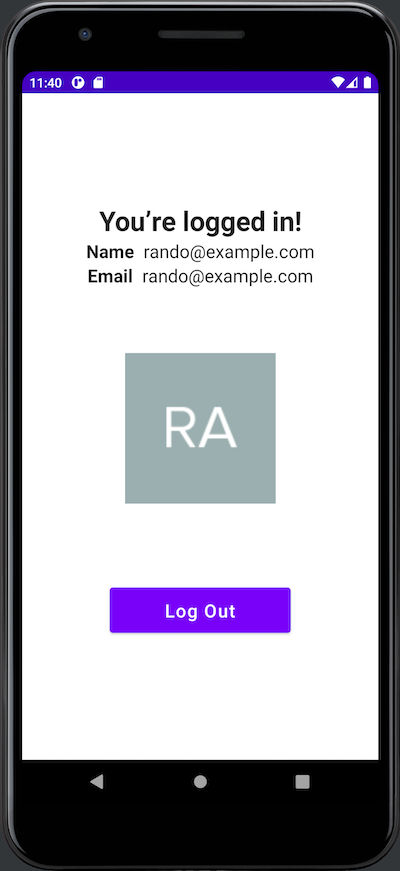
Congratulations — you’ve completed the app! If you have any trouble getting it to work, you can download the completed project from this GitHub repository.
Next Steps
You covered a lot of ground in this tutorial! You built a Jetpack Compose app starting from File → New. You learned about composable functions (a.k.a. composables), using some built-in ones, and writing your own. You learned about maintaining state in composables through the use of the remember API and the mutableStateOf() function. You built a ViewModel to separate presentation from logic in your application, and you used state hoisting to make your composables stateless. Finally, you learned about the ID token and how to extract user information from it.
Jetpack Compose is new territory for many Android developers. According to the Mobile Native Foundation’s 2022 Mobile Ecosystem Survey, nearly 60% of Android developers are still using XML to build UI layouts, while less than 40% are using Jetpack Compose.
We only scratched the surface of Jetpack Compose in this two-part tutorial. For your next steps, you might want to look at these valuable resources:
- Jetpack Compose for Android Developers: A set of tutorials from the Android team that covers composables, layouts and animation, architecture and state, and more.
- Thinking in Compose: Switching to Jetpack Compose from XML requires a completely different mental model for building Android apps. This article covers the declarative programming paradigm that you need to embrace to work with Compose.
- Jetpack Compose Tutorial: This tutorial walks you through the steps of building the kind of “list” components that so many apps use.
About the author

Joey deVilla
Senior Developer Advocate (Auth0 Alumni)