Expense approval is one of those workflows that sounds simple but breaks down fast. Managers forget to check the queue. Employees submit incomplete reports. Approvals sit pending for days. An AI agent that actively monitors expense submissions, asks for missing information, and routes approvals without anyone having to remember to do it could solve this problem.
This is the first article in a four-part series where you'll build exactly that: an AI expense approval agent using the Microsoft Agent Framework (MAF) and Auth0. The agent runs as a C# Blazor Web App in .NET 10, chats with managers about their direct reports' expenses, and gets smarter with each article. Here is the plan for this series:
- Part 1 (this article): Set up the agent, connect Auth0 login via the Auth0 .NET template, and let it respond to questions about expense reports.
- Part 2: Replace mock data with a vector database and add Auth0 Fine-Grained Authorization so managers only see their own direct reports' expenses.
- Part 3: Give the agent a Gmail tool via Auth0 Token Vault so it can email employees on the manager's behalf when a report is incomplete.
- Part 4: Wire up Client-Initiated Backchannel Authentication (CIBA) so the agent sends a push notification when it needs the manager's approval, letting them approve or reject from their phone.
By the end of this first article, a manager can log in, start a conversation, and ask the agent to list pending expense reports. The agent responds using their identity. That's the foundation everything else builds on.
What You'll Need
To build and configure the agent, you need:
- .NET 10 SDK installed on your machine
- Auth0 CLI for template auto-registration
- An Auth0 account (you can sign up for a free one)
- A GitHub personal access token with model access
- Basic familiarity with Blazor
A Quick Look at the Microsoft Agent Framework
MAF is the successor to Semantic Kernel and AutoGen. It wraps a language model with session management, tool-calling, and multi-agent orchestration. The core primitive you'll use here is AIAgent, which wraps any IChatClient-compatible inference service.
The two things you need to know right now are:
- Function tools are C# methods decorated with
[Description]attributes. CallAIFunctionFactory.Create()method to expose them to the agent. - Sessions keep conversation history across turns. Create one with
agent.CreateSessionAsync(), pass it to everyRunAsync()call, and serialize it between requests to survive stateless roundtrips.
That's enough to get started, so let's build our agent.
Creating the Project with the Auth0 Template
The Auth0 Templates for .NET package lets you scaffold a Blazor Web App with Auth0 authentication already wired up. Install it first by running the following command in a terminal window:
dotnet new install Auth0.Templates
If you have the Auth0 CLI installed and are logged in, the template auto-registers your application in your Auth0 tenant (see the auth0blazor template docs for more details). To create your project, run the following command, which will create the Blazor project in the ExpenseAgent folder:
dotnet new auth0blazor -o ExpenseAgent
If you're not using the Auth0 CLI, you can pass your credentials directly:
dotnet new auth0blazor -o ExpenseAgent \
  --domain your-tenant.auth0.com \
  --client-id your-client-id
The template generates a .NET solution with two .NET projects:
- A Blazor server project in the
ExpenseAgentfolder - A Blazor WASM project in the
ExpenseAgent.Clientfolder.
Both projects come with:
Auth0.AspNetCore.Authenticationpre-configured inProgram.cs- Login and logout endpoints
- An
AuthorizeViewcomponent andAuthorizeRouteViewinRoutes.razor - Your Auth0 domain and client ID already in
appsettings.json
To learn how to set up a Blazor Web App with Auth0 from scratch, read this blog post.
Adding the Agent Packages
From the Blazor server project folder ExpenseAgent, add the packages for MAF and session caching by running the following commands:
dotnet add package Microsoft.Agents.AI
dotnet add package OpenAI
dotnet add package Microsoft.Extensions.AI.OpenAI
dotnet add package Microsoft.Extensions.Caching.Memory
Once the packages are added to your project, let's enable access to the AI model.
Updating appsettings.json
The template already populated your Auth0 settings, so you don't need to add anything if you used the automatic registration.
This sample project uses gpt-4o-mini via GitHub Models, which is free for development purposes. Add the settings highlighted below to appsettings.json:
// ExpenseAgent/appsettings.json

{
  "Auth0": {
    "Domain": "YOUR_AUTH0_DOMAIN",
    "ClientId": "YOUR_CLIENT_ID"
  },
  //👇new settings
  "GitHubModels": {
    "Token": "YOUR_GITHUB_MODEL_TOKEN",
    "Model": "gpt-4o-mini"
  }
  //👆new settings
}
Replace the placeholder YOUR_GITHUB_MODEL_TOKEN with your fine-grained personal access token on your GitHub profile. Make sure to include the Model permission with Access: Read-only.
That's it! Your Blazor project now has the basic configuration it needs to become an AI agent.
Building the Agent Tools
The agent's tools are the C# methods it can call during a conversation. Right now, there's one: GetExpenseReports(). In part 2, this method will query a vector database. For now, it returns hardcoded sample data so we can focus on getting the agent wired up.
Create an Agent folder in the ExpenseAgent folder and add an ExpenseAgentTools.cs file with the following code:
// ExpenseAgent/Agent/ExpenseAgentTools.cs

using System.ComponentModel;
using System.Text.Json;

namespace ExpenseAgent.Agent;

public class ExpenseAgentTools
{
    private readonly string _managerId;

    public ExpenseAgentTools(string managerId)
    {
        _managerId = managerId;
    }

    [Description("Get the list of expense reports submitted by the manager's direct reports.")]
    public string GetExpenseReports(
        [Description("Optional keyword to filter expense reports by description or merchant")] string? filter = null)
    {
        // Hardcoded sample data
        var reports = new[]
        {
            new {
                Id = "exp-001",
                Employee = "alice@example.com",
                Amount = 450.00m,
                Merchant = "Marriott Hotels",
                Justification = "Client dinner during NYC conference",
                SubmittedAt = "2026-06-10"
            },
            new {
                Id = "exp-002",
                Employee = "bob@example.com",
                Amount = 0m,
                Merchant = "Delta Airlines",
                Justification = "",
                SubmittedAt = "2026-06-12"
            },
            new {
                Id = "exp-003",
                Employee = "carol@example.com",
                Amount = 120.50m,
                Merchant = "",
                Justification = "Team lunch",
                SubmittedAt = "2026-06-14"
            }
        };

        var filtered = filter is null
            ? reports
            : reports.Where(r =>
                r.Merchant.Contains(filter, StringComparison.OrdinalIgnoreCase) ||
                r.Justification.Contains(filter, StringComparison.OrdinalIgnoreCase)).ToArray();

        return JsonSerializer.Serialize(filtered);
    }
}
Notice the Description attributes applied to the GetExpenseReports() method and its parameter. This is what the AI model will take into account to decide when to use this tool.
Also, notice that exp-002 has no amount or justification, and exp-003 has no merchant. Those gaps become important in part 3 of the series when the agent learns to detect them and email the employee.
Finally, you see that the class constructor expects the managerId parameter, whose value is assigned to the private variable _managerId. However, both are unused. Actually, they will be used in the next article to filter the data using FGA.
Building the Agent Service
Now let's implement a service that creates and manages the MAF agent. This service owns session serialization so the Blazor component doesn't have to think about it.
Create the ExpenseAgentService.cs file in the Agent folder with the following content:
// ExpenseAgent/Agent/ExpenseAgentService.cs

using Microsoft.Extensions.AI;
using System.ClientModel;
using System.Text.Json;
using Microsoft.Agents.AI;
using Microsoft.Extensions.Caching.Distributed;
using OpenAI;

namespace ExpenseAgent.Agent;

public class ExpenseAgentService
{
    private readonly IConfiguration _config;
    private readonly IDistributedCache _cache;
    private AIAgent? _agent;

    public ExpenseAgentService(IConfiguration config, IDistributedCache cache)
    {
        _config = config;
        _cache = cache;
    }

    private AIAgent GetOrCreateAgent(ExpenseAgentTools tools)
    {
        if (_agent is not null) return _agent;

        var apiKey = new ApiKeyCredential(_config["GitHubModels:Token"] ?? throw new InvalidOperationException("Missing configuration: GitHubModels:Token. See the README for details."));
        var model = _config["GitHubModels:Model"] ?? "openai/gpt-4o-mini";
        var openAIOptions = new OpenAIClientOptions()
        {
            Endpoint = new Uri("https://models.github.ai/inference")
        };

        var systemPrompt = """
            You are an expense approval assistant. You help managers review expense reports
            submitted by their direct reports. When asked, retrieve and summarize the reports.
            Be concise and professional. Address the manager by their first name when you know it.
            Format the expenses as an unordered list.
            """;

        IChatClient chatClient = new OpenAIClient(apiKey, openAIOptions)
            .GetChatClient(model)
            .AsIChatClient();

        _agent = chatClient.AsAIAgent(
            instructions: systemPrompt,
            name: "ExpenseAgent",
            tools: [AIFunctionFactory.Create(tools.GetExpenseReports)]);

        return _agent;
    }

    public async Task<string> ChatAsync(
        string userId,
        string userMessage,
        string? userName,
        ExpenseAgentTools tools)
    {
        var agent = GetOrCreateAgent(tools);

        var sessionKey = $"agent-session:{userId}";
        var serializedSession = await _cache.GetStringAsync(sessionKey);

        AgentSession session = serializedSession is not null
            ? await agent.DeserializeSessionAsync(JsonDocument.Parse(serializedSession).RootElement)
            : await agent.CreateSessionAsync();

        var response = await agent.RunAsync(userMessage, session);

        var serializedState = await agent.SerializeSessionAsync(session);
        await _cache.SetStringAsync(sessionKey, serializedState.GetRawText(),
            new DistributedCacheEntryOptions
            {
                SlidingExpiration = TimeSpan.FromHours(1)
            });

        return response.Text;
    }
}
Sessions live in the distributed cache keyed by user ID, so a manager's conversation survives across Blazor re-renders and even a server restart: swap AddDistributedMemoryCache() for Redis later and nothing else changes. Notice GetOrCreateAgent() takes tools as a parameter rather than a constructor dependency: that's what lets part 2 swap in manager-scoped tools without touching this method's signature.
Now, let's register the ExpenseAgentService and the distributed memory cache by adding the following lines to the Program.cs file:
// ExpenseAgent/Program.cs

using ExpenseAgent.Client.Pages;
using ExpenseAgent.Components;
using Auth0.AspNetCore.Authentication;
using Microsoft.AspNetCore.Authentication;
using Microsoft.AspNetCore.Authentication.Cookies;
using Microsoft.AspNetCore.Components.Authorization;
using ExpenseAgent.Agent;  //👈 new code

//...existing code...

//👇new code
builder.Services.AddDistributedMemoryCache();
builder.Services.AddScoped<ExpenseAgentService>();
//👆new code

builder.Services.AddHttpClient();

//...existing code...
Your agent service is ready.
Building the Chat Component
The chat UI is a Blazor component that renders server-interactively. It injects ExpenseAgentService directly. No HTTP controller layer needed, because the component runs on the server.
In the Components/Pages folder, create a Chat.razor component with the following code:
// ExpenseAgent/Components/Pages/Chat.razor

@page "/chat"
@attribute [Authorize]
@rendermode InteractiveServer

@using Microsoft.AspNetCore.Authorization
@using Microsoft.AspNetCore.Components.Authorization
@using ExpenseAgent.Agent

@inject ExpenseAgentService AgentService

<PageTitle>Expense Agent</PageTitle>

<h2>Expense Agent</h2>

<AuthorizeView>
    <Authorized Context="auth">
        <p class="text-muted">Logged in as <strong>@auth.User.Identity?.Name</strong></p>
    </Authorized>
</AuthorizeView>

<div class="card mb-3" style="height: 350px; overflow-y: auto; padding: 12px;">
    @foreach (var msg in _messages)
    {
        <p><strong>@msg.Role:</strong> @msg.Text</p>
    }
    @if (_thinking)
    {
        <p class="text-muted"><em>Agent is thinking...</em></p>
    }
</div>

<div class="input-group">
    <input class="form-control"
           @bind="_inputText"
           @bind:event="oninput"
           @onkeydown="HandleKeyDown"
           placeholder="Ask about expense reports..."
           disabled="@_thinking" />
    <button class="btn btn-primary" @onclick="SendMessage" disabled="@_thinking">Send</button>
</div>

@code {
    [CascadingParameter]
    private Task<AuthenticationState>? AuthState { get; set; }

    private readonly List<(string Role, string Text)> _messages = new();
    private string _inputText = "";
    private string? _userId;
    private string? _userName;
    private bool _thinking;

    protected override async Task OnInitializedAsync()
    {
        if (AuthState is not null)
        {
            var state = await AuthState;
            _userId = state.User.FindFirst(System.Security.Claims.ClaimTypes.NameIdentifier)?.Value;
            _userName = state.User.FindFirst("name")?.Value
                ?? state.User.FindFirst(System.Security.Claims.ClaimTypes.GivenName)?.Value;
        }
    }

    private async Task SendMessage()
    {
        var text = _inputText.Trim();
        if (string.IsNullOrEmpty(text) || _userId is null) return;

        _inputText = "";
        _messages.Add(("You", text));
        _thinking = true;

        try
        {
            var tools = new ExpenseAgentTools(_userId);
            var reply = await AgentService.ChatAsync(_userId, text, _userName, tools);
            _messages.Add(("Agent", reply));
        }
        finally
        {
            _thinking = false;
        }
    }

    private async Task HandleKeyDown(KeyboardEventArgs e)
    {
        if (e.Key == "Enter") await SendMessage();
    }
}
OnInitializedAsync() pulls the manager's Auth0 user ID and display name from the authentication state. Those are the two pieces of identity ChatAsync() needs on every turn.
@rendermode InteractiveServer activates the Blazor SignalR circuit for this component, enabling reactive UI updates like the "thinking" indicator.
The Authorize attribute redirects unauthenticated users to login before the component renders.
Updating Routes.razor
The template generates Components/Routes.razor. Make sure it uses AuthorizeRouteView so the Authorize attribute on the chat component takes effect:
@* ExpenseAgent/Components/Routes.razor *@

<Router AppAssembly="typeof(Program).Assembly" AdditionalAssemblies="new[] { typeof(Client._Imports).Assembly }" NotFoundPage="typeof(Pages.NotFound)">
    <Found Context="routeData">
        <AuthorizeRouteView RouteData="@routeData"
                            DefaultLayout="@typeof(Layout.MainLayout)" />
        <FocusOnNavigate RouteData="@routeData" Selector="h1" />
    </Found>
</Router>
Updating the Navigation
To keep things simple, we won't redesign the entire Blazor application user interface, which showcases the classic functionality of the Blazor templates. Instead, we will add a link to the chat page in Components/Layout/NavMenu.razor, as shown below:
@* ExpenseAgent/Components/Layout/NavMenu.razor *@

@* ...existing code... *@

<div class="nav-item px-3">
    <NavLink class="nav-link" href="chat">
        <span class="bi bi-chat-dots-fill" aria-hidden="true"></span> Chat
    </NavLink>
</div>

@* ...existing code... *@
Running the Application
Let's run the application you've created so far by typing the following command:
dotnet run
Navigate to the URL shown in your terminal (mine is https://localhost:7099). You'll see the app with a Login link in the navigation bar. Click it and you're redirected to Auth0's Universal Login page. After signing in, navigate to /chat.
Try asking: "Show me the pending expense reports."
The agent calls GetExpenseReports(), formats the three sample reports, and responds as shown in the following screenshot:
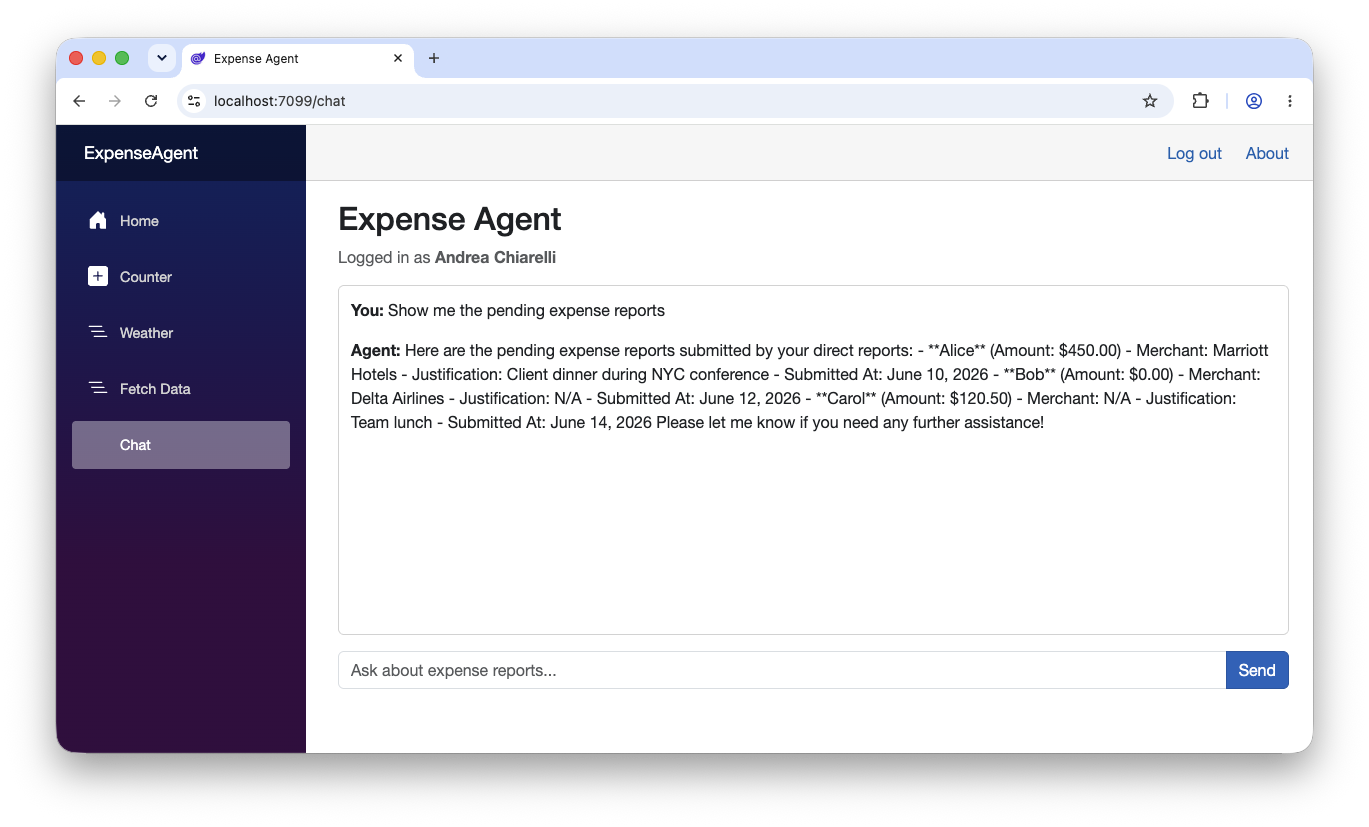
Again, to keep things simple, we're not taking care of the output format. We're just focusing on the core behavior: the interaction with the AI model and use of the tool.
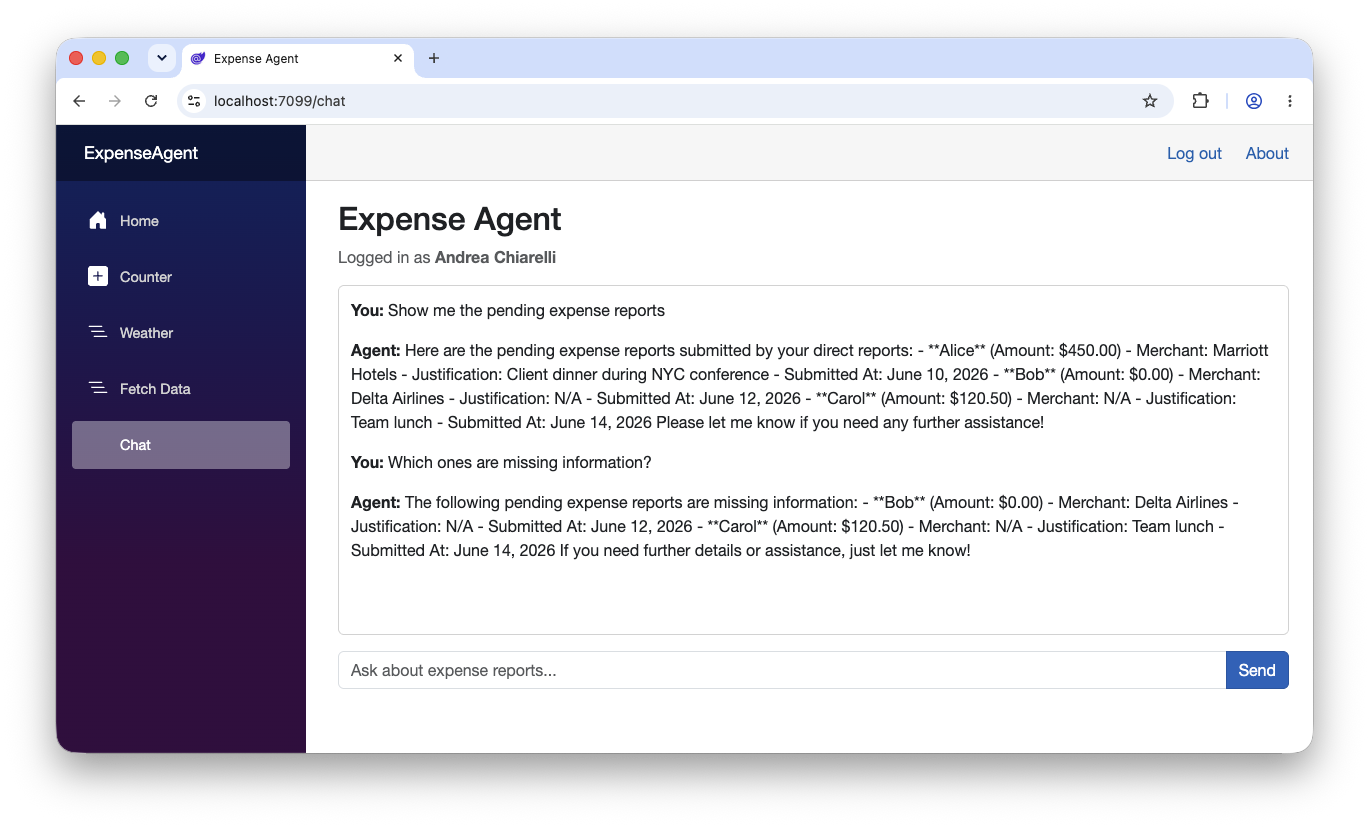
Ask a follow-up: "Which ones are missing information?"
Because the session persists across component renders, the agent knows what reports it just retrieved and can reason about them without another tool call. The output will seem like the one shown in the following image:
What the Agent Knows About the User
The agent knows two things about the logged-in manager:
- Their Auth0 user ID (the
subclaim, e.g.,auth0|64abc...): this identifier will be used to look up authorized data in part 2. - Their display name: it can be passed to the agent which can address them by name.
In part 2, the user ID becomes the key that Auth0 FGA uses to decide which expense reports this manager can see. The identity flows through the whole system, not just the login screen.
Where This Leaves Us
You now have a working AI expense agent that:
- Authenticates managers via Auth0, set up in minutes with the Auth0 .NET template
- Runs in a Blazor Web App with server-interactive rendering
- Maintains multi-turn conversation state across component re-renders
- Calls a tool to retrieve expense reports
The sample data is hardcoded, but in the next article you will store real expense reports in a vector database, write Auth0 FGA tuples that define which managers can see which expenses, and update the GetExpenseReports() tool to filter results before they reach the LLM.
About the author

Andrea Chiarelli
Principal Developer Advocate
I have over 20 years of experience as a software engineer and technical author. Throughout my career, I've used several programming languages and technologies for the projects I was involved in, ranging from C# to JavaScript, ASP.NET to Node.js, Angular to React, SOAP to REST APIs, etc.
In the last few years, I've been focusing on simplifying the developer experience with Identity and related topics, especially in the .NET ecosystem.