
TL;DR: CakePHP is a PHP framework that makes building web applications faster and simpler. It possesses a powerful scaffolding system that reduces development time when building simple or complex systems. Currently, CakePHP has over 7,000 stars on Github and a lot of organizations around the world use it to build great apps. In this tutorial, I'll show you how to build a web application with CakePHP and add authentication to it. Check out the repo to get the code.
CakePHP was developed by Larry Masters. It emerged around 2005 as the first-ever PHP MVC framework. CakePHP has grown and evolved over the past decade as a prominent and go-to PHP framework. It is currently being maintained by the CakePHP team. CakePHP ships with a lot of features out of the box, just like Laravel. These features include:
- A built-in ORM that combines the power of ActiveRecord and DataMapper patterns
- Caching
- Authentication
- Scaffolding
- Built-in Validation
In January, 2017, Oven was released by the CakePHP team. Oven is a tool for installing CakePHP without breaking a sweat. Recently, a few days ago to be precise, the CakePHP team tagged the latest release of the framework, CakePHP 3.4.7, otherwise known as Red Velvet. Tasty! It is a maintenance release for the 3.4 branch that fixes several issues submitted by developers. Checkout the changelog here.
Oven - The easiest way to install CakePHP pic.twitter.com/21ACYRzfov
— Larry E. Masters (@PhpNut) January 13, 2017
We have officially released Oven for #CakePHP You can get it here. https://t.co/VNpyrgtbnx Please let us know how you like it. pic.twitter.com/nCalCwFEYO
— Larry E. Masters (@PhpNut) January 16, 2017
CakePHP also comes with a set of conventions to guide you in developing your application. It adopts the popular mantra that the Rails community is known for, Convention over Configuration.
“Oven is a tool for installing CakePHP without breaking a sweat”
Tweet This
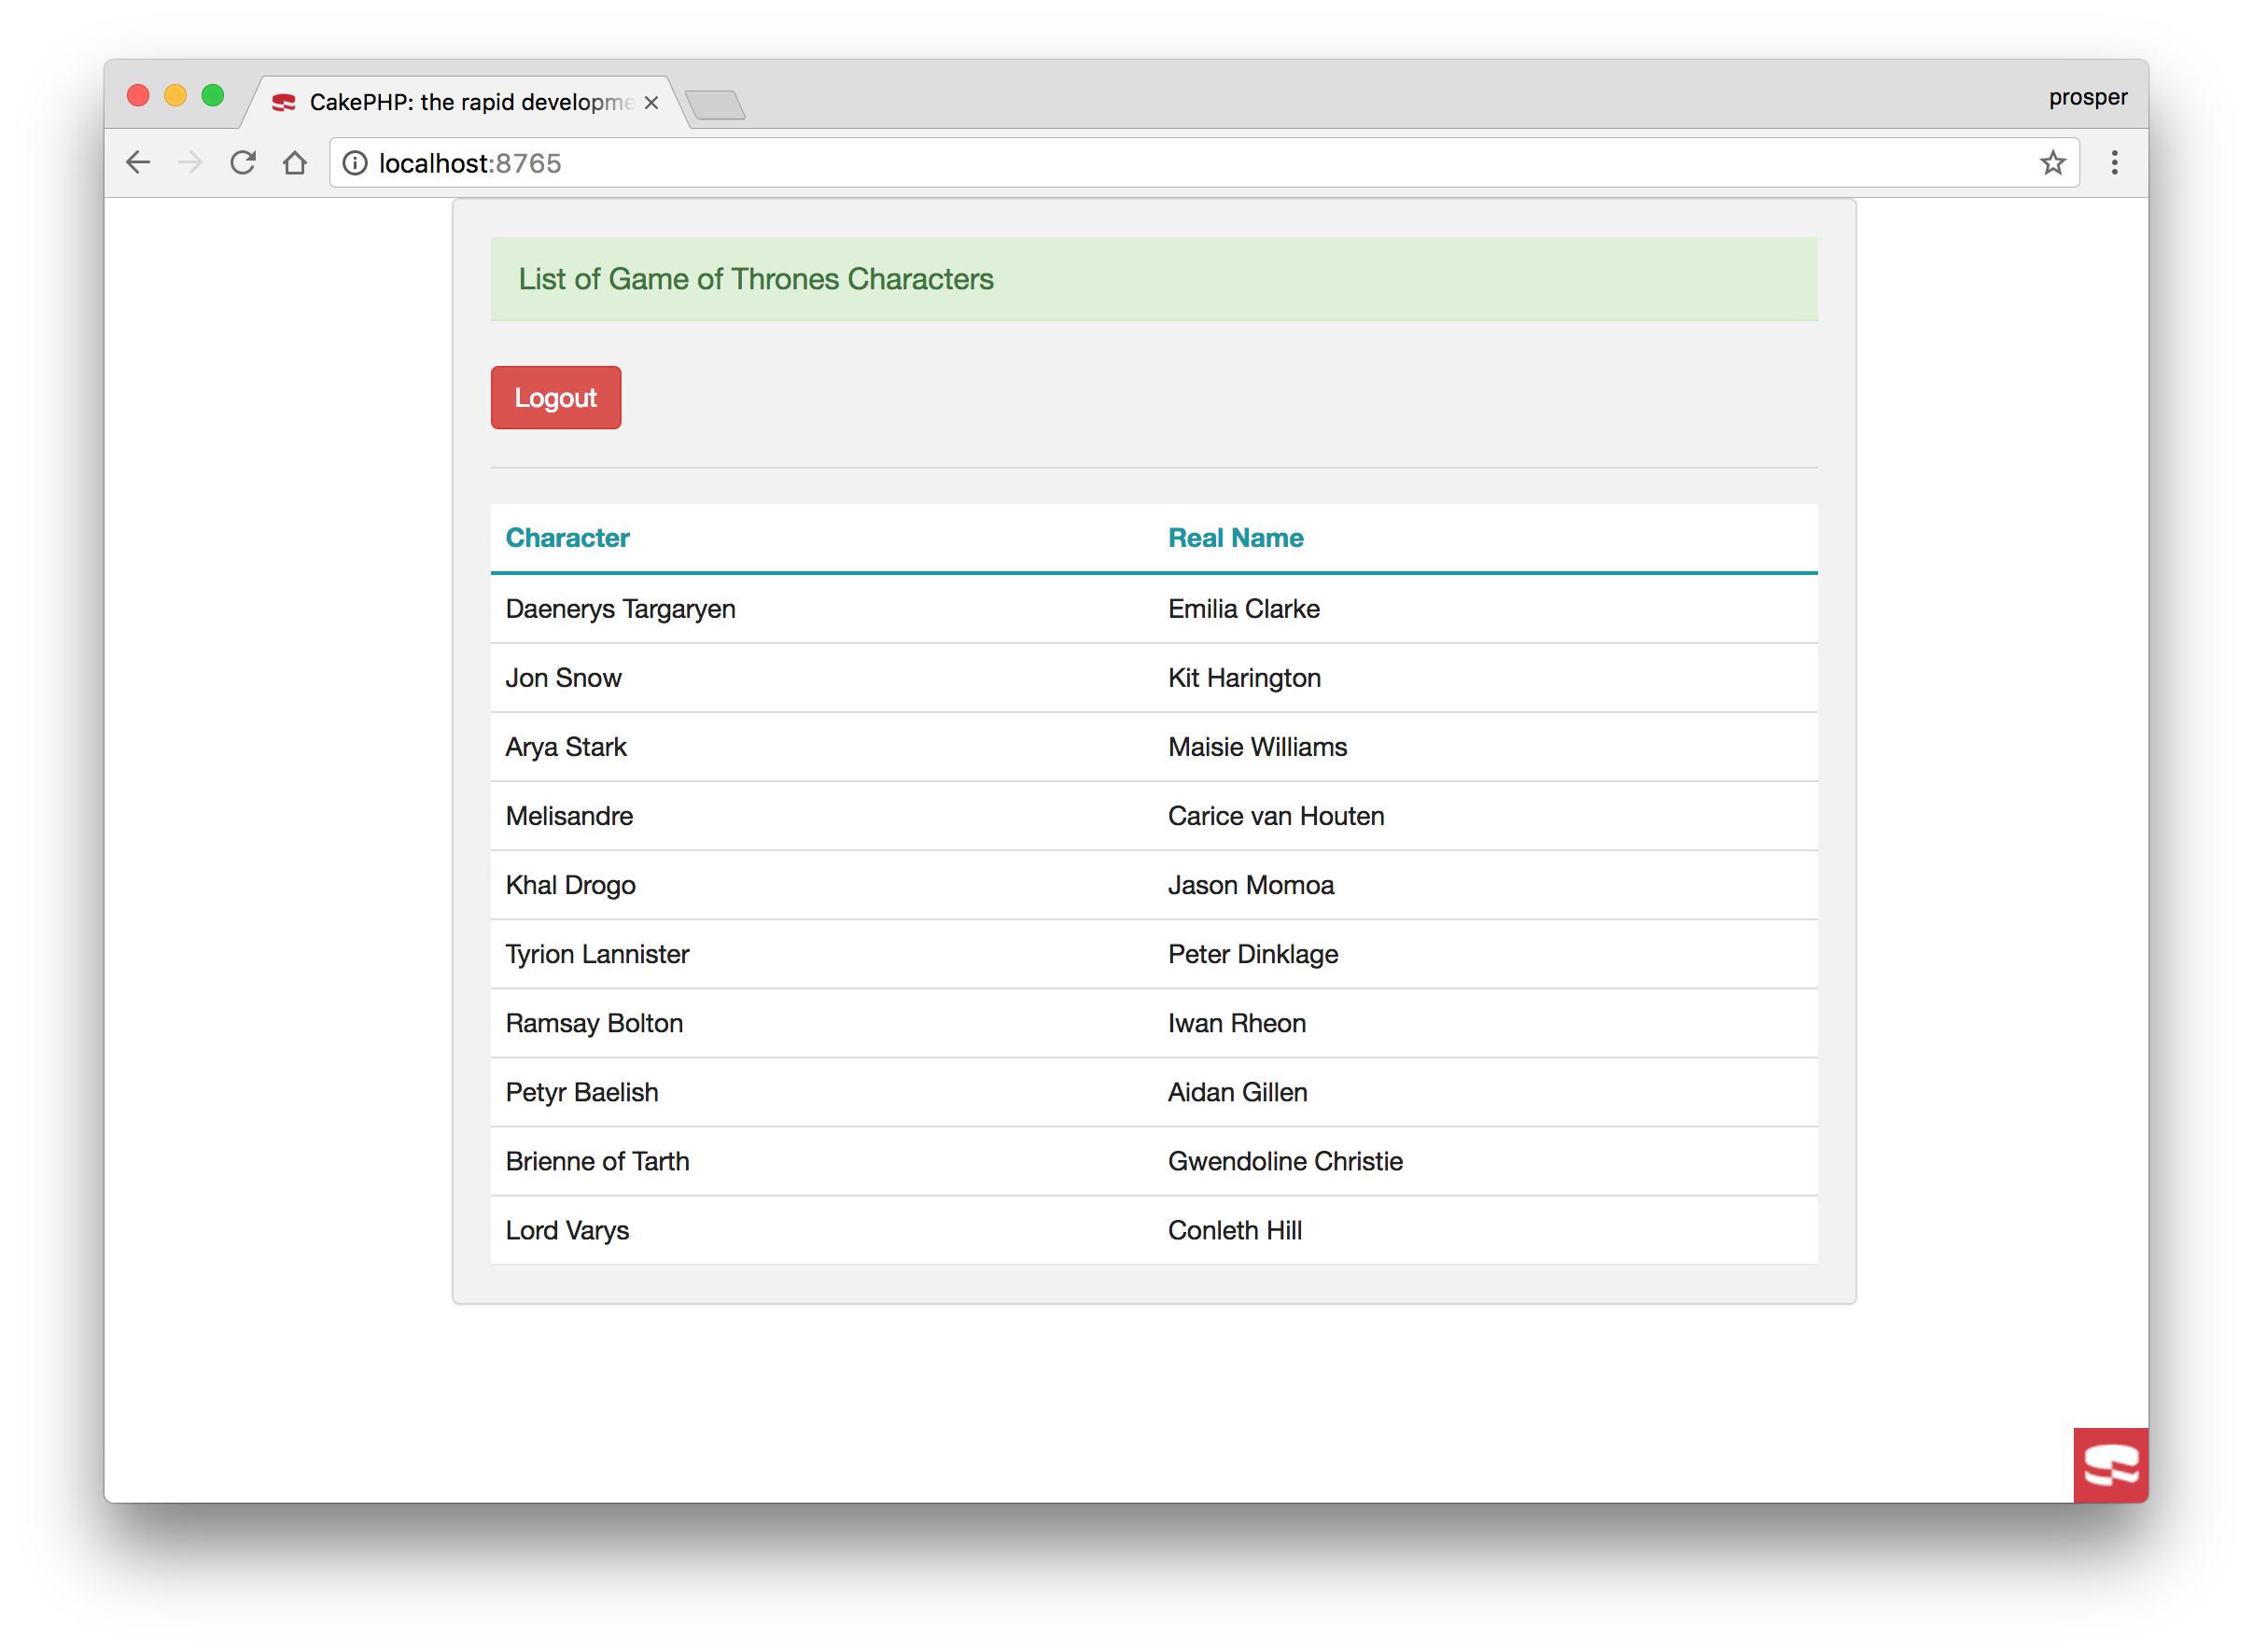
We'll be building a simple character listing app with CakePHP 3.4. Our app will simply list 10 Game of Thrones characters and their real names. Once we add authentication to the app, all logged-in users will have the privilege of knowing these celebrity characters personally.
Let's get started
CakePHP utilizes Composer to manage its dependencies. So, before using CakePHP, make sure you have Composer installed on your machine. We can install CakePHP by issuing the Composer create-project command in your terminal:
composer create-project --prefer-dist cakephp/app got
or simply use Oven. In this tutorial, we'll use composer so that we can all get along easily. So go ahead and run the command above.
During the install, you might come across this error message:
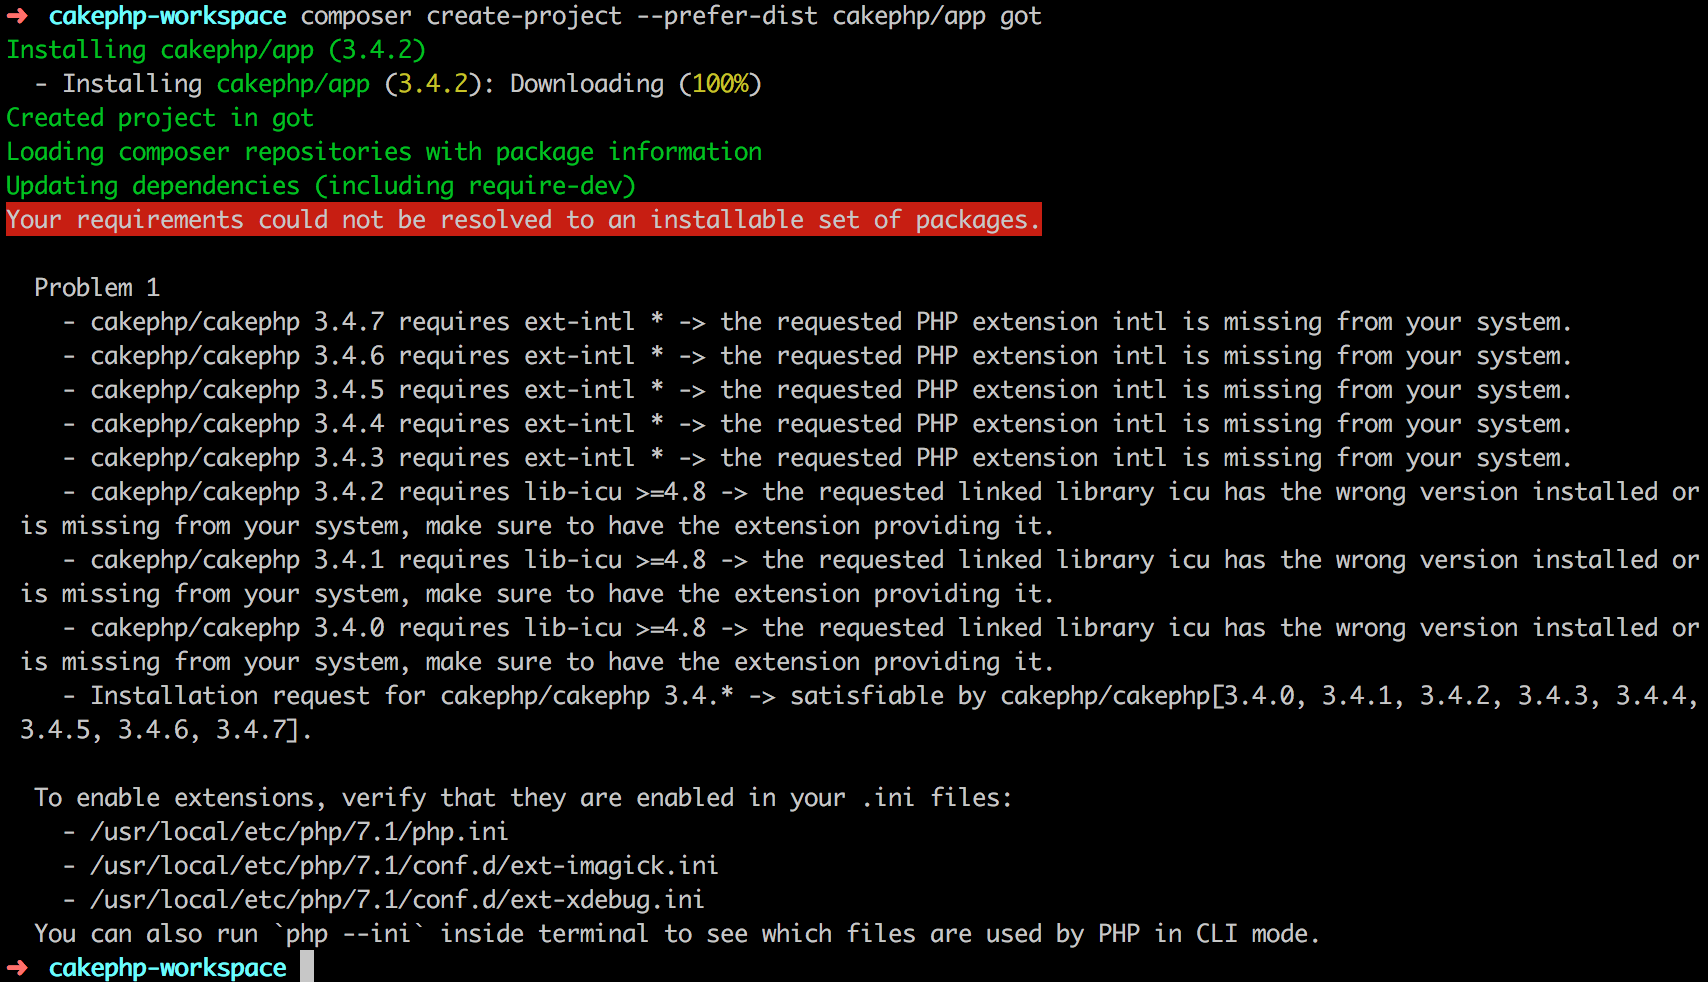
Fear not! You simply need to enable the intl PHP extension in your PHP configuration.
As a Mac user like me, you can:
- Install the
intlextension via homebrew:brew install php71-intl. If you are uing a lesser version of PHP like 5.6, then it will bebrew install php56-intl. - Restart apache
sudo apachectl restart.
As a Linux user, you can:
- Install the intl extension:
sudo apt-get install php71-intl. Usesudo yum install php71-intlif you are on CentOS or Fedora. - Restart apache:
sudo service apache2 restart.
As a Window & Xampp user, you can:
- Open your
php.inifile and change;extension=php_intl.dlltoextension=php_intl.dll - Copy all the
xampp/php/ic*.dllfiles toxampp/apache/bin. - Restart Apache server
Let's check out the directory structure of our newly scaffolded project, got .
Explore Directory Structure
CakePHP applications follow the Model-View-Controller architecture pattern.
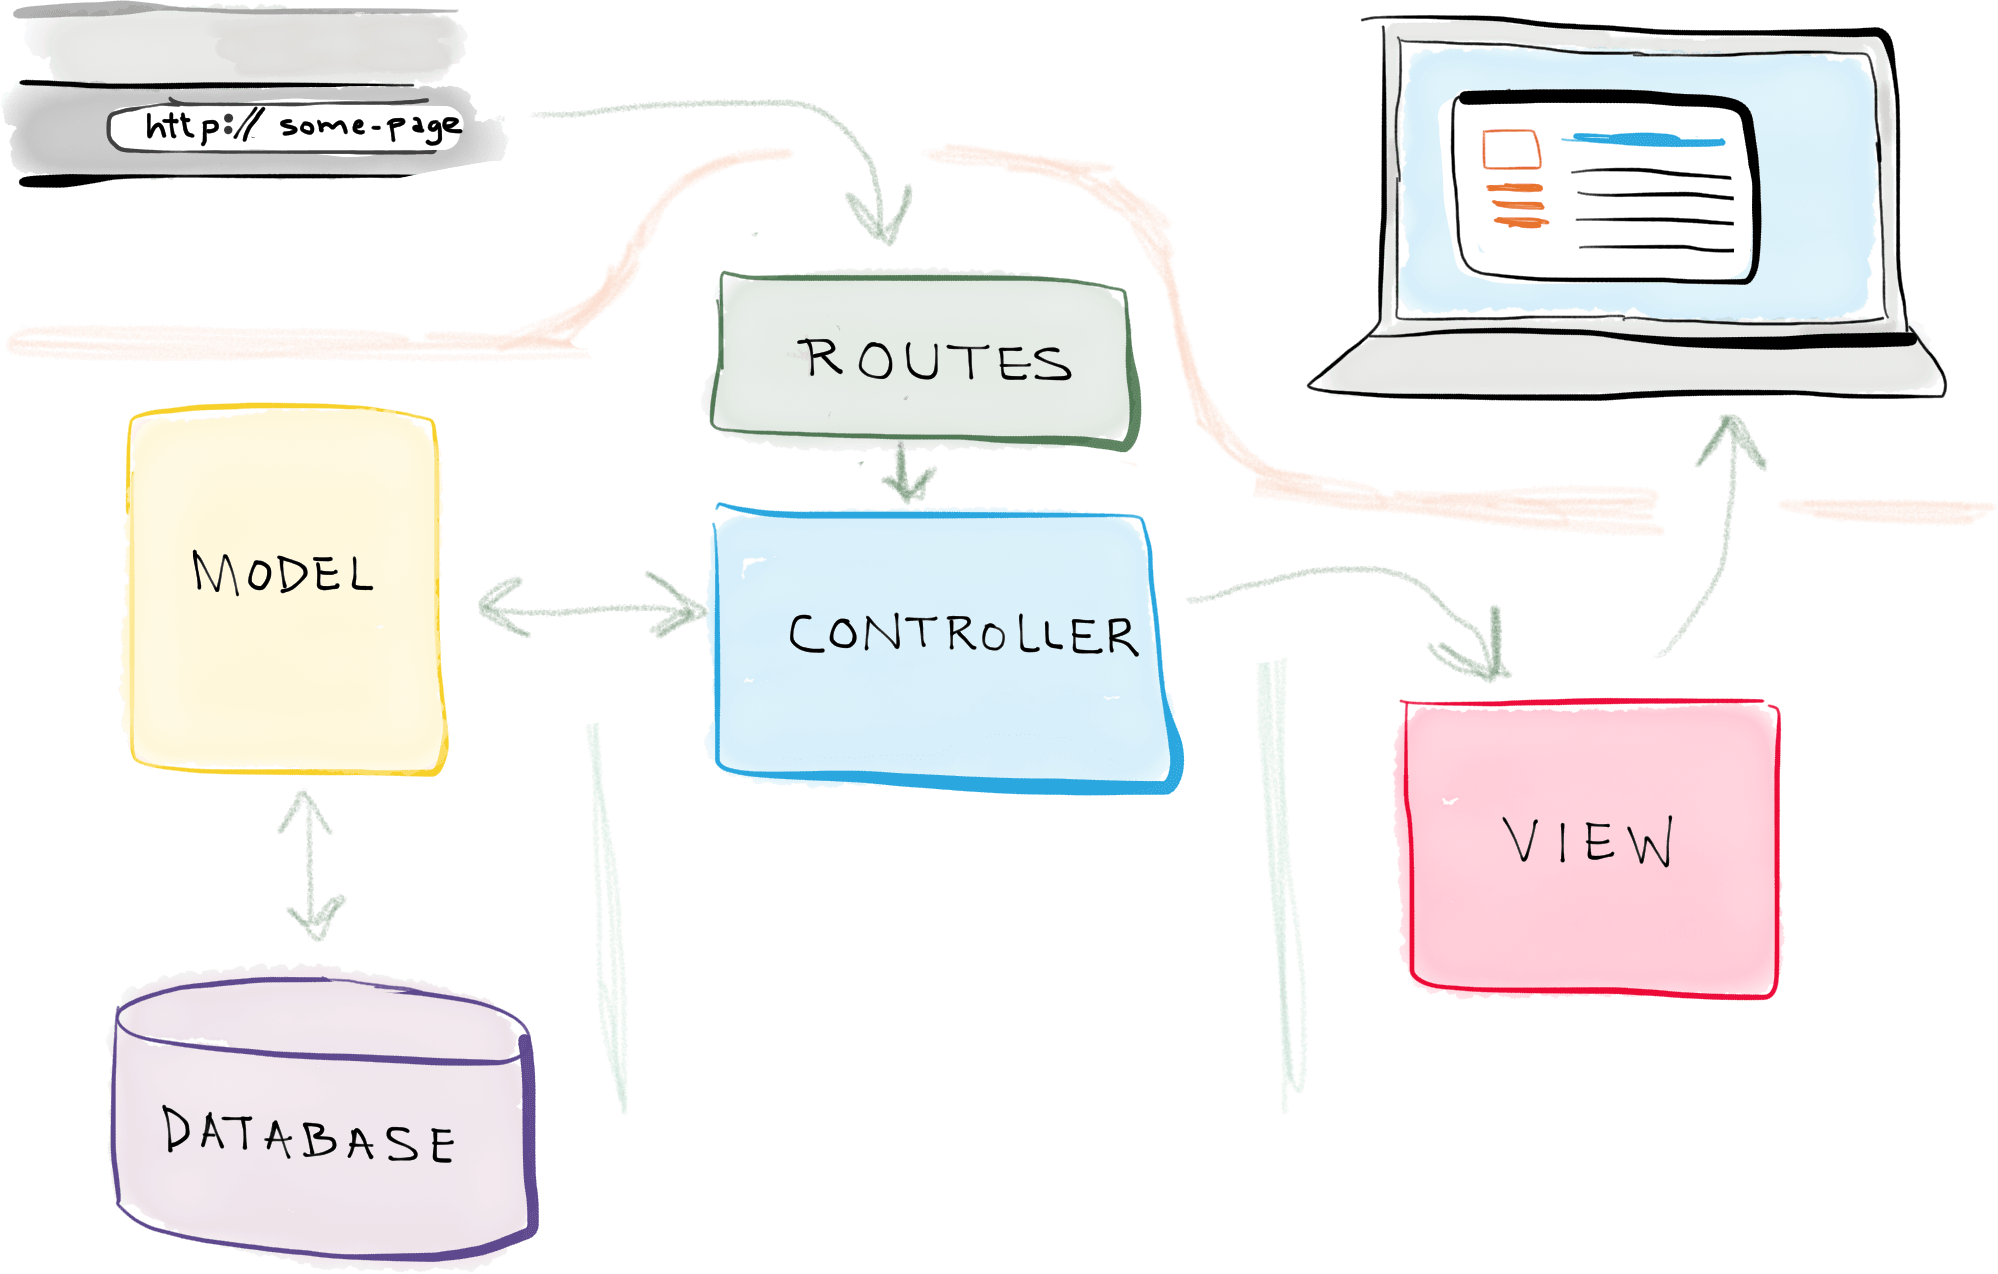
(Source: Self Taught Coders)
In a nutshell,
- Models query your database and return the necessary data.
- Views are pages that render data
- Controllers handle user requests, retrieve data from the Models and pass them into the views.
Read more about MVC here.
Let's checkout the directory structure of our CakePHP app. It contains the following directories and files:
bin- contains all the CakePHP console executables.config- contains the configuration files CakePHP uses.logs- contains your application log files.plugins- contains your application plugins.src- contains your controllers, models, templates and viewstests- contains all your test filestmp- temporary data is stored here. It also houses session information.vendor- contains the application dependencies. All the packages installed via composer.json reside here.webroot- contains all the files you want to be publicly accessible..htaccesscomposer.json- composer file that houses the list and versions of PHP packages that your application depends on.composer.lock- composer file that locks down specific versions of installed PHP packages.index.php
Setting Up The Controller
Open up your terminal and run the command below to create a ListController.
bin/cake bake controller List
The bake command generates a new controller with the index, view, add, edit and delete methods.
Open up src/controller/ListController.php and configure it like so:
<?php
namespace App\Controller;

use App\Controller\AppController;

class ListController extends AppController
{
    public function index()
    {
       $characters = [
         'Daenerys Targaryen' => 'Emilia Clarke',
         'Jon Snow'           => 'Kit Harington',
         'Arya Stark'         => 'Maisie Williams',
         'Melisandre'         => 'Carice van Houten',
         'Khal Drogo'         => 'Jason Momoa',
         'Tyrion Lannister'   => 'Peter Dinklage',
         'Ramsay Bolton'      => 'Iwan Rheon',
         'Petyr Baelish'      => 'Aidan Gillen',
         'Brienne of Tarth'   => 'Gwendoline Christie',
         'Lord Varys'         => 'Conleth Hill'
       ];

        $this->set(compact('characters'));
    }
}
Delete all other methods. We don't need it in this application.
$this->set(compact('characters')) indicates that the characters variable has been assigned to the view using the set method. It will hand down the query object collection to the view to be invoked with a foreach iteration. Let's create the view that will handle this controller.
Setting Up The View
CakePHP views are just presentation-flavored fragments that fit inside an application’s layout. For most applications, they’re HTML mixed with PHP, but they may end up as XML, CSV, or even binary data.
CakePHP’s template files are stored in src/Template inside a folder named after the controller they correspond to (we’ll have to create a folder named ‘List’ in this case). Go ahead and create a List folder in src/Template directory. Next, create an index.ctp file and add this to it:
<div class="container">
    <div class="row">
        <div class="col-md-10 col-md-offset-1">
            <div class="panel panel-success">
                <div class="panel-heading">List of Game of Thrones Characters</div>
                  <!-- Table -->
                  <table class="table">
                      <tr>
                          <th>Character</th>
                          <th>Real Name</th>
                      </tr>
                      <?php foreach($characters as $key => $value): ?>
                        <tr>
                          <td><?= $key ?></td><td><?= $value ?></td>
                        </tr>
                      <?php endforeach; ?>
                  </table>
            </div>
        </div>
    </div>
</div>
index.ctp
Go ahead and create a Users folder also in src/Template directory. Create an add.ctp and login.ctp file. The add.ctp file is the view for registering new users. The login.ctpis the view for users to log in.
Add this code in the add.ctp file:
<div class="users form">
<?= $this->Form->create($user) ?>
    <fieldset>
        <legend><?= __('Add User') ?></legend>
        <?= $this->Form->control('emailaddress', ['type' => 'email']) ?>
        <?= $this->Form->control('password') ?>
   </fieldset>
<?= $this->Form->button(__('Submit')); ?>
<?= $this->Form->end() ?>
</div>
add.ctp
The $this->Form->control is a CakePHP Form Helper.
Add this code in the login.ctp file:
<div class="users form">
  <?= $this->Flash->render() ?>
  <?= $this->Form->create() ?>
      <fieldset>
          <legend><?= __('Please enter your email address and password') ?></legend>
          <?= $this->Form->control('emailaddress', ['type' => 'email']) ?>
          <?= $this->Form->control('password') ?>
      </fieldset>
  <?= $this->Form->button(__('Login'), ['class' => 'btn btn-info']); ?>
  <?= $this->Form->end() ?>
</div>
login.ctp
One more thing. We need to pull in bootstrap to beautify our views. Go ahead and open up src/Template/Layout/default.ctp file.
The default file can be said to be the default master layout file for a CakePHP application.
In the <head> section, you will notice these two lines of code:
<?= $this->Html->css('base.css') ?>
<?= $this->Html->css('cake.css') ?>
Add the link to bootstrap just above these lines of code:
...
<link rel="stylesheet" href="https://cdnjs.cloudflare.com/ajax/libs/twitter-bootstrap/3.3.6/css/bootstrap.min.css" integrity="sha384-1q8mTJOASx8j1Au+a5WDVnPi2lkFfwwEAa8hDDdjZlpLegxhjVME1fgjWPGmkzs7" crossorigin="anonymous">


<?= $this->Html->css('base.css') ?>
<?= $this->Html->css('cake.css') ?>
...
Scroll down a bit into the <body> section and comment out the nav section. We really do not need it.
Setting Up The Routes
Open up config/routes.php and configure it like so:
...
...
Router::scope('/', function (RouteBuilder $routes) {
    /**
     * Here, we are connecting '/' (base path) to a controller called 'Pages',
     * its action called 'display', and we pass a param to select the view file
     * to use (in this case, src/Template/Pages/home.ctp)...
     */

    $routes->connect('/', ['controller' => 'List', 'action' => 'index']);

    /**
     * Connect catchall routes for all controllers.
     *
     * Using the argument `DashedRoute`, the `fallbacks` method is a shortcut for
     *    `$routes->connect('/:controller', ['action' => 'index'], ['routeClass' => 'DashedRoute']);`
     *    `$routes->connect('/:controller/:action/*', [], ['routeClass' => 'DashedRoute']);`
     *
     * Any route class can be used with this method, such as:
     * - DashedRoute
     * - InflectedRoute
     * - Route
     * - Or your own route class
     *
     * You can remove these routes once you've connected the
     * routes you want in your application.
     */
    $routes->fallbacks(DashedRoute::class);
});
...
...
Delete the pages route. We don't need it.
Once a request hits the / route, it invokes the index method of the ListController and renders the returned value in the index view of the List template directory.
Configuring the database
This application will require some info about users to be stored in the database since we intend to set up authentication. We'll set up the underlying MySQL database for our Game of Thrones app.
Open up config/app file, and scroll down to the DataSources key. Put in the username and password for accessing your MySQL database. Also, create a database called got and reference the name here:
...
...
  /**
     * Connection information used by the ORM to connect
     * to your application's datastores.
     * Do not use periods in database name - it may lead to error.
     * See https://github.com/cakephp/cakephp/issues/6471 for details.
     * Drivers include Mysql Postgres Sqlite Sqlserver
     * See vendor\cakephp\cakephp\src\Database\Driver for complete list
     */
    'Datasources' => [
        'default' => [
            'className' => 'Cake\Database\Connection',
            'driver' => 'Cake\Database\Driver\Mysql',
            'persistent' => false,
            'host' => 'localhost',
            /**
             * CakePHP will use the default DB port based on the driver selected
             * MySQL on MAMP uses port 8889, MAMP users will want to uncomment
             * the following line and set the port accordingly
             */
            //'port' => 'non_standard_port_number',
            'username' => 'root',
            'password' => '',
            'database' => 'got',
            'encoding' => 'utf8',
            'timezone' => 'UTC',
            'flags' => [],
            'cacheMetadata' => true,
            'log' => false,

            /**
             * Set identifier quoting to true if you are using reserved words or
             * special characters in your table or column names. Enabling this
             * setting will result in queries built using the Query Builder having
             * identifiers quoted when creating SQL. It should be noted that this
             * decreases performance because each query needs to be traversed and
             * manipulated before being executed.
             */
            'quoteIdentifiers' => false,

            /**
             * During development, if using MySQL < 5.6, uncommenting the
             * following line could boost the speed at which schema metadata is
             * fetched from the database. It can also be set directly with the
             * mysql configuration directive 'innodb_stats_on_metadata = 0'
             * which is the recommended value in production environments
             */
            //'init' => ['SET GLOBAL innodb_stats_on_metadata = 0'],

            'url' => env('DATABASE_URL', null),
        ],
...
...
You can check if you are connected to the database by simply checking the default landing page that was shipped with the CakePHP installation:

Mac Users can use SequelPro to manager their database.
Note: You would have to refactor the route code to point back to the Pages controller.
Setting Up Authentication
Authentication is the process of identifying users by provided credentials and ensuring that users are who they say they are. Let's set it up in our app. CakePHP provides different ways of authenticating users in your app:
- FormAuthenticate
- User authentication via form POST data.
- BasicAuthenticate
- User authentication via Basic HTTP authentication.
- DigestAuthenticate
- User authentication via Digest HTTP authentication.
In our app, we'll use FormAuthenticate. Thankfully, CakePHP's AuthComponent supports it by default.
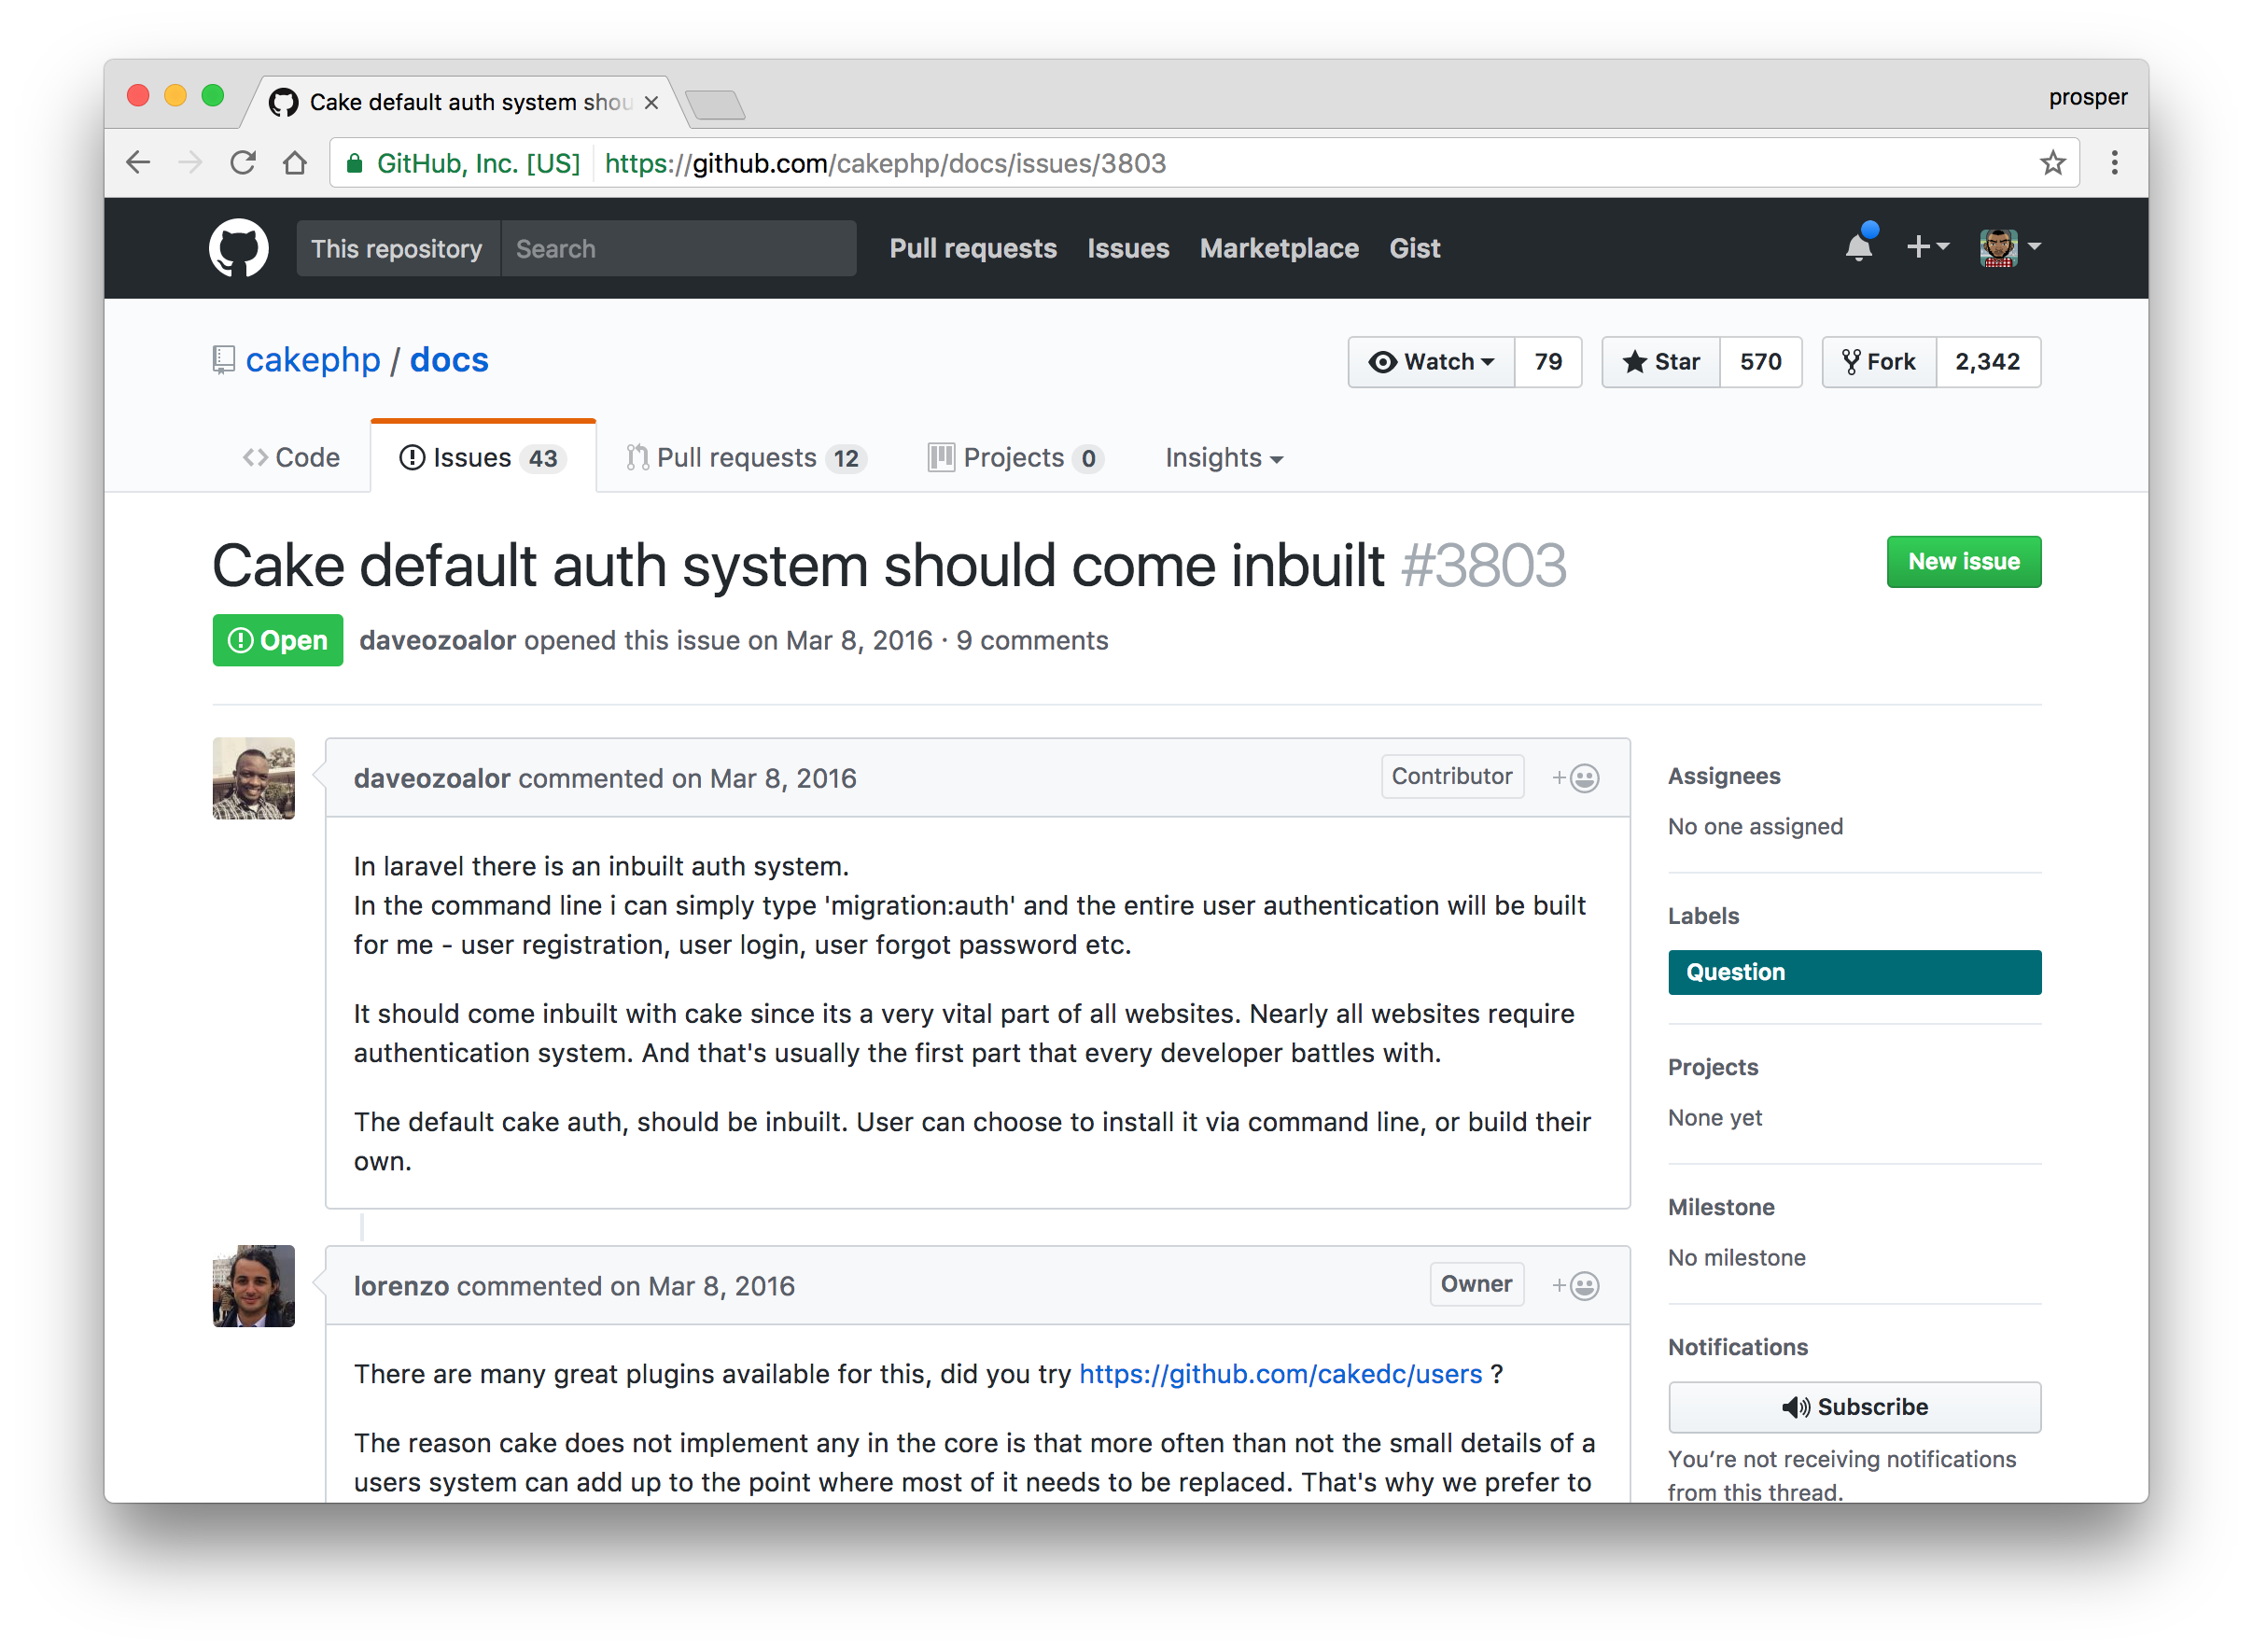
CakePHP doesn't have a full-fledged built-in auth system like Laravel. So, a developer has the option of using the AuthComponent and then configuring it with forms, views, controllers and models or pulling in ready made full-fledged auth plugins like the ones listed in Friends of Cake GitHub repository.
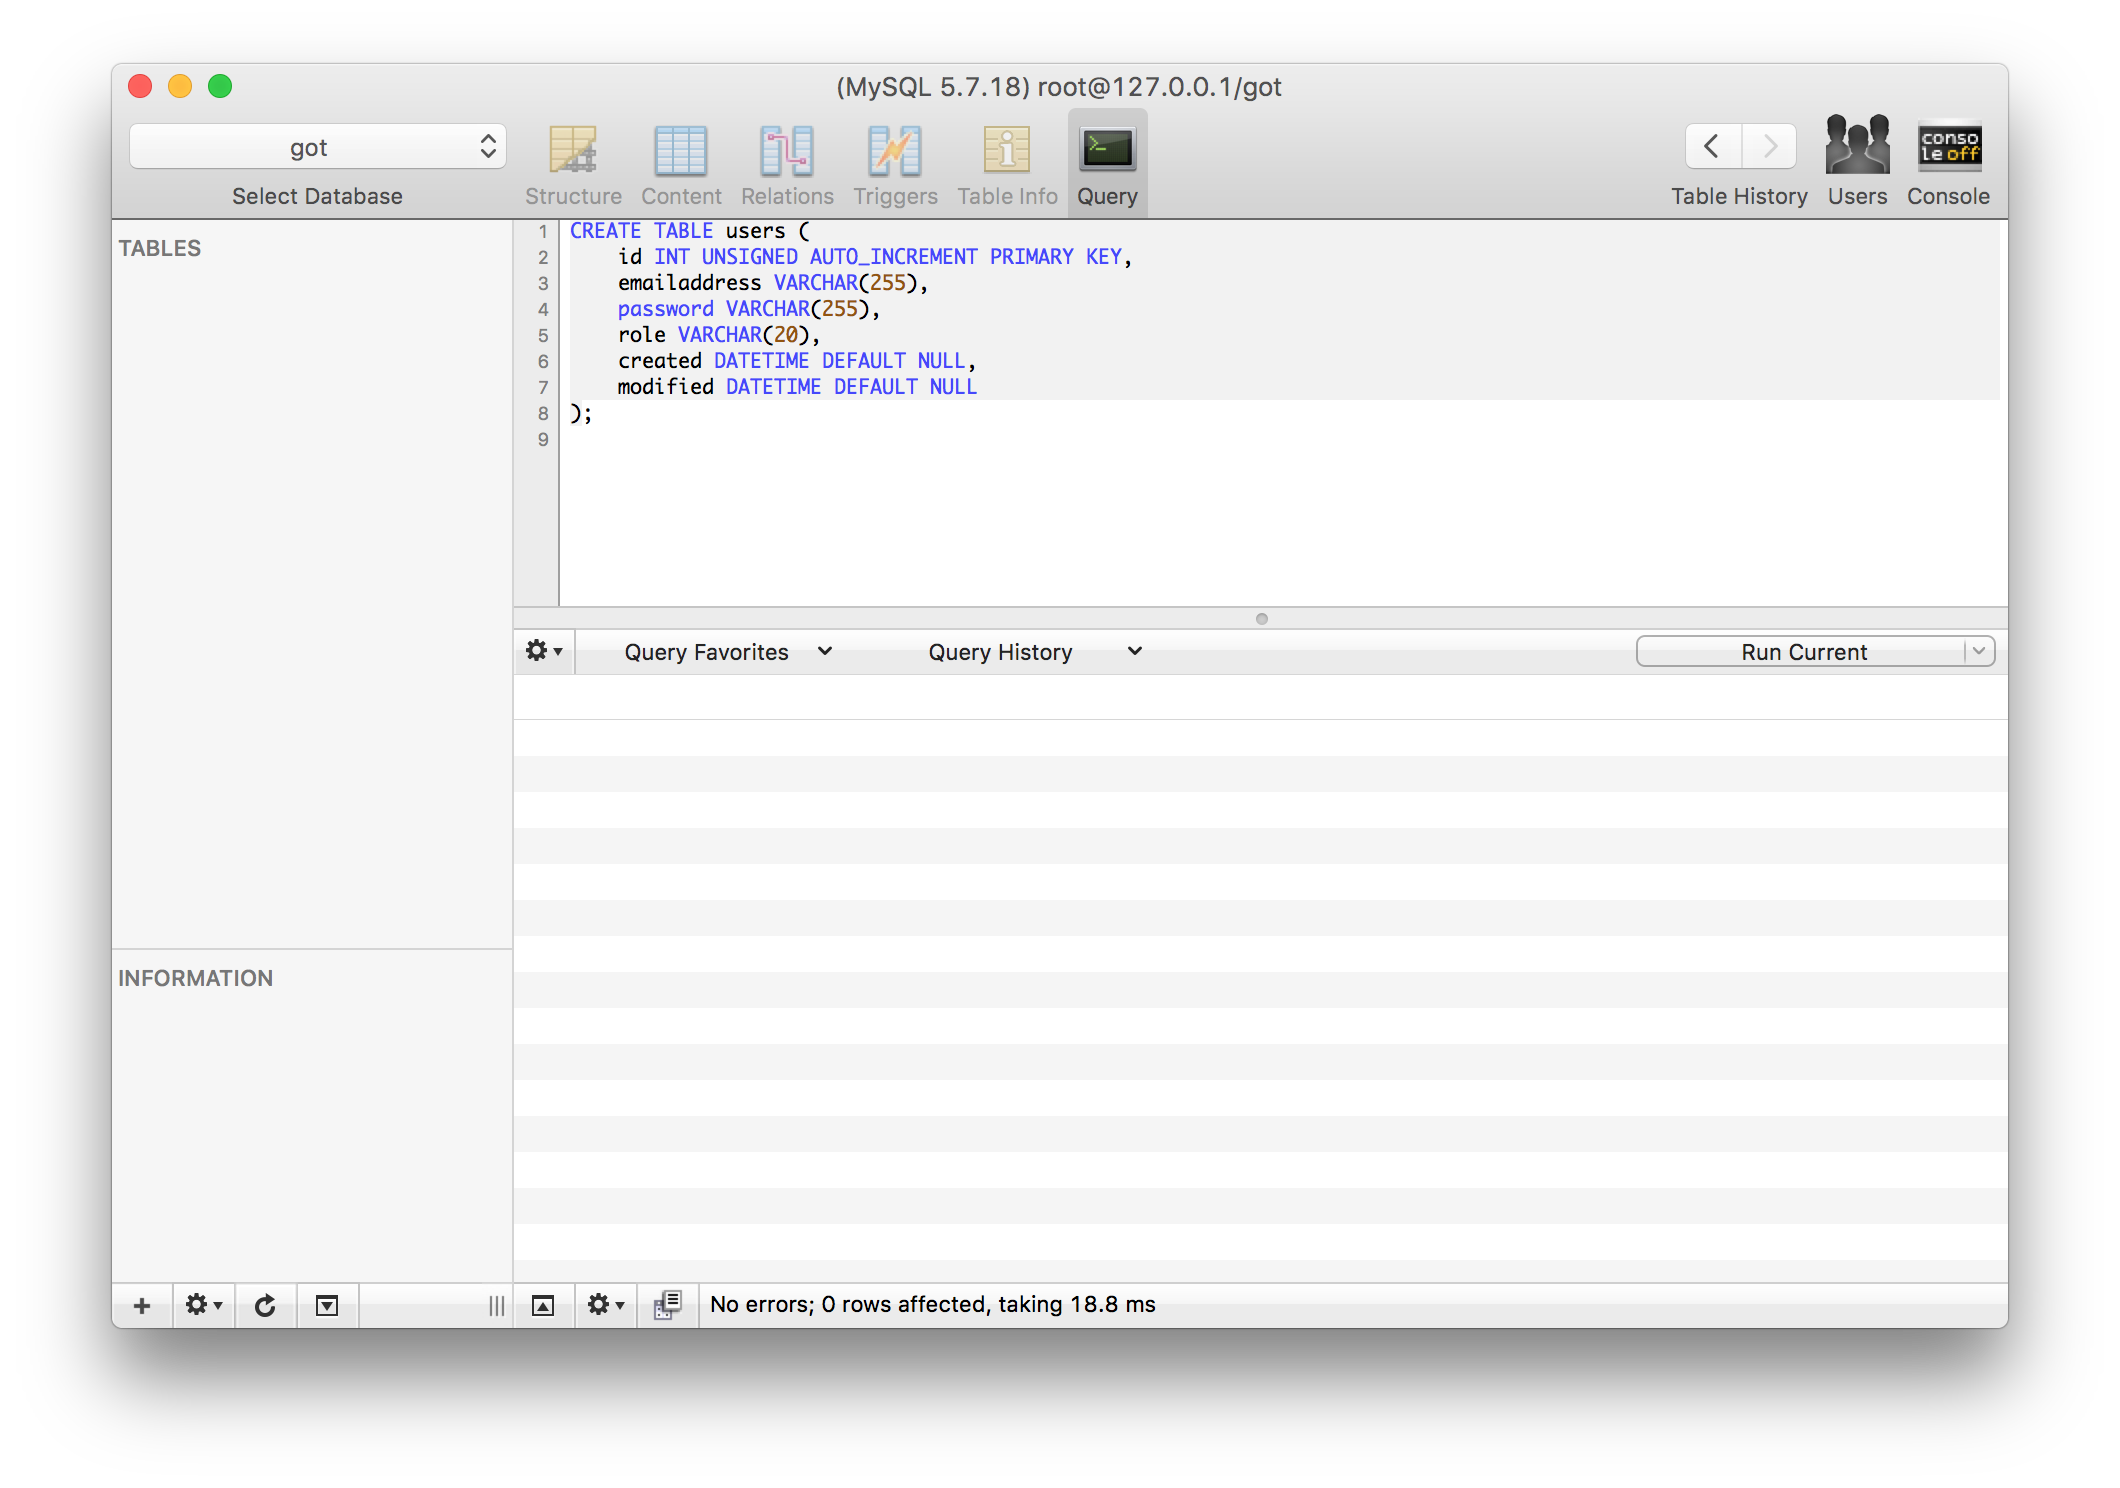
Go ahead and create the users table in the database:
CREATE TABLE users (
    id INT UNSIGNED AUTO_INCREMENT PRIMARY KEY,
    emailaddress VARCHAR(255),
    password VARCHAR(255),
    role VARCHAR(20),
    created DATETIME DEFAULT NULL,
    modified DATETIME DEFAULT NULL
);
It is advisable to use a tool like PHPMyAdmin or SequelPro, so that you can just paste the query in the tool and run it rather than using the command line.
The next step is to create our UsersTable class. Open up src/Model/Tables directory and create a file, UsersTable.php. Now add this code to it:
<?php

namespace App\Model\Table;

use Cake\ORM\Table;
use Cake\Validation\Validator;

class UsersTable extends Table
{

    public function validationDefault(Validator $validator)
    {
        return $validator
            ->notEmpty('emailaddress', 'An email address is required')
            ->notEmpty('password', 'A password is required');
    }

}
Next, create the UsersController using the bake command:
bin/cake bake controller Users
Now, open your controller file and delete every method except add, beforeFilter, login and logout.
We need to modify some of the methods in our UsersController.
The add method is responsible for adding/saving a new user. So go ahead and modify to look like this:
add
 /**
     * Add method
     *
     * @return \Cake\Http\Response|null Redirects on successful add, renders view otherwise.
     */
    public function add()
    {
        $user = $this->Users->newEntity();
        if ($this->request->is('post')) {
            $user = $this->Users->patchEntity($user, $this->request->getData());
            if ($this->Users->save($user)) {
                $this->Flash->success(__('The user has been saved.'));

                return $this->redirect(['controller' => 'list', 'action' => 'index']);
            }
            $this->Flash->error(__('The user could not be saved. Please, try again.'));
        }
        $this->set(compact('user'));
        $this->set('_serialize', ['user']);
    }
In the code above, a check is done to ensure it is a POST request coming in. The user data is also obtained from the request and saved using the User Entity class.
login
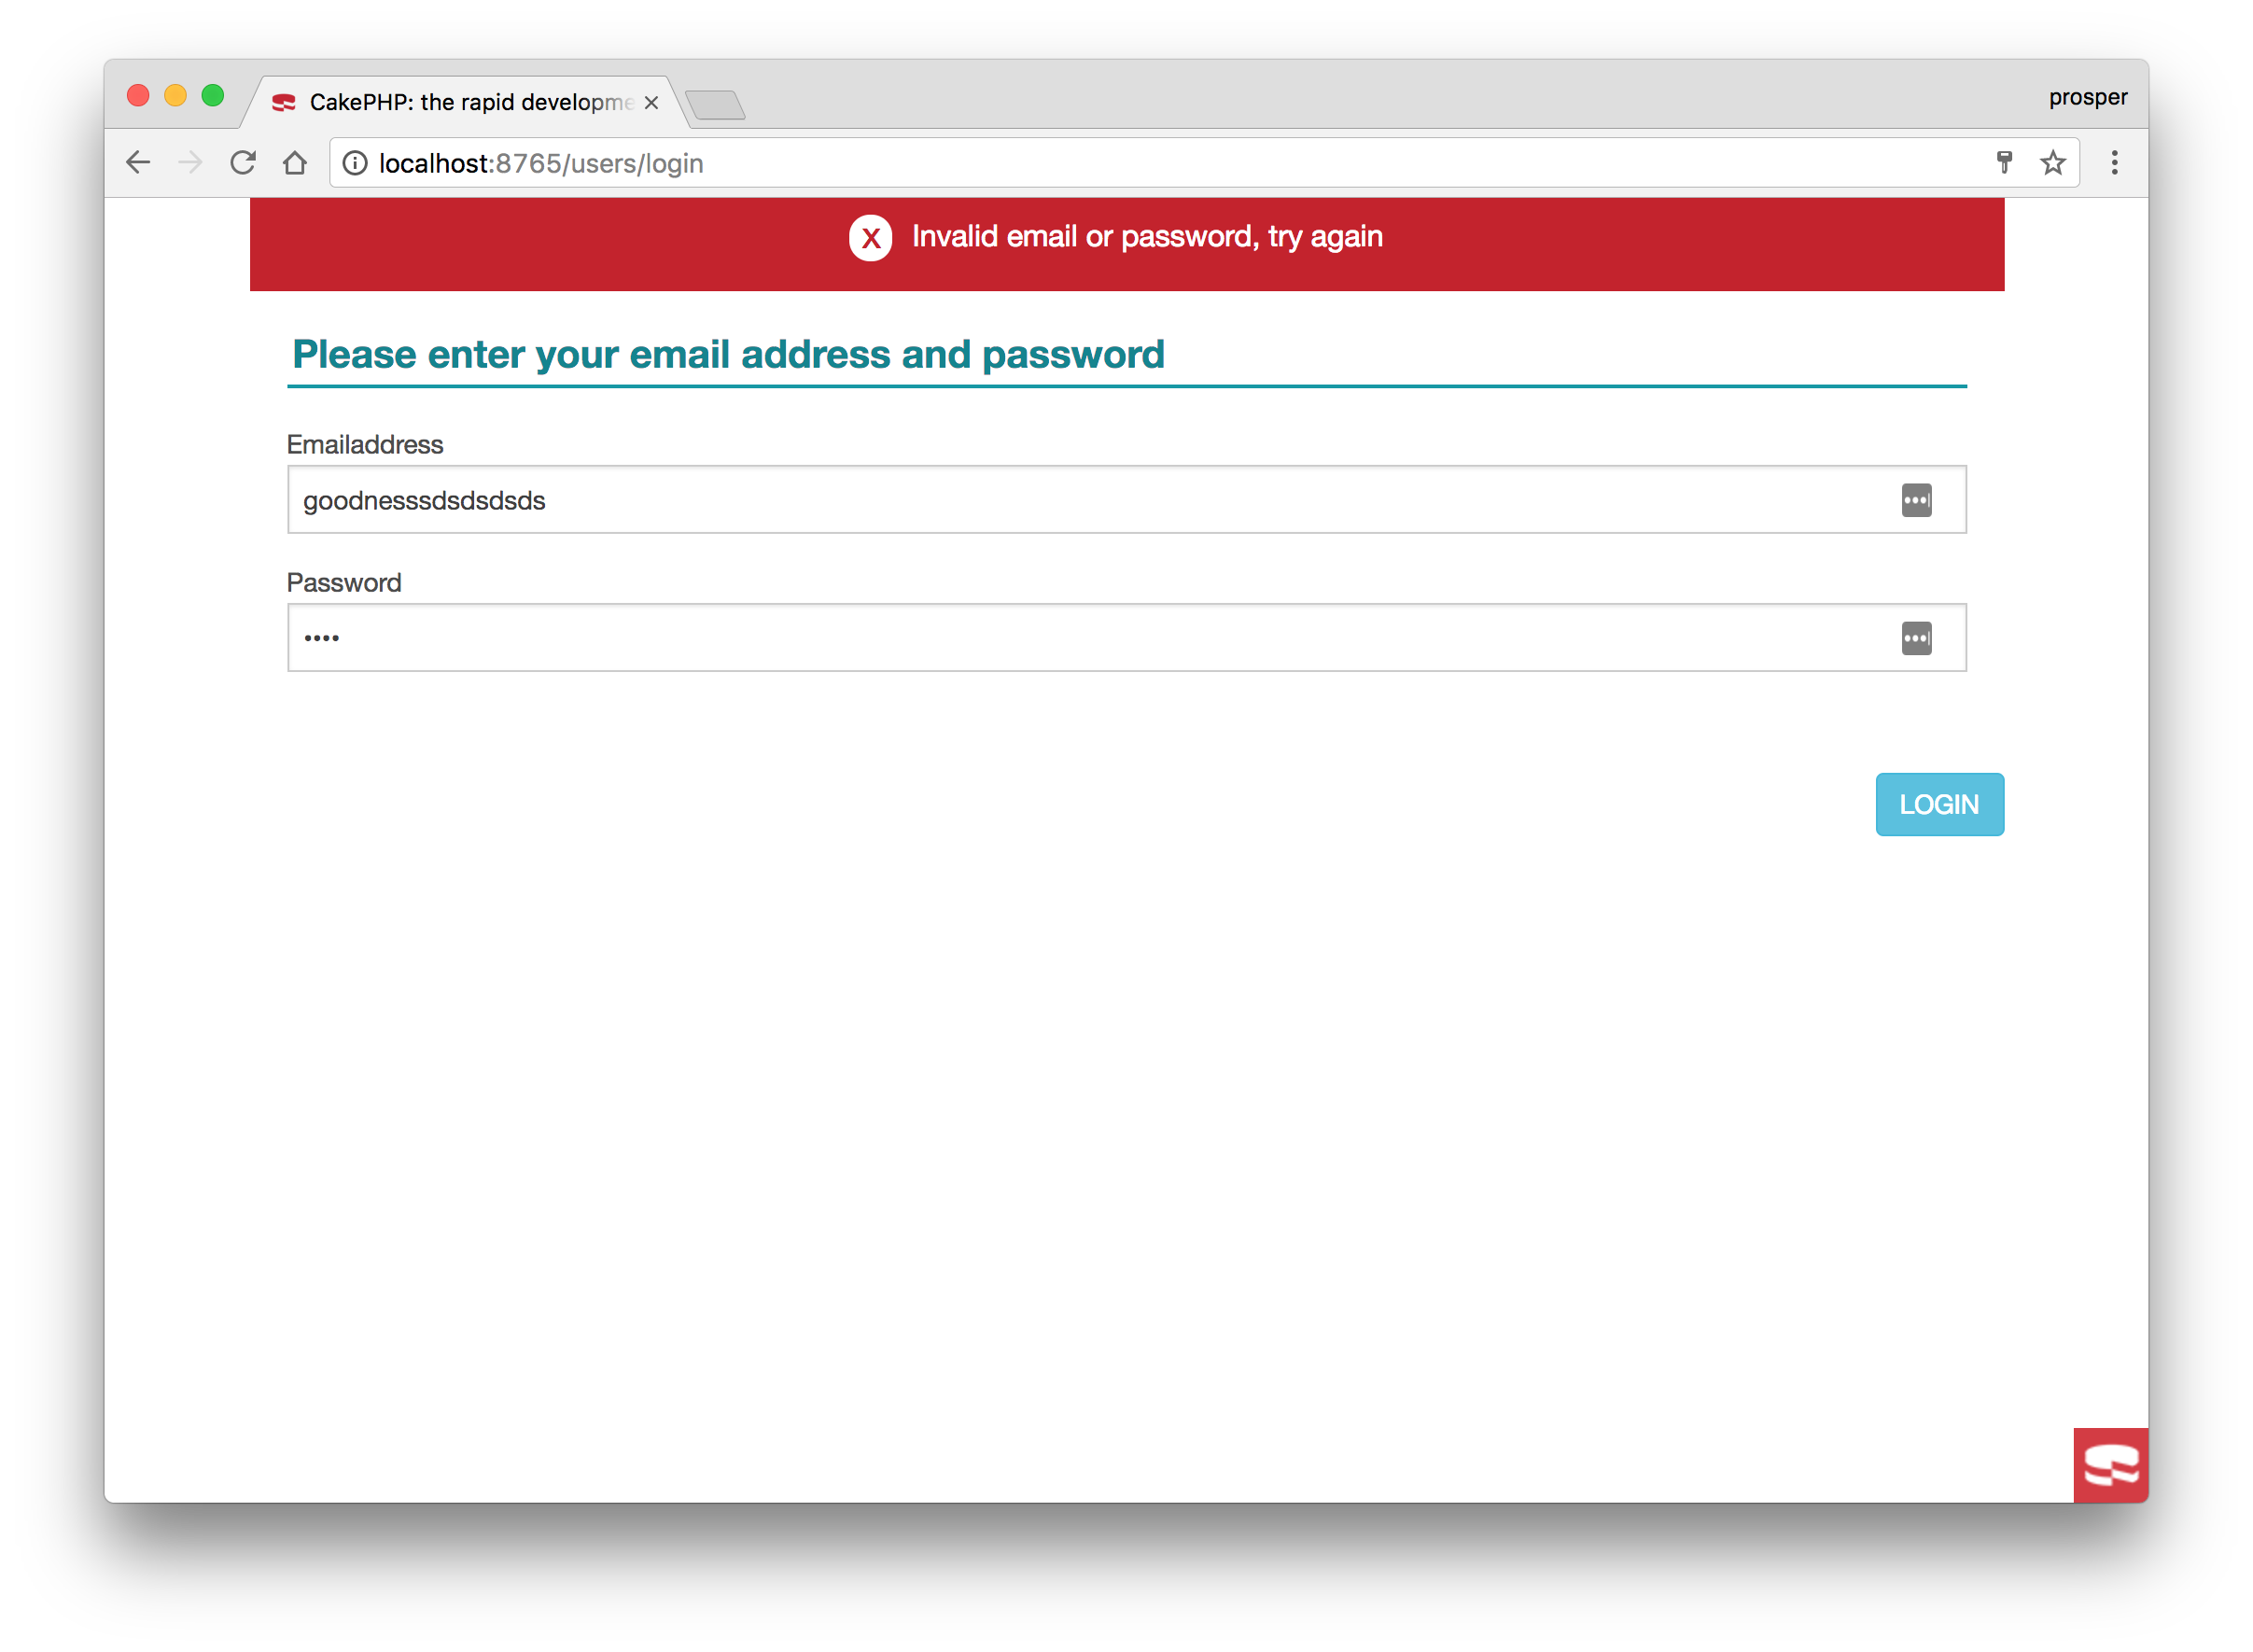
public function login()
    {
        if ($this->request->is('post')) {
            $user = $this->Auth->identify();
            if ($user) {
                $this->Auth->setUser($user);
                return $this->redirect($this->Auth->redirectUrl());
            }

            $this->Flash->error(__('Invalid email or password, try again'));
        }
    }
The error has been changed to Invalid email or password, try again. We are using email and password to authenticate instead of username and password.
In the code above, $this->Auth->identify() identifies the user using credentials provided in the request, then saves the user information to session using $this->Auth->setUser($user). This line of code logs the user in.
logout
 public function logout()
    {
        $session = $this->request->session();
        $session->destroy();
        return $this->redirect($this->Auth->logout());
    }
In the code above, we added code to destroy the session and redirect back to the list view via CakePHP's logout method. Now, you might be wondering. How do we know where it will redirect to?
Open up src/Controller/AppController.php file, go into the initialize method and modify it like this:
initialize
public function initialize()
    {
        parent::initialize();

        $this->loadComponent('RequestHandler');
        $this->loadComponent('Flash');
        $this->loadComponent('Auth', [
            'loginRedirect' => [
                'controller' => 'List',
                'action' => 'index'
            ],
            'logoutRedirect' => [
                'controller' => 'List',
                'action' => 'index'
            ],
            'authenticate' => [
                'Form' => [
                    'fields' => ['username' => 'emailaddress']
                ]
            ]
        ]);
    }
...
A lot is going on in the code above. Just relax, I'll explain. We loaded CakePHP's Auth Component and passed in three keys, loginRedirect, logoutRedirect and authenticate.
- loginRedirect
- The user will be redirected to
/listbecause the List controller and index action will be invoked.
- The user will be redirected to
- logoutRedirect
- The user will be redirected to
/listbecause the List controller and index action will be invoked.
- The user will be redirected to
- authenticate
usernameis used by default when performing the user identification and login action. We switched toemailaddress, therefore, informing CakePHP's Auth handler about the change.
In the code above, we changed the redirect function slightly to include the list controller and index action. This simply means we want the user to be redirected to the list page once registered successfully.
Note: The index method returns the data for the route
/list
We haven't taken care of something very important. Open up src/Controller/AppController.php and check out the beforeFilter function. This function acts as a middleware, it intercepts requests coming in. Here, you can determine the kind of routes you want an authenticated user to be able to access or not. You can also set an authenticated status based on users logged-in or logged-out status.
Modify the beforeFilter function like this:
...
...
public function beforeFilter(Event $event)
{
    $this->Auth->allow(['index','view']);
    $this->set('loggedIn', $this->Auth->user());
}
$this->Auth->allow(['index'], 'view']) allows the index and view action of every controller in our app to be accessible whether the user is logged in or not.
$this->set('loggedIn', $this->Auth->user()) sets a loggedIn variable that we can use in the view to conditionally display some items based on the user logged in status. If the user is not logged in, $this->Auth->user() returns null which is a falsey value.
Update Views
We need to update our views to conditionally show the list of Game of Thrones characters based on whether the user is logged in or not.
Open up List/index.ctp and modify it like this:
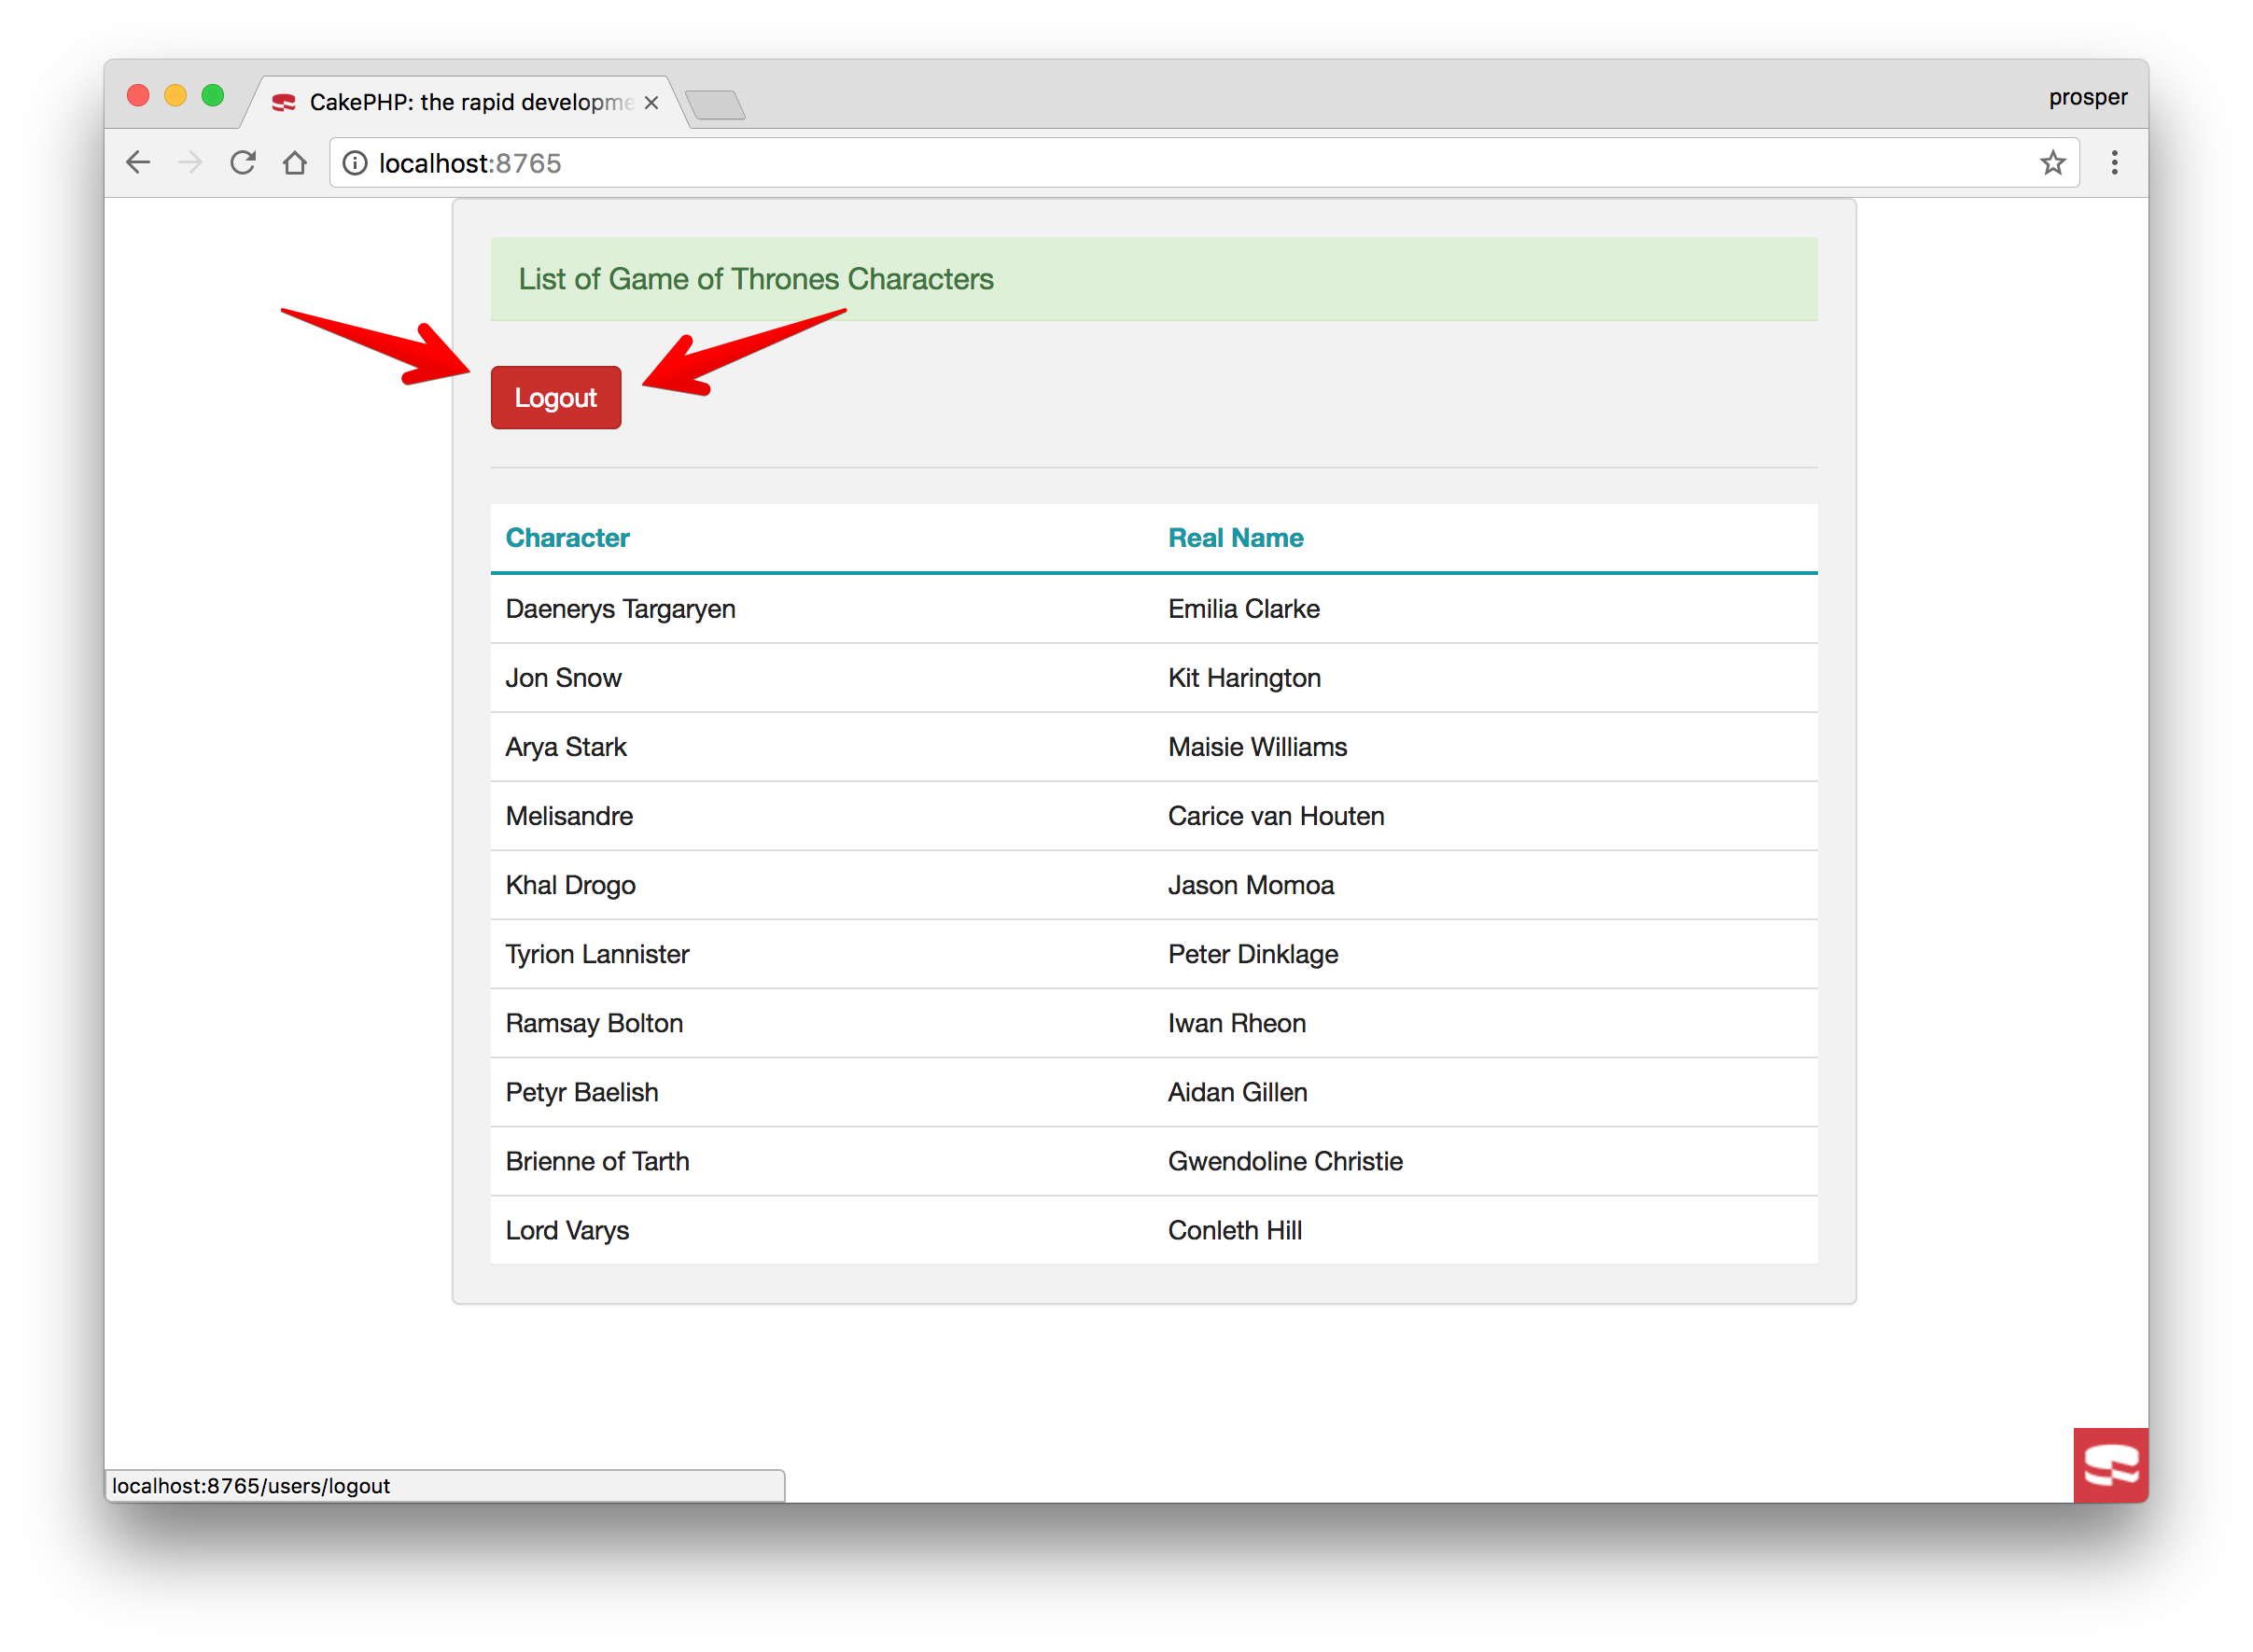
<div class="container">
    <div class="row">
        <div class="col-md-10 col-md-offset-1">
            <div class="panel panel-success">
                <div class="panel-heading">List of Game of Thrones Characters</div>
                  <?php if($loggedIn): ?>
                    <br />
                    <?= $this->Html->link('Logout', '/users/logout', ['class' => 'btn btn-danger']); ?>
                    <hr />
                    <table class="table">
                          <tr>
                              <th>Character</th>
                              <th>Real Name</th>
                          </tr>
                          <?php foreach($characters as $key => $value): ?>
                            <tr>
                              <td><?= $key ?></td><td><?= $value ?></td>
                            </tr>
                          <?php endforeach; ?>
                    </table>
                  <?php else: ?>
                    <br />
                    <div align="center">
                      <h5> You need to login to have access to this list <?= $this->Html->link('Login', '/users/login', ['class' => 'btn btn-info']); ?> </h5>
                    </div>
                  <?php endif; ?>
            </div>
        </div>
    </div>
</div>
In the code above, you can see how we're conditionally using the $loggedIn variable to display the logout, login buttons and the list of characters. Awesome!
Run The App
If you server is not up yet, then go ahead and run bin/cake server in your terminal. Try out the app:


Aside: Using Auth0 with CakePHP
Auth0 issues JSON Web Tokens on every login for your users. This means that you can have a solid identity infrastructure, including single sign-on, user management, support for social identity providers (Facebook, Github, Twitter, etc.), enterprise identity providers (Active Directory, LDAP, SAML, etc.) and your own database of users with just a few lines of code.
We can easily set up authentication in our CakePHP apps with Auth0's Centralized Login Page. If you don't already have an Auth0 account, sign up for one now. Navigate to the Auth0 management dashboard, select Applications from the navigational menu, then select the app you want to connect with CakePHP.
Auth0 provides the simplest and easiest to use user interface tools to help administrators manage user identities including password resets, creating and provisioning, blocking and deleting users. A generous free tier is offered so you can get started with modern authentication.
- Navigate to the Auth0 management dashboard.
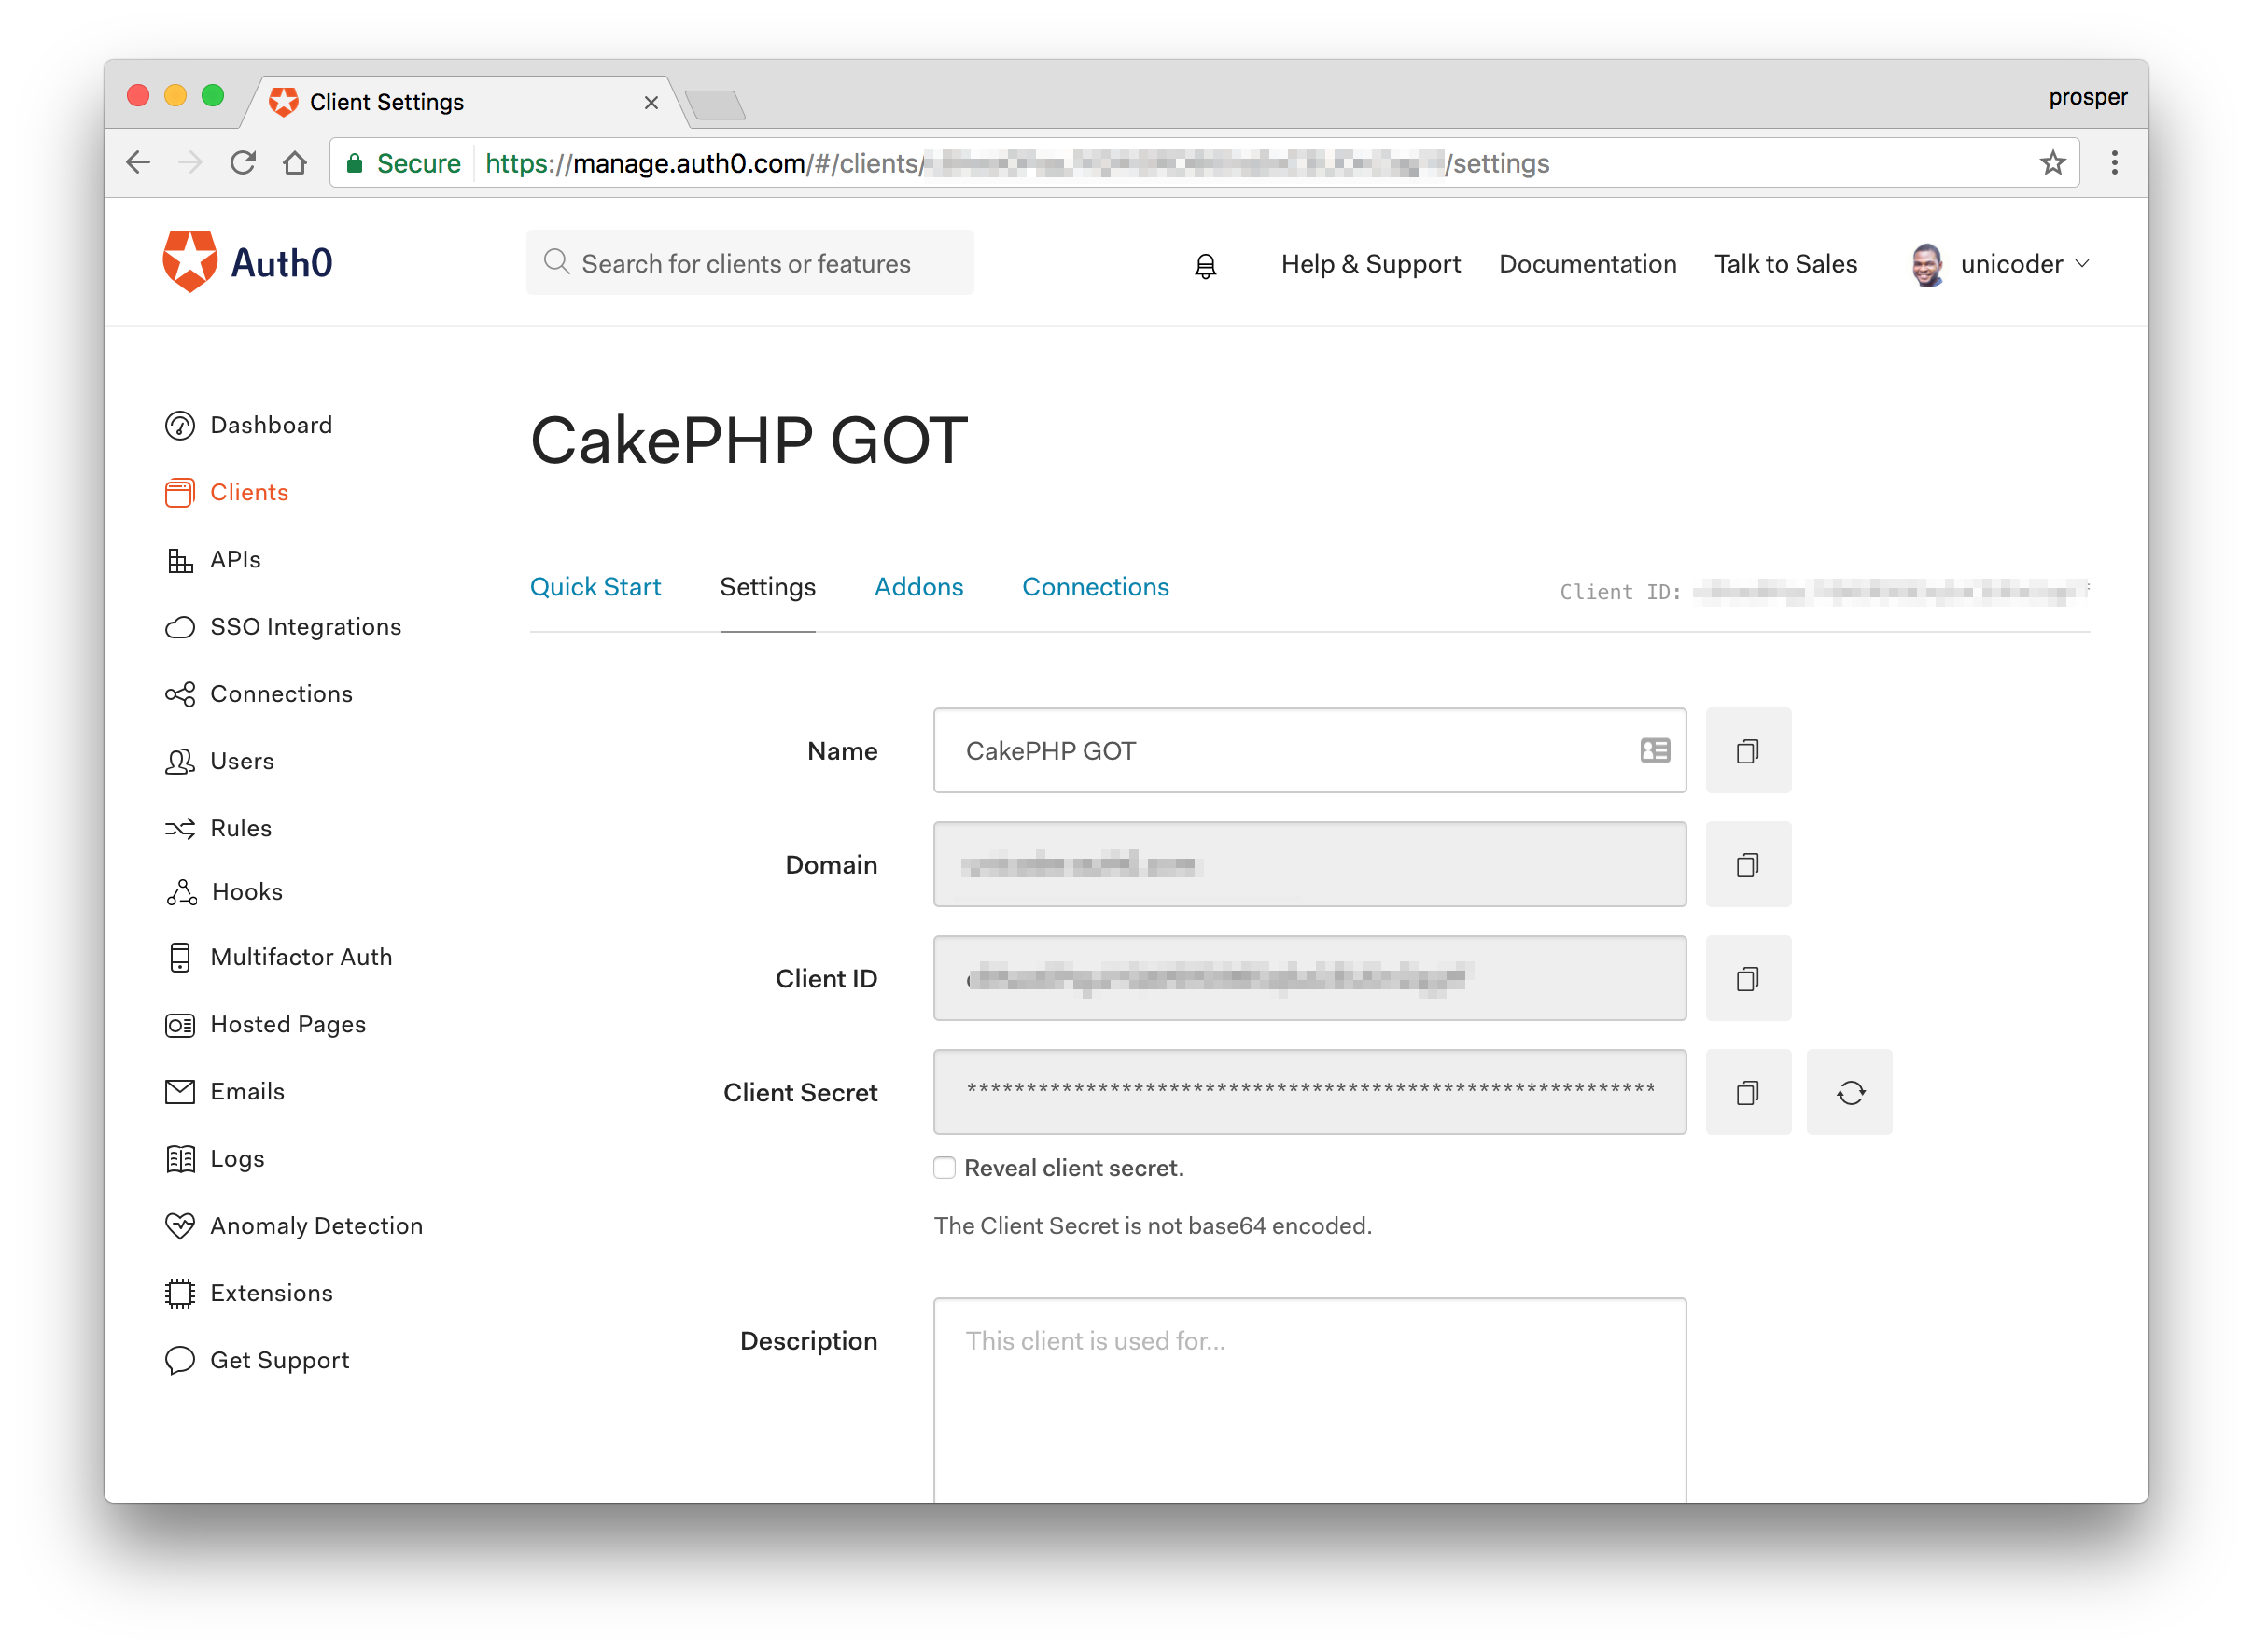
Create a new client
Give it a name and select the type of app as
Regular Web Applications.Take note of the client_id, domain, and secret. You'll need it soon.


Step 1: Install and Configure CakePHP Auth0 package
Important Notice The package you are about to install was not developed by Auth0. It is a community package.
Go ahead and install the cakephp package via composer.
You have to set
minimum-stabilitytodevin your composer.json file for the package to install successfully. Note that installingdev-masteris not best practice. You should not do this in production.
Step 2: Register the callback
Head over to your Auth0 dashboard and register a callback in Allowed Callback URLs like so: http://localhost:8765/users/login
Open up your AppControllerand add this to the initialize function:
...
$this->loadComponent('Auth', [
            'authenticate' => [
                'Auth0.Auth0' => [
                                  'domain'        => '<domain_value_provided_by_auth0>',
                                  'client_id'     => '<client_id_value_provided_by_auth0>',
                                  'client_secret' => '<client_secret_value_provided_by_auth0>',
                                  'redirect_uri'  => '<redirect_uri_value_provided_by_auth0>'
                ]
            ],
]);
Replace the placeholder values with the credentials on your dashboard. I recommend that you load them from environment variables to prevent your credentials especially the secret from been leaked.
Step 3: Configure Auth0's Centralized Login Page
Open up src/controller/ListController.php and add the following on index method:
public function index()
{
    ...
    ...
    $this->initialize();
    $domain = $this->Auth->getAuthenticate('Auth0.Auth0')->getDomain();
    $clientId = $this->Auth->getAuthenticate('Auth0.Auth0')->getClientId();
    $redirectUrl = $this->Auth->getAuthenticate('Auth0.Auth0')->getRedirectUri();
    $loginUrl = sprintf('https://%s/authorize?client_id=%s&response_type=code&redirect_uri=%s', $domain, $clientId, $redirectUrl);
    $this->set(compact('loginUrl'));
}
This code will call the initialize method from the AppController to load the Auth component, then get the Auth0 credentials to build the authorization URL and assign it to the view.
Open up List/index.ctp and add the following:
<h5> You need to log in to have access to this list <?= $this->Html->link('Log In', $loginUrl, ['class' => 'btn btn-info']); ?></h5>
...
...
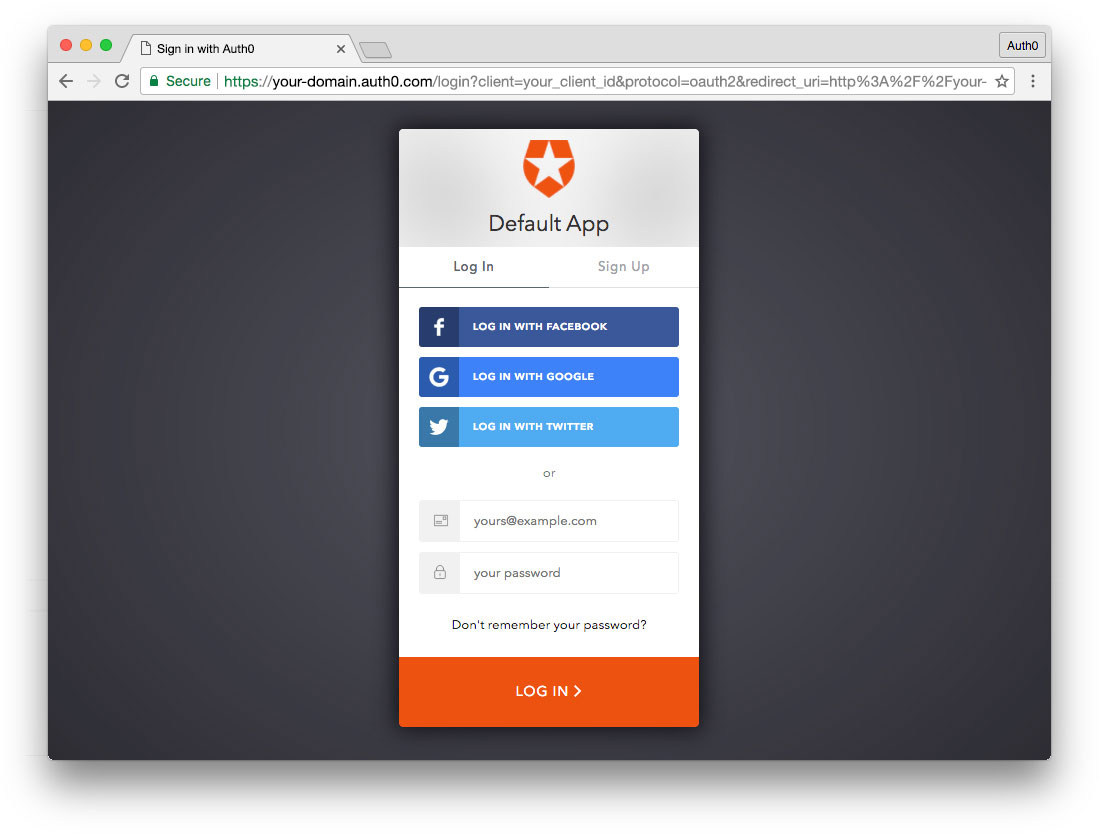
When the login button is clicked, users are redirected to Auth0's Centralized Login Page.
Step 4: Configure your UsersController
Configure the login method of your UsersController like this:
public function login()
    {
        $authCode = $this->request->query('code', null);
        if(!is_null($authCode)) {
          $user = $this->Auth->identify();
          if($user) {
            $this->Auth->setUser($user);
            return $this->redirect($this->Auth->redirectUrl());
          }
        }
    }
Now, once a user registers, it stores the user information in your Auth0 user database. The CakePHP plugin retrieves the user info and sets it so that it is accessible in $this->Auth0->user().
Step 5: Configure Logout
Modify the logout function in UsersController to this code below:
public function logout()
    {
        $url = $this->Auth->logout();
        $this->request->session()->destroy();
        return $this->redirect($url);
    }
Now, when you click the logout button, the user will be successfully logged out.
Important API Security Note: If you want to use Auth0 authentication to authorize API requests, note that you'll need to use a different flow depending on your use case. Auth0 idToken should only be used on the client-side. Access tokens should be used to authorize APIs. You can read more about making API calls with Auth0 here.
Wrapping Up
Well done! You have just built your first app with CakePHP. As we saw in this tutorial, you can easily add authentication to your CakePHP apps. This tutorial is designed to help you get started on building your own apps with CakePHP. You can leverage the knowledge gained here to build bigger and better apps. Please, let me know if you have any questions or observations in the comment section. 😊
About the author

Prosper Otemuyiwa
Former Auth0 Employee (Auth0 Alumni)