TL;DR: In this article, we will learn what are the deployment strategies while deploying containers using Kubernetes container-orchestration system. At the end of this article, we will have learned how to do deployment using different ways in Kubernetes cluster. If you find this topic interesting, keep reading! The code for this tutorial is available here on Github
Quick Introduction to Kubernetes
With containerization gaining popularity over time and revolutionizing the process of building, shipping, and maintaining applications, there was a need to effectively manage these containers. Many container orchestration tools were introduced to manage the lifecycle of these containers in large-scale systems.
Kubernetes is one such orchestration tool that takes care of provisioning and deployment, allocation of resources, load balancing, service discovery, providing high availability, and other important aspects of any system. With this platform, we can decompose our applications into smaller systems (called microservices) while developing; then, we can compose (or orchestrate) these systems together while deploying.
The adoption of cloud-native approach has increased development of applications based on microservice architecture. For such applications, one of the biggest challenges organizations face is deployment. Having a proper strategy in terms of deployment is necessary. In Kubernetes, there are different ways to release an application; it is necessary to choose the right strategy to make your infrastructure reliable during an application deployment or update. For instance, in a production environment, it is always required to ensure that end-user shouldn't experience any downtime. In Kubernetes orchestration, right strategy ensures proper management of different versions of container images. To sum up, this article will mainly be around the different deployment strategies in Kubernetes.
Prerequisites
To follow along with this article, we will need some previous experience with Kubernetes. If new to this platform, kindly check out the Step by Step Introduction to Basic Kubernetes Concepts tutorial. There, you can learn everything you need to follow the instructions here. We would also recommend going through the Kubernetes documentation if and when required.
Besides that, we will need kubectl, a Command-Line Interface (CLI) tool that will enable us to control your cluster from a terminal. If you don't have this tool, check the instructions on the Installing Kube Control (kubectl).We will also need a basic understanding of Linux and YAML.
What Is A Deployment In Kubernetes?
A Deployment is a resource object in Kubernetes that defines the desired state for our program. Deployments are declarative, meaning that we don't dictate how to achieve the state. Instead, we declare the desired state and allow the Deployment-controller to automatically reach that end goal in the most efficient way. A deployment allows us to describe an application's life cycle, such as which images to use for the app, the number of pods there should be, and the way in which they should be updated.
Benefits Of Using Kubernetes Deployment
The process of manually updating containerized applications can be time consuming and tedious. A Kubernetes deployment makes this process automated and repeatable. Deployments are entirely managed by the Kubernetes backend, and the whole update process is performed on the server side without client interaction.
Moreover, the Kubernetes deployment controller is always monitoring the health of pods and nodes. It replaces a failed pod or bypass down nodes, ensuring continuity of critical applications.
Deployment Strategies
Rolling Update Deployment
The rolling deployment is the default deployment strategy in Kubernetes. It replaces pods, one by one, of the previous version of our application with pods of the new version without any cluster downtime. A rolling deployment slowly replaces instances of the previous version of an application with instances of the new version of the application.
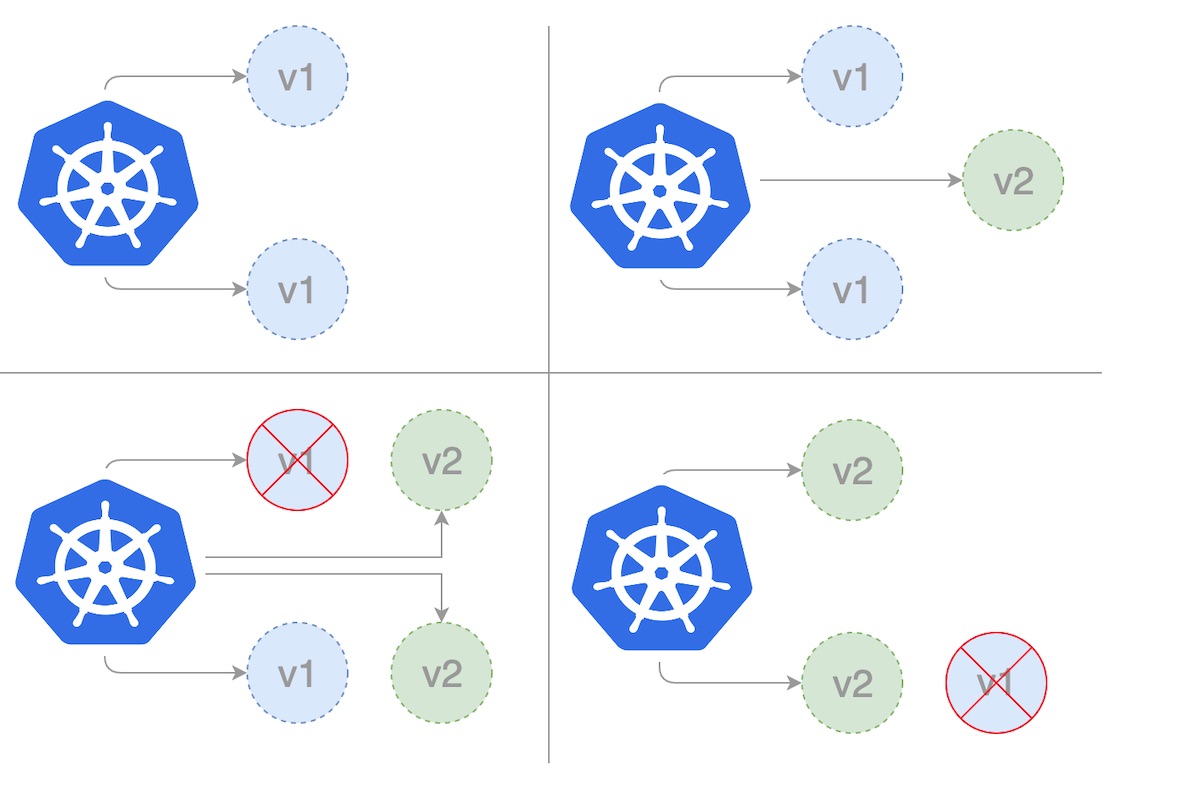
When using the RollingUpdate strategy, there are two more options that let us fine-tune the update process:
maxSurge: The number of pods that can be created above the desired amount of pods during an update. This can be an absolute number or percentage of the replicas count. The default is 25%.
maxUnavailable: The number of pods that can be unavailable during the update process. This can be an absolute number or a percentage of the replicas count; the default is 25%.
First, we create our rollingupdate.yaml deployment template. In the template below, we set maxSurge to 2 and maxUnavailable to 1.
apiVersion: apps/v1
kind: Deployment
metadata:
  name: rollingupdate-strategy
  version: nanoserver-1709
spec:
  strategy:
    type: RollingUpdate
    rollingUpdate:
      maxSurge: 2
      maxUnavailable: 1
  selector:
    matchLabels:
      app: web-app-rollingupdate-strategy
      version: nanoserver-1709
  replicas: 3
  template:
    metadata:
      labels:
        app: web-app-rollingupdate-strategy
        version: nanoserver-1709
    spec:
      containers:
        - name: web-app-rollingupdate-strategy
          image: hello-world:nanoserver-1709
We can then create the deployment using the kubectl command.
$ kubectl apply -f rollingupdate.yaml
Once we have a deployment template, we can provide a way to access the instances of the deployment by creating a Service. Note that we are deploying the image hello-world with version nanoserver-1709. So in this case we have two labels, 'name= web-app-rollingupdate-strategy' and 'version=nanoserver-1709'. We will set these as the label selector for the service below. Save this to 'service.yaml' file.
apiVersion: v1
kind: Service
metadata:
  name: web-app-rollingupdate-strategy
  labels:
    name: web-app-rollingupdate-strategy
    version: nanoserver-1709
spec:
  ports:
    - name: http
      port: 80
      targetPort: 80
  selector:
    name: web-app-rollingupdate-strategy
    version: nanoserver-1709
  type: LoadBalancer
Now creating the service will create a load balancer that is accessible outside the cluster.
$ kubectl apply -f service.yaml
Run kubectl get deployments to check if the Deployment is created. If the Deployment is still being created, the output should be similar to the following:
$ kubectl get deployments

NAME                             READY   UP-TO-DATE   AVAILABLE   AGE
rollingupdate-strategy   0/3     0            0           1s
If we run the kubectl get deployments again a few seconds later. The output should be similar to this:
$ kubectl get deployments

NAME                             READY   UP-TO-DATE   AVAILABLE   AGE
rollingupdate-strategy   3/3     0            0           7s
To see the ReplicaSet (rs) created by the Deployment, run kubectl get rs. The output should be similar to this:
$ kubectl get rs

NAME                                    DESIRED   CURRENT   READY   AGE
rollingupdate-strategy-87875f5897   3         3         3       18s
To see the 3 pods running for deployment, run kubectl get pods. The created ReplicaSet ensures that there are three Pods running. The output should be similar to the below.
$ kubectl get pods

NAME                                      READY     STATUS    RESTARTS   AGE
rollingupdate-strategy-87875f5897-55i7o   1/1       Running   0          12s
rollingupdate-strategy-87875f5897-abszs   1/1       Running   0          12s
rollingupdate-strategy-87875f5897-qazrt   1/1       Running   0          12s
Let's update the rollingupdate.yaml deployment template to use the hello-world:nanoserver-1809 image instead of the hello-world:nanoserver-1709 image. Then update the image of the existing running deployment using the kubectl command.
$ kubectl set image deployment/rollingupdate-strategy web-app-rollingupdate-strategy=hello-world:nanoserver-1809 --record
The output is similar to the below.
deployment.apps/rollingupdate-strategy image updated
We are now deploying the image hello-world with version nanoserver-1809. So, in this case, we will have to update the labels in the 'service.yaml'. The label will be updated to 'version=nanoserver-1809'. We will run the below kubectl command again to update the service so that it can pick new pods running on the newer image.
$ kubectl apply -f service.yaml
To see the rollout status run the kubectl command below.
$ kubectl rollout status deployment/rollingupdate-strategy

Waiting for rollout to finish: 2 out of 3 new replicas have been updated...
Run again to verify the rollout is successful.
$ kubectl rollout status deployment/rollingupdate-strategy

deployment "rollingupdate-strategy" successfully rolled out
After the rollout is successful, we can view the Deployment by running the command kubectl get deployments. The output is similar to this:
$ kubectl get deployments

NAME                             READY   UP-TO-DATE   AVAILABLE   AGE
rollingupdate-strategy   3/3     0            0           7s
Run kubectl get rs to see that the Deployment is updated. The new Pods are created in a new ReplicaSet and are scaled up to 3 replicas. The old ReplicaSet is scaled down to 0 replicas.
$ kubectl get rs

NAME                                    DESIRED   CURRENT   READY   AGE
rollingupdate-strategy-87875f5897   3         3         3       55s
rollingupdate-strategy-89999f7895   0         0         0       12s
Run kubectl get pods it should now show only the new Pods in the new ReplicaSet.
$ kubectl get pods

NAME                                      READY     STATUS    RESTARTS   AGE
rollingupdate-strategy-89999f7895-55i7o   1/1       Running   0          12s
rollingupdate-strategy-89999f7895-abszs   1/1       Running   0          12s
rollingupdate-strategy-89999f7895-qazrt   1/1       Running   0          12s
The kubectl's rollout command is very useful here. We can use it to check how our deployment is doing. The command, by default, waits until all of the Pods in the deployment have been started successfully. When the deployment succeeds, the command exits with return code zero to indicate success. If the deployment fails, the command exits with a non-zero code.
$ kubectl rollout status deployment rollingupdate-strategy

Waiting for deployment "rollingupdate-strategy" rollout to finish: 0 of 3 updated replicas are available…
Waiting for deployment "rollingupdate-strategy" rollout to finish: 1 of 3 updated replicas are available…
Waiting for deployment "rollingupdate-strategy" rollout to finish: 2 of 3 updated replicas are available…

deployment "rollingupdate-strategy" successfully rolled out
If the deployment fails in Kubernetes, the deployment process stops, but the pods from the failed deployment are kept around. On deployment failure, our environment may contain pods from both the old and new deployments. To get back to a stable, working state, we can use the rollout undo command to bring back the working pods and clean up the failed deployment.
$ kubectl rollout undo deployment rollingupdate-strategy

deployment.extensions/rollingupdate-strategy
Then we will verify the status of the deployment again.
$ kubectl rollout status deployment rollingupdate-strategy

deployment "rollingupdate-strategy" successfully rolled out
In order for Kubernetes to know when an application is ready, it needs some help from the application. Kubernetes uses readiness probes to examine how the application is doing. Once an application instance starts responding to the readiness probe with a positive response, the instance is considered ready for use. Readiness probes tell Kubernetes when an application is ready, but not if the application will ever become ready. If the application keeps failing, it may never respond with a positive response to Kubernetes.
A rolling deployment typically waits for new pods to become ready via a readiness check before scaling down the old components. If a significant issue occurs, the rolling deployment can be aborted. If there is a problem, the rolling update or deployment can be aborted without bringing the whole cluster down.
Recreate Deployment
In recreate deployment, we fully scale down the existing application version before we scale up the new application version. In the below diagram, Version 1 represents the current application version, and Version 2 represents the new application version. When updating the current application version, we first scale down the existing replicas of Version 1 to zero and then concurrently deploy replicas with the new version.
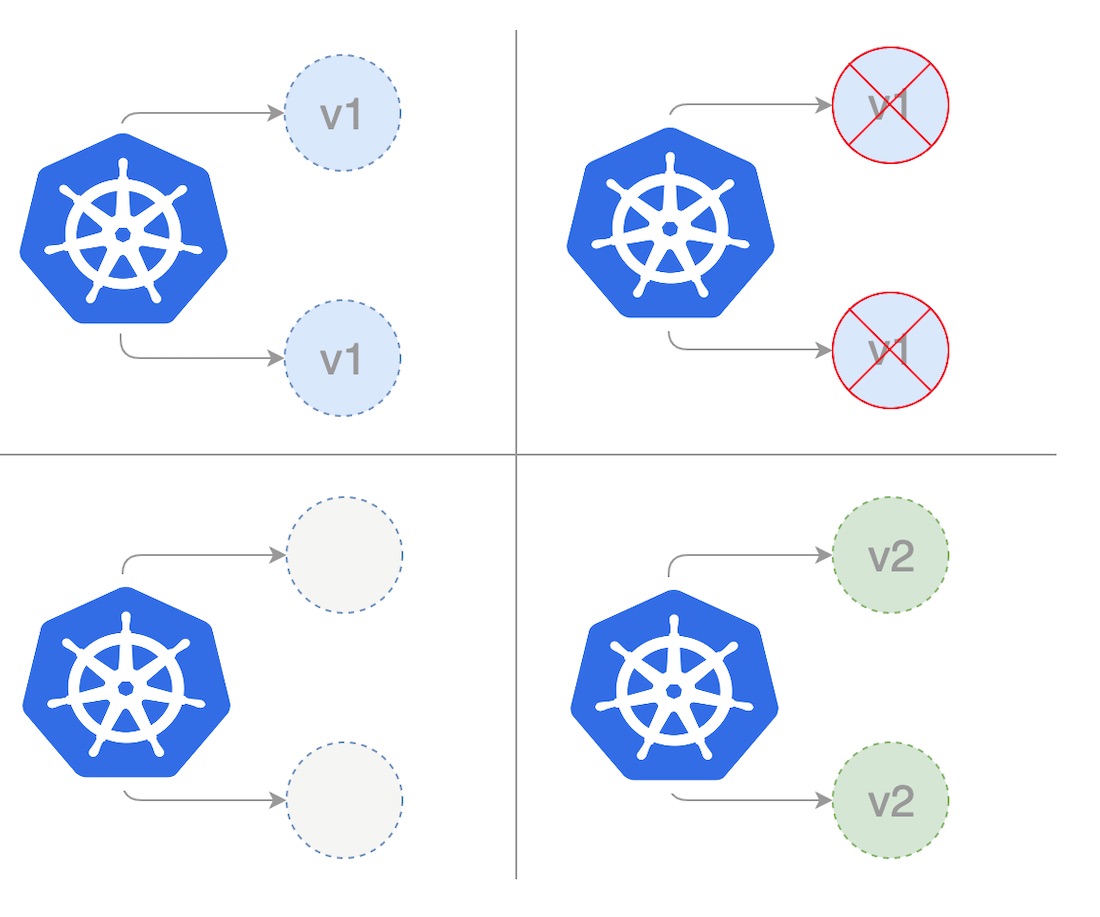
The below template shows deployment using the recreate strategy: First, we create our recreate deployment by saving the following yaml to a file recreate.yaml
apiVersion: apps/v1
kind: Deployment
metadata:
  name: recreate-strategy
spec:
  strategy:
    type: Recreate
  selector:
    matchLabels:
      app: web-app-recreate-strategy
      version: nanoserver-1809
  replicas: 3
  template:
    metadata:
      labels:
        app: web-app-recreate-strategy
    spec:
      containers:
        - name: web-app-recreate-strategy
          image: hello-world:nanoserver-1809
We can then create the deployment using the kubectl command.
$ kubectl apply -f recreate.yaml
Once we have a deployment template, we can provide a way to access the instances of the deployment by creating a Service. Note that we are deploying the image hello-world with version nanoserver-1809. So in this case we have two labels, 'name= web-app-recreate-strategy' and 'version=nanoserver-1809'. We will set these as the label selector for the service below. Save this to service.yaml file.
apiVersion: v1
kind: Service
metadata:
  name: web-app-recreate-strategy
  labels:
    name: web-app-recreate-strategy
    version: nanoserver-1809
spec:
  ports:
    - name: http
      port: 80
      targetPort: 80
  selector:
    name: web-app-recreate-strategy
    version: nanoserver-1809
  type: LoadBalancer
Now creating the service will create a load balancer that is accessible outside the cluster.
$ kubectl apply -f service.yaml
The recreate method involves some downtime during the update process. Downtime is not an issue for applications that can handle maintenance windows or outages. However, if there is a mission-critical application with high service level agreements (SLAs) and availability requirements, choosing a different deployment strategy would be the right approach. Recreate deployment is generally used in the development stage by the developers as it is easy to set up, and the application state is entirely renewed with the new version. What's more, we don't have to manage more than one application version in parallel, and therefore we avoid backward compatibility challenges for data and applications.
Blue-Green Deployment
In a blue/green deployment strategy (sometimes also referred to as red/black), the blue represents the current application version, and green represents the new application version. In this, only one version is live at a time. Traffic is routed to the blue deployment while the green deployment is created and tested. After we are finished testing, we then route traffic to the new version.
After the deployment succeeds, we can either keep the blue deployment for a possible rollback or decommission it. Alternatively, it is possible to deploy a newer version of the application on these instances. In that case, the current (blue) environment serves as the staging area for the next release.
This technique can eliminate downtime as we faced in the recreate deployment strategy. In addition, blue-green deployment reduces risk: if something unexpected happens with our new version on Green, we can immediately roll back to the last version by switching back to Blue. There is instant rollout/rollback. We can also avoid versioning issues; the entire application state is changed in one deployment.
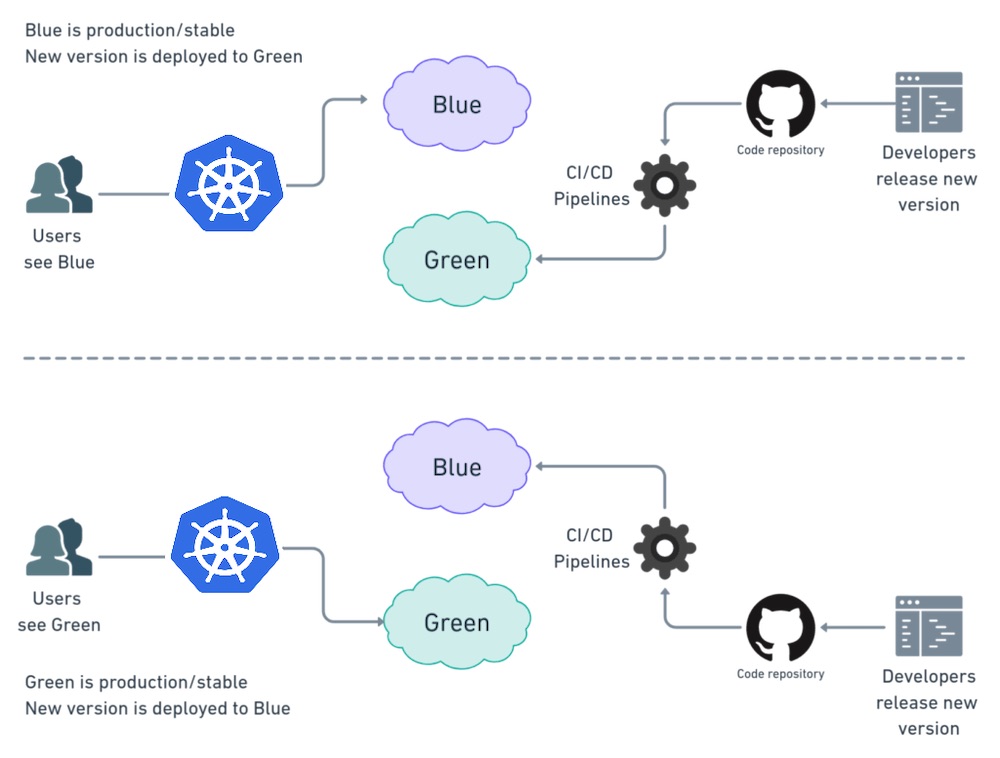
The Blue-Green deployment is expensive as it requires double the resources. A proper test of the entire platform should be done before releasing it to production. Moreover, handling stateful applications is hard.
First, we create our blue deployment by saving the following yaml to a 'blue.yaml' file:
apiVersion: apps/v1
kind: Deployment
metadata:
  name: blue-deployment
spec:
  selector:
    matchLabels:
      app: blue-deployment
      version: nanoserver-1709
  replicas: 3
  template:
    metadata:
      labels:
        app: blue-deployment
        version: nanoserver-1709
    spec:
      containers:
        - name: blue-deployment
          image: hello-world:nanoserver-1709
We can then create the deployment using the kubectl command.
$ kubectl apply -f blue.yaml
Once we have a deployment template, we can provide a way to access the instances of the deployment by creating a Service. Note that we are deploying the image hello-world with version nanoserver-1809. So in this case we have two labels, 'name= blue-deployment' and 'version=nanoserver-1709'. We will set these as the label selector for the service below. Save this to service.yaml file.
apiVersion: v1
kind: Service
metadata:
  name: blue-green-service
  labels:
    name: blue-deployment
    version: nanoserver-1709
spec:
  ports:
    - name: http
      port: 80
      targetPort: 80
  selector:
    name: blue-deployment
    version: nanoserver-1709
  type: LoadBalancer
Now creating the service will create a load balancer that is accessible outside the cluster.
$ kubectl apply -f service.yaml
We now have the below setup in place.
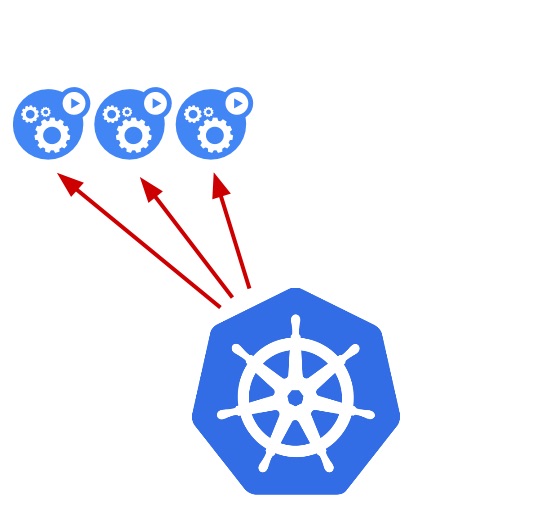
For the green deployment we will deploy a new deployment in parallel with the blue deployment. The below template is a content of the green.yaml file:
apiVersion: apps/v1
kind: Deployment
metadata:
  name: green-deployment
spec:
  selector:
    matchLabels:
      app: green-deployment
      version: nanoserver-1809
  replicas: 3
  template:
    metadata:
      labels:
        app: green-deployment
        version: nanoserver-1809
    spec:
      containers:
        - name: green-deployment
          image: hello-world:nanoserver-1809
Note that image hello-world:nanoserver-1809 tag-name has changed to 2. So we have made a separate deployment with two labels, name= green-deployment and version=nanoserver-1809.
$ kubectl apply -f green.yaml
To cut over to the green deployment, we will update the selector for the existing service. Edit the service.yaml and change the selector version to 2 and name to green-deployemnt. That will make it so that it matches the pods on the green" deployment.
apiVersion: v1
kind: Service
metadata:
  name: blue-green-service
  labels:
    name: green-deployment
    version: nanoserver-1809
spec:
  ports:
    - name: http
      port: 80
      targetPort: 80
  selector:
    name: green-deployment
    version: nanoserver-1809
  type: LoadBalancer
We create the service again using the kubectl command:
$ kubectl apply -f service.yaml
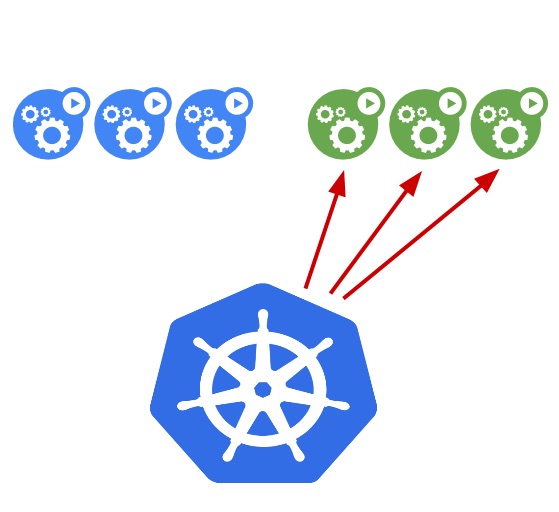
Hence concluding, we can see the blue-green deployment is all-or-nothing, unlike a rolling update deployment, where we aren't able to gradually roll out the new version. All users will receive the update at the same time, although existing sessions will be allowed to finish their work on the old instances. Hence the stakes are a bit higher than everything should work once we initiate the change. It also requires allocating more server resources since we will need to run two copies of every pod.
Fortunately, the rollback procedure is just as easy: We simply have to flip the switch again, and the previous version is swapped back into place. That's because the old version is still running on the old pods. It is simply that traffic is no longer being routed to them. When we are confident that the new version is here to stay, we should decommission those pods.
Canary Deployment
The canary update strategy is a partial update process that allows us to test our new program version on a real user base without a commitment to a full rollout. Similar to blue/green deployments, but they are more controlled, and they use a more progressive delivery where deployment is in a phased approach. There are a number of strategies that fall under the umbrella of canary, including dark launches or A/B testing.
In canary deployment, the new version of the application is gradually deployed to the Kubernetes cluster while getting a very small amount of live traffic (i.e., a subset of live users are connecting to the new version while the rest are still using the previous version).In this approach, we have two almost identical servers: one that goes to all the current active users and another with the new features that gets rolled out to a subset of users and then compared. When no errors are reported and the confidence increases, the new version can gradually roll out to the rest of the infrastructure. In the end, all live traffic goes to canaries, making the canary version the new production version.
The below picture shows the most straightforward and simple way to do a canary deployment. A new version is deployed to a subset of servers.
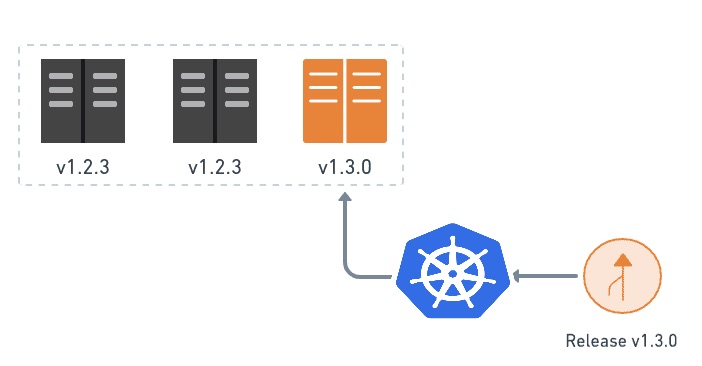
While this happens, we watch how the upgraded machines are doing. We check for errors and performance problems, and we listen for user feedback. As we grow confident in the canary, we continue installing it on the rest of the machines until they are all running the latest release.
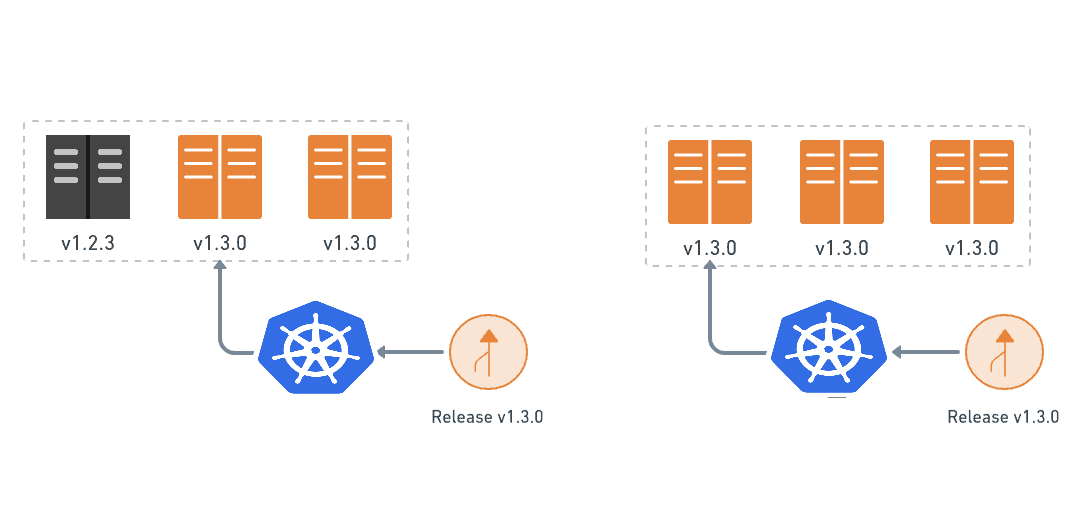
We have to take into account various things when planning a canary deployment:
- Stages: how many users will we send to the canary at first, and in how many stages.
- Duration: how long will we plan to run the canary? Canary releases are different, as we must wait for enough clients to be updated before we can assess the results. This can happen over several days or even weeks.
- Metrics: what are the metrics to record to analyze progress, including application performance and error reports? Well-chosen parameters are essential for a successful canary deployment. For instance, a very simple way to measure deployment is through HTTP status codes. We can have a simple ping service that returns 200 when the deployment is successful. It will return server end error (5xx) if there is an issue in the deployment.
- Evaluation: what criteria will we use to determine if the canary is successful
A canary is used in scenarios where we have to test a new functionality typically on the backend of our application. Canary deployment should be used when we are not 100% confident in the new version; we predict we might have a low chance of failure. This strategy is usually used when we have a major update, like adding a new functionality or experimental feature.
Summary K8s Deployments Strategies
To sum up, there are different ways to deploy an application; when releasing to development/staging environments, a recreate or ramped deployment is usually a good choice. When it comes to production, a ramped or blue/green deployment is usually a good fit, but proper testing of the new platform is necessary. If we are not confident with the stability of the platform and what could be the impact of releasing a new software version, then a canary release should be the way to go. By doing so, we let the consumer test the application and its integration into the platform. In this article, we have only scratched the surface of the capabilities of Kubernetes deployments. By combining deployments with all the other Kubernetes features, users can create more robust containerized applications to suit any need.
About the author

Akhil Chawla
Software Engineer
