In a recent article, we explored how Auth0 Organizations can help you build a B2B Blazor Web application. You learned how to create and configure Organizations for your customers using the Auth0 dashboard, which is straightforward but requires manual intervention and could be unsustainable in the long run. In this article, you will learn how to avoid this manual work and automate the Organization creation and configuration via the Auth0 Management API. This will give an extra boost to the success of your application as a B2B SaaS application.
Why Should You Automate Organization Creation?
Creating an Organization for your B2B customer using the Auth0 dashboard is pretty easy, but it is not scalable for a few reasons:
- You need to do some manual work for any new B2B customer. Apart from being time-consuming, this activity can be error-prone as with any manual activity.
- When your business grows and, hopefully, you get many new customers, this manual work becomes significant and risks becoming a bottleneck. Imagine your new customers waiting for you to build a new Organization to let them just try your product. It's not the best presentation.
- In the modern business scenario, customers prefer self-service services. For example, they prefer to subscribe to your SaaS application for a free trial and evaluate your product autonomously while still having the opportunity to reach out to you when necessary.
- By providing self-service Organization creation, you follow the Product-Led Growth (PLG) principles, which will lead to your business's success.
That said, let's explore how you can enable self-subscription for your new customers to your B2B SaaS application and automate the Organization creation process.
The Scenario for Automatic Organization Creation
Assume you have your B2B Blazor application published as a SaaS and want to add a feature that allows new customers to subscribe and start using it autonomously. For example, you can allow them to use your SaaS application for free for a limited time or to use a subset of its features for free forever.
Regardless of the approach you want to use to let your customers evaluate your product, when they subscribe to your app, a new Auth0 Organization will be created and their account will be added to that Organization.
In this scenario, your application will play two roles in relation to Auth0:
- The application role. This is the ordinary behavior of your Blazor application, i.e., the role in which your application offers its features to your customer's users. In this role, your users are authenticated in the context of an Auth0 Organization.
- The onboarding role. This is the role your application plays during a new customer's subscription process. At this stage, there is no Organization for your new users yet, and they are created and authenticated outside an Organization context. In this role, your application uses the Auth0 Management API to create a new Organization and eventually adds the new user to it as a member.
To play the application role, your application must be registered with Auth0 as a regular web app and configured to use Organizations.
To play the onboarding role, you need to register a new application in your Auth0 dashboard and make some changes to your Blazor application, as we will discuss.
As a starting point for following the steps illustrated in this article, you can download a sample Blazor application with the following command:
git clone --branch organization-manual --single-branch https://github.com/andychiare/MyBlazorSaaS
Follow the instructions in the attached README file to register and configure the application.
In the following sections, you will:
- Enable the onboarding role for your application.
- Start your customer's subscription process.
- Create the Auth0 Organization on behalf of your new subscriber customer.
Leverage Auth0's authentication and authorization services in your .NET applications.
DOWNLOAD THE FREE EBOOK
Enable the Onboarding Process
To enable your application's onboarding role, you need to register a new application in your Auth0 tenant, make some changes to your code to configure the onboarding process, and enable interaction with the Auth0 Management API.
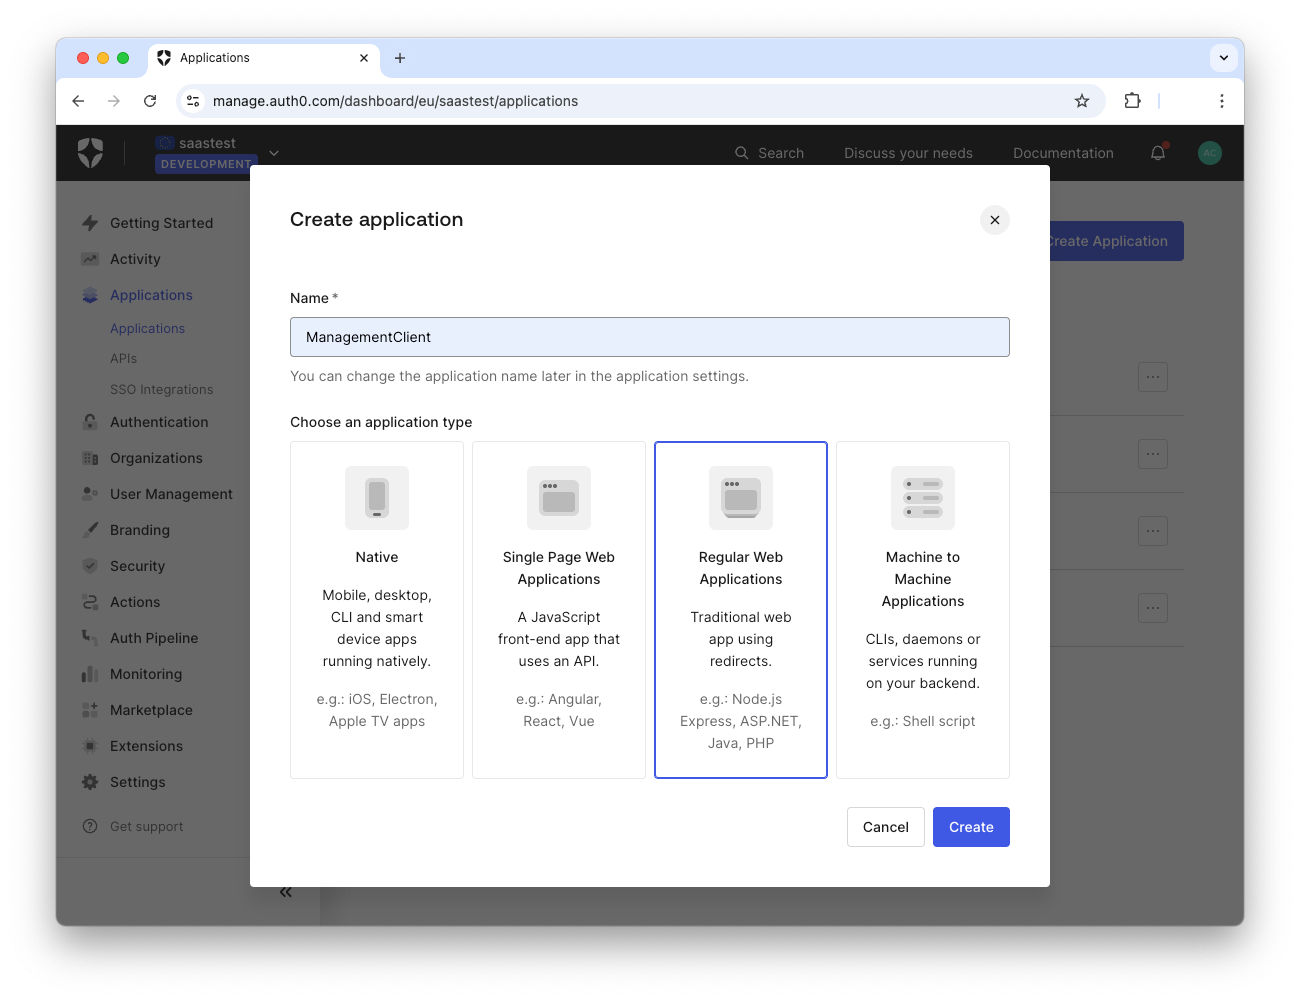
Register your application for onboarding
As a first step, access your Auth0 dashboard and register a new regular web app as shown in the following image:
Once you register your application, take note of its domain, client ID, and client secret. Then scroll down to the Application URIs section and assign the value https://localhost:7187/onboarding/callback to the Allowed Callback URLs field and the value https://localhost:7187/ to the Allowed Logout URLs field. Click Save Changes to confirm your changes.
Now, select the APIs tab of the application's configuration page and toggle the switch button corresponding to the Auth0 Management API. This will authorize your application to access that API. Now, expand the area below the Auth0 Management API item as shown below:
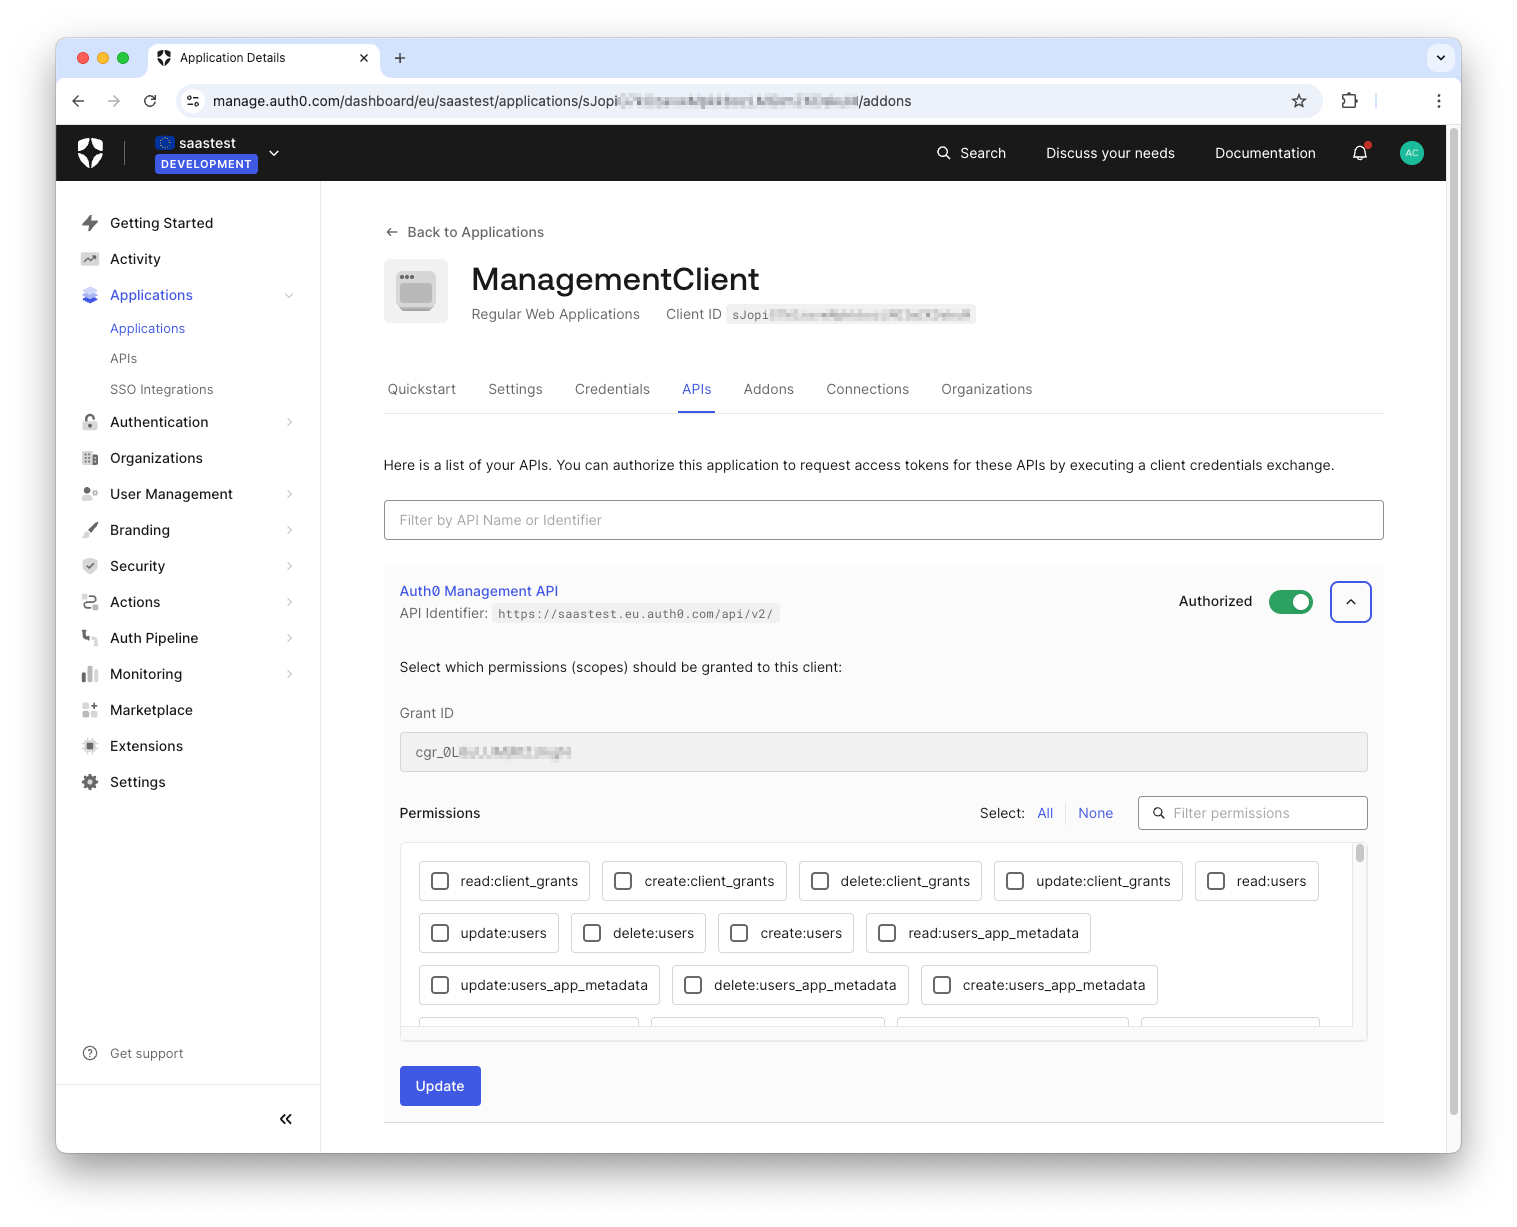
Here, you must select the permissions your application needs to onboard your customer. Specifically, it needs to create and configure an Organization and add a new user to it. For this purpose, enable the following permissions:
read:users, create:users, update:users, read:organizations, create:organizations, update:organizations, read:organization_members, create:organization_members, create:organization_connections
As a general rule, make sure you enable only the permissions that are strictly necessary for the operations you intend to perform on your tenant.
Don't forget to click the Update button to apply your changes.
Configure your application for onboarding
In your Blazor project, open the appsettings.json configuration file in the MyBlazorSaaS folder and add the keys highlighted below:
//MyBlazorSaaS/appsettings.json

{
 "Logging": {
 "LogLevel": {
 "Default": "Information",
 "Microsoft.AspNetCore": "Warning"
 }
 },
 "AllowedHosts": "*",
 "Auth0": {
 "Domain": "YOUR_DOMAIN",
 "ClientId": "YOUR_CLIENT_ID",
 // 👇 new settings
 "ManagementClientId": "YOUR_MANAGEMENT_CLIENT_ID",
 "ManagementClientSecret": "YOUR_MANAGEMENT_CLIENT_SECRET",
 "DefaultConnectionId": "YOUR_CONNECTION_ID"
 // 👆 new settings
 }
}
Replace the placeholders YOUR_MANAGEMENT_CLIENT_ID and YOUR_MANAGEMENT_CLIENT_SECRET with the corresponding values of the application you just registered with Auth0.
You also need the ID of the connection you want to use as the source of users for your application's Organizations. You can use various strategies to define how to provide users to your Organizations, but for the purpose of this article, you will use the default Username-Password-Database connection. So, in your Auth0 dashboard, click Database under the Authentication menu and then select Username-Password-Database. In the page that shows up, find the connection identifier just below the connection name, as highlighted in the following image:
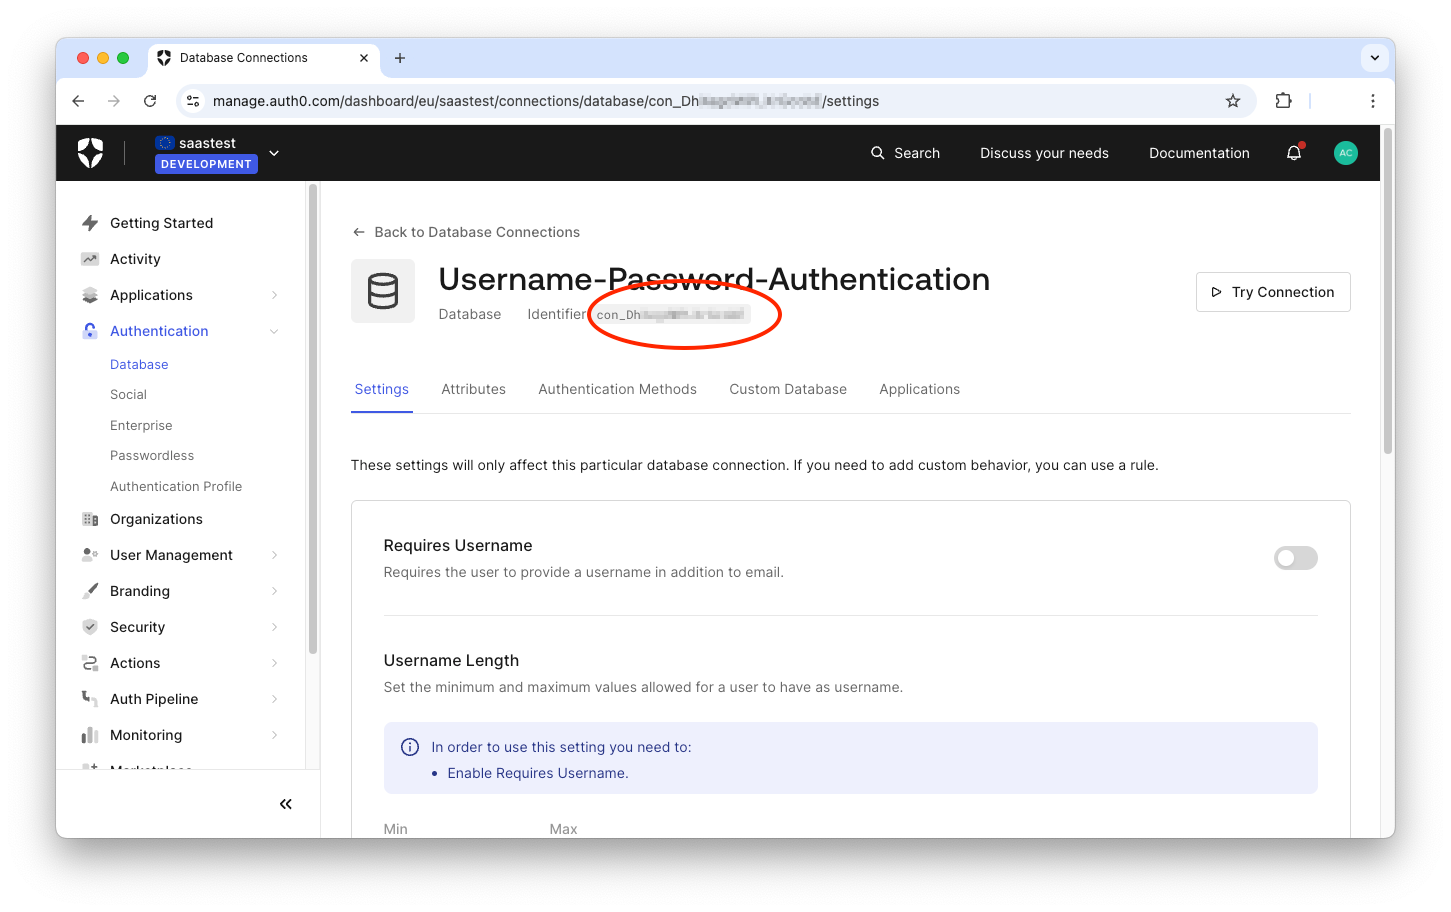
Replace the placeholder YOUR_CONNECTION_ID with this value.
Configure authentication and logout for onboarding
As mentioned earlier, when your new customer subscribes to your application, you need to allow them to sign up. However, your application is currently configured to authenticate users in the context of an Organization. The new user is not associated with any Organization, so you need a different flow to handle user signup and authentication outside the context of an Organization.
In terms of ASP.NET Core authentication, you need to configure a new authentication scheme. The code highlighted below defines this new authentication scheme in the Program.cs file of the folder MyBlazorSaaS:
//MyBlazorSaaS/Program.cs


//...existing code...

builder.Services
    .AddAuth0WebAppAuthentication(options => {
 options.Domain = builder.Configuration["Auth0:Domain"];
 options.ClientId = builder.Configuration["Auth0:ClientId"];
 options.Scope = "openid profile email";
    });

// 👇 new code
builder.Services
    .AddAuth0WebAppAuthentication("OnboardingScheme", options => {
 options.Domain = builder.Configuration["Auth0:Domain"];
 options.ClientId = builder.Configuration["Auth0:ManagementClientId"];
 options.ClientSecret = builder.Configuration["Auth0:ManagementClientSecret"];
 options.Scope = "openid profile email";
 options.CookieAuthenticationScheme = "OnboardingCookieScheme";
 options.CallbackPath = "/onboarding/callback";
    });
// 👆 new code

//...existing code...
In the code snippet above, you can see the existing authentication scheme, which authenticates the user in the context of an Organization. It uses the configuration data of the application role.
The new code uses the configuration data of the new application registration regarding the onboarding role of your application. In this case, you assigned the "OnboardingScheme" name to this new authentication scheme. In addition, you notice that we added a name for the cookie authentication scheme and a specific callback path, which is the relative path of the value you registered in the Allowed Callback URLs field. These two additional options are needed to prevent conflicts with the other authentication scheme, which uses the default names.
Since you added a new authentication scheme, you need to log out of this authentication scheme, too. In the Program.cs file, locate the definition of the logout endpoint and add the statements highlighted in the following code:
//MyBlazorSaaS/Program.cs


//...existing code...

app.MapGet("/account/logout", async (HttpContext httpContext, string returnUrl = "/") =>
{
  var authenticationProperties = new LogoutAuthenticationPropertiesBuilder()
          .WithRedirectUri(returnUrl)
          .Build();

  await httpContext.SignOutAsync(Auth0Constants.AuthenticationScheme, authenticationProperties);
  await httpContext.SignOutAsync(CookieAuthenticationDefaults.AuthenticationScheme);
  // 👇 new code
  await httpContext.SignOutAsync("OnboardingScheme", authenticationProperties);
  await httpContext.SignOutAsync("OnboardingCookieScheme");
  // 👆 new code
});

//...existing code...
Similarly to the existing logout statements, these new statements close the authenticated sessions associated with the Onboarding scheme.
A new Auth0-powered .NET app in less than a minute? Try out our templates
Install the Nugget package
Start the Subscription Process
Once the onboarding configuration is ready, let's implement the steps to let your customer subscribe to your application and create a new Organization.
Open the MainLayout.razor component in the MyBlazorSaaS/Components/Layout folder and replace the “About” markup with the one highlighted below:
<!-- MyBlazorSaaS/Components/Layout/MainLayout.razor -->

@inherits LayoutComponentBase

<div class="page">
    <div class="sidebar">
        <NavMenu />
    </div>

    <main>
        <div class="top-row px-4">
            <Login />
            <!-- 👇 new code -->
            <a href="Onboarding/Signup">Subscribe</a>
            <!-- 👆 new code -->
        </div>

        <article class="content px-4">
 @Body
        </article>
    </main>
</div>

<!-- ...existing code --->
This code just adds a Subscribe menu item at the top right of your Blazor application. It will look as in the following screenshot:
You see that the Subscribe menu item points to the Onboarding/Signup URL. So, let's implement a Razor component that handles this request.
Create the folder Onboarding under the MyBlazorSaaS/Components/Pages folder. Create a file Signup.razor in that Onboarding folder and put the following code in there:
<!-- MyBlazorSaaS/Components/Pages/Onboarding/Signup.razor -->

@page "/Onboarding/Signup"
@rendermode InteractiveServer
@using System.Web
@inject NavigationManager NavigationManager

<h1>Try MyBlazorSaaS for Free</h1>
<p>
 Enter your email address to sign up and create a new organization for you and your collaborators.
</p>

<div>
  <div class="form-group row">
    <label for="email" class="col-sm-2 col-form-label">Email</label>
    <div class="col-sm-6">
      <InputText
 type="email"
 @bind-Value="Email"
 placeholder="name@example.com"
        class="form-control"
 id="email"
 required/>
 </div>
 </div>
  <button class="btn btn-primary" @onclick="StartSignup">Get Started</button>
</div>

@code {
  private string Email = "";

  private void StartSignup()
  {
 NavigationManager.NavigateTo($"/account/signup?login_hint={HttpUtility.UrlEncode(Email)}");
  }
}
This code asks for the customer's email to start the onboarding process. It will be rendered as shown below:

When the customer enters their email address and clicks the Get Started button, they will be redirected to the /account/signup endpoint with the email address as a parameter.
To handle the signup request, open the Program.cs file in the MyBlazorSaaS folder and add the code highlighted in the following code snippet:
// MyBlazorSaaS/Program.cs

//...existing code..

app.MapGet("/account/logout", async (HttpContext httpContext, string returnUrl = "/") =>
{
  //...existing code..
});

// 👇 new code
app.MapGet("/account/signup", async (HttpContext httpContext, string login_hint) =>
{
  var authenticationProperties = new LoginAuthenticationPropertiesBuilder()
          .WithRedirectUri("/onboarding/createOrganization")
          .WithParameter("screen_hint", "signup")
          .WithParameter("login_hint", login_hint)
          .Build();

  await httpContext.ChallengeAsync("OnboardingScheme", authenticationProperties);
});
// 👆 new code

app.MapGet("/api/internalData", () =>
{
  //...existing code..
}

//...existing code..
You implement a minimal API endpoint to handle the request to the /account/signup URL. This endpoint takes the login_hint parameter containing the customer's email address and builds an authentication request. You can see that the authentication request uses the Universal Login's screen_hint parameter to ask Auth0 to show the signup form instead of the usual login form. It also passes the login_hint parameter to populate the username field. Finally, it specifies the URL to redirect the user to after the signup process is complete: /onboarding/createOrganization.
To start the signup process, it calls the httpContext.ChallengeAsync() method. Notice that in this case, the "OnboardingScheme" authentication scheme is specified since the user should be created and authenticated outside an Organization context.
In a real-world scenario, you should verify the user's email address before proceeding with the Organization creation. By default, Auth0 sends an email with a verification link to the user when they sign up, but it's up to you to check if the email is verified before allowing them to perform any action. We are omitting the email verification here for simplicity, but you can read this article to learn how to add the email verification step to your customer onboarding flow.
Create the Auth0 Organization
Once your customer starts the signup process with Auth0, they will create their account and be authenticated through the Universal Login page, which, by the way, you can customize to fit your design needs. As we have configured the signup request, after their account creation, they will be redirected to a page that will allow them to create their Organization.
Enable the management API client
To create the customer's Organization, your Blazor application needs to call the Auth0 Management API. This API allows you to do everything you can do via code via the Auth0 dashboard.
We will use the Auth0.NET SDK to enable your application to use the Auth0 Management API. The Auth0.NET SDK allows you to create a client for the Management API that we will call the management client. The Auth0.NET SDK consists of two packages:
- The Authentication API package, which allows you to handle login, logout, and signup using the Authentication API.
- The Management API package allows you to handle all the tenant management operations.
To learn more about the various Auth0 SDKs available for .NET, read this article.
Let's start by installing both packages in your Blazor server project hosted in the MyBlazorSaaS folder with the following commands:
dotnet add package Auth0.ManagementApi
dotnet add package Auth0.AuthenticationApi
As you will see in a minute, you need to create a slug version of the Organization name your customer will provide. In our sample project, we will use the Slugify package, but feel free to use the solution you prefer. To install Slugify in your project, run the following command:
dotnet add package Slugify.Core
Build the management API client
Once you add the packages that enable your Blazor application to call the Auth0 Management API, let's create the management client. Instead of creating a new instance of the management client each time we need to call the Auth0 Management API, we can build a singleton that helps us save time and resources beyond avoiding code duplication. For this purpose, add a new file named Auth0Management.cs to the MyBlazorSaaS folder and add the following code there:
using Auth0.ManagementApi;
using Auth0.AuthenticationApi;
using Auth0.AuthenticationApi.Models;

interface IAuth0Management
{
 Task<ManagementApiClient> getClient();
}

public class Auth0Management: IAuth0Management
{
  private string _domain = "";
  private string _clientId = "";
  private string _clientSecret = "";
  private ManagementApiClient managementClient = null;

  public Auth0Management(string domain, string clientId, string clientSecret)
  {
 _domain = domain;
 _clientId = clientId;
 _clientSecret = clientSecret;
  }

  public async Task<ManagementApiClient> getClient()
  {
    if (managementClient is null)
    {
      var authClient = new AuthenticationApiClient(_domain);
      var token = await authClient.GetTokenAsync(new ClientCredentialsTokenRequest
      {
 Audience = $"https://{_domain}/api/v2/",
 ClientId = _clientId,
 ClientSecret = _clientSecret
      });
 managementClient = new ManagementApiClient(token.AccessToken, _domain);
    }
    return managementClient;
  }
}
You can see here the definition of an interface, IAuth0Management, with just one method, getClient().
Below this interface, you can see the class implementation of this interface, Auth0Management. The constructor of this class takes three parameters, which are the values needed to build the management client, and stores them in private variables.
The getClient() method first checks if a management client instance already exists. In this case, the existing instance is returned. Otherwise, it creates an instance of the authentication client, authClient, and uses it to get an access token for the Auth0 Management API. Notice that in this case, we are using the client credential flow. As you will see soon, the parameters you are passing here are the ones coming from the registration of your app playing the onboarding role.
Then, it creates an instance of the management client passing the access token and the Auth0 domain.
To make the management client available to the application, you need to register it as a singleton service. Open the Program.cs in your MyBlazorSaaS folder and add the following code:
//...existing code..

// 👇 new code
builder.Services.AddSingleton<IAuth0Management>(sp =>
  new Auth0Management(
 builder.Configuration["Auth0:Domain"],
 builder.Configuration["Auth0:ManagementClientId"],
 builder.Configuration["Auth0:ManagementClientSecret"]
  )
);
// 👆 new code

var app = builder.Build();

//...existing code..
Notice the values you passed to the service constructor to configure the management client. From now on, whenever your code needs an instance of the management client, it can rely on the dependency injection mechanism.
Start the Organization creation
Now we can move forward creating the page that will ask for the Organization name and start the creation of the Organization.
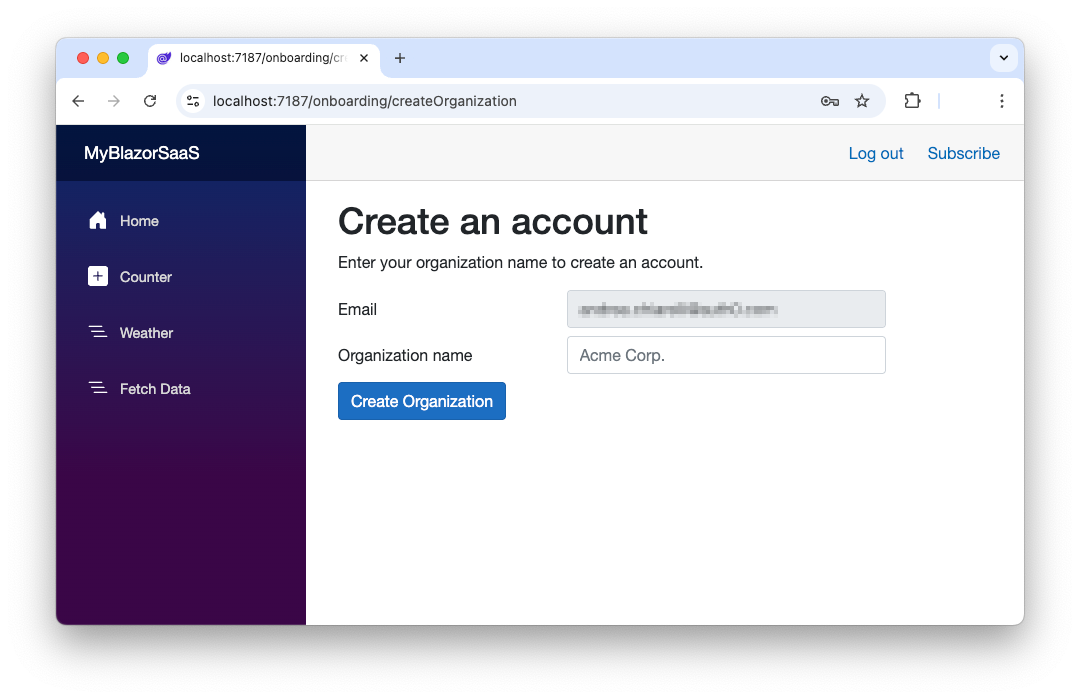
In the MyBlazorSaaS/Components/Pages/Onboarding folder, create a Razor component named CreateOrganization.razor with the following code:
<!-- MyBlazorSaaS/Components/Pages/Onboarding/CreateOrganization.razor -->

@page "/Onboarding/CreateOrganization"
@rendermode InteractiveServer

@using System.Security.Claims
@using Auth0.AuthenticationApi;
@using Auth0.ManagementApi;
@using Auth0.AuthenticationApi.Models;
@using Auth0.ManagementApi.Models
@using System.Web
@using Slugify
@using Microsoft.Extensions.Configuration

@inject NavigationManager NavigationManager
@inject IConfiguration Configuration
@inject IAuth0Management auth0Management

<h1>Create an account</h1>
<p>
Enter your organization name to create an account.
</p>

<div class="my-2">
  <div class="form-group row">
    <label for="email" class="col-sm-4 col-form-label">Email</label>
    <div class="col-sm-6">
      <InputText
 type="email"
 @bind-Value="Email"
 id="email"
        class="form-control"
 disabled/>
 </div>
 </div>

  <div class="form-group row">
    <label for="organization" class="col-sm-4 col-form-label">Organization name</label>
    <div class="col-sm-6">
      <InputText
 @bind-Value="OrganizationName"
 placeholder="Acme Corp."
 id="organization"
        class="form-control"
 required/>
 </div>
 </div>

  <button class="btn btn-primary" @onclick="StartCreateOrganization">Create Organization</button>
</div>

@if (!string.IsNullOrWhiteSpace(Message)) {
  <div class="alert alert-danger" role="alert">
 @Message
 </div>
}

@code {
  [CascadingParameter]
  private Task<AuthenticationState>? authenticationState { get; set; }
  private string Email = "";
  private string UserId = "";
  private string OrganizationName = "";
  private string Message = "";

  protected override async Task OnInitializedAsync()
  {
    if (authenticationState is not null)
    {
      var state = await authenticationState;

      if (state.User?.Identity?.IsAuthenticated??false)
      {
 Email = state.User?.FindFirst(c => c.Type == ClaimTypes.Email)?.Value??String.Empty;
 UserId = state.User?.FindFirst(c => c.Type == ClaimTypes.NameIdentifier)?.Value??String.Empty;
      } else {
 NavigationManager.NavigateTo("/Onboarding/Signup");
      }
    }
  }

  private async Task StartCreateOrganization()
  {
    if (!String.IsNullOrEmpty(OrganizationName))
    {
 Organization organization;

      try {
        //Get management client
        var managementClient = await auth0Management.getClient();

        //Create organization
 organization = await managementClient.Organizations.CreateAsync(
          new OrganizationCreateRequest() {
 Name = new SlugHelper().GenerateSlug(OrganizationName),
 DisplayName = OrganizationName,
 EnabledConnections = [new OrganizationConnectionCreateRequest() { ConnectionId = Configuration["Auth0:DefaultConnectionId"]}]
          }
        );

        //Add member
        await managementClient.Organizations.AddMembersAsync(
 organization.Id,
          new OrganizationAddMembersRequest() {
 Members = [UserId]
          }
        );

        // Redirect to the Organization login
 NavigationManager.NavigateTo($"/Account/Login?organizationId={organization.Id}");
      } catch (Exception ex) {
 Message = "Failed to create an organization.";
      }
    } else {
 Message = "Organization name is required.";
    }
  }
}
There is a lot in this code. Let's analyze it one piece at a time.
First of all, the markup defines a form that will be rendered as in the following image:
The OnInitializedAsync() method defines the checks to be performed when the user lands on this page:
//...existing code...

  protected override async Task OnInitializedAsync()
  {
    if (authenticationState is not null)
    {
      var state = await authenticationState;

      if (state.User?.Identity?.IsAuthenticated??false)
      {
 Email = state.User?.FindFirst(c => c.Type == ClaimTypes.Email)?.Value??String.Empty;
 UserId = state.User?.FindFirst(c => c.Type == ClaimTypes.NameIdentifier)?.Value??String.Empty;
      } else {
 NavigationManager.NavigateTo("/Onboarding/Signup");
      }
    }
  }

//...existing code...
Basically, it makes sure that the user is authenticated. In this case, it extracts their email address and ID from the claims provided by Auth0 through the ID token. Otherwise, the user will be redirected to the signup form.
The StartCreateOrganization() method is invoked when the user clicks the Create Organization button. Let's discuss the main steps implemented in its body.
Get the management client
In the first step, you get an instance of the management client:
//...existing code...

//Get management client
var managementClient = await auth0Management.getClient();

//...existing code...
You simply call the getClient() method of the auth0Management instance injected through the @inject IAuth0Management auth0Management statement at the beginning of the page.
Create the Organization
In the next step, you use the management client to create a new Organization:
//...existing code...

organization = await managementClient.Organizations.CreateAsync(
  new OrganizationCreateRequest() {
 Name = new SlugHelper().GenerateSlug(OrganizationName),
 DisplayName = OrganizationName,
 EnabledConnections = [new OrganizationConnectionCreateRequest()
      { ConnectionId = Configuration["Auth0:DefaultConnectionId"]}]
  }
);

//...existing code...
You use the managementClient.Organizations.CreateAsync() method, passing an instance of the OrganizationCreateRequest class. This instance contains the minimal parameters to create an Organization:
Name. This is a unique logical identifier for the Organization, which follows the usual rules for variable names (no spaces, no special characters, etc.). We generate this identifier as a slug version of the Organization name provided by the user.DisplayName. This is the user's friendly name for the Organization.EnabledConnections. This is a list of connections enabled by the Organization. In our case, we are adding the default Username-Password-Database connection we discussed at the beginning of this article.
Add a member to the Organization
After creating the Organization, you add the current user as its member with the following code:
//...existing code...

await managementClient.Organizations.AddMembersAsync(
 organization.Id,
  new OrganizationAddMembersRequest() {
 Members = [UserId]
  }
);

//...existing code...
In short, you call the managementClient.Organizations.AddMembersAsync() method, passing the ID of the newly created Organization and the ID of the current user in the form of the OrganizationAddMembersRequest instance.
The final step is to redirect the user to log in in the context of the Organization just created:
//...existing code...

NavigationManager.NavigateTo($"/Account/Login?organizationId={organization.Id}");

//...existing code...
This redirection will not show the login form because the user has already been authenticated. However, the user will be silently authenticated in the context of the specified Organization.
Final Touch
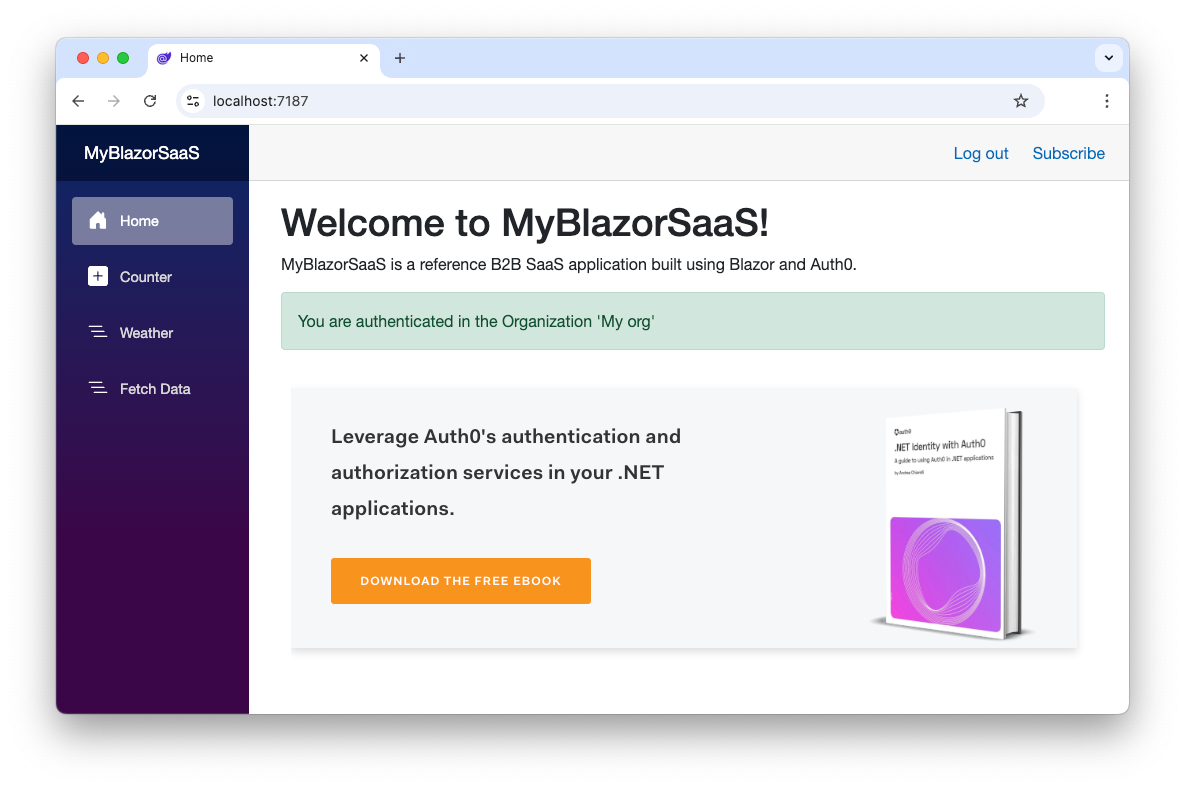
To complete the flow and give the user feedback on the fact they are logged in to their new Organization, let's add a message with the Organization name on the home page. Open the Home.razor page in the MyBlazorSaaS/Components/Pages folder and add the code highlighted below:
<!-- MyBlazorSaaS/Components/Pages/Home.razor -->

@page "/"
@inject IAuth0Management auth0Management
<!-- 👆 new code -->

<PageTitle>Home</PageTitle>

<p>
MyBlazorSaaS is a reference B2B SaaS application built using Blazor and Auth0.
</p>

<!-- 👇 new code -->
@if (!string.IsNullOrWhiteSpace(OrganizationMessage)) {
  <div class="alert alert-success" role="alert">
 @OrganizationMessage
 </div>
}
<!-- 👆 new code -->

<!-- ...existing markup... -->

<!-- 👇 new code -->
@code {
  [CascadingParameter]
  private Task<AuthenticationState>? authenticationState { get; set; }
  private string OrganizationMessage = "";

  protected override async Task OnInitializedAsync()
  {
    if (authenticationState is not null)
    {
      var state = await authenticationState;

      if (state.User?.Identity?.IsAuthenticated??false)
      {
        var organizationId = state.User?.FindFirst(c => c.Type == "org_id")?.Value??String.Empty;
        if (!string.IsNullOrEmpty(organizationId))
        {
          var managementClient = await auth0Management.getClient();
          var organization = await managementClient.Organizations.GetAsync(organizationId);
 OrganizationMessage = $"You are authenticated in the Organization '{organization.DisplayName}'";
        }
      }
    }
  }
}
<!-- 👆 new code -->
The markup you added shows an alert message when the OrganizationMessage variable has a non-empty string value. The code block you added at the bottom of the file checks if the user is authenticated. In that case, it gets the Organization ID from the user's claims and uses the management client instance to retrieve the display name of the current Organization.
The final result is a page like the following:
Awesome! You added a new powerful feature that qualifies your Blazor application as a modern B2B SaaS application: the ability to let your new customers autonomously subscribe to your services by leveraging the power of Auth0 Organizations.
Try out Auth0 authentication for free.
Get started →Conclusion
I hope that now you have all the elements to allow your new customers to register for your B2B SaaS application.
You have seen that your application plays two roles in the Auth0 context: the ordinary application role and the onboarding role for your new customer.
In the onboarding role, your application needs to be authorized to access the Auth0 Management API and must allow your new customer to register outside the context of an Organization. Once registered, your application uses the Management API to create a new Organization for the new customer and add them as a member.
At this point, your customer's onboarding is complete. They can authenticate in the new Organization and explore your application's features freely.
Stay tuned to learn how to evolve your Blazor Web application as a B2B SaaS.
You can download the final project built in this article from this GitHub repository.
About the author

Andrea Chiarelli
Principal Developer Advocate
I have over 20 years of experience as a software engineer and technical author. Throughout my career, I've used several programming languages and technologies for the projects I was involved in, ranging from C# to JavaScript, ASP.NET to Node.js, Angular to React, SOAP to REST APIs, etc.
In the last few years, I've been focusing on simplifying the developer experience with Identity and related topics, especially in the .NET ecosystem.