

TL;DR Profiling your React code is simple using the tools providing by the react-addons-perf package. Once you know where React is wasting time, you can improve the performance by using the correct keys, implementing shouldComponentUpdate in your components, and extending from PureComponent instead of regular Component.
React is fast. Like, hella fast. The core team spends lots of time and money making sure that React only makes the changes to the DOM that actually need to be made based on changes in state. However, as developers, we need to be aware that the code we write and the way we write it have huge impacts on the performance of our applications. We can't just expect the framework to be able to figure everything out.
The reconciliation process React goes through when updates are made can be quite complex. I recommend you read Facebook's article on reconciliation in React for a better understanding.
There are two types of wasted operations that can happen in React. The first is calculating pieces of the virtual DOM that won't change. The second is making changes to the actual DOM when those changes are not necessary.
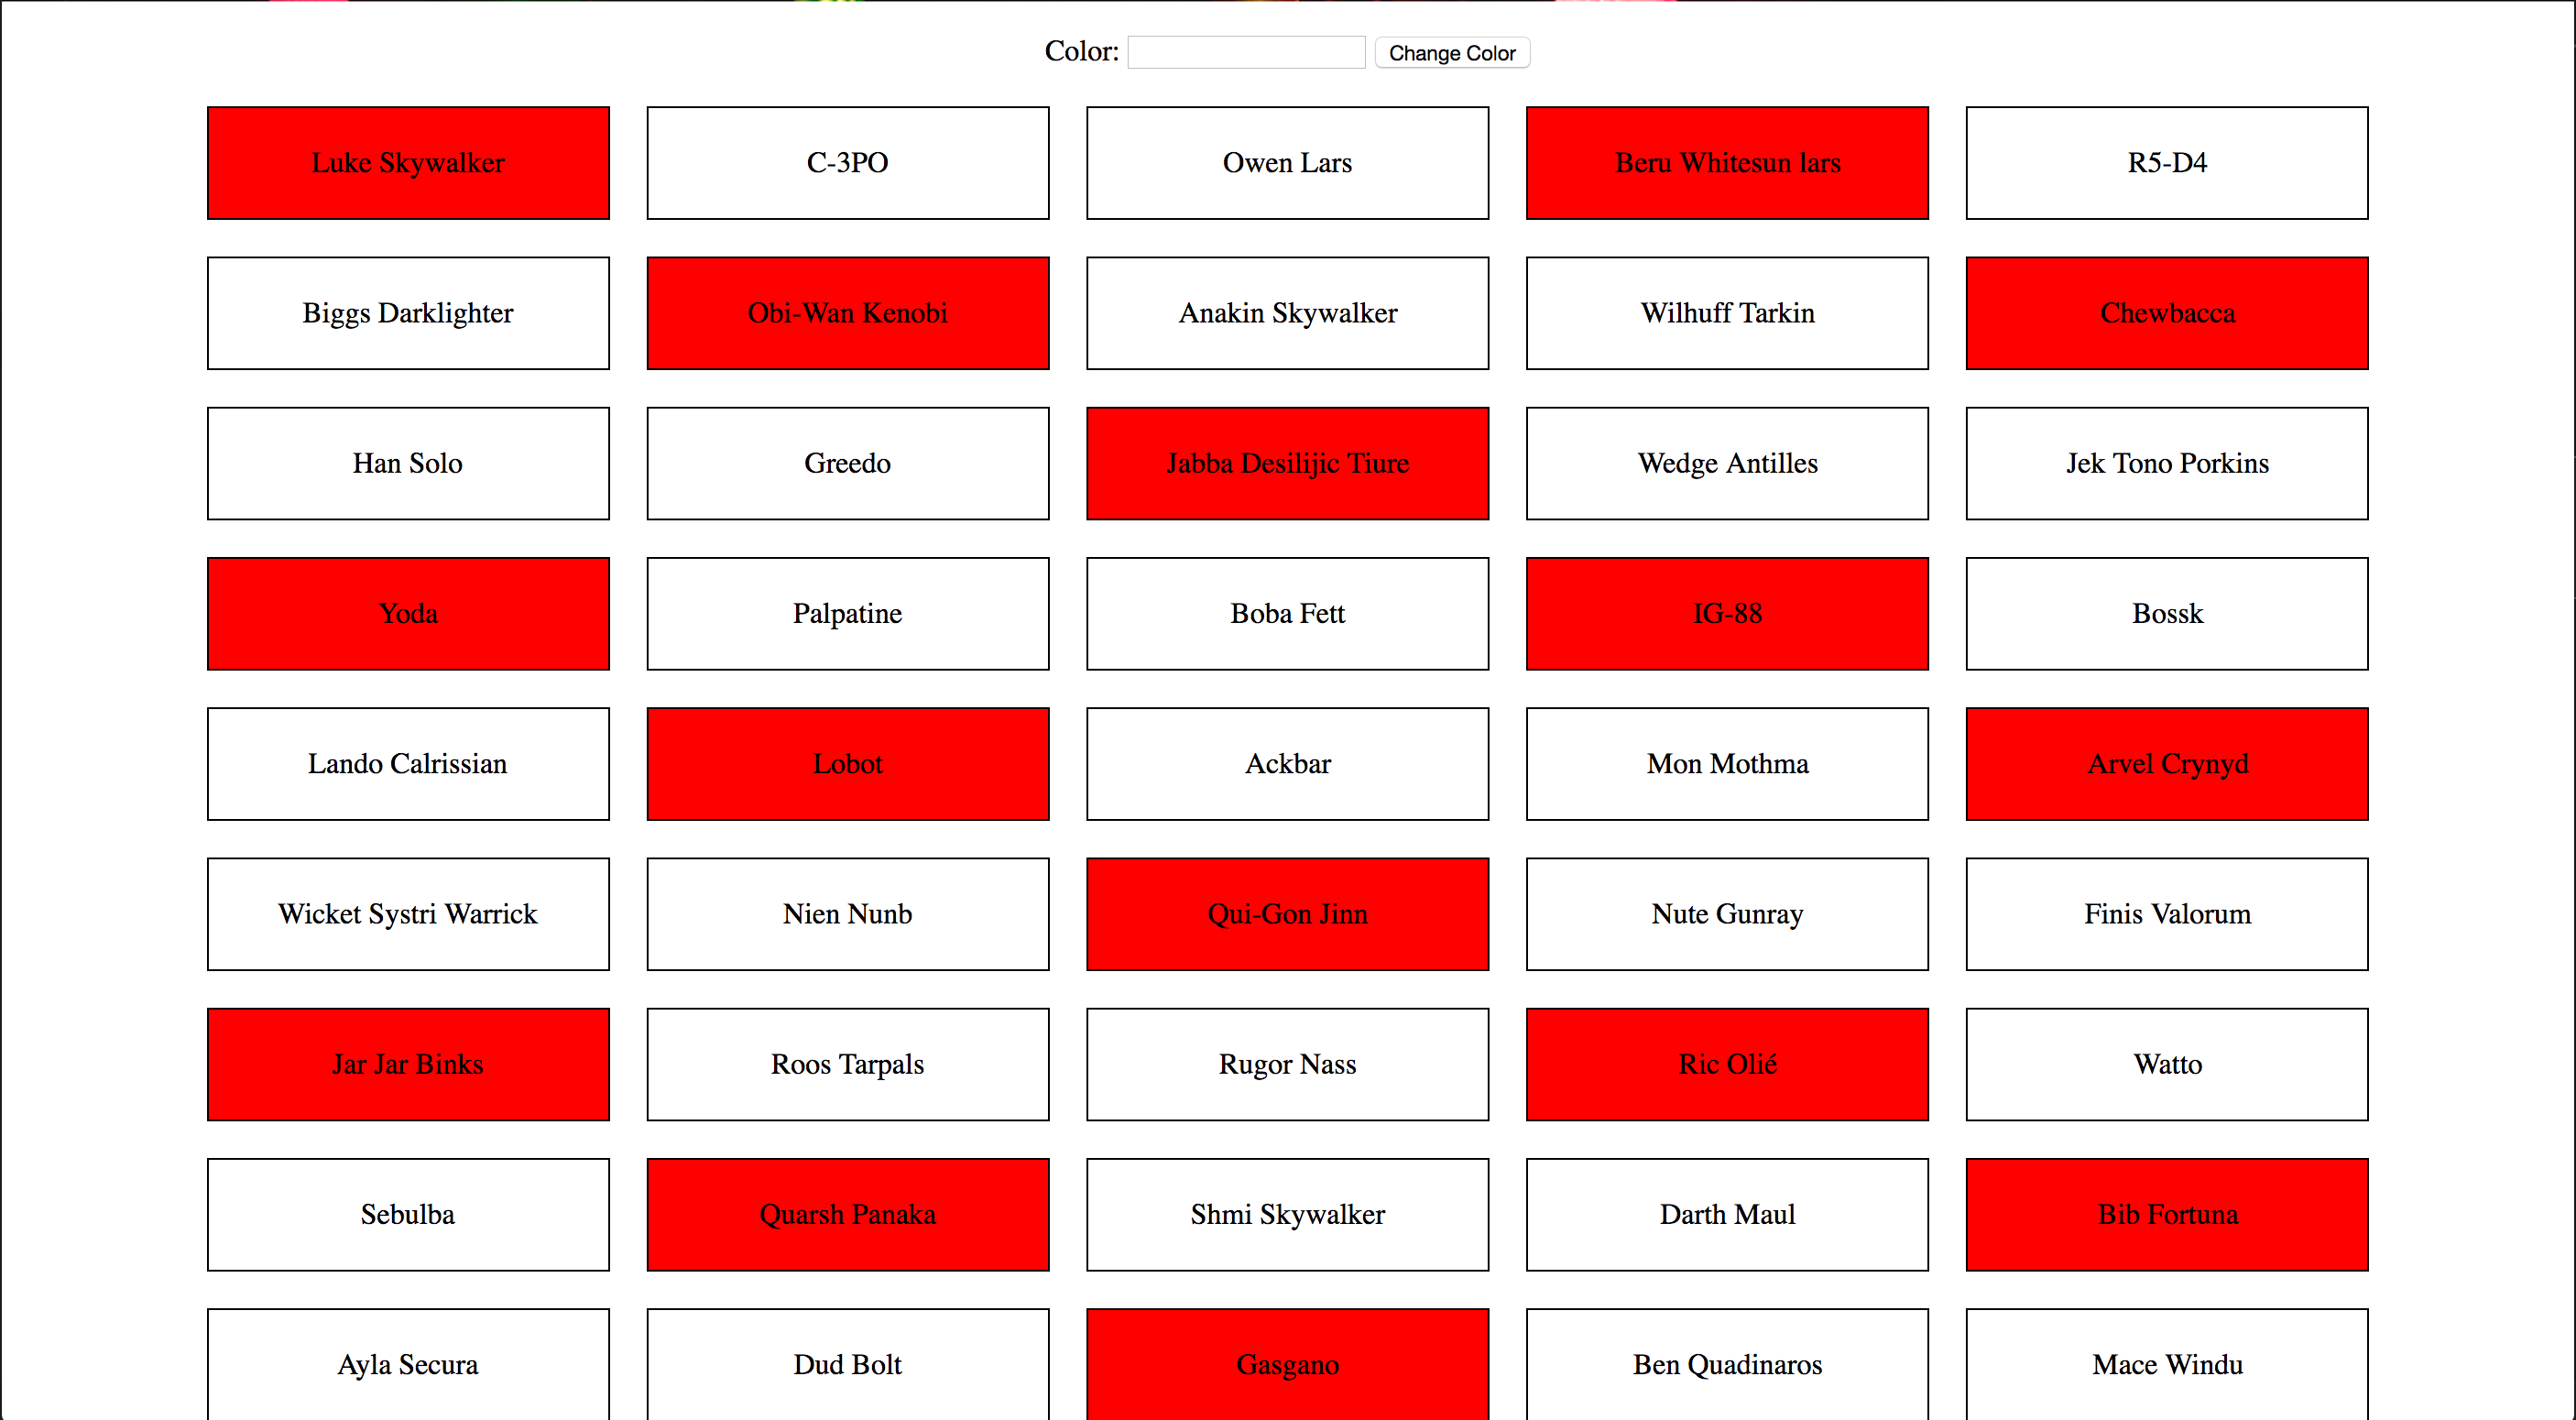
We are going to take a look at a small application that can definitely be optimized. There is a form we can use to change the desired color. Then a bunch of boxes with Star Wars characters' names are printed to the screen underneath the form. We will start by getting some data printed to the console so we can tell if our optimizations are working. Then we will implement different ways of optimization.
Let's get to it!
Note: I will be using Node version 6.9.2 for this post.
Setup
First, we need to set things up. Clone the repo that holds the initial code for this application and install all the dependencies using npm. For those who are familiar with yarn, you can use it to install the dependencies instead of npm. If you'd rather just download the source, you can get that from the Github repo.
git clone https://github.com/searsaw/optimizing-react.git
cd optimizing-react
npm install # or `yarn` if you have it
npm run serve # or `yarn run serve`
Open up a browser to localhost:8080 and get to know the application a bit. If you enter a color such as red or a hex color such as #ff0000 and hit the "Change Color" button, it will change the background of every third square to that color. If you click on a square, it will be removed from the group.
Profiling the Application
Now that we have the application on our machines, we need a way to profile it to see where React is wasting time. Luckily, the team over at Facebook (heard of them?) has created a package called react-addons-perf. It's pretty simple to use. When we are ready for it to start profiling, we call Perf.start(). We do some actions to profile and then call Perf.stop(). Once we have some profiled data, there are a few tables we can output to see some of this data. The two we will concentrate on will be Perf.printWasted() and Perf.printOperations(). In this case, wasted means, as stated before, that React calculated the new virtual DOM, compared it to the old one, and saw that there were some pieces it calculated that didn't change. This means it wasted time creating the new virtual DOM for pieces of the page that won't change at all. Operations are the changes React made to the actual DOM to make the it mirror the virtual DOM.
npm install --save-dev react-addons-perf # or `yarn add --dev react-addons-perf`
I have created a simple component that wraps react-addons-perf to make working with it much easier. Create a file at src/components/PerfProfiler/index.js and put the following in it.
import React from 'react';
import Perf from 'react-addons-perf';
import styles from './styles.css';

class PerfProfiler extends React.Component {
  constructor(props) {
    super(props);

    this.state = { started: false };
  }

  toggle = () => {
    const { started } = this.state;

    started ? Perf.stop() : Perf.start();

    this.setState({ started: !started });
  }

  printWasted = () => {
    const lastMeasurements = Perf.getLastMeasurements();

    Perf.printWasted(lastMeasurements);
  }

  printOperations = () => {
    const lastMeasurements = Perf.getLastMeasurements();

    Perf.printOperations(lastMeasurements);
  }

  render() {
    const { started } = this.state;

    return <div className={styles.perfProfiler}>
      <h1>Performance Profiler</h1>
      <button onClick={this.toggle}>{started ? 'Stop' : 'Start'}</button>
      <button onClick={this.printWasted}>Print Wasted</button>
      <button onClick={this.printOperations}>Print Operations</button>
    </div>;
  }
}

export default PerfProfiler;
Next create another file alongside this one at src/components/PerfProfiler/styles.css and put the following in it.
.perf-profiler {
  display: flex;
  flex-direction: column;
  position: absolute;
  right: 50px;
  top: 20px;
  padding: 10px;
  background: #bada55;
  border: 2px solid black;
  text-align: center;
}

.perf-profiler > h1 {
  font-size: 1.5em;
}

.perf-profiler > button {
  display: block;
  margin-top: 10px;
  padding: 5px;
}
Lastly, we need to add the PerfProfiler to the application. In src/components/App.js, add the following.
import PerfProfiler from './PerfProfiler'; // This import should be at the top with the rest
...
return <div id="container">
<PerfProfiler /> <!-- Add this line to put the profiler on the page --->
<div id="form-container">
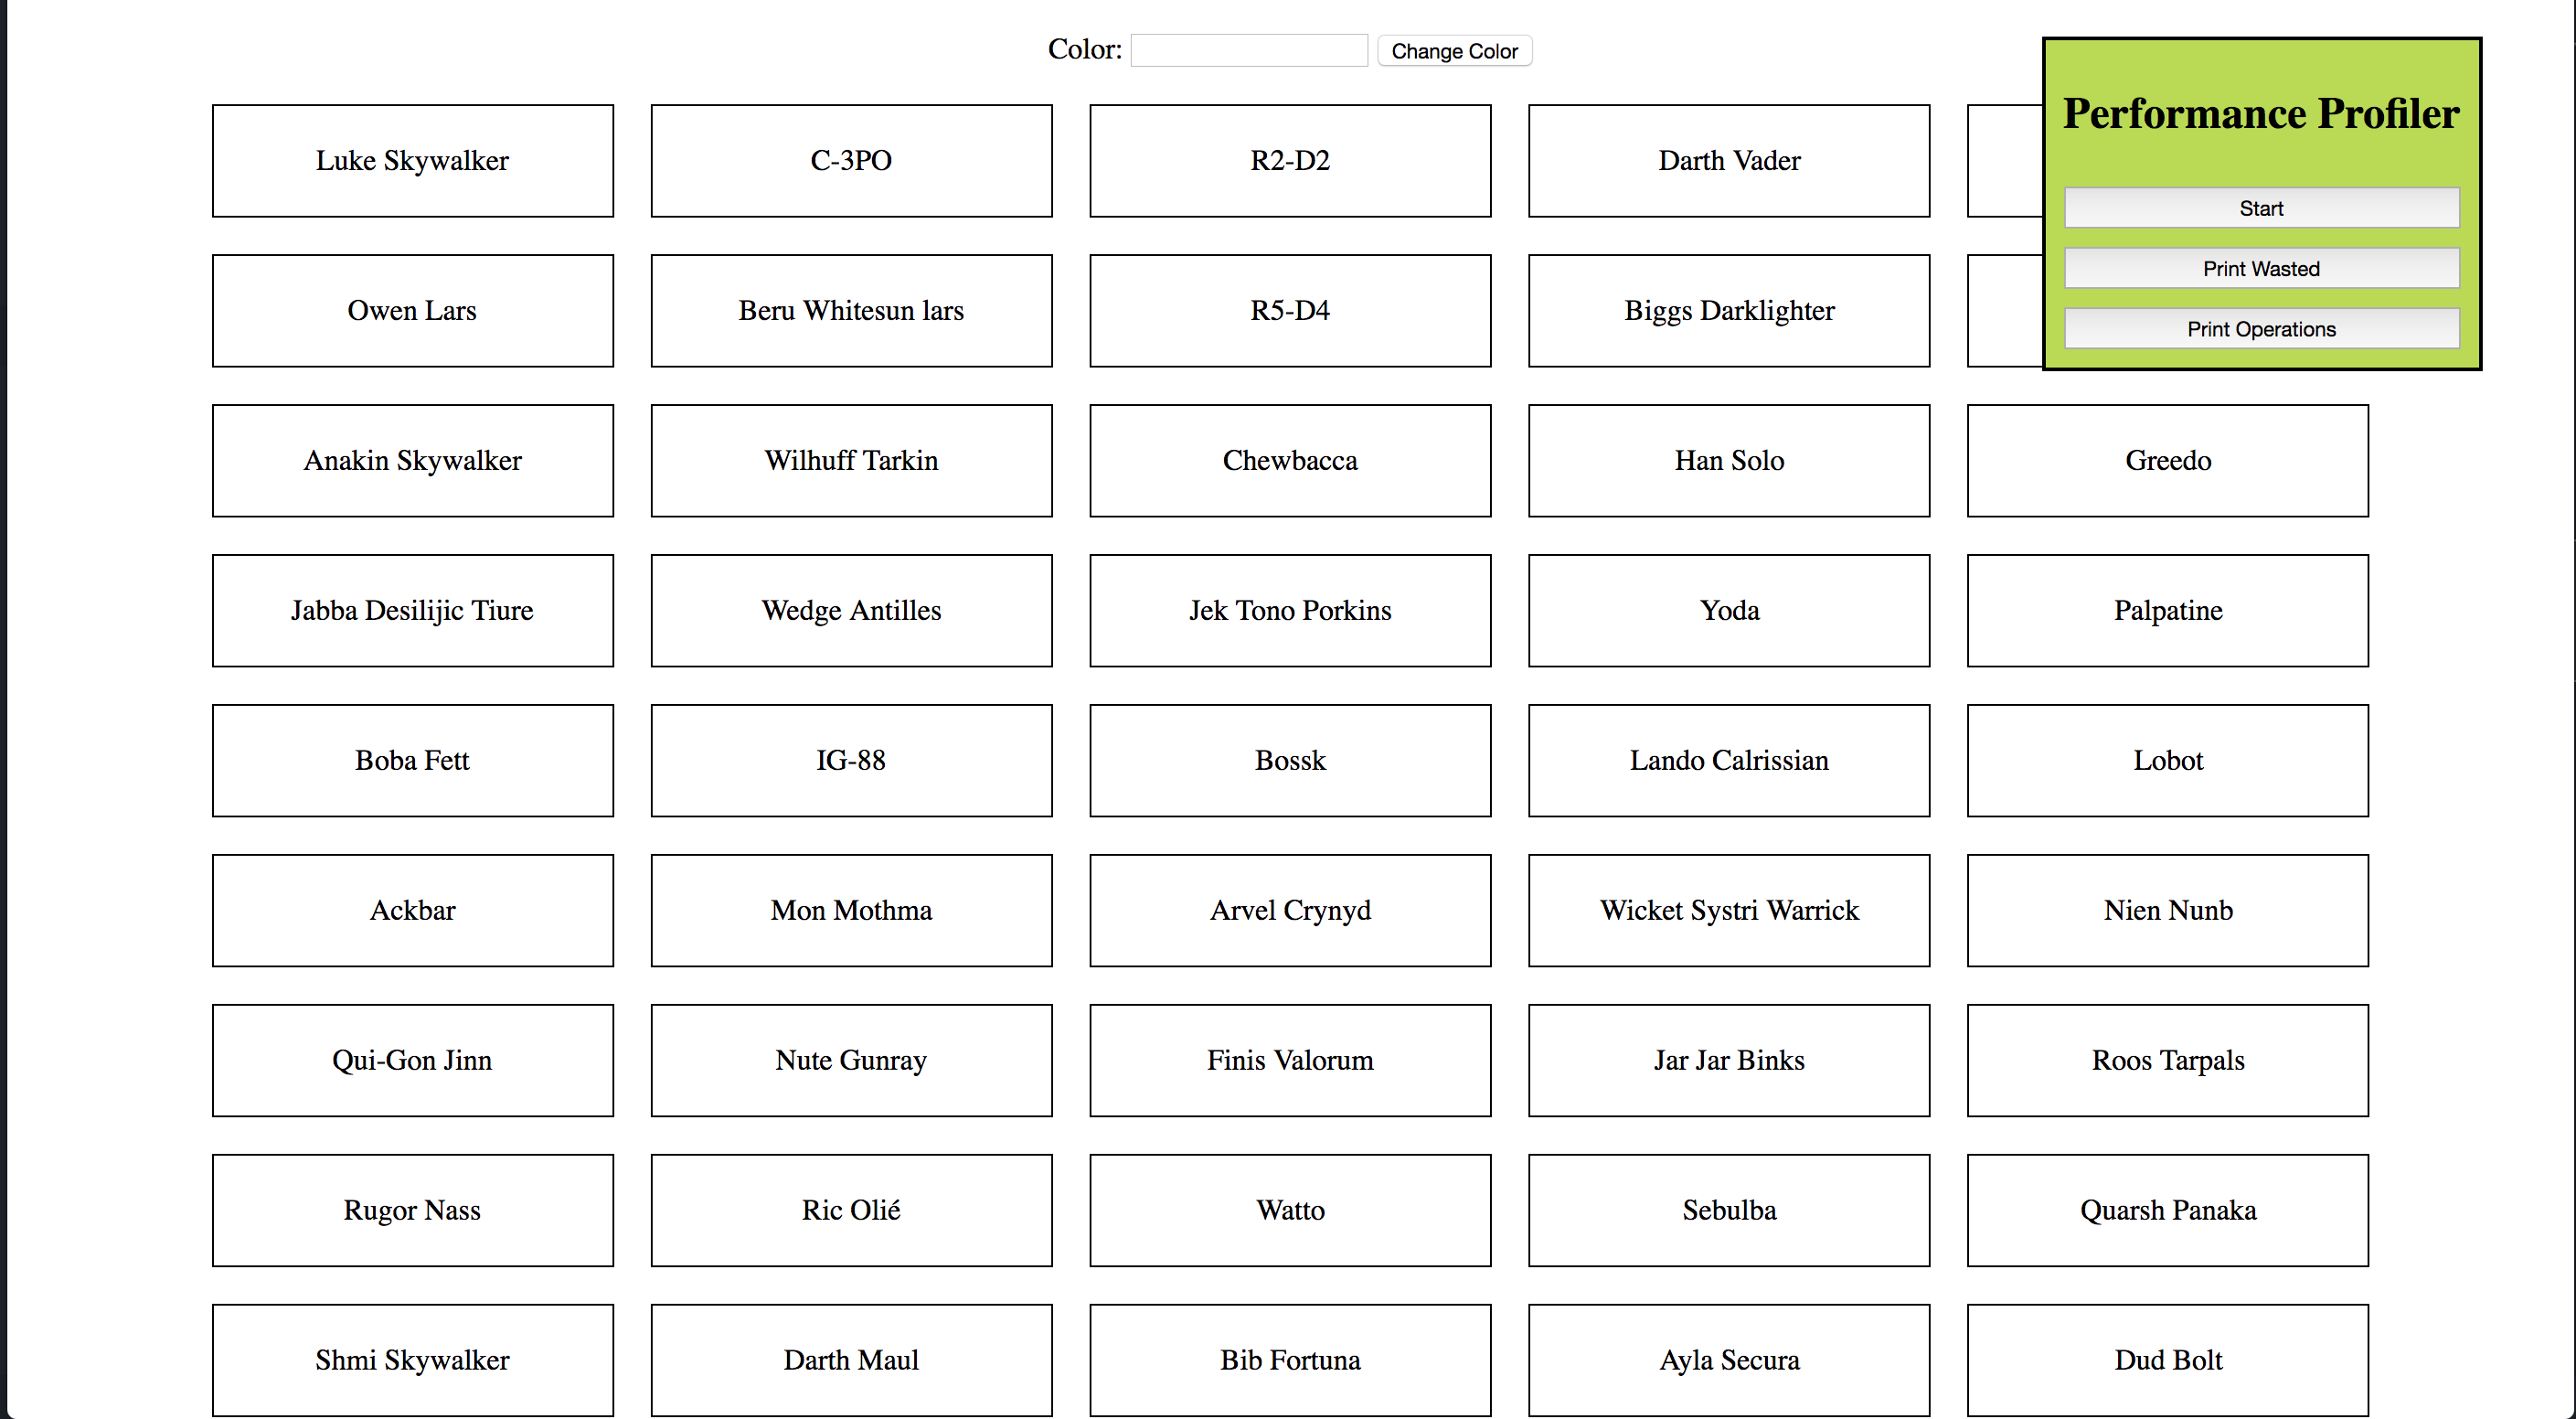
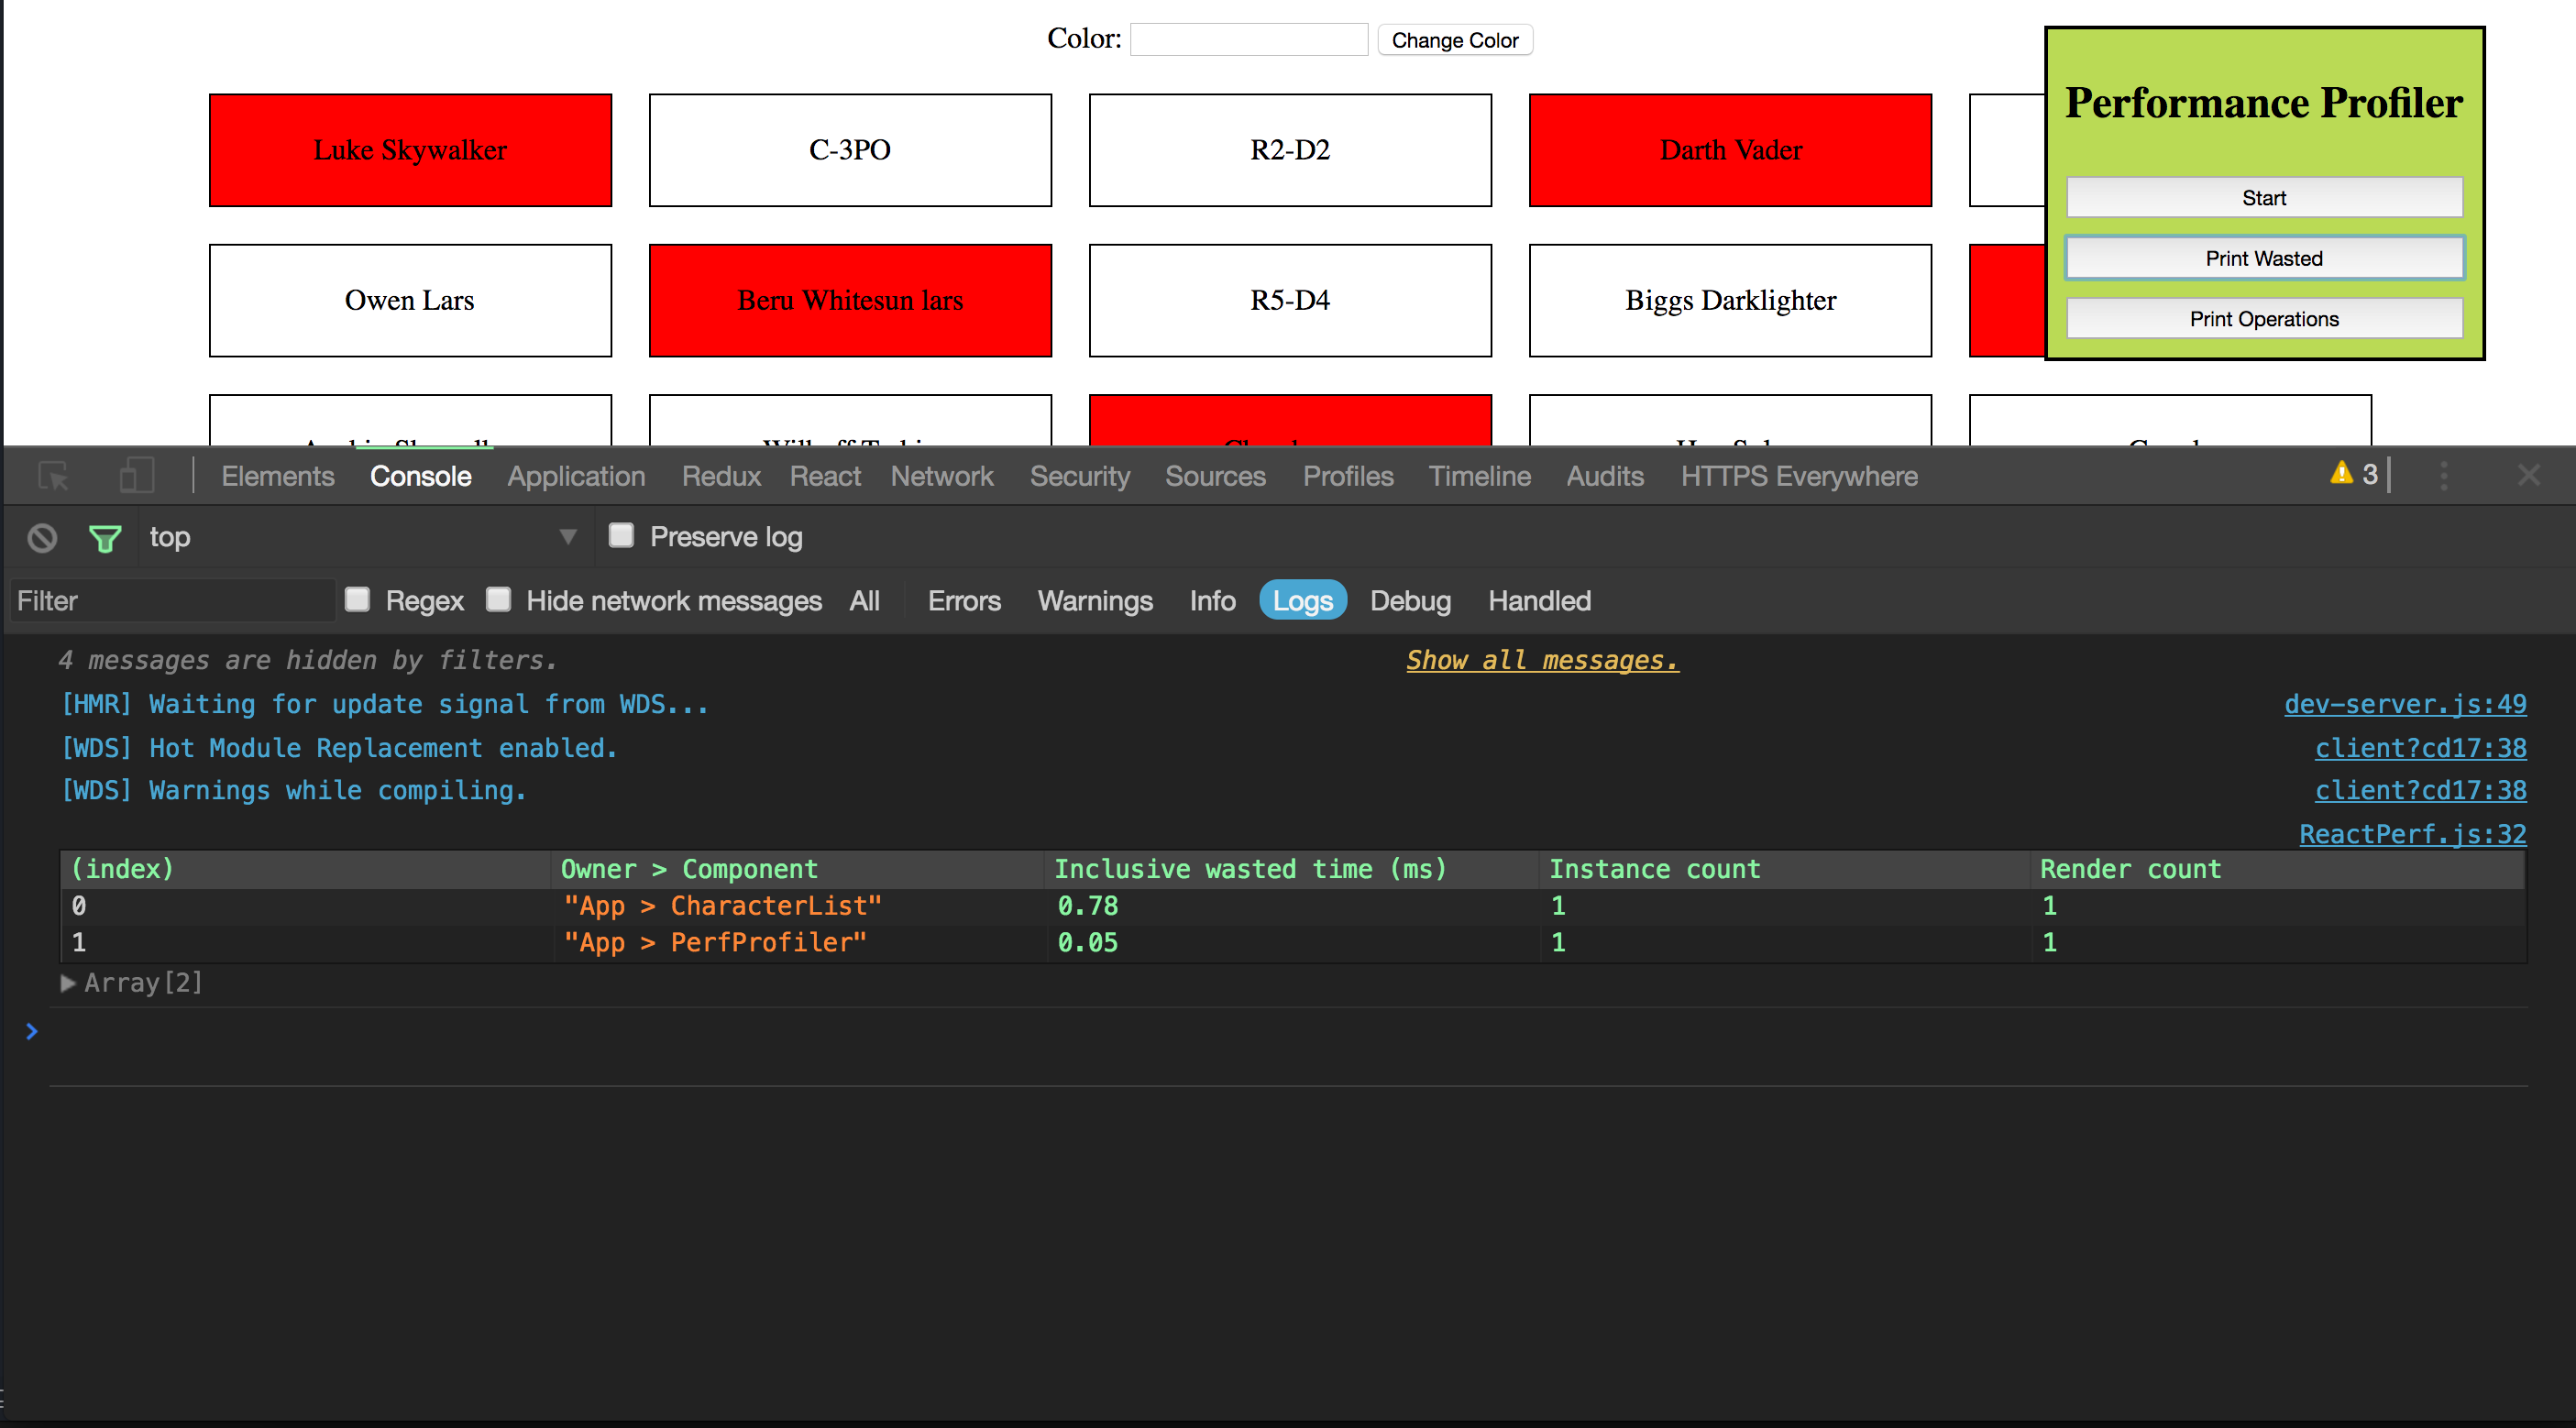
<Form onSubmit={this.onFormSubmit} />If you restart the dev server and view our application in the browser again, you will see a box in the top right corner. We will use this to turn the profile on and off and to output our data to the developer's console.
If you press "Start," change the color, press "Stop," and then click "Print Wasted," you will be able to see a table printed out in the developer's console that shows all the wasted calculations React had to perform.

The Importance of Keys in Lists
If you open the console now, you will see a warning from React, telling us that we need to have a key prop on each item in our list of characters so React can identify each item individually. So let's do as it says and add a key prop. Open up src/components/CharacterList/index.js and add a key prop that is equal to the index of the character in the array we are iterating over.
{characters.map((c, i) =>
  <Character
    key={i}
    character={c}
    style={getStyles(color, i)}
    onClick={this.removeCharacter(i)} />
)}
That should take care of the warning. Now, let's see if we have any wasted operations when we remove a character by clicking on it. To profile this, click on "Start" on the profiler. Then click on a character. You're better off clicking on one near the top. Then click on "Stop" on the profiler. Let's see if there were any wasted calculations by clicking on "Print Wasted." You will see that there are a couple wasted operations that occurred. The instance and render counts will be equal to the number of characters that are before the one you removed. We will tackle this waste a bit later.
Now let's look at the operations that occurred. Click on "Print Operations."
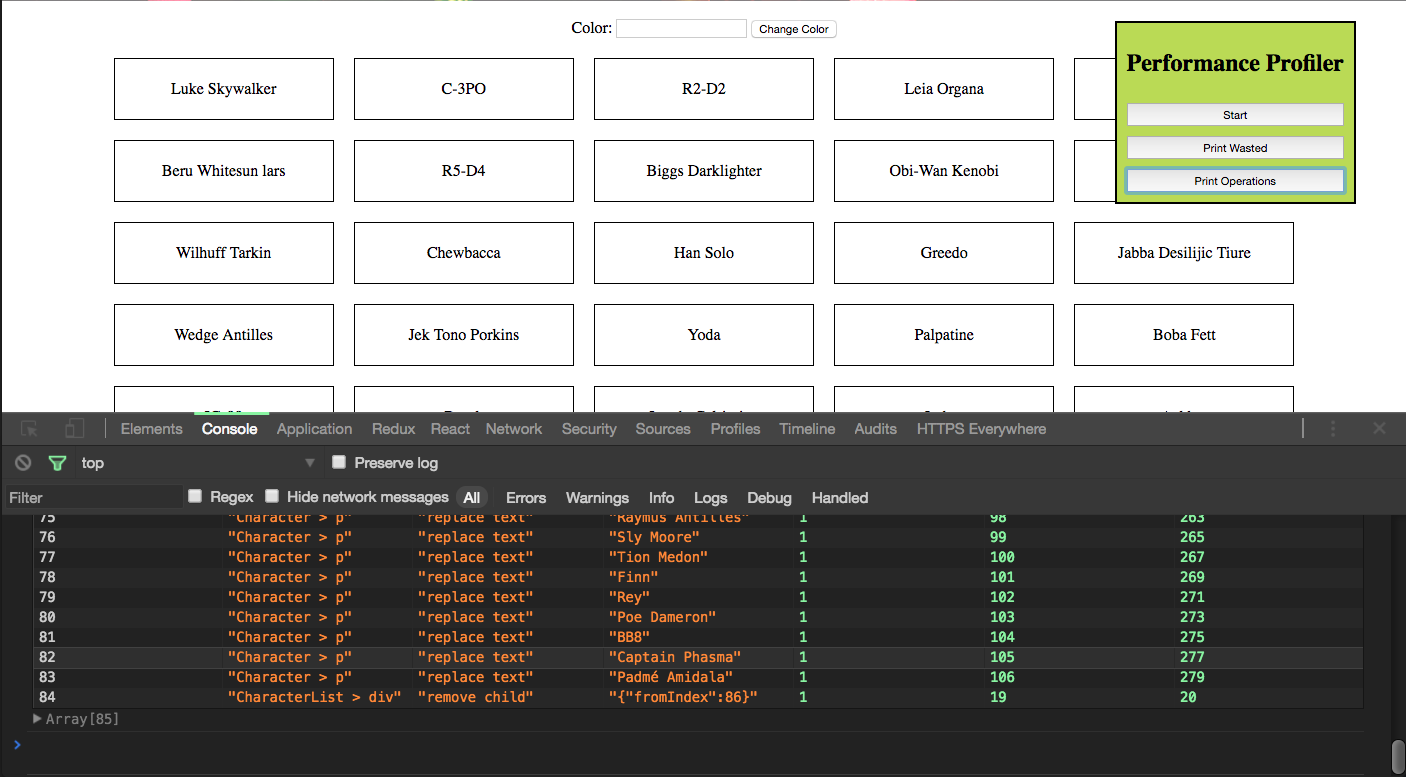
Whoa! Eighty four operations just to remove one element from the page? That doesn't seem right. If we look more closely at the data given to us, we see that most of the operations were just text replacements. We didn't tell it to update any text. Did we?
Well, yeah. We did. Unintentionally, but we did. React uses the key prop as the way of identifying unique items in a list. The way React works is it renders the virtual representation of the DOM. It's essentially just a giant JavaScript object. Whenever something changes, it rerenders it and compares the new one to the old one. Whatever has changed gets updated in the real DOM. If we remove an item in an array that is iterated over using the index of the array as the key, the next rerender of the DOM will have decreased the index by one of everything above the one we removed.
['one', 'two', 'three', 'four', 'five']
          ^
          |-- let's remove this one

['one', 'three', 'four', 'five']
Notice in the "drawing" above, in the first array, one is at index 0, two is at index 1, three is at index 2, and so on. Then when we remove 'two' from the array, the indexes of everything after two have shifted down by one. In our application, when we remove a square, the index for each item after the one we removed is shifted down one, which means so is its key. When React compares the virtual DOM representation of each item by comparing the ones with the same key, it will see that the text in it has changed and will therefore will "replace text" in everyone of the items after the item we removed. Then it will remove the last one since it thinks it was the one removed.
We need to change our code somehow so that React will only "remove child" on the one we clicked on and will leave the others alone. We can accomplish this by giving each item a unique key that won't change between renders. The best way to do this is to base the key on a piece of data that is displayed in the square. Since we have all of a character's data when we render a Character component, let's use a piece of data from each character. Let's use its name since it won't change and we know it will be unique for each character in our array. Change the key prop like so.
...
<Character
  key={c.name}
  character={c}
  style={getStyles(color, i)}
...
We have simply changed the key to instead be equal to c.name, which will be the name of the character we are currently iterating over. Profile the removing of a character and then look at the operations. You will see that we have successfully fixed all the "replace text" operations, but they have been replaced by some new ones.
Implementing shouldComponentUpdate
There are a bunch of "update styles" operations that shouldn't be there. We want the default color to always be white. However, since we are returning an empty string for most of them, it is switching the background-color for them from an empty string to the string "white" or vice versa. We don't want this to happen. We want the default to always be white. So let's update getStyles in CharacterList to look like the following.
const getStyles = (color, index) => {
  if (index % 3 === 0) {
    return { backgroundColor: color };
  }

  return { backgroundColor: 'white' };
};
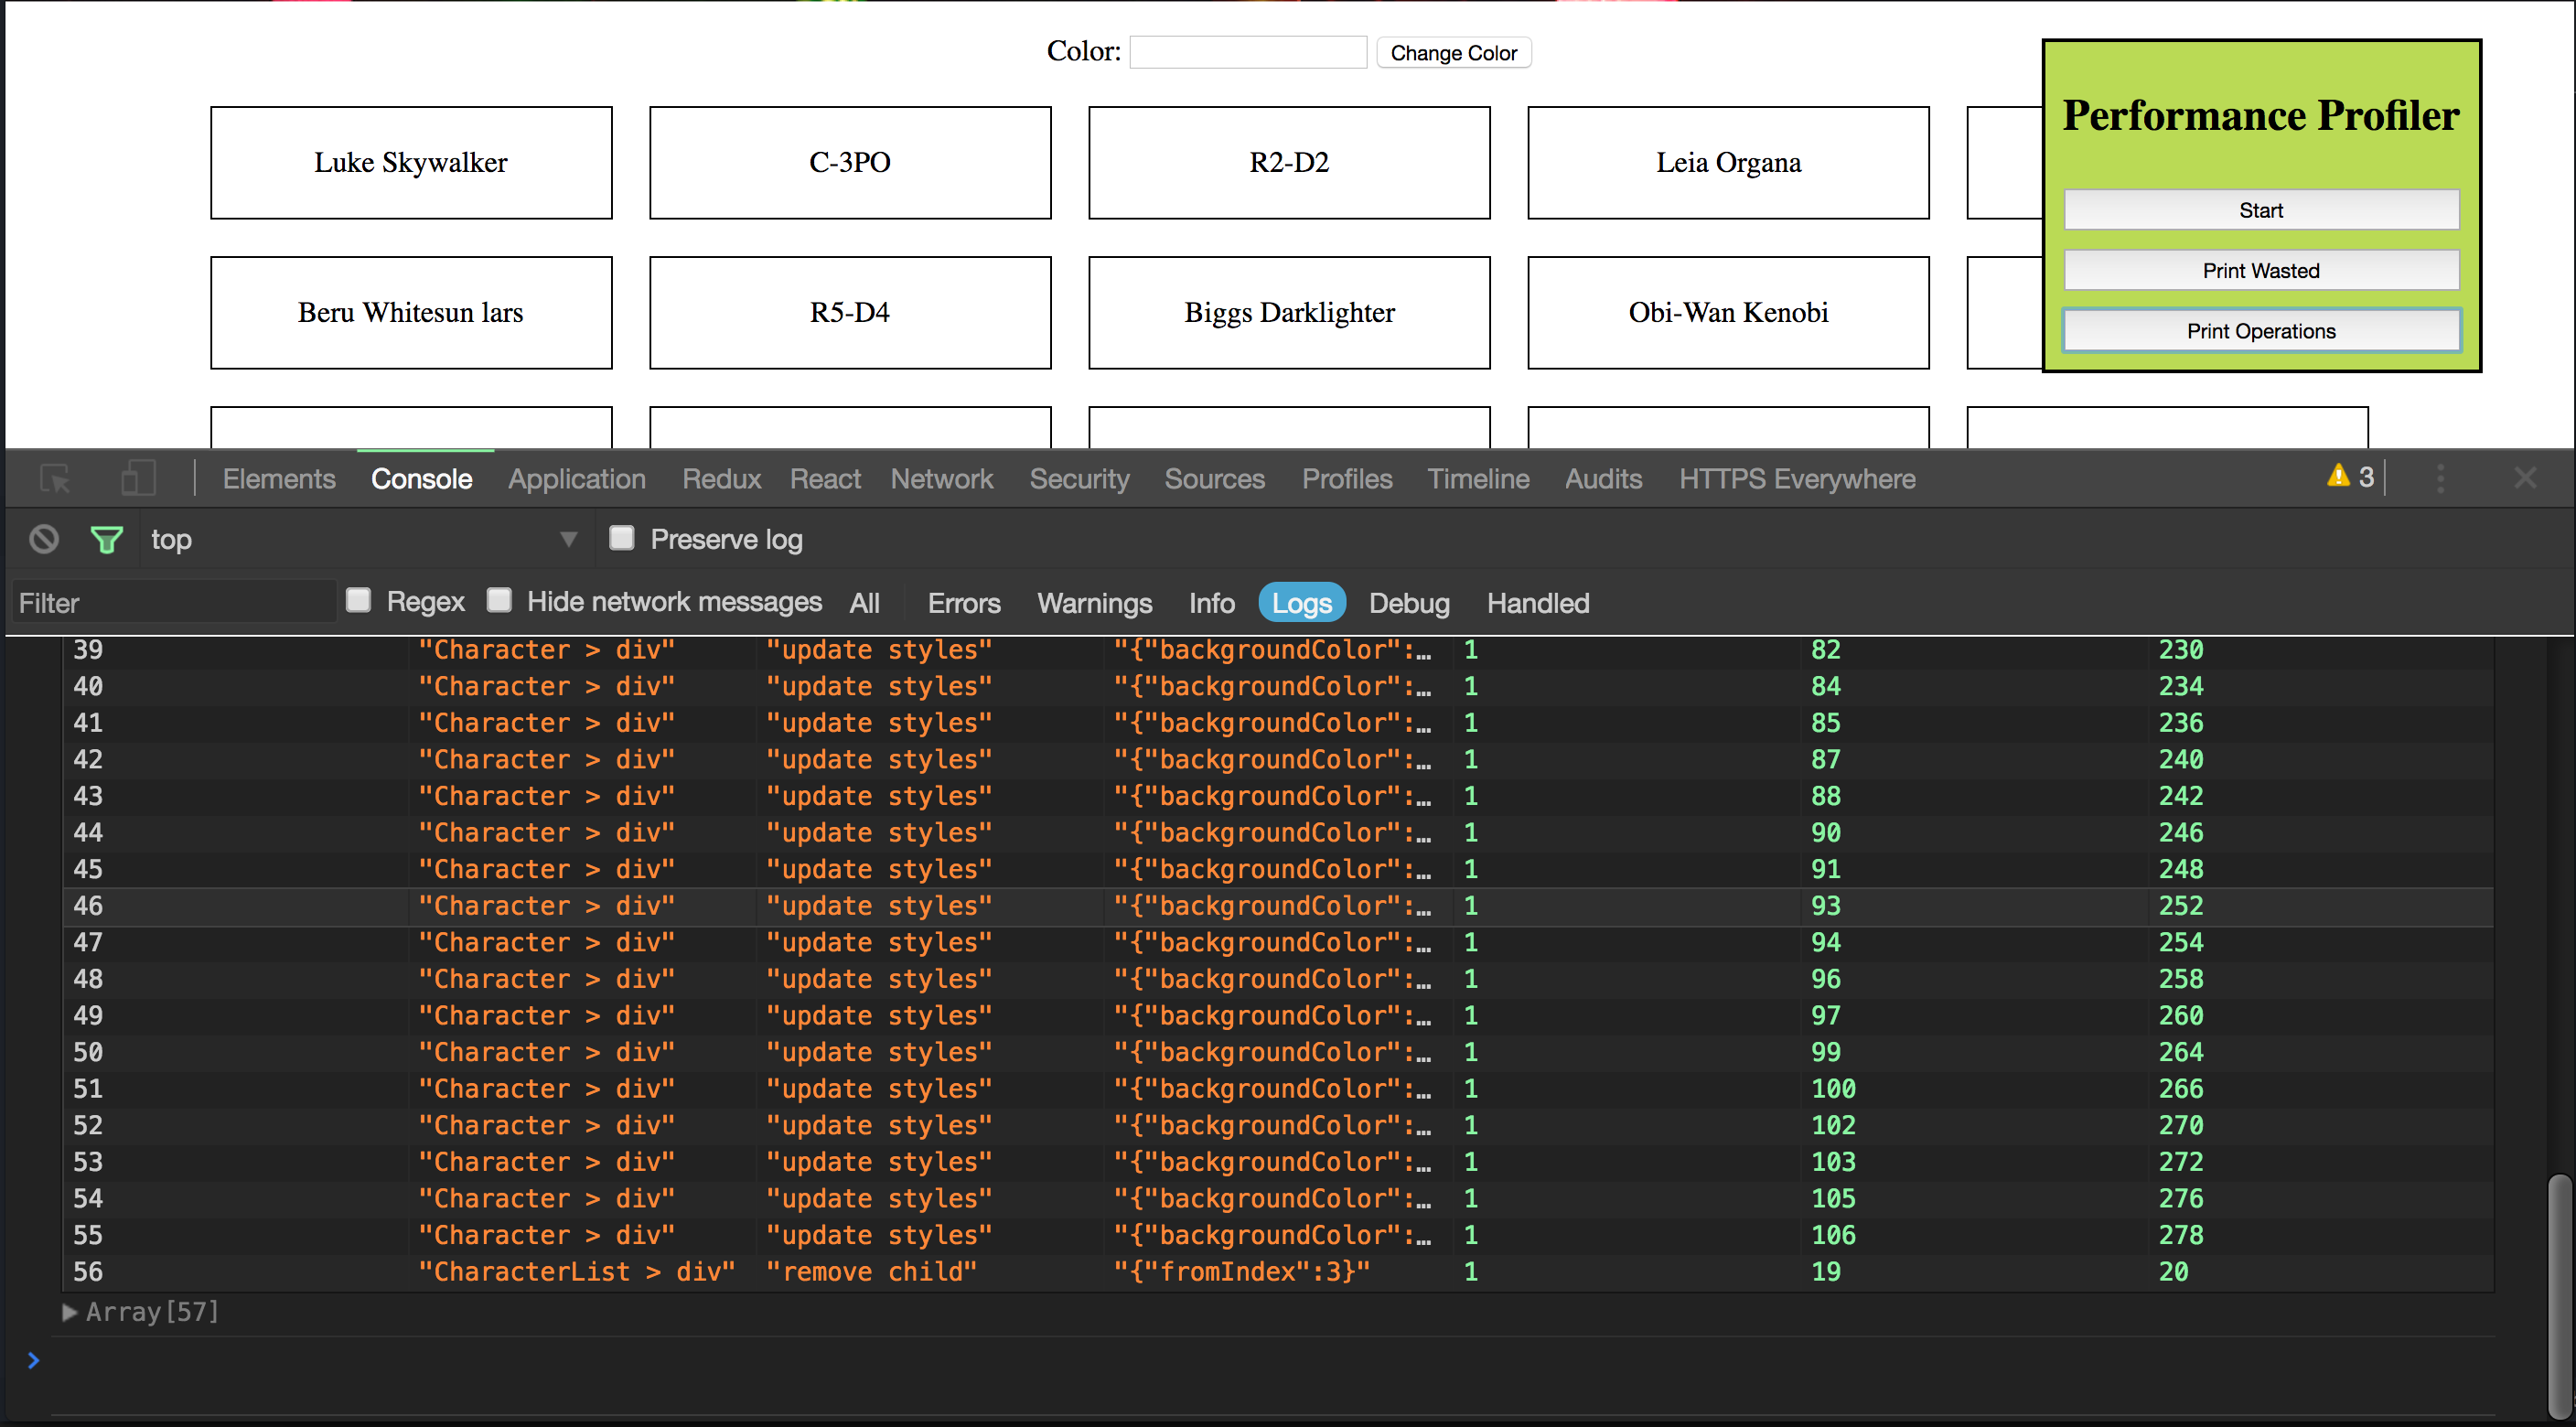
Now profile the removal of a list item using the PerfProfiler and output the operations. All of those "update styles" operations are gone, and it took little work on our part. Now print the wasted operations by pressing "Print Wasted" on the PerfProfiler.

Oops, look at all those wasted virtual DOM calculations. We need to make sure we are telling React to only re-render a Character when the props passed to it have changed.
React components, by default, are always re-rendered. However, one of the many lifecycle methods React gives us is called shouldComponentUpdate. This is a method we implement on a component that is passed the new props and the new state that is created when something changes in our application. If we return true, then it will re-render the function; a value of false will prevent it. We will use this to compare the new props coming in to the props we currently have.
With this said, let's implement shouldComponentUpdate on our Character component.
shouldComponentUpdate(nextProps) {
  const { character, style, onClick } = this.props;

  return character.name !== nextProps.character.name
    || style.backgroundColor !== nextProps.style.backgroundColor;
}
We are saying that if the character names or style colors don't match, we want to re-render the component. Profile this in the browser. You will see that we have no more wasted operations! However, this solution doesn't extend well. If we add another prop or decide that the onClick handler may change, then we need to make sure we add the checking to our shouldComponentUpdate method. React gives us a way to automatically do that. This logic exists inside React.PureComponent. We can extend our component from this component and get this functionality for free.
Using React.PureComponent
There is a catch with using this method, though. React will do the comparison for us, but it only does a shallow comparison. For simple types like numbers and strings, this is not a big deal. This becomes an issue when we are passing down objects or arrays. Data changes inside objects or arrays won't be automatically picked up because the prop that is compared will be the reference to the object or array. A shallow comparison does not look at the data inside it. Here's a simple example in vanilla JavaScript to illustrate the issue.
const obj1 = { name: "George" };
const obj2 = { name: "George" };
const obj3 = obj1;

obj1 === obj2 // false
obj2 === obj3 // false
obj1 === obj3 // true
Also note that React will only check a component for changes if its parent has shown a change somehow. This means if a component returns false from shouldComponentUpdate or not show prop changes in when extending PureComponent, then none of its children will be checked either. Therefore, it's important that when using PureComponent, all children are also pure components as well. As Uncle Ben said, "With great power comes great responsibility."
In our Character component, we are passing down three objects. character will never change. We know that. So we don't need to worry about changing the reference it passes down. style is an object that has one attribute: backgroundColor. Each time React calculates the style prop, it is getting a new object, which means it will be passing down a new reference to an object that could potentially look exactly the same (if the background color stays white). Therefore, we can move backgroundColor out of this object and pass it down directly through props as a string. Strings are checked by value. So we are good there. Lastly, the onClick prop is calculated by creating a new closure that contains the current index of the item so we know which one to remove. The issue is that each time we create a new closure, we are creating a new function and therefore a new reference. This is similar to the issue with the style prop. We can fix this by passing an onClick prop that doesn't change at all. This new onClick will be called by the Character component and will be passed the current character's name. We will have to change the logic in CharacterList.removeCharacter to work with this. Let's start with updating the Character component.
import React from 'react';
import styles from './styles.css';

class Character extends React.PureComponent {
  onClick = () => {
    const { character, onClick } = this.props;

    onClick(character.name);
  }

  render() {
    const { character, backgroundColor } = this.props;
    const style = { backgroundColor };

    return <div
      className={styles.character}
      style={style}
      onClick={this.onClick}>
      <p>{character.name}</p>
    </div>;
  }
}

export default Character;
We have changed the Character class to instead extend React.PureComponent. We added an onClick handler that is called by our component. Inside this handler, we call the onClick prop that was passed down from the CharacterList and pass it the character's name. Lastly, we have updated our render method to work with the new form of our props. Notice, the onClick prop of the wrapping div is now equal to the internal onClick, not the one passed down through props.
Now on to the CharacterList!
import React from 'react';
import Character from '../Character';
import styles from './styles.css';

class CharacterList extends React.Component {
  constructor(props) {
    super(props);

    this.state = {
      characters: this.props.characters.slice(0)
    };
  }

  removeCharacter = characterName => {
    const { characters } = this.state;
    const characterIndex = characters.findIndex(c => c.name === characterName);

    characters.splice(characterIndex, 1);

    this.setState({ characters });
  }

  render() {
    const { characters } = this.state;
    const { color } = this.props;

    return <div className={styles.characterList}>
      {characters.map((c, i) =>
        <Character
          key={c.name}
          character={c}
          backgroundColor={i % 3 === 0 ? color : 'white'}
          onClick={this.removeCharacter} />
      )}
    </div>
  }
}

export default CharacterList;
We have removed the getStyles function, since it is no longer needed. Also, we updated removeCharacter to be a simple method that takes a name, removes the character with that name from the character list, and then updates state with that list. Lastly, we update our render function to pass down the correct props this time around. Notice I have used a ternary operator to get the necessary value for the backgroundColor prop. This could be abstracted into its own function, but I felt it was small and easy enough to understand to not warrant that.
Now profile the removal of a character. We have no more wasted operations! In my opinion, I also think this code is cleaner and easier to understand to someone new to a codebase. That may just be me though.
Using Immutable Objects
We have done a ton of optimizing already, but there are still improvements to be made. Try changing the color to "red." Then type "red" in the input box again. Don't click "Change Color" yet! Press "Start" on the profiler. Next, hit "Change Color." Lastly, hit "Stop." We have changed the color of some of the squares to red, and then changed them again. If you look at the wasted operations that occurred, you will see two things: the CharacterList and the PerfProfiler.
These both re-render because a piece of data stored in the highest parent changed. It caused all the children of it to re-render. Since we never told React how to tell if each should be updated, it defaulted to re-rendering them. However, since we have implemented shallow checking of props and state in our Character components, they did not re-render since their color didn't change at all.
Let's start with the easy one: the PerfProfiler. It doesn't take any props and has only one thing in state it manages, and it is just a boolean. This means we can use PureComponent to give us shallow checking, and we won't have to change the functionality at all!
...
class PerfProfiler extends React.PureComponent {
  constructor(props) {
    super(props);
...
All we changed here is React.Component to React.PureComponent. Profile the application like we did above, and you will see that the profiler is no longer causing any wasted calculations.
Now let's deal with the last piece of wasted calculations. We can do a similar thing with the CharacterList. Let's make it extend from React.PureComponent and see what happens.
...
class CharacterList extends React.PureComponent {
  constructor(props) {
    super(props);
...
If we profile the application again, we will see the CharacterList is not re-calculated, which is exactly what we want. However, we have broken our application! If we try to remove a square by clicking on it, nothing happens. Why is this happening? Well, remember when I said that React does a shallow comparison of all props and pieces of state to determine if the component should update? In our removeCharacter method, we are using the splice method on the characters array to remove an item from it. splice changes an array in place. This means the array reference we are storing in state never changes. Therefore, React doesn't know it needs to update.
To get this working correctly, we need to make sure this reference changes. We need to make sure we treat the characters array as an immutable structure. This means we need to use operations on it that will always return a new array. To do this, we need to update our removeCharacter method.
removeCharacter = characterName => {
  const { characters } = this.state;

  this.setState({
    characters: characters.filter(c => c.name !== characterName)
  });
}
Here we are using the filter method. This method returns a new array reference that points to an array that is exactly like the previous one but has certain items filtered out. We set this new reference to be the one we keep track of in state. React will see this change in the reference when it does its shallow checking and will know that the CharacterList will need updating. This will cause React to see that we removed one from the list, and it will then be removed from the actual DOM.
Go ahead and give it a try. Make sure everything is working. Profile some stuff to make sure we have removed all wasted calculations and unnecessary operations on the DOM.
Aside: Securing React Apps with Auth0
As you will learn in this section, you can easily secure your React applications with Auth0, a global leader in Identity-as-a-Service (IDaaS) that provides thousands of enterprise customers with modern identity solutions. Alongside with the classic username and password authentication process, Auth0 allows you to add features like Social Login, Multifactor Authentication, Passwordless Login, and much more with just a few clicks.
To follow along the instruction describe here, you will need an Auth0 account. If you don't have one yet, now is a good time to sign up for a free Auth0 account.
Also, if you want to follow this section in a clean environment, you can easily create a new React application with just one command:
npx create-react-app react-auth0
Then, you can move into your new React app (which was created inside a new directory called react-auth0 by the create-react-app tool), and start working as explained in the following subsections.
Setting Up an Auth0 Application
To represent your React application in your Auth0 account, you will need to create an Auth0 Application. So, head to the Applications section on your Auth0 dashboard and proceed as follows:
- click on the Create Application button;
- then define a Name to your new application (e.g., "React Demo");
- then select Single Page Web Applications as its type.
- and hit the Create button to end the process.
After creating your application, Auth0 will redirect you to its Quick Start tab. From there, you will have to click on the Settings tab to whitelist some URLs that Auth0 can call after the authentication process. This is a security measure implemented by Auth0 to avoid the leaking of sensitive data (like ID Tokens).
So, when you arrive at the Settings tab, search for the Allowed Callback URLs field and add http://localhost:3000/callback into it. For this tutorial, this single URL will suffice.
That's it! From the Auth0 perspective, you are good to go and can start securing your React application.
Dependencies and Setup
To secure your React application with Auth0, there are only three dependencies that you will need to install:
auth0.js: This is the default library to integrate web applications with Auth0.react-router: This is the de-facto library when it comes to routing management in React.react-router-dom: This is the extension to the previous library to web applications.
To install these dependencies, move into your project root and issue the following command:
npm install --save auth0-js react-router react-router-dom
Note: As you want the best security available, you are going to rely on the Auth0 login page. This method consists of redirecting users to a login page hosted by Auth0 that is easily customizable right from your Auth0 dashboard. If you want to learn why this is the best approach, check the Universal vs. Embedded Login article.
After installing all three libraries, you can create a service to handle the authentication process. You can call this service Auth and create it in the src/Auth/ directory with the following code:
// src/Auth/Auth.js
import auth0 from 'auth0-js';

export default class Auth {
  constructor() {
    this.auth0 = new auth0.WebAuth({
      // the following three lines MUST be updated
      domain: '<AUTH0_DOMAIN>',
      audience: 'https://<AUTH0_DOMAIN>/userinfo',
      clientID: '<AUTH0_CLIENT_ID>',
      redirectUri: 'http://localhost:3000/callback',
      responseType: 'token id_token',
      scope: 'openid profile',
    });

    this.getProfile = this.getProfile.bind(this);
    this.handleAuthentication = this.handleAuthentication.bind(this);
    this.isAuthenticated = this.isAuthenticated.bind(this);
    this.login = this.login.bind(this);
    this.logout = this.logout.bind(this);
    this.setSession = this.setSession.bind(this);
  }

  getProfile() {
    return this.profile;
  }

  handleAuthentication() {
    return new Promise((resolve, reject) => {
      this.auth0.parseHash((err, authResult) => {
        if (err) return reject(err);
        console.log(authResult);
        if (!authResult || !authResult.idToken) {
          return reject(err);
        }
        this.setSession(authResult);
        resolve();
      });
    });
  }

  isAuthenticated() {
    return new Date().getTime() < this.expiresAt;
  }

  login() {
    this.auth0.authorize();
  }

  logout() {
    // clear id token and expiration
    this.idToken = null;
    this.expiresAt = null;
  }

  setSession(authResult) {
    this.idToken = authResult.idToken;
    this.profile = authResult.idTokenPayload;
    // set the time that the id token will expire at
    this.expiresAt = authResult.expiresIn * 1000 + new Date().getTime();
  }
}
The Auth service that you just created contains functions to deal with different steps of the sign in/sign up process. The following list briefly summarizes these functions and what they do:
getProfile: This function returns the profile of the logged-in user.handleAuthentication: This function looks for the result of the authentication process in the URL hash. Then, the function processes the result with theparseHashmethod fromauth0-js.isAuthenticated: This function checks whether the expiry time for the user's ID token has passed.login: This function initiates the login process, redirecting users to the login page.logout: This function removes the user's tokens and expiry time.setSession: This function sets the user's ID token, profile, and expiry time.
Besides these functions, the class contains a field called auth0 that is initialized with values extracted from your Auth0 application. It is important to keep in mind that you have to replace the <AUTH0_DOMAIN> and <AUTH0_CLIENT_ID> placeholders that you are passing to the auth0 field.
Note: For the
<AUTH0_DOMAIN>placeholders, you will have to replace them with something similar toyour-subdomain.auth0.com, whereyour-subdomainis the subdomain you chose while creating your Auth0 account (or your Auth0 tenant). For the<AUTH0_CLIENT_ID>, you will have to replace it with the random string copied from the Client ID field of the Auth0 Application you created previously.
Since you are using the Auth0 login page, your users are taken away from the application. However, after they authenticate, users automatically return to the callback URL that you set up previously (i.e., http://localhost:3000/callback). This means that you need to create a component responsible for this route.
So, create a new file called Callback.js inside src/Callback (i.e., you will need to create the Callback directory) and insert the following code into it:
// src/Callback/Callback.js
import React from 'react';
import { withRouter } from 'react-router';

function Callback(props) {
  props.auth.handleAuthentication().then(() => {
    props.history.push('/');
  });

  return <div>Loading user profile.</div>;
}

export default withRouter(Callback);
This component, as you can see, is responsible for triggering the handleAuthentication process and, when the process ends, for pushing users to your home page. While this component processes the authentication result, it simply shows a message saying that it is loading the user profile.
After creating the Auth service and the Callback component, you can refactor your App component to integrate everything together:
// src/App.js

import React from 'react';
import { withRouter } from 'react-router';
import { Route } from 'react-router-dom';
import Callback from './Callback/Callback';
import './App.css';

function HomePage(props) {
  const { authenticated } = props;

  const logout = () => {
    props.auth.logout();
    props.history.push('/');
  };

  if (authenticated) {
    const { name } = props.auth.getProfile();
    return (
      <div>
        <h1>Howdy! Glad to see you back, {name}.</h1>
        <button onClick={logout}>Log out</button>
      </div>
    );
  }

  return (
    <div>
      <h1>I don't know you. Please, log in.</h1>
      <button onClick={props.auth.login}>Log in</button>
    </div>
  );
}

function App(props) {
  const authenticated = props.auth.isAuthenticated();

  return (
    <div className="App">
      <Route
        exact
        path="/callback"
        render={() => <Callback auth={props.auth} />}
      />
      <Route
        exact
        path="/"
        render={() => (
          <HomePage
            authenticated={authenticated}
            auth={props.auth}
            history={props.history}
          />
        )}
      />
    </div>
  );
}

export default withRouter(App);
In this case, you are actually defining two components inside the same file (just for the sake of simplicity). You are defining a HomePage component that shows a message with the name of the logged-in user (that is, when the user is logged in, of course), and a message telling unauthenticated users to log in.
Also, this file is making the App component responsible for deciding what component it must render. If the user is requesting the home page (i.e., the / route), the HomePage component is shown. If the user is requesting the callback page (i.e., /callback), then the Callback component is shown.
Note that you are using the Auth service in all your components (App, HomePage, and Callback) and also inside the Auth service. As such, you need to have a global instance for this service, and you have to include it in your App component.
So, to create this global Auth instance and to wrap things up, you will need to update your index.js file as shown here:
// src/index.js

import React from 'react';
import ReactDOM from 'react-dom';
import { BrowserRouter } from 'react-router-dom';
import Auth from './Auth/Auth';
import './index.css';
import App from './App';
import registerServiceWorker from './registerServiceWorker';

const auth = new Auth();

ReactDOM.render(
  <BrowserRouter>
    <App auth={auth} />
  </BrowserRouter>,
  document.getElementById('root'),
);
registerServiceWorker();
After that, you are done! You just finished securing your React application with Auth0. If you take your app for a spin now (npm start), you will be able to authenticate yourself with the help of Auth0, and you will be able to see your React app show your name (that is, if your identity provider does provide a name).
If you are interested in learning more, please, refer to the official React Quick Start guide to see, step by step, how to properly secure a React application. Besides the steps shown in this section, the guide also shows:
Wrapping Up
So let's recap. We have learned how to profile our application using a component that wraps react-addons-perf. We figured out the best value to use for the key prop - a unique, consistent value. Lastly, we learned how React figures out what changes need to be made to the actual DOM and how to tell React when it needs to recalculate when a component needs to be updated in the new virtual DOM representation.
As you can see, optimizing the work React has to do does not have to be hard. Using the profiler, going back and optimizing the application is made simple. Using immutable data structures makes things even easier. If you want an easy way to ensure all complex structures will be immutable, I recommend looking into the Immutable.js library.
I hope this has made more clear what React does under the hood and how to make things faster. Let me know what you think in the comments!
Looking for the best way to secure your React projects? Auth0 offers a generous free tier to get started with modern authentication. This modern tool provides the simplest and easiest to use User interface tools to help administrators manage user identities including password resets, creating and provisioning, blocking and deleting users.