post-login Actions, you can customize your flows to challenge users with a specific factor or sequence of factors. You can also use contextual information about users and their organizations to create more individualized experiences. For example, you can customize your flows to challenge users with specific factors based on their membership in certain Organizations or their assigned user roles.
- This feature allows you to customize your MFA selection flows. If you want to customize your MFA enrollment flows, review Customize MFA Enrollments in Universal Login.
- You can only customize MFA flows with Actions if you are using Universal Login.
- Some methods detailed can only be used on Universal Login and not Classic Login. For more information, read Customize MFA for Classic Login.
How it works
You can use Actions to customize your MFA flows. Specifically, you can modify thepost-login trigger of the Login Flow with the following Authentication API methods:
-
challengeWith: Specifies the factor or factors users must use to authenticate, such as a one-time password (OTP). This method presents a default challenge to users and can optionally provide access to a factor picker that allows them to choose a different authentication method. -
challengeWithAny: Sets a group of factors users can choose from when authenticating, such as email and OTP. By default, this method presents a factor picker to users rather than a specific challenge, in accordance with the following conditions:- If two or more factors are specified, a factor picker displays to the user.
- If the user has only enrolled in one of the specified factors (or only one factor is supplied), the factor picker is skipped.
- If the user has not enrolled in any of the specified factors, the command fails.
enrolledFactors value. enrolledFactors represents the list of active factors associated with a user’s account.
-
otp -
email -
push-notificationotpFallback
-
phonepreferredMethod: voicepreferredMethod: smspreferredMethod: both
-
webauthn-platform -
webauthn-roaming
event.authentication.methods includes a type field when the name of the method is set to mfa. type is a string that contains factor values matching those used by the type field from enrolledFactors (listed above). When an MFA challenge is performed, methods contains an object of name:mfa with type set to the factor used for that challenge. methods is only updated when an Action begins. To see the results of a challenge, methods must be accessed in the next Action in the flow.
To learn more, review the following resources:
Sequenced and contextual flows
With thechallengeWith or challengeWithAny commands, you can use contextual information to determine the best challenge or series of challenges to present to users. Specifically, you can leverage the following:
- Sequenced flows: Challenge users with a series of different factors in a specific order.
- Contextual flows: Determine which factor to next challenge the user with based on previous challenges in the flow.
challengeWithAny command in Action 1. Then, Action 2 challenges the user with a push notification because they have the Admin user role and also completed the SMS challenge.
In this flow, you can make decisions about which factor to challenge the user with due to the following:
- The flow pauses after executing Action 1.
- The user completes the MFA flow prompted by Action 1.
event.authentication.methods.typein Action 2 populates with information from the previous MFA challenge.- The flow resumes to execute Action 2 using contextual information from Action 1.
challengeWith and challengeWithAny offer the following unique benefits:
- Flows pause after each command, allowing you to accumulate user information that can be used in subsequent Actions. Comparatively, redirects only occur a single time as the final command in a flow.
- MFA is triggered after each Action containing
challengeWithorchallengeWithAnycommands is executed. With redirects, MFA runs as the final Action in the pipeline.
challengeWith or challengeWithAny commands. Actions serving other purposes are not affected.
Before you begin
Before you can customize your MFA flows, you must first enable MFA in your tenant and prompt your users to enroll in the appropriate factors.Prepare your tenant
To get started, set up MFA in your tenant and enable the Customize MFA Factors using Actions setting. You can set up one or more factors and define your MFA policies on the under Security > Multifactor Auth.- To learn more about the setup process, review Enable Multi-Factor Authentication.
- For information about configuring specific factors, review Multi-factor Authentication Factors.
- Actions invoking
challengeWithandchallengeWithAnycommands override any challenges enabled viaapi.multifactor.enable. They also take precedence over the MFA settings available under Define Policies. - To ensure users complete MFA when attempting to access your application, set the Require Multi-factor Auth setting to either Use Adaptive MFA or Always. In the event your Actions code does not run, this setting serves as a backup and prevent users from bypassing MFA.
- If you wish to use risk assessors in your commands, enable the Adaptive MFA Risk Assessment toggle and use event.authentication.riskAssessment in your
post-loginActions code.
Enroll users in factors
Once MFA is configured, ensure your users enroll in one or more of the factors you enabled. Users must enroll in authenticators before they can be challenged bypost-login Action commands.
After a user signs up or is created in your tenant, you can create enrollments with the authentication-methods endpoint, or you can manage users’ enrollments directly through their profile pages in the Auth0 Dashboard.
Customize your MFA flows
Once your tenant is ready, you can createpost-login Actions to customize your MFA flows. Steps and example use cases are provided below.
Create your post-login Action
- On your Auth0 Dashboard, navigate to Actions > Flows and select Login.
- Under Add Action, select Custom and choose Create Action.
-
On the Create Action popup:
- Enter a name for your Action.
- Select Login / Post-Login as the trigger.
- Use Node 22 (Recommended) for the runtime.
- Review the popup to ensure accuracy. Then, select Create.
-
After creation, the code editor displays the
onPostExecutecommand. Add your custom code or code sample to the command. - When your command is ready, select Deploy.
-
Select Add to Flow on the successful deployment notification.
- Note: If the notification has closed, choose Back to Flow above the code editor.
- Drag and drop your new command from the Add Action panel into your Login flow. Then, select Apply.
Test your post-login Action
To ensure your commands function appropriately, you can test your Action through the Auth0 Dashboard:- Navigate to Authentication > Authentication Profile.
- Select Try to open a sample login prompt in a new tab.
- Enter your credentials and test your new MFA flow.
Example use cases
The examples below outline common use cases for customizing MFA flows.Use current enrollments to determine challenge method
The following sample challenges a user with MFA if they are enrolled with the following factors:- One-time password (OTP)
- Phone
Use roles to determine challenge method
The following sample challenges all users with OTP. If a user has the Admin role and requires a higher level of access to your application, they are challenged with an additional factor as a form of step-up authentication.Use metadata to determine challenge method
In this example, MFA factors are enabled at the Organization level. This sample uses different categories of metadata to determine the right challenge for individual users:- Organization metadata: Organization-level data, such as the specific factors enabled for an Organization.
- User metadata: User-level data, such as whether a user has a phone number associated with their profile.
Allow users to select an alternate method of authentication
For a more flexible experience, you can present users with a Try Another Method link as part of their MFA challenge. This link allows users to select a different method of authentication than the default challenge. To achieve this, include theadditionalFactors parameter in your Actions code. You can set this parameter to a specific factor for all users or use enrolledFactors to let users choose their preferred factor.
Specific Factor
The following sample challenges users with OTP by default. If desired, users can access the Try Another Method link to authenticate with email instead.
Use Adaptive MFA to determine when to challenge users
The following example uses Adaptive MFA to determine if users should be challenged. is a flexible MFA policy that protects your tenant from by assessing potential risk during login transactions and prompting users for additional verification when appropriate. In this case, users are prompted with MFA if they log in from an unrecognized device and their overall confidence score is low or medium.Use Actions to challenge users
You can use Actions to customize MFA flows by modifying thepost-login trigger of theLogin Flow. This example uses the phone method of authentication and preferredMethod: 'both', referring to the active MFA factors associated with a user’s account. For more information, refer to Actions Triggers: post-login - Event Object.
Troubleshooting
In the event that you experience errors or unexpected results from your customized MFA flows, you can use the information below to help identify and resolve these issues.Tenant logs
You can monitor your customized MFA flows through tenant logs. Tenant logs are available on the Auth0 Dashboard under Monitoring > Logs. Alternatively, you can retrieve logs using the Management API. If you or your users experience unexpected behavior, review tenant logs for the following event codes for more information:| Scenario | Event Code | Descriptive Error |
|---|---|---|
| A user is prompted with multi-factor authentication, but none of the requested factors can be used as a challenge. In this case, the user cannot complete MFA. | mfar | This scenario results in the following error message: An MFA challenge is used in a PostLogin action but the requested factors are not properly set up. To perform MFA, enable the requested factors and ensure the user is enrolled with them. |
| A user is prompted with multi-factor authentication, but one of the requested factors cannot be used as a challenge. In this case, the user can complete MFA using a different requested factor. | w | This scenario results in the following warning message: An MFA challenge is used in a PostLogin action, but the requested factor {factor name} is not properly set up. Enable the requested factor and ensure the user is enrolled with it. |
Troubleshooting checklist
The following checklist provides additional suggestions for identifying and resolving common issues with customized MFA flows.-
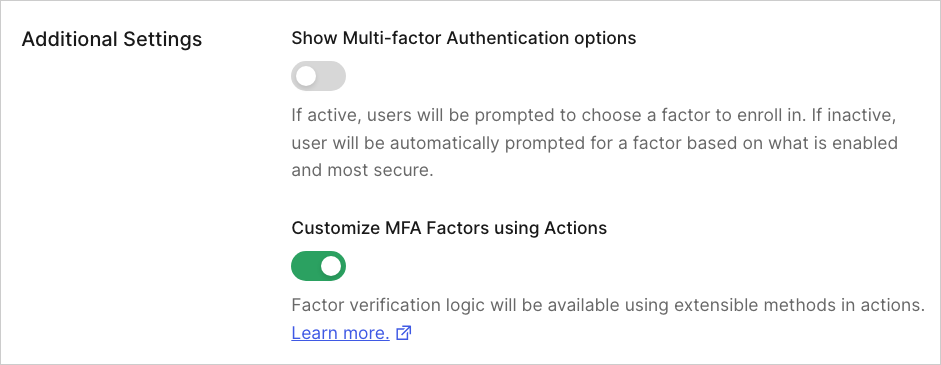
The Customize MFA factors with Actions toggle must be enabled.
- Navigate to Auth0 Dashboard > Security > Multi-factor Auth and ensure the toggle in the Additional Settings section is enabled.
-
Factors referenced in your Actions must be enabled in your tenant.
- Review your code: Navigate to Auth0 Dashboard > Actions > Library > Custom and review your Actions code. Ensure all factors referenced are applicable to your use cases.
- Review your factors: Navigate to Auth0 Dashboard > Security > Multi-factor Auth and ensure all factors referenced in your Actions are enabled.
-
Users must be enrolled in the factors referenced in your Actions.
-
If an individual receives an error, review their user details to ensure they are enrolled in the proper factors. Navigate to Auth0 Dashboard > User Management > Users and select their name from the list.
- Review the Multi-factor Authentication section on the Detail tab to verify their enrollments. If the user is not enrolled, you can use the Send an enrollment invitation link available in this section.
- Alternatively, verify the user’s enrollments through the Raw JSON tab. This information can also be retrieved using the Management API. However, it is important to note that the API does not list auto-enrolled authenticators, such as Email factors set up via an email verification link.
- If users are not enrolled in the appropriate factors, you can create enrollments with the Management API authentication-methods endpoint. You can also manage users’ enrollments directly through their profile pages in the Auth0 Dashboard.
-
If an individual receives an error, review their user details to ensure they are enrolled in the proper factors. Navigate to Auth0 Dashboard > User Management > Users and select their name from the list.
-
Ensure your Actions have been deployed and saved in your Pipeline.
- Navigate to Auth0 Dashboard > Actions > Library > Custom. Locate your Action in the list and ensure its status is Deployed. If a different status is listed, access your Action, review your code, and click Deploy to the top right.
- Navigate to Auth0 Dashboard > Actions > Library > Flows and select Login. Ensure your Action is listed in the flow. If not, access the Custom tab of the Add Action panel and drag and drop your Action into your Login flow. Then, select Apply.
-
Ensure you’ve upgraded to the latest version of
post-loginActions.- Navigate to Auth0 Dashboard > Actions > Library > Custom and select your Action. If your Action is out-of-date, you will see a yellow banner prompting you to update the Action. If the banner displays, select Update.
- You can also specify the latest version of
post-loginActions for deployment when using the Deploy CLI. For more information, review Configure the Deploy CLI.