
TL;DR: In this tutorial, I'll show you how easy it is to build and secure an API with Hapi. Check out the repo to get the code.
Hapi is an open-source and rich Node.js framework created and actively maintained by Eran Hammer. Hapi is a rich framework for building applications and services. It enables developers to focus on writing reusable application logic instead of spending time building infrastructure.
Several organizations such as Paypal, Vendigo, Clarify, Pling, and Npm already use Hapi in production. Hapi is a framework that gives you greater flexibility when compared to other Node.js frameworks. It is also perfect for grounds up development. The documentation is detailed, and there is a vibrant community of users. Furthermore, there are dozens of plugins for virtually any feature you are trying to build into your application.
“Hapi is a framework that gives you greater flexibility when compared to other Node.js frameworks.”
Tweet This
Hapi Features
Hapi is a simple to use configuration-centric framework that provides an amazing set of built-in functionality, which allows developers build web applications and services quickly and effectively with JavaScript. Check out some of the features below that makes it a worthy framework to consider for your next project.
“Hapi is a simple to use configuration-centric framework that provides a set of amazing built-in functionalities that allows developers build web applications and services quickly.”
Tweet This
- Authentication and Authorization: Hapi ships with built-in authentication and authorization schemes and strategies. Anonymous, basic-auth, cookie-based and token-based authentication schemes are provided in the Node.js framework.
- Caching: Hapi provides powerful client and server side caching via catbox and makes using cache very convenient.
- Routing: Hapi provides a router that allows you to express how your web application or API routes should look.
- Validation: With
Joi, object schema validation is a breeze in Hapi. - Cookies: Hapi provides several configuration options for making dealing with cookies flexible, safe and simple.
- Logging: Logging is key when building quality software. Hapi ships with built-in logging methods.
- Simplified Error Handling: Boom provides a set of utilities for returning HTTP-friendly error objects.
- Process Monitoring: Good is a Hapi plugin to monitor and report on a variety of hapi server events as well as ops information from the host machine. It listens for events emitted by hapi server instances and pushes standardized events to a collection of streams.
Hapi Key Requirements
In order to use Hapi, you need to have the following tools installed on your machine.
- Node.js: Navigate to the Node.js website and install the latest version on your machine.
- Familiarity with database concepts, and a working knowledge of JavaScript.
Note: You'll need MongoDB for this tutorial. Navigate to the mongodb website and install the MongoDB community server edition. If you are using a Mac, I'll recommend following this instruction. To avoid micromanaging from the terminal, I'll also recommend installing a MongoDB GUI, Robo 3T, formerly known as RoboMongo. You can then run
mongodfrom the terminal to start up the MongoDB service on your machine.
Hapi Vs Express
Express is a very popular and widely used node.js framework. Many developers get introduced to express before they become familiar with other node.js frameworks. Ultimately, the developer weighs express and hapi and decides which framework suits their use case. Express is very minimal. You need to add more packages for several functionalities while Hapi, on the other hand, provides a robust API for several functionalities out-of-the-box.
Performance-wise, Apache Bench was used to test sample apps built with Hapi, Express and other Node.js frameworks. Apache Bench was configured to make 100 requests concurrently until 50,000 requests had completed or 20 seconds had elapsed. The request responses per second were then recorded. Apache Bench and the server were hosted within the same environment to avoid extra factors setting in. And tests were repeated five times in each environment.
- Framework version: Hapi v16.1.1 and Express 4.15.2
- Test Environment: The Ubuntu subsystem environment running on Windows 10 PC – 32 GB RAM, i7-4790 CPU and a $20 Digital Ocean VM running Ubuntu 16.04 – 2GB Memory, 2 Cores
- Requests per second: Express -
2875 r/s, Hapi -688 r/son an Ubuntu VM on Digital Ocean. Express -1745 r/s, Hapi -1094 r/son an Ubuntu Subsystem on Windows 10.
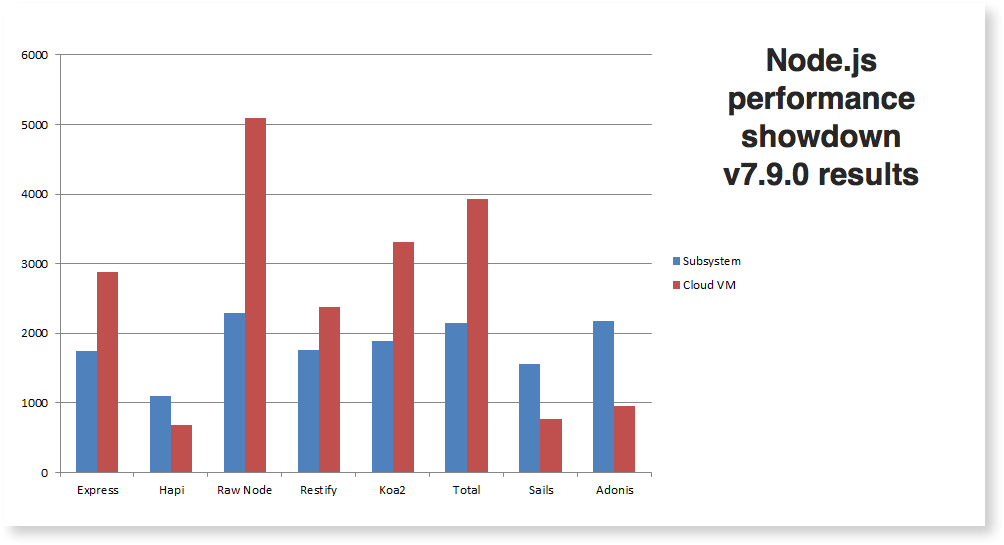
Check out the full performance result and analysis on RayGun.
Hapi v17: What's New?
Hapi is now at version 17. This is the latest major release version of the Node.js framework, and it was tagged on November 5, 2017. It's a major rewrite of the Hapi codebase such as replacing all callbacks with a fully async/await interface and the reply() method passed to handlers with the new lifecycle methods. Hapi v17 requires node v8+. Let's go through the major changes in version 17.
- Single Connection Per Server: In Hapi v17, you have a single connection per server. The
server.connectionmethod has been removed. You need to initialize the connection details with the server's constructor.
const server = new Hapi.Server({
  host: 'localhost',
  port: 3000
})
- Starting and Stopping Hapi Server: In Hapi v17, the
server.startandserver.stopmethods are fully async. No more error callbacks.
try {
  await server.start()
}
catch (err) {
  console.log(err)
}

try {
  await server.stop()
}
catch (err) {
  console.log(err)
}
- reply() Callbacks removed: In Hapi v17, the
replyinterface isn’t available anymore and you can return values from route handlers directly. Theresponse.hold()andresponse.resume()methods are no longer available. A new response toolkit,h, is provided with helpers(instead of thereply()decorations).
// Before

const handler = function (request, reply) {
  return reply('ok');
};

// After

const handler = function (request, h) {
  return 'ok';
};
More examples on how to use the h response toolkit can be found below:
const handler = (request, h) => {
  // return a string
  return 'ok'

  // return an object and hapi creates JSON out of it
  return { name: 'Authentication Library', library: true }

  // redirect to 404
  return h.redirect('/404')

  // return a view
  return h.view('index', { name: 'Authentication Library' })

  // use the "h" response toolkit to create a response
  return h
    .response(thisHTML)
    .type('text/html')
    .header('X-Custom', 'my-value')
    .code(201)
}
Events: In Hapi v17, the three request event types(
request,request-interval, andrequest-error) have been merged into a singlerequestevent. Emitter methods such asserver.on,request.on,response.onshould be replaced withserver.events.on(),request.events.on(), andresponse.events.on()respectively. Applies to every emitter method.New Request Extension: onCredentials: Before now, Hapi had
onPreAuthandonPostAuth. In Hapi v17, there's a new request extension,onCredentials. WithonCredentials, you have the ability to customize credentials before request authorization.
server.ext('onPreAuth', (request, h) => { … })
server.ext('onCredentials', (request, h) => { … })
server.ext('onPostAuth', (request, h) => { … }) ]
- Replace
configwithoptionsin Route definition: In Hapi v17, replaceconfigwithoptionswhen adding routes. For now,configwill still work but will be removed in the future.
server.route({
  method: 'POST',
  path: '/',
  options: { … }
})
- Plugins: In Hapi v17, the plugin function with object properties style has been replaced with a plain object. Replace the
exports.register()and the matchingexports.register.attributeswithexports.plugin = { register, name, version, multiple, dependencies, once, pkg }and remove theconnectionsattribute.
Check out the full release note on GitHub.
Building a Dog API With Hapi
Let's build a Dog API with Hapi. The design of this API is simple. It's an API to manage the collection of dogs. For the purpose of the tutorial, the data will be very limited, but I'll put the API structure in place and you'll learn how to secure it.
A few core API principles you should be aware of:
- REST describes how to make resources available in a client-server relationship.
- Data should be organized around resources.
- API should respond to common HTTP verbs,
GET,POST,PUT,PATCH,DELETE. - Server should be stateless.
In this tutorial, given some dogs resource, we want different API endpoints for CRUD operations.
- Get all dogs -
GET /dogs - Get one dog -
GET /dog/11 - Create a dog -
POST /dogs - Edit a dog -
PUT /dogs/11 - Delete a dog -
DELETE /dogs/11
A dog will have the following attributes:
- name
- breed
- age
- image
Create a src directory in the root folder. Move into the src directory and create two folders, controllers and models respectively.
- The
controllersfolder will house the logic of saving and retrieving data from the database. - The
modelsfolder will house the schema for the Dog API.
Let's create the Dog Schema. Open up src/models and create a dog.js file with the code below:
src/models/dog.js
'use strict';

const mongoose = require('mongoose');
const Schema = mongoose.Schema;

const dogModel = new Schema({
  name: { type: String, required: true, index: { unique: true } },
  breed: { type: String, required: true },
  age: { type: Number, required: true },
  image: { type: String, required: true }
});

module.exports = mongoose.model('Dog', dogModel, 'dogs');
The code above is quite explanatory. We have defined the dog attributes using the mongoose Schema. This Schema gives our API data structure.
The next step is to create the controller. Open up src/controllers and create a new file, dog.js with the code below:
src/controllers/dog.js
var Dog =  require('../models/dog');

/**
 * List Dogs
 */
exports.list = (req, h) => {
  return Dog.find({}).exec().then((dog) => {

    return { dogs: dog };

  }).catch((err) => {

    return { err: err };

  });
}

/**
 * Get Dog by ID
 */
exports.get = (req, h) => {

  return Dog.findById(req.params.id).exec().then((dog) => {

    if(!dog) return { message: 'Dog not Found' };

    return { dog: dog };

  }).catch((err) => {

    return { err: err };

  });
}


/**
 * POST a Dog
 */
exports.create = (req, h) => {

  const dogData = {
    name: req.payload.name,
    breed: req.payload.breed,
    age: req.payload.age,
    image: req.payload.image
  };

  return Dog.create(dogData).then((dog) => {

     return { message: "Dog created successfully", dog: dog };

  }).catch((err) => {

    return { err: err };

  });
}

/**
 * PUT | Update Dog by ID
 */
exports.update = (req, h) => {

  return Dog.findById(req.params.id).exec().then((dog) => {

    if (!dog) return { err: 'Dog not found' };

    dog.name = req.payload.name;
    dog.breed = req.payload.breed;
    dog.age = req.payload.age;
    dog.image = req.payload.image;

    dog.save(dogData);

  }).then((data) => {

      return { message: "Dog data updated successfully" };

  }).catch((err) => {

      return { err: err };

  });
}

/**
 * Delete Dog by ID
 */
exports.remove = (req, h) => {

  return Dog.findById(req.params.id).exec(function (err, dog) {

    if (err) return { dberror: err };
    if (!dog) return { message: 'Dog not found' };

    dog.remove(function (err) {
      if (err) return { dberror: err };

      return { success: true };
    });
  });
}
Let's analyze the code above. We have four functions in the src/controllers/dog.js file. list, create, update and remove. These functions are mapped to HTTP operations like so:
list- /GETcreate- /POSTget- /GETupdate- /PUTremove- /DELETE
For example, if you make a POST request to /dog API endpoint, the create function will be invoked.
- The
listfunction checks the document for all the resources. - The
createfunction creates a new resource. - The
getfunction checks the document store for a single resource. - The
updatefunction checks if a resource exists and allows the resource to be updated. - The
removefunction checks if a resource exists and deletes it.
Now, we need to map these functions to the API routes for a functional API to exist. Head over to the server.js file and modify it like so:
'use strict';

const Hapi = require('hapi');
const mongoose = require('mongoose');
const DogController =  require('./src/controllers/dog');
const MongoDBUrl = 'mongodb://localhost:27017/dogapi';

const server = new Hapi.Server({
  port: 3000,
  host: 'localhost'
});

server.route({
  method: 'GET',
  path: '/dogs',
  handler: DogController.list
});

server.route({
  method: 'GET',
  path: '/dogs/{id}',
  handler: DogController.get
});
server.route({
  method: 'POST',
  path: '/dogs',
  handler: DogController.create
});

server.route({
  method: 'PUT',
  path: '/dogs/{id}',
  handler: DogController.update
});

server.route({
  method: 'DELETE',
  path: '/dogs/{id}',
  handler: DogController.remove
});

(async () => {
  try {
    await server.start();
    // Once started, connect to Mongo through Mongoose
    mongoose.connect(MongoDBUrl, {}).then(() => { console.log(`Connected to Mongo server`) }, err => { console.log(err) });
    console.log(`Server running at: ${server.info.uri}`);
  }
  catch (err) {
    console.log(err)
  }
})();
The server.route methods have a method, path, and handler object attribute. The handler value is invoked when the user hits the path.
Check this out:
server.route({
  method: 'GET',
  path: '/dogs',
  handler: (req, h) => {
    return "This is the dog route";
  }
});
We abstracted the functionality in the route handler to the controller file and called the methods instead!
Finally, test the API routes with Postman.

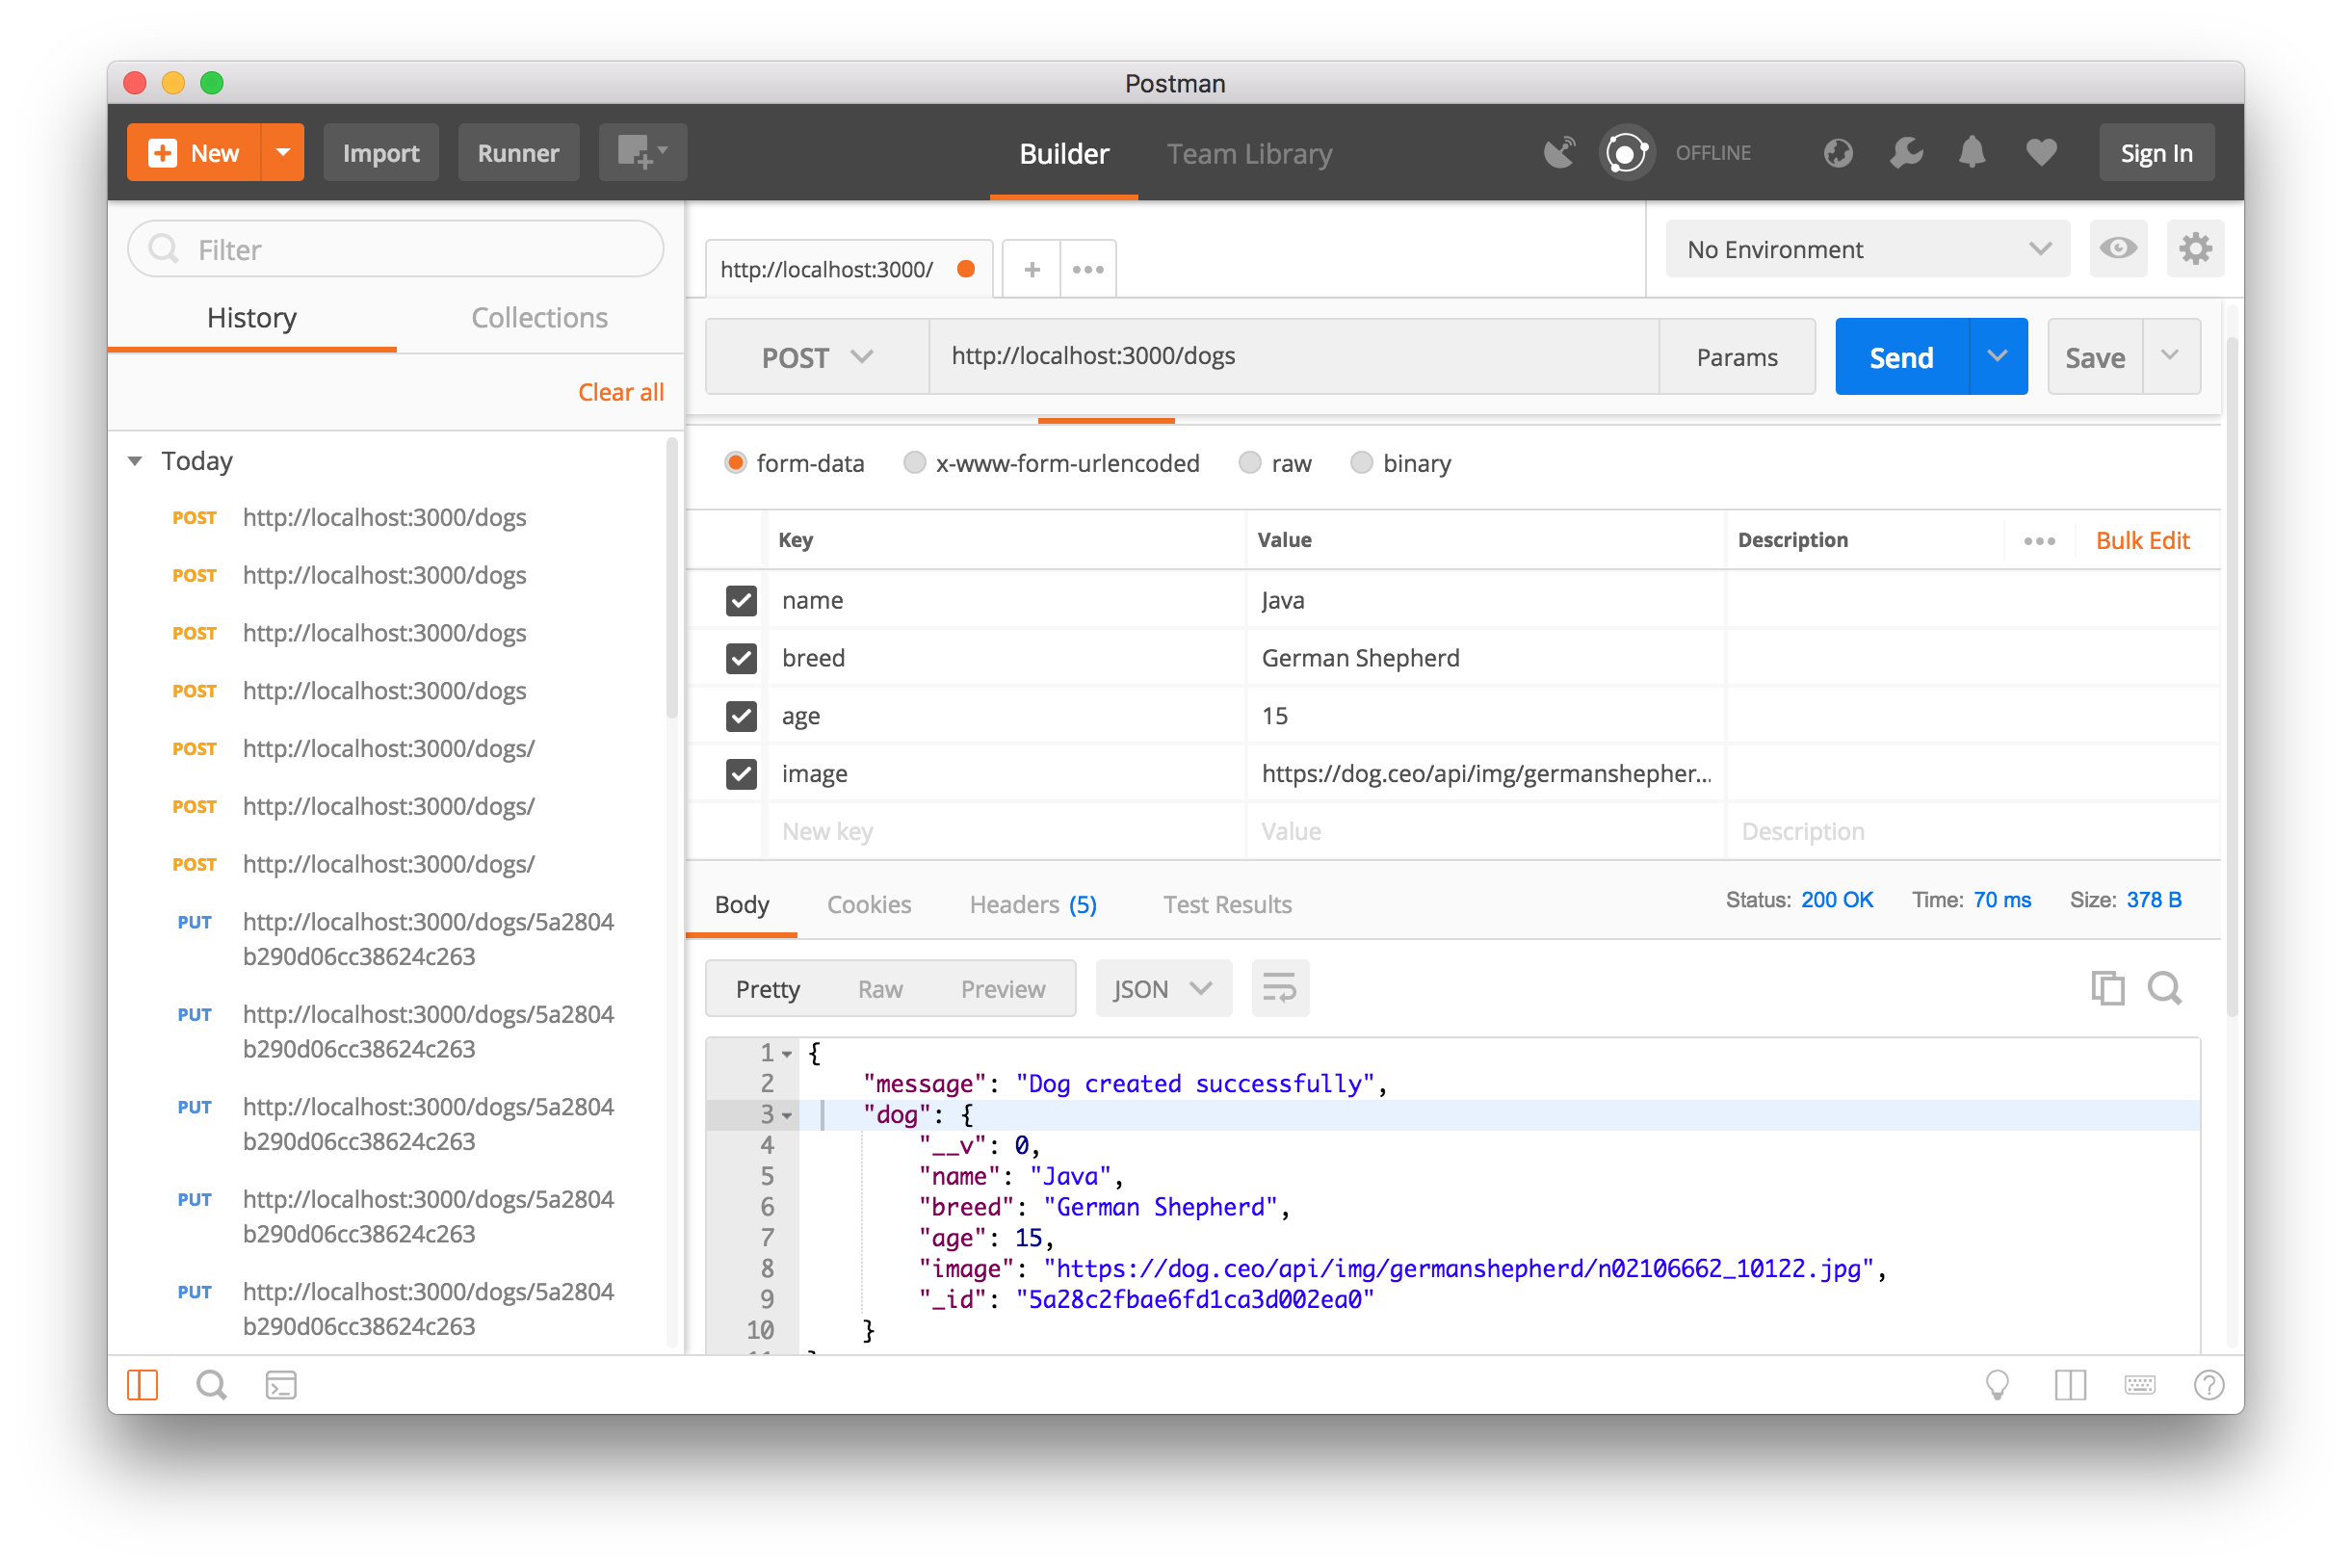
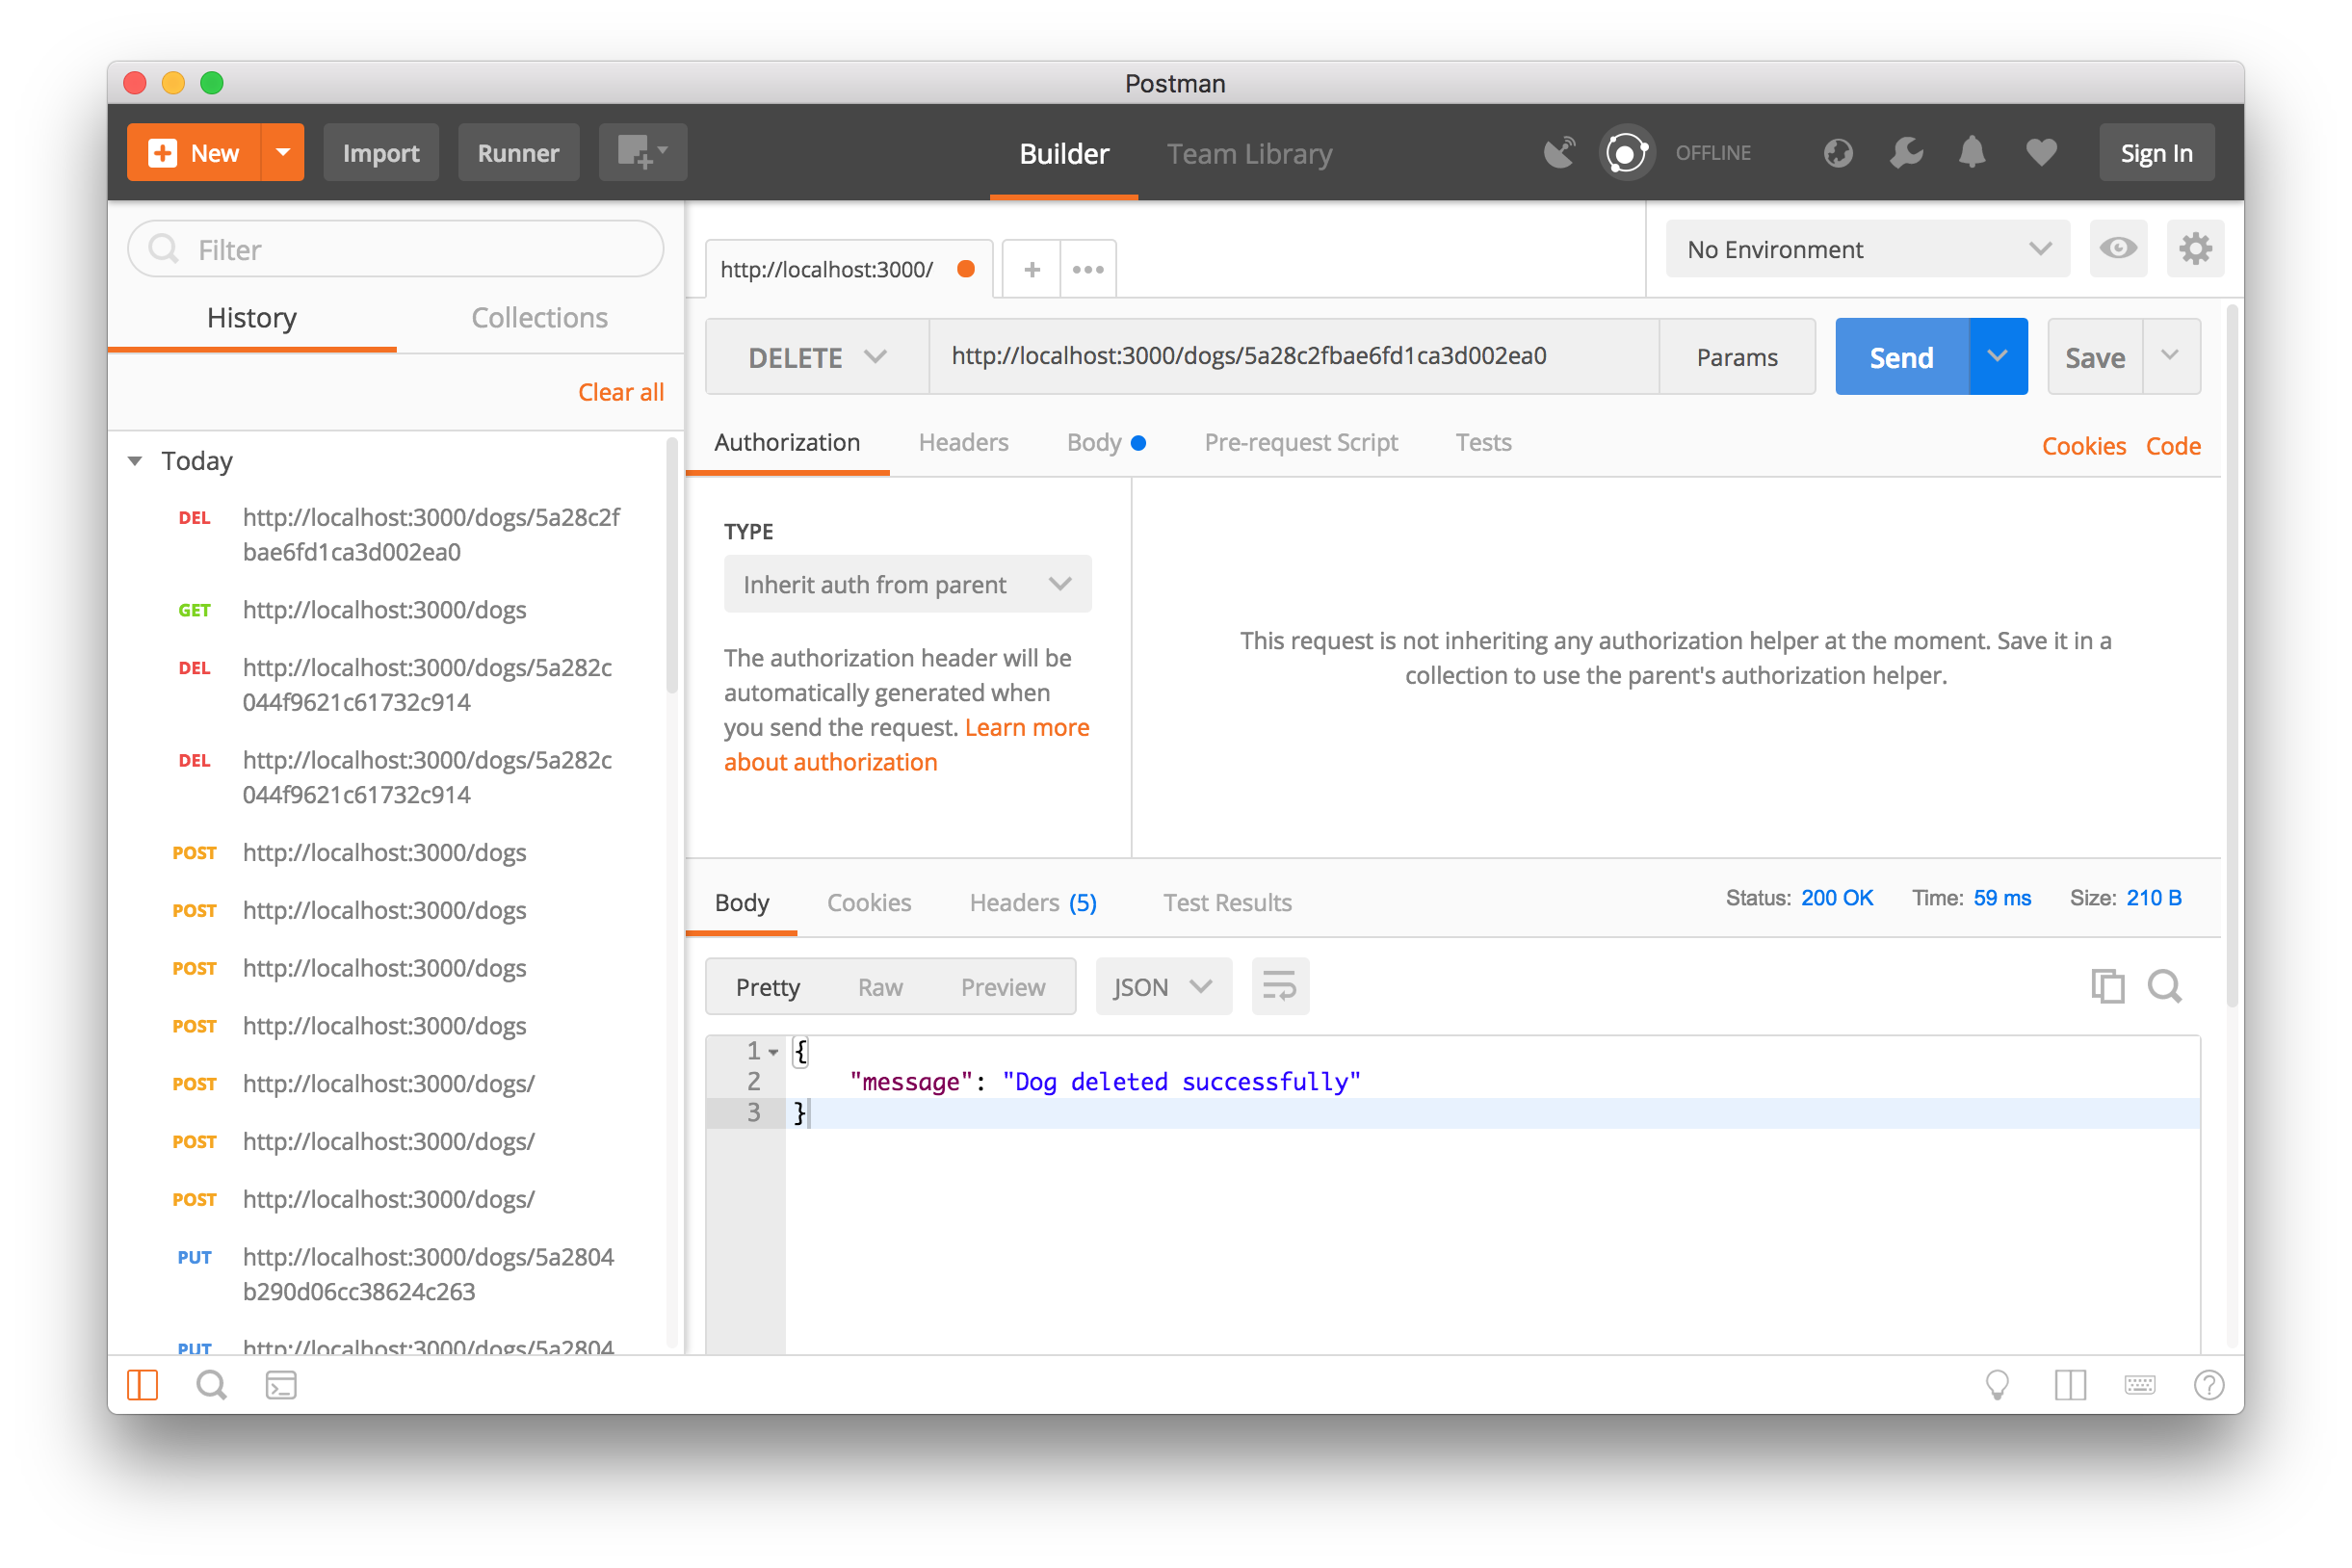
Our API works. Awesome!
Securing a Dog API with Auth0
Right now, anyone can make GET and POST requests to all of the endpoints present in our API. In a real-world scenario, we should restrict POST, DELETE and PUT requests to certain registered and authorized users.
We'll go ahead and secure some of these API endpoints with JSON Web Tokens.
JSON Web Tokens, commonly known as JWTs, are tokens that are used to authenticate users on applications. This technology has gained popularity over the past few years because it enables backends to accept requests simply by validating the contents of these JWTs. That is, applications that use JWTs no longer have to hold cookies or other session data about their users. This characteristic facilitates scalability while keeping applications secure.
Whenever the user wants to access a protected route or resource (an endpoint), the user agent must send the JWT, usually in the Authorization header using the Bearer schema, along with the request.
When the API receives a request with a JWT, the first thing it does is to validate the token. This consists of a series of steps, and if any of these fails then, the request must be rejected. The following list shows the validation steps needed:
- Check that the JWT is well-formed.
- Check the signature.
- Validate the standard claims.
- Check the Client permissions (scopes).
We will make use of Auth0 to issue our JSON Web Tokens. With Auth0, we have to write just a few lines of code to get a solid identity management solution, including single sign-on, user management, support for social identity providers (like Facebook, GitHub, Twitter, etc.), enterprise (Active Directory, LDAP, SAML, etc.), and your own database of users.
For starters, if you haven't done so yet, this is a good time to sign up for a free Auth0 account. Having an Auth0 account, the first thing that we must do is to create a new API on the dashboard. An API is an entity that represents an external resource, capable of accepting and responding to protected resource requests made by clients. And we are dealing with an API here, SWAPI (Star Wars API).
Auth0 offers a generous free tier to get started with modern authentication.
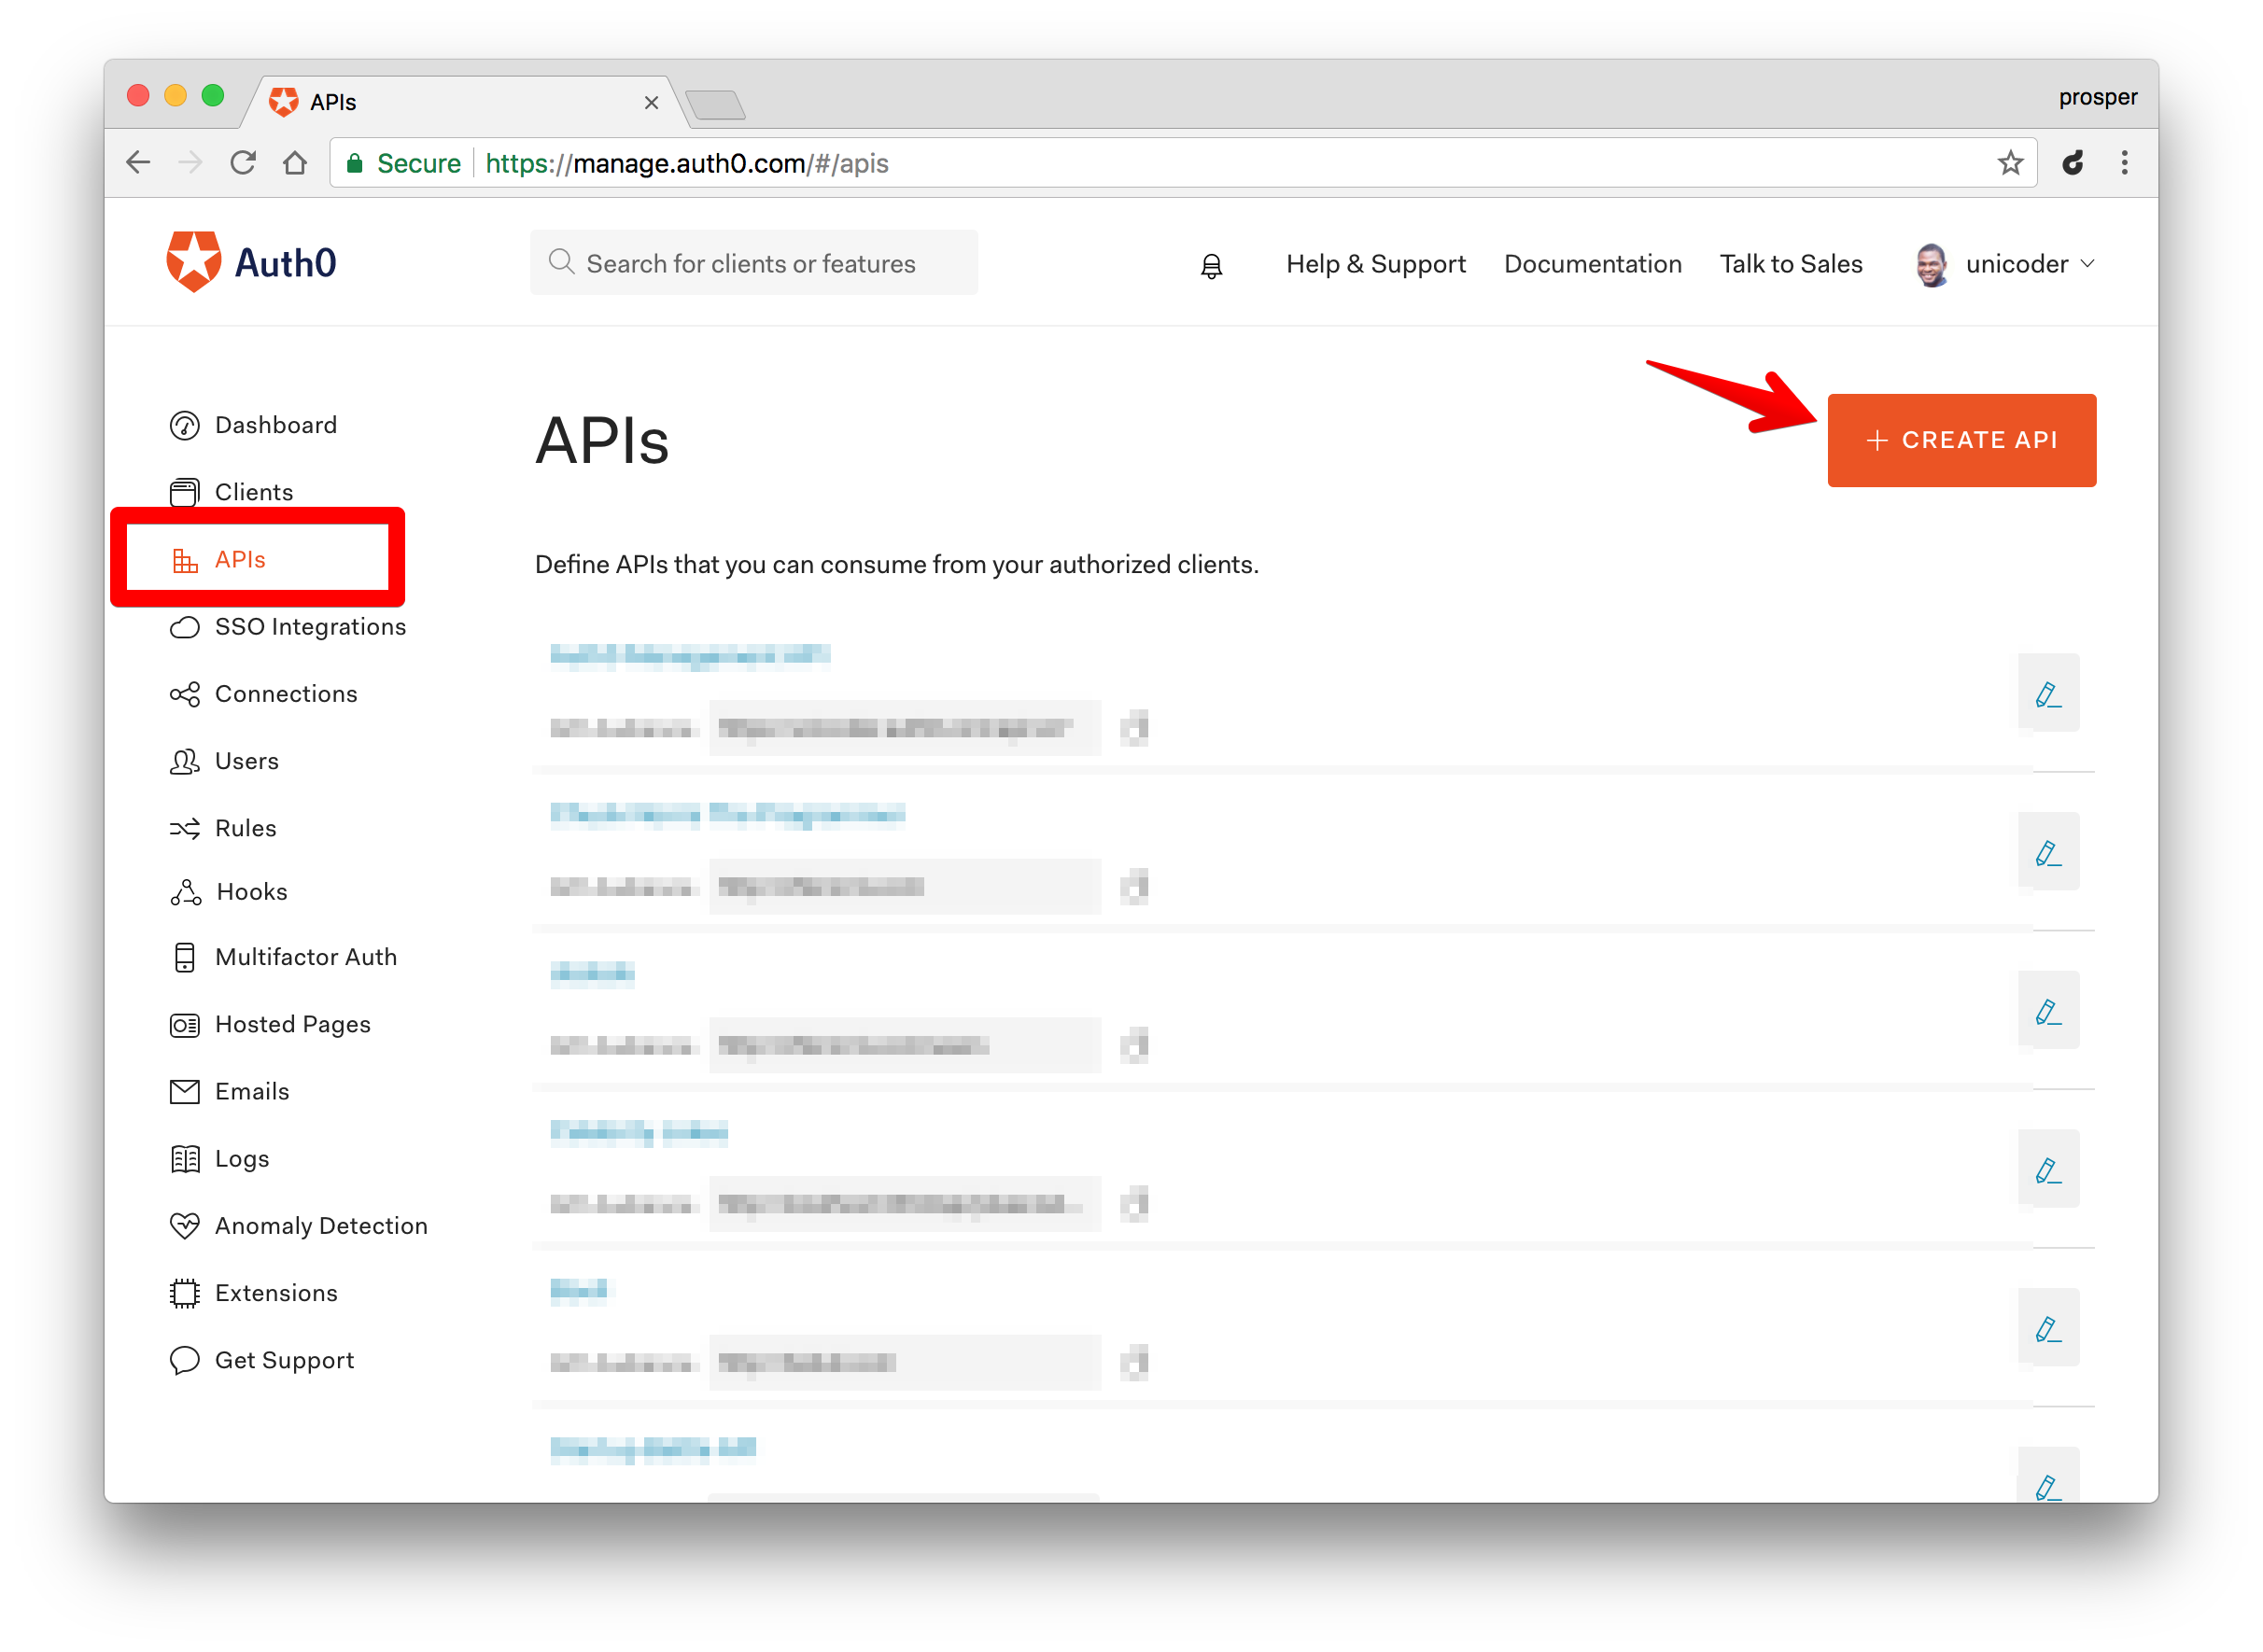
Login to your Auth0 management dashboard and create a new API client.
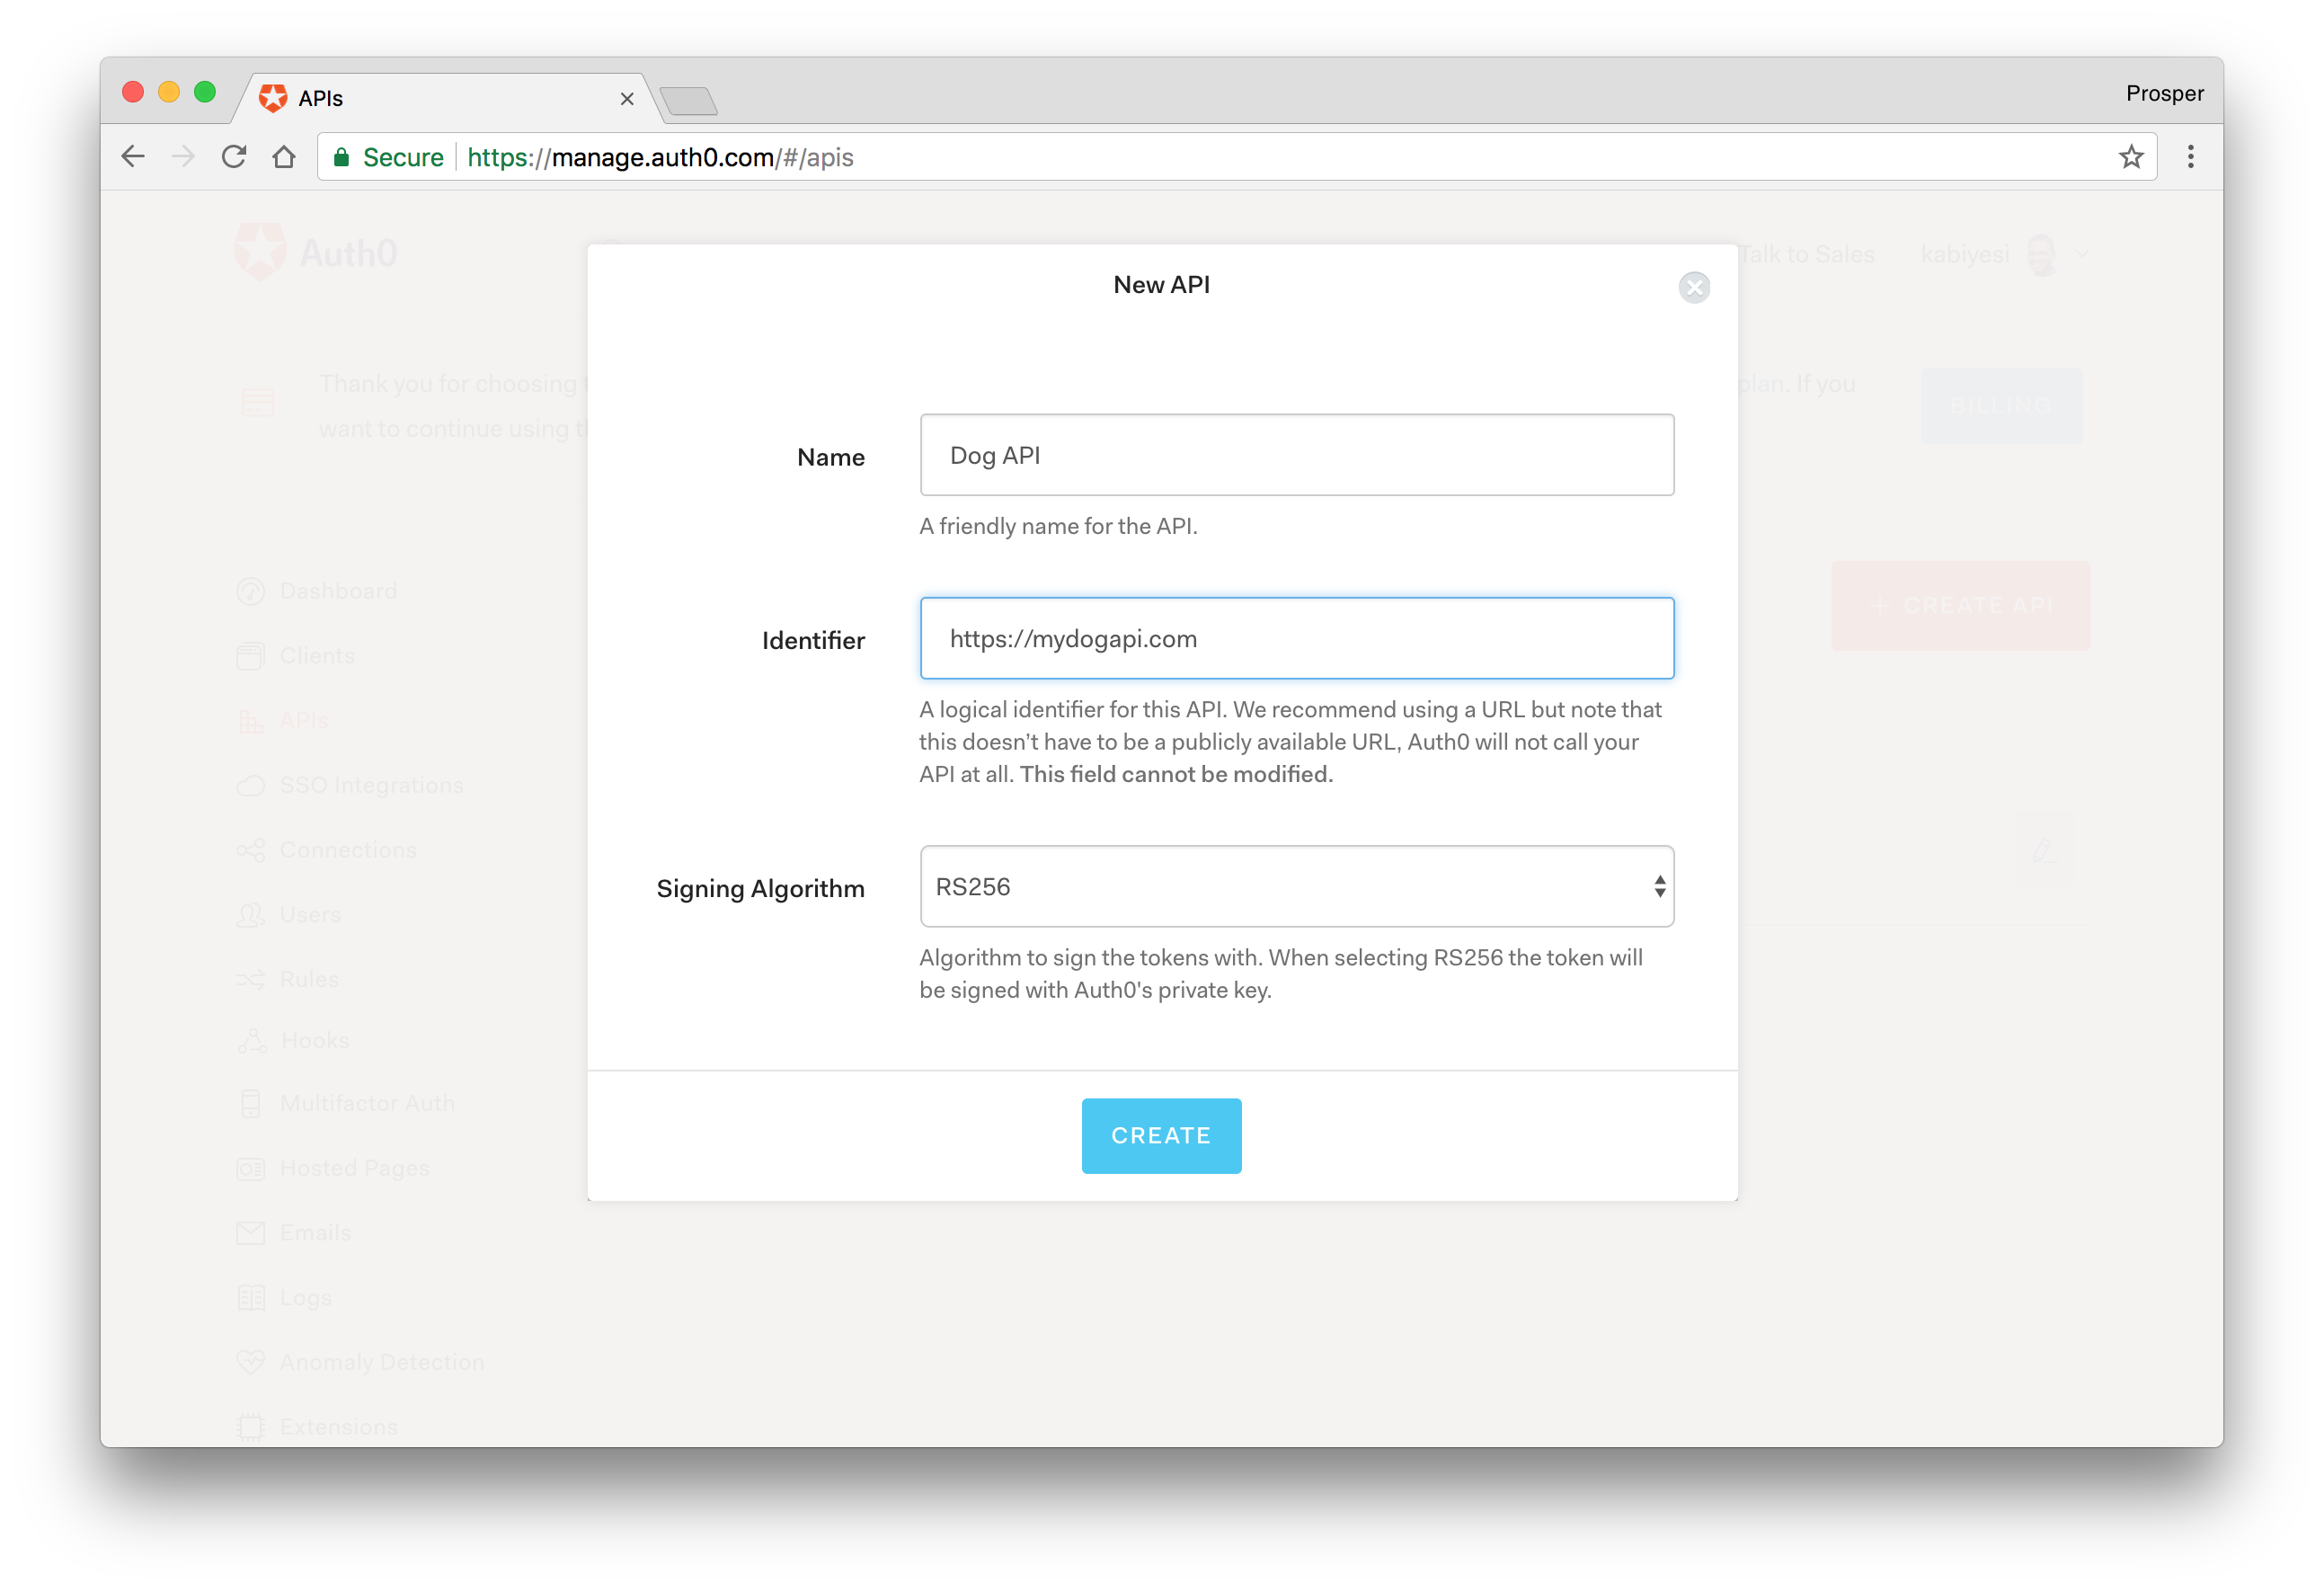
Click on the APIs menu item and then the Create API button. You will need to give your API a name and an identifier. The name can be anything you choose, so make it as descriptive as you want.
The identifier will be used to identify your API, this field cannot be changed once set. For our example, I'll name the API, Dog API, and for the identifier, I'll set it as https://mydogapi.com. We'll leave the signing algorithm as RS256 and click on the Create API button.
Head over to your terminal and install the following node modules:
npm install jwks-rsa salzhrani/hapi-auth-jwt2#v-17 --save
Open your server.js file and modify it like so:
'use strict';

const Hapi = require('hapi');
const mongoose = require('mongoose');
const hapiAuthJWT = require('hapi-auth-jwt2');
const jwksRsa = require('jwks-rsa');
const DogController =  require('./src/controllers/dog');
const MongoDBUrl = 'mongodb://localhost:27017/dogapi';

const server = new Hapi.Server({
  port: 3000,
  host: 'localhost'
});

const validateUser = (decoded, request, callback) => {
  // This is a simple check that the `sub` claim
  // exists in the access token. Modify it to suit
  // the needs of your application
  console.log("Decoded", decoded);
  if (decoded && decoded.sub) {
    return callback(null, true, {});
  }

  return callback(null, false, {});
}

const registerRoutes = () => {
  server.route({
    method: 'GET',
    path: '/dogs',
    options: {
      handler: DogController.list
    }
  });

  server.route({
    method: 'GET',
    path: '/dogs/{id}',
    options: {
      handler: DogController.get
    }
  });

  server.route({
    method: 'POST',
    path: '/dogs',
    handler: DogController.create
  });

  server.route({
    method: 'PUT',
    path: '/dogs/{id}',
    handler: DogController.update
  });

  server.route({
    method: 'DELETE',
    path: '/dogs/{id}',
    handler: DogController.remove
  });
}

const init = async() => {
  await server.register(hapiAuthJWT);
  // see: http://Hapi.com/api#serverauthschemename-scheme
  server.auth.strategy('jwt', 'jwt', {
    key: jwksRsa.hapiJwt2Key({
      cache: true,
      rateLimit: true,
      jwksRequestsPerMinute: 5,
      // YOUR-AUTH0-DOMAIN name e.g https://prosper.auth0.com
      jwksUri: '{YOUR-AUTH0-DOMAIN}/.well-known/jwks.json'
    }),
    verifyOptions: {
      audience: '{YOUR-API-AUDIENCE-ATTRIBUTE}',
      issuer: "{YOUR-AUTH0-DOMAIN}",
      algorithms: ['RS256']
    },
    validate: validateUser
  });

  server.auth.default('jwt');

  registerRoutes();

  await server.start();
  return server;

};

init().then(server => {
  console.log('Server running at:', server.info.uri);
}).catch(err => {
  console.log(err);
});
- The
hapi-auth-jwt2module is a library that validates a JSON Web Token in your headers, query or cookies for your application. At the time of this writing, a PR has been submitted to support Hapi v17. We can only make use of the repo by installing it via the GitHub repo. - The
jwks-rsamodule is a library that helps retrieve RSA public keys from a JSON Web Key Set endpoint.
The validate function validates the API for any scopes defined in the token. In this example, we did not explicitly define any scope.
Note: Replace the YOUR-API-AUDIENCE-ATTRIBUTE and YOUR-AUTH0-DOMAIN placeholders with the API audience and Auth0 domain values from your Auth0 dashboard.
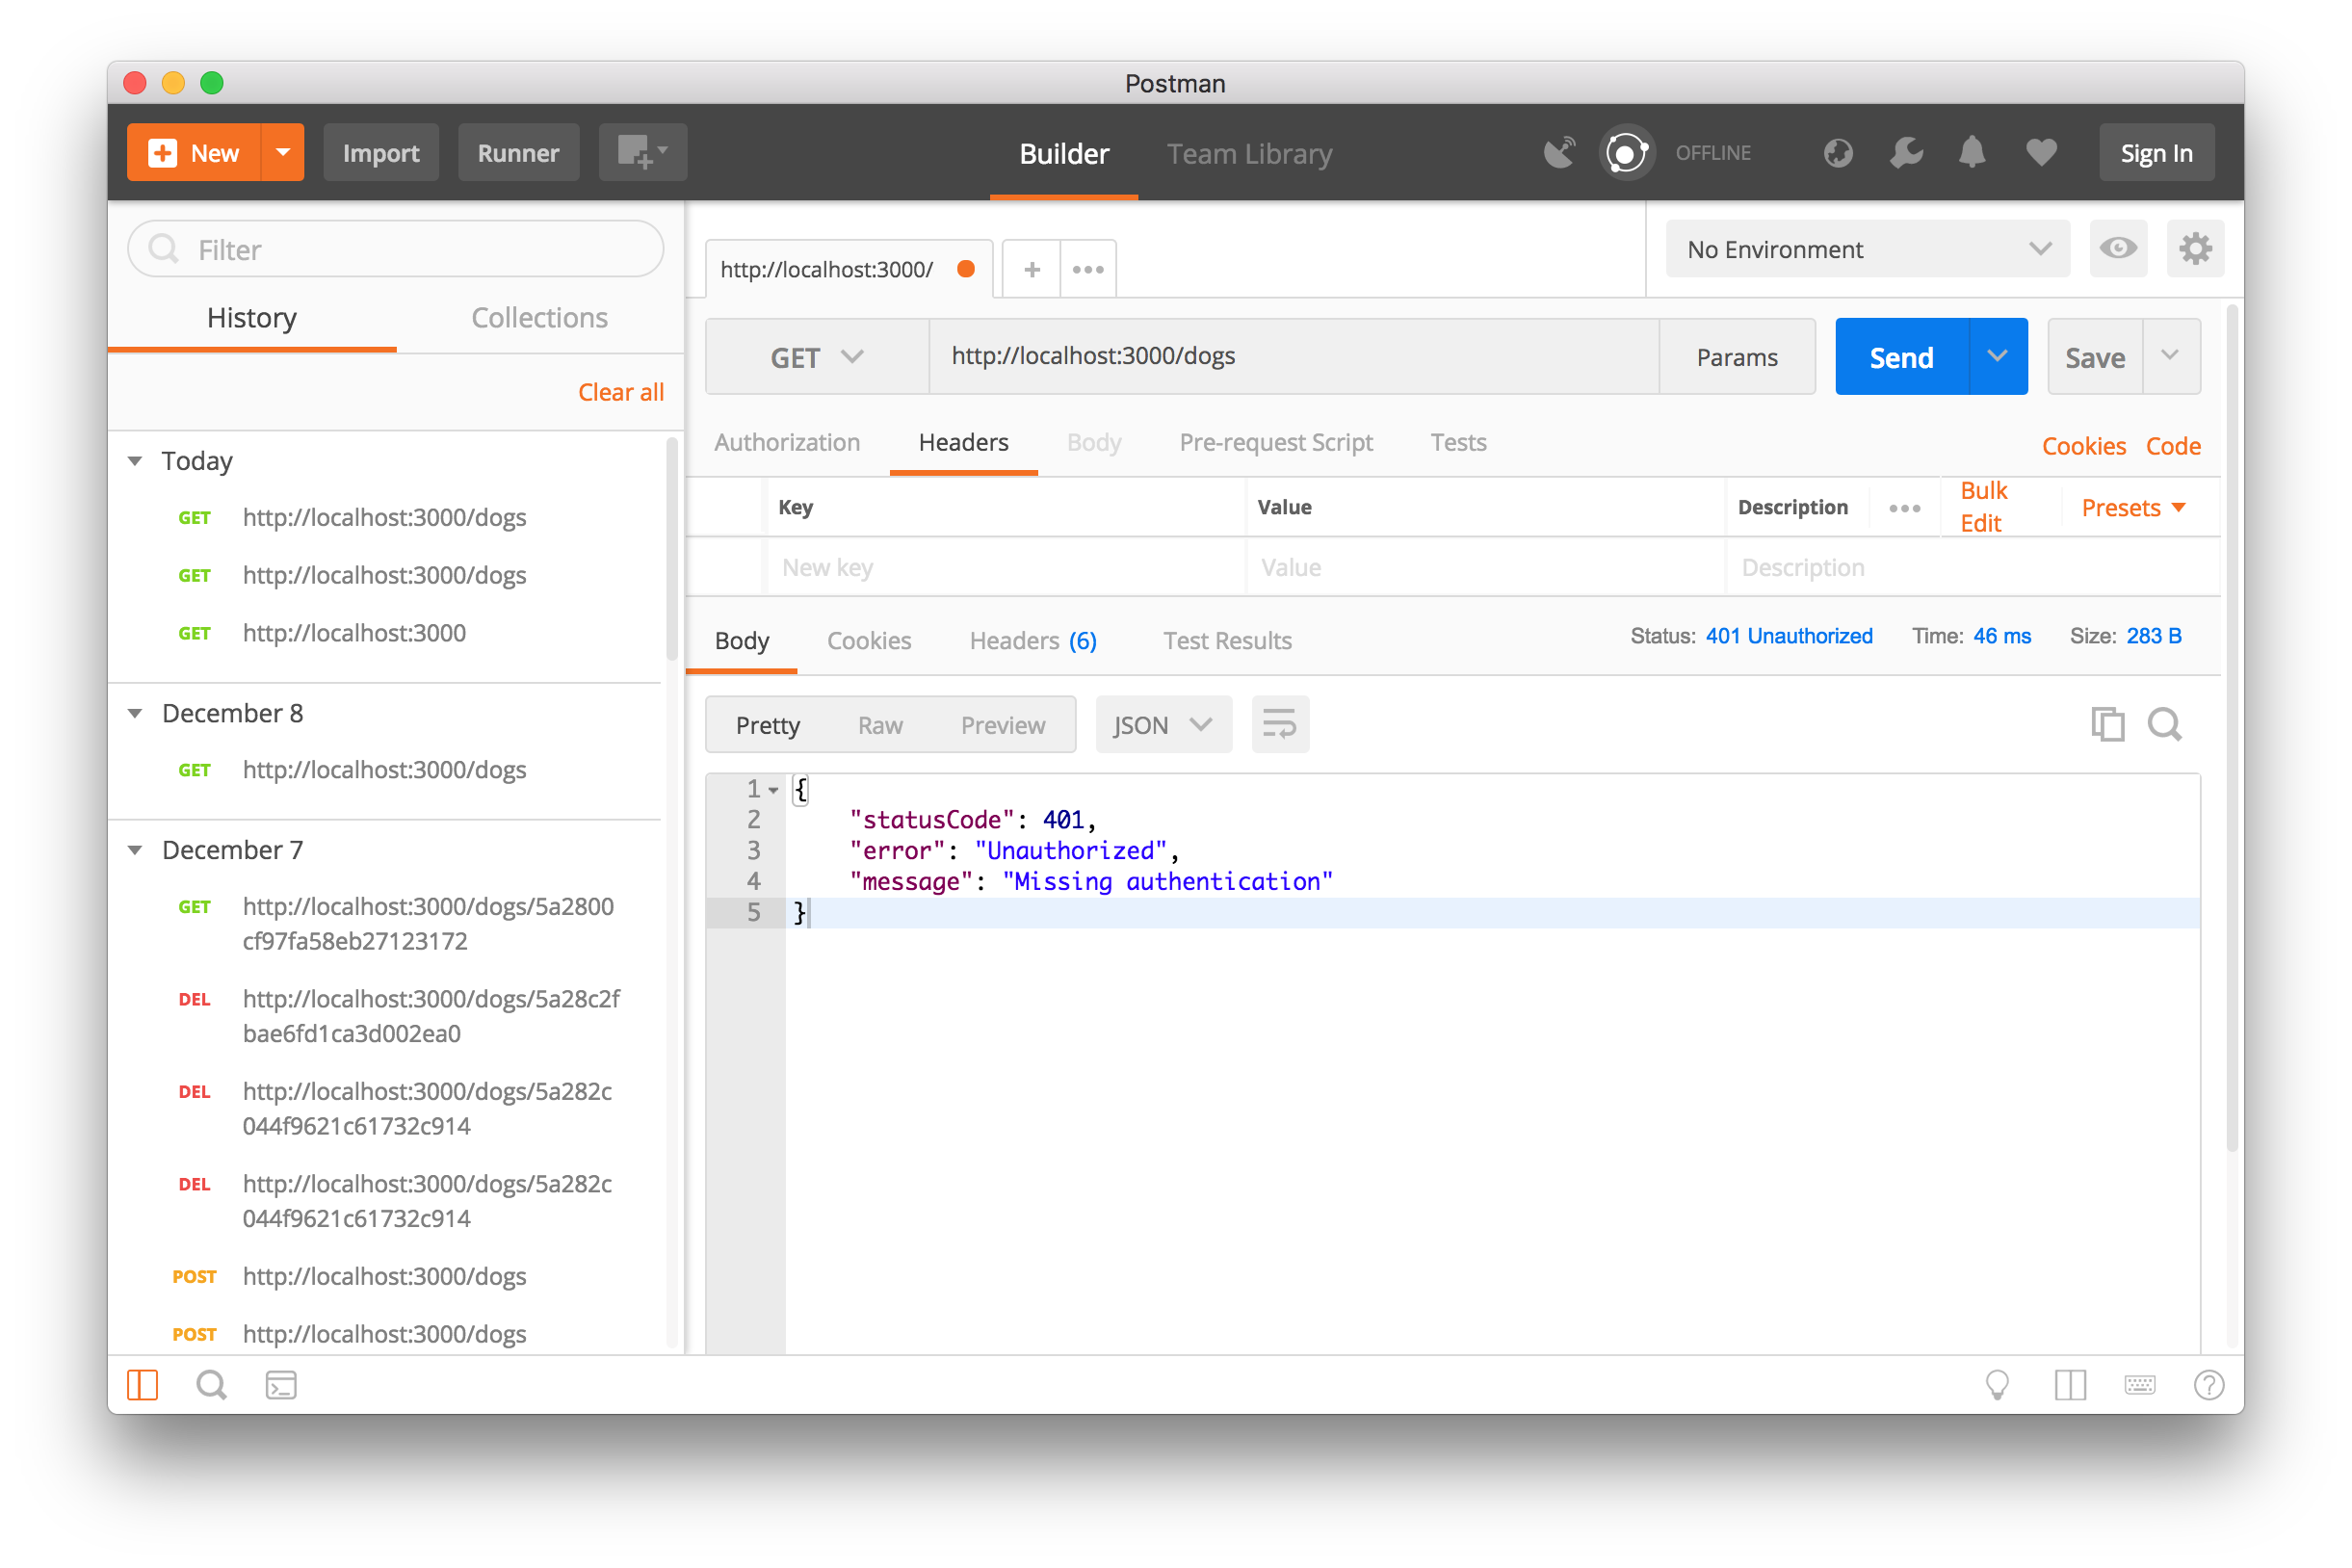
We just secured all the post, put, and delete API endpoints with JWT. If a user accesses these API endpoint/route without a valid access token or no token at all, it returns an error. Try it out.
Go ahead and test it with a valid access token. Head over to the test tab of your newly created API on your Auth0 dashboard.
Grab the Access token from the Test tab
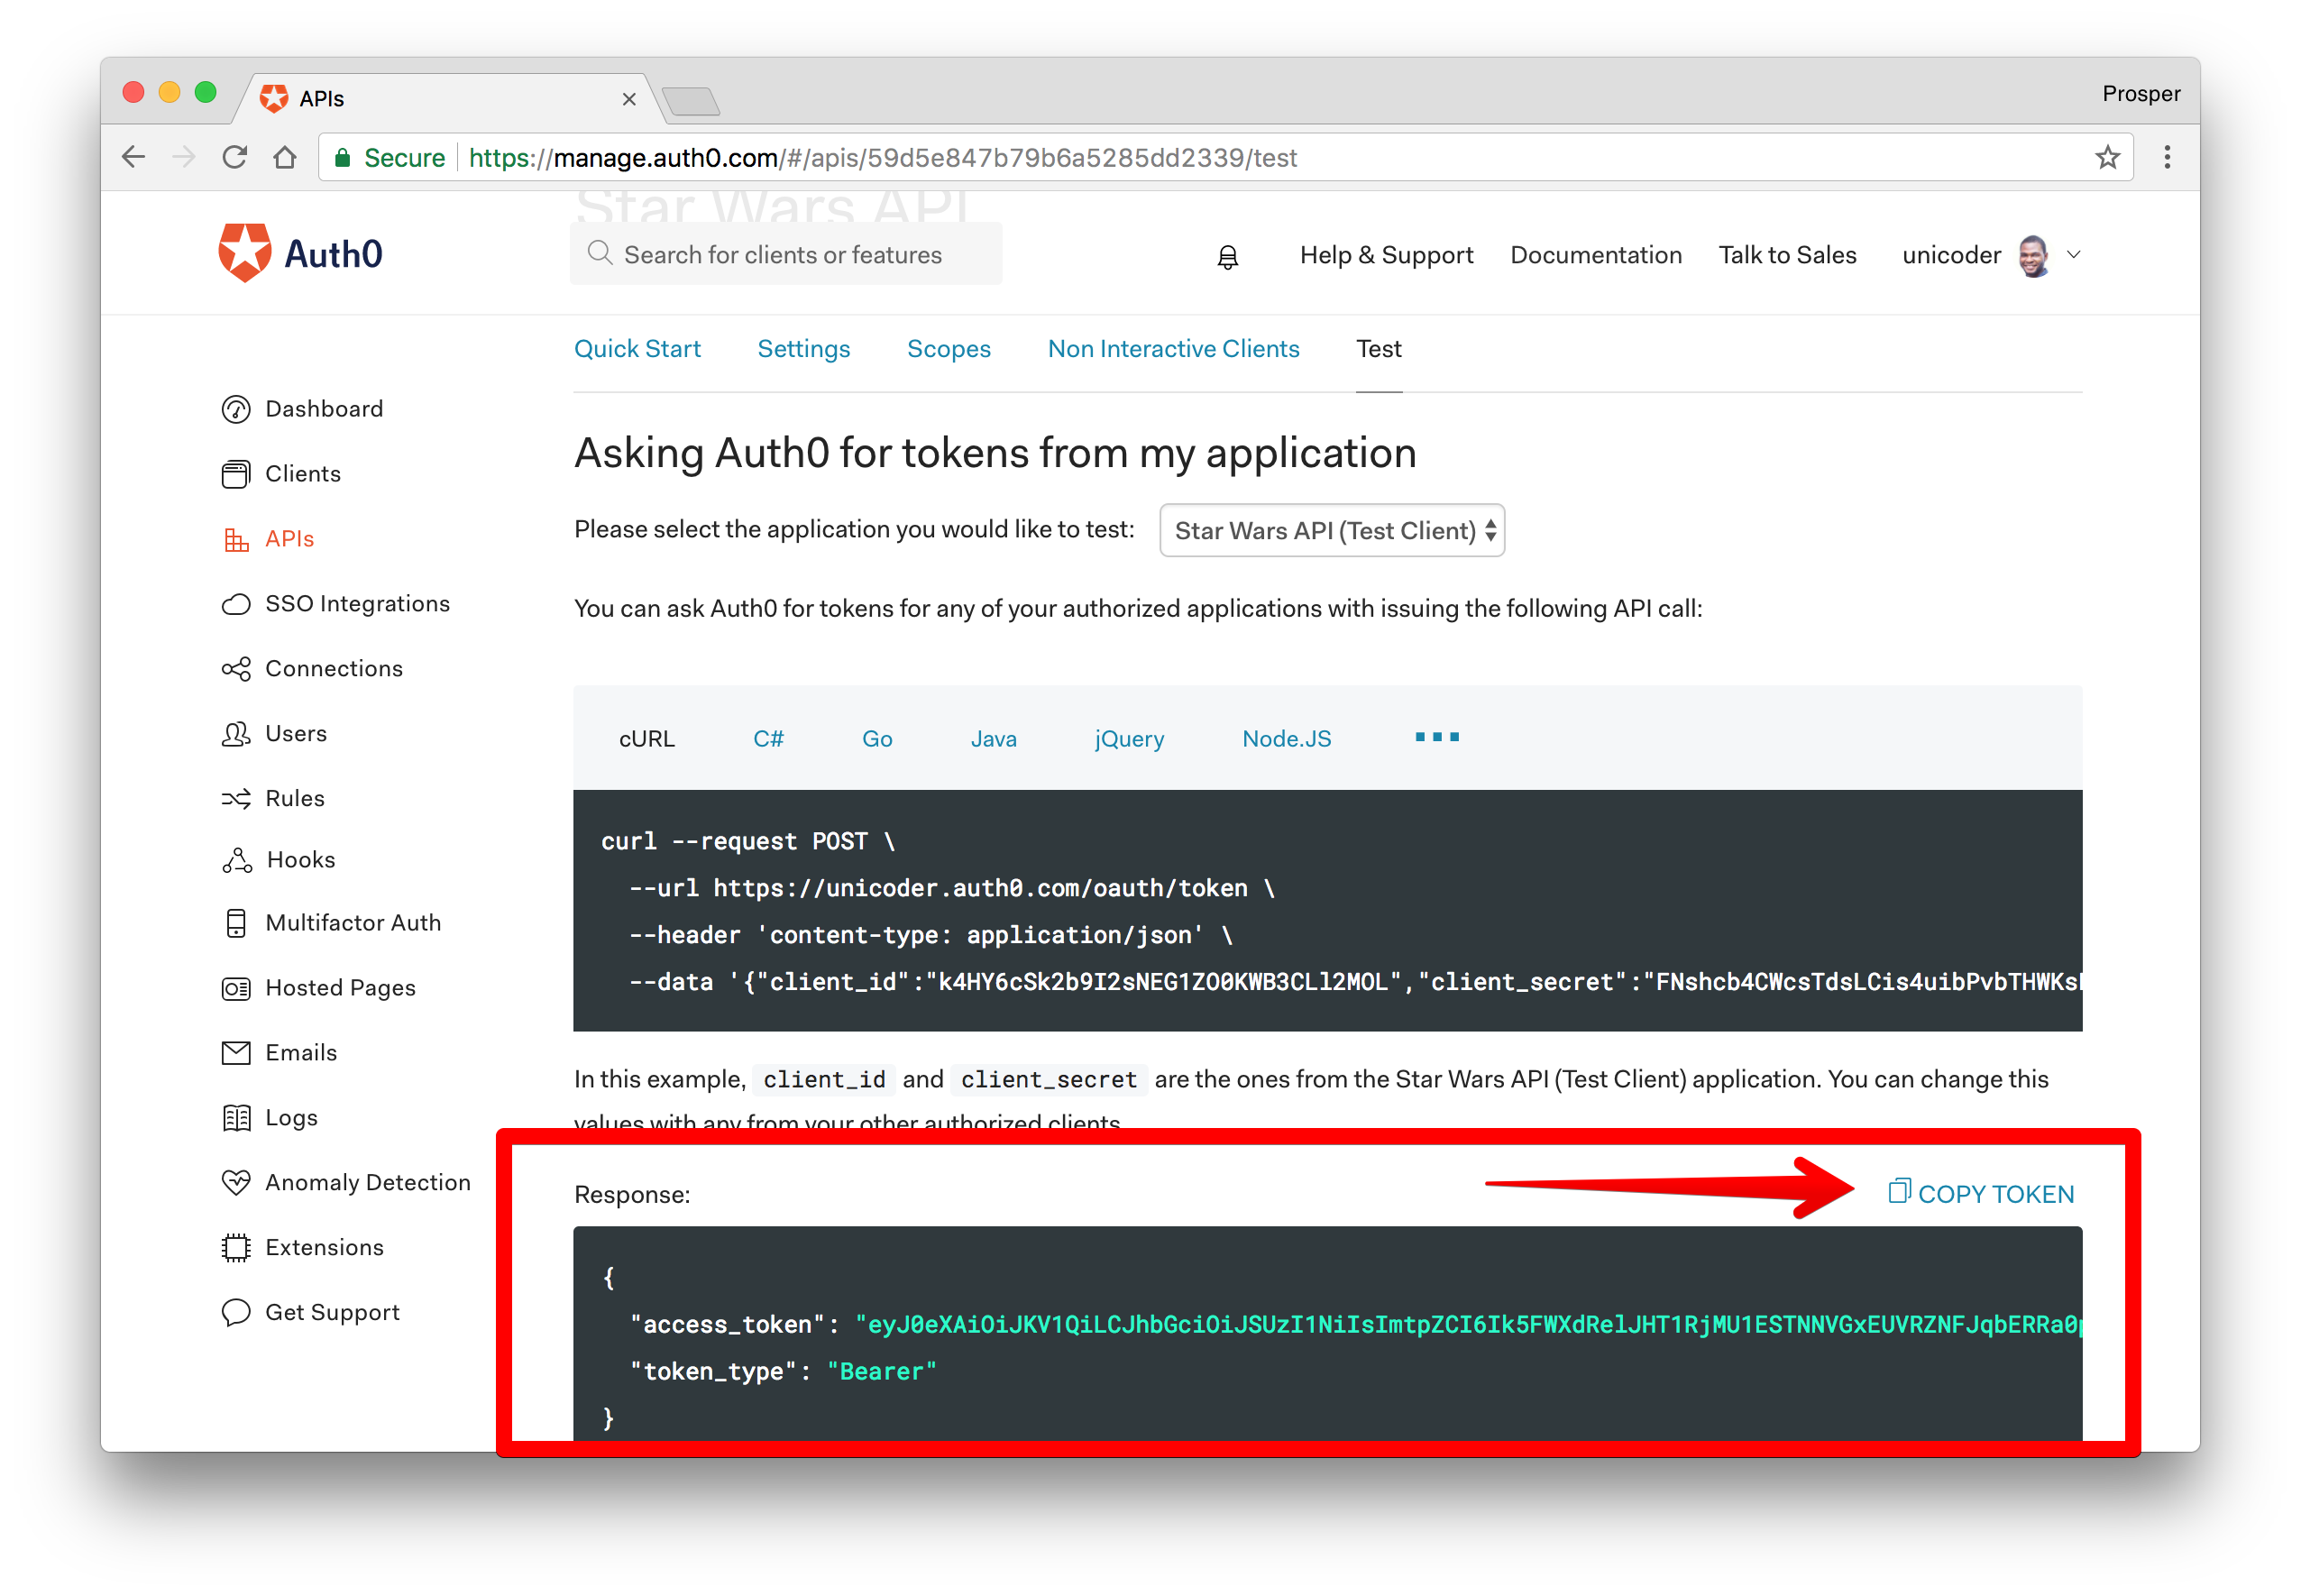
Now use this access token in Postman by sending it as an Authorization header to make a GET request to /dogs endpoint. It validates the access token and successfully makes the GET request.
Conclusion
You have successfully learned how to build and secure an API with Hapi. A lot of changes were made in the latest release of Hapi (v17). And there are several organizations to thank for supporting Hapi FOSS. The active sponsors were Lob, Auth0, CNN Digital, Contentful, Creative Artists Agency and Conde Nast Technology. Still working with version 16 of Hapi? check out this excellent article.
In addition, Auth0 can help secure your API easily. Auth0 provides more than just username-password authentication. It provides features like multifactor auth, breached password detection, anomaly detection, enterprise federation, single sign on (SSO), and more. Sign up today so you can focus on building features unique to your app.
Please, let me know if you have any questions or observations in the comment section. 😊
About the author

Prosper Otemuyiwa
Former Auth0 Employee (Auth0 Alumni)