
Starting from this chapter?
Clone the application repo and check out the build-api branch:
git clone git@github.com:auth0-blog/menu-api-spring-boot-java.git \
menu-api \
--branch build-api
Make the project folder your current directory:
cd menu-api
Then, install the project dependencies using Gradle:
./gradlew --refresh-dependencies
Finally, update the application.properties file in src/main/resources as follows:
server.port=7000
Run the project by executing the following command:
./gradlew bootRun
Learn how to secure an API with the world's most popular Java framework and Auth0.
So far, you've built an API that allows anyone to read and write data. It's time to tighten the security, so only users with the menu-admin role can create, update, and delete menu items.
Authentication vs. Authorization
To know what a user can do, you first need to know who the user is. This is known as authentication. It is often done by asking for a set of credentials, such as username & password. Once verified, the client gets information about the identity and access of the user.
To implement these Identity and Access Management (IAM) tasks easily, you can use OAuth 2.0, an authorization framework, and OpenID Connect (OIDC), a simple identity layer on top of it.
OAuth encapsulates access information in an access token. In turn, OpenID Connect encapsulates identity information in an ID token. The authentication server can send these two tokens to the client application initiating the process. When the user requests a protected API endpoint, it must send the access token along with the request.
You won't have to worry about implementing OAuth, OpenID Connect, or an authentication server. Instead, you'll use Auth0.
Auth0 is a flexible, drop-in solution to add authentication and authorization services to your applications. Your team and organization can avoid the cost, time, and risk that comes with building your own solution. Also, there are tons of docs and SDKs for you to get started and integrate Auth0 in your stack easily.
Set Up an Authorization Service
Auth0 is a flexible, drop-in solution to add authentication and authorization services to your applications. Your team and organization can avoid the cost, time, and risk that comes with building your own solution to authenticate and authorize users. Auth0 offers tons of guidance and SDKs for you to get started and integrate Auth0 in your stack easily.
To start, you need to create a free Auth0 account if you don't have one yet.
Try out the most powerful authentication platform for free.
Get started →After you create your account, you'll create an Auth0 Tenant, which is a container that Auth0 uses to store your identity service configuration and your users in isolation — no other Auth0 customer can peek into or access your tenant. It's similar to you being a tenant in an apartment building. Auth0 looks after the building while the apartment is all yours to live in and customize. However, each apartment is fully isolated (no windows, soundproof walls, etc.) so that neighbors can't intrude on your privacy.
After creating your tenant, you need to create an API register with Auth0, which is an API that you define within your Auth0 tenant and that you can consume from your applications to process authentication and authorization requests.
After creating your account, head to the APIs section in the Auth0 Dashboard and hit the Create API button.
Then, in the form that Auth0 shows:
Add a Name to your API:
Menu API.Set its Identifier to
https://menu-api.example.com.Leave the signing algorithm as
RS256as it's the best option from a security standpoint.
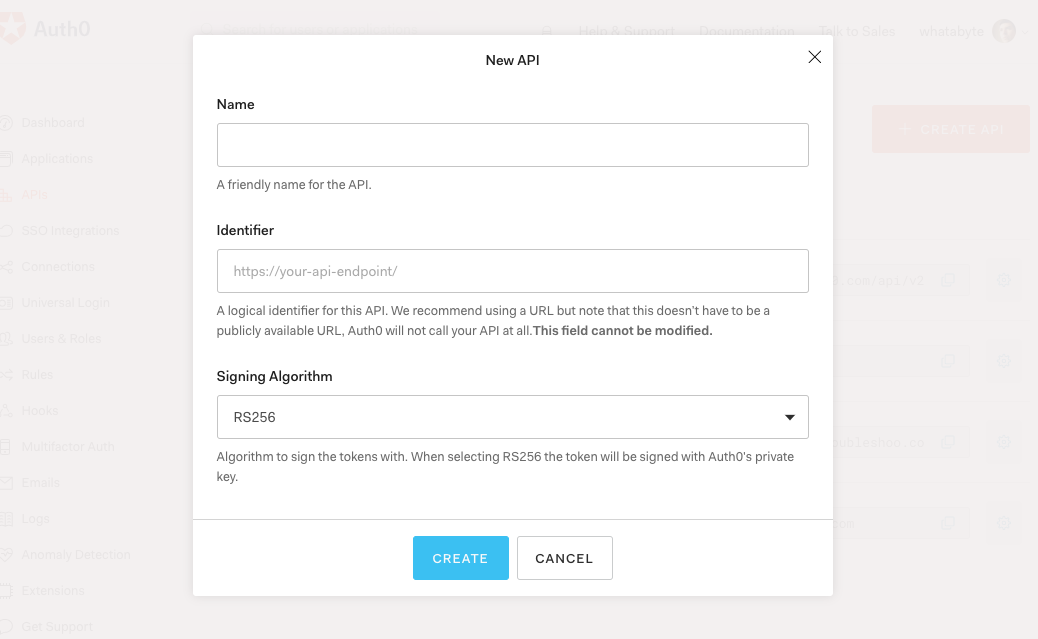
Identifiers are unique strings that help Auth0 differentiate between your different APIs. Using URLs is considered a good practice, as they are predictable and easy to read. Don't worry, Auth0 will never invoke or call them.
With these values in place, hit the Create button.
Your API needs some configuration variables to identity itself with Auth0: an Audience and a Domain value. The best place to store these values is within the application.properties file of your Spring Boot project.
Open the application.properties file in src/main/resources and update it:
server.port=7000
auth0.audience=
auth0.domain=
spring.security.oauth2.resourceserver.jwt.issuer-uri=https://${auth0.domain}/
Head back to your Auth0 API page, and follow these steps to get the Auth0 Audience:
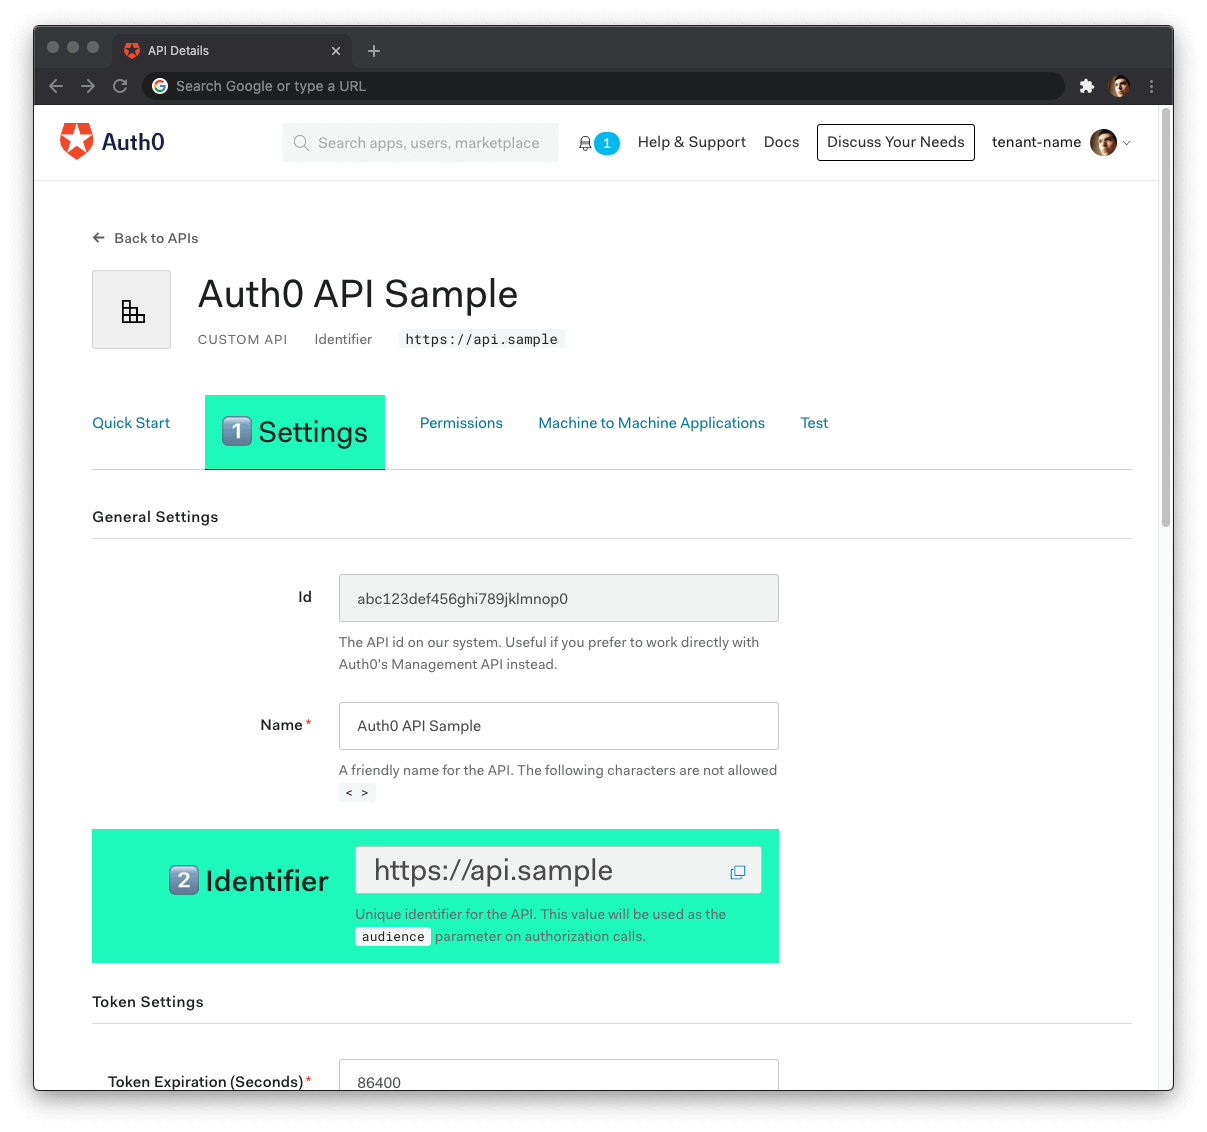
Click on the "Settings" tab.
Locate the "Identifier" field and copy its value.
Paste the "Identifier" value as the value of
auth0.audienceinapplication.properties.
Now, follow these steps to get the Auth0 Domain value:
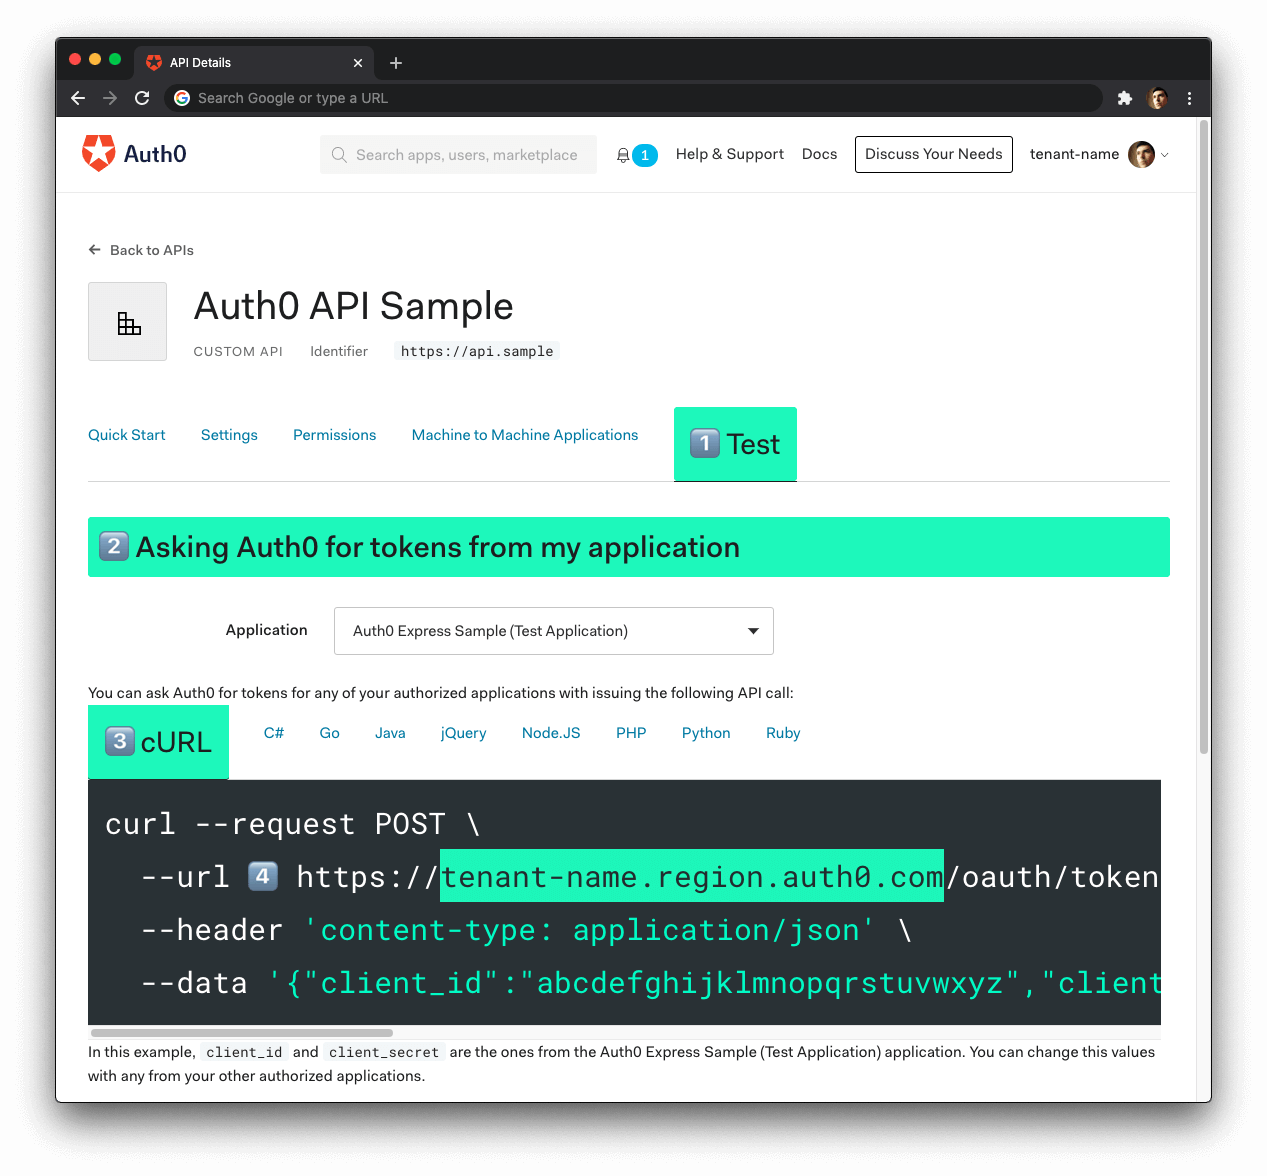
- Click on the "Test" tab.
- Locate the section called "Asking Auth0 for tokens from my application".
- Click on the cURL tab to show a mock
POSTrequest. - Copy your Auth0 domain, which is part of the
--urlparameter value:tenant-name.region.auth0.com. - Paste the Auth0 domain value as the value of
auth0.domaininapplication.properties.
Tips to get the Auth0 Domain
The Auth0 Domain is the substring between the protocol,
https://and the path/oauth/token.The Auth0 Domain follows this pattern:
tenant-name.region.auth0.com.The
regionsubdomain (au,us, oreu) is optional. Some Auth0 Domains don't have it.Click on the image above, please, if you have any doubt on how to get the Auth0 Domain value.
Restart the server so that Spring Boot can recognize the changes you just made to application.properties. Stop the running process and execute ./gradlew bootRun once again.
Spring Boot and Authorization
Recall the Identity and Access Management (IAM) flow:
- Users will start by authenticating with a username and password managed by Auth0.
- Once authenticated, the client will receive a JWT representing an access token.
- The client will include the access token in the authorization header of every request to a secure endpoint.
- The server will validate the access token and determine if it has the right permissions, using the information within the token.
To secure your API, first add a few new dependencies in your build.gradle:
dependency {
  implementation 'org.springframework.boot:spring-boot-starter-security'
  implementation 'org.springframework.security:spring-security-oauth2-resource-server'
  implementation 'org.springframework.security:spring-security-oauth2-jose'
  // ...
}
spring-boot-starter-securityprovides the core security entities you need to build a bulletproof app.spring-security-oauth2-resource-servercontains support for OAuth 2.0 Resource Servers, mainly used to protect APIs via OAuth 2.0 Bearer Tokens.Finally,
spring-security-oauth2-josegives you the JOSE (Javascript Object Signing and Encryption) framework, built from a collection of specifications you'll need, such as JWT & JWK.
Sync Gradle and then create a security package under the com.example.menu package.
Under the new security package, create a class called SecurityConfig:
// com/example/menu/security/SecurityConfig.java

package com.example.menu.security;

import org.springframework.http.HttpMethod;
import org.springframework.security.config.annotation.web.builders.HttpSecurity;
import org.springframework.security.config.annotation.web.configuration.EnableWebSecurity;
import org.springframework.security.config.annotation.web.configuration.WebSecurityConfigurerAdapter;

@EnableWebSecurity
public class SecurityConfig extends WebSecurityConfigurerAdapter {
  @Override
  protected void configure(HttpSecurity http) throws Exception {
    http.authorizeRequests()
      .mvcMatchers(HttpMethod.GET, "/api/menu/items/**").permitAll() // GET requests don't need auth
      .anyRequest()
      .authenticated()
      .and()
      .oauth2ResourceServer()
      .jwt();
  }
}
Let's unpack. The @EnableWebSecurity annotation tells Spring to apply the web security configuration declared by the class. The class extends WebSecurityConfigurerAdapter, which provides a convenient customization base.
You override the configure method to ensure GET requests can be processed without authentication. Other requests require a JWT, which will be verified using the issuer-uri from the application.properties file.
HttpSecurityis a builder class and provides numerous convenience methods that can be chained. Under the hood, each method adds a filter the HTTP request needs to pass through.
For extra security, you also want to check the audience. To do so, you need a custom validator. In the same security package, create a class called AudienceValidator:
// com/example/menu/security/AudienceValidator.java

package com.example.menu.security;

import org.springframework.security.oauth2.core.OAuth2Error;
import org.springframework.security.oauth2.core.OAuth2ErrorCodes;
import org.springframework.security.oauth2.core.OAuth2TokenValidator;
import org.springframework.security.oauth2.core.OAuth2TokenValidatorResult;
import org.springframework.security.oauth2.jwt.Jwt;

import java.util.List;
import java.util.Objects;

class AudienceValidator implements OAuth2TokenValidator<Jwt> {
  private final String audience;

  AudienceValidator(String audience) {
    Assert.hasText(audience, "audience is null or empty");
    this.audience = audience;
  }

  public OAuth2TokenValidatorResult validate(Jwt jwt) {
    List<String> audiences = jwt.getAudience();
    if (audiences.contains(this.audience)) {
      return OAuth2TokenValidatorResult.success();
    }
    OAuth2Error err = new OAuth2Error(OAuth2ErrorCodes.INVALID_TOKEN);
    return OAuth2TokenValidatorResult.failure(err);
  }
}
OAuth2TokenValidator interface and its method validate provide means to verify custom OAuth 2.0 Token attributes. With the class above, you ensure only tokens containing the specified audience, or aud claim to be exact, are valid.
To apply the custom validator, you need to update the SecurityConfig class:
// com/example/menu/security/SecurityConfig.java

package com.example.menu.security;

import org.springframework.beans.factory.annotation.Value;
import org.springframework.http.HttpMethod;
import org.springframework.security.config.annotation.web.builders.HttpSecurity;
import org.springframework.security.config.annotation.web.configuration.EnableWebSecurity;
import org.springframework.security.config.annotation.web.configuration.WebSecurityConfigurerAdapter;
import org.springframework.security.oauth2.core.DelegatingOAuth2TokenValidator;
import org.springframework.security.oauth2.core.OAuth2TokenValidator;
import org.springframework.security.oauth2.jwt.*;

@EnableWebSecurity
public class SecurityConfig extends WebSecurityConfigurerAdapter {
  @Value("${auth0.audience}")
  private String audience;

  @Value("${spring.security.oauth2.resourceserver.jwt.issuer-uri}")
  private String issuer;

  @Override
  protected void configure(HttpSecurity http) throws Exception {
    http.authorizeRequests()
      .mvcMatchers(HttpMethod.GET, "/api/menu/items/**").permitAll() // GET requests don't need auth
      .anyRequest()
      .authenticated()
      .and()
      .oauth2ResourceServer()
      .jwt()
      .decoder(jwtDecoder());
  }

  JwtDecoder jwtDecoder() {
    OAuth2TokenValidator<Jwt> withAudience = new AudienceValidator(audience);
    OAuth2TokenValidator<Jwt> withIssuer = JwtValidators.createDefaultWithIssuer(issuer);
    OAuth2TokenValidator<Jwt> validator = new DelegatingOAuth2TokenValidator<>(withAudience, withIssuer);

    NimbusJwtDecoder jwtDecoder = (NimbusJwtDecoder) JwtDecoders.fromOidcIssuerLocation(issuer);
    jwtDecoder.setJwtValidator(validator);
    return jwtDecoder;
  }
}
The @Value annotation on an instance variable is the Spring way of assigning a property value from the application.properties file. In the jwtDecoder method, you ensure both the audience claim (aud) and the issuer claim (iss) are validated.
Your authentication process is now complete. Rerun the Gradle command and try it out:
curl -X POST -H 'Content-Type: application/json' -d '{
  "name": "Salad",
  "price": 499,
  "description": "Fresh",
  "image": "https://cdn.auth0.com/blog/whatabyte/salad-sm.png"
}' http://localhost:7000/api/menu/items -i
You'll get a 401 Unauthorized response. However, the GET /api/menu/items endpoint works:
curl http://localhost:7000/api/menu/items -i
To test the authentication feature of your application, you need a valid access token. A client, such as a Single-Page Application (SPA), would get the access token by performing a login and then passing the access token in an authorization header to your API. This is where the WHATABYTE Dashboard comes in.
Register a Client Application with Auth0
You need a client application to simulate an end-user interaction with your API and see its security in action. To make that simulation more fun and engaging, you'll use the WHATABYTE Dashboard, a demo client application that lets you manage items for a restaurant menu. You'll create a user with Auth0, log in, and access pages that make requests to your API endpoints under the hood.
For that end-user interaction to happen, you'll need to create a Single-Page Application register with Auth0. This register will provide you with the configuration values that you need to connect the demo client application with Auth0, namely the Auth0 Domain and Auth0 Client ID. Once configured, the client application can communicate with the Auth0 authentication server and get access tokens for your logged-in users.
The process of creating an Auth0 Single-Page Application register is straightforward:
Open the Auth0 Applications section of the Auth0 Dashboard.
Click on the Create Application button.
Provide a Name value such as WHATABYTE Demo Client.
Choose Single Page Web Applications as the application type.
Click on the Create button.
A new page loads with details about your Auth0 application register. Click on its Settings tab to access its configuration values.
Next, visit https://dashboard.whatabyte.app/ to open the WHATABYTE Dashboard demo client application.
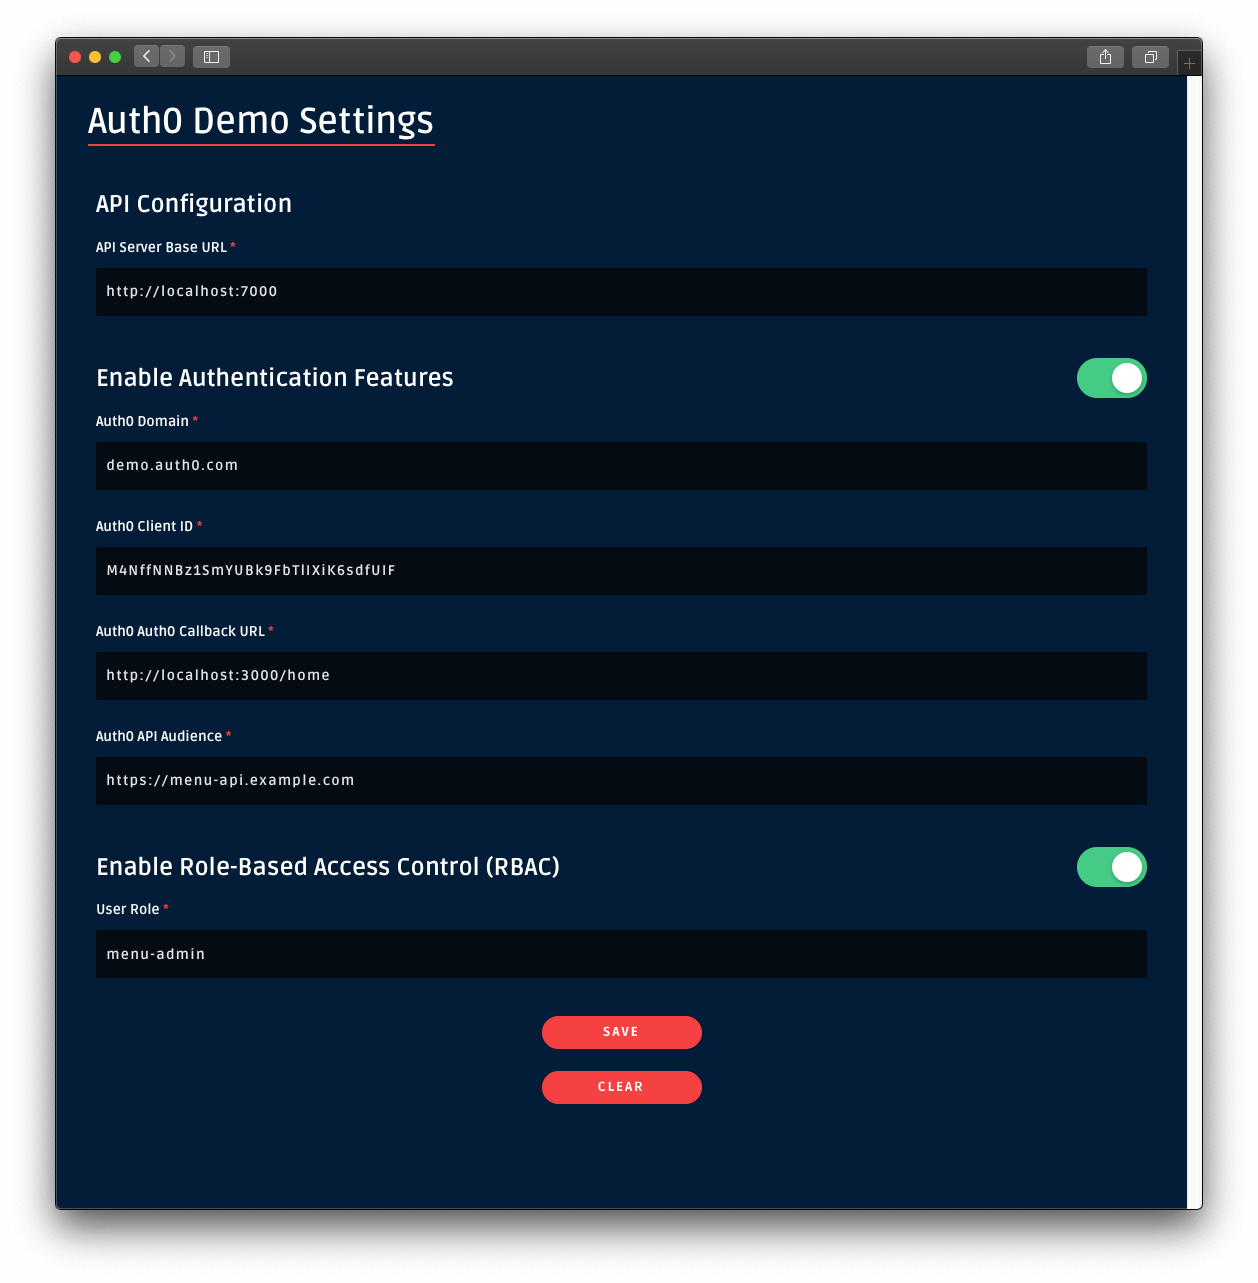
If you are not on the Auth0 Demo Settings page, click on the "Settings" tab from the left-hand navigation bar and then click the "Modify" button.
Enable the authentication features of the demo application. Then, use the configuration values present in your Auth0 application "Settings" page to fill the values of Auth0 Domain and Auth0 Client ID in the demo settings form:
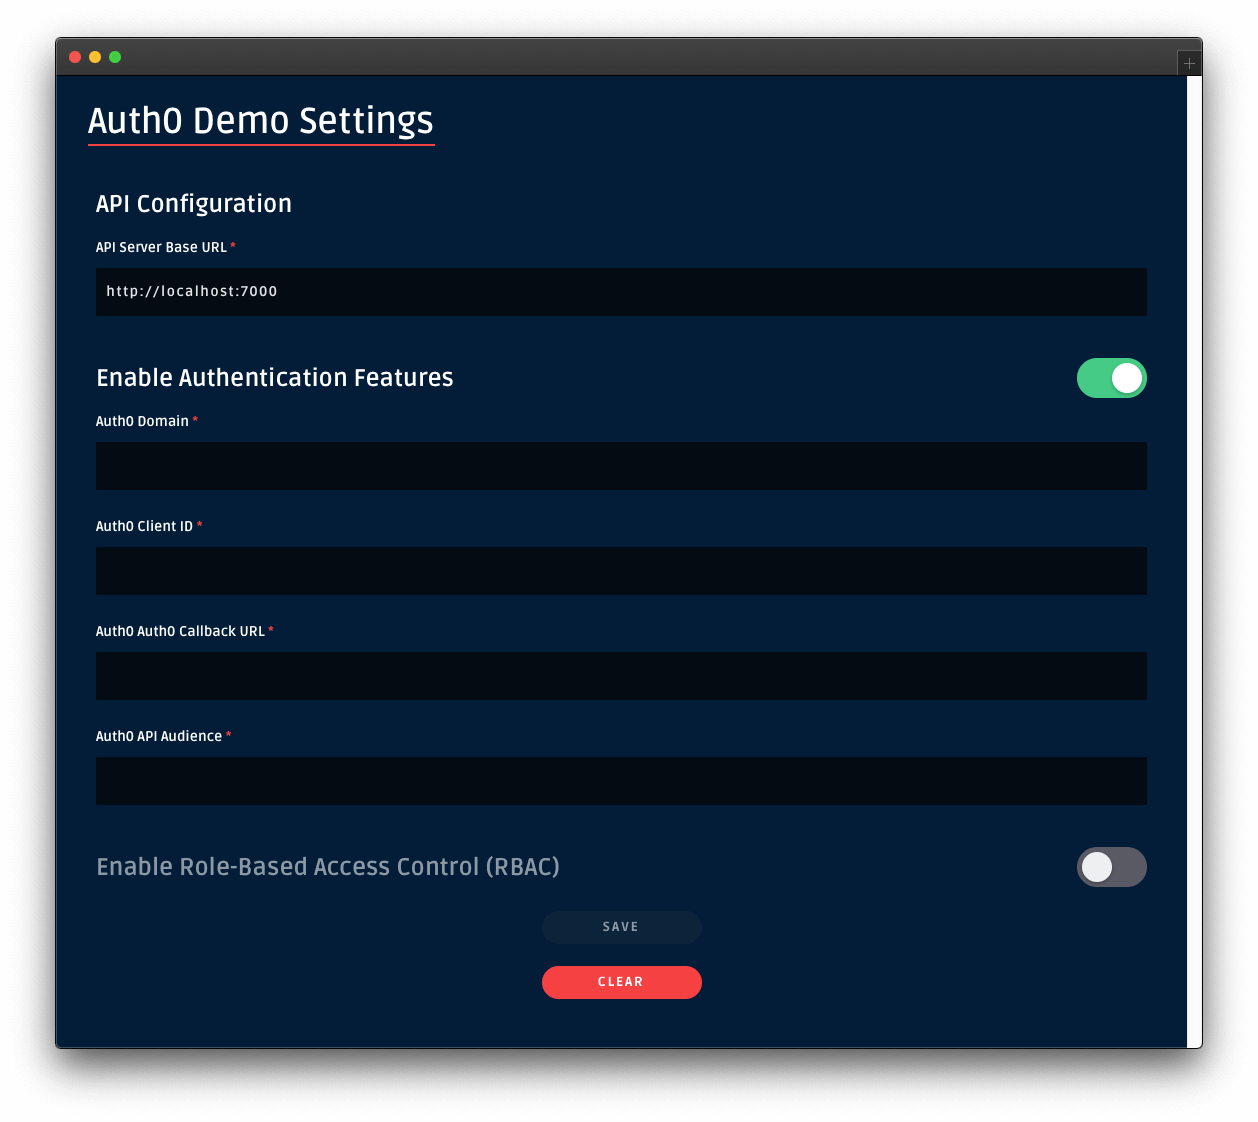
For the value of Auth0 API Audience use https://menu-api.example.com, which is the Identifier of the MENU API you registered with Auth0 earlier in the tutorial.
For the value of Auth0 Callback URL use https://dashboard.whatabyte.app/home. You'll learn what how Auth0 uses this callback value in the next section.
Click the Save button below the form. The WHATABYTE Dashboard is a client to your API server. To test this connection, click on the Menu tab and observe how it populates with the menu items you defined in your API store.
Connect a client application with Auth0
Head back to the Settings tab of your Auth0 application register page and update the following fields:
Allowed Callback URLs
Use the value of Auth0 Callback URL from the Auth0 Demo Settings form, https://dashboard.whatabyte.app/home.
After a user authenticates, Auth0 only calls back any of the URLs listed in this field. You can specify multiple valid URLs by comma-separating them (typically to handle different environments like QA or testing). Make sure to specify the protocol, http:// or https://; otherwise, the callback may fail in some cases.
Allowed Web Origins
Use https://dashboard.whatabyte.app.
A client application will make requests under the hood to an Auth0 URL to handle authentication requests. As such, you need to add your the application's origin URL to avoid Cross-Origin Resource Sharing (CORS) issues.
Allowed Logout URLs
Use https://dashboard.whatabyte.app/home.
This field holds a set of URLs that Auth0 can redirect to after a user logs out of your application. The default configuration of the demo client uses the provided value for redirecting users.
With these values in place, you can scroll to the bottom of the "Settings" page and click on the Save Changes button.
Enable CORS in Spring Boot
In the previous chapter, you used the @CrossOrigin annotation to enable CORS for the ItemController. In this section, you'll set up CORS in your SecurityConfig class.
Open your SecurityConfig class from the security package and replace its content with the following:
// com/example/menu/security/SecurityConfig.java

package com.example.menu.security;

import org.springframework.beans.factory.annotation.Value;
import org.springframework.http.HttpMethod;
import org.springframework.security.config.annotation.web.builders.HttpSecurity;
import org.springframework.security.config.annotation.web.configuration.EnableWebSecurity;
import org.springframework.security.config.annotation.web.configuration.WebSecurityConfigurerAdapter;
import org.springframework.security.oauth2.core.DelegatingOAuth2TokenValidator;
import org.springframework.security.oauth2.core.OAuth2TokenValidator;
import org.springframework.security.oauth2.jwt.*;
import org.springframework.web.cors.CorsConfiguration;
import org.springframework.web.cors.CorsConfigurationSource;
import org.springframework.web.cors.UrlBasedCorsConfigurationSource;

import java.util.List;

@EnableWebSecurity
public class SecurityConfig extends WebSecurityConfigurerAdapter {
    @Value("${auth0.audience}")
    private String audience;

    @Value("${spring.security.oauth2.resourceserver.jwt.issuer-uri}")
    private String issuer;

    @Override
    protected void configure(HttpSecurity http) throws Exception {
        http.authorizeRequests()
                .mvcMatchers(HttpMethod.GET, "/api/menu/items/**").permitAll() // GET requests don't need auth
                .anyRequest()
                .authenticated()
                .and()
                .cors()
                .configurationSource(corsConfigurationSource())
                .and()
                .oauth2ResourceServer()
                .jwt()
                .decoder(jwtDecoder());
    }

    CorsConfigurationSource corsConfigurationSource() {
        CorsConfiguration configuration = new CorsConfiguration();
        configuration.setAllowedMethods(List.of(
                HttpMethod.GET.name(),
                HttpMethod.PUT.name(),
                HttpMethod.POST.name(),
                HttpMethod.DELETE.name()
        ));

        UrlBasedCorsConfigurationSource source = new UrlBasedCorsConfigurationSource();
        source.registerCorsConfiguration("/**", configuration.applyPermitDefaultValues());
        return source;
    }

    JwtDecoder jwtDecoder() {
        OAuth2TokenValidator<Jwt> withAudience = new AudienceValidator(audience);
        OAuth2TokenValidator<Jwt> withIssuer = JwtValidators.createDefaultWithIssuer(issuer);
        OAuth2TokenValidator<Jwt> validator = new DelegatingOAuth2TokenValidator<>(withAudience, withIssuer);

        NimbusJwtDecoder jwtDecoder = (NimbusJwtDecoder) JwtDecoders.fromOidcIssuerLocation(issuer);
        jwtDecoder.setJwtValidator(validator);
        return jwtDecoder;
    }
}
You can also delete the following line from ItemsController:
@CrossOrigin(origins = "https://dashboard.whatabyte.app")
Stop the running server and execute ./gradlew bootRun once again to make these changes effective.
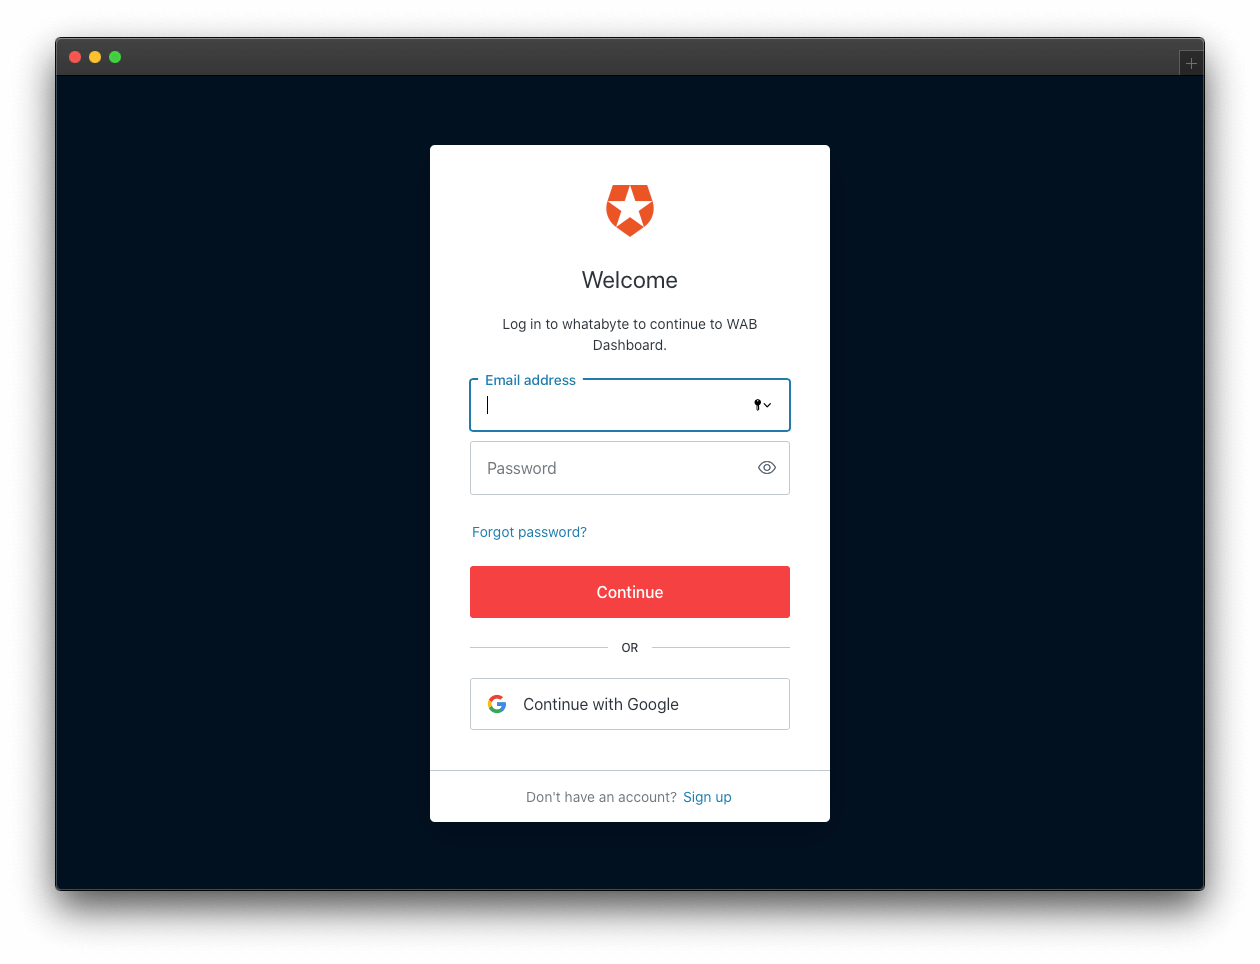
Sign In
In the demo client, click on the Sign In button. The client will redirect you to the Auth0 Universal Login page to log in or sign up. Since this may be the first user you are adding to Auth0, go ahead and click on the Sign Up link at the bottom of the form. Then, provide an email and password to register a new user.
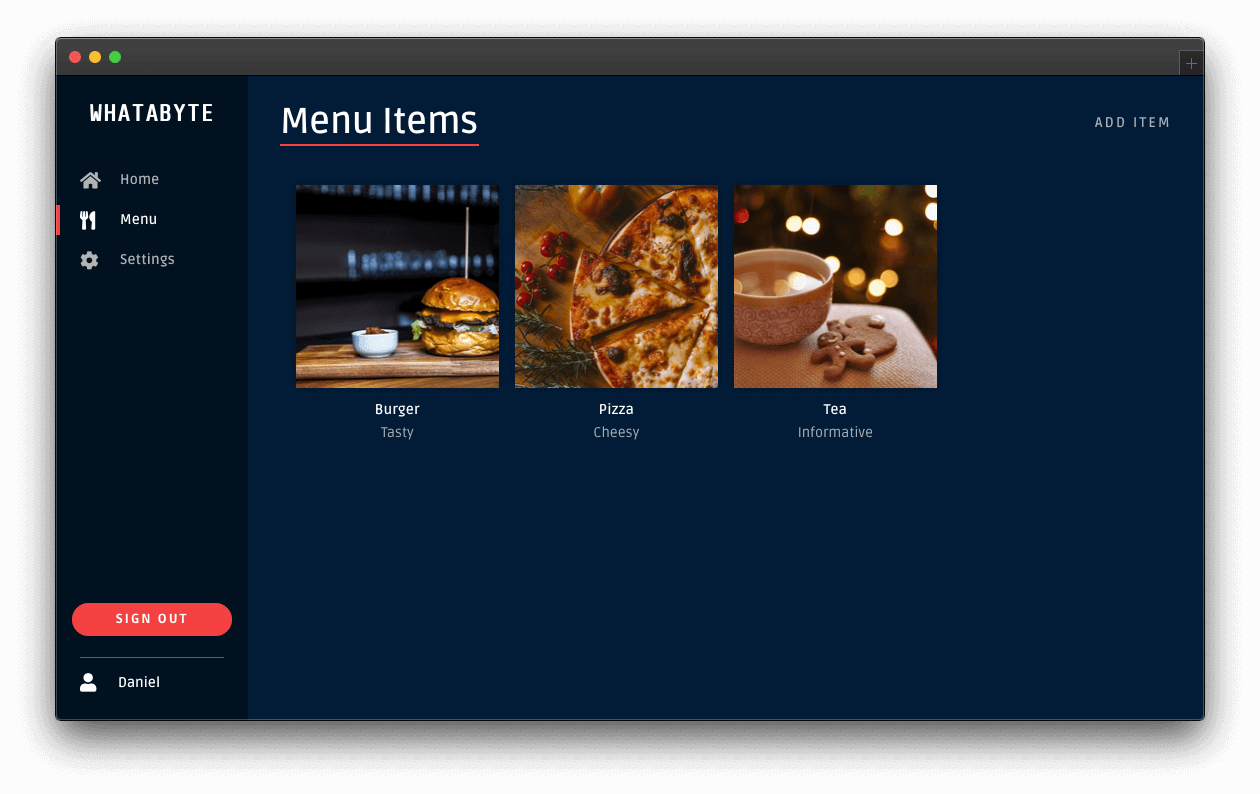
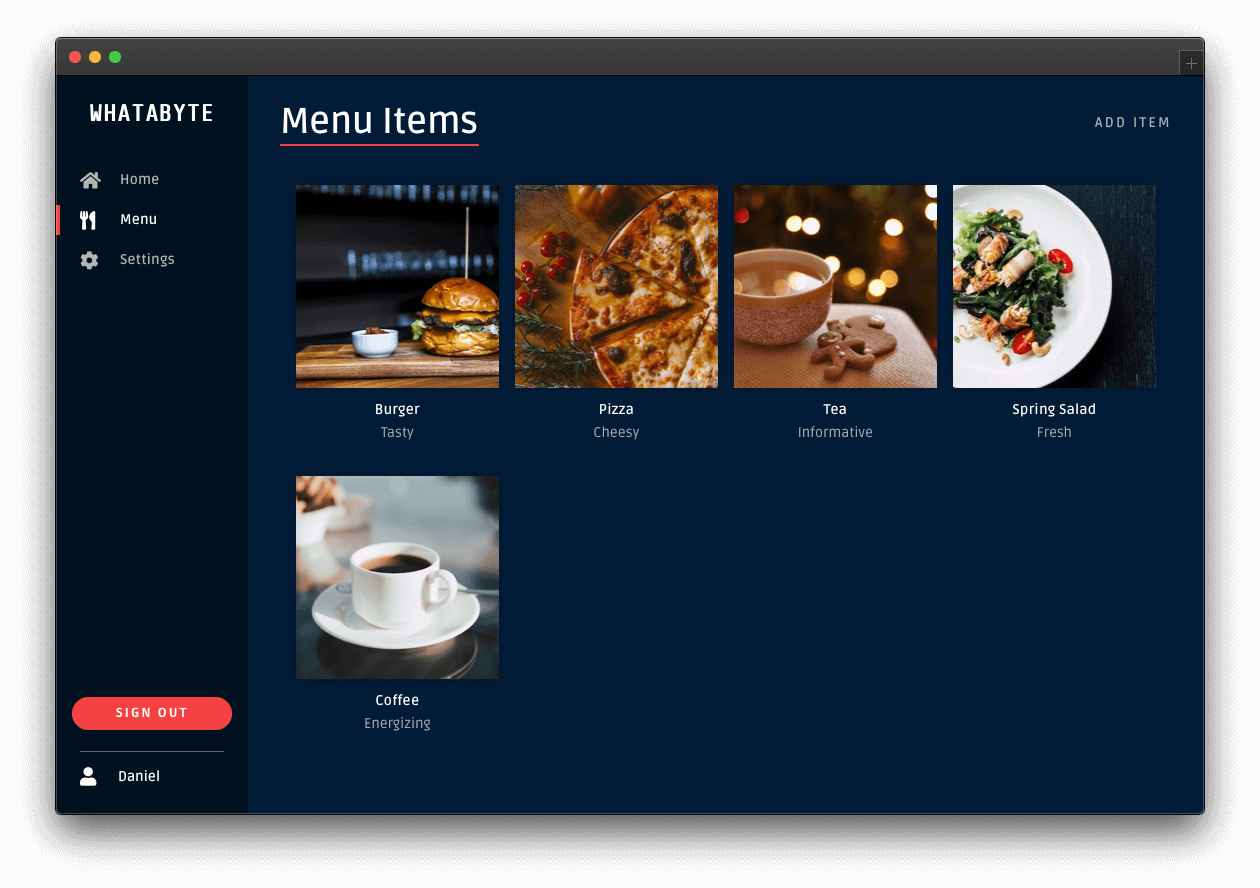
Once you sign in, the user interface of the demo client changes:
The Sign In button becomes a Sign Out button.
You can find a user tab below the Sign Out button.
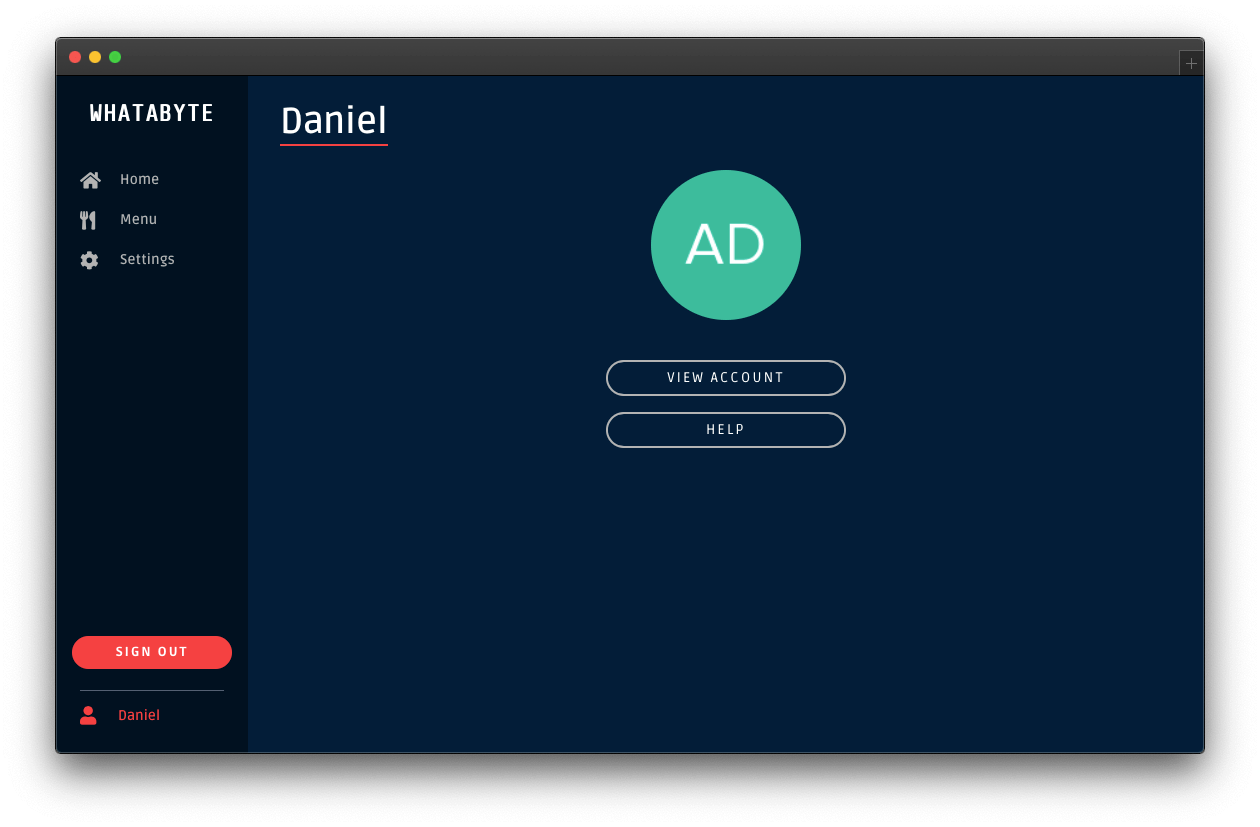
Click on the user tab to see a profile page with your name or email as the title and your profile picture — if you signed in with Google:
The demo client caters to three types of users:
Unauthenticated visitors: any visitor who has not logged in — some literature may refer to this type of user as "guest" or "anonymous".
Authenticated users: any visitor who successfully logs in.
Admin users: any authenticated user with the
menu-adminrole.
The end-goal of this tutorial is to use the menu-admin role and its associated permissions as access control artifacts. The plan is to only allow admin users to create, update, and delete menu items in the WHATABYTE Dashboard. In the Role-Based Access Control (RBAC) section of this tutorial, you'll create the menu-admin role, associate permissions with it, and assign it to a new user that you'll create through the Auth0 Dashboard.
However, you'll start with protecting your API write endpoints against unauthenticated visitors.
Experiment with the demo client:
Add items by clicking on the Add Item button located at the top-right corner of the "Menu" page.
Click on items and try to edit them or delete them.
You can do any read or write operations right now.
Security Exercise: Test your endpoint protection
Log out from the demo application. Click on the Settings tab on the left-hand navigation bar of the demo client. Then, click on the Modify button. The "Auth0 Demo Settings" page loads up. Disable the authentication features: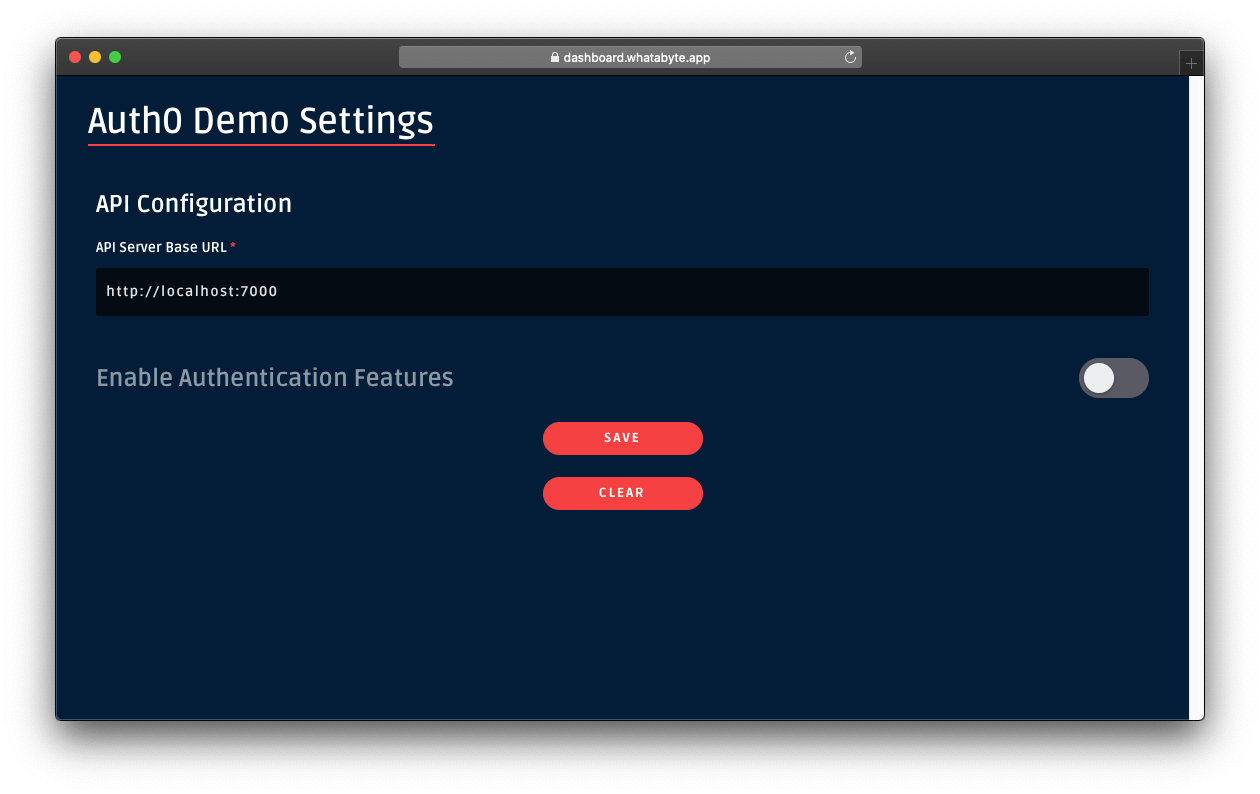 Click on the Save button.
Once the demo application loads again, click on the Menu tab. You'll notice that the Add Item button is now visible. In this mode, the demo client lets you access UI elements that make requests to your API write endpoints as an unauthenticated visitor. As such, those requests won't include an access token. If your API security is working correctly, it should reject those requests.
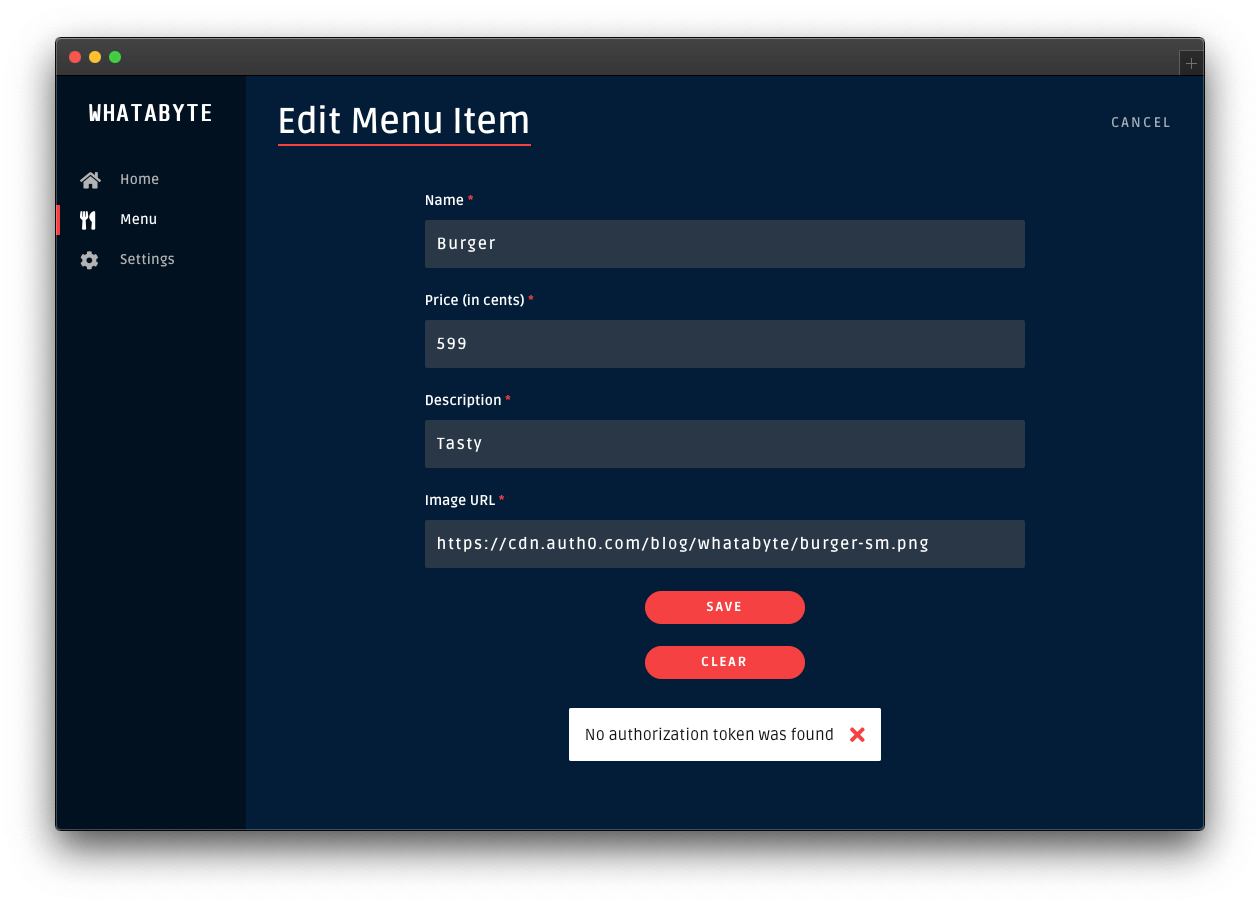
Click on the Add Item button to open a pre-populated form and click on the Save button. You'll get an error,
Click on the Save button.
Once the demo application loads again, click on the Menu tab. You'll notice that the Add Item button is now visible. In this mode, the demo client lets you access UI elements that make requests to your API write endpoints as an unauthenticated visitor. As such, those requests won't include an access token. If your API security is working correctly, it should reject those requests.
Click on the Add Item button to open a pre-populated form and click on the Save button. You'll get an error, No authorization token was found:
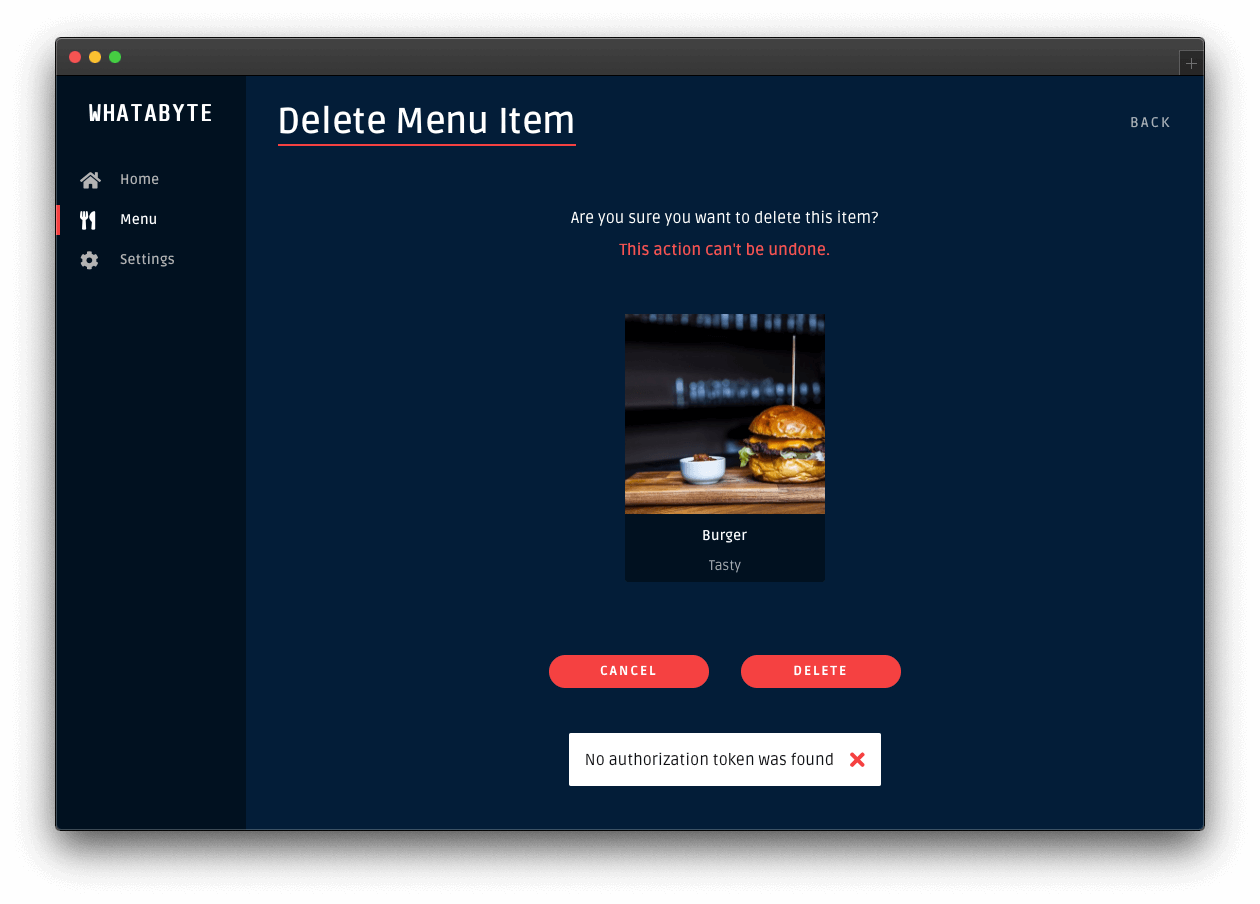
 Success! Your Spring Boot API server is effectively guarding your write endpoints against unauthorized requests. In this context, only authenticated users are authorized to access the API write endpoints.Click on the Cancel button in the "Add Menu Item" page. The "Menu Items" loads again. Click on the "Burger" item and try to edit it or delete it.
Those two actions will also fail:
Success! Your Spring Boot API server is effectively guarding your write endpoints against unauthorized requests. In this context, only authenticated users are authorized to access the API write endpoints.Click on the Cancel button in the "Add Menu Item" page. The "Menu Items" loads again. Click on the "Burger" item and try to edit it or delete it.
Those two actions will also fail:
 You have tested that Spring Boot is guarding your create, update, and delete endpoints correctly, concluding this short exercise.To continue with the rest of this tutorial, re-enable the demo client authentication features. Click on the Settings tab and click on the Modify button. The "Auth0 Demo Settings" page loads up. Enable the authentication features, fill out the necessary value, and click on the Save button.
Configure Role-Based Access Control (RBAC)
Any request with a valid access token can use the API to read and write data. But not all users are equal: some only need to read data, while others might want to add, delete, or change the data in the store.
You need to further develop your authorization strategy to check if a user making a request may perform a certain operation.
Manage Access with Auth0
An easy way to implement this level of authorization is through role-based access control (RBAC). It assigns permissions to users based on their roles. A menu-admin role, for example, could have all the necessary permissions to create, update, and delete menu items.
When users successfully log in, the Auth0 access token has the information on any permissions the users have based on their assigned roles. Since Auth0 issues the access token as a JSON Web Token (JWT), that access information is added to the token as a claim named permissions.
JWT claims are essentially key-value pairs encoded as a JSON object.
Your server application can inspect the access token and compare the values present in its permissions claim with the permissions required by the API endpoint. If the server can fully match the permissions required by the endpoint, the client request is authorized.
Implementing RBAC is easily done through the Auth0 Dashboard. Here's the plan of what you'll do:
- Create permissions for the Menu API you created earlier.
- Create a role called
menu-admin. - Assign permissions from the Menu API to the
menu-adminrole. - Create a new user and assign it to the
menu-adminrole.
Let's get started.
Define permissions for the API
Open the APIs page from the Auth0 Dashboard and select the Menu API that you created earlier.
In the Menu API page, click on the Permissions tab and create three permissions by filling each row as follows (the + Add button adds a new row):
create:items: Create menu itemsupdate:items: Update menu itemsdelete:items: Delete menu items
Next, you need to configure Auth0 to enforce role-based access control (RBAC) authorization for the Menu API. Click on the Settings tab and scroll down until you see the RBAC Settings section. Use the toggle button next to Enable RBAC to turn it on, which enforces Auth0 to evaluate RBAC authorization policies during the login transaction of a user.
Next, enable Add Permissions in the Access Token to add a permissions property to the access token created by Auth0 when a user logs in. The permissions property is a key-value pair known as a token claim. The presence of this claim is critical for the implementation of RBAC in your API server.
Once you enable these options, make sure to click on the Save button.
Create roles
Open the Roles page from the Auth0 Dashboard and click on the Create Role button. Fill out the pop-up form as follows:
Name:
menu-adminDescription: Create, update, and delete menu items.
Once done, click the Create button to complete the creation of the role.
Now, you need to associate the permissions you've created with this role, mapping it to your API's resources. Click on the Permissions tab of the role page. Once there, click on the Add Permissions button.
In the dialog that comes up, choose the Menu API from the dropdown box and select all the boxes in the Scopes section. Once that's done, click on the Add permissions button. You are back to the menu-admin role page, which now lists all its associated permissions.
A scope is a term used by the OAuth 2.0 protocol to define limitations on the amount of access that you can grant to an access token. In essence, permissions define the scope of an access token.
Get user roles
Auth0 attaches the menu-admin role permissions as a claim to the access token, but not the role itself. The demo client application needs this information as it renders its UI conditionally based on the user role. To include the user role as a claim in the tokens that Auth0 sends to the client, you can use Auth0 Rules.
When a user logs in successfully to your application, the Auth0 authorization server sends two tokens to the client:
Access token
After a user successfully authenticates and authorizes access, the client application receives an access token from the Auth0 authentication server. The client passes the access token as a credential whenever it calls a protected endpoint of the target API. This token informs the server that the client is authorized to access the API. Through its permissions claim, the access token tells the server which actions the client can perform on which resources.
ID token
The ID Token is a JSON Web Token (JWT) that contains claims representing user profile attributes like name or email, which are values that clients typically use to customize the UI.
Using Auth0 Rules, you can add to each of these tokens a new claim, representing the roles assigned to a user.
What are Auth0 Rules?
Auth0 Rules are JavaScript functions that execute when a user logs in to your application. They run once the authentication process is complete, and you can use them to customize and extend Auth0's capabilities. For security, your Rules code executes in a sandbox, isolated from the code of other Auth0 tenants.
You can create Auth0 Rules easily using the Auth0 Dashboard. Follow these steps to create a rule that adds user roles to tokens:
Open the Rules page from the Auth0 Dashboard.
Click on the Create Rule button.
Click on the Empty Rule option.
Provide a Name to your rule, such as "Add user roles to tokens".
Next, replace the content of the Script section with the following function:
function(user, context, callback) {
  const namespace = 'https://menu-api.example.com';

  if (context.authorization && context.authorization.roles) {
    const assignedRoles = context.authorization.roles;

    if (context.idToken) {
      const idTokenClaims = context.idToken;
      idTokenClaims[`${namespace}/roles`] = assignedRoles;
      context.idToken = idTokenClaims;
    }

    if (context.accessToken) {
      const accessTokenClaims = context.accessToken;
      accessTokenClaims[`${namespace}/roles`] = assignedRoles;
      context.accessToken = accessTokenClaims;
    }
  }

  callback(null, user, context);
}
- Click the Save Changes button.
What's this rule doing?
When the user successfully authenticates, this rule function executes, receiving three parameters: -user: an object returned by the identity provider (such as Auth0 or Google) that represents the logged-in user.
- context: an object that stores contextual information about the current authentication transaction, such as the user's IP address or location.
- callback: a function to send modified tokens or an error back to Auth0. You must call this function to prevent script timeouts.
js
function(user, context, callback) {
  // ...
}
To keep your custom claims from colliding with any reserved or external claims, you must give them a globally unique name using a namespaced format. By default, Auth0 always enforces namespacing and silently excludes from the tokens any custom claims with non-namespaced identifiers.
Namespaces are arbitrary identifiers, so technically, you can call your namespace anything you want. For convenience, the namespace value is the API audience value set in the WHATABYTE Dashboard Demo Settings.
js
function(user, context, callback) {
  const namespace = 'https://menu-api.example.com';

  //...
}
You then check if the context object has an authorization property and, in turn, if that property has a roles property:
js
function(user, context, callback) {
  const namespace = 'https://menu-api.example.com';

  if (context.authorization && context.authorization.roles) {
   // ...
  }

  // ...
}
context.authorization is an object containing information related to the authorization transaction, such as roles.
context.authorization.roles is an array of strings containing the names of the roles assigned to a user.
Next, you assign the roles array to the assignedRoles constant and check if there is an ID token or access token present in the context object:
js
function(user, context, callback) {
  const namespace = 'https://menu-api.example.com';

  if (context.authorization && context.authorization.roles) {
    const assignedRoles = context.authorization.roles;

    if (context.idToken) {
      // ...
    }

    if (context.accessToken) {
      // ...
    }
  }

  // ...
}
If any of these tokens are present, you add to the token object a <namespace>/roles property with the roles array, assignedRoles, as its value, effectively creating a custom claim on the token that represents the user roles:
``js
function(user, context, callback) {
const namespace = 'https://menu-api.example.com';
if (context.authorization && context.authorization.roles) {
const assignedRoles = context.authorization.roles;
if (context.idToken) {
const idTokenClaims = context.idToken;
idTokenClaims[${namespace}/roles] = assignedRoles;
context.idToken = idTokenClaims;
}
if (context.accessToken) {
const accessTokenClaims = context.accessToken;
accessTokenClaims[${namespace}/roles] = assignedRoles;
context.accessToken = accessTokenClaims;
}
}
// ...
}
`Finally, you invoke the callback function to send the potentially modified tokens back to Auth0, which in turn sends them to the client:
js
function(user, context, callback) {
  // ...

  callback(null, user, context);
}
`
That's all you need to create an Auth0 rule that adds user roles to tokens. What's left to do is for you to create a user that has the menu-admin role.
Before you do that, verify how the user interface restricts access to certain user interface elements and views when a user doesn't have the menu-admin role.
Head back to the demo client.
Next, click on the "Settings" tab from the left-hand navigation bar and click the "Modify" button to change the demo settings.
The "Auth0 Demo Settings" view loads up. Enable Role-Based Access Control (RBAC), which reveals the User Role field. Populate that field with the following value: menu-admin.
Once you set that value, leave every other field as it is. Then, click on the Save button.
Once you are back to the application, sign in. Notice how the Add Item button is no longer visible in the "Menu Items" page. If you click on a menu item, you won't see the Edit or Delete buttons either.
You need to grant yourself or any other user you create admin access!
Create an admin user
Open the Users page from the Auth0 Dashboard and click on Create User. Fill the form that pops up with the following:
Email:
admin@example.comPassword and Repeat Password: Any password of your choice
Connection:
Username-Password-Authentication
Click on the Create button. The page of the admin@example.com user loads up. On this page, click on the "Roles" tab and then click on the Assign Roles button.
From the dropdown, select the menu-admin role that you created earlier and click on the Assign button. Verify that the user has the permissions by clicking on the "Permissions" tab. If so, your admin user is all set up and ready to use.
As an alternative, you may assign the menu-admin role to the existing user you have been using to access the demo application.
Sign In as Admin
Head back to the demo client and sign out.
Click on the Sign In button again and, this time, login in as the admin@example.com user or as any user that you have granted the menu-admin role.
This time around, the UI unlocks admin features. Open the "Menu" page and notice the "Add Item" button is back at the top-right corner. Click on a menu item and notice how you can now edit or delete the item.
However, at this moment, non-admin users could circumvent the client-side route protections to unlock the admin features of the UI. Additionally, they could extract the access token sent by Auth0 using the browser's developer tools and make requests directly to the server write endpoints using the terminal, for example.
Your server needs to implement role-based access control to mitigate these attack vectors.
Implement Role-Based Access Control in Spring Boot
A JWT issued by an authorization server will typically have a scope attribute, listing the granted permissions. Spring calls them granted authorities. Instead, Auth0 uses a custom claim called permissions to specify them. The JWT payload looks like this:
{
  // ...
  "scope":"openid profile email",
  "permissions":[
    "create:items",
    "delete:items",
    "read:items",
    "update:items"
  ]
}
Spring provides a default instance of JwtAuthenticationConverter which expects granted authorities in a scope or scp claim. To use permissions instead, update your SecurityConfig class to its final form:
// com/example/menu/security/SecurityConfig.java

package com.example.menu.security;

import org.springframework.beans.factory.annotation.Value;
import org.springframework.http.HttpMethod;
import org.springframework.security.config.annotation.method.configuration.EnableGlobalMethodSecurity;
import org.springframework.security.config.annotation.web.builders.HttpSecurity;
import org.springframework.security.config.annotation.web.configuration.EnableWebSecurity;
import org.springframework.security.config.annotation.web.configuration.WebSecurityConfigurerAdapter;
import org.springframework.security.oauth2.core.DelegatingOAuth2TokenValidator;
import org.springframework.security.oauth2.core.OAuth2TokenValidator;
import org.springframework.security.oauth2.jwt.Jwt;
import org.springframework.security.oauth2.jwt.JwtDecoder;
import org.springframework.security.oauth2.jwt.JwtDecoders;
import org.springframework.security.oauth2.jwt.JwtValidators;
import org.springframework.security.oauth2.jwt.NimbusJwtDecoder;
import org.springframework.security.oauth2.server.resource.authentication.JwtAuthenticationConverter;
import org.springframework.security.oauth2.server.resource.authentication.JwtGrantedAuthoritiesConverter;
import org.springframework.web.cors.CorsConfiguration;
import org.springframework.web.cors.CorsConfigurationSource;
import org.springframework.web.cors.UrlBasedCorsConfigurationSource;

import java.util.List;

@EnableWebSecurity
@EnableGlobalMethodSecurity(prePostEnabled = true)
public class SecurityConfig extends WebSecurityConfigurerAdapter {
    @Value("${auth0.audience}")
    private String audience;

    @Value("${spring.security.oauth2.resourceserver.jwt.issuer-uri}")
    private String issuer;

    @Override
    protected void configure(HttpSecurity http) throws Exception {
        http.authorizeRequests()
                .mvcMatchers(HttpMethod.GET, "/api/menu/items/**").permitAll() // GET requests don't need auth
                .anyRequest()
                .authenticated()
                .and()
                .cors()
                .configurationSource(corsConfigurationSource())
                .and()
                .oauth2ResourceServer()
                .jwt()
                .decoder(jwtDecoder())
                .jwtAuthenticationConverter(jwtAuthenticationConverter());
    }

    CorsConfigurationSource corsConfigurationSource() {
        CorsConfiguration configuration = new CorsConfiguration();
        configuration.setAllowedMethods(List.of(
                HttpMethod.GET.name(),
                HttpMethod.PUT.name(),
                HttpMethod.POST.name(),
                HttpMethod.DELETE.name()
        ));

        UrlBasedCorsConfigurationSource source = new UrlBasedCorsConfigurationSource();
        source.registerCorsConfiguration("/**", configuration.applyPermitDefaultValues());
        return source;
    }

    JwtDecoder jwtDecoder() {
        OAuth2TokenValidator<Jwt> withAudience = new AudienceValidator(audience);
        OAuth2TokenValidator<Jwt> withIssuer = JwtValidators.createDefaultWithIssuer(issuer);
        OAuth2TokenValidator<Jwt> validator = new DelegatingOAuth2TokenValidator<>(withAudience, withIssuer);

        NimbusJwtDecoder jwtDecoder = (NimbusJwtDecoder) JwtDecoders.fromOidcIssuerLocation(issuer);
        jwtDecoder.setJwtValidator(validator);
        return jwtDecoder;
    }

    JwtAuthenticationConverter jwtAuthenticationConverter() {
        JwtGrantedAuthoritiesConverter converter = new JwtGrantedAuthoritiesConverter();
        converter.setAuthoritiesClaimName("permissions");
        converter.setAuthorityPrefix("");

        JwtAuthenticationConverter jwtConverter = new JwtAuthenticationConverter();
        jwtConverter.setJwtGrantedAuthoritiesConverter(converter);
        return jwtConverter;
    }
}
Finally, add a @PreAuthorize annotation to the relevant methods in the ItemController, update that class to its final form:
// com/example/menu/item/ItemController.java

package com.example.menu.item;

// ✨ New! Updated imports
import org.springframework.http.ResponseEntity;
import org.springframework.security.access.prepost.PreAuthorize;
import org.springframework.validation.FieldError;
import org.springframework.validation.ObjectError;
import org.springframework.web.bind.MethodArgumentNotValidException;
import org.springframework.web.bind.annotation.*;
import org.springframework.web.servlet.support.ServletUriComponentsBuilder;

import javax.validation.Valid;
import java.net.URI;
import java.util.HashMap;
import java.util.List;
import java.util.Map;
import java.util.Optional;

@RestController
@RequestMapping("api/menu/items")
public class ItemController {
    private final ItemService service;

    public ItemController(ItemService service) {...}

    @GetMapping
    public ResponseEntity<List<Item>> findAll() {...}

    @GetMapping("/{id}")
    public ResponseEntity<Item> find(@PathVariable("id") Long id) {...}

    @PostMapping
    @PreAuthorize("hasAuthority('create:items')") // ✨ 👈 New line ✨
    public ResponseEntity<Item> create(@Valid @RequestBody Item item) {...}

    @PutMapping("/{id}")
    @PreAuthorize("hasAuthority('update:items')") // ✨ 👈 New line ✨
    public ResponseEntity<Item> update(
            @PathVariable("id") Long id,
            @Valid @RequestBody Item updatedItem) {...}

    @DeleteMapping("/{id}")
    @PreAuthorize("hasAuthority('delete:items')") // ✨ 👈 New line ✨
    public ResponseEntity<Item> delete(@PathVariable("id") Long id) {...}

    @ExceptionHandler(MethodArgumentNotValidException.class)
    public ResponseEntity<Map<String, String>> handleValidationExceptions(
            MethodArgumentNotValidException ex) {...}
}
The @PreAuthorize annotation holds a Spring Expression Language (SpEL) expression which must be satisfied before the method is executed. hasAuthority will check if the permission/argument is in the list of granted authorities. Since you've ensured they will be read from the permissions claim, this is the final step of the authorization process.
Make sure you rerun the Gradle bootRun command to make your changes effective:
./gradlew bootRun
Sign out and sign back in as the admin user in the demo client. Try to add a new item. The "Add Item" page has a form pre-loaded with some data to make this process easier for you. If you already created the salad item, try to create a coffee item with this data:
name: Coffee
price: 299
description: Woke
image: https://images.ctfassets.net/23aumh6u8s0i/6HS0xLG6bx52KJrqyqfznk/50f9350a7791fa86003024af4762f4ca/whatabyte_coffee-sm.png
Click on that newly created item and notice that you can either edit or delete it. Try both operations.
menu-admin role from your current user in the Auth0 Dashboard and sign in as that user.
You'll have access to the admin UI elements. Click on the "Tea" item and try to delete it. You'll get an error message, Insufficient scope:
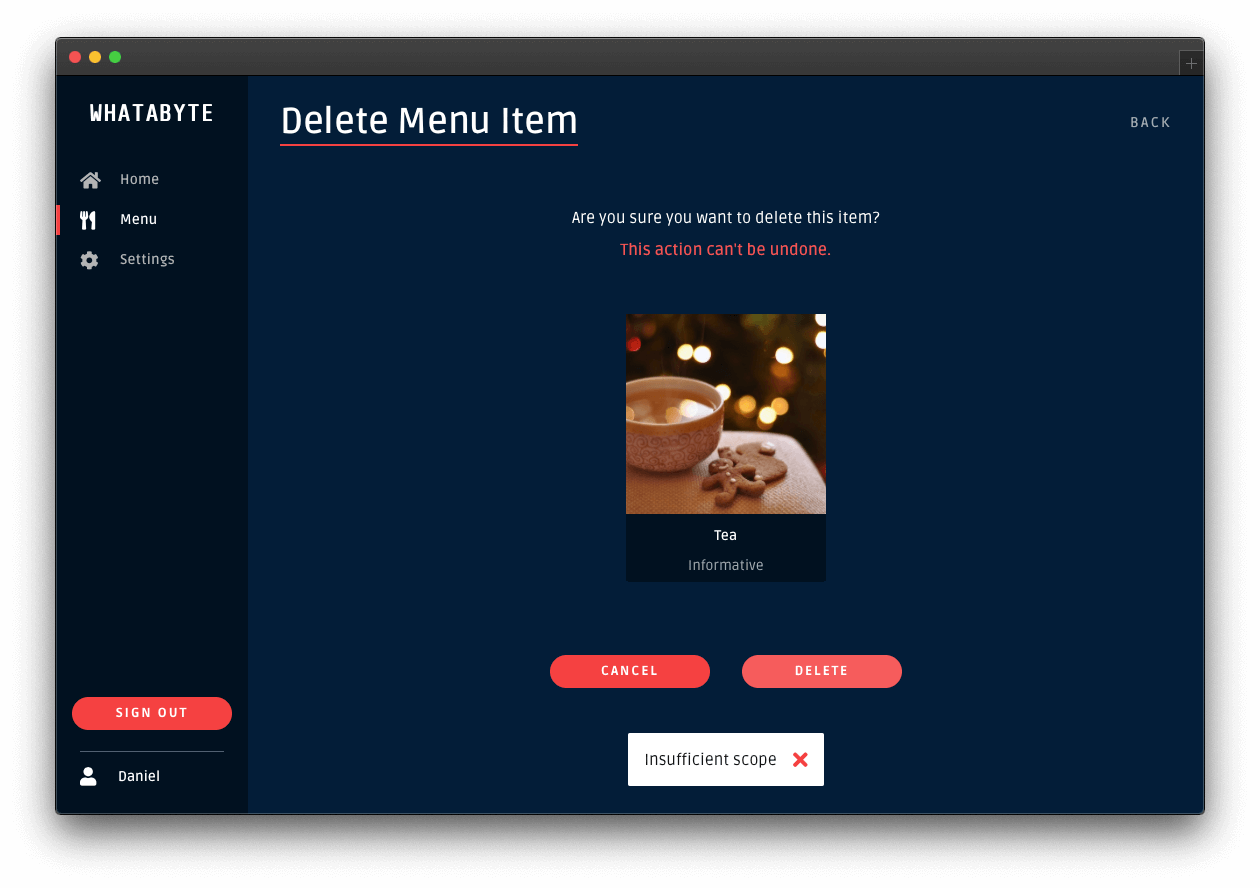
This error message is telling you that you don't have enough permissions to perform that action. If you inspect the "Network" or "Console" tab of your browser's developer tools, you'll notice that your String Boot API server replied with a 403 (Forbidden) error.
You'll get the same type of error if you try to add or edit an item. You have confirmed that your String Boot API server is effectively guarding your write endpoints from unauthenticated users and from authenticated users who lack the permissions to access them.
Click on the Settings tab on the left-hand navigation and click on the Modify button. Restore the value of User Role back tomenu-admin and save your changes. If you removed the menu-admin role from a user, head back to the Auth0 Dashboard and give back the role to the user.
What's Next
This concludes the Spring Boot Authorization tutorial. You have implemented authorization to control the resources that your users can access. You have learned how to implement different access levels:
- Access based on authentication status.
- If you have logged in, you are authorized to access the resources.
- Access based on permissions.
If you have logged in and have the required permissions, you are authorized to access the resources.
This tutorial covered the most common authorization use cases for a Spring Boot API server. However, Auth0 is an extensible and flexible platform that can help you achieve even more. If you have a more complex use case, check out the Auth0 Architecture Scenarios to learn more about the typical architecture scenarios we have identified when working with customers on implementing Auth0.
What other chapters should be added? This is what I have in mind for the future:
- Deploying a Spring Boot application to AWS.
- Connecting a Spring Boot application to a MongoDB or PostgreSQL store.
- Using GraphQL or gRPC with Spring Boot.
Let me know what you think in the feedback section, and thanks for reading!
I have feedback or ran into an issueAbout the author

Tadej Slamic
CTO at Shortcut AS