
Auth0 Hooks completes the customization capability of Rules in the Auth0 platform. However, Auth0 Actions provide a unified and powerful environment to perform the same tasks you can do with both Rules and Hooks. Learn how to migrate your existing Auth0 Hooks into Auth0 Actions with this article.
Auth0 Actions and Customization
One of the most compelling Auth0 features is its support for customization. Beyond the basic login and logout functionality for your applications, you can tweak the standard flow of some of Auth0's behind-the-scenes processes to meet your specific needs. For example, you can do extra authentication checks or perform specific operations after a user registers with your application.
The features that many Auth0 customers are familiar with to make those customizations are Auth0 Rules and Auth0 Hooks. Auth0 Rules allow you to customize the authentication flow, while Auth0 Hooks enable you to customize the Auth0 behavior for some extensibility points, such as pre and post user registration, password change, phone message sending, and so on.
Now you have Auth0 Actions, an Auth0 feature that allows you to achieve the same customization goals as Rules and Hooks. Auth0 Actions provide you with a unified development environment to customize the extensibility points you were used to doing with Rules and Hooks. Actions not only offer you the same power as Rules and Hooks. They also give you some additional features that simplify your development experience:
- Actions provide you with an integrated version system. You can modify an Action without affecting the one in production, create multiple versions, and restore a previous one.
- The Actions editor supports code hints, all npm packages, and isolated secrets management.
- You can take advantage of a growing number of no-code Actions integrations from the Auth0 Marketplace, which solve common identity use cases such as consent management, progressive profiling, and user verification. Built by Partners, those integrations enable developers to go-to-market faster while reducing development and maintenance costs associated with custom code.
Read this blog post for a quick introduction to Auth0 Actions.
While Auth0 Actions bring you an improved customization environment, Rules and Hooks are still available, and they all can live together. Remember that Rules and Hooks execute before Actions.
Auth0 Actions are a recommended alternative to Auth0 Rules and Hooks. If you customized Auth0 flows with Rules and Hooks and now want to migrate to Auth0 Actions, you are in the right place.
This article provides some guidelines for migrating your Auth0 Hooks to Auth0 Actions. Check out this article to migrate your Auth0 Rules to Auth0 Actions.
Code Conversion Guidelines
To convert your Auth0 Hooks into an equivalent Auth0 Action, follow the guidelines in this section.
This article assumes that you have a basic understanding of how to create a Hook and how to create an Action. If not, please refer to Auth0 documentation about Hooks creation and Actions writing. In both cases, you need an Auth0 account. If you don't have it, you can get one for free.
Mapping Hook types to Action Triggers
The first thing you need to do is identify the Action Trigger that corresponds to your Hook type. Auth0 Action Triggers are events that happen within Auth0 flows. The following table maps each Hook type to the respective Action Trigger:
| Hook type | Action Trigger |
|---|---|
| Pre-User Registration | Pre User Registration |
| Post-User Registration | Post User Registration |
| Post-Change Password | Post Change Password |
| Send Phone Message | Send Phone Message |
| Client Credential Exchange | M2M/Client-Credentials |
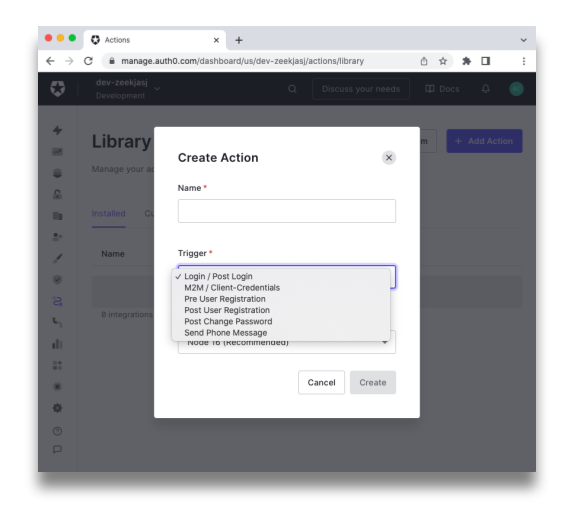
The names for Hook types and Action Triggers are almost identical. So, when you are going to convert your Hook into an Action, you need to create the Action by selecting the right Trigger from the list, as shown in the following picture:
When you select a Trigger, you get an empty named export in the Action editor. The name of the specific export depends on the selected Trigger. For example, if you convert your Post-User Registration Hook into a Post User Registration Action Trigger, you will get the following code in your Action editor:
exports.onExecutePostUserRegistration = async (event) => {

};
You can see this mapping between your Hook type and the corresponding export name in the following table:
| Hook type | Action Trigger | Action named export |
|---|---|---|
| Pre-User Registration | Pre User Registration | onExecutePreUserRegistration
|
| Post-User Registration | Post User Registration | onExecutePostUserRegistration
|
| Post-Change Password | Post Change Password | onExecutePostChangePassword
|
| Send Phone Message | Send Phone Message | onExecuteSendPhoneMessage
|
| Client Credential Exchange | M2M/Client-Credentials | onExecuteCredentialsExchange
|
The body of your Hook will go into the body of your newly created Action, with some changes as you will learn as you go along.
Mapping parameters
Hooks functions receive contextual data about the user, the client, the request, etc. in multiple arguments depending on the Hook type. Most of the Hook function types have three parameters: user, context, and cb. Other Hook function types have more parameters to receive additional data.
Actions consolidate the data passed by the running environment to the Action function into no more than two arguments: event and api. All read-only properties of the Hooks' user and context objects are now in the Actions' event object. Any interaction with the running environment, such as adding user metadata, is implemented through methods of the api object.
While keeping the same name, the structure of the event and api objects changes according to the particular Action Trigger. The following table maps the Hook type to the specific documentation for the event and api objects:
| Hook type | Action named export | event docs | api docs |
|---|---|---|---|
| Pre-User Registration | onExecutePreUserRegistration
| event docs | api docs |
| Post-User Registration | onExecutePostUserRegistration
| event docs | |
| Post-Change Password | onExecutePostChangePassword
| event docs | |
| Send Phone Message | onExecuteSendPhoneMessage
| event docs | |
| Client Credential Exchange | onExecuteCredentialsExchange
| event docs | api docs |
Dealing with dependencies
Auth0 Hooks allow you to include dependencies from thousands of npm packages, but not all the packages available in the npm registry. If you need a package that is not available for Hooks (or even just a specific version of an npm package), you need to request it to Auth0.
In Actions, you can add dependencies for all the available packages in the npm registry, which means over one million.
Also, in Actions you don't need to specify the package version in the code like you do with Hooks. For example, that in your Hook you have to declare a dependency this way:
// Hook for Post-User Registration extensibility point

module.exports = function (user, context, cb) {
    const axios = require("axios@0.22.0");

    // ... other code
}
In Actions, you specify the package version just in the editor's module manager, and your code looks like the following:
const axios = require("axios");

exports.onExecutePostUserRegistration = async (event) => {
    // ... other code
};
Notice that you import the dependency outside the function's body, more in the style of a Node.js module.
Converting Hooks' callbacks
In Client Credentials Exchange and Pre User Registration Hooks, you use the cb parameter to pass back the result of your processing. For example, when your code completes its steps, it needs to pass the control to the runtime environment, which will possibly run the next Hook. In this case, you should invoke the cb() function by passing the processing result or an error instance if the processing fails.
Actions are more straightforward. You don't need to call any callback function to pass control to the runtime environment. Just use return instead.
You can interact with the runtime environment, through the api argument passed to the Action Trigger. For example, M2M/Client-Credentials and Pre User Registration Action Triggers have the api object as a second parameter. In these Action Triggers, you can prevent user registration by calling the api.access.deny() method.
Take a look at the next section to see a practical application of this guideline.
Converting secrets
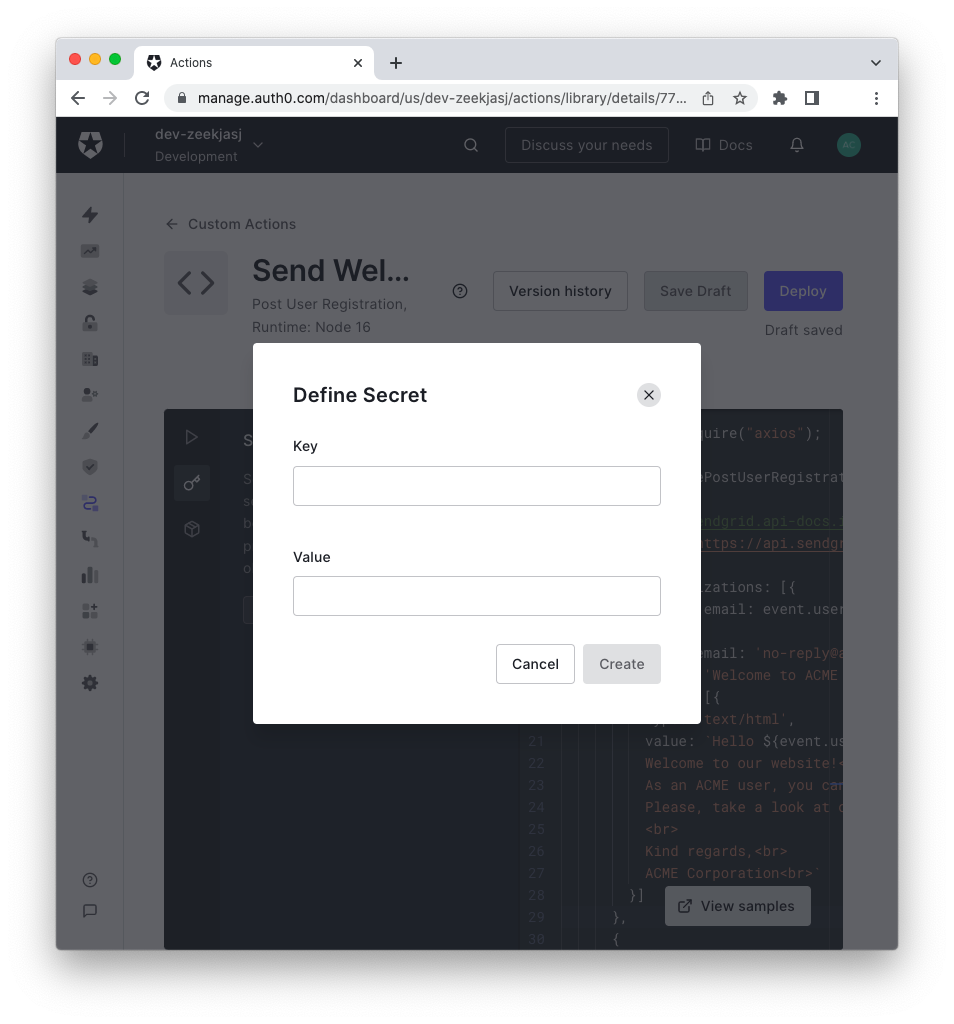
Similarly to Hooks, you can store secrets for Actions using the Add Secret button in the Action editor and assigning a key and a value:
Accessing secrets within an Action function is slightly different from Hooks.
In your Hook function, you access secrets as in the following example:
module.exports = function (user, context, cb) {
  const mySecret = context.webtask.secrets.MY_SECRET;

  // ... other code
}
In an Action Trigger function, you get the secret as follows:
exports.onExecutePostChangePassword = async (event) => {
  const mySecret = event.secrets.MY_SECRET;

  // ... other code
};
The secrets defined through the Action editor are available as properties of the event.secrets object.
Conversion Examples
Once you've learned the general guidelines to convert your Hooks to the corresponding Action Triggers, let's put them into practice with a few conversion examples.
Adding metadata to new users
Consider the following code for a Pre User Registration Hook:
module.exports = function (user, context, cb) {
  const response = {};

  if (user.phoneNumber) {
    response.user = {
     user_metadata: { favorite_color: "green" }
    };

    cb(null, response);
  } else {
    return cb(new Error("Phone number is mandatory!"));
  }
};
This code assigns green as the user's favorite color to the user's metadata only if they provide a phone number. Otherwise, it raises an error and prevents the user from registering.
The corresponding Pre User Registration Action Trigger looks as follows:
exports.onExecutePreUserRegistration = async (event, api) => {
  if (user.phoneNumber) {
    api.user.setUserMetadata("favorite_color", "green");
  } else {
    return api.access.deny("Error: missing phone number; favorite color not set",
                           "Phone number is mandatory!");
  }
};
Instead of invoking the cb() callback function to pass the newly created metadata back to the runtime environment, it uses the api.user.setUserMetadata() method to achieve the same goal. It again uses the api object to prevent the user from registering instead of the cb() function. Note that in the case of the Pre User Registration Trigger, the API object's deny method receives two parameters, a reason which is used internally, and a userMessage, which can be used to show an UI error.
Adding custom claims
In a Client Credentials Exchange Hook, you can add a custom claim to the access token as shown in the following example:
module.exports = function(client, scope, audience, context, cb) {
  const access_token = {};
  const namespace = "https://myapp.example.com";

  access_token.scope = scope;

  access_token[`${namespace}/favorite_color`] = "green";
  cb(null, access_token);
};
You can turn this Hook function into a M2M/Client-Credentials Action Trigger as follows:
exports.onExecuteCredentialsExchange = async (event, api) => {
  const namespace = "https://myapp.example.com";

  api.accessToken.setCustomClaim(`${namespace}/favorite_color`, "green");
};
Again, you don't need to invoke any callback function. You just use the api.accessToken.setCustomClaim() method to assign a value to the newly created custom claim.
Sending a notification email
Let's consider the following Post-Change Password Hook. It sends an email to the user upon password change by using SendGrid:
module.exports = function (user, context, cb) {
  const request = require("request");
  const sendgridApiKey = context.webtask.secrets.SENDGRID_API_KEY;

  request.post({
    url: "https://api.sendgrid.com/v3/mail/send",
    headers: {
      "Authorization": "Bearer " + sendgridApiKey
    },
    json: {
      personalizations: [{
        to: [{
          email: user.email
        }]
      }],
      from: {
        email: "admin@example.com"
      },
      subject: "Your password was changed",
      content: [{
        type: 'text/plain',
        value: `The password for your ${context.connection.name} account ${user.email} was recently changed.`
      }]
    }
  }, function (err, resp, body) {
    if (err || resp.statusCode !== 202) {
      return cb(err || new Error(body.errors[0].message));
    }

    cb();
  });
};
This Hook can be converted to the following Post Change Password Action Trigger:
exports.onExecutePostChangePassword = async (event) => {
  const request = require("request");
  //👇 changed code
  const sendgridApiKey = event.secrets.SENDGRID_API_KEY;

  request.post({
    url: "https://api.sendgrid.com/v3/mail/send",
    headers: {
      "Authorization": "Bearer " + sendgridApiKey
    },
    json: {
      personalizations: [{
        to: [{
          email: user.email
        }]
      }],
      from: {
        email: "admin@example.com"
      },
      subject: "Your password was changed",
      content: [{
        type: "text/plain",
        //👇 changed code
        value: `The password for your ${event.connection.name} account ${event.user.email} was recently changed.`
      }]
    }
  }, function (err, resp, body) {
    if (err || resp.statusCode !== 202) {
      //👇 changed code
      throw (err || new Error(body.errors[0].message));
    }

    //👇 changed code
    //cb();
  });
};
Take a look at the highlighted statements. As you can see, these are the only changes to the Hook function's body. You adapted:
- the way to get the SendGrid API's secret,
- the way you get the connection and user's data,
- how to return from the Action in case of failure.
Also notice the last commented line related to the cb() callback invocation: it is no longer needed in your Action.
Planning Your Migration Strategy
After reading this article, you have a better understanding of the main differences between the code used in Hooks and Actions. When converting Hooks to Actions, there is more to think about than just executing the conversion. You also need to plan a strategy to migrate your code from Hooks to Actions in order to avoid issues in your production environment.
In this regard, you should set up a staging environment where to test the Actions converted from your Hooks. This helps you to make sure your Action's code runs as expected.
In addition, consider that you can have both Hooks and Actions in your tenant. When both are active, Actions run after Hooks. So, you can migrate one Hook at a time by activating its respective Action and then deactivating the Hook. This helps to minimize the risk of breaking your production environment, although some caveats still exist.
Check out the documentation to learn more about the Hooks to Actions migration strategy.
Summary
In this article, you learned that Auth0 Actions are the new unified way to customize the standard Auth0 flows. If you were used to creating Auth0 Hooks for your customization needs, now you can leverage Actions to empower your development experience. The article explained a few guidelines to convert your existing Hooks to new Actions and provided you with a few conversion examples.
When moving from Hooks to Actions, don't forget to plan your migration accurately. Check out the documentation to learn more about the Hooks to Actions migration process.
About the author

Andrea Chiarelli
Principal Developer Advocate
I have over 20 years of experience as a software engineer and technical author. Throughout my career, I've used several programming languages and technologies for the projects I was involved in, ranging from C# to JavaScript, ASP.NET to Node.js, Angular to React, SOAP to REST APIs, etc.
In the last few years, I've been focusing on simplifying the developer experience with Identity and related topics, especially in the .NET ecosystem.