You want to connect Claude, Cursor or other AI agents to the MCP servers, APIs and tools of your application. But your customers do not want individual users to take the decision on which AI agents can connect to which tools — they want that to be centrally managed, by their IT admin team. Traditional OAuth cannot give you that: it will require every user to click through a consent screen for each connected app, leaving your customers with no central place to audit or revoke access.
This is the gap that MCP's Enterprise-Managed Auth extension closes, thanks to its underlying protocol, Cross App Access (XAA). XAA moves the authorization decision to the enterprise identity provider, it makes the flow seamless for end-users and frees them from taking consent decisions that do not belong to them. In this post, we will explore the details of the XAA flow to understand how it works, how to set it up in Auth0, and what you can get out of it.
XAA’s Three Roles
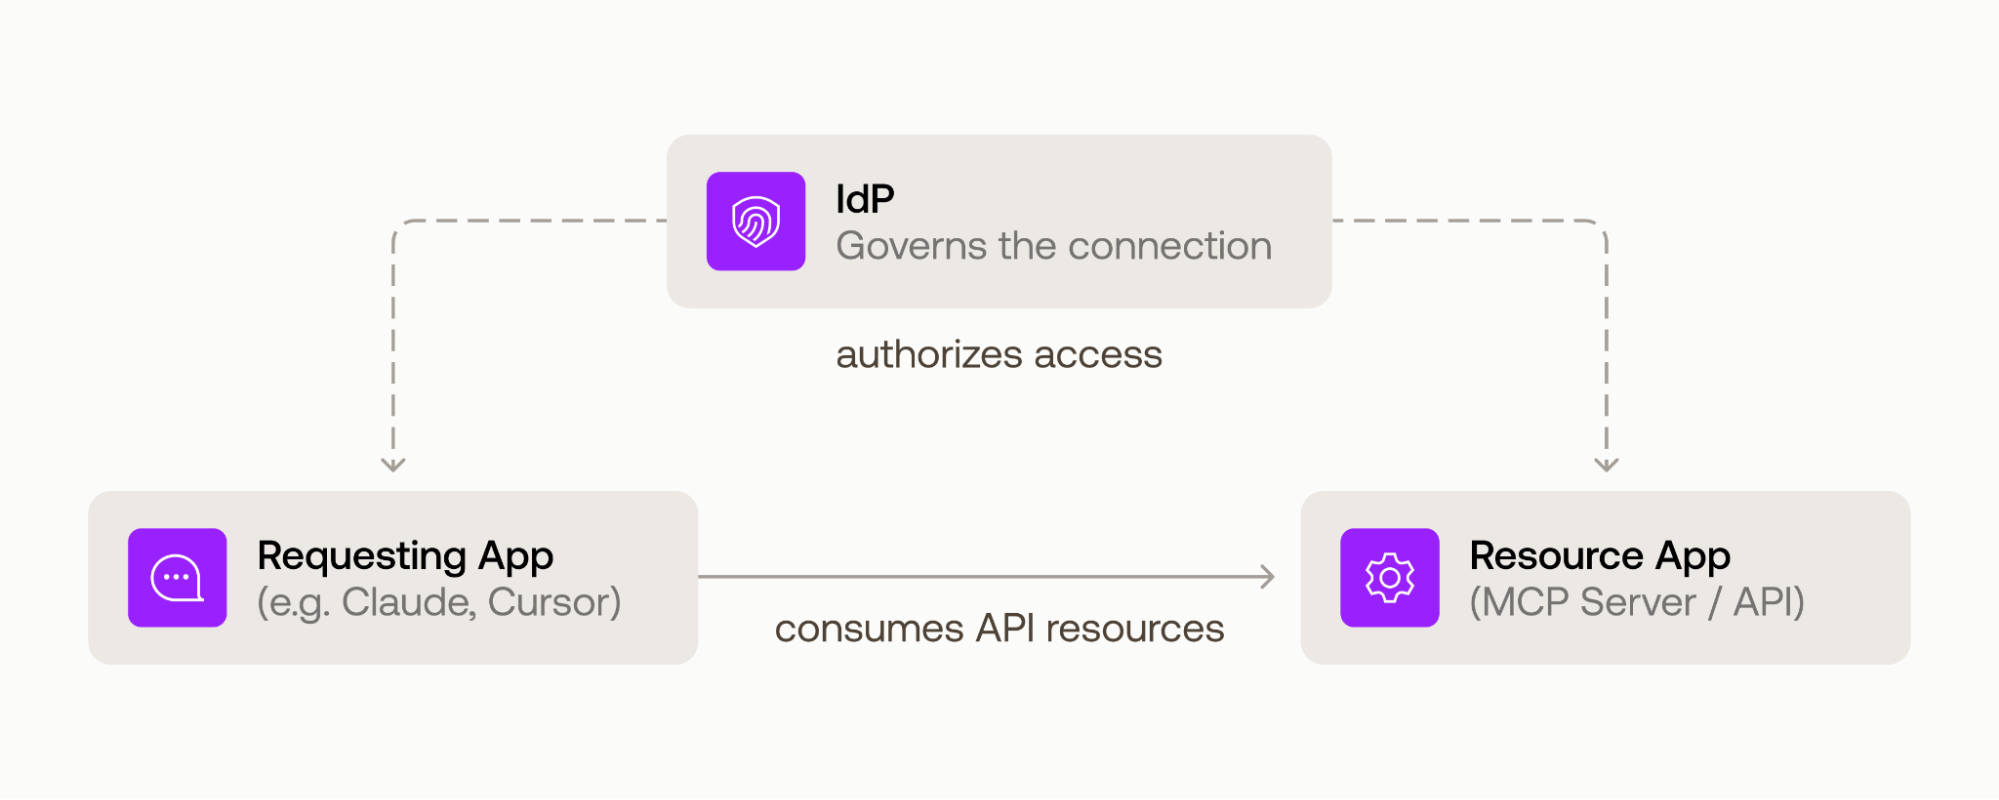
XAA involves three parties:
| Role | Who it is in our example | What it does |
|---|---|---|
| Requesting App | Claude, or another AI agent | Wants to call your API on the user's behalf |
| Enterprise IdP | Okta, or any Identity Provider (IdP) that supports XAA | Authenticates the user and authorizes the app-to-app or agent-to-app access. This is the policy enforcement point. |
| Resource App | Your API, with Auth0 as its Authorization Server | Trusts the IdP and issues an access token for the API |
In this post, we will only explore Auth0 as Resource App Authorization Server. Here Auth0 acts as an authorization server that trusts an assertion minted by an external IdP and, in return, issues access token for the Requesting App to access your API.
The XAA flow, in a nutshell
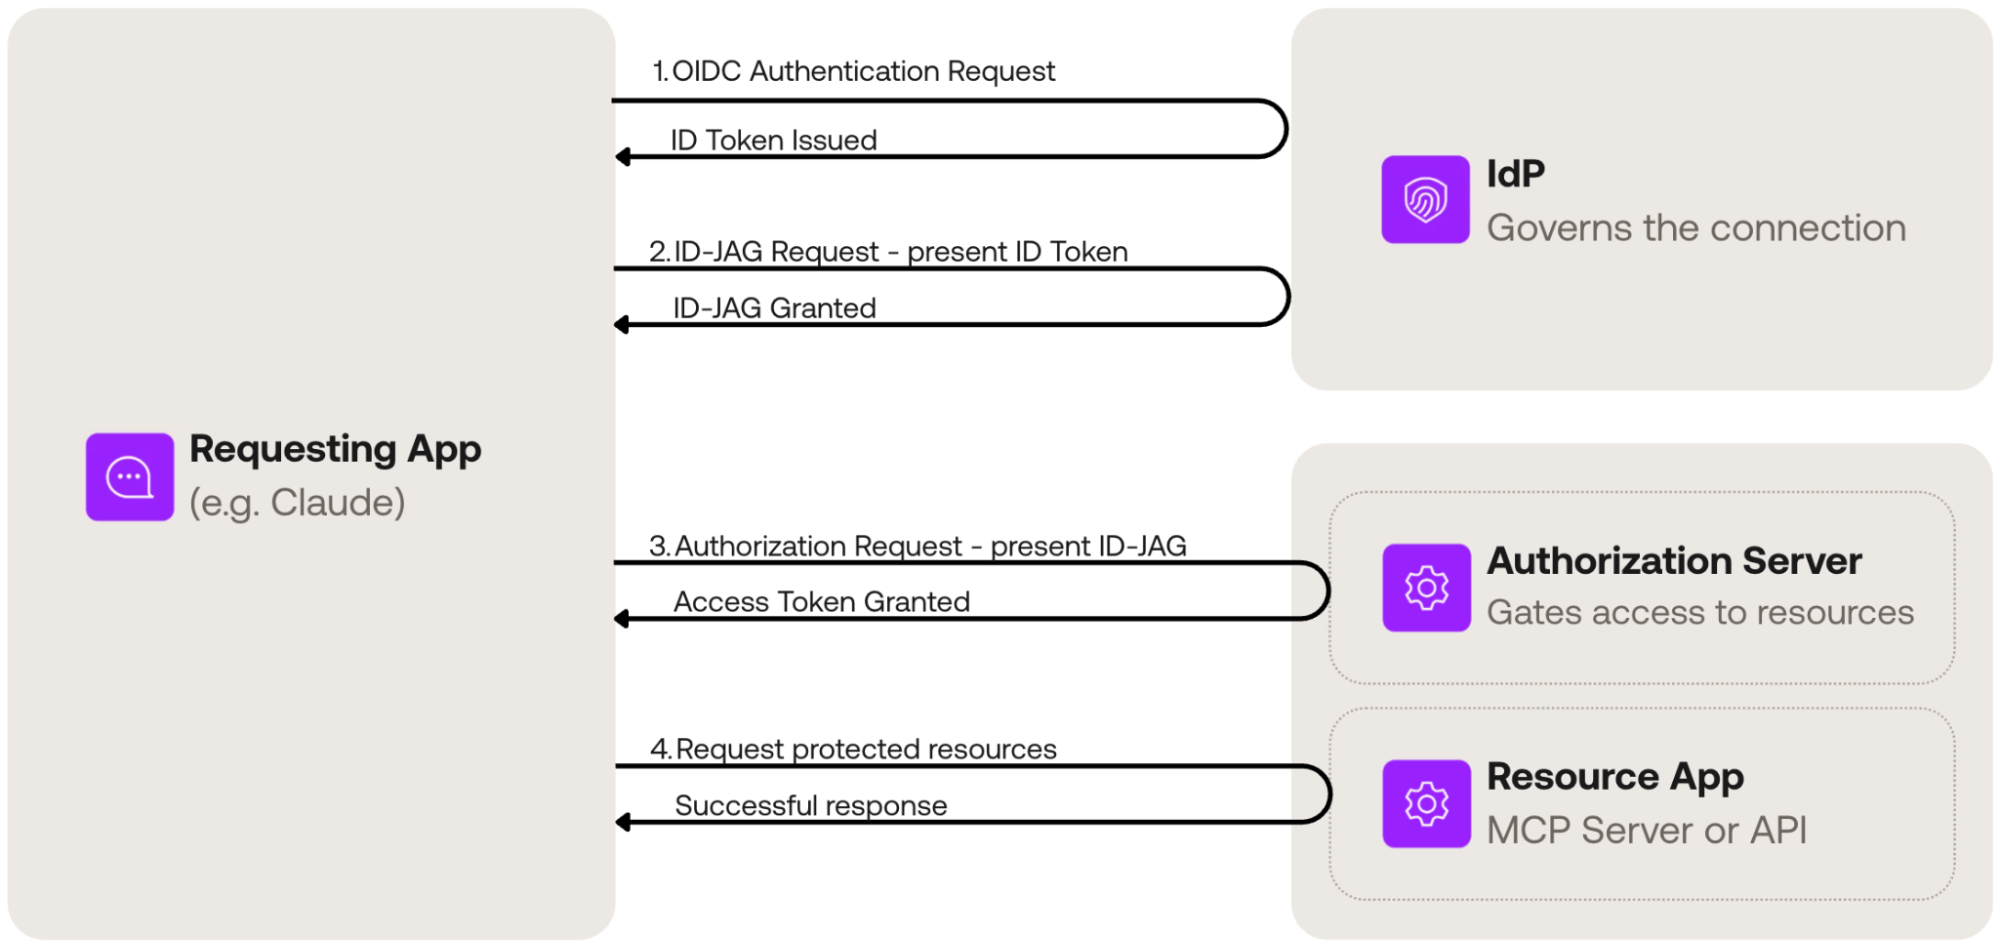
Let’s have a look at the actual machinery powering XAA: a series of token exchanges that allow the seamless yet secure connection of Agents to MCP servers and APIs. Further down in this post, you can find a guide on how to run the flow yourself, along with detailed examples of each protocol request and response.
XAA Flow with an OIDC IdP
XAA Flow with a SAML IdP
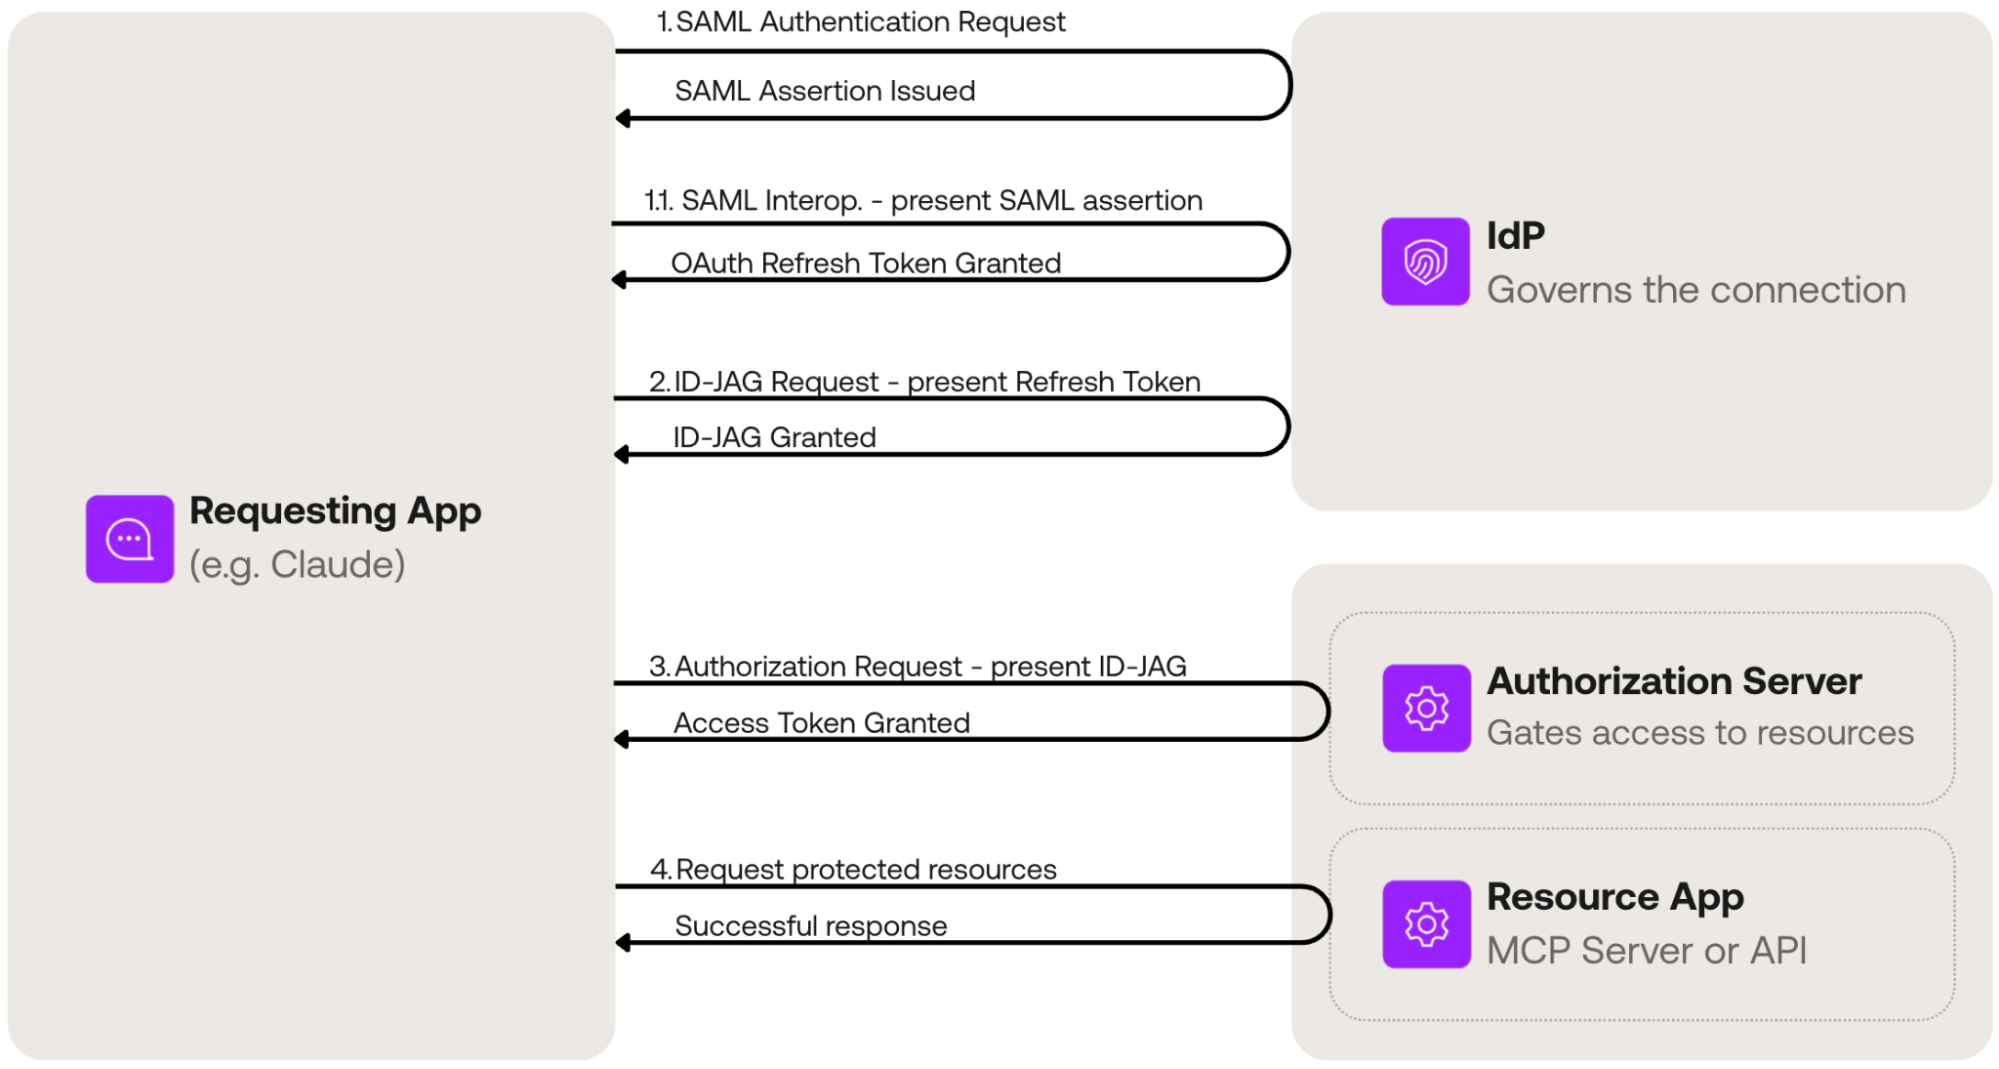
1. Authentication (user sign-in). The user authenticates against the enterprise IdP using either OIDC or SAML, obtaining either an ID Token or a SAML Assertion.
1.1. SAML Interoperability Layer (SAML only). When using SAML, we need to move from the SAML protocol to OAuth, where XAA is implemented. For this, XAA provides an interoperability layer in which the Requesting App exchanges a SAML Assertion for an OAuth Refresh Token. Once the Requesting App has a Refresh Token, the flow can continue.
2. Request an ID-JAG. An authentication artifact is exchanged against the Enterprise IdP to get an ID-JAG. Either an ID Token or a Refresh Token may be used for this. The token is exchanged for an Identity Assertion JWT Authorization Grant (ID-JAG) scoped to your Resource App. During this exchange, enterprise policies are enforced: Okta will mint the assertion only if the admin's XAA policy allows the Requesting App to access the Resource App for this user.
3. Request an Access Token. The Requesting App presents the ID-JAG to the Auth0 Authorization Server. Auth0 validates the assertion's signature against the IdP's keys, checks that it was issued for this tenant, applies your resource-level rules, and issues a normal Auth0 Access Token.
4. Call the API. The Requesting App calls your API with the issued Access Token, and your API validates it exactly as it validates any other Auth0 token. Your API code does not change — it does not even know XAA was involved.
Cross App Access in Action
It is now turn to run it and get into the details! To understand, send and see each protocol request and response, step by step, we will use the Auth0 XAA Inspector as the Requesting App. This is a small open-source Node/React app that can execute the XAA flow and print the raw HTTP request and the resulting token at every step.
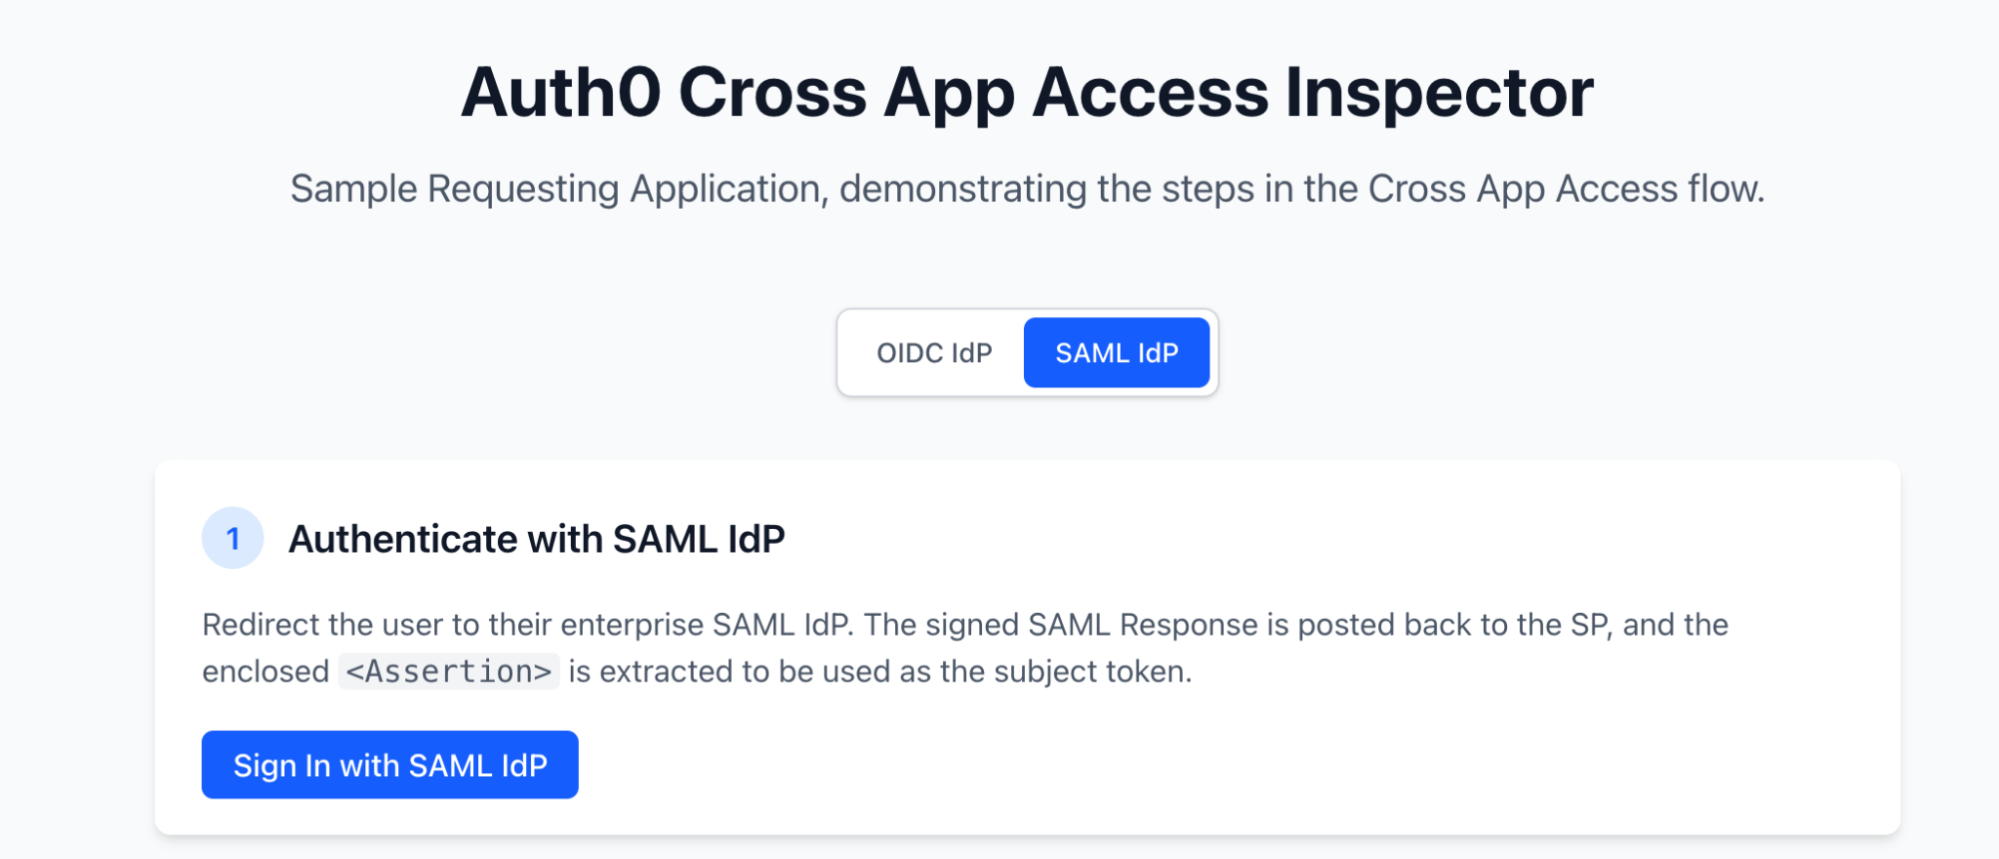
We will use Okta as enterprise IdP, and Auth0 as Resource App Authorization server, but the Inspector App will work with any other spec-compliant providers. That is the magic of an open protocol!
Here are the necessary setup steps.
What to configure in your Okta Org
In order to configure your Okta Org, you can follow the Okta as SAML IdP documentation or Okta’s guide.
You will need:
- A SAML application to model the Resource Application, with XAA enabled.
- A SAML application to model the Requesting Application.
- An AI Agent to model the agent executing XAA for the Requesting Application. Configured for the Requesting and Resource App combination.
What to configure in Auth0
Becoming the Resource App is no-code — a single toggle configuration on your Enterprise Connection and desired client.
You will need:
- An API representing the resource (your audience and scopes)
- A Requesting Application client representing the app allowed to present ID-JAGs, with Cross App Access enabled
- A SAML Enterprise Connection pointing to the IdP’s SAML Resource Application, with Cross App Access enabled so that Auth0 trusts the IdP's assertions.
See the Auth0 XAA documentation for the detailed click-by-click configuration path. In particular, you will need the Okta as SAML IdP guide.
What to configure in XAA Inspector
Configuring your Inspector App is done by configuring the .env file. Make a copy of .env.example and fill in the necessary parameters. You can follow the README to better understand this process, but here is a quick overview:
| Environment Variable | Value |
|---|---|
| OKTA_ISSUER | This is the issuer for your Okta Org authorization server. If you are using an Integrator Org, it will be something like: https://integrator-12345.okta.com |
| OKTA_TOKEN_CLIENT_ID | The Client ID for the Okta AI Agent used to model the Requesting App |
| OKTA_PRIVATE_KEY | The Private Key used by the Requesting App to authenticate via Private Key JWT against Okta, in PEM format. Should be a single-line string with escaped newline characters. Something like: -----BEGIN PRIVATE KEY-----\n…\n…\n-----END PRIVATE KEY----- |
| OKTA_PRIVATE_KEY_KID | Key ID for the above private key |
| SAML_SP_ENTITY_ID, SAML_SP_ACS_URL, SAML_IDP_SSO_URL, SAML_IDP_ISSUER, SAML_IDP_CERT | These are your standard SAML configuration parameters on the SP side. Sample values can be found in the Inspector’s README. |
| SAML_IDJAG_SCOPE | Space-separated list of scopes to be requested |
| AUTH0_DOMAIN | Your Auth0 tenant domain. Just the domain, no protocol or path. Unless you are using Custom Domains, it looks like my-tenant.eu.auth0.com |
| AUTH0_CLIENT_ID | The Client ID for the Requesting App in Auth0. In our examples, it is a sample CIMD URL we provide for demo purposes: https://raw.githubusercontent.com/auth0-samples/auth0-cross-app-access-inspector/main/public/cimd.json |
| AUTH0_AUDIENCE | The Auth0 authorization server issuer identifier. Should look like https://my-tenant.eu.auth0.com/ Note that Auth0 requires the trailing slash. |
| AUTH0_RESOURCE | The API identifier in Auth0 |
Running the XAA flow
We are now ready to run the XAA flow and watch the token exchanges in detail. Let’s navigate to the XAA Inspector and pick the SAML toggle. For each step, a panel will show the outgoing request and the returned token.
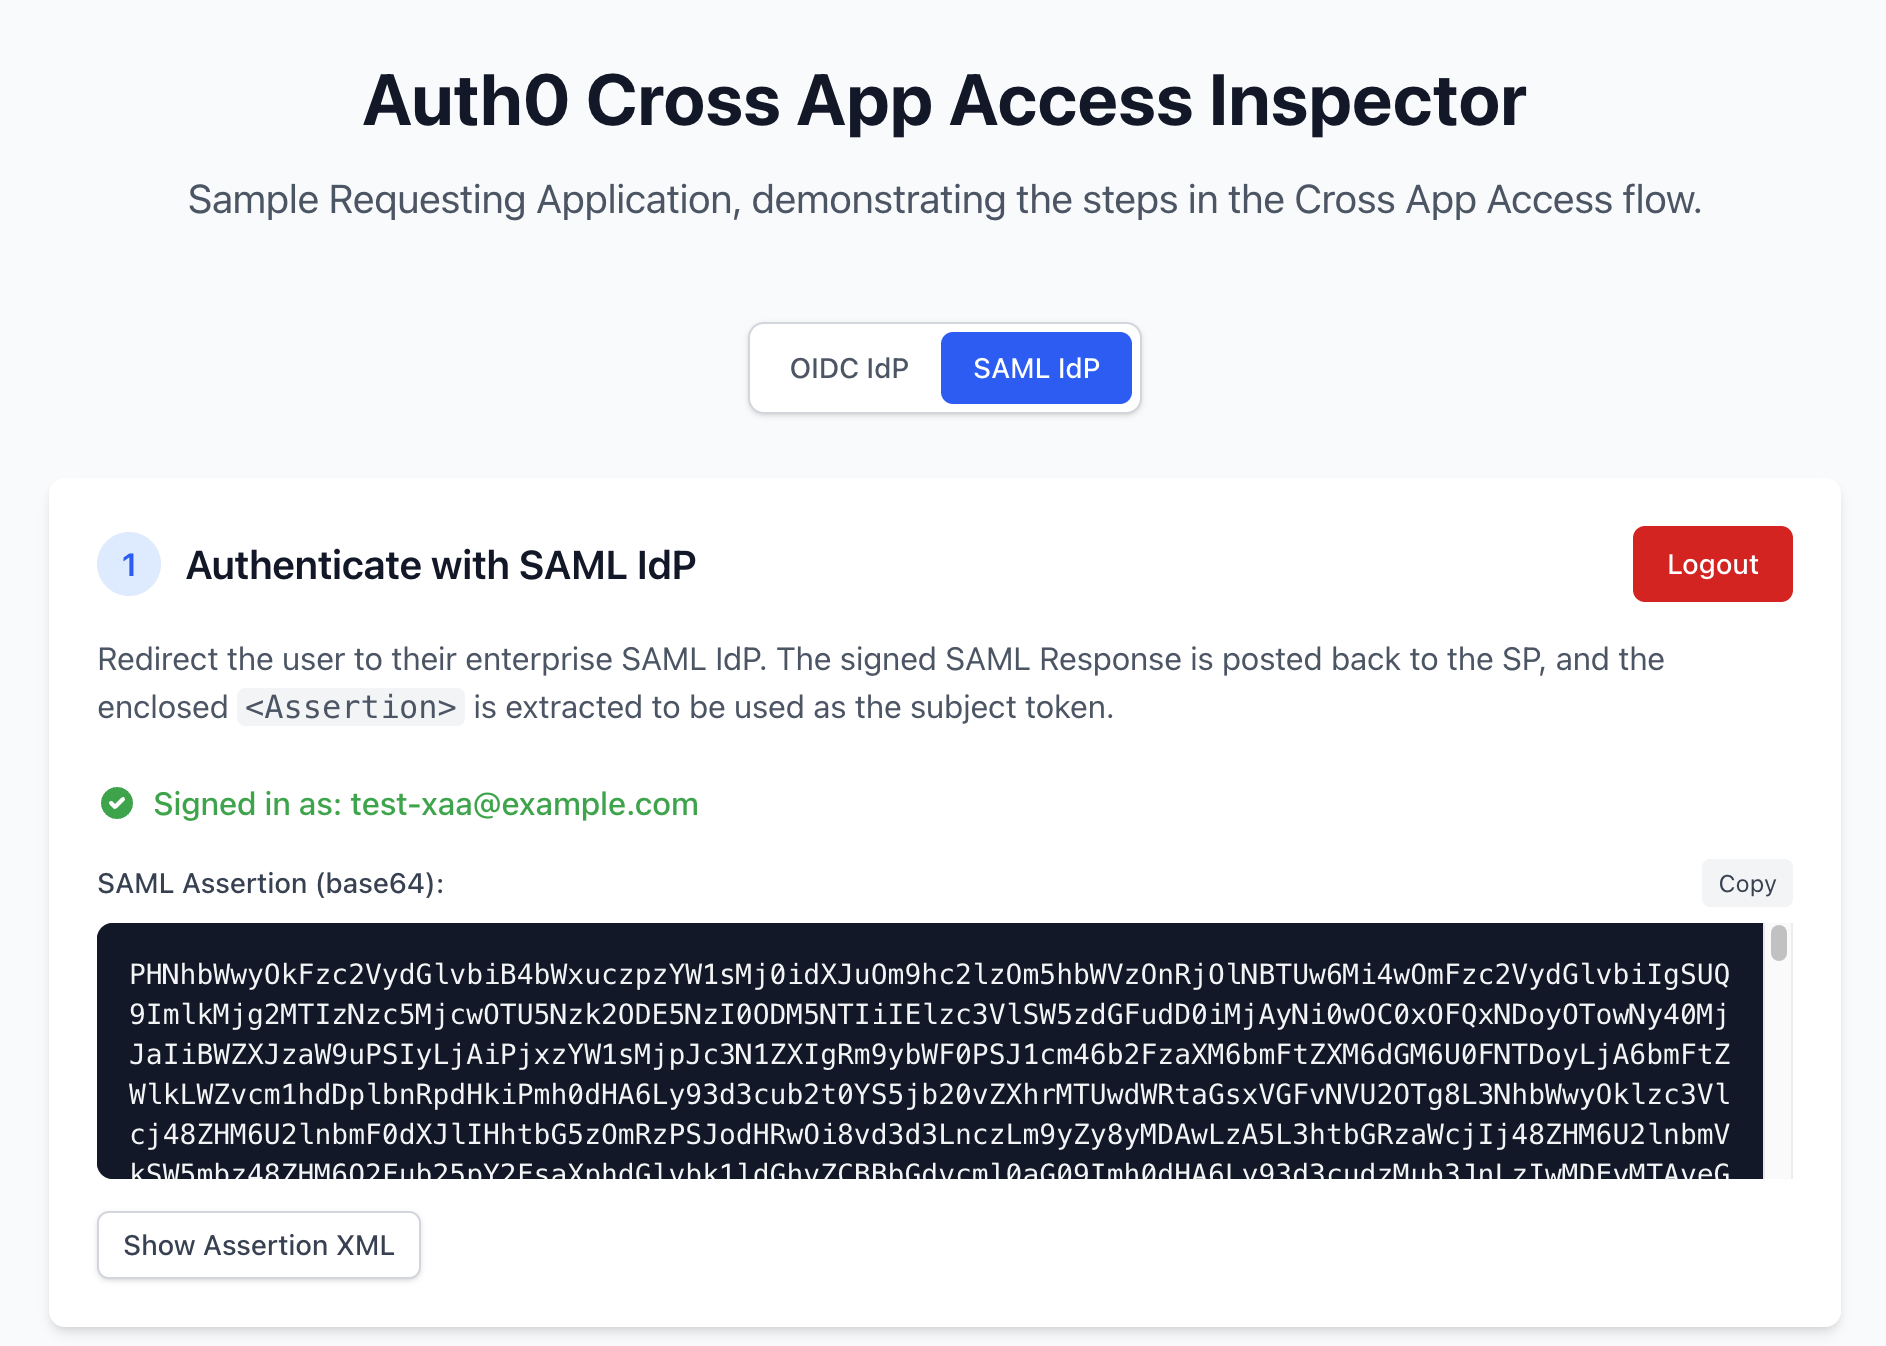
Step 1: Sign in. Authenticate against Okta; the Inspector extracts the signed <Assertion> from the SAML Response.
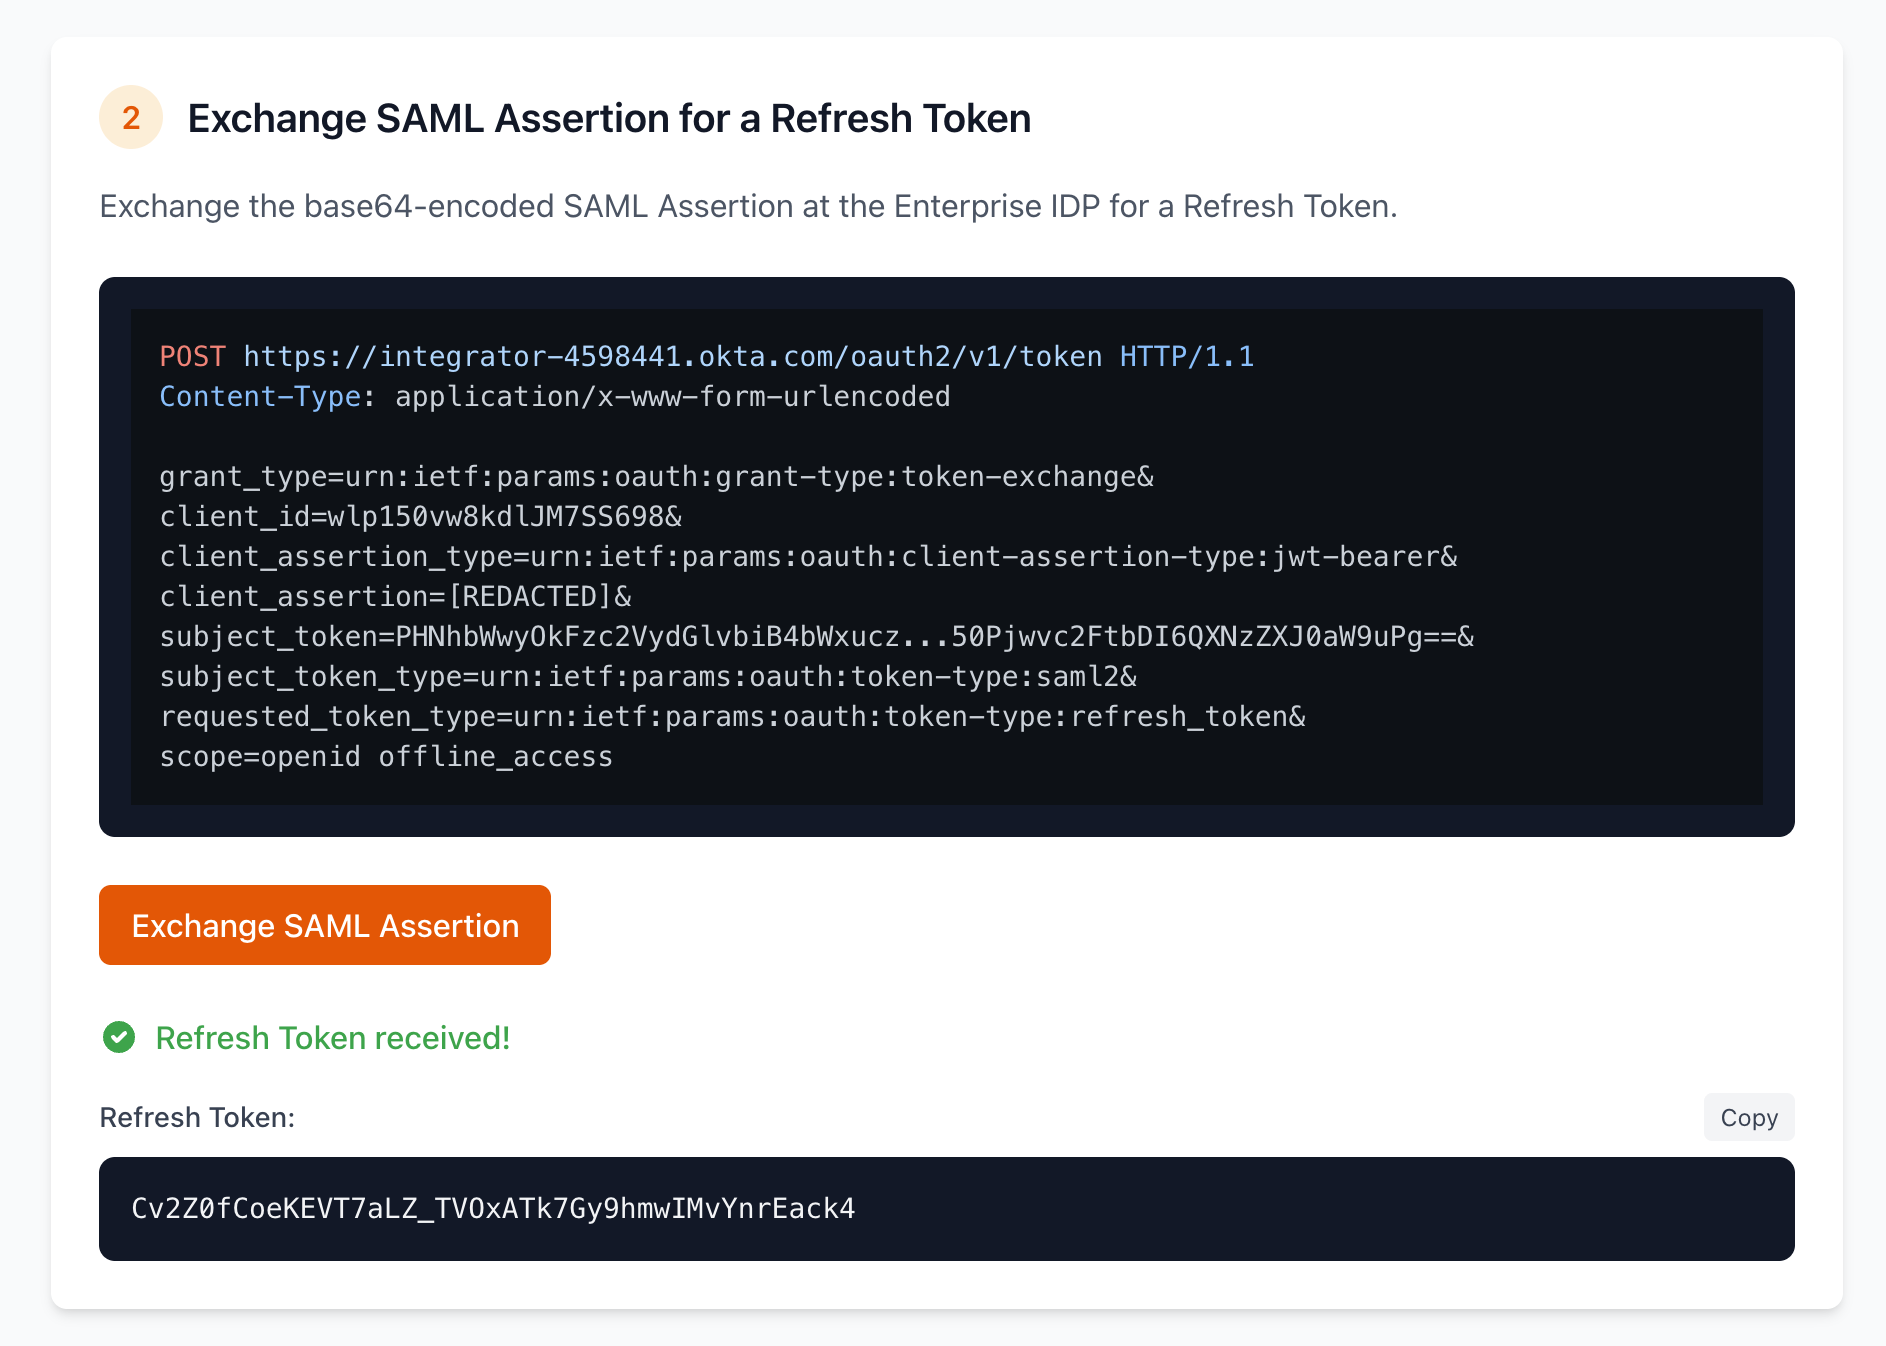
Step 2: SAML Compatibility Layer. The Inspector exchanges the SAML assertion for a refresh token at Okta. Note this request uses grant_type=urn:ietf:params:oauth:grant-type:token-exchange (RFC 8693) with subject_token_type=urn:ietf:params:oauth:token-type:saml2 (the presented token type, a SAML assertion) and requested_token_type=urn:ietf:params:oauth:token-type:refresh_token (the requested token type, an OAuth Refresh Token). The SAML assertion itself is sent in the subject_token parameter, in Base-64 encoding.
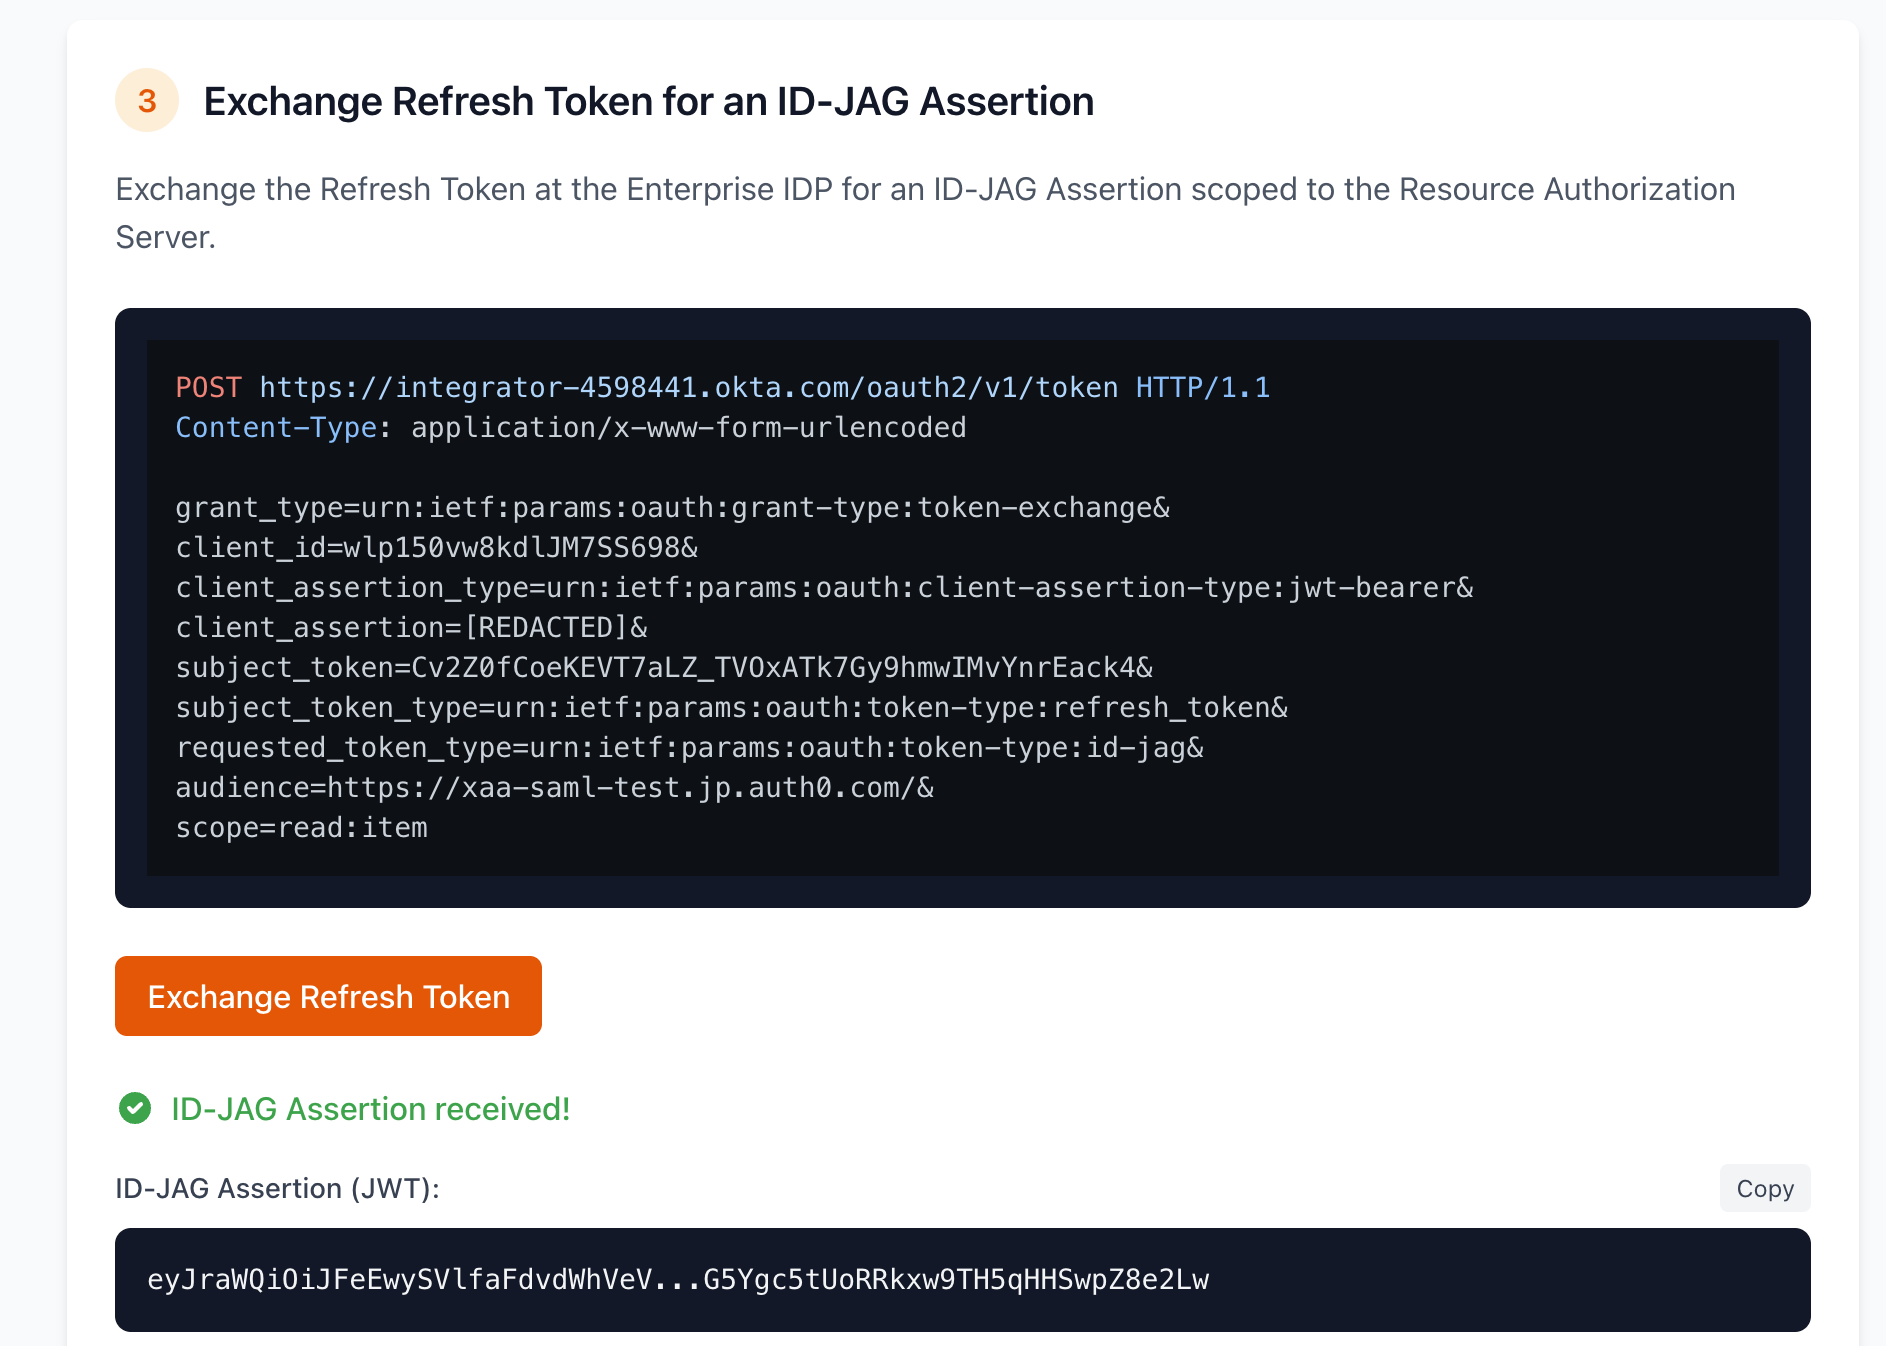
Step 3: Get the ID-JAG. The Inspector exchanges the refresh token at Okta to request an ID-JAG scoped to your Auth0 tenant. At this point, Okta enforces the enterprise policy gates — Okta will only issue the assertion if the XAA policy is configured in Okta to allow the Inspector access to your Resource App for this user. The Requesting App requests a set of scopes it wants to use in the Resource App, these scopes may or may not be granted by the IdP depending on its internal policies. It also requests an specific audience, which points to the Authorization Server gating the protected resources. Depending on the IdP implementation, the target API may also be requested through the resource parameter. Note how the Token Exchange Grant is used again on this request. Expand it and check the claims:
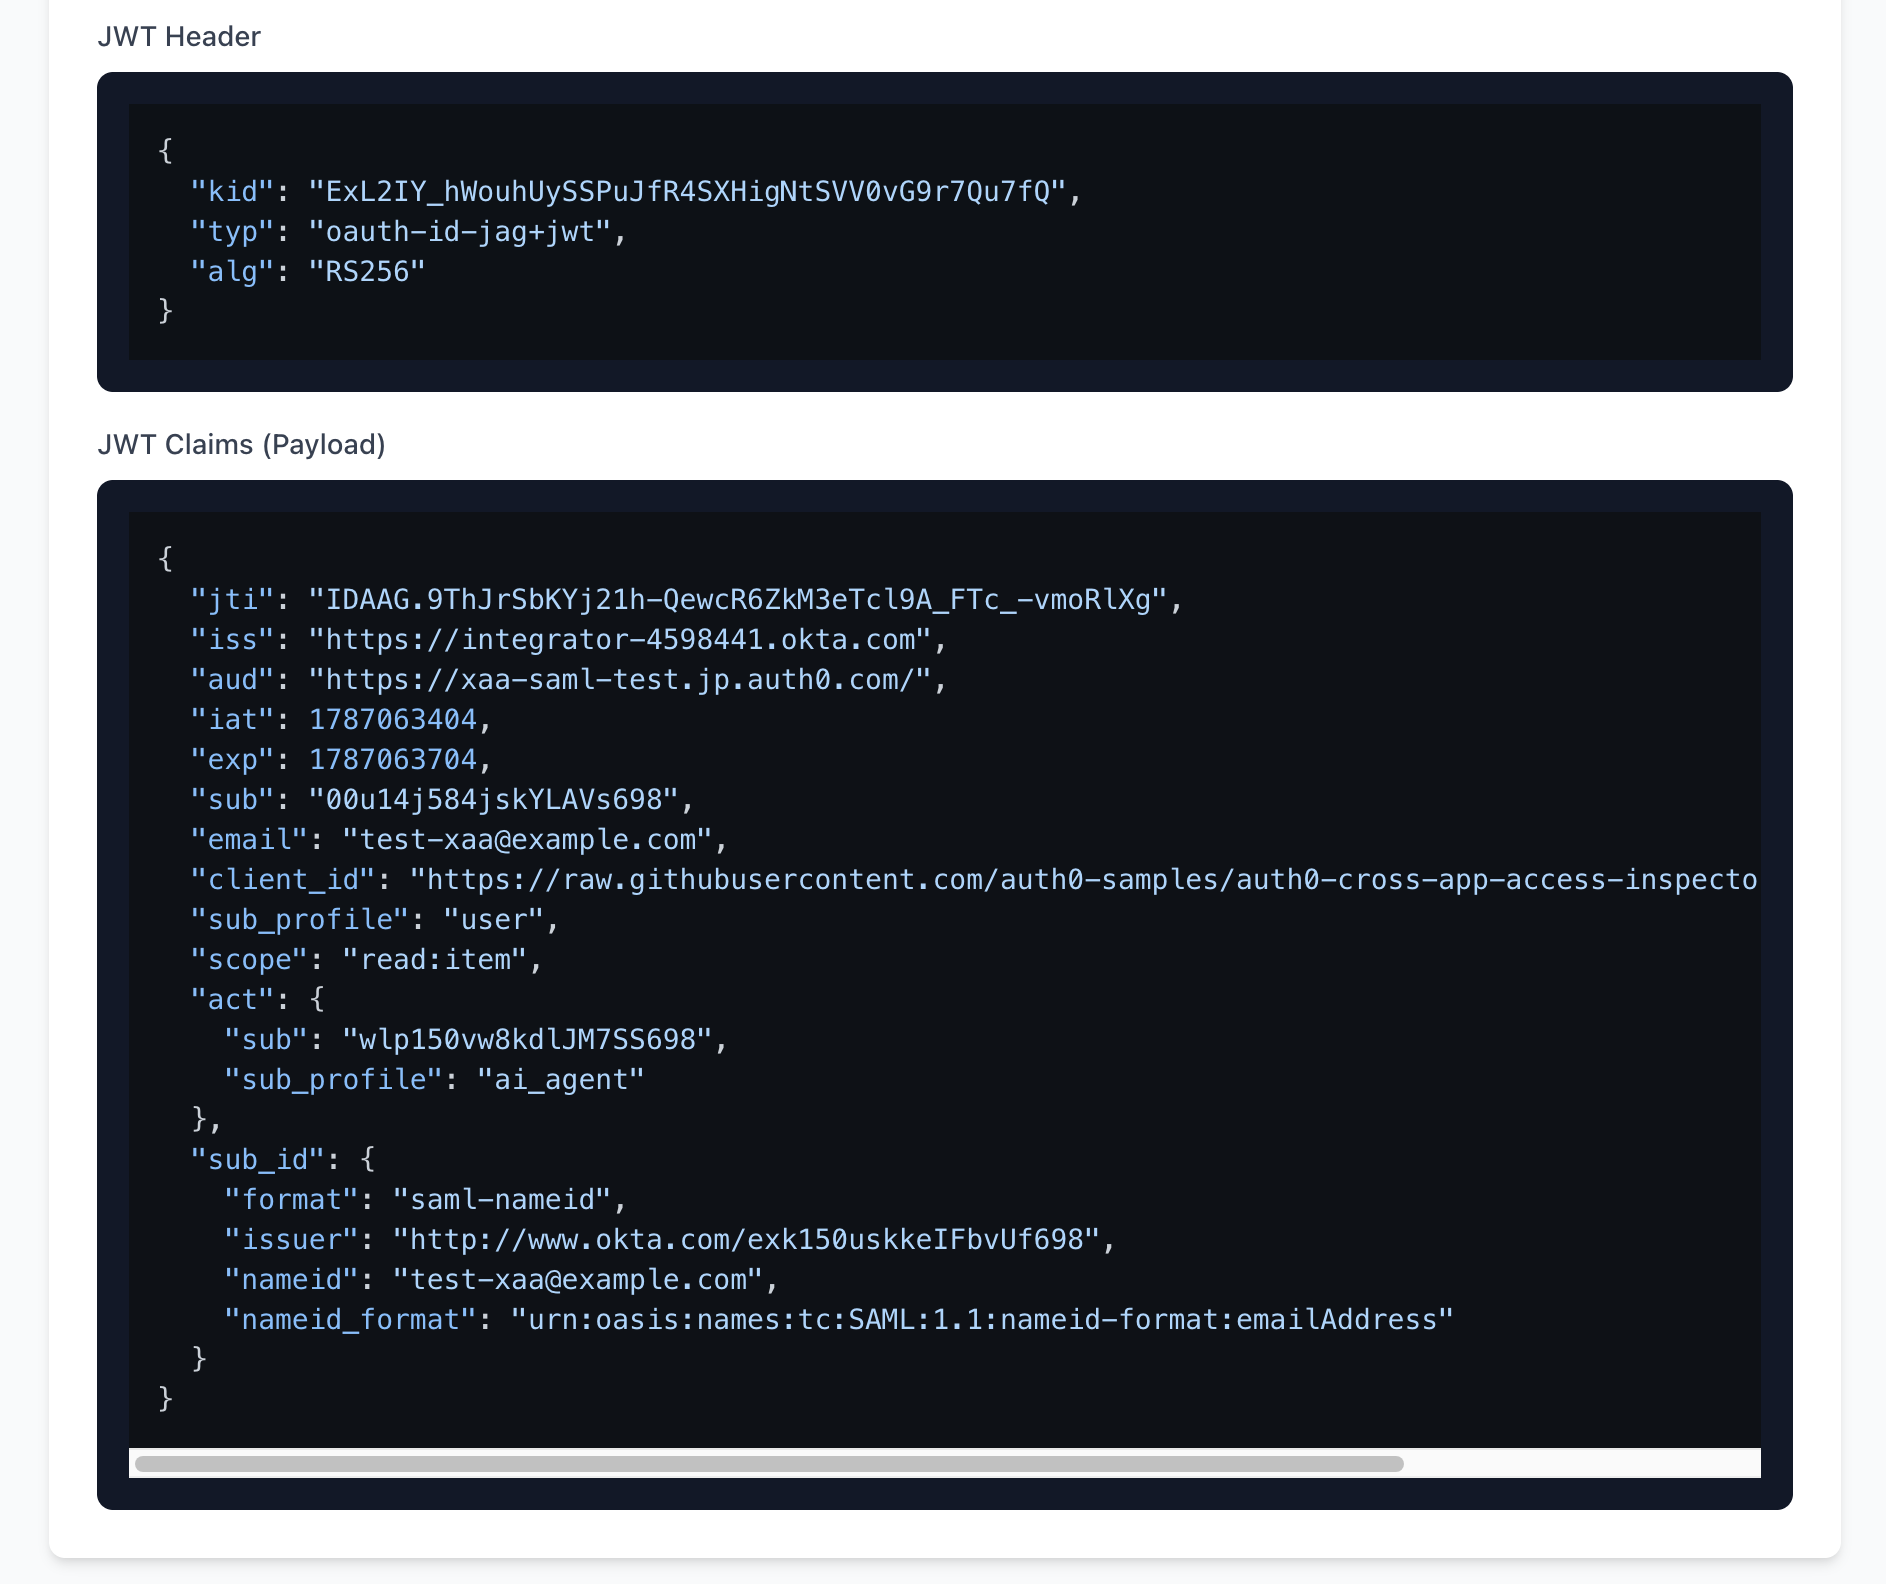
Here we can see the key piece of this puzzle: the ID-JAG. The ID-JAG is an assertion that authorizes cross-domain access to resources. It is the mechanism that allows cross-domain trust, because it is trusted by all the different parties involved. Some of the more relevant claims are:
iss: identifies the token issuer, the Okta Authorization Server in our case.aud: identifies the token audience, which is the Auth0 tenant.sub: uniquely identifies the user. This claim is always present.sub_id: identifies the user in the SAML namespace, with all the usualNameIDproperties required to identify users in the SAML protocol.client_id: the identifier of the Requesting App, in our case a CIMD identifier.scope: indicates the granular authorization details granted to the Requesting App. Note granted scopes may have been scoped down by the IdP’s policies.
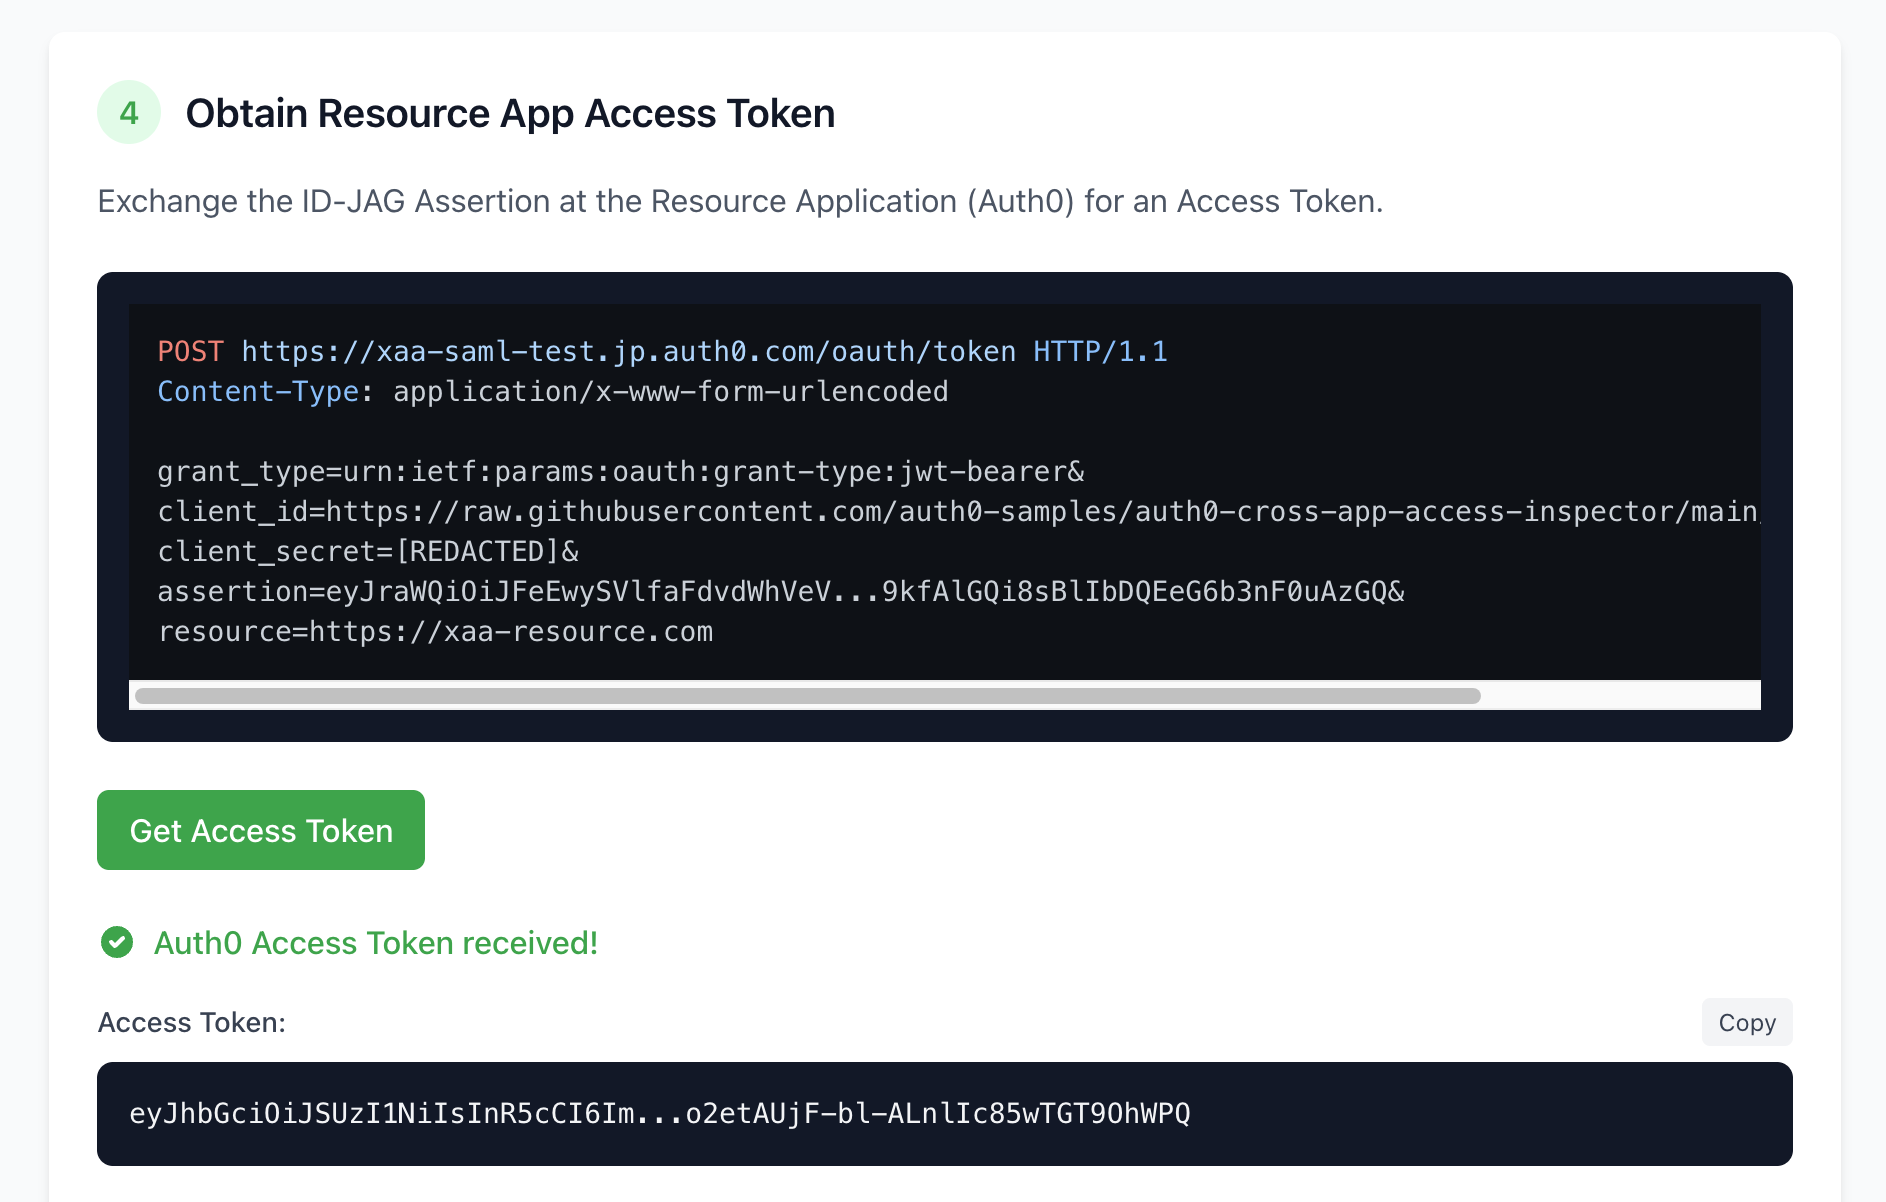
Step 4: Exchange for an Auth0 access token. The Inspector presents the ID-JAG to your Auth0 tenant via the JWT-bearer grant. Auth0 validates the signature and audience, applies your rules, and returns a standard Auth0 access token.
Note a resource parameter is specified in this request. The resource parameter identifies the target API the Requesting App wants to access. Depending on the implementation of the IdP, the resource may be requested in the ID-JAG request and included as an ID-JAG claim. A default resource is also configurable in Auth0 by configuring the Default Audience tenant setting.
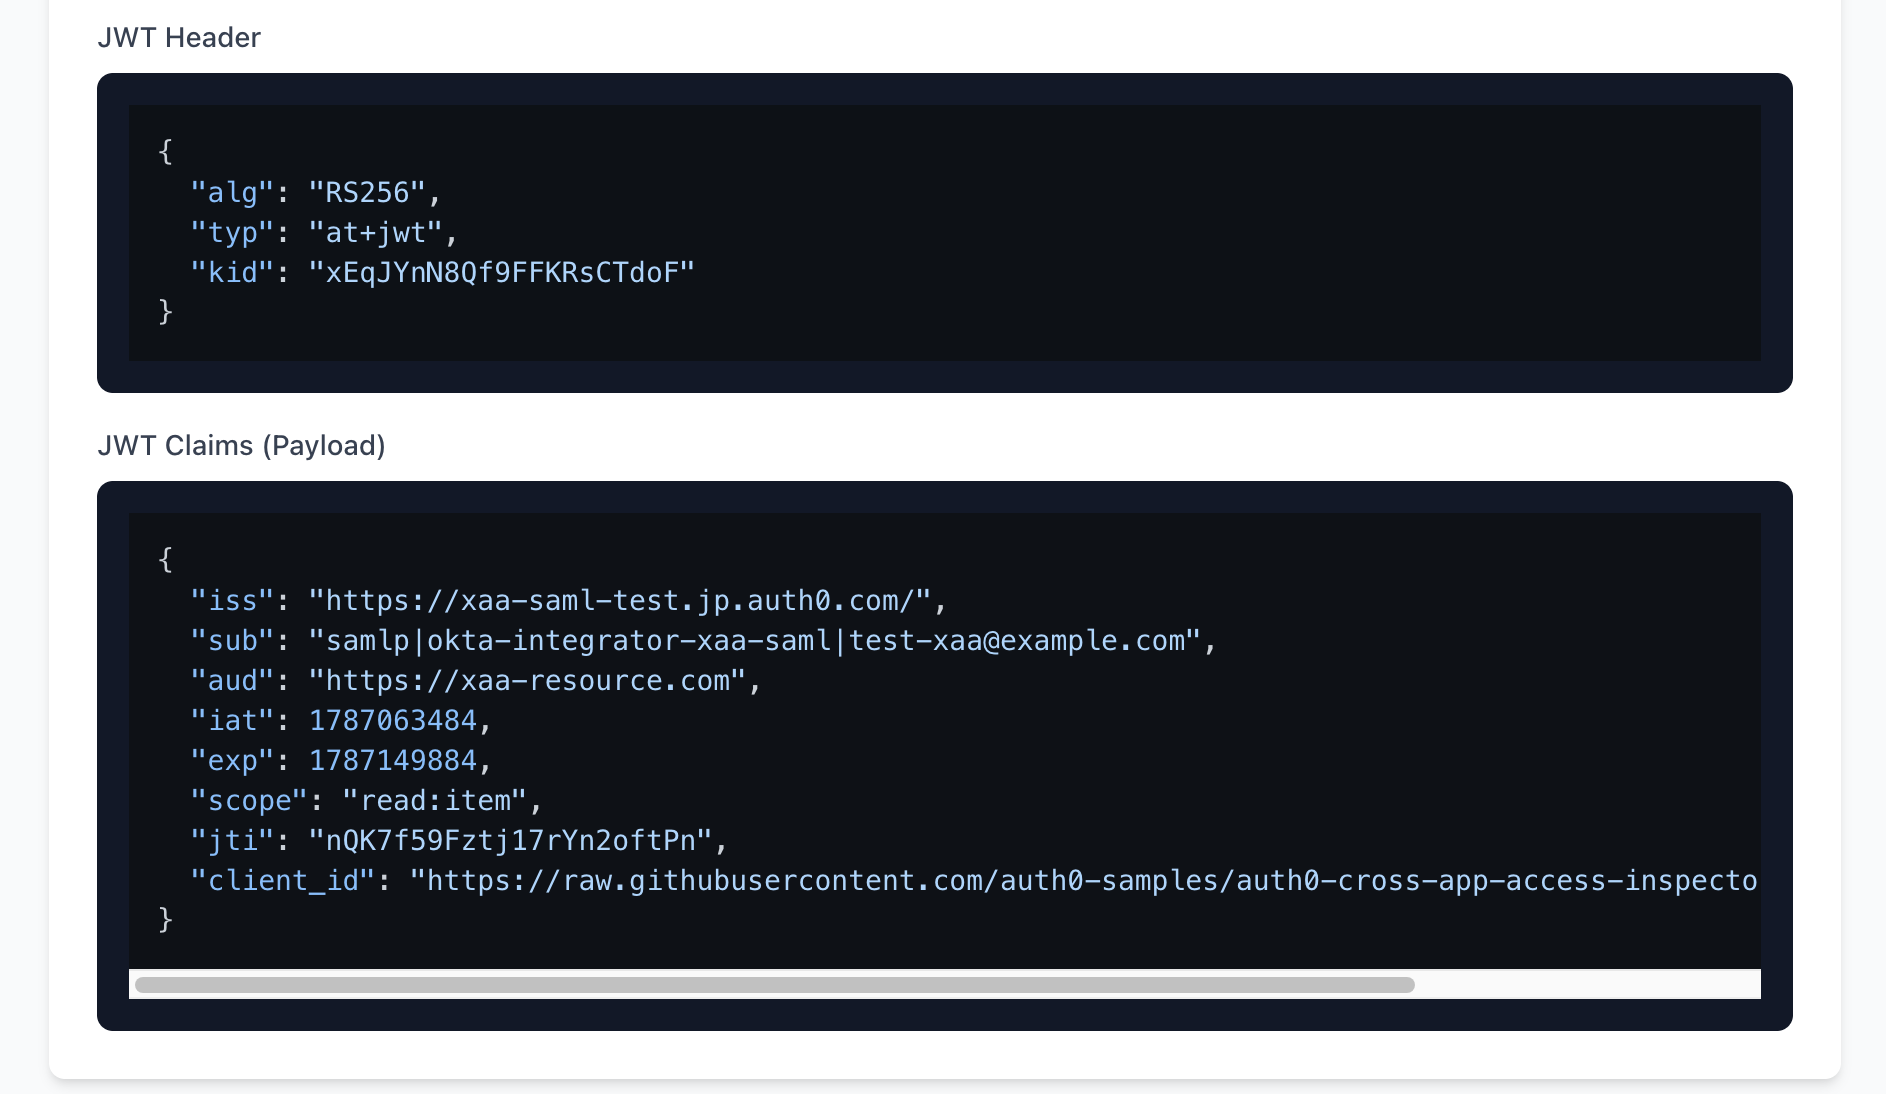
We can see here how the Access Token issued by Auth0 has the usual content one would expect from an Access Token. In our scenario:
iss: identifies the Auth0 tenant that issued the tokenaud: identifies the Resource App this AT is intended forclient_id: identifies the Requesting App, note it is a CIMD identifier
Step 5: Call the API. Use the Access Token to call the Resource App API. Your API validates it like any other Auth0 token. The flow is now complete: a user signed in once at Okta, and an agent reached your API on their behalf, with zero consent prompts and full central control.
Scaling Distribution via the Okta Integration Network (OIN)
While your Resource App can evaluate identity assertions from any spec-compliant IdP, listing your implementation in the Okta Integration Network (OIN) simplifies deployment for enterprise admins who already rely on Okta's identity architecture.
Publishing an XAA integration to the OIN offers two key structural advantages:
- Out-of-the-Box Interoperability: Your APIs and MCP servers become immediately reachable by popular Requesting Applications (such as Anthropic’s Claude, Cursor, VS Code, Docker, and Zoom) without requiring custom connection logic for each agent.
- Streamlined Enterprise Discovery: Enterprise IT administrators can discover, audit, and provision your application's XAA capabilities directly from their existing Okta Admin Console.
Publishing your integration to the OIN
Once you have verified the XAA flow in your Auth0 tenant, moving to a live OIN catalog listing involves the following steps:
- Review the metadata requirements in the OIN Submission Guide for XAA.
- Configure and test your client definitions inside an Okta preview tenant.
- Submit the integration package for verification via the Okta Developer Portal.
After approval, your application will appear as a pre-built XAA-enabled integration in the public OIN catalog.
Want to Learn More?
If you want to dig into XAA in more detail, you can learn more by checking out the Auth0 XAA documentation.
About the author

Miguel Pedregosa
Senior Software Engineer