In a recent article, Calling a Protected API from an iOS Swift App, I explained how to leverage the OAuth 2.0 Authorization Server services provided by Auth0 when accessing protected APIs via an iOS app built using Swift. In that article, I showed how to get an Access Token, how to safely and securely store it, and subsequently, how to use it to call a protected API. If you've not already done so, I highly recommend you read that article because, in this article, I'm going to build on what was previously discussed by explaining how and why you should also want to leverage an OAuth 2.0 Refresh Token. I'll also continue with the conventions used in that article, namely using the 🛠 emoji - amongst others - for those of you who’d like to skim through the content while focusing on the build and execution steps 😄

A step-by-step guide to leveraging OAuth 2.0 when accessing protected APIs via an iOS app built with Swift and integrated with Auth0.
What Is a Refresh Token?
Auth0 provides support for the OAuth 2.0-defined Refresh Token standard. In fact, Auth0 also offers additional enhancements to this standard, which we'll discuss a little later; see the Auth0 Docs for more details. A Refresh Token is essentially a credential that can be used to get a new Access Token without user interaction. In this case, the phrase "without user interaction" includes both the need for interactive user first-factor authentication as well as the need for the actual user to be present and logged in to the device.
Why Use a Refresh Token?
So why would you want to use a Refresh Token? The paradigm often favored in mobile device apps is for the user to (interactively) log in on an infrequent basis and prefer to use device biometrics for user authentication instead. Using a Refresh Token facilitates this in a way that also allows an app to obtain an Access Token for calling an API without the need for it to be extraordinarily long-lived. The use of a Refresh Token then mitigates the potential attack surface from a security perspective whilst also maintaining the expected user experience.
Configuring Auth0
🛠 Let's start by using the Dashboard to configure Auth0 (note: the Auth0 tenant I'm using is a Production class tenant, but yours will probably say Development; for the purpose of this article, the tenant classification is irrelevant). Essentially, two places in Auth0 require configuration - one affects how a Refresh Token is generated, and the other how a Refresh Token is used. As I've already mentioned, I'm going to build on the work illustrated in previous blog posts, and I'll make reference to each as I go. Let's dive in! 😎
Configuring an Application definition in Auth0.
Refresh Token configuration can be found as part of the Application definition in Auth0. In a previous Blog article, Get Started with iOS Authentication using SwiftUI, Part 1: Login and Logout under the section entitled Register the App with Auth0, my colleague did a walkthrough of creating and configuring an application definition via the Auth0 Dashboard, and I will build on that to show you how to configure for using a Refresh Token. Note that for those who'd prefer, the Get Started with iOS Authentication using Swift and UIKit article also works well, and you can follow on from the equivalent Register the App in the Auth0 Dashboard section.
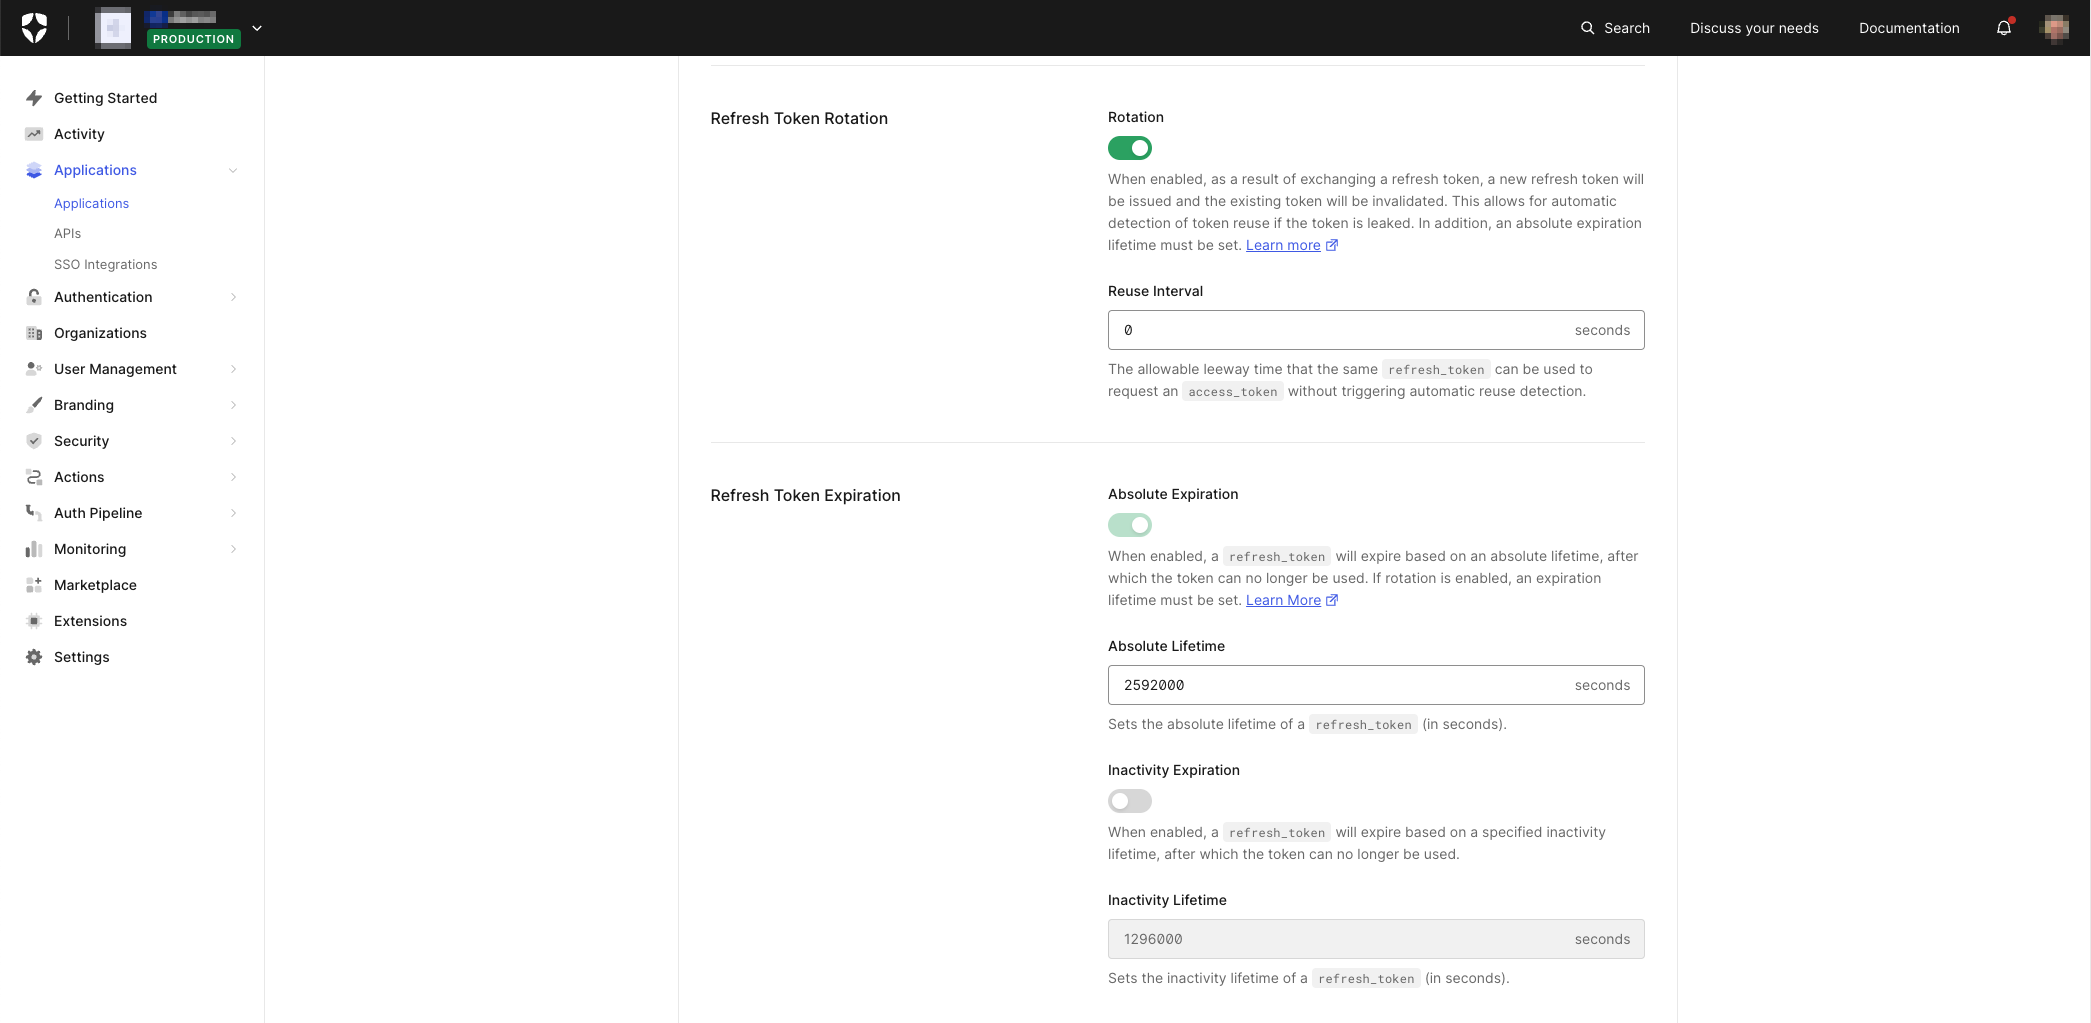
Scroll down from the top of the Application definition page, and you should get to the Refresh Token settings. There are a few parts to the dialog presented, so let's go through them one by one:
- Refresh Token Rotation indicates the use of the Refresh Token model that Auth0 provides to mitigate security risk. Refresh Token Rotation essentially provides a model where a Refresh Token can only be used once - effectively expiring the token after it's used and providing a safeguard should it be leaked. You can read more about Refresh Token Rotation here in the Auth0 Docs. Using this model is the preferred option, particularly for non-confidential clients, such as mobile apps. However, there are some considerations for use, particularly in multi-threaded apps; more about that later.
- Refresh Token Expiration allows you to define an expiry period for a Refresh Token. By default, Refresh Tokens, as described in OAuth 2.0, typically never expire. However, employing expiry is another way to reduce the threat surface from the perspective of the security landscape. You can read more about Refresh Token expiry in Auth0 here, and token expiration is mandatory when using Refresh Token Rotation.
🛠 I'm going to enable Refresh Token Rotation with the default Reuse Interval and also set Absolute Expiration with the default Absolute Lifetime.
- Refresh Token Rotation: click to enable
Refresh Token Expiration: enabled as mandatory and by implication
🛠 Click Save Changes, and you should be notified that your Application definition has been updated.
Configuring an API definition in Auth0.
Once Refresh Token behavior has been configured, the next thing to do is to tell Auth0 that Refresh Token processing can be utilized against a particular API. In my previous blog article, Calling a Protected API from an iOS Swift App, I created an API definition in Auth0 called MyAPI, and I'm going to use that to show you how to configure for Refresh Token use.
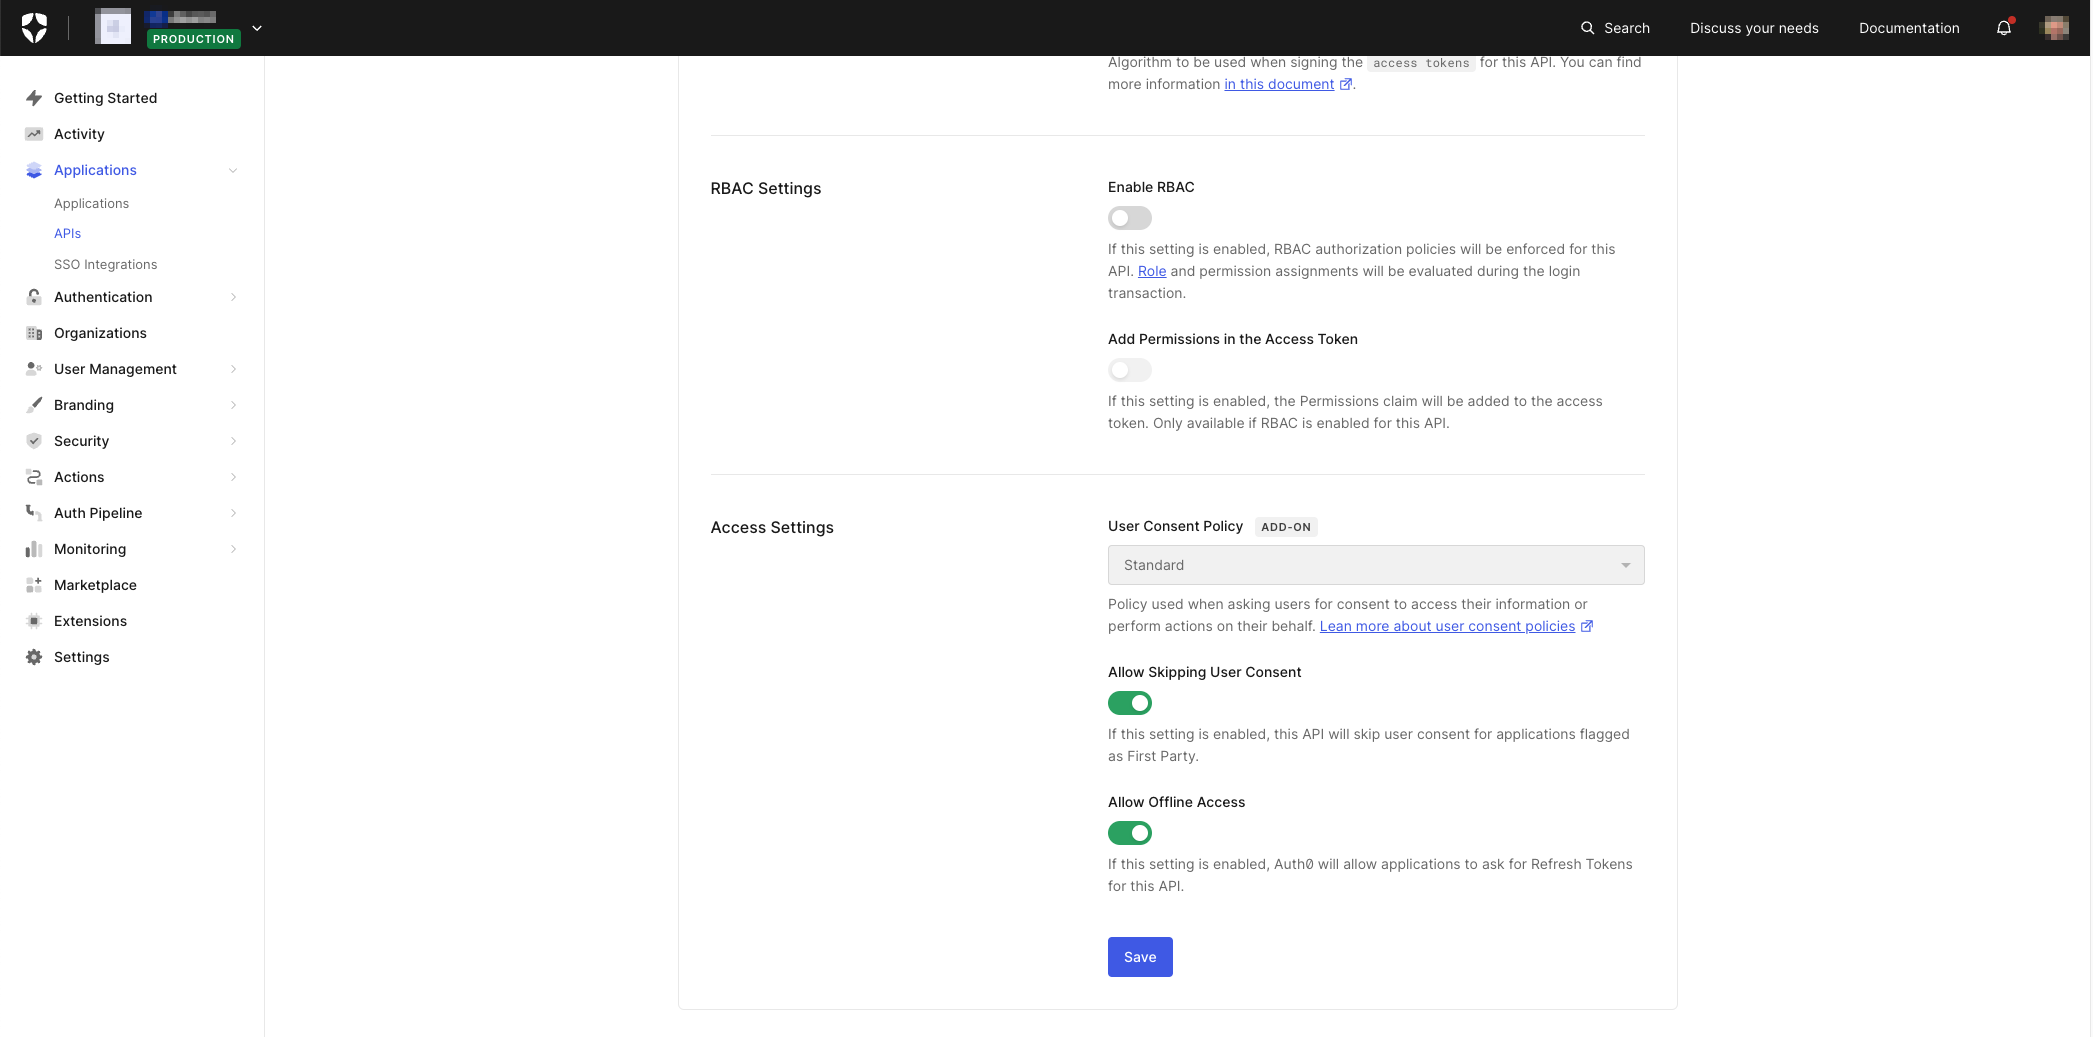
🛠 Scroll down from the top of the API definition page, and you should get to the section right at the bottom that contains the Allow Offline Access option. Click to enable and then click Save Changes. You should be notified that your API definition has been updated once Auth0 has finished processing.
Requesting a Refresh Token
With Auth0 configured, now let's turn our attention to the changes we need to make in the app to make use of Refresh Token processing. I'm going to be building on the app from the Calling a Protected API from an iOS Swift App article - which, by now, you'll have undoubtedly read. If not, I would highly recommend you take a moment to do so 😎
Updating the Project
🛠 From the completed code Calling a Protected API from an iOS Swift App - either the code you completed as part of the walkthrough or found in the iOS Swift Protected API Call folder as part of the download - open the project in Xcode (if it isn't already) and update the login() function in the manner illustrated below. The rest of the code should remain unchanged. You can also download all the code we're going to be creating from this GitHub repository
// [ 📄 ContentView.swift ]

  func login() {
    Auth0
      .webAuth()
      .audience("https://myapi.com")
      .scope("openid profile email offline_access read:events")  // 1
      .start { result in
        switch result {
          case .failure(let error):
            print("Failed with: (error)")

          case .success(let credentials):
            self.isAuthenticated = true
            self.userProfile = Profile.from(credentials.idToken)
            print("Credentials: (credentials)")
            print("ID token: (credentials.idToken)")
            print("Access token: (credentials.accessToken)")
            print("Refresh token: (credentials.refreshToken ?? "")") // 2
        }
      }
  }
The notes below correspond to the numbered comments above:
- Adding
offline_accesstoscopeindicates to Auth0 that you also want to request a Refresh Token for the specifiedaudience(API). - Add the
printline to display the returned Refresh Token in the XCode. This will help with debugging; however, please note that the Refresh Token is not in JWT format (a Refresh Token is essentially an opaque artifact), so it cannot be decoded. We're also using conditional logic here, asrefreshTokenis defined as having an optional value.
Running the App
🛠 Now run the app (either in the Simulator that comes with XCode or on a real device) and watch what happens when you press the Log in button. With the Allow Skipping User Consent option in the Access Settings section enabled, you'll likely see nothing different. Disable it, and you'll allow Auth0 to display the consent dialog, which should now look similar to the image below when run for the first time; for more details, see the section here in my previous blog article:
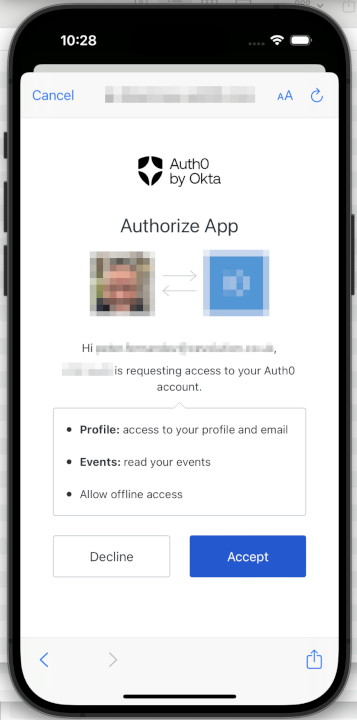
Note the new Allow offline access, which the user needs to consent to. In Auth0, whenever the scope of access changes to include something the user has not already agreed to, the consent dialog - if not disabled - will be presented to the user as part of their next interactive login. This is by design and a function of the delegated authorization provided by OAuth 2.
Information Returned.
Whilst you won't necessarily see anything different, some changes in the information returned from Auth0 will be present. Firstly, in XCode, you'll see that the credentials print statement in the code above shows a refreshToken: Optional("<REDACTED>" line in the debug console log, and also scope: Optional("openid profile email read:events offline_access"). We independently print the value of the refreshToken, so I'll discuss that in just a second; scope now echoes the values from the scope requested.
The refreshToken that's returned is the thing used to obtain a new Access Token without requiring any additional interactive first-factor authentication. In fact, it doesn't need the user present at all, so it can also be used to obtain a new Access Token as part of background task processing when the app is not executing interactively. As previously mentioned, a Refresh Token is opaque, so it cannot be decoded as can an ID Token or an Access Token; a Refresh Token, in Auth0, is not in a JWT format.
Storing the Refresh Token
A Refresh token is synonymous with user credentials, so it also needs to be treated in a safe and secure manner. A Refresh Token should also not be shared: it's intended for the application that requested it and should not be sent to an API or given to any other app. Fortunately, the Auth0 iOS SDK for Swift makes life easier, and the provided Credentials Manager makes both storing a Refresh Token and using a Refresh Token - discussed in the section below - a breeze. For more information, see here in the Auth0 Docs.
Using the Refresh Token
As I said, the provided Credentials Manager makes both storing a Refresh Token and using a Refresh Token a breeze. So, in fact, we have to make no changes to the code that we implemented in the previous blog article (see here for details): we already stored the result returned from Auth0 in the Credentials Manager, so the Auth0 iOS SDK for Swift will take care of automatically refreshing the Access Token if need be. Whilst we don't have to make any code changes, let's go ahead and make a few simple modifications to allow us to test things in practice 😎
!🛠 Firstly, let's modify the actual API call so that we always bypass the cache associated with the shared URLSession: while using the shared URLSession is a good performance option, it will, by default, cache data returned. To make it easier to follow, I'm only going to show the code I've changed from the previous implementation; everything else stays the same. I've also added some notes below for things that I feel are relevant:
// [ 📄 APICallView.swift ]

class WebService: Codable {

    func downloadData<T: Codable>(fromURL: String) async -> T? {
        do {
            guard let url = URL(string: fromURL) else { throw NetworkError.badUrl }
            var request = URLRequest(url: url)
            let credentials = try await credentials();

            /* Convention is for an Access Token to be supplied as an Authorization Bearer in the header of an HTTP request. Apple's documentation is somewhat ambiguous when it comes to how to do this, so for the purpose of this example, I'll follow the advice suggested at https://ampersandsoftworks.com/posts/bearer-authentication-nsurlsession/
             */
            request.setValue("Bearer (credentials.accessToken)", forHTTPHeaderField: "Authorization")

            let (data, result) = try await URLSession(configuration: .ephemeral).data(for: request) // 1
            guard let response = result as? HTTPURLResponse else { throw NetworkError.badResponse }
            guard response.statusCode >= 200 && response.statusCode < 300 else { throw NetworkError.badStatus }
            guard let decodedResponse = try? JSONDecoder().decode(T.self, from: data) else { throw NetworkError.failedToDecodeResponse }
            return decodedResponse
        } catch NetworkError.badUrl {
            print("There was an error creating the URL")
        } catch NetworkError.badResponse {
            print("Did not get a valid response")
        } catch NetworkError.badStatus {
            print("Did not get a 2xx status code from the response")
        } catch NetworkError.failedToDecodeResponse {
            print("Failed to decode response into the given type")
        } catch {
            print("An error occurred downloading the data")
        }

        return nil
    }
}

struct APICallView: View {
    @StateObject var vm = EventViewModel()

    @Binding var isAPICall: Bool  // 2

    var body: some View {
        List(vm.eventData) { event in
            HStack {
                Text("(event.id)")
                    .padding()
                    .overlay(Circle().stroke(.blue))

                VStack(alignment: .leading) {
                    Text(event.title)
                        .bold()
                        .lineLimit(1)

                    Text(event.body)
                        .font(.caption)
                        .foregroundColor(.secondary)
                        .lineLimit(2)
                }
            }
        }
        .onAppear {
            if vm.eventData.isEmpty {
                Task {
                    await vm.fetchData()
                }
            }
        }

        if (!vm.eventData.isEmpty) {  // 3
            HStack {
                Button("Done") {
                    isAPICall = false;
                }
                .buttonStyle(MyButtonStyle())
            } // HStack
        }
    }

    struct MyButtonStyle: ButtonStyle { // 4
        let blueGreen = Color(red: 0, green: 0.5, blue: 0.5)

        func makeBody(configuration: Configuration) -> some View {
            configuration.label
              .padding()
              .background(blueGreen)
              .foregroundColor(.white)
              .clipShape(Capsule())
        }
    }
}
The following notes correspond to the numbered comments above:
- Switch to using a
URLSessionthat doesn't use caching; this allows us to call the API more than once via the changes described in 2 and 3 below. In reality, if you don't want or need data caching, you'll probably want to switch to implementing something reusable, similar to whatURLSession.sharedprovides. - Bind to the
isAPICallparameter we're now going to pass in so we can switch between the logged-in screen and the API call screen. More on this below. To make things easier in XCode, I've also commented out the default#Preview - Use the supplied
isAPICallparameter to flip between showing the API call screen and the logged-in screen. We'll do that via a button that's displayed once the API call is complete. - Mix things up a little by having a different button color 😉
API call UX
We also need to update the existing function in ContentView.swift to pass the bound parameter described in the previous section; the code below shows the changes made - all other code remains the same - with the customary notes added for good measure.
// [ 📄 ContentView.swift ]
  var body: some View {

    if isAuthenticated {
        if isAPICall {

            APICallView(isAPICall: $isAPICall)  // 1

        } else {
            // “Logged in” screen
            // ------------------
            // When the user is logged in, they should see:
            //
            // - The title text “You’re logged in!”
            // - Their photo
            // - Their name
            // - Their email address
            // - The "Log out” button

            VStack {

                Text("You’re logged in!")
                    .modifier(TitleStyle())

                UserImage(urlString: userProfile.picture)

                VStack {
                    Text("Name: (userProfile.name)")
                    Text("Email: (userProfile.email)")
                }
                .padding()

                HStack {

                    Button("Log out") {
                        logout()
                    }
                    .buttonStyle(MyButtonStyle())

                    Button("Call API") {
                        isAPICall = true;
                    }
                    .buttonStyle(MyButtonStyle())

                } // HStack

            } // VStack
        }

    } else {

      // “Logged out” screen
      // ------------------
      // When the user is logged out, they should see:
      //
      // - The title text “SwiftUI Login Demo”
      // - The ”Log in” button

      VStack {

        Text("SwiftUI Login demo")
          .modifier(TitleStyle())

        Button("Log in") {
          login()
        }
        .buttonStyle(MyButtonStyle())

      } // VStack

    } // if isAuthenticated

  } // body
- Update the code to pass the binding that allows for control of the display
Testing Token Refresh
With the updates described above, testing token refresh is relatively straightforward. Navigate back to the configured API via the Auth0 Dashboard and set both the Token Expiration and the Token Expiration for Browser Flows to something like 60 seconds - as shown in the illustration below:
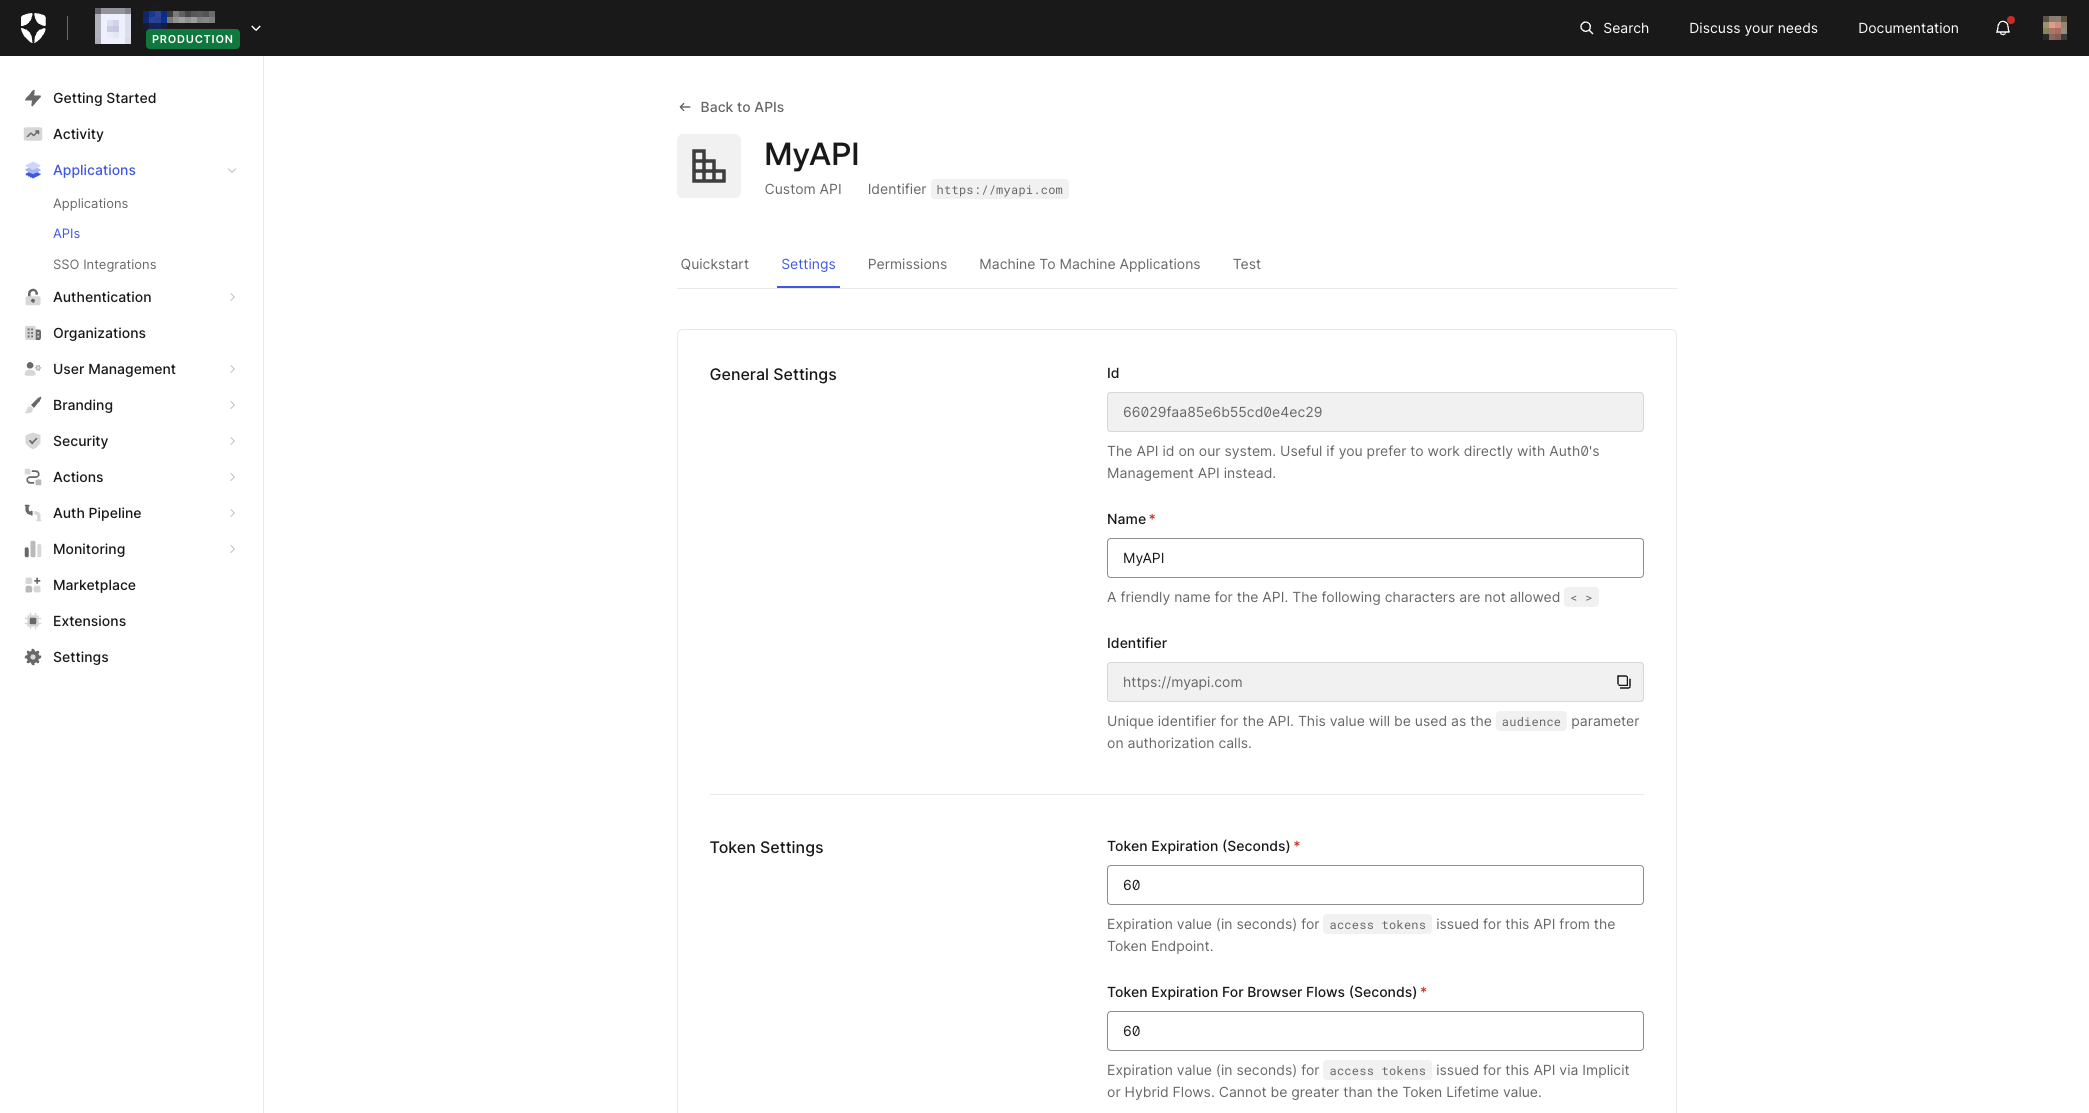
Now log out and log back in via the UX; make a call to the API; go back to the logged-in user screen and wait for 60 seconds or more to elapse. The next time you make a call to the API, there should be an almost imperceptible delay - depending on your network connection - whilst the Auth0 iOS SDK, as part of credentialsManager.credentials, goes out to Auth0 to refresh the Access Token. You can see this in the Auth0 Logs labelled as Successful Refresh Token exchange. And if you update the code to remove offline_access from scope and repeat the process, you'll find that the second API call, executed after the 60 seconds have elapsed, will fail.
Considerations for Multi-Threaded Apps.
When using Refresh Token Rotation - the preferred option, as described in the section above - one needs to take care in scenarios where multi-threading is used. In such cases, the recommendation is to serialize obtaining an Access Token from the Credentials Manager. Failure to do this could render any held Refresh Token invalid. Auth0 will invalidate any and all instances in the Refresh Token chain if it detects a replay scenario. Consider that in a multi-threaded scenario, non-serialized execution could cause a race condition that would effectively precipitate such a situation - irrespective of any configured Reuse Interval (described here in the Auth0 Docs). If this does happen, then any held Refresh Token is essentially rendered useless, necessitating (interactive) first-factor authentication to obtain a new one.
Where to Go Next
Don't forget to check out all the code we created by visiting this GitHub repository. And, of course, feel free to comment below and tell us what you think - we always love to hear feedback, positive or otherwise, as it helps us to improve our content! Thank you. Aside from that, here are some additional resources you might like to follow up on that can help you on your journey. At some point, I'm going to write an article concerning best practices when using URLSession - both in this article and my previous one (Calling a Protected API from an iOS Swift App), I discovered some interesting aspects concerning the use of URLSessionDelegate and URLSessionTaskDelegate that I think would be worth sharing. But for now, have fun, and I'll catch up with you next time! 😁
About the author

Peter Fernandez
Principal Developer Advocate