
TL;DR: In this series, you will learn how to make React and Redux control a bunch of SVG elements to create a game. The knowledge acquired throughout this series will also allow you to create other types of animations that are orchestrated by React and Redux, not only games. You can find the final code developed in this article in the following GitHub repository: Aliens Go Home - Part 1
The React Game: Aliens, Go Home!
The game that you will develop in this series is called Aliens, Go Home! The idea of this game is simple, you will have a cannon and will have to kill flying discs that are trying to invade the earth. To kill these flying discs you will have to point and click on an SVG canvas to make your cannon shoot.
If you are curious, you can find the final game up and running here. But don't play too much, you have work to do!
Prerequisites
As the prerequisites to follow this series, you will need some knowledge on web development (JavaScript mainly) and a development machine with Node.js and NPM installed. You don't have to have deep knowledge about the JavaScript programming language or how React, Redux, and SVG work to follow this series. However, if you do so, you will have an easier time to grasp the different topics and how they fit together.
Nevertheless, this series includes links to relevant articles, posts, and documents that provide better explanations of topics that deserve more attention.
Before Starting
Although the previous section has not mentioned anything about Git, this is a good tool to have around. All professional developers use Git (or another version control system like Mercurial or SVN) while developing, even for pet projects.
Why would you start creating a project and don't back it up? You don't even have to pay for it. You can use services like GitHub (the best!) or BitBucket (not bad, to be honest) and save your code to trustworthy cloud infrastructures.
Besides assuring that your code will remain safe, tools like that facilitate grasping the development process. For example, if you are using Git and you create a new buggy version of your app, you can easily move back to the previous code with just a few commands.
Another great advantage is that you can follow each section of this series and commit the code developed on them in separately. This will allow you to easily see the changes proposed by these sections, making your life easier while learning through tutorials like this one.
So, do yourself a favor and install Git. Also, create an account on GitHub (if you don't have one yet) and a repository to save your project. Then, after finishing each section, commit changes to this repository. Oh, and don't forget to push these changes.
Bootstrapping a React Project with Create-React-App
The very first thing you will do to create a game with React, Redux, and SVG is to use create-react-app to bootstrap your project. As you probably know (it doesn't matter if you don't), create-react-app is an open-source tool, maintained by Facebook, that helps developers to start developing in React in no time. Having Node.js and NPM installed locally (the latter has to be 5.2 and higher), you can use create-react-app without even installing it:
# using npx will download (if needed)
# create-react-app and execute it
npx create-react-app aliens-go-home

# change directory to the new project
cd aliens-go-home
This tool will create a structure similar to the following one:
|- node_modules
|- public
  |- favicon.ico
  |- index.html
  |- manifest.json
|- src
  |- App.css
  |- App.js
  |- App.test.js
  |- index.css
  |- index.js
  |- logo.svg
  |- registerServiceWorker.js
|- .gitignore
|- package.json
|- package-lock.json
|- README.md
The create-react-app tool is popular, well documented, and well supported by the community. As such, if you are interested in learning its details, you can check the official create-react-app GitHub repository and its user guides.
Right now, what you will want to do is to remove some stuff that you won't need. For example, you can get rid of the following files:
App.css: theAppcomponent is important but the styles definitions will be delegated to other components;App.test.js: tests might be addressed in another article, but you won't use it for now;logo.svg: you won't use React's logo in this game;
Removing these files will probably generate an error if you try to execute your project. This is easily solved by removing two import statements from the ./src/App.js file:
// remove both lines from ./src/App.js
import logo from './logo.svg';
import './App.css';
And by refactoring the render() method to:
// ... import statement and class definition
render() {
  return (
    <div className="App">
      <h1>We will create an awesome game with React, Redux, and SVG!</h1>
    </div>
  );
}

// ... closing bracket and export statement
Don't forget to commit your files to Git!
Installing Redux and PropTypes
After bootstrapping the React project and removing the useless files from it, you will want to install and configure Redux to be the single source of truth on your application. You will also want to install PropTypes as this tool helps avoiding common mistakes. Both tools can be installed in a single command:
npm i redux react-redux prop-types
As you can see, the command above includes a third NPM package: react-redux. Although you could use Redux directly with React, this is not recommended. The react-redux package does some performance optimizations that would be cumbersome to handle manually.
Configuring Redux and Using PropTypes
With these packages in place, you can configure your app to use Redux. The process is simple, you will need to create a container component, a presentational component, and a reducer. The difference between container components and presentational components is that the first simply connects presentational components to Redux. The third element that you will create, a reducer, is the core component in a Redux store. This kind of component is responsible for getting actions triggered by events that occur in your application and applying functions to change state based on these actions.
If you are not familiar with these concepts, you can read this article to get a better explanation about presentational and container components and you can go through this practical Redux tutorial to learn about actions, reducers, and the store. Although learning about these concepts is highly recommended, you can still follow this series without reading about them.
You will be better off starting by creating the reducer, as this element does not depend on the others (actually, it's the other way around). To keep things organized, you can create a new directory called reducers, inside the src directory, and add to it a file called index.js. This file can contain the following source code:
const initialState = {
  message: `It's easy to integrate React and Redux, isn't it?`,
};

function reducer(state = initialState) {
  return state;
}

export default reducer;
For now, your reducer will simply initialize the app's state with a message saying that it's easy to integrate React and Redux. Soon, you will start defining actions and handling them in this file.
Next, you can refactor the App component to show this message to users. As you installed prop-types, it's a good time to start using it as well. To achieve this, open the ./src/App.js file and replace its contents with the following:
import React, {Component} from 'react';
import PropTypes from 'prop-types';

class App extends Component {
  render() {
    return (
      <div className="App">
        <h1>{this.props.message}</h1>
      </div>
    );
  }
}

App.propTypes = {
  message: PropTypes.string.isRequired,
};

export default App;
As you can see, defining what types your component is expecting is very easy with prop-types. You just have to define the propTypes property of the App component with the props that it needs. There are a few cheat sheets around the web (like this one, this one, and this one) that summarize how to create basic and advanced prop-types definitions. If needed, refer to them.
Even though you have defined what the App component needs to render and what is the initial state of your Redux store, you still need a way to tie these elements together. That's exactly what container components do. To define a container in an organized fashion, you will want to create a directory called containers inside the src directory. Then, you can create a container called Game inside a file called Game.js in this new directory. This container will use the connect utility from react-redux to pass the state.message to the message props of the App component:
import { connect } from 'react-redux';

import App from '../App';

const mapStateToProps = state => ({
  message: state.message,
});

const Game = connect(
  mapStateToProps,
)(App);

export default Game;
You are almost done now. The last step to integrate everything together is to refactor the ./src/index.js file to initialize the Redux store and to pass it to the Game container (which will then fetch the message and pass to App). The following code shows how your ./src/index.js file will look like after the refactoring:
import React from 'react';
import ReactDOM from 'react-dom';
import { Provider } from 'react-redux';
import { createStore } from 'redux';
import './index.css';
import Game from './containers/Game';
import reducer from './reducers';
import registerServiceWorker from './registerServiceWorker';

/* eslint-disable no-underscore-dangle */
const store = createStore(
    reducer, /* preloadedState, */
    window.__REDUX_DEVTOOLS_EXTENSION__ && window.__REDUX_DEVTOOLS_EXTENSION__(),
);
/* eslint-enable */

ReactDOM.render(
    <Provider store={store}>
        <Game />
    </Provider>,
    document.getElementById('root'),
);
registerServiceWorker();
You are done! To see everything working, you can head to the project root and run npm start. This will run your app in development mode and open it in your default browser.
“It's easy to integrate React and Redux.”
Tweet This
Creating SVG Components with React
As you will see in this series, creating SVG components with React is quite easy. In reality, there is almost no difference between creating a React component with HTML and with SVG. Basically, the only differences are that SVG introduces new elements and that these elements are drawn in an SVG canvas.
Nevertheless, before creating your components with SVG and React, a quick overview of SVG may be useful.
Quick Overview of SVG
SVG is one of the coolest and flexible web standards. SVG, which stands for Scalable Vector Graphics, is a markup language that allows developers to describe two-dimensional based vector graphics. SVG is pretty similar to HTML. Both technologies are XML-based markup languages and work well with other web standards like CSS and the DOM. This means that you can apply CSS rules to SVG elements just like you would do with HTML elements, including animations.
Throughout this series, you will create more than a dozen SVG components with React. You will even compose (group) SVG elements to form your game elements (like the cannon that shoots cannon balls).
A thorough explanation about SVG is out of scope and would make this series too lengthy. So, if you are looking forward to learning the details of the SVG markup language, you can take a look at the SVG Tutorial provided by Mozilla and at this article about the SVG coordinate system.
However, prior to start creating your components, there a few SVG characteristics that are important to understand. First, SVG and DOM enable developers to accomplish great things when combined. This makes using SVG with React very easy.
Second, the SVG coordinate system is similar to the Cartesian plane but upside-down. This means that negative vertical values are, by default, shown above the X-axis. The horizontal values, on the other hand, are just like the Cartesian plane (i.e. negative values are shown to the left of the Y-axis). This behavior could be easily changed by applying a transformation to the SVG canvas. However, in order not to confuse other developers, it's better to stick with the default. You will soon get used to it.
The third and last characteristic that you need to know is that SVG introduces a lot of new elements (e.g. circle, rect, and path). To use these elements, you cannot simply define them inside an HTML element. First, you must define an svg element (your canvas) where you will draw all your SVG components.
SVG, Path Elements, and Cubic Bezier Curves
Drawing elements with SVG can be accomplished in three ways. First, you can use basic elements like rect, circle, and line. These elements are not very flexible, though. As their names state, they simply allow you to draw some simple shapes.
The second way is to combine these basic elements to form more complex shapes. For example, you could use a rect with equals sides (this would be a square) and two lines to form the shape of a house. However, this approach is still limited.
The third and more flexible way is to use path elements. This kind of element allows developers to create fairly complex shapes. It does that by accepting a set of commands that instruct the browser how to draw a shape. For example, to draw an "L", you could create a path element that contains three commands:
M 20 20: this command instructs the browser to move its "pen" to the X and Y coordinates defined afterM(i.e.20, 20);V 80: this command instructs the browser to draw a line from the previous point to the position80in the Y-axis;H 50: this command instructs the browser to draw a line from the previous point to the position50in the X-axis;
<svg>
  <path d="M 20 20 V 80 H 50" stroke="black" stroke-width="2" fill="transparent" />
</svg>
The path element accepts many other commands. Among of them, one of the most important is the Cubic Bezier Curves command. This command allows you to add some smooth curves in your path by taking two reference points and two control points.
From the Mozilla tutorial, this is how Cubic Bezier Curves work on SVG:
"Cubic Bezier curves take in two control points for each point. Therefore, to create a cubic Bezier curve, you need to specify three sets of coordinates. The last set of coordinates are where you want the line to end. The other two are control points. [...]. The control points essentially describe the slope of your line starting at each point. The Bezier function then creates a smooth curve that transfers you from the slope you established at the beginning of your line, to the slope at the other end." —Mozilla Developer Network
For example, to draw an "U", you can proceed as follows:
<svg>
  <path d="M 20 20 C 20 110, 110 110, 110 20" stroke="black" fill="transparent"/>
</svg>
In this case, the commands passed to the path element tell the browser:
- to start drawing on the point
20, 20; - that the first control point lies on the point
20, 110; - that the second control point lies on the point
110, 110; - to finish the curve on the point
110 20;
If you still don't understand exactly how Cubic Bezier curves work, don't worry. You will have the opportunity to practice during this series. Besides that, you can find a lot of tutorials on the web about this feature and you can always practice in tools like JSFiddle and Codepen.
Creating the Canvas React Component
Now that you have your project structured and that you know the basic stuff about SVG, it's time to start creating your game. The first element that you will need to create is the SVG canvas that you will use to draw the elements of the game.
This component will behave as a presentational component. As such, you can create a directory called components, inside the ./src directory, to hold this new component and its siblings. Since this will be your canvas, nothing more natural than calling it Canvas. Therefore, create a new file called Canvas.jsx inside the ./src/components/ directory and add the following code:
import React from 'react';

const Canvas = () => {
  const style = {
    border: '1px solid black',
  };
  return (
    <svg
      id="aliens-go-home-canvas"
      preserveAspectRatio="xMaxYMax none"
      style={style}
    >
      <circle cx={0} cy={0} r={50} />
    </svg>
  );
};

export default Canvas;
With this file in place, you will want to refactor the App component to use your Canvas:
import React, {Component} from 'react';
import Canvas from './components/Canvas';

class App extends Component {
  render() {
    return (
      <Canvas />
    );
  }
}

export default App;
If your run (npm start) and check your application, you will see that the browser draws just a quarter of this circle. This happens because, by default, the origin axis is rendered in the top left corner of the window. Besides that, you will also see that the svg element does not fit the entire screen.
To make things more interesting and easier to manage, you can make your canvas fit the entire screen. You will also want to reposition its origin to be on the center the X-axis and to be near the bottom (you will add your cannon to the origin in a little while). To do both, you will need to change two files: ./src/components/Canvas.jsx and ./src/index.css.
You can start by replacing the contents of the Canvas component with the following code:
import React from 'react';

const Canvas = () => {
  const viewBox = [window.innerWidth / -2, 100 - window.innerHeight, window.innerWidth, window.innerHeight];
  return (
    <svg
      id="aliens-go-home-canvas"
      preserveAspectRatio="xMaxYMax none"
      viewBox={viewBox}
    >
      <circle cx={0} cy={0} r={50} />
    </svg>
  );
};

export default Canvas;
In this new version, you have defined the viewBox attribute of the svg element. What this attribute does is to define that your canvas and its contents must fit a particular container (in this case the inner area of the window/browser). As you can see, viewBox attributes are made of four numbers:
min-x: This value defines what is the leftmost point that your users will see. So, to make the origin axis (and the circle) appear in the center of the screen, you divided your screen width by negative two (window.innerWidth / -2) to the get this attribute (min-x). Note that you need to use-2to make your canvas show the same amount of points to the left (negative) and to the right (positive) of the origin.min-y: This value defines what will be the uppermost point of your canvas. Here, you have subtracted thewindow.innerHeightfrom100to give some area (100points) after the Y origin.widthandheight: These are the values that define how many X and Y points your users will see on their screen.
Besides defining the viewBox attribute, you have also defined an attribute called preserveAspectRatio in this new version. You have used xMaxYMax none on it to force uniform scaling of your canvas and its elements.
After refactoring your canvas, you will need to add the following rule to the ./src/index.css file:
/* ... body definition ... */

html, body {
  overflow: hidden;
  height: 100%;
}
This will make both the html and body elements hide (and disable) scrolling. It will also make these elements fit the entire screen.
If you check your app now, you will see your circle horizontally centered in the screen and near the bottom.
Creating the Sky React Component
After making your canvas fit the entire screen and repositioning the origin axis to the center of it, it's time to start creating real game elements. You can start by defining the element that will act as the background of your game, the sky. For that, create a new file called Sky.jsx in the ./src/components/ directory with the following code:
import React from 'react';

const Sky = () => {
  const skyStyle = {
    fill: '#30abef',
  };
  const skyWidth = 5000;
  const gameHeight = 1200;
  return (
    <rect
      style={skyStyle}
      x={skyWidth / -2}
      y={100 - gameHeight}
      width={skyWidth}
      height={gameHeight}
    />
  );
};

export default Sky;
You might be wondering why you are setting your game with such a huge area (width of 5000 and height of 1200). Actually, the width is not important in this game. You just have to set it to a number that is high enough to cover any screen size.
Now, the height is important. Soon, you will force your canvas to show this 1200 points, no matter what is the resolution and orientation of your users. This will give your game consistency and you will know that all users will see the same area in your game. As such, you will be able to define where the flying discs will appear and how long they will take to go through these points.
To make the canvas element show your new sky, open the Canvas.jsx file in your editor and refactor it like that:
import React from 'react';
import Sky from './Sky';

const Canvas = () => {
  const viewBox = [window.innerWidth / -2, 100 - window.innerHeight, window.innerWidth, window.innerHeight];
  return (
    <svg
      id="aliens-go-home-canvas"
      preserveAspectRatio="xMaxYMax none"
      viewBox={viewBox}
    >
      <Sky />
      <circle cx={0} cy={0} r={50} />
    </svg>
  );
};

export default Canvas;
If you check your app now (npm start), you will see that your circle is still centered and near the bottom and that now you have a blue (fill: '#30abef') background color.
Note: If you add the
Skyelement after thecircleelement, you won't be able to see the latter anymore. This happens because SVG does not supportz-index. SVG relies on the order that the elements are listed to decide which one is above the other. That is, you have to define thecircleelement after theSkyso web browsers know that they must show it above the blue background.
Creating the Ground React Component
After creating the Sky element, the next one that you can create is the Ground element. To do that, create a new file called Ground.jsx in the ./src/components/ directory and add the following code:
import React from 'react';

const Ground = () => {
  const groundStyle = {
    fill: '#59a941',
  };
  const division = {
    stroke: '#458232',
    strokeWidth: '3px',
  };

  const groundWidth = 5000;

  return (
    <g id="ground">
      <rect
        id="ground-2"
        data-name="ground"
        style={groundStyle}
        x={groundWidth / -2}
        y={0}
        width={groundWidth}
        height={100}
      />
      <line
        x1={groundWidth / -2}
        y1={0}
        x2={groundWidth / 2}
        y2={0}
        style={division}
      />
    </g>
  );
};

export default Ground;
There is nothing fancy about this element. It's just a composition of a rect element and a line. However, as you may have noted, this element also uses a constant with the value of 5000 to define its width. Therefore, it might be a good idea to create a file to keep some global constants like this one.
As such, create a new directory called utils inside the ./src/ directory and, inside this new directory, create a file called constants.js. For now, you can add a single constant to it:
// very wide to provide as full screen feeling
export const skyAndGroundWidth = 5000;
After that, you can refactor both the Sky element and the Ground element to use this new constant.
To wrap this section, don't forget to add the Ground element to your canvas (keep in mind that you need to add it between the Sky and the circle elements). If you have any doubt about how to do these last steps, please take a look at this commit.
Creating the Cannon React Component
You already have the sky and the ground elements defined in your game. Next, you will want to add something more interesting. Perhaps, you can add the elements that will represent your cannon. These elements will be a little bit more complex than the other two elements defined before. They will have many more lines of source code, but this is due to the fact that you will need Cubic Bezier curves to draw them.
As you might remember, defining a Cubic Bezier curve on SVG depends on four points: the starting point, the ending point, and two control points. These points, which are defined in the d property of a path element, look like this: M 20 20 C 20 110, 110 110, 110 20.
To avoid repeating similar template literals in your code to create these curves, you can create a new file called formulas.js in the ./src/utils/ directory and add a function that returns this string based on some parameters:
export const pathFromBezierCurve = (cubicBezierCurve) => {
  const {
    initialAxis, initialControlPoint, endingControlPoint, endingAxis,
  } = cubicBezierCurve;
  return `
    M${initialAxis.x} ${initialAxis.y}
    c ${initialControlPoint.x} ${initialControlPoint.y}
    ${endingControlPoint.x} ${endingControlPoint.y}
    ${endingAxis.x} ${endingAxis.y}
  `;
};
This code is quite simple, it just extracts four attributes (initialAxis, initialControlPoint, endingControlPoint, endingAxis) from a parameter called cubicBezierCurve and passes them to a template literal that builds the Cubic Bezier curve representation.
With this file in place, you can start creating your cannon. To keep things more organized, you can divide your cannon into two parts: the CannonBase and the CannonPipe.
To define the CannonBase, create a new file called CannonBase.jsx inside ./src/components and add the following code to it:
import React from 'react';
import { pathFromBezierCurve } from '../utils/formulas';

const CannonBase = (props) => {
  const cannonBaseStyle = {
    fill: '#a16012',
    stroke: '#75450e',
    strokeWidth: '2px',
  };

  const baseWith = 80;
  const halfBase = 40;
  const height = 60;
  const negativeHeight = height * -1;

  const cubicBezierCurve = {
    initialAxis: {
      x: -halfBase,
      y: height,
    },
    initialControlPoint: {
      x: 20,
      y: negativeHeight,
    },
    endingControlPoint: {
      x: 60,
      y: negativeHeight,
    },
    endingAxis: {
      x: baseWith,
      y: 0,
    },
  };

  return (
    <g>
      <path
        style={cannonBaseStyle}
        d={pathFromBezierCurve(cubicBezierCurve)}
      />
      <line
        x1={-halfBase}
        y1={height}
        x2={halfBase}
        y2={height}
        style={cannonBaseStyle}
      />
    </g>
  );
};

export default CannonBase;
Besides the Cubic Bezier curve, there is nothing new about this element. In the end, the browser will render this element as a curve with a dark brown (#75450e) stroke and will add a light brown (#a16012) color to its background.
The code to create the CannonPipe will be similar to the CannonBase code. The differences are that it will use other colors and it will pass other points to the pathFromBezierCurve formula to draw the pipe. Besides that, this element will make use of the transform attribute to simulate the cannon rotation.
To create this element, add the following code to a new file called CannonPipe.jsx inside the ./src/components/ directory:
import React from 'react';
import PropTypes from 'prop-types';
import { pathFromBezierCurve } from '../utils/formulas';

const CannonPipe = (props) => {
  const cannonPipeStyle = {
    fill: '#999',
    stroke: '#666',
    strokeWidth: '2px',
  };
  const transform = `rotate(${props.rotation}, 0, 0)`;

  const muzzleWidth = 40;
  const halfMuzzle = 20;
  const height = 100;
  const yBasis = 70;

  const cubicBezierCurve = {
    initialAxis: {
      x: -halfMuzzle,
      y: -yBasis,
    },
    initialControlPoint: {
      x: -40,
      y: height * 1.7,
    },
    endingControlPoint: {
      x: 80,
      y: height * 1.7,
    },
    endingAxis: {
      x: muzzleWidth,
      y: 0,
    },
  };

  return (
    <g transform={transform}>
      <path
        style={cannonPipeStyle}
        d={pathFromBezierCurve(cubicBezierCurve)}
      />
      <line
        x1={-halfMuzzle}
        y1={-yBasis}
        x2={halfMuzzle}
        y2={-yBasis}
        style={cannonPipeStyle}
      />
    </g>
  );
};

CannonPipe.propTypes = {
  rotation: PropTypes.number.isRequired,
};

export default CannonPipe;
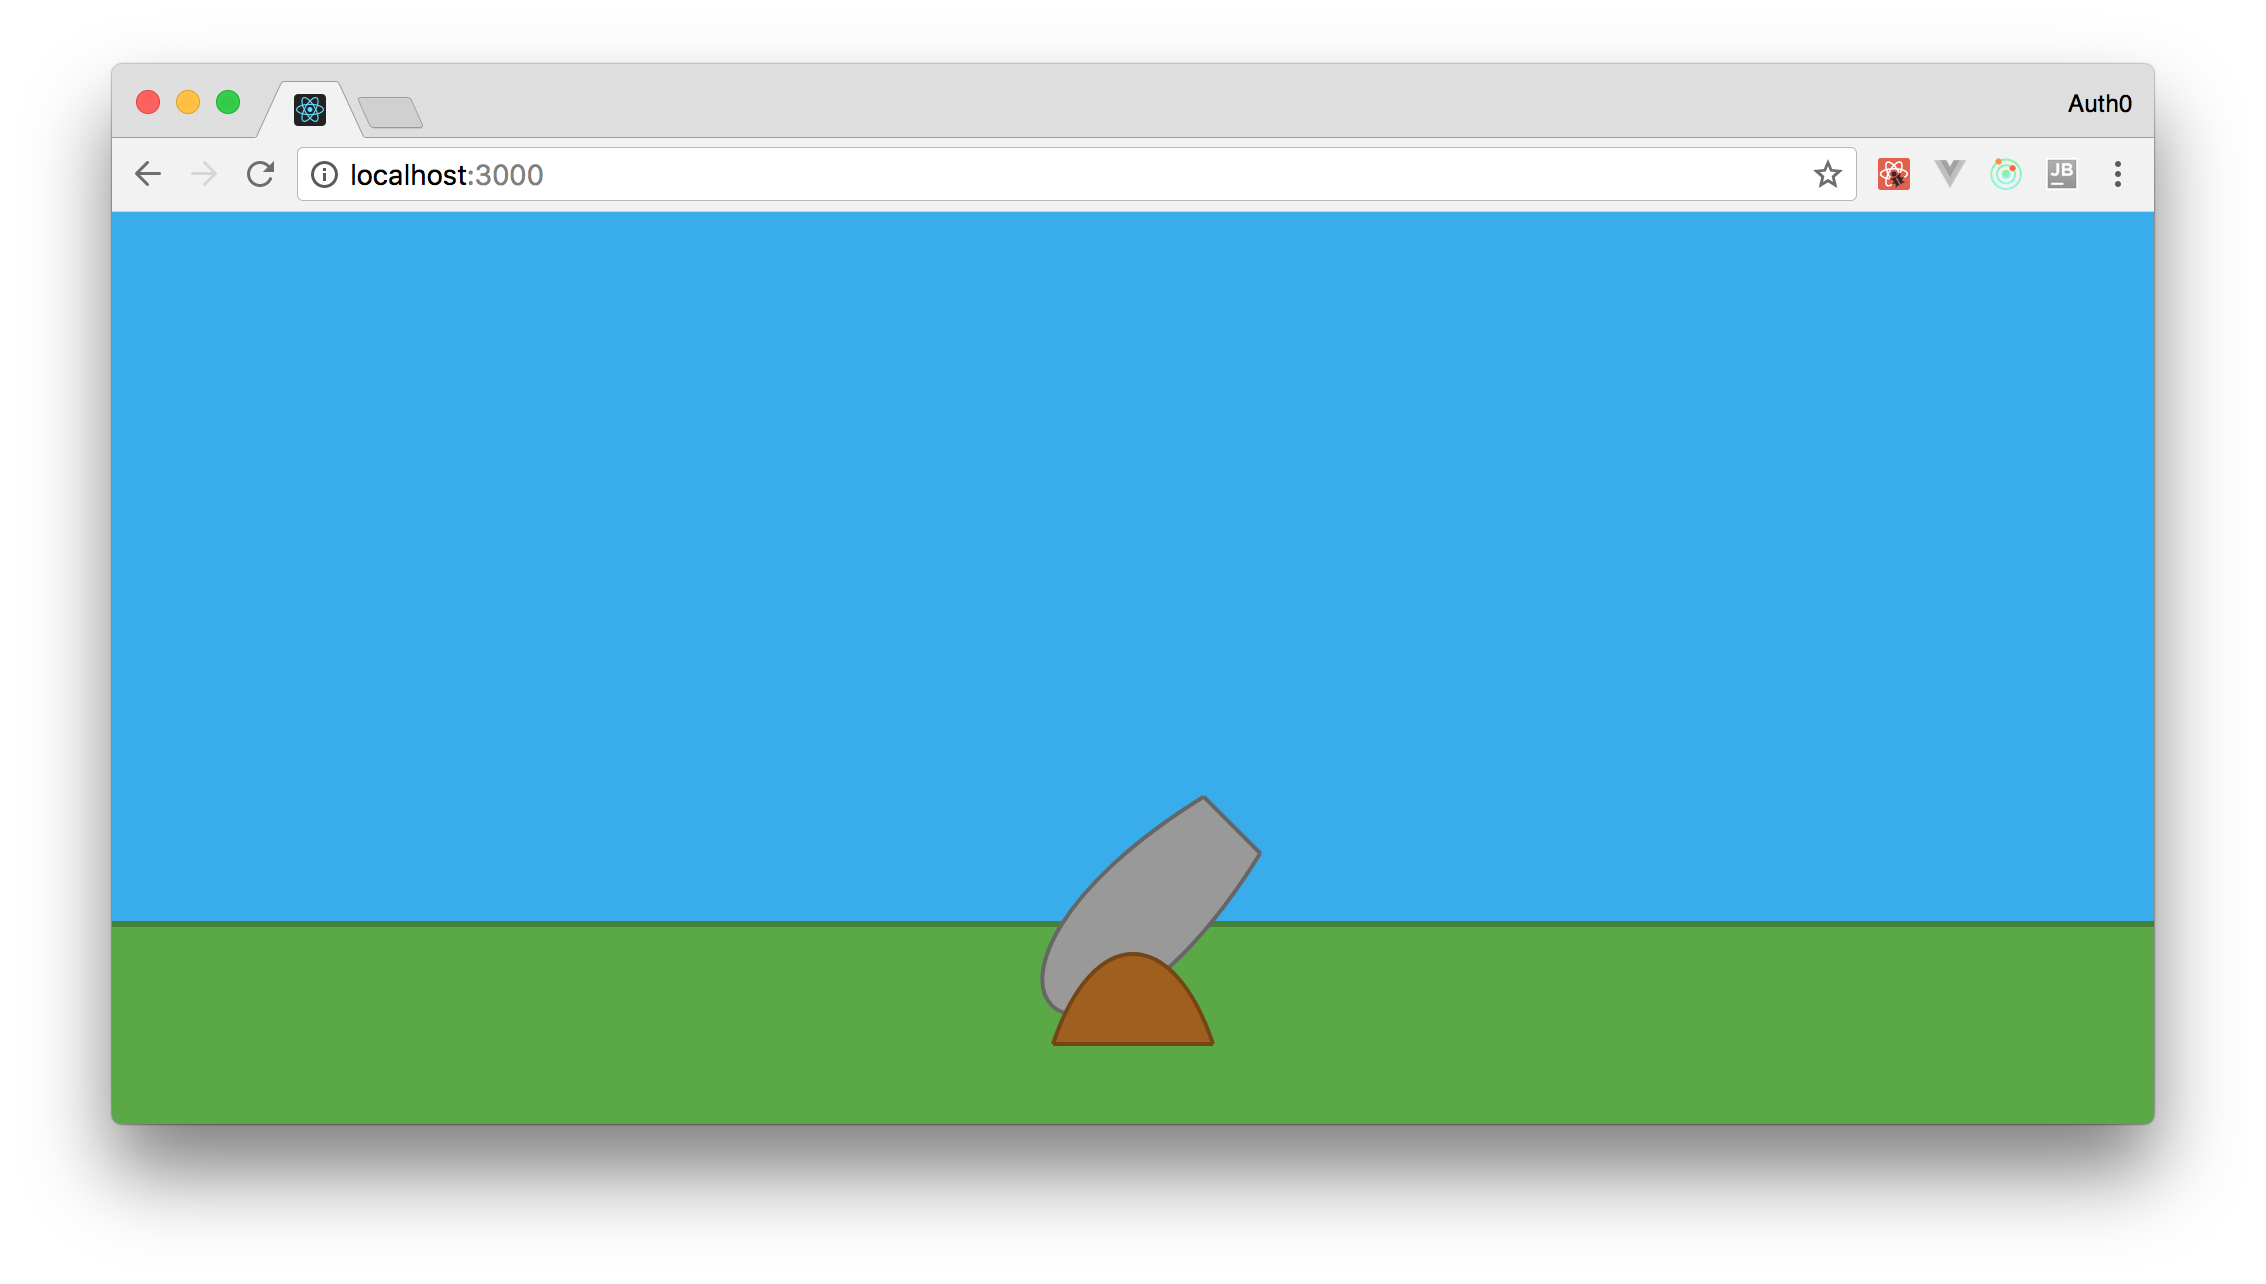
After that, remove the circle element from your canvas and add both the CannonBase and the CannonPipe to it. The following code is what you will have after refactoring your canvas:
import React from 'react';
import Sky from './Sky';
import Ground from './Ground';
import CannonBase from './CannonBase';
import CannonPipe from './CannonPipe';

const Canvas = () => {
  const viewBox = [window.innerWidth / -2, 100 - window.innerHeight, window.innerWidth, window.innerHeight];
  return (
    <svg
      id="aliens-go-home-canvas"
      preserveAspectRatio="xMaxYMax none"
      viewBox={viewBox}
    >
      <Sky />
      <Ground />
      <CannonPipe rotation={45} />
      <CannonBase />
    </svg>
  );
};

export default Canvas;
Running and checking your application now will bring an app that shows the following vector graphics:
Making the Cannon Aim
Your game is gaining ground. You have created the background elements (Sky and Ground) and your cannon. The problem now is that everything is inanimate. So, to make things interesting, you can focus on making your cannon aim. To do that, you could add the onmousemove event listener to your canvas and make it refresh on every event triggered (i.e. every time a user moves the mouse), but this would degrade the performance of your game.
To overcome this situation, what you can do is to set an uniform interval that checks the last mouse position to update the angle of your CannonPipe element. You are still going to use the onmousemove event listener in this strategy, the difference is that these events won't trigger a re-render. They will only update a property in your game and then the interval will use this property to trigger a re-render (by updating the Redux store).
This is the first time that you will need a Redux action to update the state of your app (or the angle of your cannon). As such, you need to create a new directory called actions inside the ./src/ directory. In this new directory, you will need to create a file called index.js with the following code:
export const MOVE_OBJECTS = 'MOVE_OBJECTS';

export const moveObjects = mousePosition => ({
  type: MOVE_OBJECTS,
  mousePosition,
});
Note: You are going to call this action
MOVE_OBJECTSbecause you won't use it to update the cannon only. In the next parts of this series, you will also use this same action to move cannon balls and flying objects.
After defining this Redux action, you will have to refactor your reducer (the index.js file inside ./src/reducers/) to deal with it:
import { MOVE_OBJECTS } from '../actions';
import moveObjects from './moveObjects';

const initialState = {
  angle: 45,
};

function reducer(state = initialState, action) {
  switch (action.type) {
    case MOVE_OBJECTS:
      return moveObjects(state, action);
    default:
      return state;
  }
}

export default reducer;
The new version of this file takes an action and, if its type is MOVE_OBJECTS, it calls a function called moveObjects. You still have to define this function but, before that, note that this new version also defines the initial state of your app to include a property called angle with the value 45. This is the angle that your cannon will be aiming when your app starts.
As you will see, the moveObjects function is also a Redux reducer. You will define this function in a new file because your game will have a good number of reducers and you want to keep things maintainable and organized. Therefore, create the moveObjects.js file inside the ./src/reducers/ and add the following code to it:
import { calculateAngle } from '../utils/formulas';

function moveObjects(state, action) {
  if (!action.mousePosition) return state;
  const { x, y } = action.mousePosition;
  const angle = calculateAngle(0, 0, x, y);
  return {
    ...state,
    angle,
  };
}

export default moveObjects;
This code is quite simple, it just extracts the x and y properties from mousePosition and passes them to the calculateAngle function to get the new angle. Then, in the end, it generates a new state with the new angle.
Now, you probably noticed that you haven't defined a calculateAngle function in your formulas.js file, right? The math behind calculating an angle based on two points is out of scope here, but if you are interested, you can check this thread on StackExchange to understand how the magic happens. In the end, what you will need is to append the following functions to the formulas.js file (./src/utils/formulas):
export const radiansToDegrees = radians => ((radians * 180) / Math.PI);

// https://math.stackexchange.com/questions/714378/find-the-angle-that-creating-with-y-axis-in-degrees
export const calculateAngle = (x1, y1, x2, y2) => {
  if (x2 >= 0 && y2 >= 0) {
    return 90;
  } else if (x2 < 0 && y2 >= 0) {
    return -90;
  }

  const dividend = x2 - x1;
  const divisor = y2 - y1;
  const quotient = dividend / divisor;
  return radiansToDegrees(Math.atan(quotient)) * -1;
};
Note: The
atanfunction, provided by theMathJavaScript object, returns results in radians. You will need this value converted to degrees. That's why you have to define (and use) theradiansToDegreesfunction.
After defining both your new Redux action and your new Redux reducer, you will have to use them. As your game relies on Redux to manage its state, you need to map the moveObjects action to the props of your App. You will do this by refactoring the Game container. So, open the Game.js file (./src/containers) and replace its content with the following:
import { connect } from 'react-redux';

import App from '../App';
import { moveObjects } from '../actions/index';

const mapStateToProps = state => ({
  angle: state.angle,
});

const mapDispatchToProps = dispatch => ({
  moveObjects: (mousePosition) => {
    dispatch(moveObjects(mousePosition));
  },
});

const Game = connect(
  mapStateToProps,
  mapDispatchToProps,
)(App);

export default Game;
With these new mappings in place, you can focus on using them in the App component. So, open the App.js file (located at ./src/) and replace its contents with this:
import React, {Component} from 'react';
import PropTypes from 'prop-types';
import { getCanvasPosition } from './utils/formulas';
import Canvas from './components/Canvas';

class App extends Component {
  componentDidMount() {
    const self = this;
    setInterval(() => {
        self.props.moveObjects(self.canvasMousePosition);
    }, 10);
  }

  trackMouse(event) {
    this.canvasMousePosition = getCanvasPosition(event);
  }

  render() {
    return (
      <Canvas
        angle={this.props.angle}
        trackMouse={event => (this.trackMouse(event))}
      />
    );
  }
}

App.propTypes = {
  angle: PropTypes.number.isRequired,
  moveObjects: PropTypes.func.isRequired,
};

export default App;
You will notice that this new version introduces a lot of changes. The following list summarizes them:
componentDidMount: You have defined this lifecycle method to start the uniform interval that will trigger themoveObjectsaction.trackMouse: You have defined this method to update thecanvasMousePositionproperty of theAppcomponent. This property is used by themoveObjectsaction. Note that this property does not refer to the mouse position over the HTML document. It refers to a relative position inside your canvas. You will define thecanvasMousePositionfunction in a moment.render: This method now passes theangleproperty and thetrackMousemethod to yourCanvascomponent. This component will useangleto update the way it renders your cannon and thetrackMouseto attach as an event listener to thesvgelement. You will update this component in a while.App.propTypes: You now have two properties defined here,angleandmoveObjects. The first one,angle, refers to the angle that your cannon is aiming to. The second one,moveObjects, is the function that is going to be triggered on a uniform interval to update your cannon.
Now that you have updated your App component, you have to add the following function to the formulas.js file:
export const getCanvasPosition = (event) => {
  // mouse position on auto-scaling canvas
  // https://stackoverflow.com/a/10298843/1232793

  const svg = document.getElementById('aliens-go-home-canvas');
  const point = svg.createSVGPoint();

  point.x = event.clientX;
  point.y = event.clientY;
  const { x, y } = point.matrixTransform(svg.getScreenCTM().inverse());
  return {x, y};
};
If you are interested in why this is needed, this StackOverflow thread is a good reference.
The last piece of software that you need to update to make your cannon aim is the Canvas component. Open the Canvas.jsx file (located at ./src/components) and replace its contents with this:
import React from 'react';
import PropTypes from 'prop-types';
import Sky from './Sky';
import Ground from './Ground';
import CannonBase from './CannonBase';
import CannonPipe from './CannonPipe';

const Canvas = (props) => {
  const viewBox = [window.innerWidth / -2, 100 - window.innerHeight, window.innerWidth, window.innerHeight];
  return (
    <svg
      id="aliens-go-home-canvas"
      preserveAspectRatio="xMaxYMax none"
      onMouseMove={props.trackMouse}
      viewBox={viewBox}
    >
      <Sky />
      <Ground />
      <CannonPipe rotation={props.angle} />
      <CannonBase />
    </svg>
  );
};

Canvas.propTypes = {
  angle: PropTypes.number.isRequired,
  trackMouse: PropTypes.func.isRequired,
};

export default Canvas;
The differences between the previous version and the new one are:
CannonPipe.rotation: This property is not hard-coded anymore. Now, it's tied to the state provided by the Redux store (through yourAppmappings).svg.onMouseMove: You have added this event listener to your canvas to make yourAppcomponent aware of the mouse position.Canvas.propTypes: You have explicitly defined that this component needsangleandtrackMouseto be happy.
That's it! You are ready to see your cannon aiming feature in action. Go to your terminal, in the project root, and type npm start (if it's not running already). Then, open http://localhost:3000/ in a web browser and move the mouse around. You cannon will keep rotating to follow your mouse.
How fun is that!?
“I have created an animated cannon with React, Redux, and SVG! How fun is that!?”
Tweet This
Conclusion and Next Steps
In the first part of this series, you have learned about some important topics that will enable you to create the complete game. You have also used create-react-app to bootstrap your project and you have created some game elements like the cannon, the sky, and the ground. In the end, you have added the aiming feature to your cannon. With these elements in place, you are ready to create the rest of the React components and to make them animated.
In the next article of this series, you are going to create these components, then you are going to make some flying discs appear randomly in some predefined positions. After that, you will also make your cannon shoot some cannon balls. This will be awesome!
Stay tuned!
The community has translated this article into Russian. You can find part 1 here, part 2 here, and part 3 here.
About the author

Bruno Krebs
R&D Content Architect (Auth0 Alumni)