
TL;DR In this article, you will learn how to develop real-time web apps with Firebase and Firestore. In addition, you will learn how to use (and why to use) Auth0 as the authentication system in your Firebase apps. To get your feet wet on these technologies and on the integration, you will build a simple real-time web chat that will securely store messages on Firestore (a real-time database provided by Firebase), and that will enable users to authenticate through Auth0. If needed, you can find the final code developed through the article in this GitHub repository.
“Learn how to develop real-time web apps with Firebase and Firestore.”
Tweet This
Prerequisite
To follow along, you are supposed to have a basic understanding of Node.js and JavaScript. You'll use Node.js for the server-side and NPM as a package manager of your project. As such, you will need to have both software installed locally. If you don't have these tools installed, please, check this resource (NPM comes bundled with Node.js).
What is Firebase
Firebase is a platform which allows you to develop web and mobile applications quickly. This platform provides services that can be easily integrated into your project to provide certain functionalities. One of these services is Cloud Firestore, a flexible, scalable, and real-time NoSQL database provided by Google. You will use Firestore in this article to set up a real-time database for the chat application.
Why use Firebase and Auth0 Together?
One thing to notice is that Firebase does provide authentication features out of the box. However, as previously mentioned, you are going to configure Auth0 as the authentication method in your Firebase instance. Having that in mind, you are probably wondering what's the need of using an external authentication provider such as Auth0 with Firebase.
Using Auth0 to secure Firebase services doesn't necessarily mean that you won't be using Firebase authentication. As a matter of fact, Firebase offers a custom authentication approach using custom tokens which allows you to use your preferred identity provider to secure Firebase rather than the built-in authentication approach already provided by Firebase. So why would you want to use the custom authentication approach with Auth0 rather than Firebase's built-in authentication methods? There are multiple answers to this question:
- You may need to integrate a variety of social providers into your application besides the basic Google, Twitter, and Facebook social providers. Auth0 facilitates using hundreds of different social providers.
- You may need to gain more insight into users activity. Auth0 provides powerful reporting and analytics so you can see exactly what's going on.
- You may need a robust user management system.
- You may want to provide enhanced security for your application using features such as multi-factor authentication, breached password security, or anomaly detection.
- You may need to able to fully customize any stage of your authorization and authentication pipeline.
In summary, you should go for the custom authentication approach if your application requires a more robust and complex authentication method (which is usually the case). Thankfully, Firebase provides a way of integrating other authentication solutions into their services. You'll go through it in detail in this article.
“Using Auth0 as a custom authentication provider in your Firebase applications can make your app more robust.”
Tweet This
How can Firebase and Auth0 Work Together?
Making Firebase and Auth0 work together is, as you will see, quite simple. The whole flow starts by securing your application (no matter if you have a native app, a web app, a SPA, etc.) with Auth0. When your users authenticate through Auth0, as part of the authentication process, your app gets back tokens (idTokens and/or accessTokens) that it can use to issue requests to backend APIs that are also secured by Auth0. These APIs, while processing requests, get these tokens and validate them to check if they are really issued by a trusted provider (Auth0 in this case) and if they are not expired. If these tokens are valid, the API can then fulfill the request accordingly.
The flow above is what it usually happens when you have applications secure by Auth0. Now, to add Firebase to this recipe, what you need to do is to create an endpoint in your backend API (which is secured by Auth0) to generate custom Firebase tokens. Then, when your backend finishes creating these tokens, your client app will get them back and use them to authenticate to Firebase.
The magic here is that, as your backend API and your frontend client are secured by Auth0, your users will only be able to get custom Firebase tokens if they have authenticated through Auth0 first. If you are curious to see that in action, don't worry, you will implement the whole flow in a moment.
Setting up Firebase
In order to use Firebase, you'll need to sign up for a Firebase account. When you're done with that, the next thing you'll need to do is create a Firebase project. To do so, go to your Firebase console and click on Add Project. Clicking on it will make Firebase show you a form where you will have to define a name for your project (you can choose something like "Firestore Chat App") and tick two checkboxes. After doing so, click on the Create Project button.
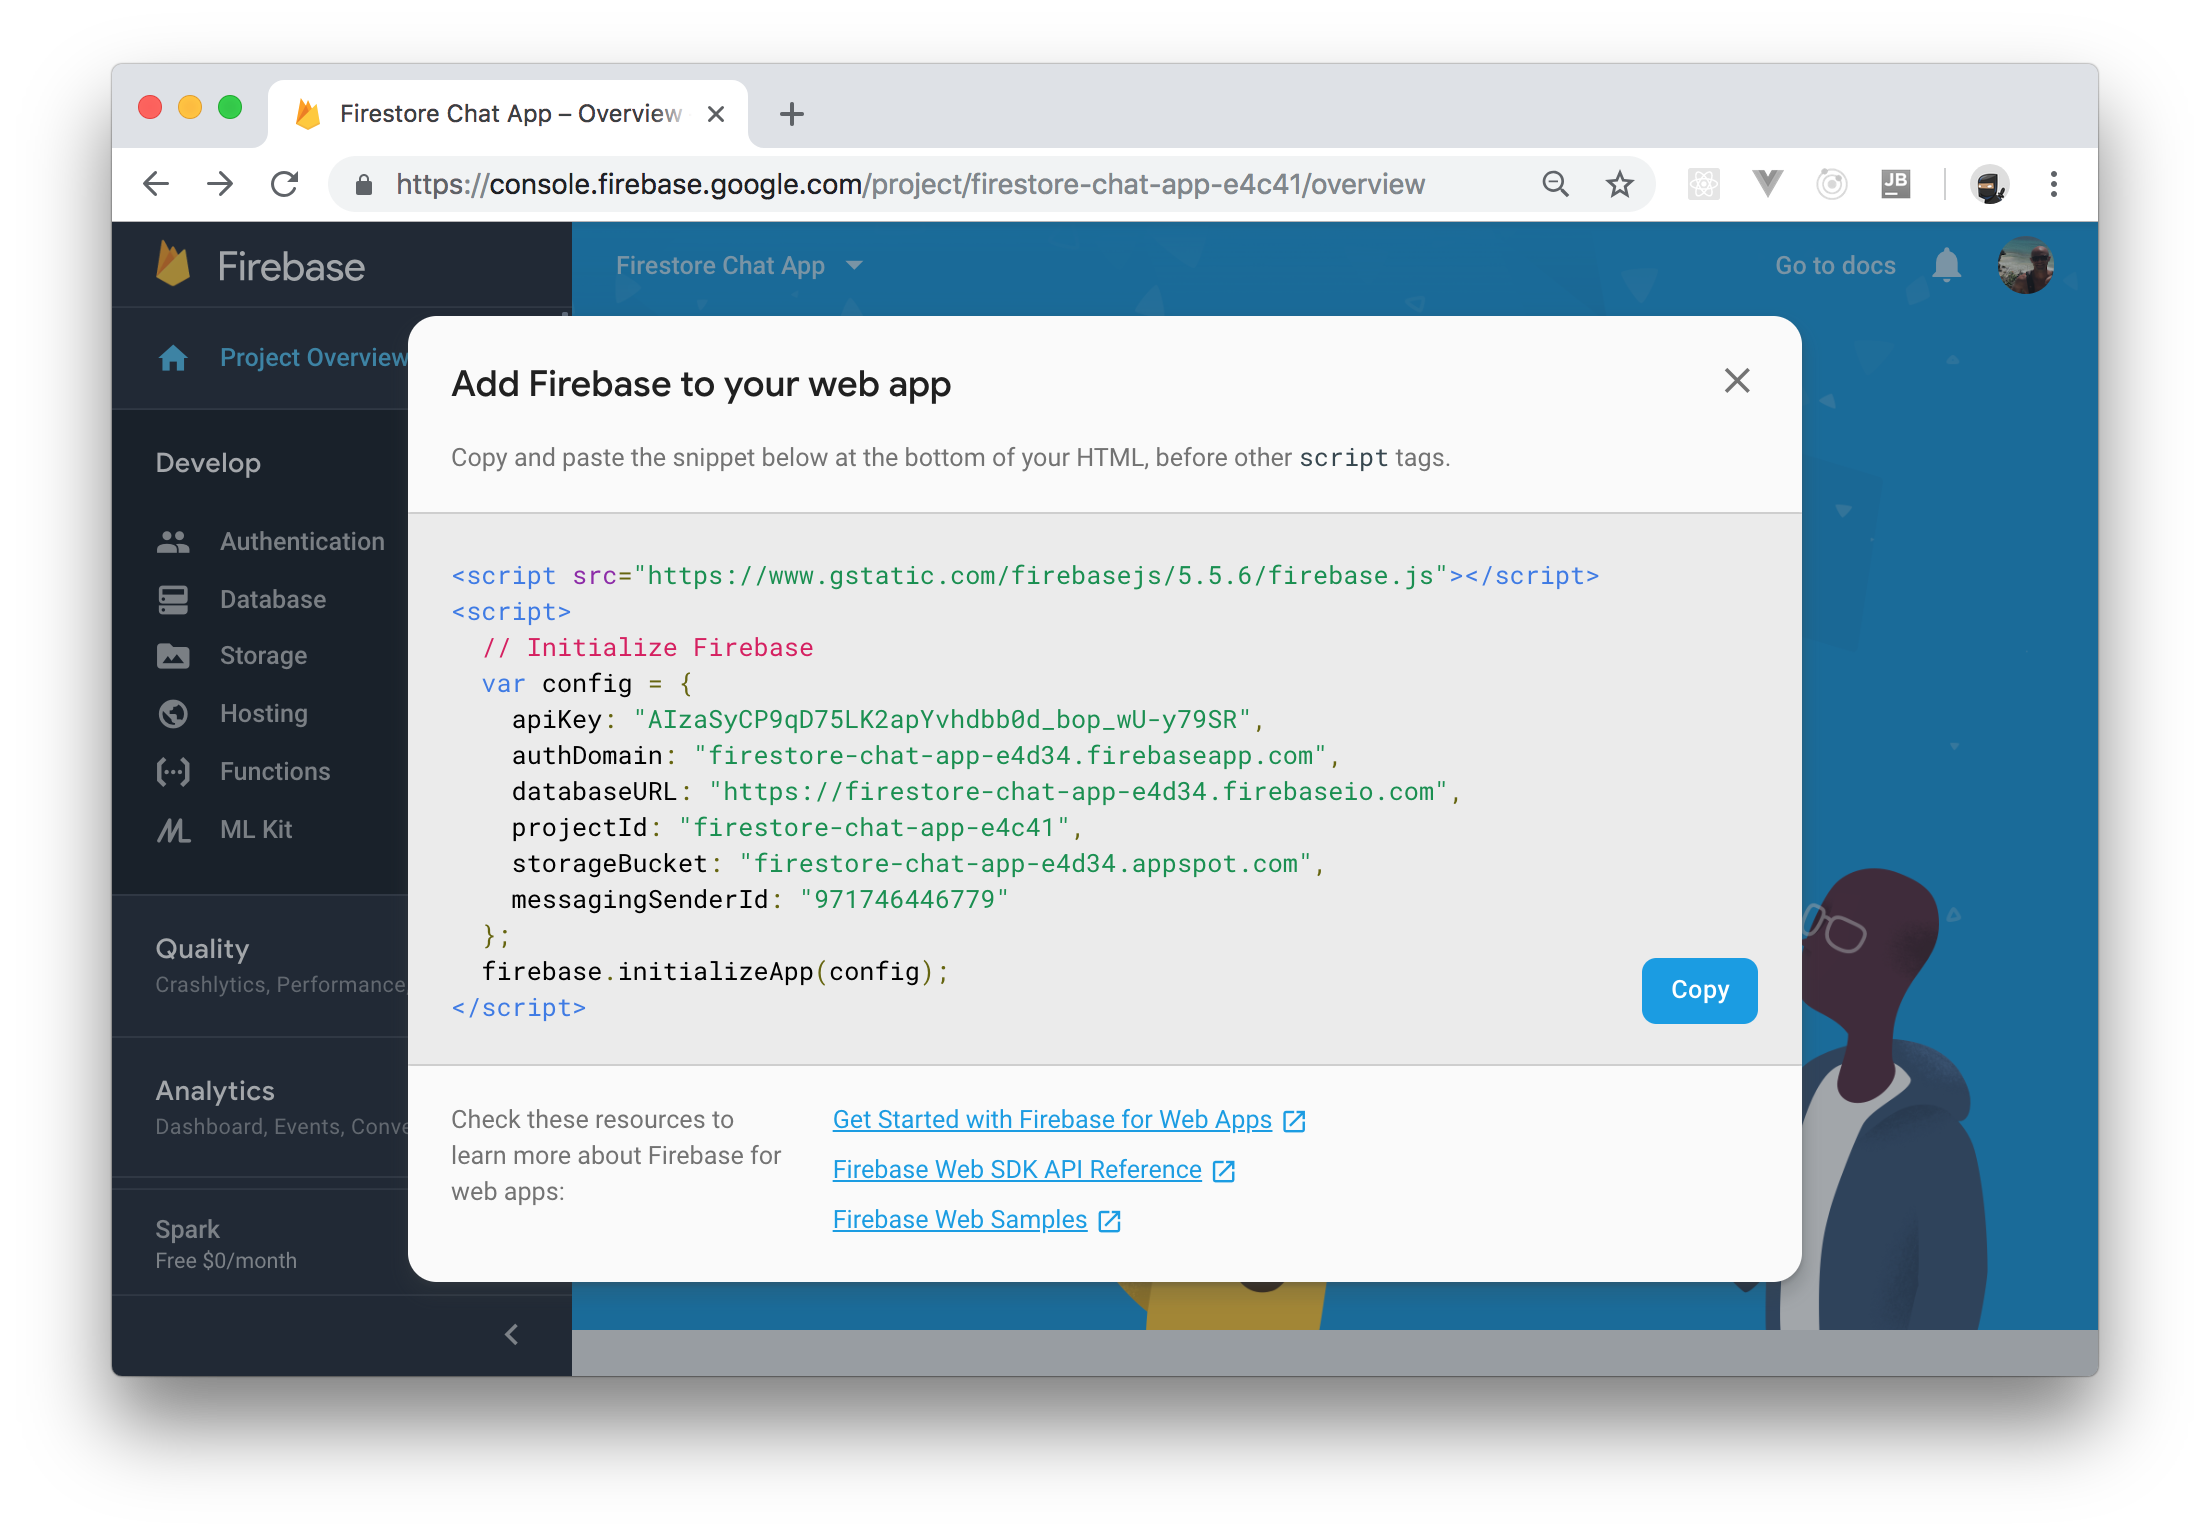
After a few seconds, Firebase will finish creating your project and will redirect you to the Project Overview page. From there, click on the button that looks like </> to make a popup appear with your Firebase properties. Copy the apiKey, authDomain, and projectId values from this popup and store them somewhere. You'll use them later on while configuring Firebase on the client app.
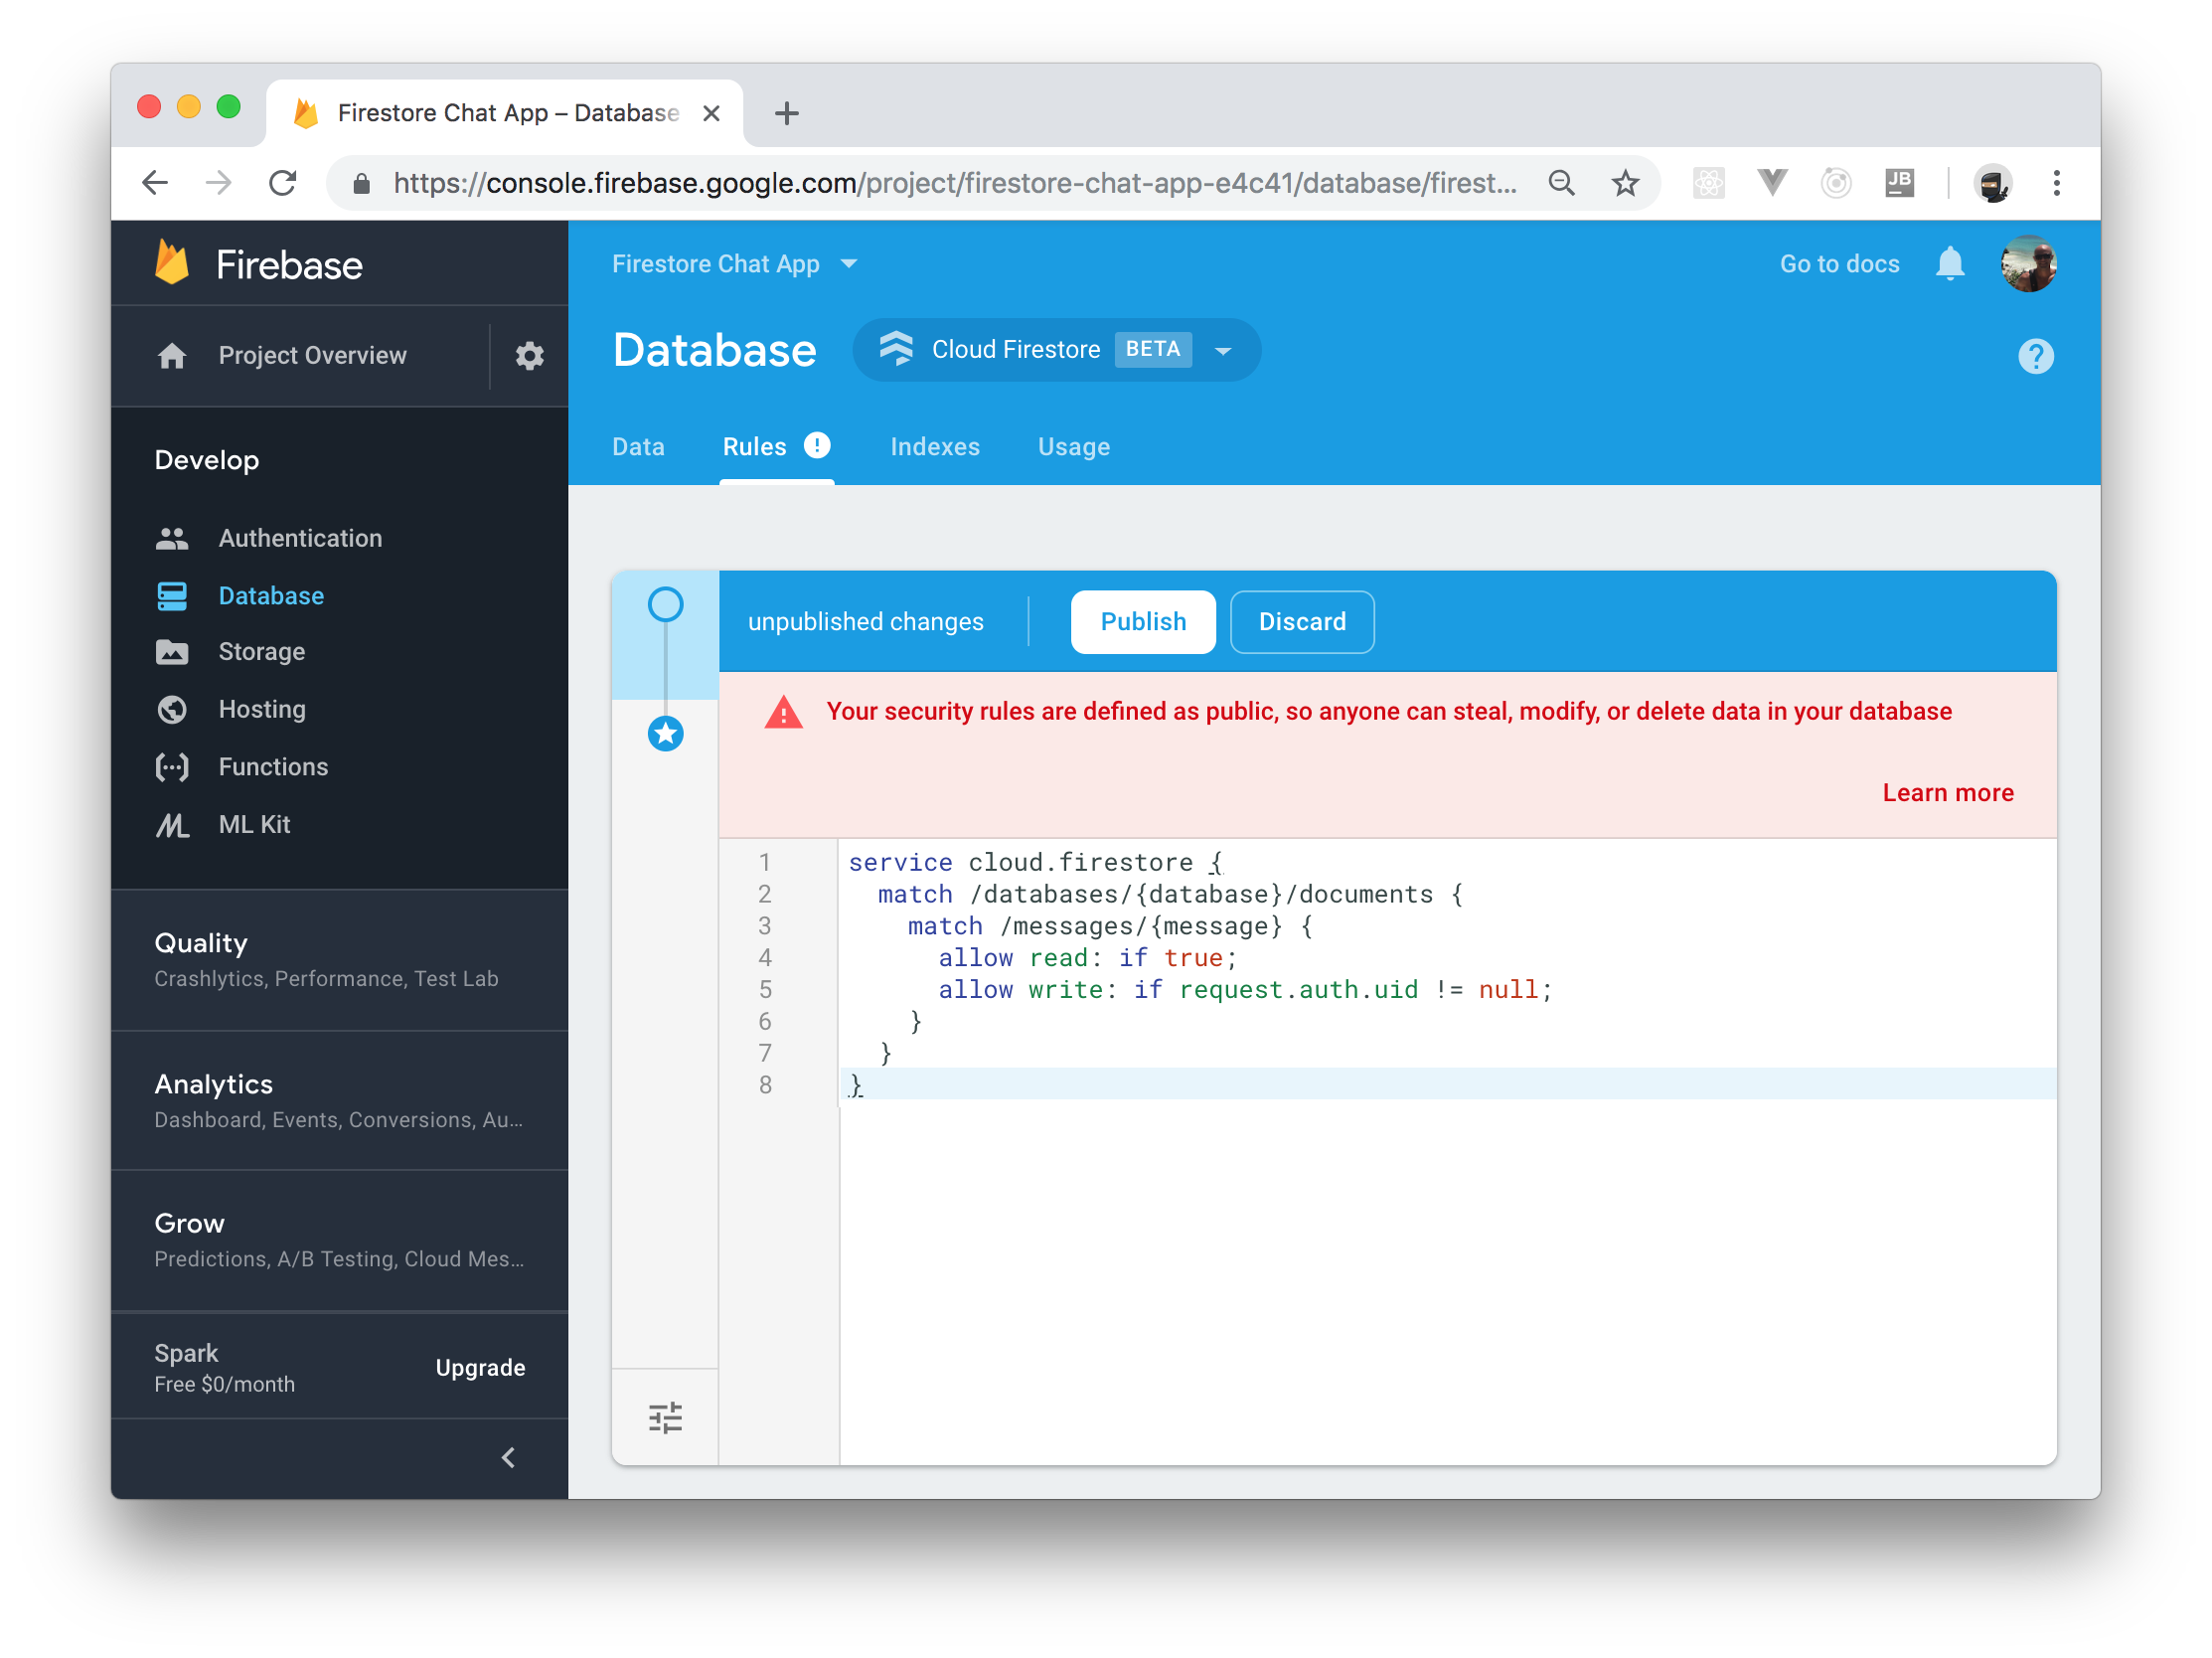
With that covered, you will have to configure Firestore. As mentioned, the client application that you will build will use Firestore to store chat messages. As such, you'll need to create a new database in your Firebase console. To do so, click on the Database option on the vertical menu. Then, click on the Create Database button, select the Start in test mode option, and click Enable. A few seconds will pass and you will have your Firestore database ready to be used.
Then, to secure your Firestore database, you will have to move to the Rules section of your new Firestore database and replace the default rule with this:
service cloud.firestore {
  match /databases/{database}/documents {
    match /messages/{message} {
      allow read: if true;
      allow write: if request.auth.uid != null;
    }
  }
}
Basically, what this rule does is to state that anyone can read from the database (allow read: if true) but that only authenticated users can write to it (allow write: if request.auth.uid != null). With this rule in place, you will have to hit the Publish button to make the rule effective immediately.
Generating a Service Account Private Key
Due to the fact that you're using the custom authentication approach, you'll need to create custom tokens which will be used to authenticate with Firebase. Firebase provides an admin SDK that helps with creating these custom tokens. However, to make this SDK work, you'll have to give to it some credentials (in the form of a file) that refer to a service account. To create this account and get these credentials (this file), you will have to click on the little gear icon beside Project Overview and then click on Project Settings.
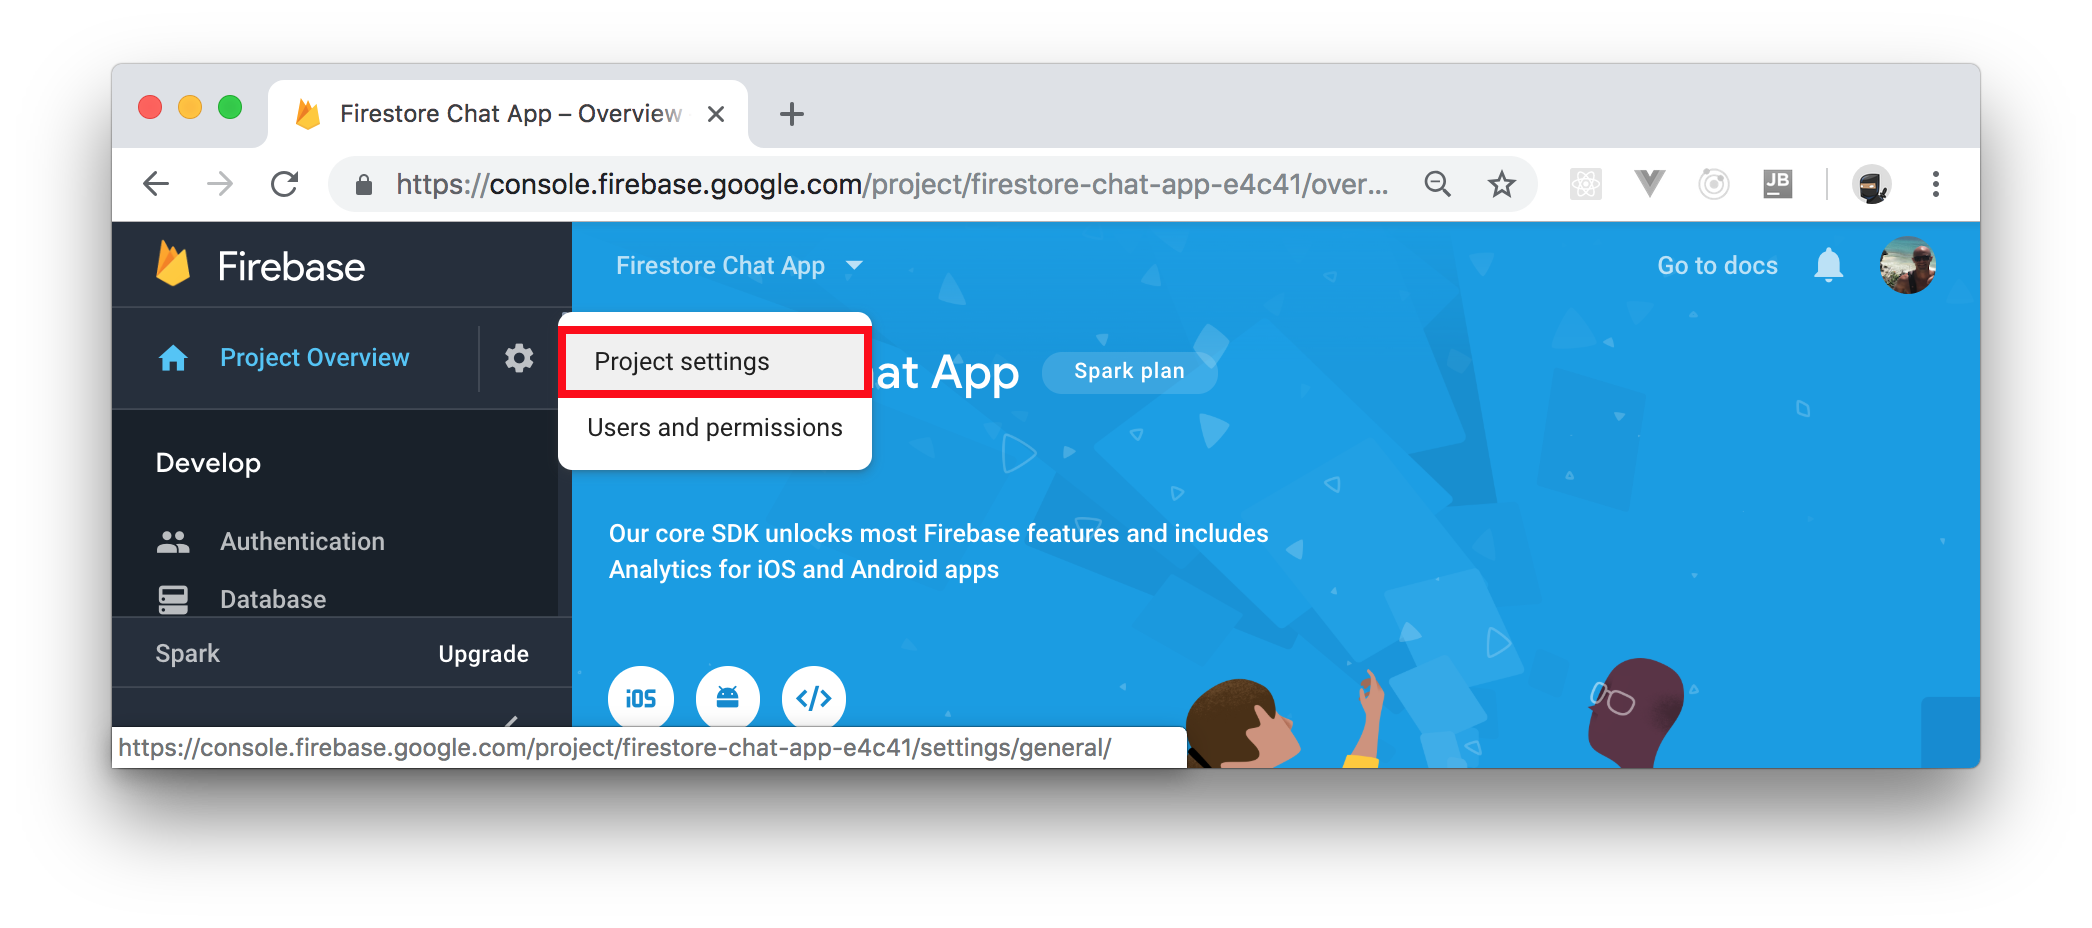
After clicking on it, Firebase will redirect you to the project's settings page. When that loads, navigate to the Service Accounts tab and select the Firebase Admin SDK option. Then, click on the Generate new private key button. In a second, Firebase will send you a JSON file with the credentials of your service account. Make sure you store this file in a secure location for now. You will need these credentials in no time.
Note: The JSON file containing the private key of your service account is highly confidential and you must keep it away from public repositories like GitHub.
Setting Up Auth0
Similarly, in order to use Auth0, you'll need an account. If you don't have one yet, go ahead and sign up for a free one here.
When you're done creating the account, head over to the Applications section of your dashboard and click on Create Application. Clicking on this button will make Auth0 show you a popup where you will have to inform a name for your application (you can use "Firestore Chat App" again) and the type of the app. As you are going to build a real-time chat app (an app that doesn't depend on reloading), you will have to choose Single Page Web Applications. Then, when you click on the Create button, Auth0 will redirect you to the Quick Start section of your new application. From there, you will have to click on the Settings tab and change one particular field.
When you arrive at the Settings tab, search for the Allowed Callback URL field and add http://localhost:3001/ to it. This field instructs Auth0 that, after authenticating, your users will have to be redirected to whatever is configured on it (in this case, http://localhost:3001/) and nothing else. This is a security measure implemented by Auth0 to guarantee that no other apps will get the tokens generated to your app.
After filling up this field, click on the Save changes button at the bottom of this page to update the configuration. However, don't close this page, you will have to copy some information from it soon.
Scaffolding the Web Server
Now that you're done setting up Auth0 and Firebase, the next thing you'll do is to create a directory for the application. Open up your terminal and run the following command:
mkdir firestore-web-chat
When that's done, navigate to that directory and then run the following command in the terminal:
# navigate to your project
cd firestore-web-chat

# initialize it as an NPM package
npm init -y
This command will initialize a package.json file which helps you keep track of all your project dependencies. This file also contains some useful information about your application.
Now, you will need to install the dependencies of your backend. You'll use some packages to help build certain parts of the application on the server-side. Go ahead and install the following packages by running the command below:
npm install express cors express-jwt jwks-rsa firebase-admin
Here you can see a brief rundown of what these packages do and how they will help you:
express: Express is a Node.js framework that makes it easy to build web applications with Node.js.cors: This package works as an Express middleware to enable cross-origin resource sharing on the server.express-jwt: You'll use this package to authenticate HTTP requests using JSON Web Tokens (JWT). This package is essentially an Express middleware that extracts the token (a JWT) sent on theAuthorizationheader of HTTP requests and attempts to validate this token.jwks-rsa: This package is used to retrieve the key, from a JWKS (JSON Web Key Set) endpoint, used to sign these tokens.firebase-admin: This package lets you interact with Firebase services from privileged environments such as servers. You'll be using this package particularly to create custom authentication tokens.
Creating Custom Authentication Tokens
Now you're done scaffolding your backend server, you can start coding your project. So, in the project root directory, create a folder called src. This folder will contain all your application code (both server-side and client-side). Now, within this new folder, create a file called server.js and insert the following code into it:
// src/server.js
const express = require('express');
const cors = require('cors');
const jwt = require('express-jwt');
const jwks = require('jwks-rsa');
const firebaseAdmin = require('firebase-admin');
const path = require('path');

const app = express();
app.use(cors());
app.use('/', express.static(path.join(__dirname, 'public')));

const jwtCheck = jwt({
  secret: jwks.expressJwtSecret({
    cache: true,
    rateLimit: true,
    jwksRequestsPerMinute: 5,
    jwksUri: `https://${process.env.AUTH0_DOMAIN}/.well-known/jwks.json`
  }),
  audience: process.env.AUTH0_API_AUDIENCE,
  issuer: `https://${process.env.AUTH0_DOMAIN}/`,
  algorithm: 'RS256'
});
In the code snippet above, the first thing you did was to import the previously installed packages. After that, you initialized express and configured cors to make your server accept requests from different origins. Then, there are two important things happening right after it:
- You are telling your Express server to treat files under a directory called
publicas static files that users can consume (you will create this directory soon). - You have created a middleware called
jwtCheck(with the help ofexpress-jwt) that will verify JSON web tokens sent over from the client.
In greater detail, when the client makes a request to certain routes on your server, a token (signed by Auth0) is sent along in the Authorization header. The jwtCheck middleware extracts this token and checks if it is valid. If the token is invalid or has been compromised, it is immediately rejected. Otherwise, the token is decoded, and the payload is sent to the next middleware.
Now how does this middleware ensure that the token is valid, you might ask. Certain configuration properties are used to configure this middleware to let it know how exactly to validate tokens:
secret: This is the public key used to verify/validate the token. The token sent from the client is expected to be a token signed by Auth0. Auth0 exposes an endpoint for each tenant (including yours) which points to a JSON file containing a JWK (JSON Web Key) which simply represents a cryptographic key that has been used to sign the Auth0 issued token. This JWK also contains a public key which is used to verify the authenticity of the token. Thejwks-rsapackage is used to retrieve this key from the endpoint exposed by Auth0 for your tenant.audience: The audience simply uses your Auth0clientIDto identify the recipient of the JWT.issuer: This is a URI that uniquely identifies the party that issued the JWT. For an Auth0 issued ID Token, this should be thedomainof your Auth0 application (e.g.,blog-samples.auth0.com).algorithm: This signifies the algorithm that Auth0 used to sign the JWT.RS256is used to sign the token here. This approach uses an asymmetric algorithm meaning that a private key is used to sign the JWT and a public key is used to validate the signature. If you want to know more about this algorithm, read this article.
Now that you learned how securing Express apps with Auth0 works, you will have to create a new folder called firebase in the src directory. In this folder, you will put the JSON file that you downloaded previously from Firebase. This is the file that contains the credentials of your Firebase service account. To ensure that this JSON file isn't committed to your repository, create a .gitignore file in the same firebase folder and add the name of the generated JSON file to it, you can rename the JSON file to firebase-key.json for readability:
# src/firebase/.gitignore
firebase-key.json
Alright, next you'll set up an Express route which uses the authentication middleware you've configured to validate the token sent by the client. You'll also use the Firebase Admin SDK to create a custom Firebase token that will allow your client to communicate with your Firestore. Paste the following code into the bottom of the server.js file:
// src/server.js

// ... keep the rest untouched ...

const serviceAccount = require('./firebase/firebase-key');

firebaseAdmin.initializeApp({
  credential: firebaseAdmin.credential.cert(serviceAccount),
  databaseURL: `https://${serviceAccount.project_id}.firebaseio.com`
});

app.get('/firebase', jwtCheck, async (req, res) => {
  const {sub: uid} = req.user;

  try {
    const firebaseToken = await firebaseAdmin.auth().createCustomToken(uid);
    res.json({firebaseToken});
  } catch (err) {
    res.status(500).send({
      message: 'Something went wrong acquiring a Firebase token.',
      error: err
    });
  }
});

app.listen(3001, () => console.log('Server running on localhost:3001'));
The first thing you did above was to initialize the Firebase Admin SDK with the credentials you downloaded from Firebase. After that, you created an Express route under /firebase so clients can get their custom tokens to communicate with your Firestore. Notice that you plugged the jwtCheck into the /firebase route to guarantee that only users authenticated through Auth0 can get custom Firebase tokens. On every request from clients to this route, the middleware extracts the token and validates it. If the token is valid, the payload carried by the token is populated onto the req.user object and sent to the next middleware. Otherwise, if the token is invalid, it throws an error message at the client and further access is denied.
The payload on the req.user object contains a property called sub which is used to identify each user uniquely. The Firebase Admin SDK uses this unique identifier to create a custom token, and that custom token is then sent back to the client. Then, the client can use the token to authenticate/communicate with Firebase. That's all for the server-side, next you'll set up your application on the client-side.
You might have noticed a function above prefixed with the
asynckeyword, this is used to signify that some asynchronous operations with Promises are going to take place. If you aren't familiar with Async/Await, you can read about it here.
Building the User Interface
In this section, you will build the client application which is a simple real-time chat application. The first thing you'll need to do is to set up the UI. So, in the src directory, create a folder called public. This directory will contain all the client side code. After that, create a file called index.html and put it in the public folder. With that done, copy and paste the code below into your index.html file:
<!doctype html>
<html lang="en" class="h-100">
<head>
  <!-- Required meta tags -->
  <meta charset="utf-8">
  <meta name="viewport" content="width=device-width, initial-scale=1, shrink-to-fit=no">
  <!-- Bootstrap CSS -->
  <link rel="stylesheet" href="https://stackpath.bootstrapcdn.com/bootstrap/4.1.3/css/bootstrap.min.css"
        integrity="sha384-MCw98/SFnGE8fJT3GXwEOngsV7Zt27NXFoaoApmYm81iuXoPkFOJwJ8ERdknLPMO" crossorigin="anonymous">
  <title>Auth0 and Firebase Chat App</title>
</head>
<body class="h-100">
<div class="container-fluid d-flex flex-column h-100">
  <div class="row bg-primary p-2 text-white" style="z-index: 10000; min-height: 60px;">
    <div class="col-12 p-2">
      <div id="profile" class="font-weight-bold"></div>
      <button id="sign-in" type="button" class="btn">Sign In</button>
      <button id="sign-out" type="button" class="btn">Sign Out</button>
    </div>
  </div>
  <div class="row flex-fill">
    <div id="chat-area" class="col-12 d-flex flex-column-reverse" style="overflow-y: auto;">
    </div>
  </div>
  <div class="row bg-dark p-2" style="min-height: 55px;">
    <div class="col-12">
      <input type="text" class="form-control" id="message" aria-describedby="message-help"
             placeholder="Enter your message" disabled>
    </div>
  </div>
</div>
<script src="https://www.gstatic.com/firebasejs/5.3.0/firebase-app.js"></script>
<script src="https://www.gstatic.com/firebasejs/5.3.0/firebase-auth.js"></script>
<script src="https://www.gstatic.com/firebasejs/5.3.0/firebase-firestore.js"></script>
<script src="https://cdn.auth0.com/js/auth0/9.7.3/auth0.min.js"></script>
<script src="/app/auth0.js"></script>
<script src="/app/firebase.js"></script>
<script src="/app/index.js"></script>
</body>
</html>
Nothing really fancy is going on above. You are just setting up some styling for the chat application (with the help of Bootstrap), and you are adding some script tags which point to external libraries provided by Auth0 and Firebase (auth0.min.js and the three firebase-*.js scripts). These libraries will enable you to initialize and interact with the Auth0 and Firebase application/instances you created previously.
Also, this file defines some key elements of your app's UI, like:
sign-in: The button that will enable users to authenticate themselves.sign-out: The button that will enable users to sign out.chat-area: The area where the real-time messages will appear.message: The input text where users will type their messages.
In the end, you are adding some extra script tags that point to some local files (/app/auth0.js, /app/firebase.js, and /app/index.js). You'll create these files in the next section.
Configuring Auth0 on the Client
Now, you will create a file that will allow the client-side app that you will build to communicate with Auth0 (i.e., to use Auth0 as the authorization server). To do so, create another directory called app inside ./src/public and then create a file called auth0.js in this new directory. This is where you will initialize and configure Auth0. So, paste the code below into this file:
// ./src/public/app/auth0.js

let _auth0Client = null;
let _idToken = null;
let _profile = null;

class Auth0Client {
  constructor() {
    _auth0Client = new auth0.WebAuth({
      domain: 'YOUR_APP_DOMAIN',
      audience: 'https://YOUR_APP_DOMAIN/userinfo',
      clientID: 'YOUR_APP_CLIENTID',
      redirectUri: 'http://localhost:3001/',
      responseType: 'token id_token',
      scope: 'openid profile'
    });
  }

  getIdToken() {
    return _idToken;
  }

  getProfile() {
    return _profile;
  }

  handleCallback() {
    return new Promise((resolve, reject) => {
      _auth0Client.parseHash(async (err, authResult) => {
        window.location.hash = '';
        if (err) return reject(err);

        if (!authResult || !authResult.idToken) {
          // not an authentication request
          return resolve(false);
        }
        _idToken = authResult.idToken;
        _profile = authResult.idTokenPayload;

        return resolve(true);
      });
    });
  }

  signIn() {
    _auth0Client.authorize();
  }

  signOut() {
    _idToken = null;
    _profile = null;
  }
}

const auth0Client = new Auth0Client();
As you can see, you are defining a class called Auth0Client and defining a global constant called auth0Client that is an instance of this class. This class (and its instance), implements certain methods that handle the authentication flow:
constructor: The constructor of your class configures theauth0-jslibrary with your own Auth0 credentials.signIn: This method initializes the authentication process by redirecting users to Auth0 so they can choose an authentication method.signOut: This method removes the current user session by cleaning up_idTokenand_profile.handleCallback: This method checks the URL hash of the current page (this is actually done byparseHash) to see if there are tokens on it. After your users authenticate, Auth0 will send them back to your app with their information (tokens) on the hash fragment of the URL. To fetch these tokens, you will call this method and set up a client-side session (i.e., set the_idTokenand the_profilevariables) accordingly.getIdTokenandgetProfile: These methods enable your app to consume user information.
Note: You will have to replace all occurrences of the
YOUR_APP_DOMAINplaceholder and of theYOUR_APP_CLIENTIDplaceholder with your own Auth0 properties. To replaceYOUR_APP_DOMAIN, you can copy the value showed on the Domain field of the Auth0 Application you created before (e.g.,blog-samples.auth0.com). To replaceYOUR_APP_CLIENTID, you can use the Client ID field of your Auth0 Application.

Configuring Firebase on the Client
With that covered, the next thing you will do is to configure Firebase in your client-side app. To do so, go ahead and create a new file called firebase.js inside the app directory. Then, add the following code into this file:
// ./src/public/app/firebase.js

let _messagesDb = null;

class Firebase {
  constructor() {
    firebase.initializeApp({
      apiKey: 'YOUR_PROJECT_APIKEY',
      authDomain: 'YOUR_PROJECT_AUTHDOMAIN',
      projectId: 'YOUR_PROJECT_ID',
    });

    // initialize Firestore through Firebase
    _messagesDb = firebase.firestore();

    // disable deprecated features
    _messagesDb.settings({
      timestampsInSnapshots: true
    });
  }

  async addMessage(message) {
    const createdAt = new Date();
    const author = firebase.auth().currentUser.displayName;
    return await _messagesDb.collection('messages').add({
      author,
      createdAt,
      message,
    });
  }

  getCurrentUser() {
    return firebase.auth().currentUser;
  }

  async updateProfile(profile) {
    if (!firebase.auth().currentUser) return;
    await firebase.auth().currentUser.updateProfile({
      displayName: profile.name,
      photoURL: profile.picture,
    });
  }

  async signOut() {
    await firebase.auth().signOut();
  }
}
Similarly to what you did in the last section, you are creating a class to help you interact with third-party services in this file (in this case, Firebase instead of Auth0). This is how this new script works:
constructor: You are initializing both Firebase and Firestore in theconstructorfunction.addMessage: You are defining this method to enable your client-side app to add chat messages into your Firestore database. Anytime a user sends a chat message, your app will call your function passing the message as an argument. As you can see, rather than just storing the message in the database, you are adding to the message other properties likecreatedAtandauthor. You will learn in a bit from where thisdisplayNamethat defines theauthorvariable comes from.signOut: This method ends the Firebase session.updateProfile: This method gets a parameter with profile information about the currently-signed in user and uses that to update the user's Firebase profile.getCurrentUser: This method returns the details of the current user.
Note: You will have to replace
YOUR_PROJECT_APIKEY,YOUR_PROJECT_AUTHDOMAIN, andYOUR_PROJECT_IDwith your own Firebase values. You can replace these placeholders with theapiKey,authDomain, andprojectIdvalues that you copied before, respectively.
Now, to complete this script, you will have to add the following methods to the Firebase class:
let _messagesDb = null;

class Firebase {
  // ... constructor and methods defined above ...

  setAuthStateListener(listener) {
    firebase.auth().onAuthStateChanged(listener);
  }

  setMessagesListener(listener) {
    _messagesDb.collection('messages').orderBy('createdAt', 'desc').limit(10).onSnapshot(listener);
  }

  async setToken(token) {
    await firebase.auth().signInWithCustomToken(token);
  }
}

const firebaseClient = new Firebase();
Note: Don't forget to add the last line (
const firebaseClient = new Firebase();).
These new methods add the following features to this class:
setAuthListener: This method enables your app to add a listener that Firebase will call whenever the authentication status change.setMessagesListener: This method adds a listener to themessagescollection of your Firestore database. Firebase will call this listener in real-time whenever this collection changes.setToken: This method receives custom tokens that you generate on your server and uses them to authenticate with Firebase.
That's all the functionality you will need to make your app communicate with Firebase. Next, you will create the main script of your client-side app to integrate both Auth0 and Firebase together to build your real-time web chat.
Implementing the Real-Time Web Chat UI
The last thing you will need to do to complete your real-time chat app is to create a new file called index.js inside ./src/public/app and insert the following code into it:
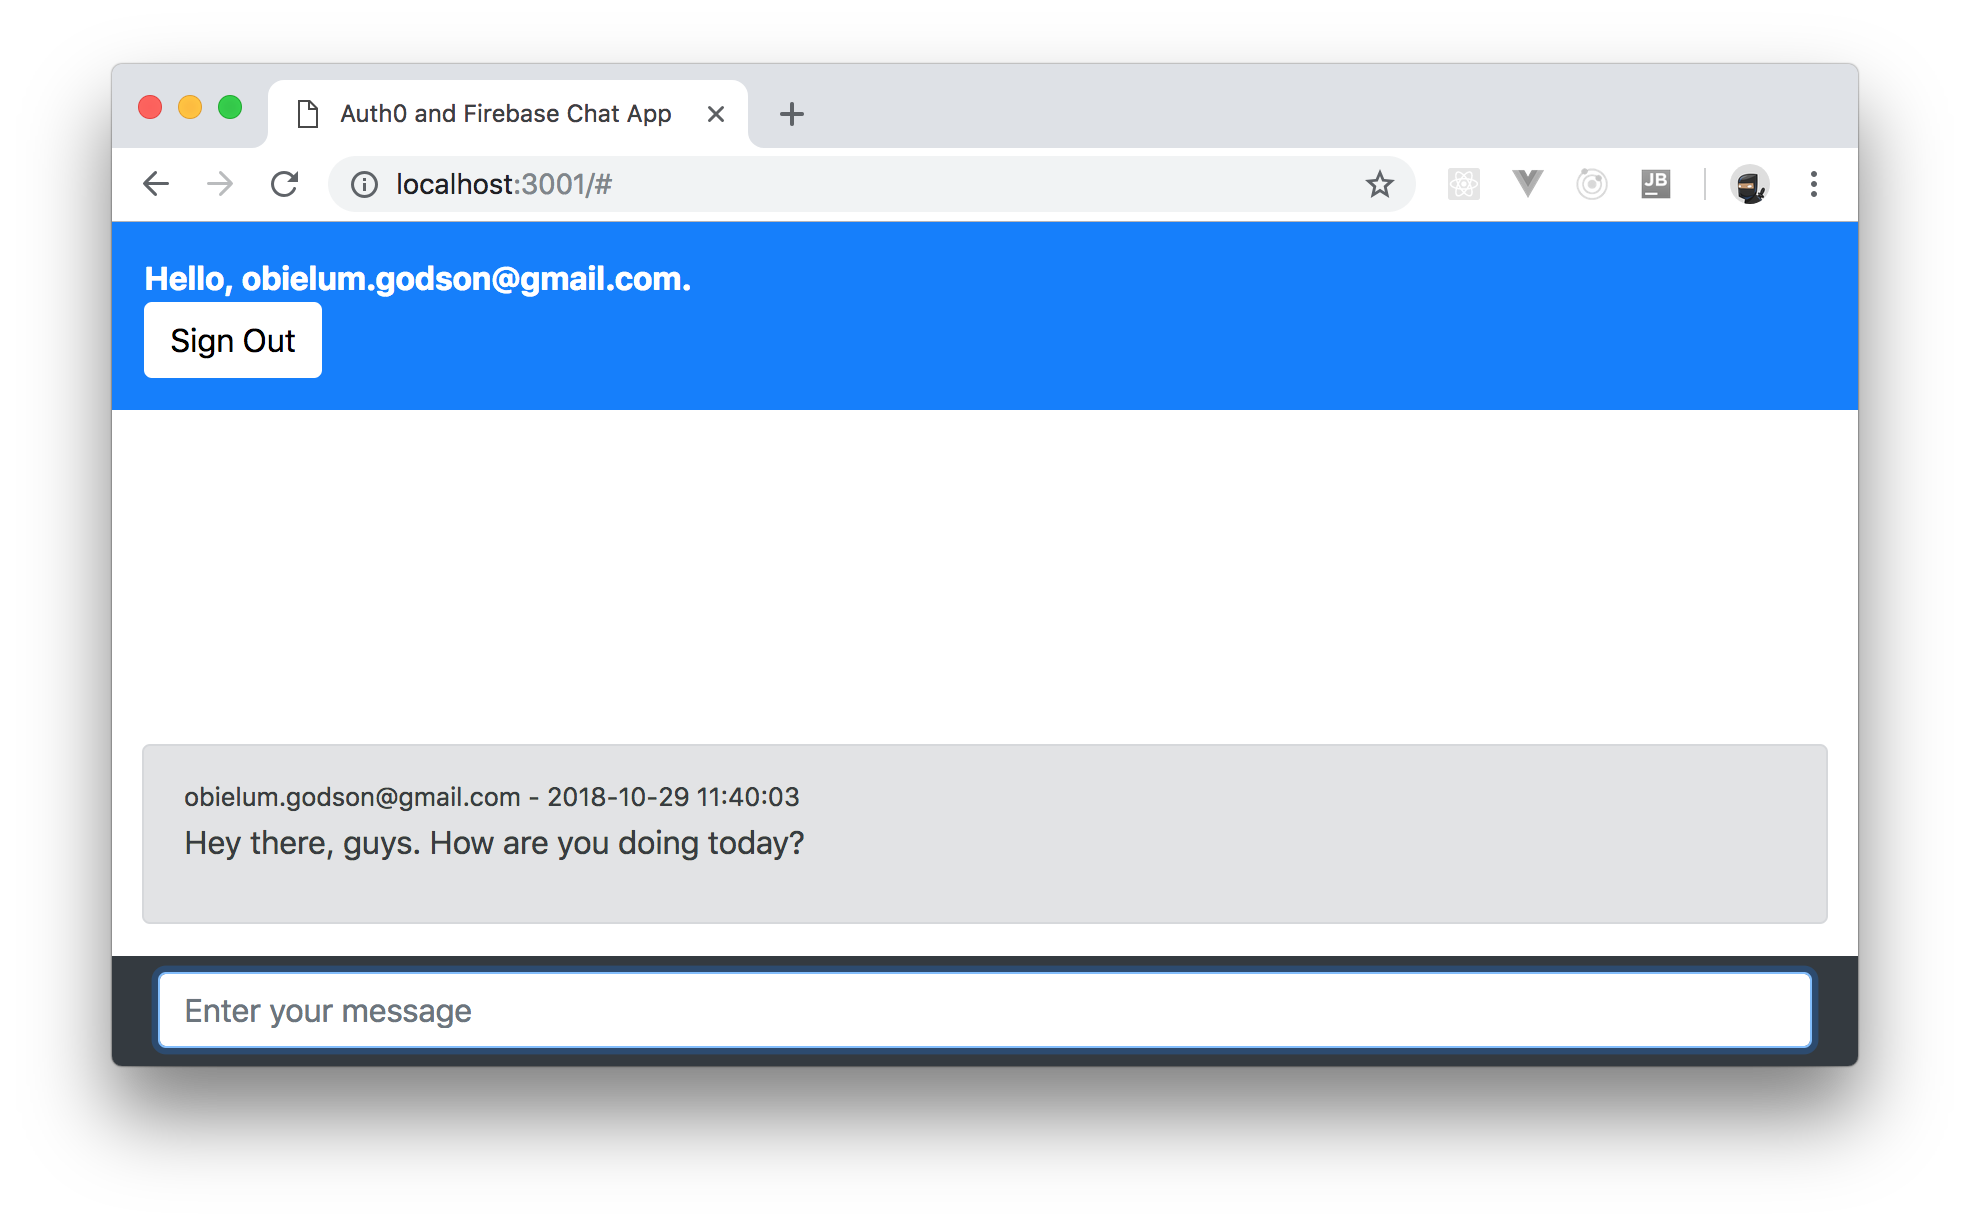
// ./src/public/app/index.js

const chatArea = document.getElementById('chat-area');
const messageInput = document.getElementById('message');
const profileElement = document.getElementById('profile');
const signInButton = document.getElementById('sign-in');
const signOutButton = document.getElementById('sign-out');

messageInput.addEventListener('keyup', async (event) => {
  if (event.code !== 'Enter') return;
  firebaseClient.addMessage(messageInput.value);
  messageInput.value = '';
});

signInButton.addEventListener('click', async () => {
  auth0Client.signIn();
});

signOutButton.addEventListener('click', async () => {
  auth0Client.signOut();
  firebaseClient.signOut();
  deactivateChat();
});

async function setFirebaseCustomToken() {
  const response = await fetch('http://localhost:3001/firebase', {
    headers: {
      'Authorization': `Bearer ${auth0Client.getIdToken()}`,
    },
  });

  const data = await response.json();
  await firebaseClient.setToken(data.firebaseToken);
  await firebaseClient.updateProfile(auth0Client.getProfile());
  activateChat();
}

function activateChat() {
  const {displayName} = firebase.auth().currentUser;
  profileElement.innerText = `Hello, ${displayName}.`;
  signInButton.style.display = 'none';
  signOutButton.style.display = 'inline-block';
  messageInput.disabled = false;
  firebaseClient.setMessagesListener((querySnapshot) => {
    chatArea.innerHTML = '';
    querySnapshot.forEach((doc) => {
      const messageContainer = document.createElement('div');
      const timestampElement = document.createElement('small');
      const messageElement = document.createElement('p');

      const messageDate = new Date(doc.data().createdAt.seconds * 1000);
      timestampElement.innerText = doc.data().author + ' - ' + messageDate.toISOString().replace('T', ' ').substring(0, 19);
      messageElement.innerText = doc.data().message;
      messageContainer.appendChild(timestampElement);
      messageContainer.appendChild(messageElement);
      messageContainer.className = 'alert alert-secondary';
      chatArea.appendChild(messageContainer);
    });
  });
}

function deactivateChat() {
  profileElement.innerText = '';
  signInButton.style.display = 'inline-block';
  signOutButton.style.display = 'none';
  messageInput.disabled = true;
}

(async () => {
  deactivateChat();

  const loggedInThroughCallback = await auth0Client.handleCallback();
  if (loggedInThroughCallback) await setFirebaseCustomToken();
})();
The main goals of the new script you added to your project is to control the whole UI app and to sign into Firebase with a custom token. More specifically, this script starts by creating references to the following UI elements:
chatArea: where the app will show messages;messageInput: where users will type messages;profileElement: where the app will show the name of the logged-in user;signInButton: which will allow users to authenticate.- and
signOutButton: which will allow users to sign out.
After that, the script adds a keyUp listener to your messageInput element. This listener checks what key the user is pressing and, if they are pressing the Enter key, this listener calls firebaseClient.addMessage to issue a new message.
The next thing your script does is to add event listeners to the signInButton and the signOutButton so your users can authenticate and sign out when needed.
Next, you are defining a function called setFirebaseCustomToken that, when called, uses the idToken retrieved from Auth0 to issue an AJAX request to http://localhost:3001/firebase. The goal here is to get a custom Firebase token from your backend server so your app can communicate with (authenticate to) your Firestore database without trouble. Also, this function updates the Firebase profile of the current user with the profile returned by Auth0.
With that in place, this script adds two more functions:
activateChat: This function activates the whole UI so the current user can start issuing messages and it also adds a listener to Firestore so, when new messages arrive, the UI gets updated.deactivateChat: This function clears the chat after users sign out.
Then, the last thing this script does is to use an IIFE (Immediately Invoked Function Expression) to do two things:
- Call the
handleCallbackfunction to check if the user is coming back from Auth0 (after authenticating) or not. - Call the
setFirebaseCustomTokenfunction (if the user just signed in) to sign in to Firebase with the custom token.
“Developing real-time web apps with Firebase is easy and fun.”
Tweet This
Testing the Real-Time Web Chat
Hooray! You just finished developing your real-time web chat. Now it is time to use it. To run your app, make sure you are in the project root directory and issue the following commands:
# define the env variables used by server.js
export AUTH0_DOMAIN=YOUR_APP_DOMAIN
export AUTH0_API_AUDIENCE=YOUR_APP_AUDIENCE

# run the app
node src/server
Note: You will have to replace
YOUR_APP_DOMAINwith your own Auth0 domain andAUTH0_API_AUDIENCEwith your Auth0 Application client id. You can find both values in theauth0.jsfile that you defined before (domainandclientIDrespectively).
After that, you can open http://localhost:3001 in a web browser, and you will see a screen with your web chat. Then, if you click on sign in, your app will redirect you to Auth0 so you can authenticate to start using the chat. After signing in, Auth0 will redirect you back to your app and you will be able to start sending messages (just type a message and press enter). Cool, right?
Conclusion
In this article, you learned how to use Firebase and Firestore to build real-time web apps. Besides that, you learned why and how to configure Auth0 as a custom authentication system in your Firebase instance. In the end, you have got yourself a good-looking web chat application that uses both Firebase and Auth0 to provide a modern, real-time web app. Nice, isn't it?
About the author

Obielum Godson
Full-Stack Developer